

Page 1
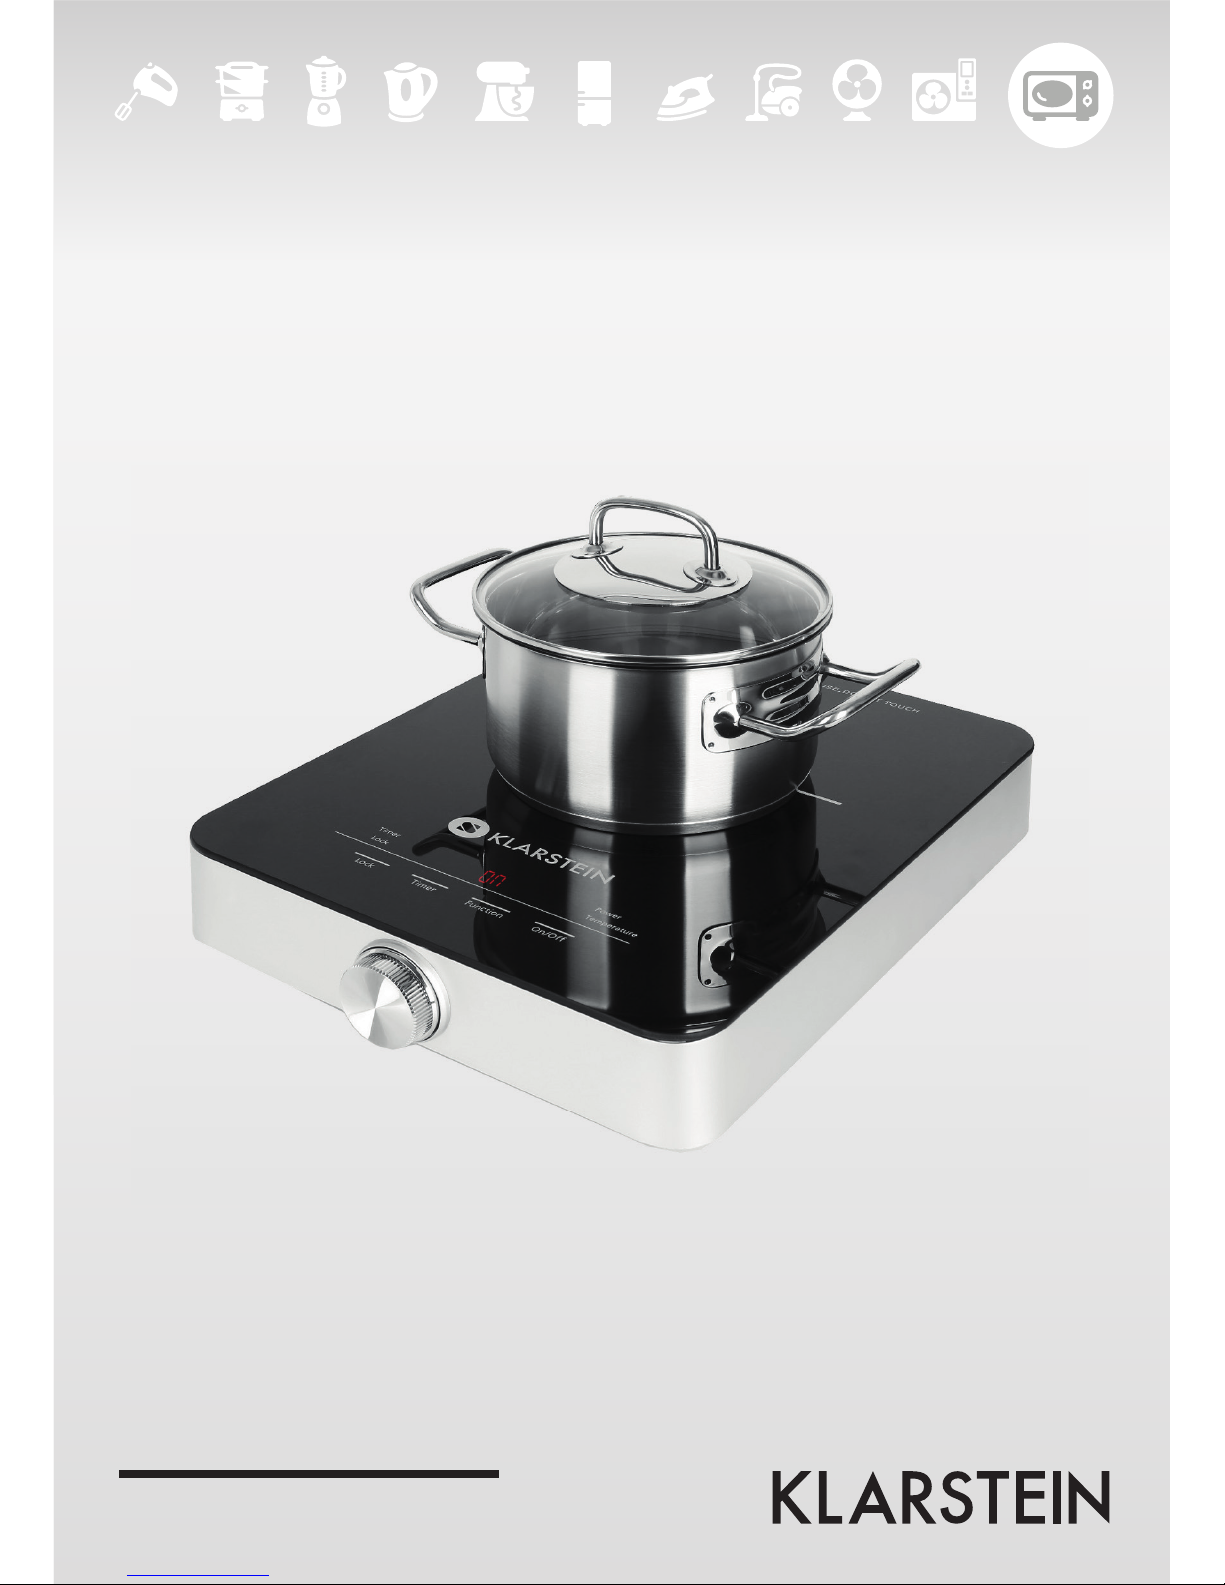
10012196
Induktionskochfeld
Page 2
2
Sehr geehrter Kunde,
wir gratulieren Ihnen zum Erwerb Ihres Gerätes. Lesen Sie die folgenden Hinweise sorgfältig durch und befolgen Sie diese, um möglichen Schäden vorzubeugen. Für Schäden, die durch Missachtung der Hinweise und
unsachgemäßen Gebrauch entstehen, übernehmen wir keine Haftung.
Technische Daten
Artikelnummer 10021296
Stromversorgung 220-240 V ~ 50-60 Hz
Leistung 1800 W
Temperaturbereich 60-240 °C
Sicherheitshinweise
Zur Reduzierung der Gefahr von Brand, elektrischem Schlag und Beschädigung:
• Setzen Sie dieses Gerät nicht dem Regen aus.
• Stellen Sie keine mit Flüssigkeiten gefüllten Gefäße, wie Vasen, auf dieses Gerät.
• Ausschließlich das empfohlene Zubehör verwenden.
• Reparieren Sie dieses Gerät nicht selbst. Wenden Sie sich zur Wartung an qualifiziertes
• Kundendienstpersonal.
• Lassen Sie keine Gegenstände aus Metall in dieses Gerät fallen.
• Stellen Sie keine schweren Gegenstände auf dieses Gerät.
Netzkabel/Netzteil
• Gewährleisten Sie, dass die Spannung der Stromversorgung dem auf diesem Gerät angegebenen Wert entspricht.
• Stecken Sie den Netzstecker vollständig in die Steckdose ein.
• Ziehen Sie nicht am Kabel, knicken Sie es nicht und stellen Sie keine schweren Gegenstände darauf.
• Fassen Sie den Stecker nicht mit nassen Händen an.
• Fassen Sie den Stecker beim Herausziehen an seinem Korpus an.
• Verwenden Sie keinen beschädigten Netzstecker oder eine beschädigte Steckdose.
• Installieren Sie dieses Gerät so, dass das Netzkabel sofort aus der Steckdose gezogen werden kann, wenn
Störungen auftreten.
Kleine Objekte/Verpackungsteile
Bewahren Sie die kleine Objekte (z.B. Schrauben und anderes Montagematerial, Speicherkarten) und Verpackungsteile außerhalb der Reichweite von Kindern auf, damit sie nicht von diesen verschluckt werden kann.
Lassen Sie kleine Kinder nicht mit Folie spielen. Es besteht Erstickungsgefahr!
Page 3

3
Standort
• Stellen Sie das Gerät auf eine trockene, ebene, wasserfeste und hitzebeständige Oberfläche.
• Die Steckdose muss leicht zugänglich sein, um im Notfall das Gerät schnell vom Stromkreis trennen zu können.
• Installieren oder positionieren Sie dieses Gerät nicht in einem Bücherregal, Einbauschrank oder einem sonstigen engen Raum. Stellen Sie eine gute Belüftung des Gerätes sicher.
• Stellen Sie das Gerät nicht auf Verstärker oder andere Geräte, die heiß werden können. Diese Hitze könnte
das Gerät beschädigen.
• Setzen Sie dieses Gerät keinem direkten Sonnenlicht, hohen Temperaturen, starker Feuchtigkeit und übermäßigen Erschütterungen aus.
Netzadapter
Der Netzadapter kann mit Wechselstrom von 220 - 240 V betrieben werden. Verwenden Sie aber einen geeigneten Steckeradapter, wenn der Stecker nicht in die Netzsteckdose passt.
Bestimmungsgemäßer Gebrauch
Dieses Gerät dient der induktiven Erwärmung. Es ist ausschließlich für diesen Zweck bestimmt und darf nur
zu diesem Zweck verwendet werden. Es darf nur in der Art und Weise benutzt werden, wie es in dieser Gebrauchsanleitung beschrieben ist.
Dieses Gerät ist nicht dafür bestimmt, durch Personen (einschließlich Kinder) mit eingeschränkten physischen,
sensorischen oder geistigen Fähigkeiten oder mangels Erfahrung und/oder mangels Wissen benutzt zu werden, es sei denn,sie werden durch eine für ihre Sicherheit zuständige Person beaufsichtigt oder erhielten von
ihr Anweisungen, wie das Gerät zu benutzen ist. Kinder sollten beaufsichtigt werden, um sicherzustellen, dass
sie nicht mit dem Gerät spielen.
Transport und Reinigung
Bitte bewahren Sie die Originalverpackung auf. Um einen ausreichender Schutz beim Transport des Gerätes zu
erreichen, verpacken Sie das Gerät in der Originalverpackung.
Verwenden Sie keine flüchtigen Flüssigkeiten, wie Insektensprays. Durch zu starken Druck beim Abwischen
können die Oberflächen beschädigt werden. Gummi- oder Plastikteile sollten nicht über einen längeren Zeitraum mit dem Gerät in Kontakt sein.
Reparaturen
• Reparaturen am Gerät sollten nur von einer autorisierten Fachwerkstatt durchgeführt werden.
• Ein Umbauen oder Verändern des Produktes beeinträchtigt die Produktsicherheit. Verletzungsgefahr!
• Öffnen Sie das Produkt niemals eigenmächtig und führen Sie Reparaturen nie selber aus!
• Falscher Zusammenbau führt möglicherweise zu Fehlfunktionen oder dem Totalausfall.
• Öffnen Sie in keinem Fall das Gerät. Es wird keine Haftung für Folgeschäden übernommen. Technische Änderungen und Irrtümer vorbehalten! Die Gewährleistung verfällt bei Fremdeingriffen in das Gerät.
Page 4
4
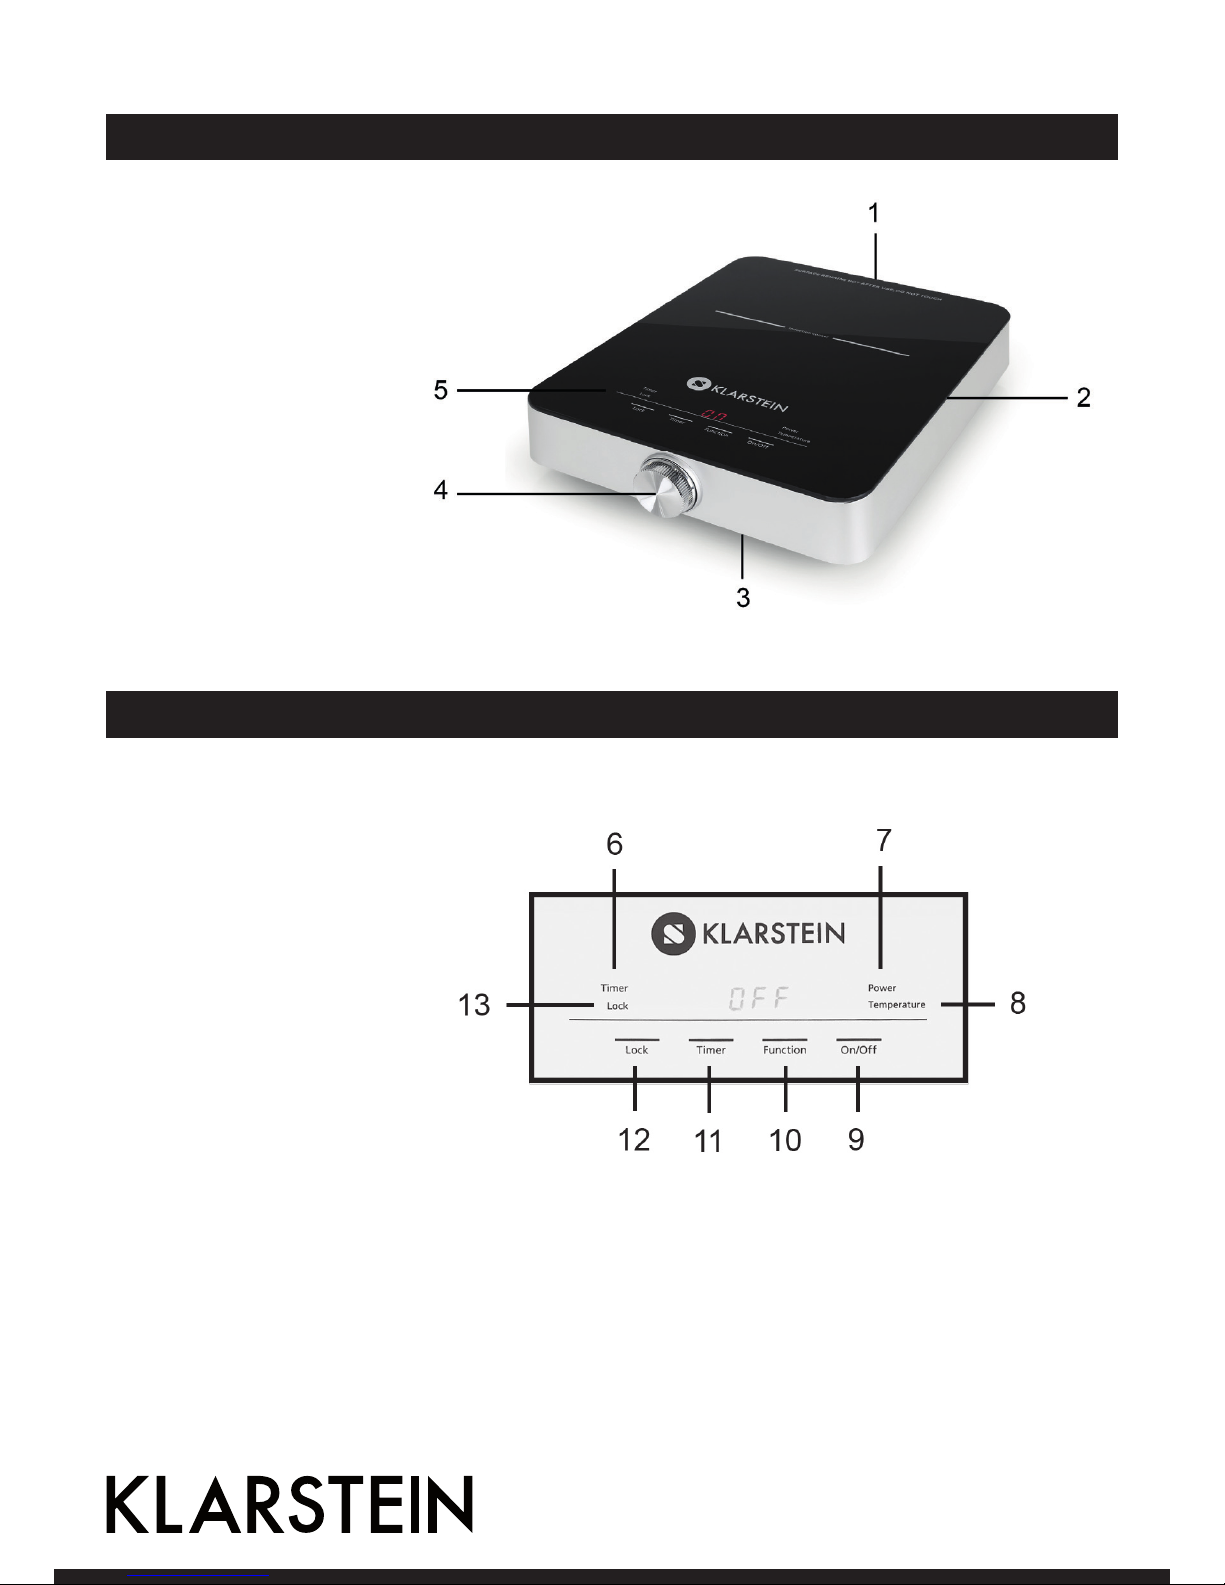
Geräteübersicht
1 Luftauslass
2 Kochfläche
3 Lufteinlass
4 Regler
5 Bedienfeld
Bedienfeld
6 Timer-Anzeige
7 Power-Anzeige
8 Temperatur-Anzeige
9 Ein/Aus Taste
10 Funktionstaste
11 Timereinstellung
12 Tastensperre
13 Sperr-Anzeige
Page 5

5
Inbetriebnahme und Bedienung
Gerät einschalten
• Drücken Sie die Taste „ON/OFF“, um das Gerät einzuschalten. Das Display zeigt „ON“ und die Ventilatoren
laufen an.
• Das Gerät erkennt selbständig ob Sie den passenden Topf benutzen, wenn ja, betätigen Sie die „Function“Taste, um eine gewünschte Einstellung zu wählen.
• Anderenfalls erscheint auf dem Display die „E0“-Warnanzeige und Sie vernehmen ein wiederholtes Piepen.
Nach 40 Sekunden schaltet das Gerät in den Standby Zustand.
Leistungsstufe einstellen
• Drücken Sie die „Function“-Taste, die Anzeige „P“ für die Leistungsstufe beginnt zu leuchten. Die Voreinstellung ist 1600W.
• Mit dem Regler können Sie die Leistungsstufen in 10-er Schritten zwischen 200W und 1800W einstellen.
Temperatur einstellen
• Drücken Sie die „Function“-Taste zweimal, die Anzeige „°C“ beginnt zu leuchten. Die Voreinstellung liegt
bei 240°C.
• Mit dem Regler können Sie die Temperatur in 10-er Schritten zwischen 60°C und 240°C einstellen.
Timer einstellen
• Drücken Sie die „Function“-Taste dreimal, die Anzeige für den Leistungsmodus beginnt zu leuchten und die
Anzeige zeigt „0:00“
• Mit dem Regler können Sie die Zeit in Minuten-Schritten zwischen 00:01 und 3:00 einstellen.
• Warten Sie kurz bis die Anzeige 1600W anzeigt und stellen anschließend mit dem Regler die gewünschte
Leistungsstufe ein.
Tastensperre
Drücken Sie diese Taste, damit die Einstellungen während des Betriebs nicht verstellt werden können.
Geeignetes Kochgeschirr
• Diese Gerät eignet sich zur Nutzung mit Kochgeschirr aus:
Stahl, Edelstahl, Eisen, emaillierem Eisen, Gusseisen mit flachem Boden und einem Durchmesser zwischen 12 und 26 cm.
• Diese Gerät eignet sich nicht zur Nutzung mit Kochgeschirr aus:
Hitzebeständigem Glas, Keramik, Kupfer, Aluminium mit abgerundeten Boden und weniger als 12cm
Durchmesser.
Page 6
6
Fehlersuche und Fehlerbehebung
Fehler Mögliche Ursache Problemlösung
E0 Falscher Topf. Benutzen Sie einen passenden Topf.
E1 Schaltkreis defekt. Kontaktieren Sie einen Fachbetrieb.
E2 Problem mit dem Temperatursensor. Kontaktieren Sie einen Fachbetrieb.
E3 Überspannung (mehr als 275V). Prüfen Sie den Stromkreislauf und finden Sie einen
geeigneten Stromanschluss.
E4 Unterspannung (weniger als 100W). Prüfen Sie den Stromkreislauf und finden Sie einen
geeigneten Stromanschluss.
E5 Überhitzung des Topfbodens. Lassen Sie das Gerät abkühlen.
E6 Der Luftstom ist unterbrochen. Überprüfen Sie die Luftstromöffnungen, reinigen Sie
diese von außen. Sollte das Problem weiterhin bestehen, Kontaktieren Sie das Fachpersonal.
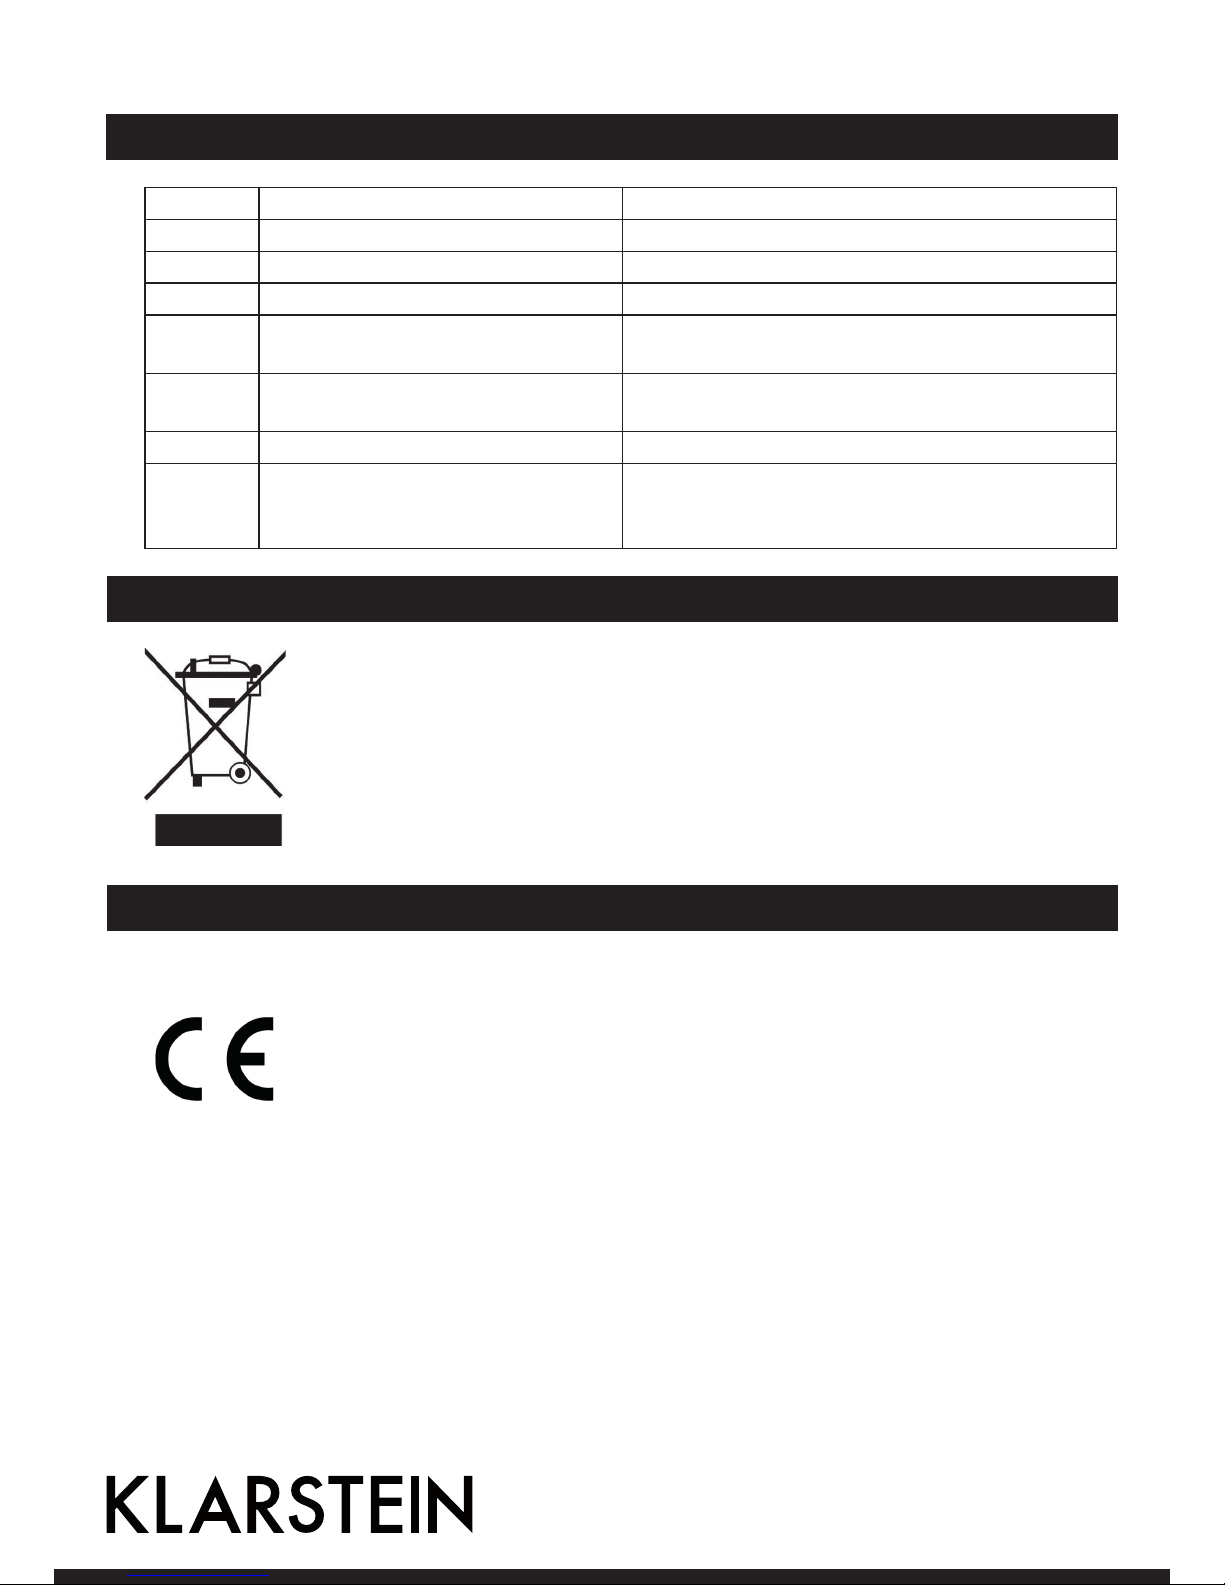
Hinweise zur Entsorgung
Befindet sich die linke Abbildung (durchgestrichene Mülltonne auf Rädern) auf dem Produkt, gilt die Europäische Richtlinie 2002/96/EG. Diese Produkte dürfen nicht mit dem
normalen Hausmüll entsorgt werden. Informieren Sie sich über die örtlichen Regelungen
zur getrennten Sammlung elektrischer und elektronischer Gerätschaften. Richten Sie sich
nach den örtlichen Regelungen und entsorgen Sie Altgeräte nicht über den Hausmüll.
Durch die regelkonforme Entsorgung der Altgeräte werden Umwelt und die Gesundheit
ihrer Mitmenschen vor möglichen negativen Konsequenzen geschützt. Materialrecycling
hilft, den Verbrauch von Rohstoffen zu verringern.
Konformitätserklärung
Hersteller: CHAL-TEC Vertriebs- + Handels GmbH, Wallstraße 16, 10179 Berlin, Deutschland.
Dieses Produkt entspricht den folgenden Europäischen Richtlinien:
2004/108/EG (EMV)
2011/65/EU (RoHS)
2006/95/EG (LVD)
Page 7
7
Dear Customer,
Congratulations on purchasing this equipment. Please read this manual carefully and take care of the following
hints to avoid damages. Any failure caused by ignoring the mentioned items and cautions mentioned in the
instruction manual are not covered by our warranty and any liability.
Technical Data
Item number 10021296
Power supply 220-240 V ~ 50-60 Hz
Power consumtion 1800 W
Temperature range 60-240 °C
Safety Instructions
To reduce the risk of fire, electric shock and damage:
• Do not expose this device to rain.
• Do not playe objects on the unit filled with liquids, such as vases.
• Use recommended accessories only.
• Do not repair this device yourself. Refer repairs to qualified service personnel.
• Do not drop any metal objects into this unit.
• Do not place heavy objects on top of this unit.
Power cord / power supply
• Make sure that the power supply voltage corresponds to the specifications on this unit.
• Plug the power cord into the outlet securely.
• Do not pull the cable, do not bend it and do not place heavy objects on it.
• Do not handle the plug with wet hands.
• Grasp the plug when pulling out of the electrical outlet.
• Do not use a damaged power plug or a damaged electrical outlet.
• Install this unit so that the power cord can be unplugged immediately when a problem occurs.
Small objects / Packaging Parts
Store small objects (eg screws and other mounting hardware, memory cards) and packaging parts out of the
reach of children. Do not let you play with the film. Risk of suffocation!
Page 8

8
Location
• Set the appliance on a dry, flat, waterproof and heat-resistant surface.
• The socket must be readily accessible to disconnect the unit quickly in an emergency from the electrical
circuit.
• Do not install or position this unit in a bookcase, built-in wardrobe or any other confined space. Ensure good
ventilation of the unit.
• Do not place near to an amplifier or other equipment that may be hot. The heat can damage the unit.
• Do not expose this unit to direct sunlight, high temperatures, excessive moisture and excessive vibration.
AC Adapter
• The power adapter can operate on AC 220-240 V only. Use a suitable plug adapter if the plug does not fit
into the power outlet.
Intended Use
• This device is used for inductive heating. It is exclusively meant for this purpose and must only be used for
this purpose. It may only be used in the manner as described in this manual.
• This product is not designed for use by persons (including children) who have reduced physical, sensory or
mental capacities or persons with no experience or knowledge, unless they are instructed and supervised in
the use of the appliance by a person responsible for their safety.
Transport and Cleaning
• Please keep the original packaging. To an adequate protection during transport of the device, pack the unit
in its original packaging.
• Do not use volatile liquids, such as insecticide spray. Dont wipe the surfaces with strong pressure, otherwise
they may be damaged. Rubber or plastic should not be in contact with the unit over a longer period.
Repairs
• Repairs to the appliance should only be carried out by an authorized service center.
• A remodeling or modification of the affected product safety. Risk of injury!
• Open the product never arbitrarily and perform repairs never yourself!
• Incorrect reassembly may result in malfunction or total failure.
• Open in no case the unit. We assume no liability for consequential damages. The warranty expires at foreign
interference with the device.
Page 9

9
Product Desciption
1 Air vents
2 Cooktop
3 Air intake openings
4 Control button
5 Control panel
Control Panel
6 Timer level display
7 Power display
8 Temperature display
9 On/Off button
10 Function button
11 Timer button
12 Lock button
13 Lock display
Page 10

10
Use and Operation
Switching on
• After plugging the induction hob in the electric outlet you will hear a beep and you will see „OFF“
• on the display. Press the On/Off button and the display will show „ON“, the fan will start and the induction
hob will change from standby mode to heating mode.
• The induction hob detects if you are using correct cookware. If yes, after the „ON” indicator shows on the
display, press the „Function“ button and you can select the cooking setting, the hob will switch on.
• Otherwise, it is not possible to select the cooking setting after pressing the „Function button‘ You will hear
repeated sound signal and the display shows warning notice E0. The induction hob will switch to standby
mode after 40 seconds.
Setting the power level
• Press the „Function“ button and the light indicator of „Power“ turns on.
• After switching on, the power level is automatically set to 1600 W.
• Using the power control button you will set the required power level in the range of 200 - to 1800 W
(10 stage power setting).
Setting the temperature
• Press the „Function“ button twice and the light indicator of temperature °C turns on.
• After switching on, the temperature is automatically set to 240 °C.
• Using the control button, set the temperature to required level in the range of 60-240 °C (10 stage temperature control).
Setting the timer
• Press the „Timer“ button the third time, the power level indicator will light up and the timer control; the
display will show „0:00“.
• Using the control button set the required time in the range of 0:01 - 3:00. The setting advances by 1 minute.
• After setting the timer wait, until the display shows the preset power setting 1600 W. Then using the control
button set the required power level.
Setting the Lock
After setting the temperature and time of the cooker, the lock button of panel may be used The lock prevents
accidental changes in settings of previously selected parameters.
Suitable cookware for cooking on an induction hob
Before use, make sure that the pot you would use is made of magentisable conductive material (enamel, cast
iron, stainless steel) while the bottom of the pot is flat and even and has at least 12 cm diameter. Place the pot/
pan always at the center of the induction zone, otherwise the lower part of the pan is heated unevenly and the
food in the pan may burn. Unsuitable cookware: ceramic, glass, aluminum, pots/pans with rounded/convex
bottoms or with diameter less than 12 cm or larger than 30 cm.
Page 11

11
Troubleshooting
Warning Possible cause Solution
E0 An unsuitable pot/pan is on the induction
zone or the diameter of the pot/pan is less
than 12 cm.
Place suitable cookware on the cooktop.
E1 Bad connection of the induction hob/ faulty
electrical circuit.
Contact an authorized service center.
E2 Problem with the temperature sensor. Contact an authorized service center.
E3 Voltage is too high. Check the power source, turn on when the
power source returns to normal.
E4 Voltage is too low. Check the power source, turn on when the
power source returns to normal.
E5 Protection against overheating - the cooktop
is too hot.
Wait few minutes until the appliance cools;
check the pot/pan.
E6 Problem with the fan, the air in-take/outflow
is blocked.
When the appliance cools down, clean the
openings. Afterwards, restart the appliance. If
the problem persists, contact an authorized
service center.
Hints on Disposal
According to the European waste regulation 2002/96/EC this symbol on the product
or on its packaging indicates that this product may not be treated as household waste.
Instead it should be taken to the appropriate collection point for the recycling of electrical
and electronic equipment. By ensuring this product is disposed of correctly, you will help
prevent potential negative consequences for the environment and human health, which
could otherwise be caused by inappropriate waste handling of this product. For more detailed information about recycling of this product, please contact your local council or your
household waste disposal service.
Declaration of Conformity
Producer: CHAL-TEC Vertriebs- + Handels GmbH, Wallstraße 16, 10179 Berlin, Germany.
This product is conform to the following European Directives:
2004/108/EC (EMC)
2011/65/EU (RoHS)
2006/95/EC (LVD)
Page 12

12
Gentile cliente,
La ringraziamo per aver scelto il nostro prodotto. La preghiamo di leggere e di seguire attentamente le seguenti
istruzioni in modo da evitare eventuali danni. Decliniamo ogni responsabilità in caso di danni dovuti ad una
mancata osservanza delle norme di sicurezza e ad un uso improprio del prodotto.
Dati tecnici
Numero articolo 10021296
Alimentazione 220-240 V ~ 50-60 Hz
Potenza 1800 W
Temperatura 60-240 °C
Avvertenze di sicurezza
Per ridurre il rischio di incendi, scosse elettriche e guasti:
• Non esporre il dispositivo alla pioggia.
• Non collocare sul dispositivo recipienti contenenti liquidi, come per esempio vasi.
• Utilizzare esclusivamente gli accessori consigliati.
• Non riparare il dispositivo da soli. Per la manutenzione rivolgersi esclusivamente a personale tecnico qualificato.
• Non far cadere oggetti metallici all’interno del dispositivo.
• Non collocare oggetti pesanti sul dispositivo.
Cavo di alimentazione e alimentatore
• Assicurarsi che i valori della tensione elettrica corrispondano a quelli indicati sul dispositivo.
• Inserire correttamente la spina nella presa di corrente.
• Non tirare il cavo di alimentazione, non torcerlo e non collocarci sopra oggetti pesanti.
• Non maneggiare la spina con le mani bagnate. Disinserire la spina direttamente dalla sua base.
• Non utilizzare spine e prese di corrente danneggiate.
• Collocare il dispositivo in modo che il cavo di alimentazione sia prontamente scollegabile dalla presa di
corrente in caso di emergenza.
Accessori e materiali di imballaggio
Tenere gli accessori forniti in dotazione (le viti e altri utensili per il montaggio) e il materiale d’imballaggio fuori
dalla portata dei bambini per evitare che li ingeriscano. Non lasciare che i bambini giochino con l’involucro. Pericolo di soffocamento. Non collocare sul dispositivo fonti di fiamme vive, come per esempio candele accese.
Page 13

13
Collocazione
• Collocare il dispositivo su una superficie asciutta, piana, impermeabile e resistente al calore.
• Collocare il dispositivo in un luogo dove i bambini non abbiano facile accesso alle superfici calde del dispositivo.
• La presa di corrente deve essere facilmente accessibile, in modo che il dispositivo sia facilmente scollegabile
dall’alimentazione elettrica in caso di emergenza.
• Non installare o collocare il dispositivo in librerie, impianti incassati o in spazi ristretti. Assicurarsi che intorno
al dispositivo vi sia spazio libero a sufficienza per garantire un’adeguata circolazione dell’aria.
• Non collocare il dispositivo su amplificatori o altri dispositivi che si riscaldano durante il funzionamento. Il
calore potrebbe danneggiare il dispositivo.
• Non esporre il dispositivo ai raggi diretti del sole, alle alte temperature, a umidità elevata e a forti vibrazioni.
Adattatore CA
Collegare l’adattatore CA a un’alimentazione c.a. da 230 V. In caso la spina non sia adeguata alla presa di corrente a disposizione, adoperare un adattatore per spina.
Uso conforme
Questo dispositivo permette il riscaldamento a induzione. Esso deve essere utilizzato esclusivamente per
questo scopo e secondo le modalità di utilizzo descritte nel presente manuale di istruzioni
Questo dispositivo non è destinato a essere usato da persone (bambini compresi) le cui capacità fisiche, sensoriali o mentali sono ridotte, oppure da persone con mancanza di esperienza o di conoscenza, a meno che
abbiano potuto beneficiare, attraverso l’intermediazione di una persona responsabile della loro sicurezza, di
una sorveglianza o delle istruzioni riguardanti l’uso del dispositivo. Assicurarsi che i bambini non giochino con
il dispositivo.
Trasporto e pulizia
Custodire la confezione originale. Per proteggere il dispositivo durante il trasporto, imballarlo nella confezione
originale.
Non utilizzare liquidi volatili (per esempio spray per insetti). Non strofinare troppo energicamente: si possono
danneggiare le superfici esterne. Parti in plastica o in gomma non devono rimanere a contatto con il dispositivo
per un tempo prolungato
Riparazioni
• Le riparazioni del dispositivo devono essere eseguite solo da personale tecnico autorizzato.
• Smontare o manomettere il dispositivo mette a rischio la sicurezza del prodotto. Pericolo di lesioni fisiche.
• Non forzare le aperture del prodotto e non eseguire le riparazioni autonomamente.
• Un’installazione non corretta può causare malfunzionamenti e avarie.
• Non aprire mai il dispositivo. Non ci assumiamo nessuna responsabilità per i danni da ciò derivati. Fatto salvo
errori e modifiche tecniche. La garanzia decade in caso di alterazioni o modifiche non autorizzate.
Page 14

14
Descrizione del prodotto
1 Uscita dell’aria
2 Piano cottura
3 Entrata dell’aria
4 Manopola
5 Pannello di controllo
Pannello di controllo
6 Indicatore Timer
7 Indicatore Power
8 Indicatore temperatura
9 Accensione /Spegnimento
10 Tasti funzione
11 Impostazione Timer
12 Tasto di blocco
13 Indicatore blocco
Page 15

15
Messa in funzione e utilizzo
Accensione del dispositivo
• Premere il tasto “ON/OFF” per accendere il dispositivo. Sul display appare “ON” e il sistema di ventilazione
si avvia.
• Il dispositivo riconosce autonomamente se la pentola utilizzata è idonea. In caso risulta adatta, azionare il
tasto “Function” per selezionare le impostazioni desiderate.
• In caso contrario, ossia se la pentola utilizzata risulta non idonea, sul display appare l’avviso “E0” e vengono
emessi ripetutamente dei “PIP”. Dopo 40 secondi il dispositivo va in standby.
Impostazione dei livelli di potenza
• Premere il tasto “Function” e l’indicazione “P” inizia a lampeggiare. La potenza preimpostata è di 1600 W.
• Tramite al manopola è possibile impostare la potenza con intervalli di 10 W dai 200 W ai 18’’ W.
Impostazione della Temperatura
• Premere due volte il tasto “Function”, l’indicazione “°C” inizia a lampeggiare. La temperatura preimpostata
è 240 °C.
• Tramite la manopola è possibile regolare la temperatura con intervalli di 10 °C dai 60 °C ai 240 °C.
Impostazione del Timer
• Premere tre volte il tasto” Function” e appare l’indicazione “0:00”.
• Tramite la manopola è possibile impostare il timer con intervalli di 1 minuto da 0:01 a 3:00.
• Attendere che compaia l’indicazione 1600 W e impostare con la manopola la potenza desiderata.
Tasto di blocco
Durante il funzionamento premere questo tasto per bloccare le impostazioni.
Stoviglie idonee
Questo dispositivo è adatto essere utilizzato con stoviglie di:
• Acciaio, acciaio inossidabile, di ferro smaltato, di ghisa dal fondo piatto e dal diametro dai 12 ai 16 cm.
Questo dispositivo non è adatto essere utilizzato con stoviglie di:
• Vetro resistente al calore, ceramica, rame, alluminio, stoviglie dalla base convessa o dal diametro inferiore
ai 12 cm.
Page 16

16
Identificazione e Risoluzione dei Problemi
Errore Possibili cause Soluzione
E0 Pentola non idonea. Utilizzare una pentola idonea.
E1 Circuito elettrico difettoso. Contattare personale tecnico.
E2 Problema con il sensore della
temperatura.
Contattare personale tecnico.
E3 Sovratensione (oltre i 275 V). Verificare la corrente elettrica e utilizzare una presa di
corrente adatta.
E4 Tensione troppo bassa (meno di 100
W).
Verificare la corrente elettrica e utilizzare una presa di
corrente adatta.
E5 Surriscaldamento della piastra di
cottura.
Lasciare che il dispositivo si raffreddi.
E6 La ventilazione è ostruita. Controllare le aperture di areazione. Pulirle e
se il problema persiste, contattare una tecnico
specializzato.
Smaltimento
Questo simbolo a sinistra (un cassonetto dei rifiuti mobile barrato) è conforme alla direttiva europea 2002/96/CE sui rifiuti di apparecchiature elettriche ed elettroniche (WEEE) e indica che
il presente prodotto non deve essere smaltito insieme ai rifiuti urbani. Per ulteriori informazioni
sul regolamento vigente in merito alla raccolta differenziata di apparecchiature elettroniche ed
elettriche, si prega di contattare le autorità locali responsabili dello smaltimento dei rifiuti. I vecchi elettrodomestici non rientrano tra i rifiuti urbani. Attraverso uno smaltimento responsabile e
conforme alle direttive, è possibile salvaguardare l´ambiente e chi ci circonda da possibili conseguenze negative. Il riciclaggio di materiali aiuta a ridurre il consumo di materie prime.
Dichiarazione di conformità
Produttore: Chal-Tec GmbH, Wallstraße 16,10179 Berlino, Germania.
Questo prodotto è conforme alle seguenti direttive europee:
2004/108/CE (EMC)
2011/65/UE (RoHS)
2006/95/CE (LVD)
Page 17

17
Estimado cliente:
Le felicitamos por la adquisición de este producto. Lea atentamente el siguiente manual y siga cuidadosamente
las instrucciones de uso con el fin de evitar posibles daños. La empresa no se responsabiliza de los daños
ocasionados por un uso indebido del producto o por haber desatendido las indicaciones de seguridad.
Datos técnicos
Número de artículo 10021296
Suministro eléctrico 220-240 V ~ 50-60 Hz
Potencia 1800 W
Rango de temperatura 60-240 °C
Indicaciones de seguridad
Para reducir el riesgo de incendio, descarga eléctrica y otros daños:
• Protega el aparato de la lluvia.
• No coloque encima del aparato recipientes que contengan líquido, como jarrones.
• Utilice exclusivamente los accesorios recomendados por el fabricante.
• No repare el aparato usted mismo. En caso de avería, contacte con el servicio de atención al cliente.
• No deje caer objetos de metal sobre el aparato.
• No coloque objetos pesados encima del aparato.
Cable de alimentación / fuente de alimentación
• Asegúrese de que la tensión del suministro eléctrico se adecua a los valores especificados en el aparato.
• Introduzca el enchufe completamente en la toma de corriente.
• No tire del cable ni lo pise no coloque objetos pesados encima.
• No toque el enchufe con las manos mojadas.
• Para desenchufar el aparato no tire del cable, sino del cuerpo del enchufe.
• No utilice enchufes ni tomas de corriente en mal estado.
• Instale el aparato de tal manera que el cable de alimentación pueda desenchufarse inmediatamente de la
toma de corriente en caso de avería.
Piezas pequeñas/partes del embalaje
Mantenga las piezas pequeñas (p.ej. tornillos y otro material de montaje) y las partes del embalaje fuera
del alcance de los niños para evitar que se atraganten. No permita que los niños pequeños jueguen con los
plásticos, pueden provocar riesgo de asfixia.
Page 18

18
Colocación
• Coloque el aparato en una superficie seca, plana y resistente al calor y al agua.
• La toma de corriente debe ser accesible para desconectar el aparato de la red eléctrica en caso de avería.
• No instale ni coloque este aparato en estanterías, armarios empotrados u otros lugares estrechos. Asegúrese
de que el aparato tiene suficiente ventilación.
• No coloque el aparato cerca de amplificadores u otros aparatos que puedan generar calor, podría dañar el
aparato.
• No someta el aparato a la luz directa del sol, temperaturas y humedad altas y movimientos demasiado
bruscos.
Adaptador
El adaptador funciona con corriente alterna de 220-240 V. Utilice un adaptador adecuado cuando el enchufe
no encaje en la toma de corriente.
Uso del aparato
Este aparato ha sido concebido para calentar alimentos por inducción. Se ha diseñado solamente para tal
efecto y no debe ser utilizado para ningún otro fin distinto al del indicado en estas instrucciones de uso.
Los niños y las personas con discapacidades físicas, psíquicas o sensoriales o carentes de la experiencia y
conocimiento necesarios no podrán utilizar el aparato salvo que estén bajo supervisión o hayan sido
previamente instruidas sobre su utilización y conozcan las indicaciones de seguridad y sus funciones. Los niños
deberán estar vigilados para evitar que jueguen con el aparato.
Transporte y limpieza
Conserve el embalaje original. Para proteger el aparato durante el transporte introdúzcalo en su embalaje
original.
No utilice líquidos volátiles, como sprays insecticidas. El exterior del aparato podría dañarse si se frota
demasiado fuerte. Evite que el aparato esté en contacto continuado con objetos de goma o plástico.
Reparaciones
• Las reparaciones del aparato deberán ser realizadas solamente por personal técnico cualificado.
• La transformación o cambio del producto reduce la seguridad del mismo.
• Nunca abra el producto por su cuenta ni intente repararlo.
• Un montaje deficiente conlleva fallos en el funcionamiento o una avería total del aparato.
• No abra el aparato en ningún caso. La empresa no se responsabiliza de los daños resultantes. Quedan
reservados cambios en los datos técnicos y posibles errores. La garantía expirará si abre el aparato.
Page 19

19
Descripción del aparato
1 Salida de aire
2 Superficie para cocinar
3 Entrada de aire
4 Regulador
5 Panel de control
Panel de control
6 Indicador del temporizador
7 Indicador de potencia
8 Indicador de temperatura
9 Botón on/off
10 Botón de función
11 Ajustes del temporizador
12 Botón de bloqueo
13 Indicador de bloqueo
Page 20

20
Puesta en marcha y uso
Encender el aparato
• Pulse el botón “ON/OFF” para encender el aparato. El display mostrará “ON” y los ventiladores comenzarán
a moverse.
• El aparato reconoce si está utilizando una batería de cocina adecuada. En caso afirmativo, pulse el botón
“Function” para seleccionar los ajustes deseados.
• En caso negativo, el display indicará el símbolo de advertencia “E0” acompañado de un pitido. Transcurridos
40 segundos el aparato pasa al modo standby.
Ajustar la potencia
• Pulse el botón “Function” y el indicador “P” de la potencia se ilumina. La potencia predeterminada es 1600 W.
• Con el regulador puede controlar la potencia en 10 niveles distintos, desde 200 W a 1800 W.
Ajustar la temperatura
• Pulse el botón “Function” dos veces y el indicador “°C” se ilumina. La temperatura predeterminada es de
240 °C.
• Con el regulador puede controlar la temperatura en 10 niveles en un rango de entre 60 °C y 240 °C.
Programar el temporizador
• Pulse el botón “Function” tres veces y el indicador para el modo de potencia se ilumina y el indicador
muestra “0:00”.
• Con el regulador puede ajustar el tiempo en intervalos de un minuto desde 00:01 hasta 3:00.
• Espere hasta que el indicador 1600 W aparezca y ajuste la potencia deseada con el regulador.
Botón de bloqueo
Pulse este botón para que los ajustes introducidos no puedan modificarse durante el funcionamiento de la
placa.
Batería de cocina adecuada
• Este aparato es apto para el uso de baterías de cocina hechas de: Acero, acero inoxidable, hierro, hierro
esmaltado, hierro fundido con fondo plano y un diámetro entre 12 y 16 cm.
• Este aparato no es apto para el uso de baterías de cocina hechas de: Vidrio resistente al calor, cerámica,
cobre, aluminio con fondo abombado e inferior a 12 cm de diámetro.
Page 21

21
Detección y resolución de problemas
Error Causa posible Solución
E0 Batería de cocina no adecuada. Utilice una batería de cocina adecuada.
E1 Circuito eléctrico averiado. Contacte con el servicio técnico.
E2 Problema con el sensor de
temperatura.
Contacte con el servicio técnico.
E3 Sobretensión (superior a 275 V). Compruebe el circuito eléctrico y localice una conexión
eléctrica adecuada.
E4 Hipotensión (inferior a 100 W). Compruebe el circuito eléctrico y localice una conexión
eléctrica adecuada.
E5 Sobrecalentamiento del fondo
de la olla.
Deje que el aparato se enfríe.
E6 La corriente de aire se ha inter-
rumpido.
Compruebe los orificios de la corriente de aire y límpielos
desde fuera. Si el problema persiste, contacte con el
servicio técnico.
Indicaciones para la retirada del aparato
Si el aparato lleva adherida la ilustración de la izquierda (el contenedor de basura
tachado) entonces rige la normativa europea, directiva 2002/96/CE. Este producto no
debe arrojarse a un contenedor de basura común. Infórmese sobre las leyes territoriales
que regulan la recogida separada de aparatos eléctricos y electrónicos. Respete las leyes
territoriales y no arroje aparatos viejos al cubo de la basura doméstica. Una retirada de
aparatos conforme a las leyes contribuye a proteger el medio ambiente y a las personas a
su alrededor frente a posibles consecuencias perjudiciales para la salud. El reciclaje ayuda
a reducir el consumo de materias primas.
Declaración de conformidad
Fabricante: Chal-Tec GmbH, Wallstraße 16, 10179, Berlín (Alemania).
Este producto cumple con las siguientes directivas europeas:
2004/108/CE (EMC)
2011/65/UE (refundición RoHS 2)
2006/95/CE (baja tensión)
 Loading...