

INSTRUCTION MANUAL
MANUALE D’USO
K-KARP BITE INDICATION SYSTEM
3 + 1 B I T E I N D I C A T O R S S E T

Thank you and congratulations for purchasing your new Pulsar NTX Bite Detection System. We’re sure your
purchase will prove to be a worthwhile investment that will last you several years. Pulsar NTX is a ultrareliable, compact, high quality, bite indicator set packed with the latest generations technology and with a
great modern appearance. By keeping a compact case we succeeded to offer all the functions required by
a modern carp angler. It fits perfectly in the latest “less is more” trend in carp fishing, where all the gear
needs to be as compact and subtle as possible. This great set shows again that the K-Karp team is putting
many efforts in making excellent quality products for a fair price. This great wireless 3+1 set is very easy
to be extend to a 4+1 by the also available loose alarm Pulsar NTX (019-26-110).
• Multicolour Led Selection System with 7 cool colours
to choose (Blue, Red, Green, UV-Blue, Pink, Yellow and
White), just by pressing “C” button key.
• Ultra Bright and Long Life high quality Leds which
are easily visible during the day.
• Automatic Detection System to easily sync your alarms
with the receiver or extend the set into a 4+1 system.
• Long Range Signal (150/200m depending on conditions)
with Auto Range-Test Function
• Integrated Automatic Night Light to help you position
your rod centrally onto alarm during nightime by using
a long life and low consumption diode
• Ultra Low Battery Consumption with Low Level Battery
Warning both on the receiver and the alarm. Constantly
monitors battery condition ensures you know when your
battery is due for replacement.
• Run ‘N Drop Bite Detection differentiation both on alarms
and receiver
• Vibro & Mute Mode Selection to help you position
your rods correctly without having to turn-off your
alarms.
• Micro Adjustable Sensitivity & Tone
• Manual Switch ON/OFF to reduce power consumption when switch off.
• Memory Function both on the Alarms and the
Receiver retains all personal settings when changing
batteries or turning the alarm off.
• Power Out Socket fully integrated with Drake Hangers System
• Compact and Weather-Proof body made by high
impact ABS with Soft Touch treatment.
• Weather-Proof cone speakers.
• Non-Slip Rubber Rod Seat designed with a deep U to
held securely your rods and prevent rod slide.
• Stainless Steel 3/8” screw with Lock Ring.
FEATURES:
ENgLISh
1. Open the battery cover of receiver. Install the three 1.5V AAA batteries. Turn the receiver on by pressing key “O”.
2. Open the battery cover of the alarms to install 1 battery 9V(6LR61). Turn the ON/OFF switch to turn the unit on.
3. Set the alarm in MUTE Mode selection by pressing Volume key “V”, you can now set up your rods. Adjust
the volume by pressing “V” button, the tone by pressing “T” and the sensitivity by pressing “S”.
OPERATINg INSTRUCTIONS:
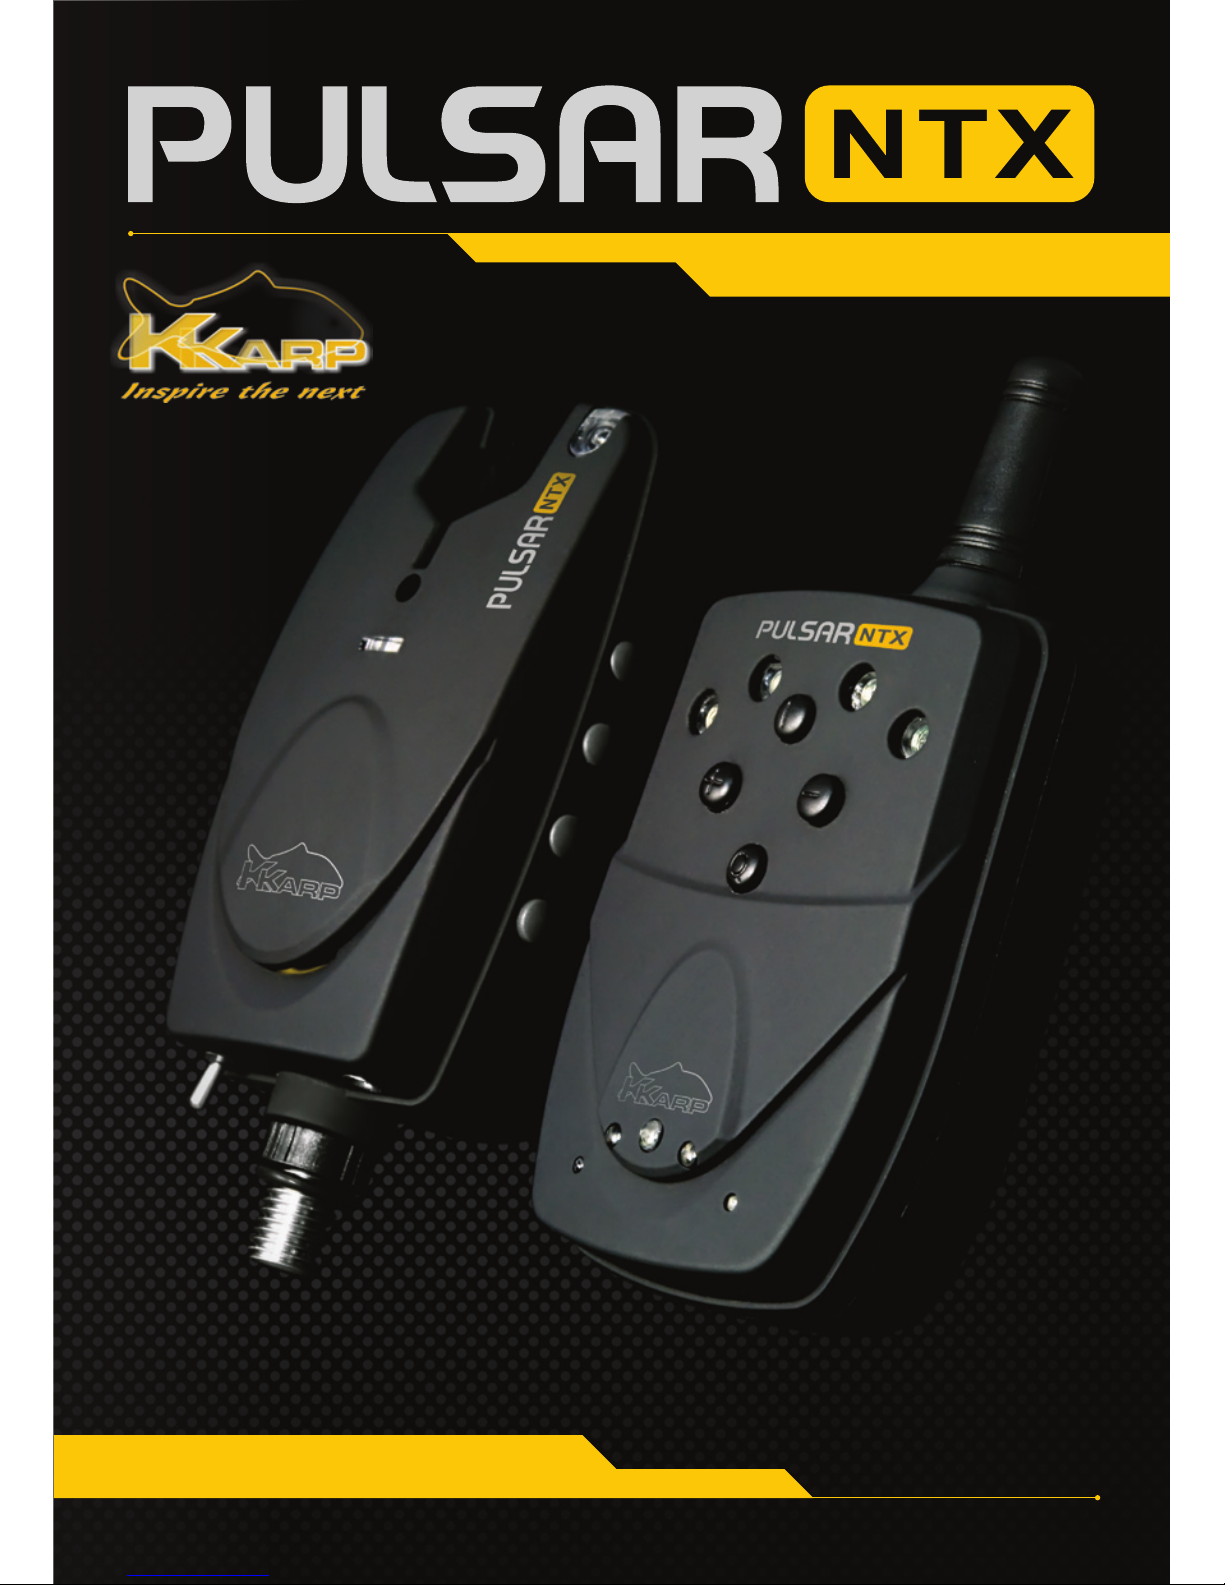
HIGH PRECISION
ROLLER
MULTICOLOR LED
NIGHT LIGHT SENSOR
VOLUME CONTROL
NON-SLIP ROD SEAT
TONE CONTROL
LED COLOR
BATTERY
COMPARTMENT
LOCK RING
S/S SCREW
SENSITIVITY
ADJUSTMENT
AUTO-NIGHT LIGHT
CONE SPE AKER
ONN /OFF SWITCH

Congratulazioni per aver acquistato il nuovissimo set di avvisatori acustici Pulsar NTX Bite Detection System. Siamo sicuri che il vostro acquisto si rivelerà un investimento utile e durerà diversi anni. Pulsar Ntx è
un set ultra affidabile, compatto, di alta qualità fornito delle tecnologie di ultimissima generazione e con un
aspetto moderno. Mantenendo un corpo compatto siamo riusciti ad inserire tutte le funzionalità avanzate.
Tutto questo in pieno stile minimalista come richiede il moderno carpfishing, dove tutta l’attrezzatura deve
essere il più compatta possibile. Questo ancora una volta a dimostrazione di come il Team K-Karp stia
riuscendo a proporre prodotti di altissima qualità a prezzi ragionevoli. Questo set 3+1 senza fili può essere
esteso a 4+1 grazie alle unità Pulsar NTX disponibili separatamente (019-26-110).
• Multicolour Led Selection System per scegliere fra 7
colori ( Blu, Rosso, Verde, UV-Blu, Rosa, Giallo e Bianco),
premendo semplicemente il tasto “C”
• Led ultra luminosi a lunga durata di alta qualità, facil-
mente visibili anche durante il giorno.
• Automatic Detection System per sincronizzare facil-
mente gli avvisatori con la ricevente o estendere il set
ad un sistema 4+1.
• Segnale a lungo raggio (150/200m a seconda delle
condizioni), con funzione automatica di test.
• Luce notturna automatica per consentire il posiziona-
mento delle canne centralmente sull’avvisatore durante
la notte, utilizzando un diode a basso consumo energetico.
• Avvisatore e centralina a bassissimo consumo ener-
getico, con avviso di livello batteria basso. Controlla
costantemente la condizione della batteria assicura di
sapere quando queste sono da sostituire.
• Sistema di rilevazione delle abboccate Run ‘N Drop (dif-
ferenziazione corsa e calata) sia sull’avvisatore che
sulla ricevente.
• Modalità di selezione Vibro & Mute per consentire
il posizionamento delle canne in modo silenzioso
senza dover spegnere gli avvisatori.
• Regolazione micrometrica della sensibilità e del tono
• Switch ON/OFF manuale per ridurre il consumo
energetico
• Avvisatore e centralina con funzione Memoria, mantiene le impostazioni personali quando si cambiano
le batterie o si spengono le unità.
• Jack di uscita per la connessione dei Drake Hangers
System.
• Corpo compatto e resistente agli agenti atmosferici
costruito in ABS con finitura Soft Touch
• Speaker resistente agli agenti atmosferici
• Supporto per la canna ad U in gomma morbida
anti-scivolo
• Vite in acciaio inox 3/8” con anello di bloccaggio.
CARATTERISTIChE TECNIChE:
ITALIANO
1. Aprire il coperchio della batteria della ricevente. Installare le tre batterie da 1,5 V AAA. Accendere il ricevente
premendo il tasto “O”.
2. Aprire il coperchio della batteria del segnalatore ed installare 1 batteria da 9V (6LR61). Premere il pulsante
ON/OFF per accendere l’unità.
3. Regolare il segnalatore in modalità MUTE premendo il tasto “V”, posizionate le vostre canne. Regolare il
volume premendo il tasto “V”, il tono premendo “T” e la sensibilità premendo “S”.
ISTRUzIONI PER L’USO:
LED INDICATORS
CONE SPE AKER
LONG R ANGE ANTENNA
BATTERY
COMPARTMENT
POWER OFF
RUN’N DROP
BITE DETECTION
POWER ON
VOLUME
CONTROLS

www.k-karp.com / info@k-karp.com
Designed and Developed by K-Karp International — K-Karp is a Registered Trade Mark
To simply sync your alarms with your receiver or extend your 3+1 set into a 4+1 with the loose alarm
available separately.
1. Press and hold the button “-“ on the receiver and switch it on by pressing “O” button, release the button “-“
when the led are flashing.
2. Select the colour and the location of your led on the receiver by pressing “-“
3. Switch-On the unit and select the colour of the led by pressing “C” and then activate the system by roll the wheel
in the middle of the unit.
4. To sync the next alarm, just press “-“ on the receiver and repeat the process on the second unit.
5. To stop the encoding process just restart the receiver.
Per sincronizzare semplicemente gli avvisatori con la ricevente o estedere il set in 4+1 con un avvisatore
disponibile separatamente.
1. Tenere premuto il tasto “-“ sulla ricevente ed attivare premendo il tasto “O”, rilasciare il tasto “-“ quando I led
lampeggiano
2. Selezionare il colore e il posizionamento del led sulla ricevente premendo “-“
3. Attivare l’unità e selezionare il colore del led premendo “C” e poi attivare il sistema muovendo la ruota al centro
dell’unità.
4. Per sincronizzare il prossimo avvisatore premere “-“ sulla ricevente e ripetere il processo precedente.
5. Per terminare il processo di codifica riavviare la ricevente.
AUTO DETECTION SYSTEM / ENCODINg INSTRUCTIONS:
AUTO DETECTION SYSTEM / ISTRUzIONI DI CODIFICA:
To activate the range test feature, press and hold down the “C“ button on the unit and then switch-on, then switch-on the receiver
by pressing the “O” button. The unit will then start to transmit a fix signal to the receiver, the user can then walk away, with the
receiver, to their desired location. If the test signal can still be heard from the receiver, then it is within reception range. To stop the
range-test switch-off the unit and receiver and restart them normally.
NOTE: The unit itself will remain silent whilst in test mode – beeps are heard from the receiver only, but the LED on the unit will
illuminate. If using more than one bite alarm, select range test mode on ONE unit only.
AUTO RANgE-TEST FUNCTION:
Per attivare la funzione di test della portata, premere e tenere premuto il tasto “C” sull’unità poi attivarla spostando la leva
“ON/OFF”, dopo attivare la ricevente premendo il tasto “O”. L’unità inizierà a trasmettere un segnale fisso alla ricevente, l’utente
può poi spostarsi con la ricevente sulla postazione desiderata. Fino a quando il segnale di test può essere percepito sulla ricevente,
questa si trova nel range di portata. Per terminare il test, spegnere la ricevente e l’unità e riavviarli normalmente.
NOTE: L’unità rimarrà silenziosa durante la fase di test – beeps sono ascoltabili dalla ricevente soltanto, ma il led sull’unità rimane
acceso. Se utilizzate più di un ricevitore, eseguite il test con UNA unità soltanto.
FUNzIONE AUTO RANgE-TEST:
• Although the alarms are designed to function in all weather conditions do NOT put them into the water.
• Whenever you do not use the alarms for a longer time, take out the batteries.
• Do NOT screw the alarms on the buzzer bar or bank stick too tight to prevent the alarm from damaging.
• Although the signal range of the alarms is very big, please stay near your rods at all times.
ATTENTION:
• Anche se gli allarmi sono stati progettati per funzionare in tutte le condizioni atmosferiche non metterli in acqua.
• Ogni volta che il set non viene utilizzato per un tempo più lungo, togliere le batterie.
• NON avvitare gli avvisatori sulla buzzer bar o sui bankstick troppo stretti per evitare di danneggiare l’avvisatore.
• Anche se la portata del segnale è a lungo raggio, vi consigliamo di rimanere vicino alla vostra postazione.
ATTENzIONE:
ENgLISh
ITALIANO
 Loading...