

Page 1

Safety Precautions and Notes
Use only the included power supply to operate your Xtreme Life DVR.
(AC: 120 Volt, 60 Hz ONLY, if outside the US and Canada
a special adaptor may be required).
To avoid electrical shock, do not attempt to open the unit. Opening the unit
voids the warranty. To prevent fire or shock hazard, do not expose this product
to direct rain or moisture. Do not operate near bath tub, sink, or swimming
pool. Avoid operation in moist environments. Do not overload electrical outlets or extension cords as this may result in fire or electric shock, this unit
works only on 120 Volt. Power surges or over voltage (i.e. 220 Volt) will
damage the unit and void the warranty. A surge suppressor and other
adaptors may be required and are the responsibility of the user.
Manufacturer warrants all Covert Video and Sleuth Gear Hidden Video Products (Product) assembled and sold by
Manufacturer to be free of defects in material and workmanship, subject to the following conditions. The duration of
Manufacturer's warranty with respect to the Product is limited to one (1) year from the date of sale to the original
consumer purchaser only for Products delivered within the fifty (50) states of the United States, District of Columbia, or
the possessions and territories of the United States
No other express warranties are made with respect to any Product. All implied warranties, including
warranties of merchantability and fitness for a particular purpose are limited to the warranty period set
forth above. This warranty is not transferable and applies only to the original consumer purchaser of the
Product.
Manufacturer will, as its sole obligation under this warranty, replace or repair, at its option, any Product that
does not conform to this warranty. Under no circumstances will the Manufacturer issue credit or give a refund for Product covered by this warranty. Furthermore, under no circumstances will Manufacturer be liable for any incidental or
consequential damages under this warranty or any implied warranties.
What Is Not Covered. This limited warranty does not cover Products that in Manufacturer’s judgment have
damage resulting from any (i) deviation from Manufacturer's operating i nstructions as printed in Manufacturer's catalog
or on any packaging, labels or other literature provided with a Product, (ii) installation of a Product in a manner which is
inconsistent with Manufacturer's written i nstructions, (iii) alteration, modification of or tempering with a Product, (iv)
misuse, (v) neglect, (vi) abuse, (vii) accident, (viii) power surge, static electricity or other el ectrical discharge, (i x)
normal wear and tear, (x) commercial use, (xi) service by anyone other than a Manufacturer authorized repair facility,
or (xii) other improper application, installation or operation of the Product. Or, (xiii) have been purchased from inventory clearance or liquidation sales or other sales in which Manufacturer expressly disclaims its warranty obligation pertaining to the Product.
How you (the Customer) can get service: To obtain warranty service during the warranty period, you must
return the defective Product with the original receipt to the original place of purchase. Contact them for return instructions.
If warranty service is needed at any time during the warranty period, the purchaser will be required to furnish a
sales receipt/proof of purchase indicating the date of purchase, amount paid and place of purchase. Customers who fail
to provide such proof of purchase will be charged for the repair of any Product.
How state law relates to the warranty: Some states do not allow limitations on how long implied warranties
last, or the exclusion or the limitation of incidental or consequential damages. So the above limitations or exclusions
may not apply to you. This warranty gives you specific legal rights. You may also have other rights that may vary from
state to state.
NO PERSON IS AUTHORIZED BY MANUFACTURER TO MODIFY OR ADD TO THIS LIMITED WARRANTY.
For warranty information on Products delivered outside the United States please contact the original place of purchase.
IT IS THE USER’S RESPONSIBILITY TO ENSURE THAT THIS EQUIPMENT IS USED IN ACCORDANCE WITH THE LAW(S) OF THE
DO NOT ATTEMPT TO RETURN PRODUCT TO ORIGINAL MANUFACTURER, AS THIS PRODUCT HAS BEEN MODIFIED AND IS NO
LONGER SUBJECT TO ORIGINAL MANUFACTURER’S WARRANTY. IN THE CASE OF A DEFECTIVE PRODUCT, CONTACT PLACE OF
THIS EQUIPMENT HAS BEEN TESTED AND HAS BEEN FOUND TO BE IN COMPLIANCE WITH THE LIMITS FOR A CLASS B DIGITAL
DEVICE, PURSUANT TO PART 15 OF THE FCC RULES. THESE LIMITS ARE DESIGNED TO PROVIDE REASONABLE PROTECTIONS
AGAINST HARMFUL INTERFERENCE IN A RESIDENTIAL INSTALLATION. THIS EQUIPMENT USES, GENERATES AND CAN RADI-
ATE RADIO FREQUENCY ENERGY AND IF NOT INSTALLED AND USED IN ACCORDANCE WITH INSTRUCTIONS, MAY CAUSE
ANY CHANGES OR MODIFICATIONS TO THIS EQUIPMENT WITHOUT THE EXPRESS AUTHORIZATION OF THE MANUFACTURER
COULD VOID THE USER’S AUTHORITY TO OPERATE THIS EQUIPMENT. (RULE 15.21 OF THE FCC)
JURISDICTION IN WHICH THIS EQUIPMENT IS UTILIZED.
HARMFUL INTERFERENCE TO RADIO COMMUNICATIONS.
Manufacturer’s Limited Warranty
PURCHASE FOR RETURN PROCEDURE.
Part 15 Low Power:
12
Xtreme Life Overview
Xtreme Life DVR and Remote Diagram
Xtreme Life Set Up and Menu Access Guide
Navigating Xtreme Life Menu
Factory Settings & Password Protection
FAQ’s
Safety and Warranty Info
Table Of Contents
2
3
4
5
10
11
12
1
Page 2
Xtreme Life™ DVR Overview
The Xtreme Life DVR by SleuthGear® is a battery operated camera system de-
signed to provide long life battery operation and weather resistant operation. Each
system comes equip with a rechargeable Lithium Ion battery and built in DVR recording system, providing maximum 1 year standby battery life. Xtreme Life DVR
systems use a special sensor, known as a PIR, to control record triggering and
battery consumption.
It’s important to note that your Xtreme Life™ DVR has two methods for triggering recording described below.
PIR Triggering – Designed as the primary record triggering method. PIR trigger-
ing preserves battery life of your system in standby, resulting in a maximum
standby battery life of up to 1 year and/or 20 continuous recording hours.
Motion Triggering – Designed as the secondary record triggering method. Motion
triggering consumes battery life during standby and recording, resulting in a maximum 20 hours of battery.
Important Note: Users who use the motion trigger recording method will not receive the maximum battery performance from their Xtreme Life DVR system.
Contents of Box
FAQ’s
Q: When trying to view the camera image why does the screen say “no signal”?
A: No signal means the DVR is not reading the camera. Double check the camera
connections to make sure the components are connected properly.
Q: What is the PIR sensor used for?
A: The PIR sensor is the primary sensor used to trigger recording.
Q: What are the white dip switches on the side of the DVR?
A: The dip switches are recommended user controls that enable recording and
allow users to adjust the PIR sensitivity.
Q: How do I reset the DVR?
A: The DVR can be reset by restoring to factory defaults. See pg 8.
Q: What is PIR?
A: PIR stands for Passive Infrared. The PIR sensor senses a change in heat caus-
ing the DVR and battery to cut on when trigger to enable recording.
Q: What is the operating temperature for the Xtreme Life DVR?
Xtreme Life DVR
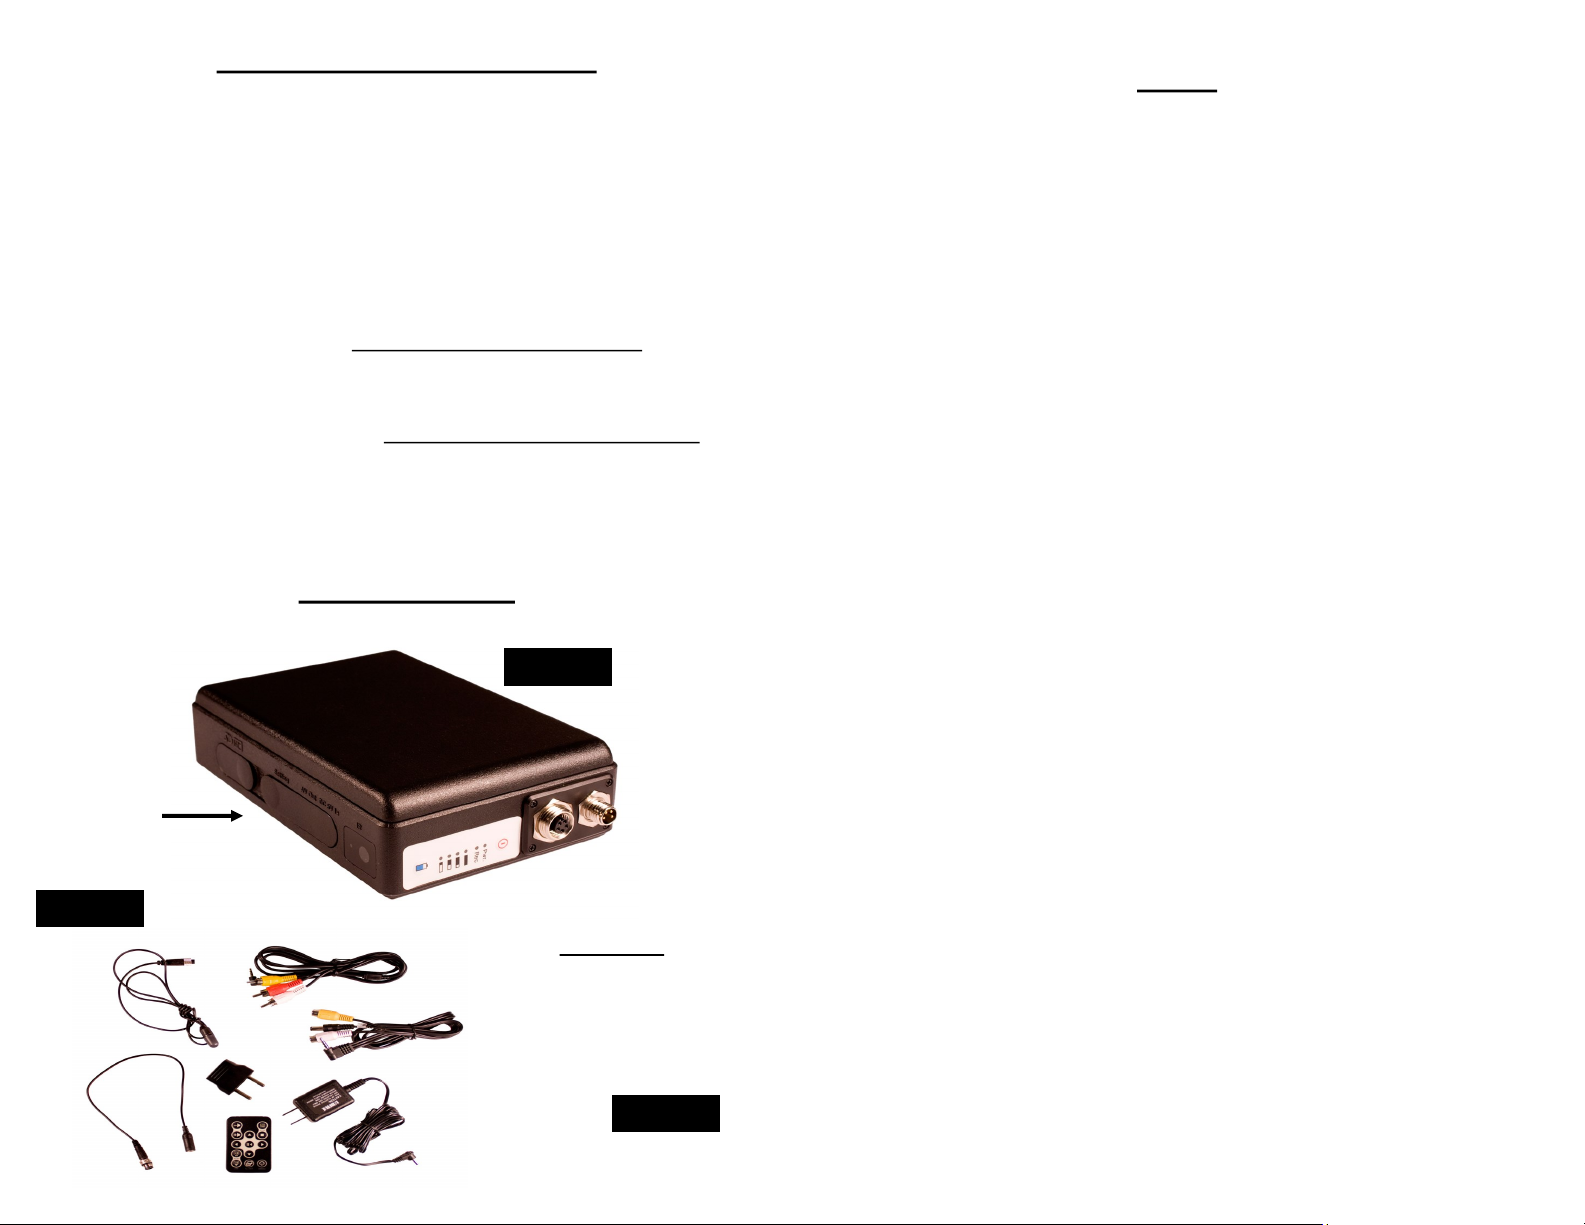
and Battery
Figure 2
1
2
Figure 1
Accessories:
3
1. PIR Sensor
2. Camera Adapter
4
5
6
3. RCA In/Out Cables
4. European Adapter
5. Remote Control
6. AC Adapt- er
Figure 3
2
A: 14 -124 degrees Fahrenheit
Q: What happens when my SD card is full.
A: Via the Settings menu you can set your SD card to full stop or Overwrite. Full
stop means no new recordings can be saved when the card is full. Overwrite
means the system will delete the oldest recorded files to make space for newly recorded files.
11
Page 3

User can restore the factory settings by accessing the main menu, the settings, the Factory Default. This is a convenient options when
you have forgotten which preferences
you have set and need to begin from default.
Factory Reset
Password Info
Xtreme Life DVR’s have multi-level password
protections.
1. Power On Password
2. USB Connection Password
To set the password, access the Main Menu,
then Settings Menu, and select the desired
password level
Once selected enter you your
six-character password and then confirm these
characters once more pressing button
to complete the setting.
Be sure to write your password in a safe place.
Xtreme Life™ DVR and Remote Diagram
Figure 5
Using remote control
1. Power Button (inactive)
2. LCD/TV Switch (inactive)
3. Record
4. Navigation/Pause/Play
5. Volume
6. Setup
7. Escape/Stop
Figure 4
PIR Switch Settings:
Switches control DVR recording time, trigger
sensitivity, and enables access to menu.
1 down = 15 seconds
2 down = 30 seconds
3 down = 45 seconds
4 down = 60 seconds
5 down = Motion High
6 down = Motion Med
7 down = Motion Low
8 up = Enables switch controls
8 down = Access menu
10
Figure 6
3
Page 4

Guide to Setting Up Xtreme Life DVR
Step 1: Charge Xtreme Life DVR for 18 hours b efore in itial use.
Step 2: Remov e Switch Cover located on the exterior side of the DVR to gain
access to switch settings.
Step 3: To Enable recording use the switches, move either switch 1-4 to the down
position to set the recording dwell time. Recording dwell time refers to how long
the DVR will record once the PIR sensor has been triggered. Note, the DVR will
record continuously as long as motion remains present, otherwise it will record for
the length of time designated by the switch. (see figure 4 found on page 3).
Step 4: Enable PIR Sensitiv ity. Using the switches, mo ve either switch 5-7 to
the down position to set the desired sensitivity. It is recommend users use the
highest sensitivity first, making adjustments to a lower sensitivity as needed.
Step 5: Ins ert yo u r SD Card in to the slot located n ext to t he swit ches. (s ee
figure 4)
Step 6: Position your camera in it’s desired record ing lo cation.
Step 7: Power on yo ur Xtreme Life™ DVR by pressing the po w er button lo -
cated on the front panel of the DVR. (see figure 6)
Accessing Main Menu
Connect the supplied video output cables to the AV Output connector located on
the exterior side of the DVR (see figure 4). Move switch 8 to the down position, all
other switches to the up position. Connect the Video Output cables to a Television
or Monitor. Then press the setup button on your remote to display main
menu.
Figure 7
Access
Video
Files
Recording
Options
Display
Camera
Image
Access
DVR
Settings
4
Xtreme Life™ DVR Hidden Cameras
Xtreme Life™ Landscape stone model #SC7000 - Show below
Xtreme Life
Stone Bottom of Rock Rock with Bottom Removed
Xtreme Life™ Electrical Box model # SC7001
Xtreme Life Electrical Box Electrical Box Opened
Xtreme Life™ House Reel model # SC7006
9
Page 5

Motion Detection & Continuous Recording
Xtreme Life™ DVR’s were not designed to use the motion detection or continuous
recording modes as there default recording options. Remember, in order to benefit
from the maximum battery life of your Xtreme Life DVR users must use the switch
controls to control the recording settings. If the users sets the motion activated or
continuous recording modes, it will bypass the switch control settings and the
battery will only last 20 hours continuous.
Motion Detection Recording
To access the motion detection option, first
access the Main menu. In the Main Menu
select Record, then select Motion Detection.
Select Motion Detection and
press button
When the video image displays press
REC button on the remote to start recording.
Continuous Record Mode
To access the continuous recording option, first access the main menu in the
main menu select record, then select preview. Note: Continuous recording will
record until the SD card is full or the users presses stop.
Select Preview and press to enter.
When the video displays press REC button on
the remote to start recording.
Press STOP button to finish recording.
8
Navigating the menu
Use directional arrows on the remote control to navigate the menu options. Press
the play/pause button to enter into and select and save your preferences.
Preferences are stored even when device is powered off.
Setting Time/Date
Via the Main Menu select Settings
then select Date and Time.
Select the correct date and time using
the directional arrows to navigate up
and down, and the play/pause button
to edit the year, month, date, hour, and
minute.
Recording Settings
Via the Main Menu select Settings then select Record Settings. Use the up and down
arrow on the re- mote
to select each set- ting,
press to set prefer- ence.
Resolution: 640x480, 720/480,
1280/960
Quality: Normal, Medium, High
Frame Rate: 1-30
Audio: Enable/Disable
Frame Counter Stamp: On/Off
5
Page 6

Navigating the Menu
Users can play back their recorded video files by connecting the Xtreme Life™
DVR to a TV monitor. First connect the supplied cables to the DVR and then to
your TV. Be sure to move switch 8 to the down position to display the menu on
your TV.
To playback video files
Press setup button on your remote control to ac-
cess the Main Menu, highlight video file using up
down arrow, then press the play/pause button
on the VIDEO icon located in the Main Menu.
Choose the files to playback from the list.
Newest files appear at top
Use the play/pause button to begin
playback of the highlighted video file.
Playback Options: Users can use th e below playback option during v ideo
playback.
Fast Forward:
Press right arrow during normal playback to double play back speed. Press
again to triple playback speed
Slow Motion:
SD Card
Xtreme Life™ DVR’s record to SD cards and is capable of supporting up to a
32GB SD card. Users can expect a maximum recording time of approximately 50
hours, or 1.5 hours/GB (recording may vary based on user settings).
Video Playback using SD Card
To view your video files simply remove the SD card from your Xtreme Life DVR
and connect to a computer. (some users will need a SD to USB card reader)
Storage Status
What to know how much space is on your
SD card?
Storage Information will show how
much total space and free space remaining
on the SD Card.
Total space shows the total storage amount.
Free space shows how much space is left.
When the SD card is inserted SD
Storage icon will be displayed in the bottom
left corner. This icon appears on the main
recording screen at all times.
You can also access the Main Menu, then
Settings, then Storage information
to see the storage status of your card shown
in the figures to the left.
Format SD
Press to pause the video, the press the left arrow once and the video
file will be played in slow motion. Press again to play in slower motion.
Rewind:
Press in stop/pause mode. The video file will play in reverse. Press again to
speed up.
6
Formatting your SD Card/Memory will insure
your SD card is in the correct format with the
DVR. It is recommended prior to recording for
the first time.
7
 Loading...