

Page 1
Motion Activated
Hidden Video Recording
System Manual
P/N: F40072B01
Patent No. M356942
SleuthGear Recluse
Page 2

Package Contains ........................................................... 2
Contents
Quick Setup.....................................................................3
How to open Motion Activated Black Box.........................3
Interface ..........................................................................4
LED Indicator status ........................................................ 4
Installation .......................................................................5
1. How to open battery cover.....................................5
2
How to insert and remove the batterty ..................5
3. Coverage angle of the camera and PIR sensor.....6
4. How to charge the battery .....................................6
5. IR Remote control sensing area ............................ 6
Compatible Storage ......................................................... 7
Start to record..................................................................7
Playback Function ...........................................................8
Remote Control Diagram .................................................9
Screen Icons .................................................................10
OSD Menu Structure Tree .............................................12
Software ........................................................................ 20
Software Operation Procedure.......................................22
FAQ...............................................................................26
Specifications ................................................................ 27
- 1 -
Page 3
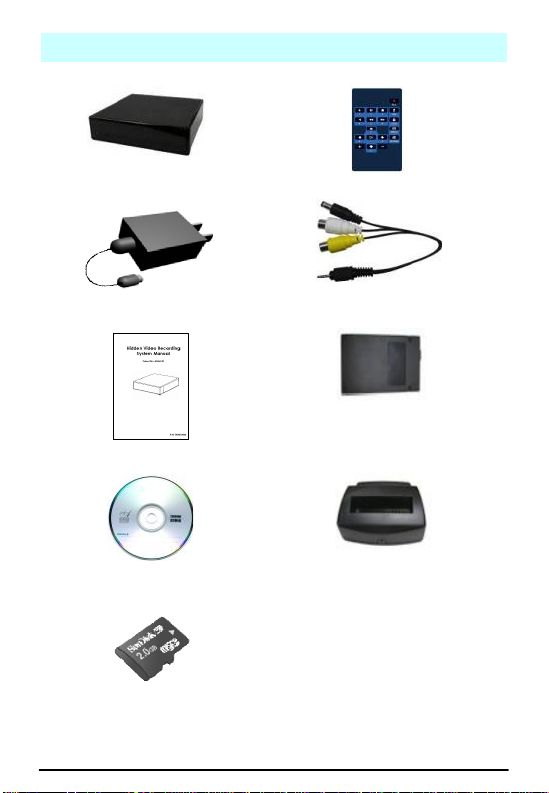
Package Contains
Motion Activated Black Box
IR remote control
Power adapter (12VDC)
AV Output cable
User manual
3.7V 4800mA Li-polymer
battery
Software CD
Charger cradle for Li-polymer
battery (optional)
Micro SD card
(optional)
- 2 -
Page 4
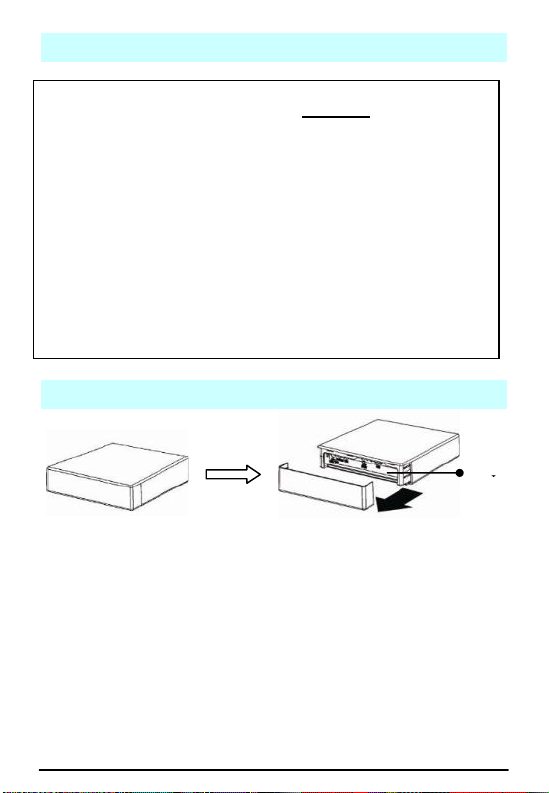
Quick Setup
Step 1: Open the back cover
Step 2: Fully charge the battery for 10 hours for the first time
using (please backup or format Micro SD card
regularly to keep it efficient)
Step 3: Insert Micro SD card into Micro SD slot. Class 6 or
above level would be highly recommended.
Step 4: Switch the power to “ON” (power switch) to turn on
Motion Activated Black Box. The LED will be on. To
turn off Motion Activated Black Box, switch the power
to other side, when the final recording ended, all LEDs
will be off.
*Set the DATE/TIME to current date an d time before
recording; or the recording date and time will be incorrect.
*Use bundled accessories. Damage which is caused by other
device will be beyond warranty
Interface
How to open Motion Activated Black Box
- 3 -
Page 5
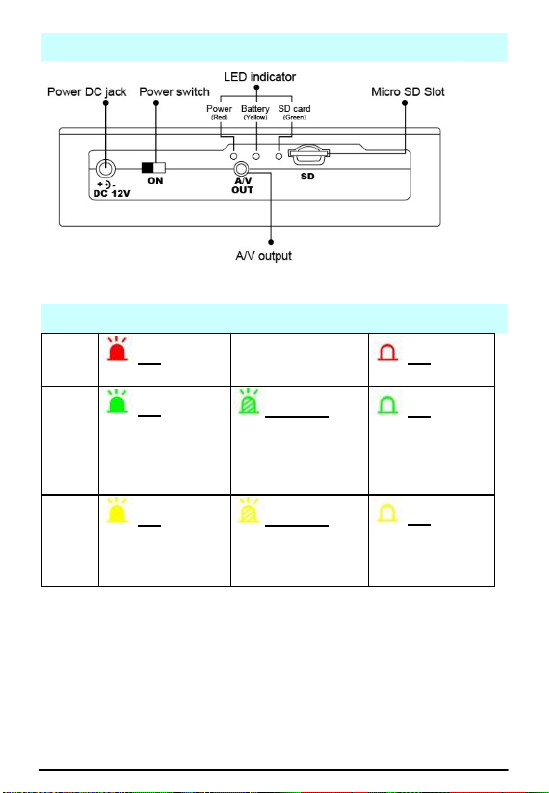
Interface
Red
LED
On
Power on
x
Off
Power off
Green
LED
On
System ready,
Micro SD card
normal, and has
schedule
Blinking
System and Micro
SD card normal,
but doesn’t have
schedule
Off
System not
ready or Micro
SD card
abnormal
Yellow
LED
On
Battery charging
Blinking
Running out of
battery, please
charge it
Off
Battery not
charging
LED Indicator status
- 4 -
Page 6
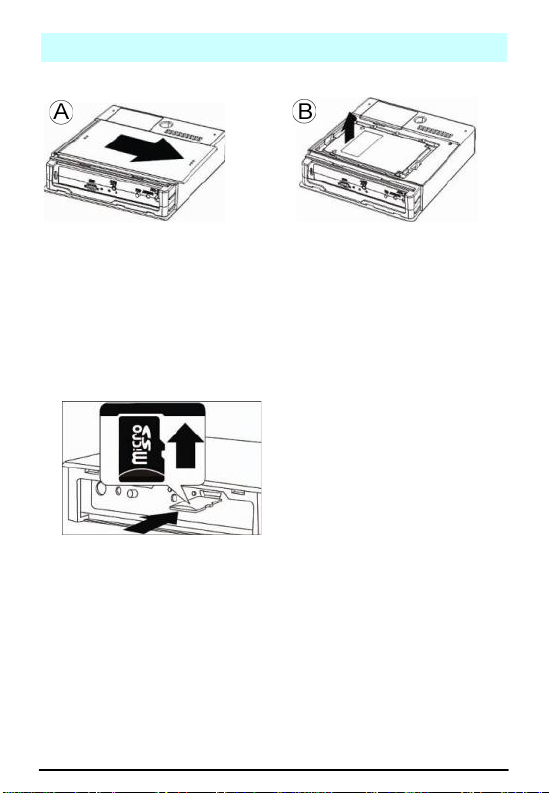
Installation
Turn the device upside down.
Firstly open back cover and
then slide off the battery cover
according to the direction of
arrow (from two points to three
points)
After removing the battery
cover, take out the battery for
charging or changing the
battery. Please make sure of
the right direction when slide
battery back into place.
device. Insert micro SD card in the
slot. Never force the card into slot
& make sure the direction is
correct. Press micro SD card for
drawing out.
F
1. How to open battery cover
2. How to insert/ draw out Micro SD card
* Always power off the unit before removing the Micro SD card,
otherwise, the card may be damaged.
* Never remove Micro SD card from your computer without using the
“Safely Remove Hardware” icon in your computer system tray .
- 5 -
Page 7
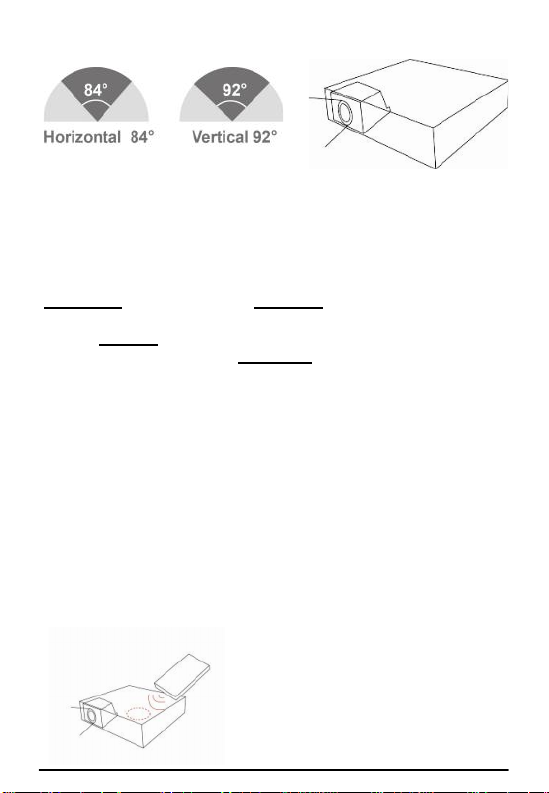
3. Coverage angle of the camera and PIR sensor
Please point the IR remote
control at the marked area
**The best IR performance distance will be 3 meters.
4. How to charge the battery
Connect bundled power adapter to power DC jack. The yellow
LED will be on if the battery is charging. Please fully charge for
7~8 hours. (Please charge for 10 hours when you charge the battery
for the first time.) With the optional cradle, the charging time is
around 3 hours and the green LED will be on . The battery, after
fully charged, can last for 6.5 hours at least under continuous
recording. Under motion activation or power saving when out of
schedule, Motion Activated Black Box can last for longer.
* NOTE: Under low temperature conditions, the battery will have
a shorter life than normal
* NOTE: Please use the bund led power adapter only. Damage
which is caused by other power adapter will be beyond
warranty.
* NOTE: Please charge the battery immediately after you receive
the unit
* NOTE: For better commanding the unit, u sers are highly
recommended to charge the ba ttery once every 3
months to activate Li-polymer battery.
5. IR Remote control sensing area
- 6 -
Page 8

Compatible Storage
The below micro SD cards are tested with CH0705.
* Apacer class 6 4GB micro card
* Toshiba 4G MicroSD
* Sandisk 2GB micro card
* Team 2G MicroSD / 4G MicroSD
* Transcend class 6 16GB micro card
* Transcend 1G MicroSD
* Kingston 4G MicroSD
* For those micro SD cards aren ’t be tested which doesn’t
mean they are not compatible. We would highly recommend
to use the micro SD card for Class 6 or above. Class 6 or
above will have smoother footage.
Start to record
Once power on unit, recording is factory preset at Sensor (PIR)
recording mode. It can also be reset as continuous recording
through MENU. Sensor (PIR) mode is when there’s motion, the
Black Box will automatically boot up for recording within 2
seconds. Once the motion ended, it will remain recording for 5
seconds (10/15/20 seconds are selectable on OSD menu) then
turn off the DVR automatically after 15 seconds (30/60 seconds
are selectable on OSD menu) in order to save power.
* Please press “menu” key before taking away the Micro SD card;
otherwise, the recording will not be saved onto Micro SD card.
- 7 -
Page 9

Playback Function
PLAYBACK Instruction
1. ID CAM_01: the ID of
recording
2. >: Playback
3. <: Rewind playback
4. PB: Playback mode
5. 1X: Speed of playback, 1X/
2X/ 4X/ 8X
6. PAUSE: Pause palyback
7. 2010/10/01: Date of recording
8. 10:10:25: Time of recording
1 ID
>PB 1X PAUSE 2010/10/01
10:10:25
Press key on remote control to get in to playback menu.
You can use “Time search” to enter the date/time which you
would like to view. Or get into “Event Search” to see the event
list and press button to playback from a selected recording.
- 8 -
Page 10

Remote Control Diagram
Button
Function
Description
Universal password:
UP/UP/DOWN/DOWN/+/+/-/Panic
Record
Start to Record manually. Press again
to cancel recording mode
KEYPAD
Virtual keypad input
Lock
Key lock
MENU/Exit
Menu mode or Exit to last page
UP (7)
DOWN (0)
LEFT (8)
RIGHT (9)
Confirm the setting/change
Still image (snapshot)
Enter
Confirm
Plus
Minus
Adjust Value
1
2
3
4
5
6
7
8
9
0
Numeric Key
- 9 -
Page 11

Play (1)
Into playback menu or start to play
Pause (2)
Pause playback, press again to play
frame by frame
Re-wind (4)
Rewind playback
Fast
forward (6)
Fast forward play 2/4/8 times
Fast rewind
(5)
Fast rewind play2/4/8 times
Stop (3)
Stop playback
LIVE/RECORD Instruction
1. CH01: Channel 1
2. H4L: H.264 compression
3. 95%: Micro SD Card free
capacity
4. NO SD: Micro SD card not
inserted
5. R: Recycledly writing Micro
SD card. If Micro SD card is
full, it overwrites the oldest
data (appear only when
Micro SD card is inserted)
1 H4L 95% O ID
LOCK
LOSS
2010/10/01 1 0:10:25 ● CON
Screen Icons
When you get into MENU or PLAY mode, it would need
password if Black Box is in key lock mode. Please enter
password (default: 1234) and press . If password is
correct, user can get into MENU or PLAY mode. If it is incorrect,
the password will go back to the first digit.
- 10 -
Page 12

6. O: Write once to Micro SD
card. If Micro SD card is full,
#3194075 will stop recording
(appear only when Micro SD
card is inserted)
7. 00000001: Camera ID
8. LOCK: Key locked
9. LOSS: Camera input loss, it
will go back to blue screen
10. 2010/10/01: Date
11. 12:14: 50: Time (24H format)
12. 12:14: 50AM: Time (12H
format if shows AM or PM)
13. ●: Recording mode
14. CON: Continuous recording
mode
15. ALARM: Alarm recording
mode
16. NONE: Not recording
1 H264 95% R ID
LOCK
2010/10/01 1 0:10:25PM ● PAN
1 H264 NO SD R ID
2010/10/01 1 0:10:25PM ● PAN
1
- 11 -
Page 13

OSD Menu Structure Tree
I. CHANNEL SETUP
TITLE SETUP
COLOR SETUP
AUTO BRIGHTNESS
II. DATE/TIME SETUP
III. SD CARD SETUP
SD INFORMATION
SD REC MODE
SD FORMAT
IV. RECORD SETUP
RECORD MODE
CONTINUOUS
RECORD
PIR RECORD
V. PERIPHERAL
SETUP
BUZZER SETUP
KEY BEEP
VIDEO
LOSS
BEEP TIME
RELAY SETUP
VI. SYSTEM SETUP
DVR ID
FACTORY DEFAULT
FIRMWARE UPGRADE
PASSWORD SETUP
- 12 -
Page 14

Menu Operation
1. Press to enter
MAIN MENU
2. Press to
select item
3. Press to enter
the selected item
4. Press to get
back to live view
I. Channel Setup
1. Press to
select item
2. Press to enter the
selected item
1. Press to
change value
2. Press to
change cursor
1234567890.
QWERTYUIO
P
↵
ASDFGHJKL
-↑+
ShiftZXCVBN
M
←↓→
TITLE SETUP
CHANNEL 1:_ _ _ 1
CHANNEL SETUP
MAIN MENU
CHANNEL SETUP
DATE/TIME SETUP
SD CARD SETUP
RECORD SETUP
PERIPHERAL SETUP
SYSTEM SETUP
TITLE SETUP
COLOR SETUP
AUTO BRIGHTNESS: ON
- 13 -
Page 15

1. Press to
select item
2. Press to
change value
II. DATE/TIME SETUP
1. Press to
select item
2. Press to
change value
* Display Format:
YY/MM/DD, MM/DD/YY, or
DD/MM/YY.
* Time Format: 12H/ 24H
1. Press to
select item
2. Press to
change value
DAYLIGHT SAVING
TUNR: OFF
START TIME:
MONTH: 04
DAY: 02
HOUR: 00
END TIME:
MONTH: 11
DAY: 04
HOUR: 00
DATE/TIME SETUP
DISPLAY FORMAT: YY/MM/DD
TIME FORMAT: 12H
YEAR: 2012
MONTH: 02
DAY: 09
HOUR: 05
MINUTE: 25
SECOND: 38
DAYLIGHT SAVING TIME SETUP
COLOR SETUP
BRIGHTNESS 32
CONTRAST 32
SATURATION 32
HUE 32
(1 -63)
- 14 -
Page 16

III. SD CARD SETUP
1. Press to
select item
SD CARD INFORMATION:
Press to enter
SD REC MODE:
Press to change
mode
(FULLSTOP:OVERWRITE)
SD FORMAT: Press to
enter
AUTO FORMAT: Press
to change
1. Press to
change mode
2. Press to run
SD CARD INFORMATION
TOTAL: 3.74GB
REMAIN: 763.13MB (20%)
SD CARD SETUP
SD INFORMATION
SD REC MODE: OVERWRITE
SD FORMAT
AUTO FORMAT: ON
FORMAT SD
FORMAT SD: NO
PRESS ENTER KEY TO RUN
- 15 -
Page 17

IV. RECORD SETUP
1. Press to
select item
2. Press to enter the
selected item
1. Press to
change cursor
2. Press to
change value
*Default value: Sensor (PIR)
recording mode
*Double click and
record mode will be
automatically change to the
select one.
1. Press to
change value
2. Frame rate adjustable
by users:
H4L 30(N)/25(P);
H4L 15(N)/12(P);
H4L 8(N)/6(P);
H4L 4(N)/4(P);
H4L 2(N)/2(P);
JPEG 2(P)/(N);
JPEG 4(P)/4(N);
JPEG 6(P)/8(N);
JPEG 12(P)/15(N);
JPEG 25(P)/30(N)
3. Quality adjustable by
users: Low/ STD/ High/
Super
FRAME RATE: H4L30(N) / 25(P)
QUALITY: SUPER
CONTINUOUS RECORD
AM PM
0 - - 3- - 6 -- 9 - - 0 -- 3 - - 6 --9 - SSSSSSSSSSSSSSSSSSSSSSSS
S: SENSOR (PIR)
C: CONTINUOUS
RECORD MODE
CONTINUOUS RECORD
PIR RECORD
RECORD SETUP
RECORD MODE
- 16 -
Page 18

1. Press to
change value
2. Frame rate adjustable
by users:
H4L 30(N)/25(P);
H4L 15(N)/12(P);
H4L 8(N)/6(P);
H4L 4(N)/4(P);
H4L 2(N)/2(P);
JPEG 2(P)/(N);
JPEG 4(P)/4(N);
JPEG 6(P)/8(N);
JPEG 12(P)/15(N);
JPEG 25(P)/30(N)
3. Quality adjustable by
users: Low/ STD/ High/
Super
4. Standby time: 60/30/15
sec selectable (DVR will
turn off automatically in
60/30/15 seconds after
the detection of PIR
sensor ends)
V. PERIPHERAL SETUP
1. Press to
select item
2. Press to enter the
selected item
BUZZER SETUP
RELAY SETUP
PERIPHERAL SETUP
FRAME RATE: H4L 30(N) / 25(P)
QUALITY: SUPER
SENSITIVITY: HIGH
PRE-RECORD: ON
STANDBY TIME: 60 SEC
PIR SETUP
- 17 -
Page 19

1. Press to
select item
2. Press to
change value
1. Press to
select item
2. Press to
change value
VI. SYSTEM SETUP
1. Press to
select item
2. Press to enter the
selected item
1. Press to
change cursor
2. Press to
change value
ID: _ _ _ _ _ _
DVR ID
DVR ID
FACTORY DEFAULT
FIRMWARE UPGRADE
PASSWORD SETUP
SYSTEM SETUP
RELAY OUT TIME: 10 SEC
(10~60 SEC)
VIDEO LOSS: NO
RELAY OUT
KEY BEEP: OFF
VIDEO LOSS: ON
BEEP TIME: 02 SEC
(2~6 SEC)
BUZZER SETUP
- 18 -
Page 20

1. Press to
change value
1. Press to
select item
2. Press to
change value
1. Key in default value
(1234) first and press
2. It will enter “NEW
PASSWORD SETUP”
and please key in new
password
3. Press to
change cursor
4. Press to
change value
ENTER PASSWORD: ****
PASSWORD SETUP
EXISTING VERSION: P.0.13.1
NEW VERSION: _ _ _ _
UPDATE: NO
PRESS ENTER KEY TO RUN
FIRMWARE UPGRADE
LOAD DEFAULT: NO
PRESS ENTER KEY TO RUN
FACTORY DEFAULT
- 19 -
Page 21

PLAYBACK MODE
In the Playback screen
1. Press to enter
SEARCH MENU
2. Press to
select item &
to change value
3. Press to run
EVENT SEARCH
1. Press to
select item
2. Press to playback
the event
NO YY/MM/DD HH:MM:SS MODE
1 12/02/02 15:36:28 S
2 12/02/02 15:35:11 S
3 12/02/02 15:33:04 S
S: SENSOR(PIR) L: LOSS
C: CONTINUOUS P: PANIC
EVENT SEARCH
(PAGE 001)
TIME: 2012/02/01 16:03 RUN
EVENT SEARCH
BEGIN: 2012/02/01 16:03:38
END: 2012/02/02 15:37:37
SEARCH
Software version
Playback function Button
Playback display area
Playback control bar
Playback functional buttons
File information
Software
- 20 -
Page 22

Search Files
Backup
DVR file
Login
Select Path
Enter
Backup
format
Set Start
Time
Set End
Time
Export
backup file
Cancel
Time/ Date on
Time/ Date
format
Time/ Date
top left
Change
account and
password
Multiply 32
times the
original speed
Save JPEG
picture
Print
Enhance the
resolution
Audio adjust
Mute
Stop
Pause
Last
-1/2X
-2X
-1X1X2X
1/2X
Next
Playback control bar:
- 21 -
Page 23

File information:
Search Files
Click
Press and then
press
* Computer Requirement: Dual Core CPU or above , 1GB RAM
or above
* Operation System Requirement: Windows XP, Windows Vista
32bit, Windows7 32bit, Windows7 64bit or above
* PC has to be installed with Sound Card, which makes PC
have audio function. Otherwise, PC may not be able to run
the software.
Software Operation Procedure
- 22 -
Page 24

Select a folder with DVR files
and press “OK”
Double click the selected
recording file to playback or
click the selected recording
file and press “Open” to
playback.
File searching method:
List all time : list all the
recording sessions in
the folder you browse.
List file event : list the
event which you select
in “List all time”
Search all event : list all
the events in the folder
you browse (max. 1000
events)
Format storage : Format
SD card easily
- 23 -
Page 25

Backup Files
Press and
choose backup format (DVR/
WMV/ AVI/ JPG) and choose
backup channel.
Backup as DVR format:
Can only backup four
channels
Backup as WMV/ JPG
format: backup four
channels or individual
channel
Backup as AVI format:
backup four channels or
individual channel;
backup resolution as
CIF or D1.
During the playback, you can
press to set
start time to backup file.
Then, press
to set end time to backup file.
Green bar: backup start
time
Red bar: backup end
time
Press to
export backup file to PC, or
Press to
cancel Backup Start time and
End time
- 24 -
Page 26

Playback Files
Move the mouse cursor to
the place you want to
enlarge. Right click to zoom
in. Right click again to get
back to the original scene.
Admin
Click and key in
account and password.
Default: root/ root
Display information:
On/Off
Date format:
yyyy/mm/dd
dd/mm/yyyy
mm/dd/yyyy
Time/Date position: Top
Left/ Bottom Right
Press to change
account and password in
Admin area.
- 25 -
Page 27

FAQ
Q1. What player software should I use to playback the
recording files?
Ans. Our bundled software is most recommended. You could
use the bundled software to transfer the files into AVI, WMV
format, then you could use “Windows Media Player” for
playing. A lot more other capable player can playback the
record files, such as VLC, etc.
Q2. How long can date/time stay working without power
supply?
Ans. Unit could self power for 3 months without other power
supply (including battery power supply)
Q3. Why can't I power on the device?
Ans.
1. Make sure the battery is well placed and has enough
power inside.
2. When you use the remote control, make sure it facing to
the IR remote control sensing area (please kindly refer to
the bottom of page 6).
3. The device was working if the LED was on and buzzer
beeped when the device powered on. Please make sure
you connect monitor appropriately.
4. If the device cannot be powered on, please contact your
dealer.
Q4. How does sensor (PIR) mode work?
Ans. The default recording mode will be sensor mode. In this
mode, after turn on the DVR, if there’s no any motion, it’ll
automatically shut down the DVR for saving power. When it
detects the motion, it’ll auto boot up within 2 seconds then
start recording. When the motion ends, it’ll record 5/10/15/20
more seconds and then shut down the DVR in 15/30/60
seconds again according to your setting.
* Please be sure the power switch is on for the auto boot up
under
sensor
mode.
- 26 -
Page 28

Specifications
Video System
NTSC / PAL
Compression
H.264
Video resolution
Recording frame rate
6/8, 13/15, 25/30 fps
Recording Mode
Pre-recording
Suported
Post Recording
Yes, 10 secs
Image Sensor
1/4”, 720x480 (NTSC)/ 720x576 (PAL)
Lens
2.5mm
IR LED
940nm
PIR Angle
Horizontal 84; Vertical 92
Audio recording
Yes (Optional)
A/V connection
RCA composite AV output
Power supply
Changeable and rechargeable 3.7V
4800mAh Li-polymer battery
Storage Media
Micro SD card (1G to 32G, SDHC Class
Control
IR remote control
LED indicator
Red, Yellow, Green
Time/Date stamp
Yes
Time/Date Battery
Lasts for 3 months w/o power supply
Power failure
Auto Recovery
Firmware Upgradable
Yes, through micro SD Card
Current consumption
Operation mode : 2.6W
Standby mode : 2.5W
Sleep mode : 0.12W (Approx.)
Operation temp.
+0~+40°C
Dimension
120(L)x120(W)x30.5(H) mm
720x
(NTSC) / 720x288 (PAL)
Continuous,
6 is recommended)
* If there is no schedule and external trigger deactivated, the
device will enter sleep mode after 30 seconds without
control.
480
Sensor
- 27 -
Page 29

Thank you for purchasing our Hidden Video Recorder System.
EU Environmental Protection
The symbol of crossed-out garbage shows that this
product should not be treated as household waste,
and it falls into the category of electric /electronic
equipment for recycling. This electronic device
should not be disposed in a regular trash. We
strongly advice you to contact related authorization
before you dispose this product.
Do not open/modify the device, as it may cause
damage to the unit. For internal repairs, consult your
dealer or an Authorized Service Center.
Do not use any accessories other than what comes
with the unit; otherwise, it would be out of warranty.
Protect from humidity. Do not put it in water and
be careful to protect it from rain, sea water, or high
humidity environment etc.
Protect from high temperatures
To avoid damage or mis-operation of the device,
only use in temperature of 0 ~ +40°C.
Do not bring the device suddenly from a hot to a
cold place, or vice versa. This may cause damaged
to the inside of the unit by creating condensation.
Please read this manual before installation.
Please fully charge the battery immediately after you
receive the unit; otherwise, the unit may not be turned on.
For customer support , please contact your dealer, and please
keep your Invoice for further support.
- 28 -
 Loading...