

Page 1

720P Wifi Tissue Box
- HD Wifi Camcorder -
User Manual
Ver. 2.2.0
F40709001
Page 2

Table of Contents
Table of Contents ................................................................................................................................... - 1 -
Quick Start Guide ................................................................................................................................... - 3 -
Diagram ................................................................................................................................................... - 4 -
LED Indicator Status .............................................................................................................................. - 5 -
How to Charge The Battery .................................................................................................................. - 5 -
Compatible Storage ............................................................................................................................... - 7 -
Software & hardware specifications on PC/mobile devices ............................................................ - 8 -
WiFi tissue box setup instruction ......................................................................................................... - 9 -
(I) Device setting ............................................................................................................................ - 9 -
(II) EZ-SEE software instruction (On PC or laptop) ................................................................ - 11 -
(III) EZ-SEE APP Instruction (On Smart Device) .................................................................... - 25 -
Specification .......................................................................................................................................... - 44 -
Page 3
- 2 -
Thank you
for purchasing our 720P Wifi Tissue Box (CH0709c). Please read this
manual before installation.
For customer support
, contact your dealer, keep your Invoice for further support.
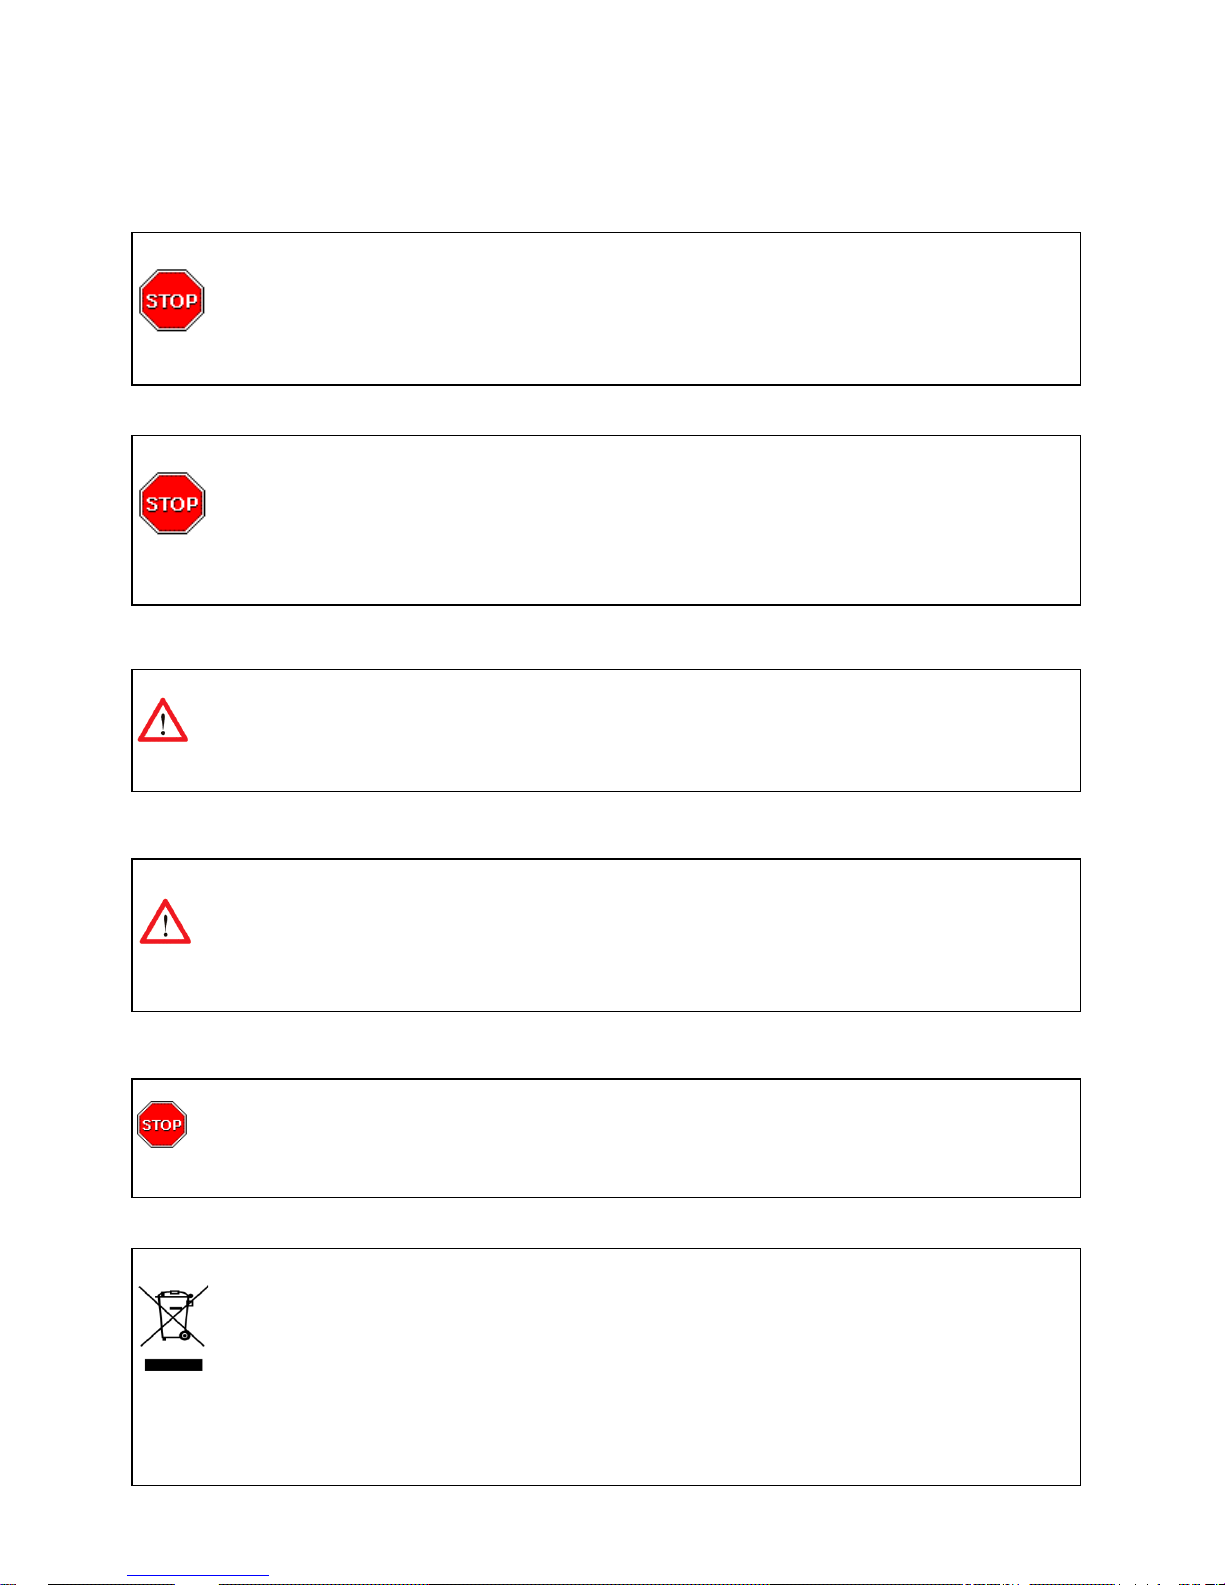
Do not open/modify the device, as it may cause damage to the unit and
void the Warranty. For internal repairs, consult your dealer or an Authorized
Service Center.
Do not use any accessories other than what comes with the unit otherwise, it
would void the warranty.
Protect from humidity.
Do not put it in water and be careful to protect it from
rain, sea water, or high humidity environment etc.
Protect from high temperatures
To avoid damage or mis-operation of the device, only use in temperature of 0 ~
+40°C.
Do not bring
the device suddenly from a hot to a cold place, or vice versa. This
may cause damaged to the inside of the unit by creating condensation.
EU Environmental Protection
The symbol of crossed-out garbage shows that this product should not be treated
as household waste, and it falls into the category of electric /electronic
equipment for recycling. This electronic device should not be disposed in a
regular trash. We strongly advice you to contact related authorization before
you dispose this product.
Page 4
- 3 -
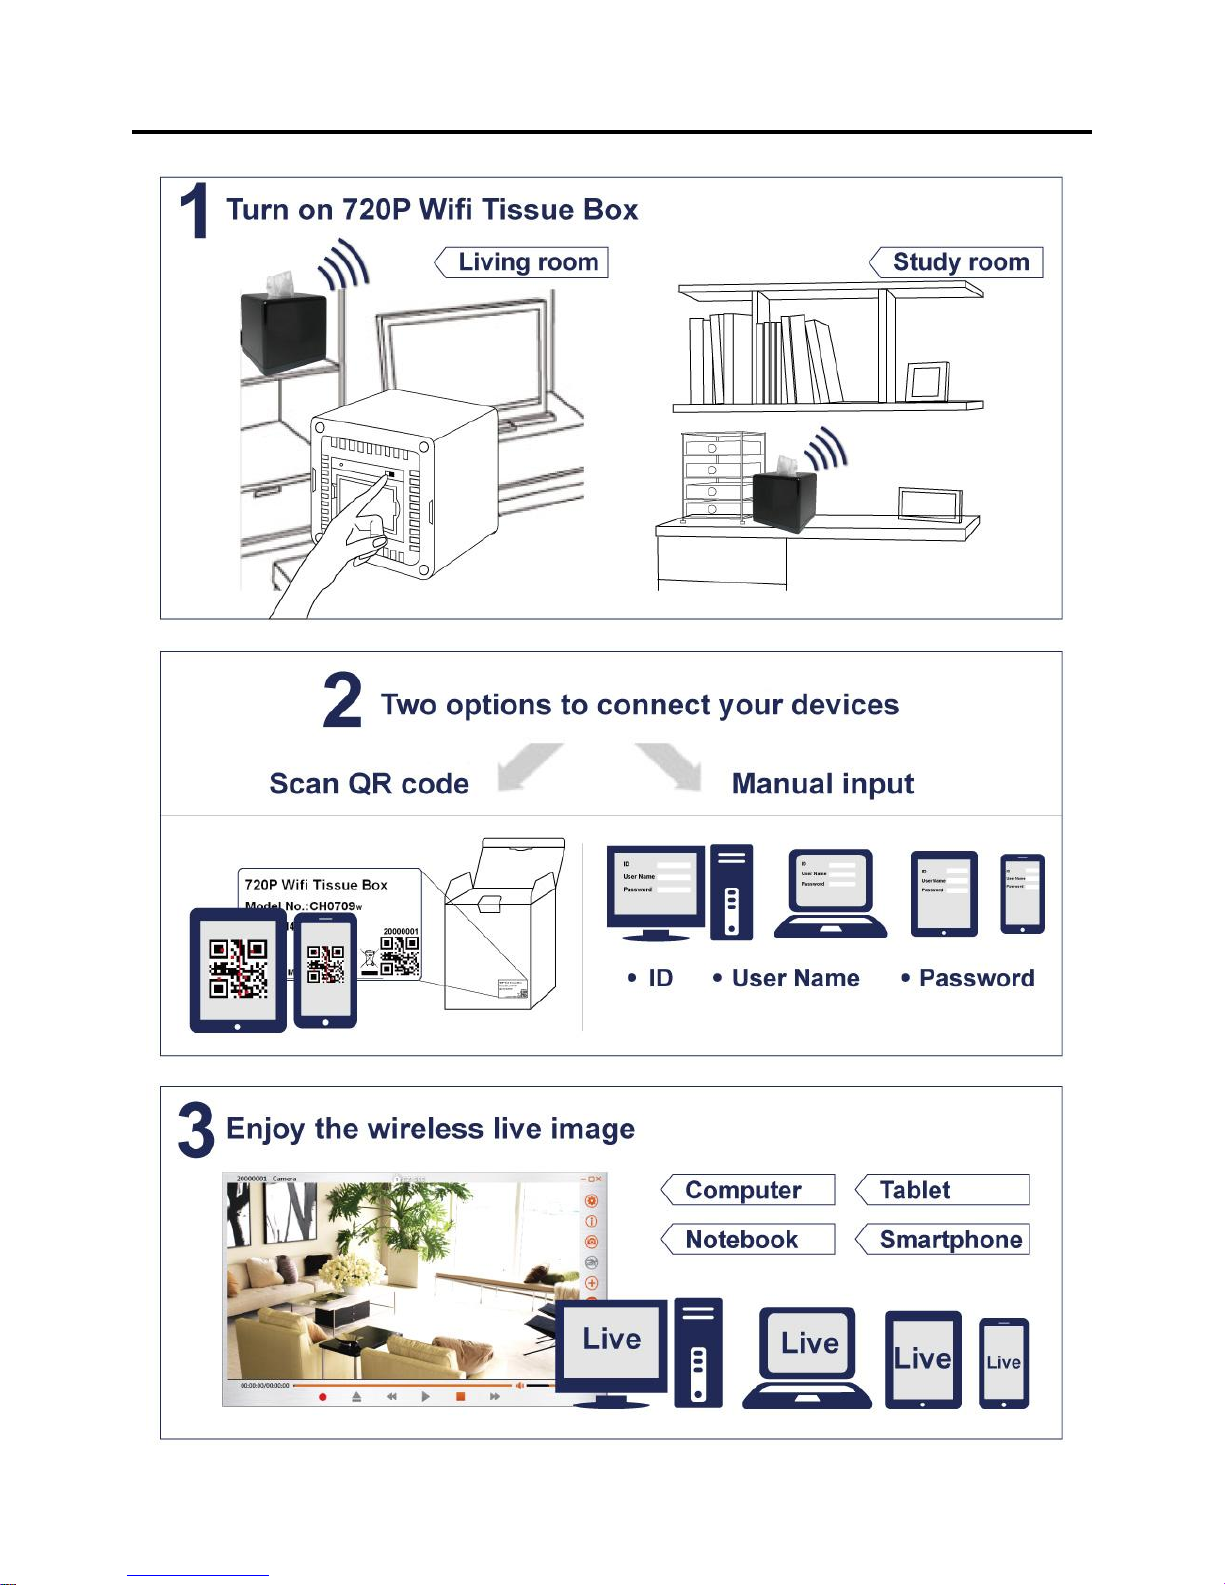
Quick Start Guide
Page 5
- 4 -
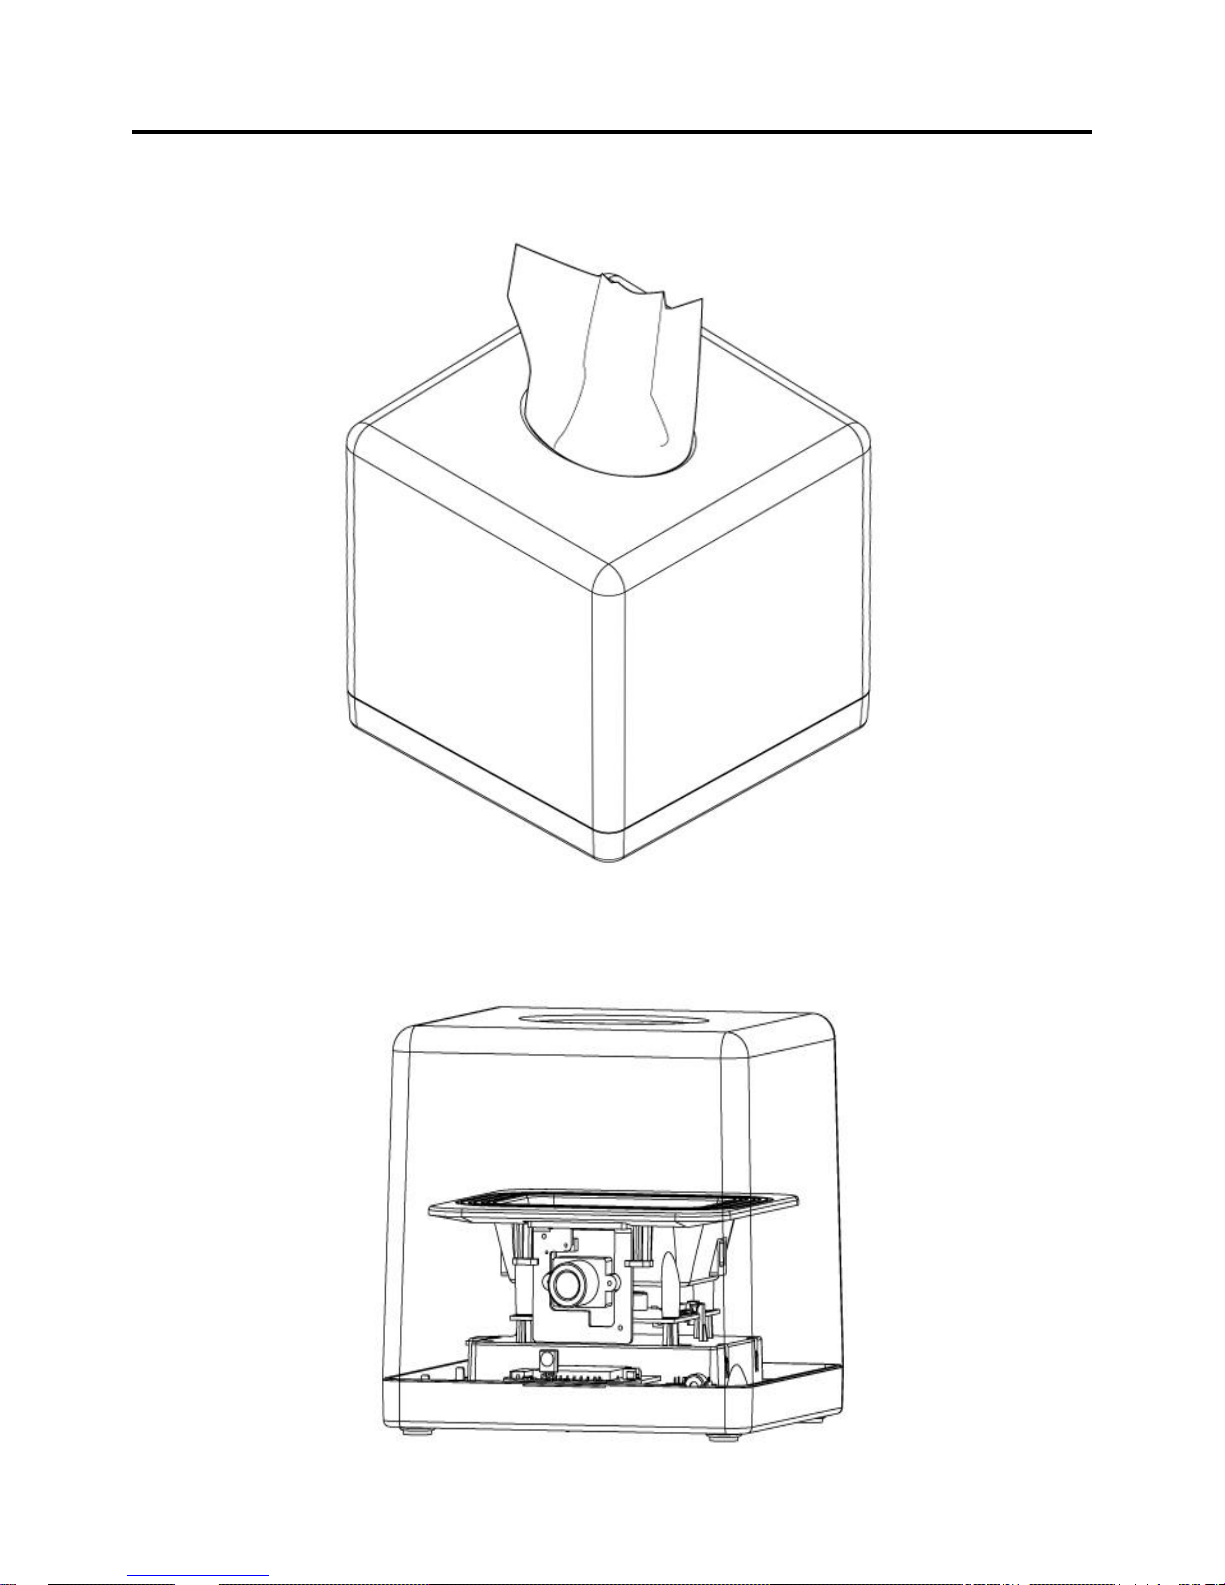
Diagram
Appearance
Perspective
Page 6
- 5 -
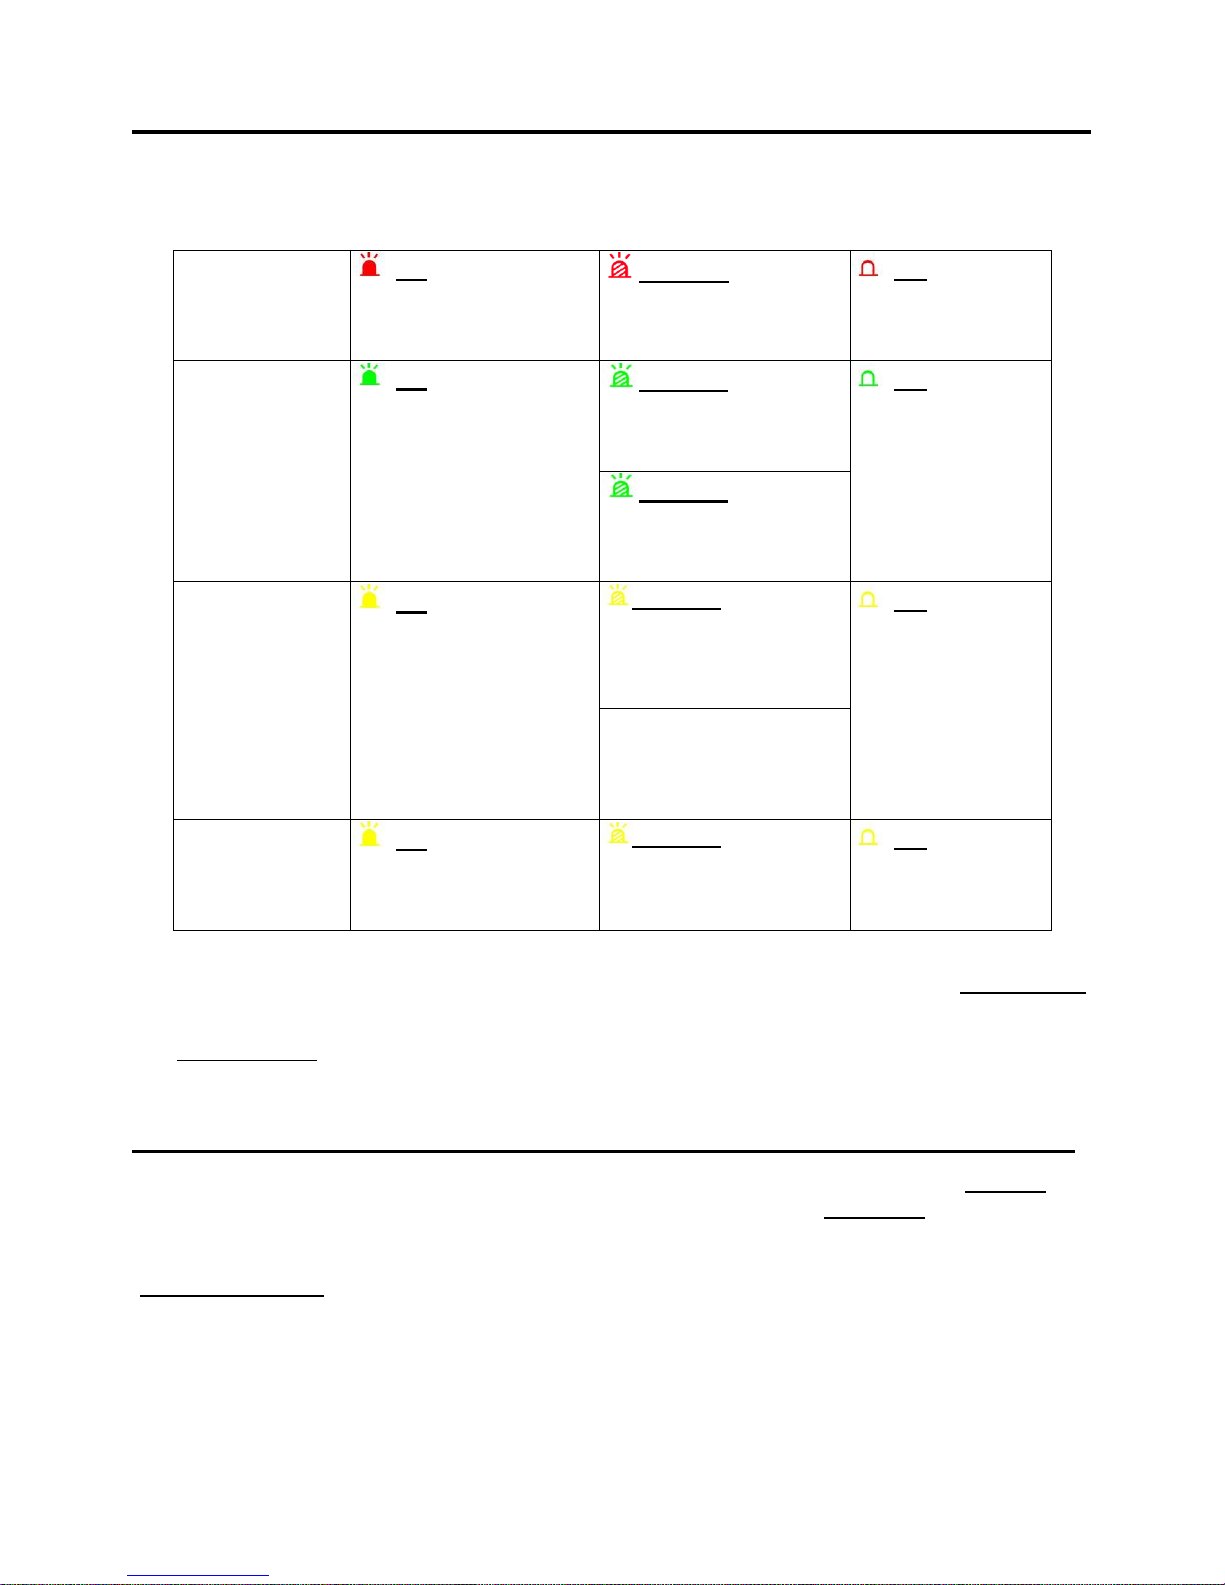
LED Indicator Status
* LED will light up when you turn the power switch to "ON", and then LED will follow below
behaviour,
Power Indicator
(Red LED)
On
1
Power on:
P-to-P Mode
Blinking 2
Slow Blinking (1s) :
Internet Mode
Off
3
Power off
SD Card
Indicator
(Green LED)
On
System ready and Micro
SD card is working
normal
Blinking
Fast Blinking (0.25s) :
SD Card Full (FS mode)
Off
Micro SD card is
abnormal or not
working
Blinking
Slow Blinking (1s) :
Recording
Battery Indicator
(Yellow LED
Device: on)
On
Powering or Battery full
of charge
Blinking
Fast Blinking (0.25s) :
less than 20% (around)
battery power left
Off
N/A
Slow Blinking (1s) :
more than 20%
(around) battery power
Battery Indicator
(Yellow LED
Device: off)
On
Powering
Blinking
N/A
Off
Battery full of
charge
Notice:
1. The Power Indicator (Red LED) will always "ON" if the CH0709c is working as P-to-P mode.
2. The Power Indicator (Red LED) will "Blinking (once a second)" if the CH0709c is working as
Internet mode.
3. When device power off, the Red LED will off.
How to Charge The Battery
Connect the provided power adapter with the cradle. The charging time is around 3 hours and
the green LED will be on. The battery, after fully charged, can last for 6.5 hours at least under
continuous recording without wifi transmission. However, the battery power will be dramatically
reduced when recording with IR LED especially at night as well as with Wifi transmission
(around 3-4 hours). Under PIR motion activation or power saving mode, 720P Wifi Tissue Box
can last for longer.
* NOTE: Under low temperature conditions, the battery will have a shorter life than normal.
* NOTE: Please use the bundled power adapter only. Damage which is caused by other power
adapter will be beyond warranty.
* NOTE: For better performance it is recommended to charge the battery once every 3 weeks.
* NOTE: please re-charge the battery to full when receiving CH0709c.
Page 7
- 6 -
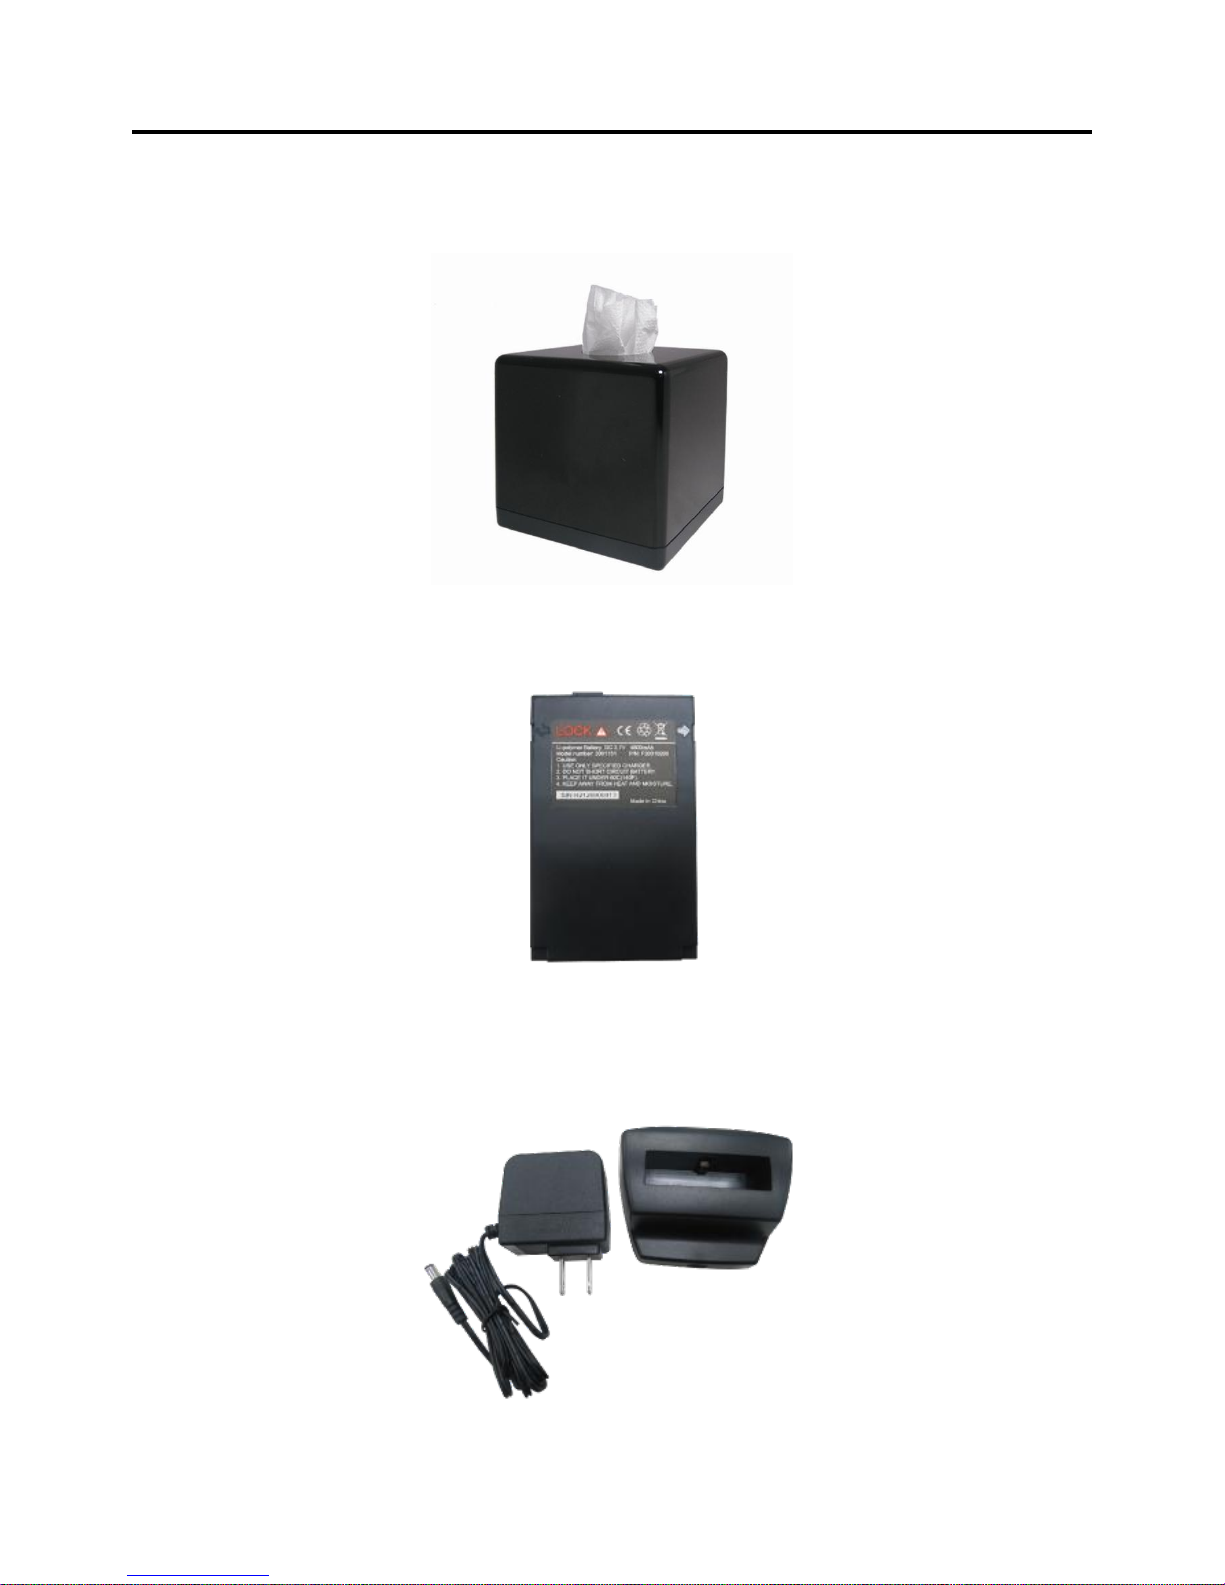
Package Contains
CH0709 Main Unit x 1
3.7V 4800mA Li-polymer Battery x 1
Power Adapter & Cradle x 1
Page 8

- 7 -
Compatible Storage
In order to work properly, below micro SD card brands are highly recommended.
* Apacer
* Toshiba
* Sandisk
* Kingston
Micro SD card Class 6 or above is highly recommended, and will have smoother footage.
Please format the micro SD card or SD card by the 720P DVR series first before recording.
IMPORTANT:
1. Please format the memory card by tissue box first before recording.
2. Please put memory card inside the storage lot first before starting to use the
device.
3. Tissue box will turn off automatically under below situation.
No memory card put inside
Press menu button in playback mode
Out of OSD
Card full when storage mode is fullstop.
Schedule setting is “none”
Page 9

- 8 -
Software & hardware specifications on PC/mobile devices
To use the remote viewing on PC, we highly recommend you to have the following software and
hardware specifications on your PC.
Microsoft® Windows XP, Windows 7, Windows 8 (.NET Framework 3.5 higher)
CPU: 2.0GHz or higher (only support x86 and x64)
Memory: 1GB (up)
Display card: Independent display card and support DirectX 9.0 or higher.
To use the remote viewing on mobile devices, we highly recommend you to have the following
software and hardware with your devices.
iPhone 3GS or higher
iPad
iOS 5.1 or higher
Android 2.3 or higher
Page 10
- 9 -
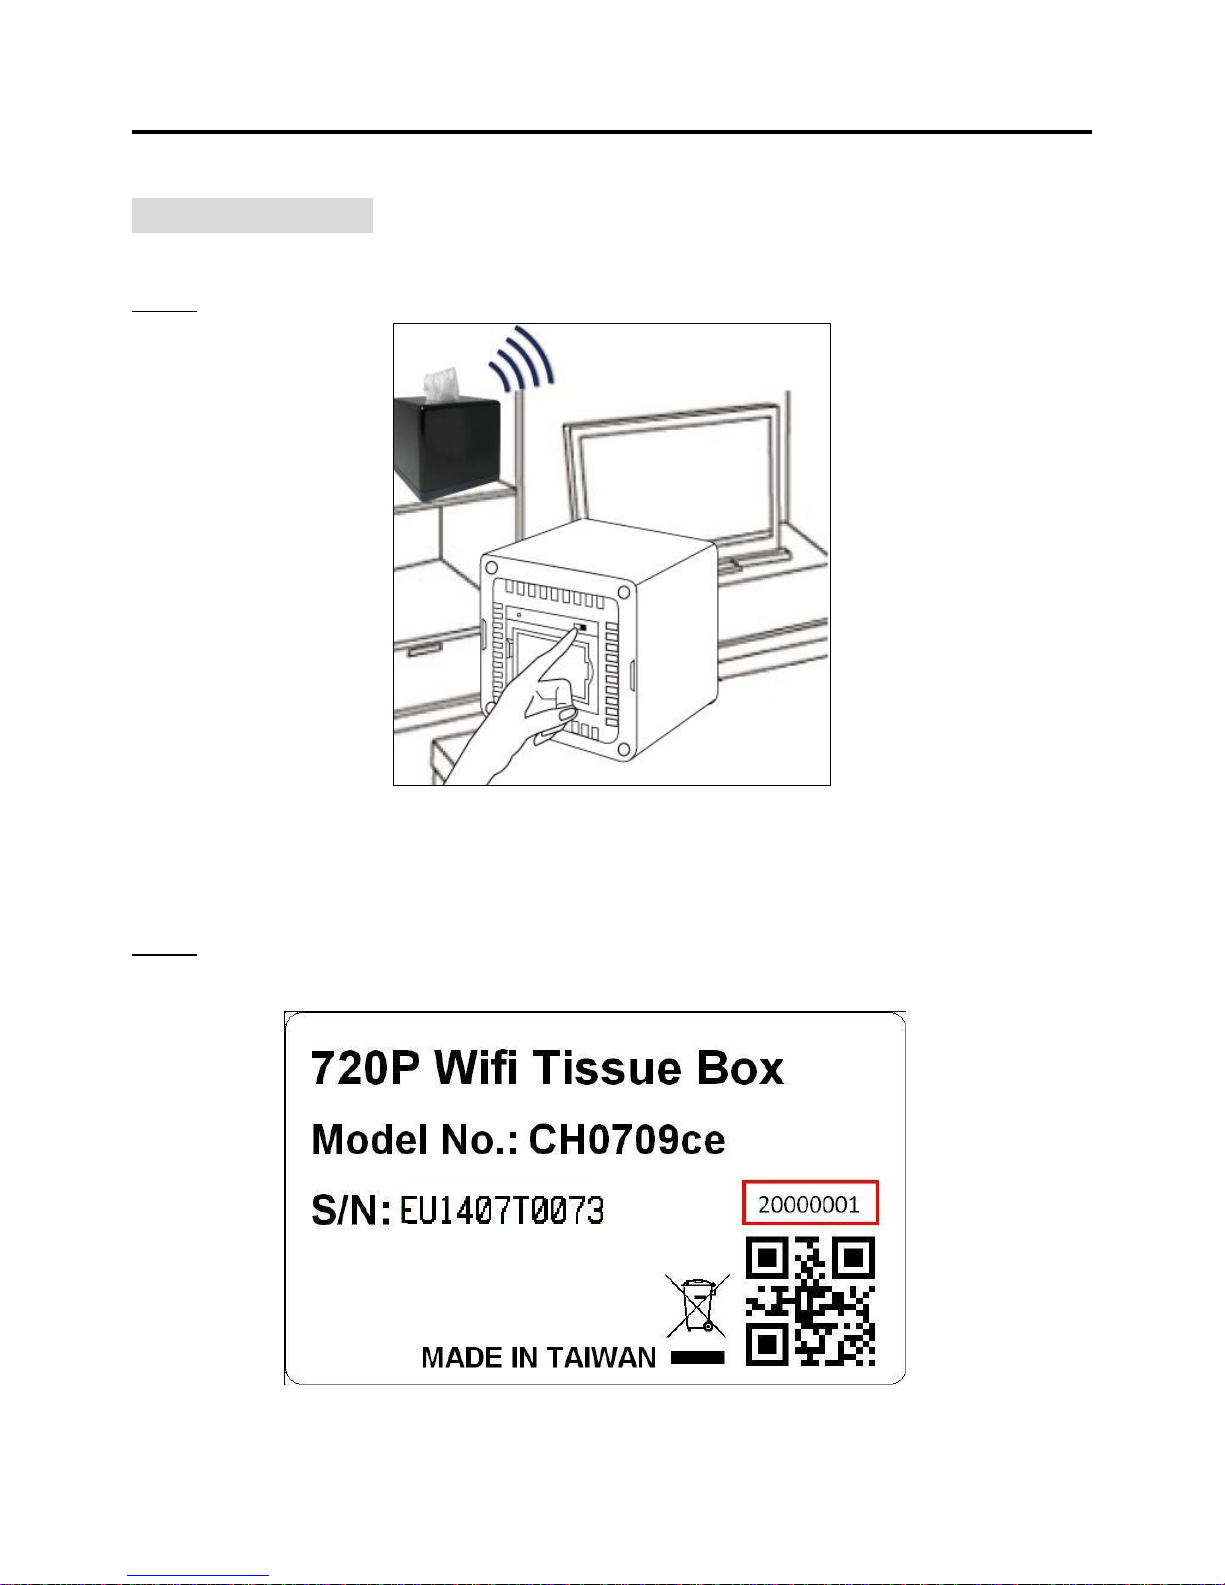
WiFi tissue box setup instruction
(I) Device setting
Step1. Turn on the device and wait 1 minute for WiFi module working.
Step2. Please check the ID number on the sticker outside the box (eg. 20000001).
Page 11

- 10 -
Step3. In your WiFi list, you will see the ID in your WiFi list. Please connect with the device
directly. Link the device with your PC or laptop. Default WiFi password of CH0709c is
888888888.
(1) Setup by PC or laptop
(2) Setup by Smart devices
Android iOS
Page 12
- 11 -
(II) EZ-SEE software instruction (on PC or laptop)
Note: PC or laptop need to have wireless network card.
Please install “EZ-SEE” software on your laptop / PC (be aware that PC or laptop should
have wireless network card). You will find the software shortcut on your desktop.
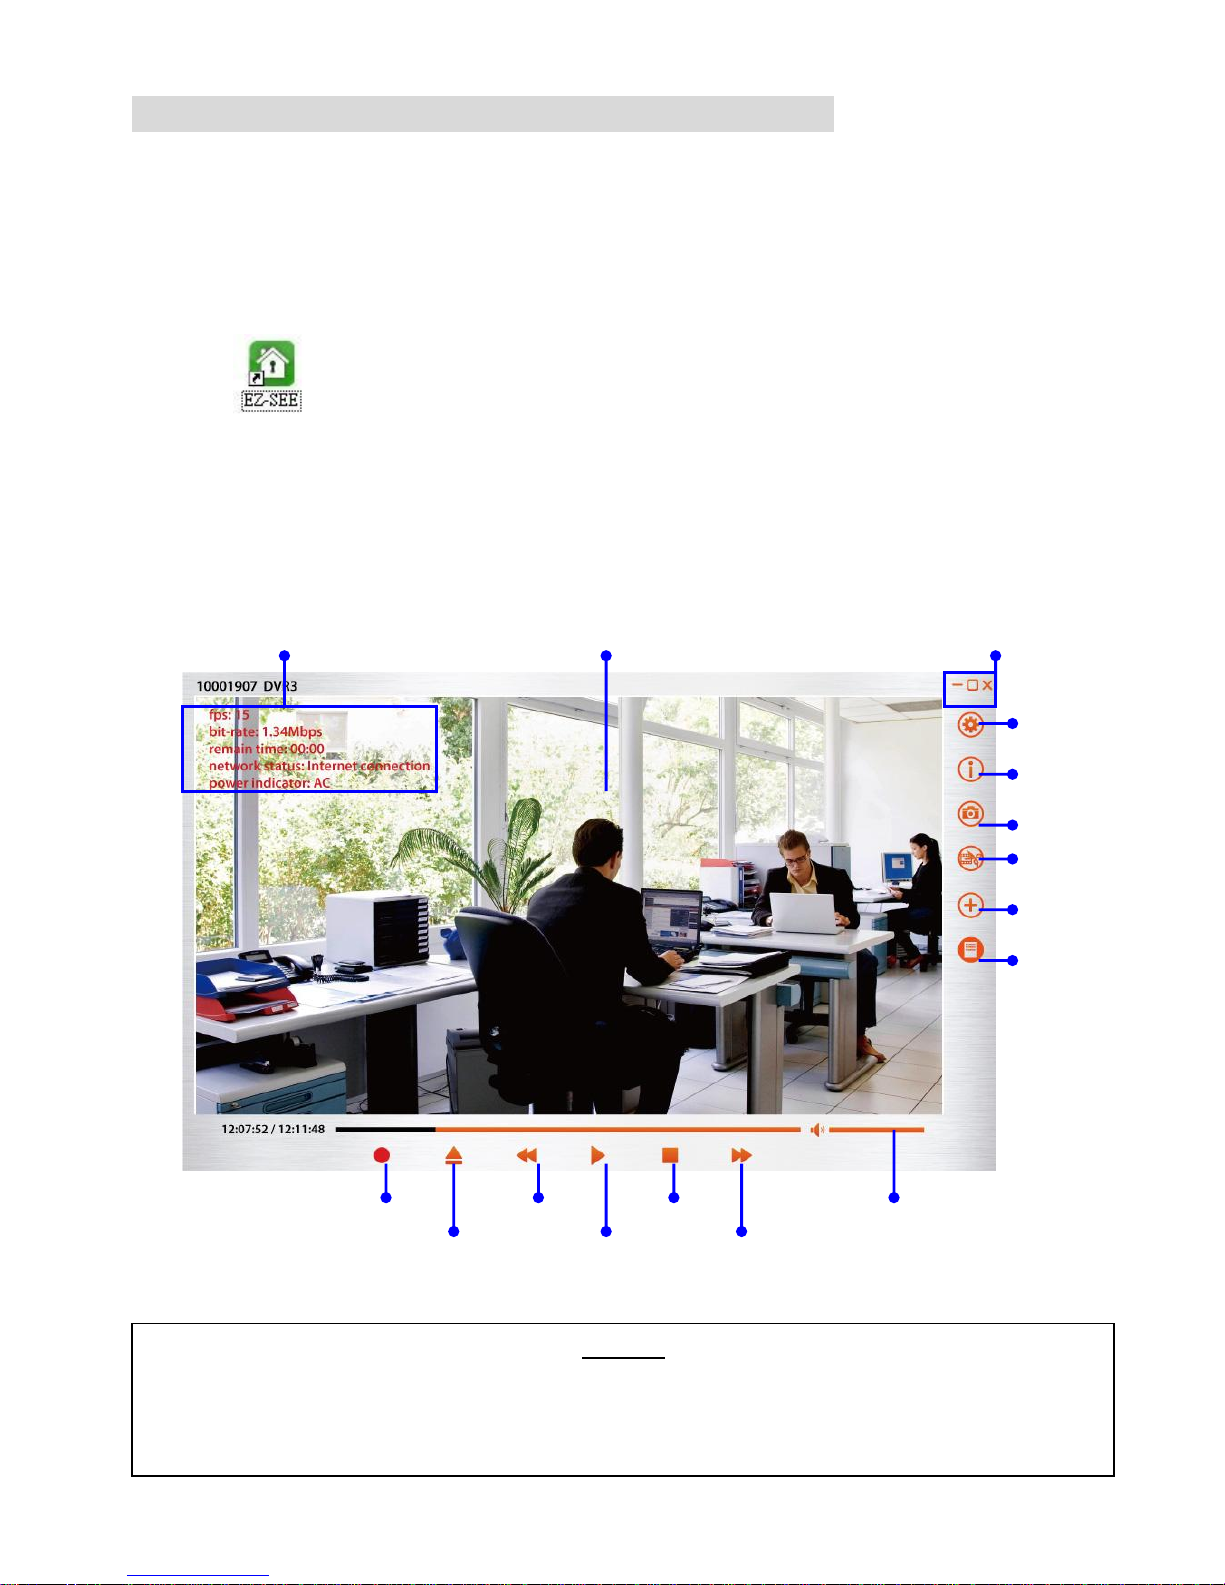
PC EZ-SEE Interface Overview
Camera Status Display Live view image Minimize/Full screen/Exit
Recording Fast Rewind Stop Volume
Open File Play Fast Forward
Caution!!
Home wireless security surveillance has risk. According to different location, it will cause the internet environment
occasionally unstable and further to fail connected, as well as, fail to receive immediate intruder alert message.
Therefore, please caution to use the wireless surveillance products.
Setting
Info
Snapshot
Video Cut
Camera List
Camera Status
Page 13

- 12 -
A. Network connection setting
(1)Point to Point Connection (Device connect with PC or laptop with wireless network
card directly)
Step1. Adding camera into list
a. Via Camera ID list.
When running the EZ-SEE PC software, there will a "Camera ID List" popup on the
screen. Click the "Camera ID" you would like to install on the list and confirm the
setting.
Enter the password of your device and press Confirm. Default WiFi password of
CH0709c is 888888888.
Page 14
- 13 -
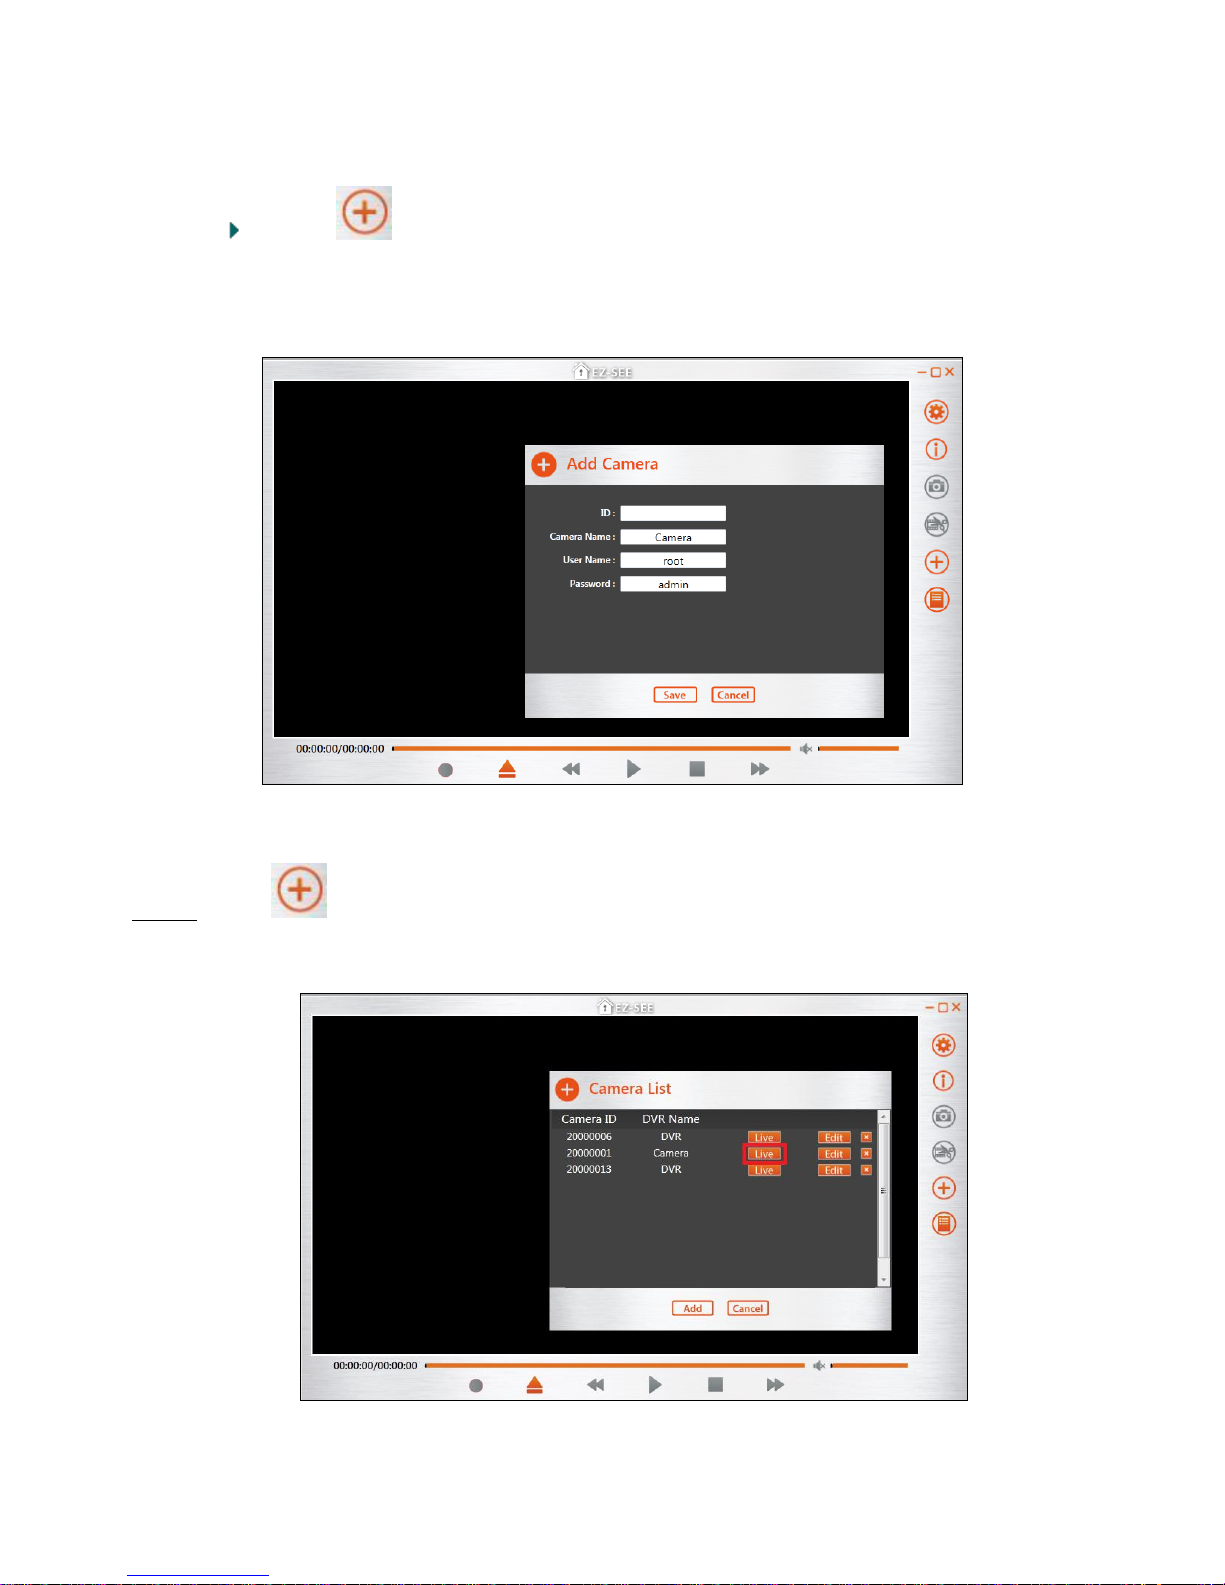
b. Manually input.
Press button in right side of EZ-SEE software. Below popup message will
come up. Input ID / Camera Name / User Name / Password and save the
information.
Step2. Press button again. Select the ID you would like to connect in the Camera list
and click "Live" for live-viewing.
Page 15

- 14 -
Step3. Software will link to CH0709c.
Step4. Point to point connection is done and remote live view is seen. You will see Network
status is “p2p connection”.
(2)Internet mode Connection (You can see remote live view of WiFi tissue box via router
by Internet mode connection)
Note: Point to Point connection need to be done first.
Step1. When Point to Point connection is done, a pop up message will come up to ask if you
would like to connect to internet for remote live-view. If selecting “Later”, pop up message will
come up in next Point to Point connection.
Page 16

- 15 -
Step2. When selecting “Yes”, EZ-SEE software will start to detect all available Wireless Router
and list as below.
Step3. Select the Router you would like to connect with CH0709c and password pop up
message to come up.
Step4. After password confirmation, EZ-SEE software will start internet mode setting for
CH0709c with the router you chose. Below popup message will come up for your
reconfirmation. Please press “Confirm”.
Page 17

- 16 -
Step5. When all setting is done, live view will stop and screen will be black. CH0709c will
reboot for WiFi setting. Please wait 1-2 minutes.
Step6. Press button. Select the ID you would like to connect in the Camera list and click
"Live" for live-viewing.
Step7. You will see Network status is “Internet connection”. Internet mode setting is done.
Step8. You can "Stop" the live-viewing when clicks stop button .
Page 18

- 17 -
B. Other setting on EZ-SEE software on PC or laptop
Camera Status Display Live view image Minimize/Full screen/Exit
Recording Fast Rewind Stop Volume
Open File Play Fast Forward
(1) Setting
EZ-SEE settings
Setting
Info
Snapshot
Video Cut
Camera List
Camera Status
Page 19

- 18 -
Snapshot – the snapshot file saved link. You can press to change file saved
place. If you select when opening the folder after saving file, folder will be
opened for you to check file easily. If selecting , folder will not be opened.
Video – the video cut file saved link. You can press to change file saved
place.
Backward – You can set up the time period to be jumped when you press
button. Default setting is 5 seconds.
Alarm – Switch to enable the intruder alert, which will send a warning
message when movement is detected. Switch Auto-liveview to show
remote live view automatically when alert is received.
If you choose Yes, live view will keep on. If you choose No, reminding message
will show for you to reconfirm again.
Tool tips –If selecting , icon name will be visible. When selecting ,
icon name will be hidden.
Page 20

- 19 -
Camera settings
Note: Network connection need to be done first. If connection is failed, you will not
see this page.
You can do Remote Configuration to adjust the camera parameters wirelessly.
Camera parameters
Adjustable value
Framerate
1, 2, 3, 4, 5, 10, 15
Resolution
HD, D1
PIR post recording
2 min, 4 min, 6 min, 8 min
Storage mode
Overwrite, Fullstop
LED indicator
ON, OFF
Recording audio
ON, OFF
"OFF" will mute the video recording.
Buzzer
ON, OFF
"OFF" will mute the setting sound.
Page 21

- 20 -
Reset to Factory Default -- Factory default will be loaded if Reset button is pressed.
Below dialog will show to reconfirm that you want to load default. Press Reset to
reconfirm.
Format Storage – micro SD card will be formatted if Format button is pressed.
Below dialog will show to reconfirm that you want to load default. Press Format to
reconfirm.
Date and Time – Press Setup button and you can set up date and time. You can
manually key in the date time column. When arrow is pressed, calendar will show
up. You also can choose the date from calendar to quick date setting.
Page 22

- 21 -
Schedule settings
In this page, you can set up recording schedule for CH0709c.
(2) Info
Camera Information – it will provide information about antenna signal strength,
connection mode of CH0709 and the connecting process log records. If CH0709 is
not on line, this page will not show.
Page 23

- 22 -
EZ-SEE information – Software version can be found in this page.
(3) Snapshot
You can quickly take a picture at any moment (live view mode and playback mode) by
clicking button.
Snapshot file will be stored in the folder which you set in general setting.
(4) Video Cut
During playback, you can edit the video length by press button.
Select the start time you would like to set and press .
The video will keep being playback and will blink.
Press again and the time you select will be end time of cut video.
Cut video file will be stored in the folder which you set in general setting.
Video cut function is only available for files recording via CH0709c.
Page 24

- 23 -
(5) Camera List
– live view connection.
– ID number can be checked here. Camera Name, User Name and
Password can be changed here.
– all changes will be saved and then dialog will close.
– all changes will not be saved and then dialog will close.
Page 25

- 24 -
– delete the camera from camera ID list
– new camera added.
– all changes will not be saved and then dialog will close.
(6) Camera Status
When you click , below information will show on your live view screen.
Fps and bit rate – the streaming process status. Both data are high means the
internet condition now is performing well.
Remain time –how much time left for recording on your SD card
Network status – p2p connection and internet connection
Power indicator – AC or battery power status
Page 26

- 25 -
(III) EZ-SEE APP Instruction (On Smart Device)
Search “EZ-SEE” app on Play Store and Install it on your device.
Android iOS
EZ-SEE APP Interface Overview
Caution!!
Home wireless security surveillance has risk. According to different location, it will cause the internet environment
occasionally unstable and further to fail connected, as well as, fail to receive immediate intruder alert message.
Therefore, please caution to use the wireless surveillance products.
Page 27

- 26 -
A. Network connection setting
(1) Point to Point Connection (Device connect with PC or laptop with wireless network
card directly)
Step1. Adding camera into list
Start EZ-SEE App and press ADD button in left top corner.
Android iOS
a. By scanning QR code.
Press SCAN button and scan QR code. You can find QR code on the sticker
outside the box.
Page 28

- 27 -
Android iOS
After scanning, EZ-SEE App will link to CH0709 directly
b. By manually input.
Input ID / User Name / Password and Press Save button in the right top corner.
You can find ID number on the sticker outside the box (eg. 20000001). Default
setting of User name and Password is root/admin.
Page 29

- 28 -
Android iOS
After setting, you will see ID in camera list. Press the ID you would like to connect.
Android iOS
APP will connect to CH0709c.
Page 30

- 29 -
Step2. Point to point connection is done and remote live view is seen. You will see Network
status is “ ”.
(2) Internet mode Connection (You can see remote live view of WiFi tissue box via router
by Internet mode connection)
Note: Point to Point connection need to be done first.
Step1. 1st time setting--
When Point to Point connection is done, a pop up message will come up to ask if
you would like to connect to internet for remote live-view. Press OK and then WiFi
setting will proceed. If selecting “Later”, you can set up WiFi in manual later.
Android iOS
Page 31

- 30 -
After confirmation, below dialog will come up for router details setting. When
select Router SSID, all available Wireless Router and list as below.
Select the router you would like to connect and enter the password.
For Android version, below popup message will come up. EZ-SEE APP will
start internet mode setting for CH0709c with the router you chose.
For iOS version, camera list will show after your setting. Select the camera
you would like to connect. EZ-SEE APP will start internet mode setting for
CH0709c with the router you chose.
EZ-SEE_2000011
Family
Wireless AP
Room
Page 32

- 31 -
Step2. Later setting—
Press Menu in the left top corner and select WiFi Setup.
Android iOS
Select the router you would like to connect and enter the password. Press the
Setup button in right top corner to finish setting.
Android iOS
Page 33

- 32 -
EZ-SEE App will start setting connection with router and CH0709. When finish
setting, dialog Done will come up and please press OK.
Android iOS
Step3. Internet mode connection is done and remote live view is seen. You will see Network
status is “ ”.
Page 34

- 33 -
B. Other setting on EZ-SEE software on PC or laptop
Android iOS
When EZ-SEE App runs, you will see 2 buttons in the top.
Left Side: Add – camera adding as per previous instruction
Right Side: Menu –You will see below function button.
Android iOS
Page 35

- 34 -
(1) Delete
Select the camera ID you would like to delete (eg.20000011).
Press "Done" to complete the setting.
Android iOS
(2) Configure EZ-SEE
Dial Call – Set up phone number as urgent contact call
Snapshot pictures – The number of pictures are taken when you press the snapshot
button. Maximum setting is 5 pictures.
Android iOS
Page 36

- 35 -
(3) Configure Camera
Note: Network connection need to be done first. If connection is failed, you will not
see this page.
Select the camera you would like to set up
Android iOS
You can do Remote Configuration to adjust the camera parameters wirelessly.
Android iOS
Page 37

- 36 -
Camera parameters
Adjustable value
Framerate
1, 2, 3, 4, 5, 10, 15
Resolution
HD, D1
PIR post recording
2 min, 4 min, 6 min, 8 min
Storage mode
Overwrite, Fullstop
LED indicator
ON, OFF
Recording Audio
ON, OFF
"OFF" will mute the video recording.
Buzzer
ON, OFF
"OFF" will mute the setting sound.
Date and Time – Press Setup button and you can set up date and time. You can
manually key in the date time column and also can adjust value by pressing “+” and
“–“. After setting, please press Confirm.
Android iOS
Page 38

- 37 -
Format Storage – micro SD card will be formatted if Confirm button is pressed.
Below dialog will show to reconfirm that you want to load default. Press OK to
reconfirm.
Android iOS
Reset to Factory Default -- Factory default will be loaded if Confirm button is pressed.
Below dialog will show to reconfirm that you want to load default. Press OK to
reconfirm.
Android iOS
Page 39

- 38 -
User Name, Password and Camera
Please press Confirm after setting.
Android iOS
You will see the Firmware Version of main board and WiFi board in the bottom of this
page.
Page 40

- 39 -
(4) WiFi Setup
Please refer to page 31.
(5) Alert Setup
Intruder Alert—when a movement is detected, camera will be triggered and instantly sends
an alert message if you enable this function.
Select the camera you would like to set up
Android iOS
Enable Alert and press “Confirm” or “Cancel” to return to camera list
(6) Alert Record
The Alert Record shows the events of intruder alerts activities
Android iOS
Page 41

- 40 -
When camera ID is triggered and sends intruder alert, in camera list, the green light
indicates a warning about a current triggered event and flashes every 0.5 sec. Once click
in to see live-view, green light will vanish.
Android iOS
(7) About
You will see App version
Android iOS
Page 42

- 41 -
(8) APP EZ-SEE Interface Overview
Speaker – Press it to mute the voice.
Snapshot – Press it for instant motion capture.
Camera Status, below information will show on your live view screen.
FPS and Bit Rate – the streaming process status. Both data are high means the
internet condition now is performing well.
Remain time –time left for recording on your SD card
Power indicator – AC or battery power status
Connection mode – and .
Dial Call – Press this button and it will make a call to setting number. You need to press
dial button again to reconfirm call will be made.
Reverse
Page 43

- 42 -
Reverse -- live-view will be displayed in 180 degree format
Page 44

- 43 -
Zoom in, Zoom out
When live-viewing, gently put your index finger and thumb on the screen, slide outward
direction at the same time to enlarge a specific area:
There is a small bar on the left while zooming (magnitude: 4.0 is maximum)
Zoom out gesture
Page 45

- 44 -
Specification
Dimension
135*135*128 mm
Operation Temperature
0 ºC ~ + 50 ºC
Video Resolution
HD (720*1280) / D1 (720*576 PAL / 720*480
NTSC) @30fps (not in Wi-Fi and Motion mode)
Power Supply
Li-polymer 4800 mAh or 12 DC input
Video Compression
H.264
Recording Frame Rate
1, 2, 3, 4, 5, 10, 15 fps
Video format
AVI
Recording Storage
SD card (up to 64G)
Antenna Gain
13dBm @ 6Mbps
10dBm @ 54Mbps
Receiving Sensitivity
90dBm @ 6Mbps
72dBm @ 54Mbps
Audio Recording
Yes
Audio Input
Condenser Microphone
Power Consumption (recording status)
nominal 4.0W without LEDs on
PIR Post Recording
2, 4, 6, 8 minutes
Video Storage Mode
Full-stop or Overwrite
Angle of View
120º x 96º x 72º
Low-lux Environment
Supported
Wifi Standard
802.11b/g/n
Wifi System Memory
32MB SDRM / 8MB Flash
 Loading...