

Page 1
CAM-U7
Digital Camcorder
User’s Manual
HD VIDEO
720p(1280X720)
* Please read the user's manual and
understand all functions before use.
* Please keep the warranty card after
writing down purchasing date and
purchasing place.
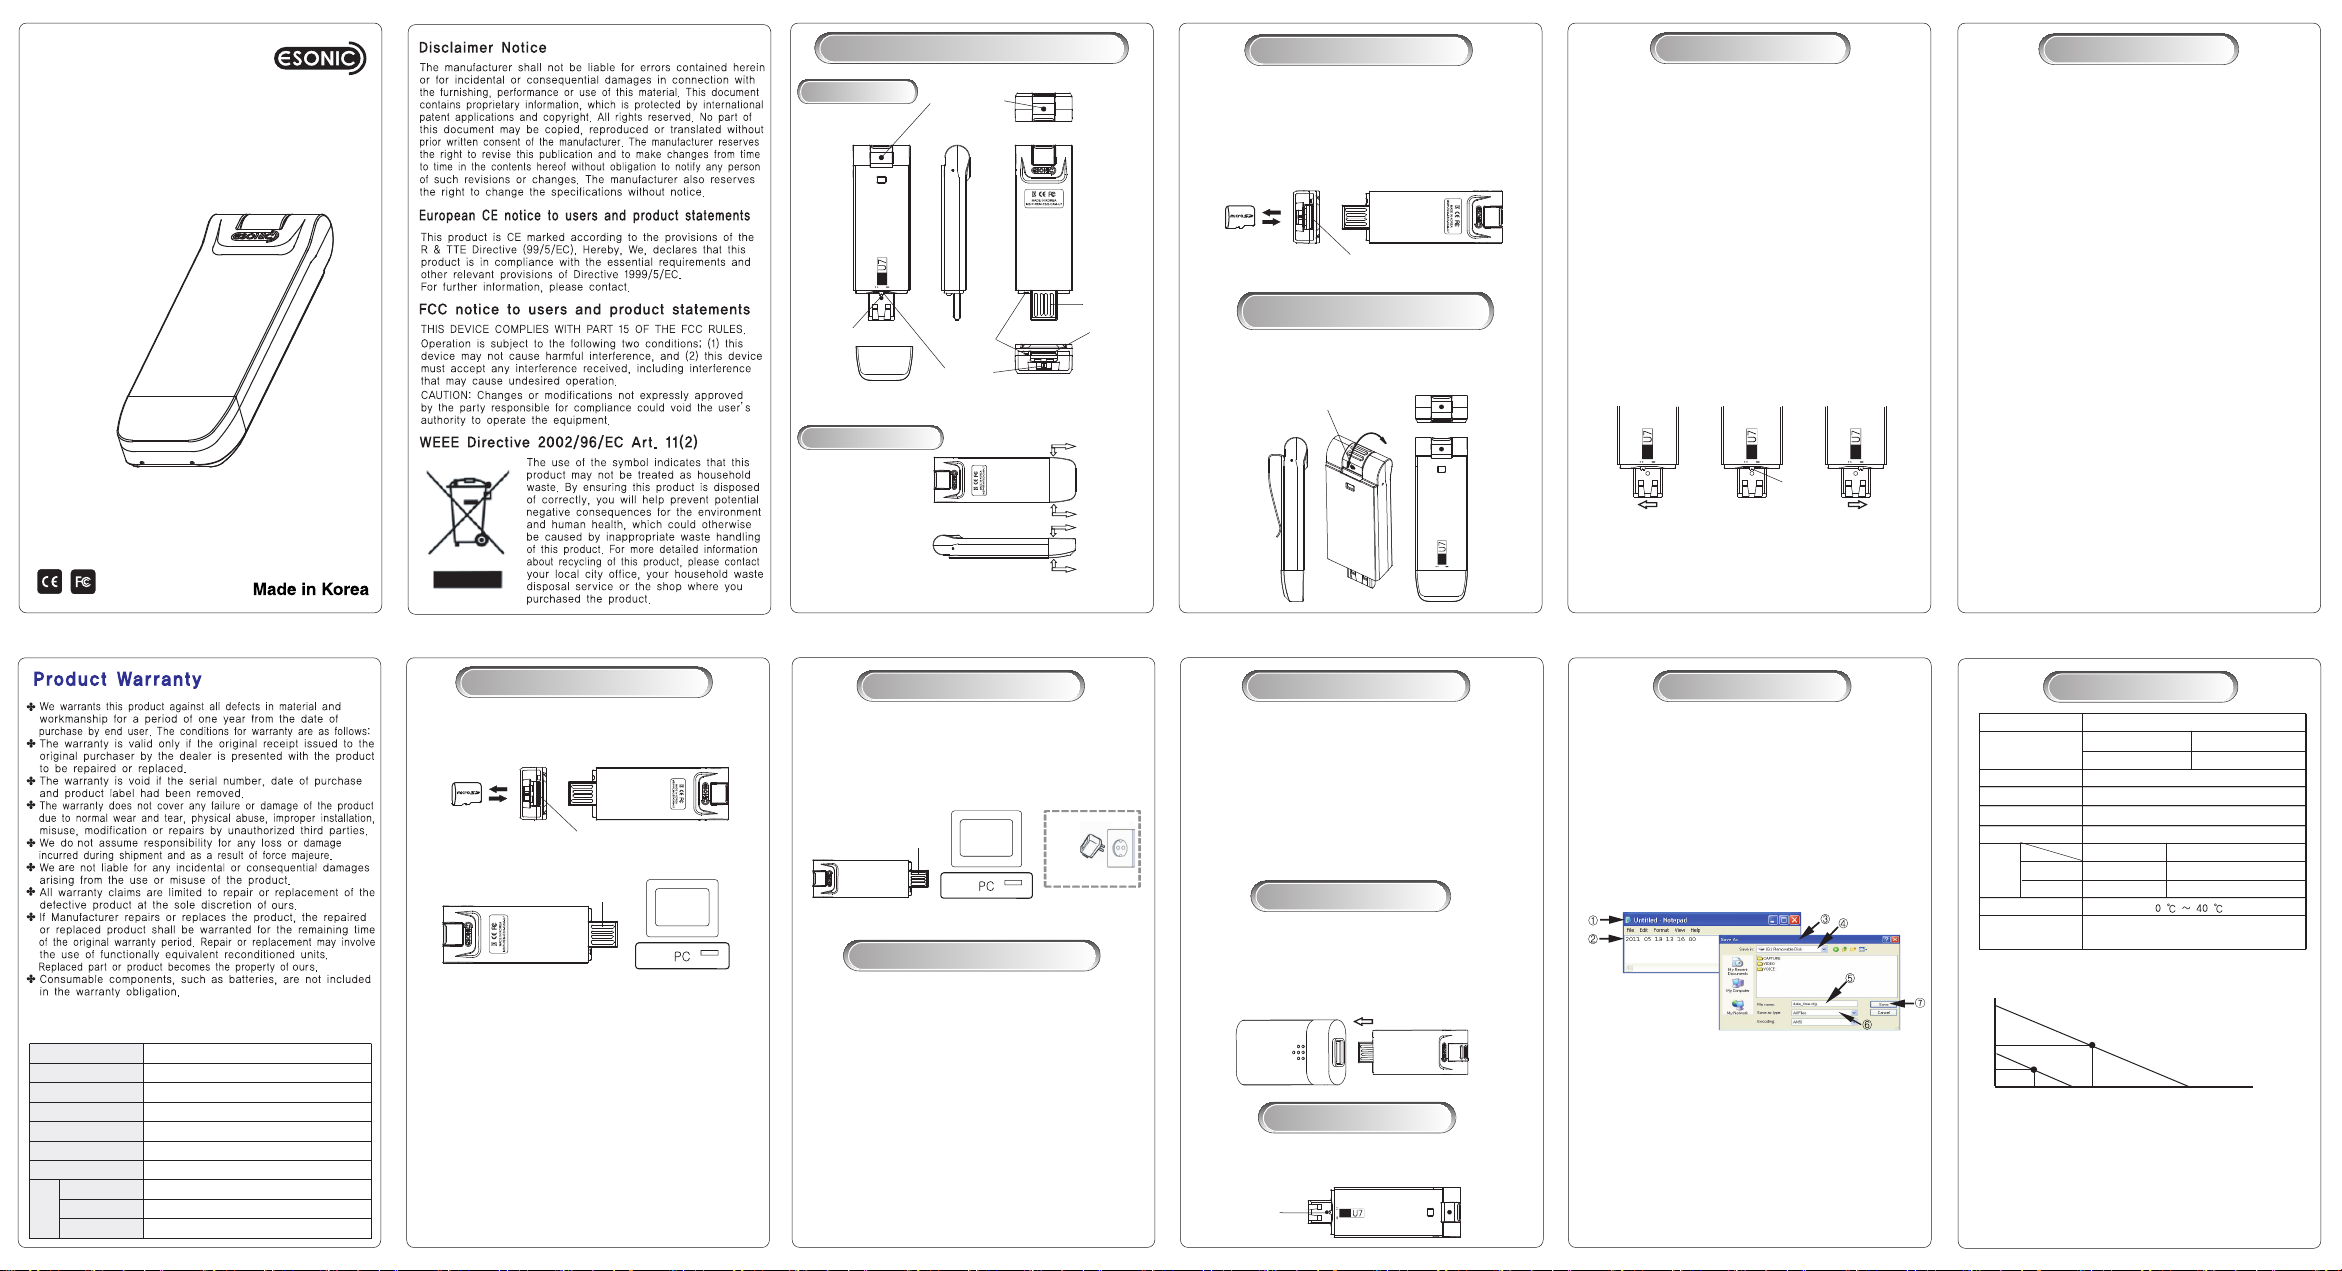
Name of Each Part
Main Body
Reset switch
USB cap
How to open USB cap
* Pull USB cap holding
the side like picture(1)
and cap is open easily.
* Please be sure to charge the battery before use
Rotating camera
(90° rotation)
Operating
lamp
Recording/
Power switch
Picture(1)
Picture(2)
USB terminal
Micro SD
card socket
Easy(
Difficult(△)
Micro SD Card
1) This device does not have internal memory and micro SD card
should be installed.
2) When you install micro SD card, push in micro SD card into
socket until locking like picture.
3) When you take micro SD card out of device, release the lock by
pushing micro SD card with nail and take it out of device with
light power.
Micro SD card
Camera direction according
to recording environment
* You can rotate camera horizontally or vertically according to
the installation place of device and install it in a stable condition.
Also, you can use it hanging on a pocket, etc. by combining clip.
Clip
○)
combination
(* Caution : once
you combine
a clip, please
note that it is
difficult to separate
the clip again.)
Camera
Micro SD
card socket
Rotation(90°)
In horizontal
recording
In vertical
recording
1) You can select continuous recording mode or motion detection
recording mode by recording switch.
2) Each mode can operate as below.
- Continuous recording :
HD video recording continuously without standby.
- Motion detection recording :
When there is no movement, it becomes recording standby and
when movement is detected, it records by the unit of 10 minutes.
* Motion detection recording for 4 hours does not mean the
extension of recording time. It is a function to make it stand by
for max 4 hours to detect movement.
ex.) when movement is detected during 2 hour recording standby,
battery value remains half and it can record for about 1 hour.
* Motion detection recording function can record necessary video
only and it can record for a long time according to memory in
case of connecting external power(battery pack, AC adaptor).
* Caution : if movement is little, recording could not be done.
3) When you change mode with recording switch during recording,
current recording ends and is saved automatically and a new
recording starts with changed mode.
Motion detection
recording mode
* Please be sure to install micro SD card before video recording.
* Please do not separate micro SD card during operation,
or that could be the cause of breakdown and malfunction.
Please separate micro SD card after recording switch is moved
to recording stop and LED operation lamp is turned off.
Recording mode
Recording
switch
Continuous
recording mode
Recording
stop
Video recording
Continuous recording
1) Move recording switch to continuous recording mode
(refer to the picture in recording mode)
2) When power is turned on, recording starts after indicating
battery value with red lamp.(lamp is off during recording)
3) When you move recording switch to the center during recording,
red lamp blinks rapidly five times and recorded video is saved
and power is turned off.
Recording file is saved by the unit of 10 minutes.
Motion detection recording
1) Move recording switch to motion detection recording mode
(refer to the picture in recording mode)
2) When power is turned on, recording starts after indicating
battery value with red lamp.(lamp is off during recording)
3) When motion is detected at the camera part, recording starts.
(It operates when movement at least more than 5 seconds is detected)
4) When you move recording switch to the center during recording,
red lamp blinks rapidly five times and recorded video is saved
and power is turned off.
* Motion detection file is recorded for 10 minutes and it moves to
motion detection recording mode and it repeats recording for
10 minutes when motion is detected again.
Remaining battery check
In starting recording, remaining battery is indicated by operation lamp.
1) Battery remaining 100% ~ 80% : red lamp is turned on for 3 seconds.
2) Battery remaining 80% ~ 30% : red lamp blinks for 3 seconds.
3) Battery remaining 30% ~ 0% : lamp is not turned on.
Cases that recording does not work
Recording does not work in case of following situations.
Please make sure of taking measures.
1) Case that battery is in need to be charged
Phenomenon : after recording starts, red lamp blinks rapidly and
power is turned off.
Solution :
2) Case that there is no memory
Phenomenon : After recording starts, red lamp indicates battery
remaining value and blinks rapidly and power is turned off.
Solution : please insert micro SD card in device.
3) Case that memory is full
Phenomenon : After recording starts, red lamp indicates battery
remaining value and blinks rapidly and power is turned off.
Solution : After connecting device to computer and moving
please charge the device by using computer or AC adaptor.
important contents to computer, please format memory or delete files.
Warranty Card
Product
Model
Purchasing date
Purchasing place
Tel.
Others
Period
Customer
Name
Address
Tel.
Digital Camcorder
CAM-U7
1 year
Playing on PC
How to Look at the recorded video on PC
1) please insert micro SD card into device.
Micro SD card
2) Please connect device into the USB port of PC.
3) When device is connected into PC, please press
"my computer -> removable disk"
4) Please go into VIDEO folder for continuous recording,
MOTION folder for motion detection recording and double-click
the file for playback.
* Memory more than 64GB can be played back in the O/S of
more than Windows 7
Micro SD
card socket
USB terminal
Moniter
1) Please charge battery by connecting device into the USB port
of PC or using AC adaptor(optional item) like following picture.
2) Operation lamp is turned on in red during charging and
red blinks when charging is completed.
3) It takes about 2 hours until charging is completed.
Optional
110~220V
USB terminal
Moniter
item
AC adapter
File saving, management, deletion
File saving
1) Continuous recording files are saved in VIDEO folder creating file
names from HD_0001 to HD_9999 with "AVI" extension in order.
2)
Motion detection recording files are saved in MOTION folder creating
file names from M_0001 to M_9999 with "AVI" extension in order.
* If middle part of file is blank in recording, recording file is created
between file and file.
ex.) If you record in case there are files of HD_0001, HD_0003,
HD_0002 file is created and if you record again, HD_0004 file
is created.
File management/file deletion
1) After connecting micro SD card into device, please connect
device into the USB port of PC.
2) It is possible to check and delete files saved in micro SD card
by using Windows Explorer, etc.
3) It is impossible to recover deleted files. Please delete after
saving important contents in PC.
It is possible to record for a long time by connecting device into
external power(PC USB port, AC adaptor)
(128GB micro SD card = max 16 hour recording)
1) After moving recording switch to continuous recording or motion
detection recording, please connect device into external power.
(It is unrelated to move recording switch after connecting device
into external power, but in terms of device structure, it is difficult to
move recording switch after connecting device into external power.
2) Because of recording by using external power, it can record
until memory is full regardless of battery capacity.
Using external battery pack
* When you use external battery pack we supply, you can record
about 3 hours in case internal battery is discharged and you
can record about 5 hours in case internal battery is fully charged
in the mode of continuous recording.
(In case of motion detection recording mode, max about 10 hour
recording standby is possible)
* External battery pack uses 3 pieces of "AAA" alkaline batteries.
External
battery
pack
Insert
Reset
In case of the malfunction of device, press the reset switch of device
slightly by using ball pen tip, etc., and it works properly.
Even though you press reset switch, saved files are preserved as they are.
Reset switch
Time Setup
1) Please insert micro SD card into device and connect device into PC.
2) Please create the file of time setup(date_time.cfg) in the root folder
of micro SD card by using the note pad of Windows, etc.
How to create the file of time setup
① Execute note pad.
② Enter date, time in order of "year month day hour minute second"
from the first column.
③ Click file and select "save as".
④ Select removable disk as a place to save.
⑤ Enter “date_time.cfg” as a file name.
⑥ Select "all file" as a file type.
⑦ Click "save" and close window for completion.
3) When you separate device from the USB port of PC, device power
is turned off and on automatically and device time is set up to the
time set at "date_time.cfg".
4) When time setup is completed, device power is turned off
automatically.
SpecificationLongtime RecordingCharging Battery
Item
Max. Video
Recording Time
Video Quality
Dimension/Weight
Storage Media
External Power
Battery
Life Time
Battery Pack
Operation Temp.
Accessories
* Motion detection standby time and remaining
recording time of battery
(Recording time)
5
26mm(W) x 82mm(H) x 13.5mm(D) / 22g
Continuous recording
Internal
battery
Internal +
Clip(basic), external battery pack(basic),
micro SD card(option)
4
3
2
A
1
1 2 3 4 5 6 7 8 9 10 (hrs)
ex.1) "A" point means that you can record for 1 hour after 2 hour standby
in case of using internal battery.
ex.2) "B" point means that you can record for 2.5 hours after 5 hour
standby in case of using external battery pack.
* Battery life time of internal + external battery is in condition that
device is fully charged.
* Recording time could be different according to the performance
of micro SD card.
* Memory more than 64GB can be played back at the O/S of more
than Windows 7.
* PC O/S : Windows 2000/XP/Vista/7/8 supported.
Specification
16GB : 2hrs 32GB : 4hrs
64GB : 8hrs 128GB : 16hrs
MJPG AVI 1280 X 720 Max 30fps
Micro SD Card
DC 5V 0.5A (Long-time recording)
about 2hrs
about 5hrs
B
Motion detection recording standby
max 4hrs
max 10hrs
** Standby time could be different
according to charging remaining,
battery capacity/performance.
(Standby time)
 Loading...