

Page 1
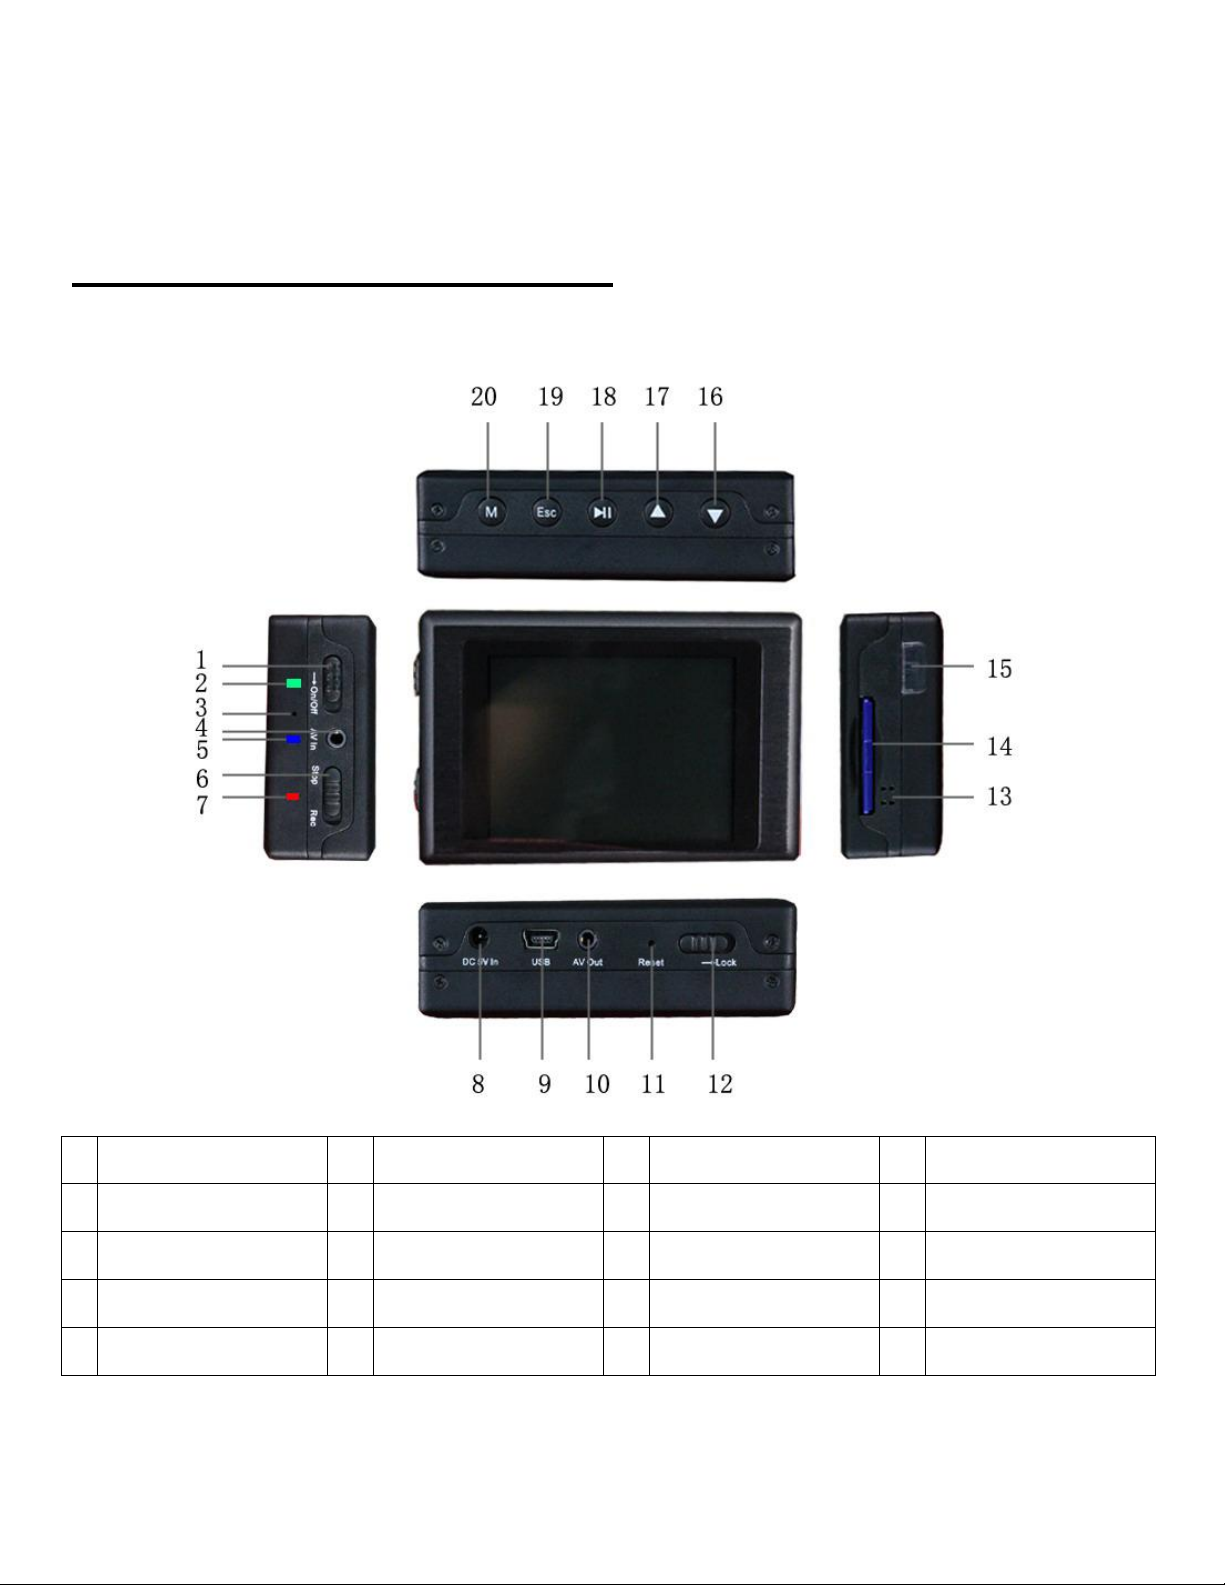
1
DVR508 Manual
1
Power On/Off
6
Stop/Record
11
Reset Button
16
Down
2
Charge LED
7
Power/Record LED
12
Button Lockout
17
Up 3 Internal Mic
8
Power Supply Input
13
Internal Speaker
18
Play/Pause/Enter
4
Audio/Video Input
9
USB Port
14
Memory Card Slot
19
Exit/Back
5
Low Power LED
10
Audio/Video Output
15
Remote Sensor
20
Menu
DVR Controls & Accessories
I. DVR
Page 2
2
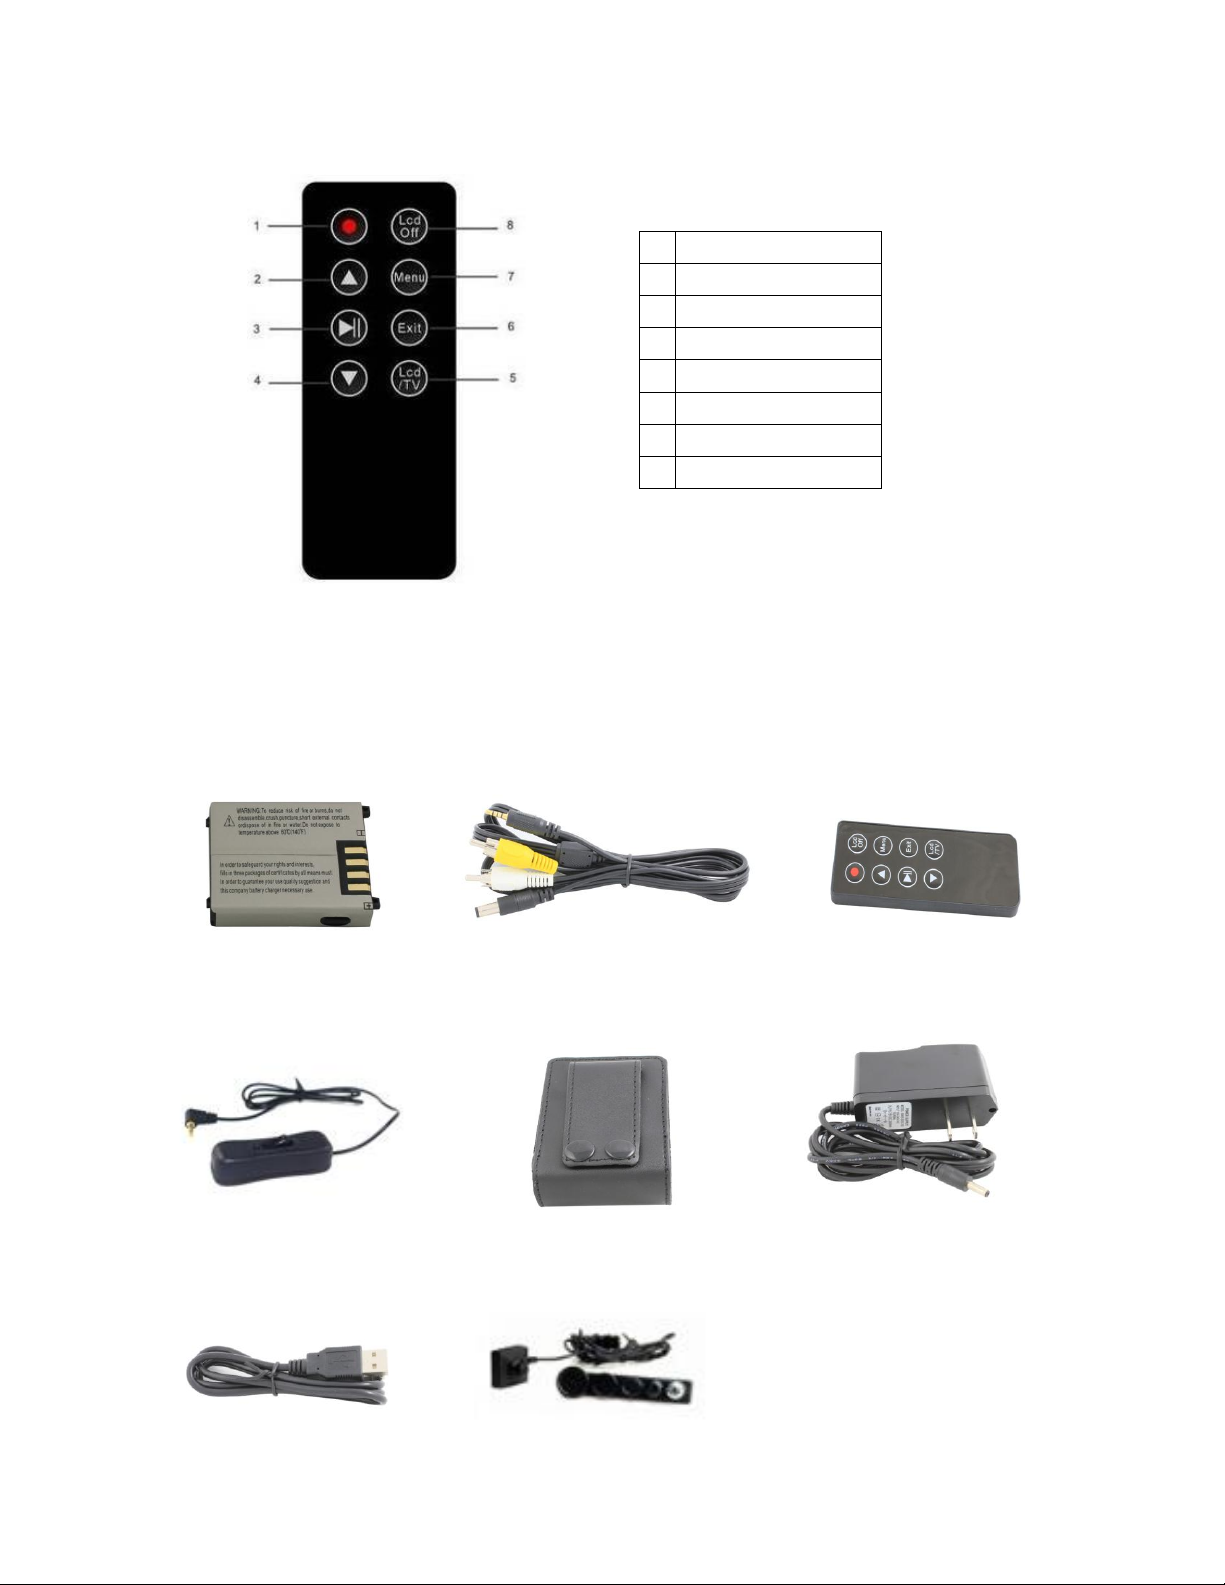
II. Remote Control
1
Record/Stop
2
Up 3 Play/Pause/Enter
4
Down
5
Output Selection
6
Exit/Back
7
Menu
8
LCD Off
III. Accessories
Battery Video & 5V DC Cable Remote Control
Wired Remote Carrying Case Power Supply
USB Cable Button Camera
Page 3
3
Basic Operation
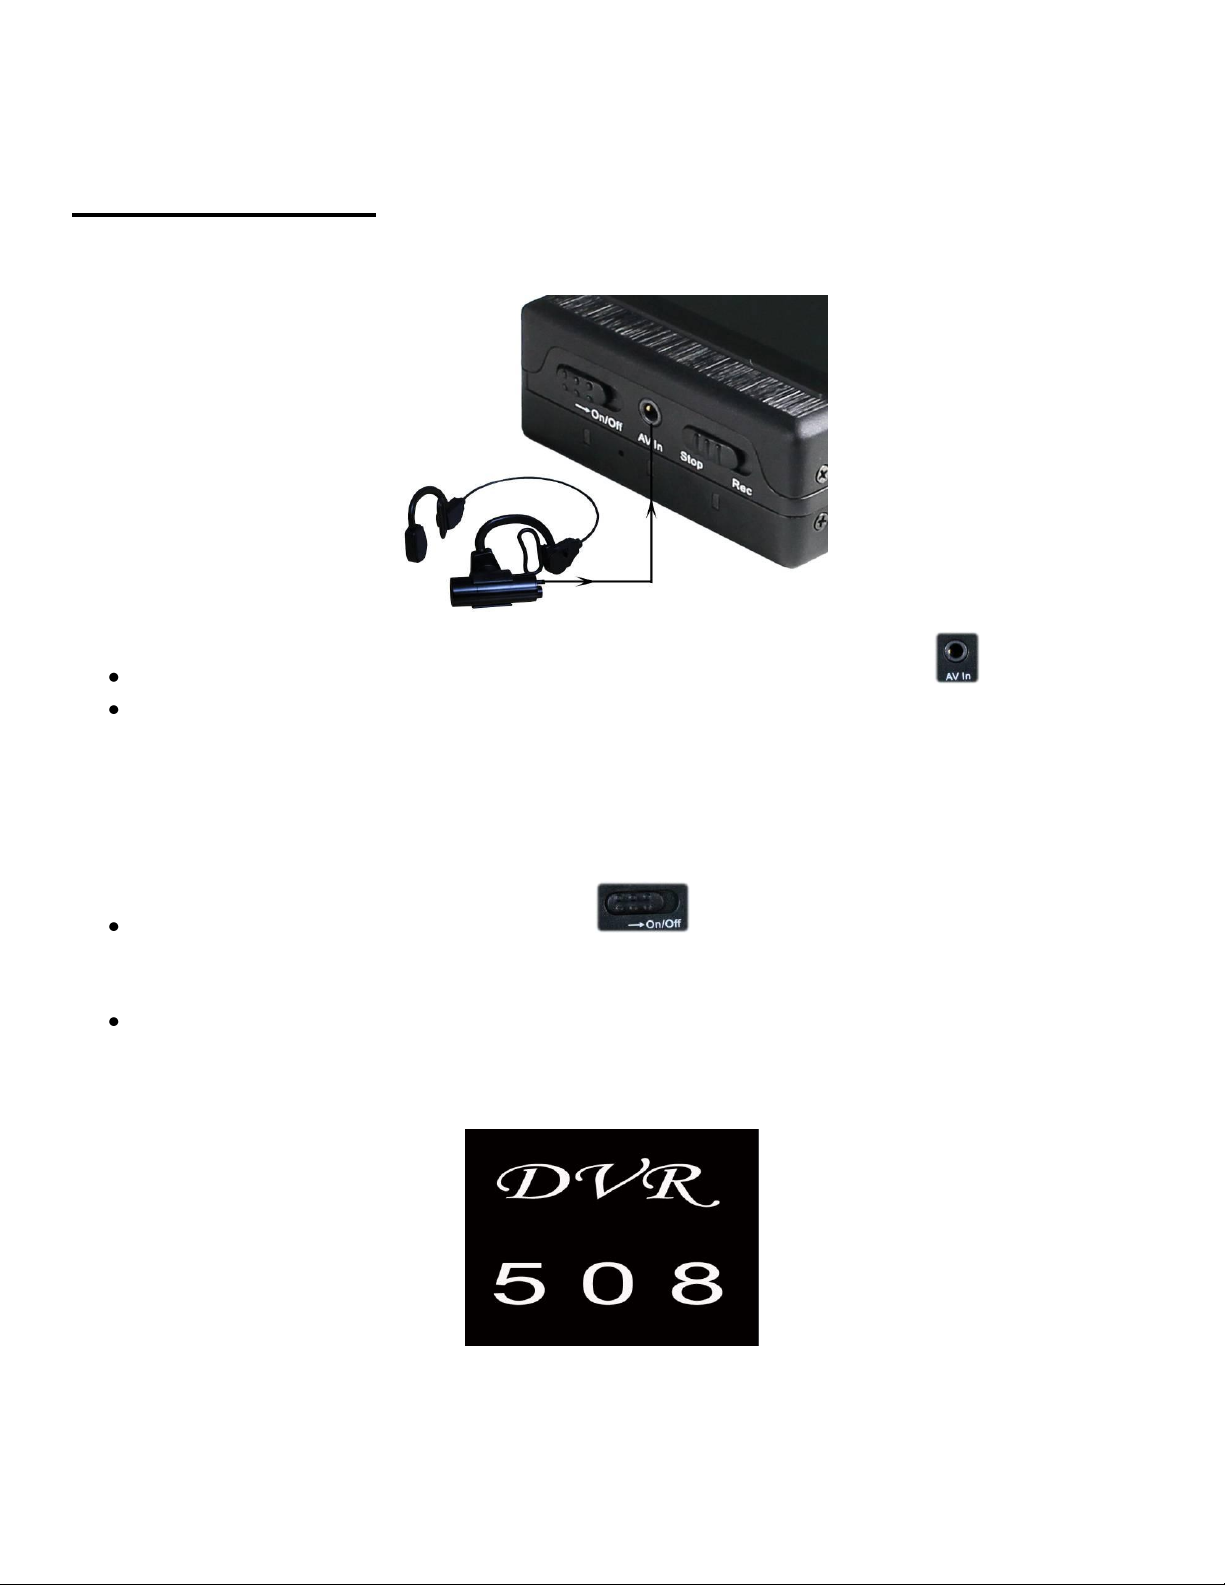
I. Connecting a Video Source
Use the included Button Camera: Plug the camera’s pin connector into the AV In .
Use the included Video Cable: Plug the cable’s pin connector into the AV In. Connect the cable to
another camera or video source using the RCA connections(yellow for video). The cable can also supply
5VDC(400ma MAX) of power to a compatible type camera.
II. Turning the DVR On & Off
To turn the device on, slide the On/Off switch forward and hold it in that position. The red
LED will power on and the screen will display the DVR508 splash screen(pictured below), at which
point the switch may be released.
To turn the device off, slide the On/Off switch forward and hold it in that position. The DVR508 splash
screen will appear before the screen turns off, at which point the switch may be released. Once
completely powered down, the red LED will also turn off.
Page 4
4
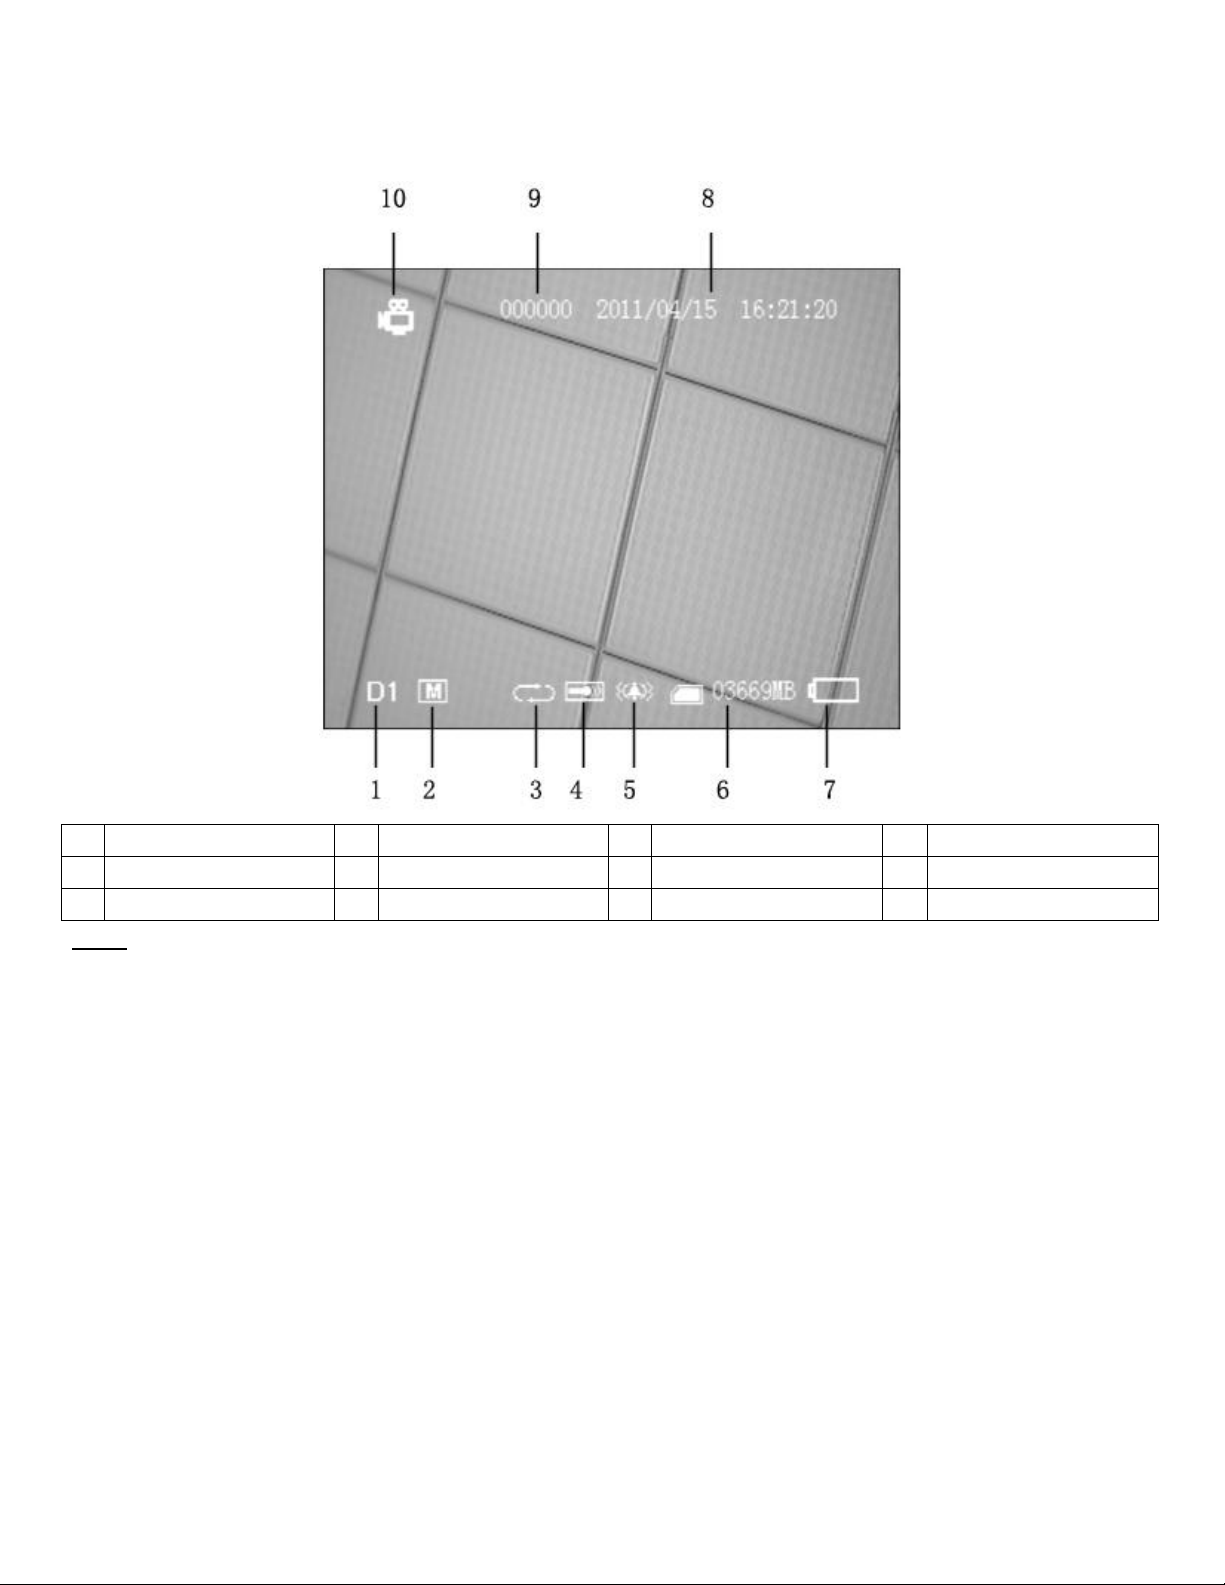
III. On Screen Display(OSD)
1
Resolution
4
Int/Ext Mic Selection
7
Battery Capacity
10
Recording Mode
2
Quality
5
Vibration On/Off
8
Date & Time Stamp
- - 3
Overwrite On/Off
6
Memory Capacity
9
Device Name - -
Note: The OSD may be toggled On/Off using either the Esc key on the DVR body or the Exit key on the wireless
remote.
Page 5
5
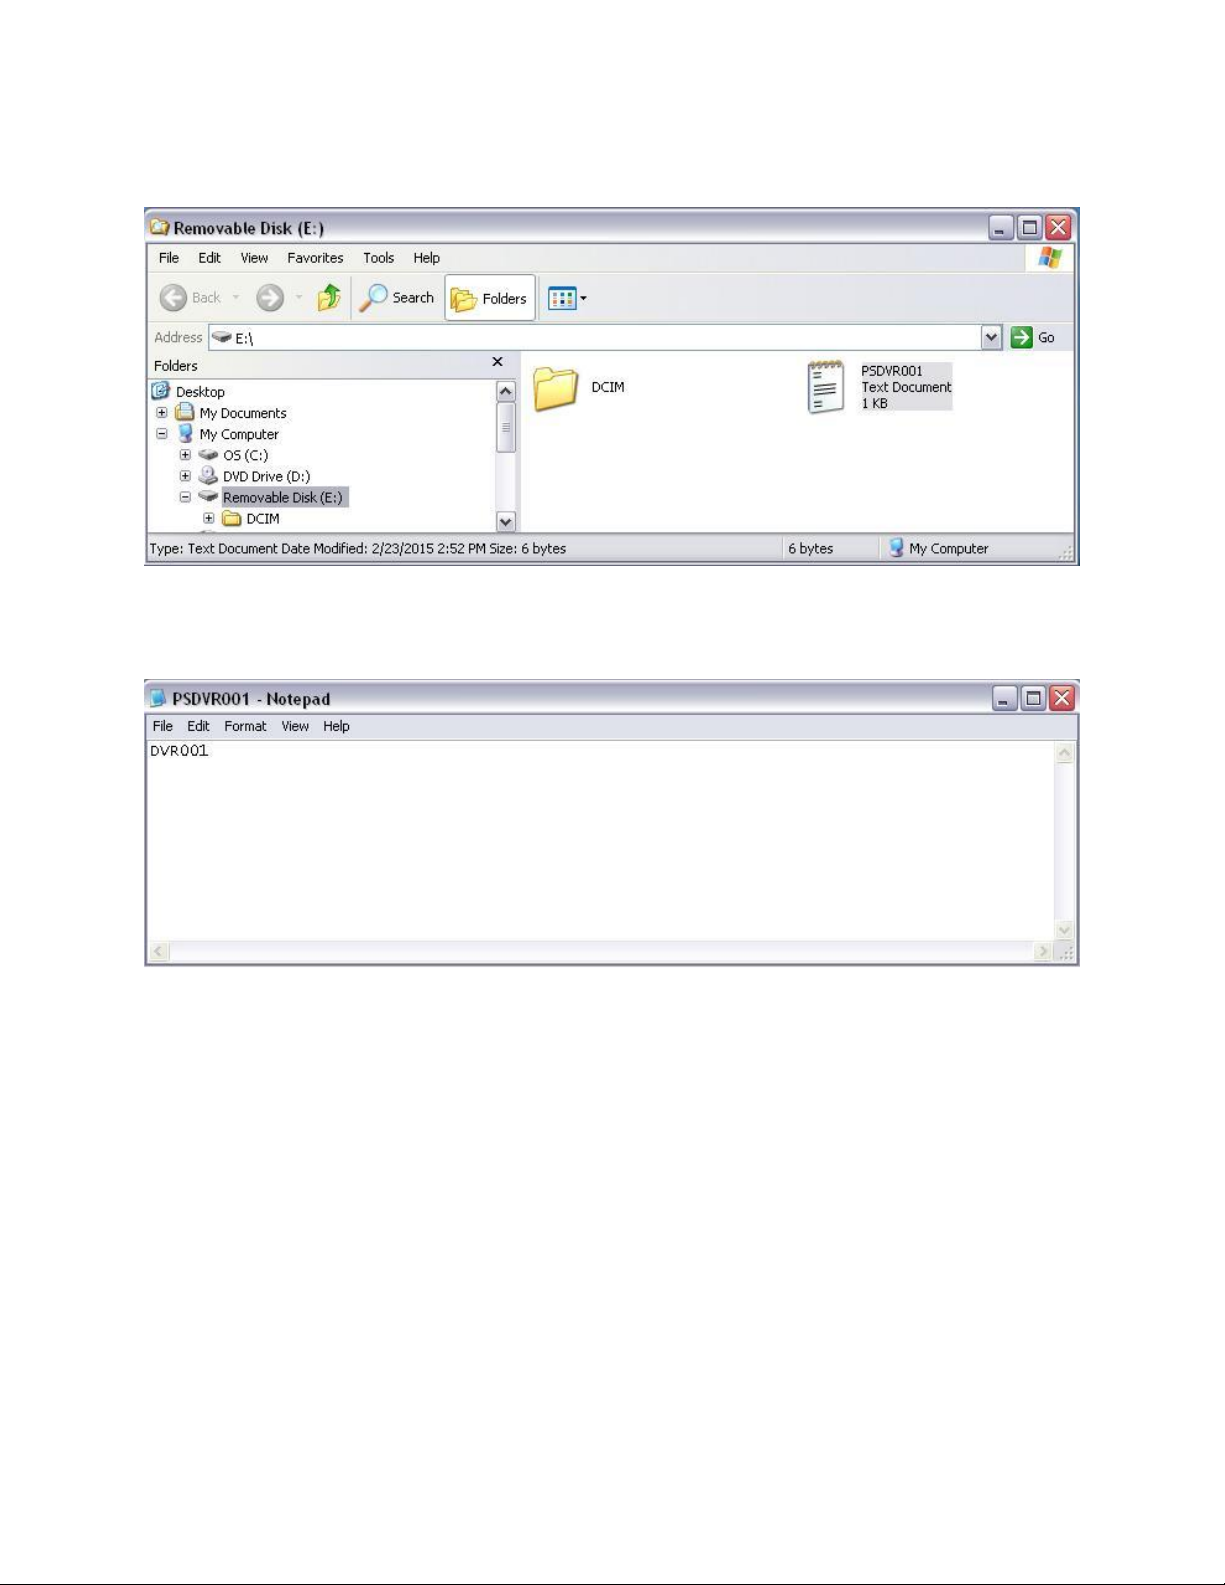
IV. Assigning a Device Name
1. Using Notepad or a similar program, create a text file on the memory card and name it PSDVR001.
2. Type the desired name in the text file. The Device Name may be up to 6 characters in length.
3. Place the memory card in the device and power it on. The device name will automatically be updated.
4. The device name will only show on the OSD when Timestamp is turned On in the Recorder Setting
menu.
Page 6
6
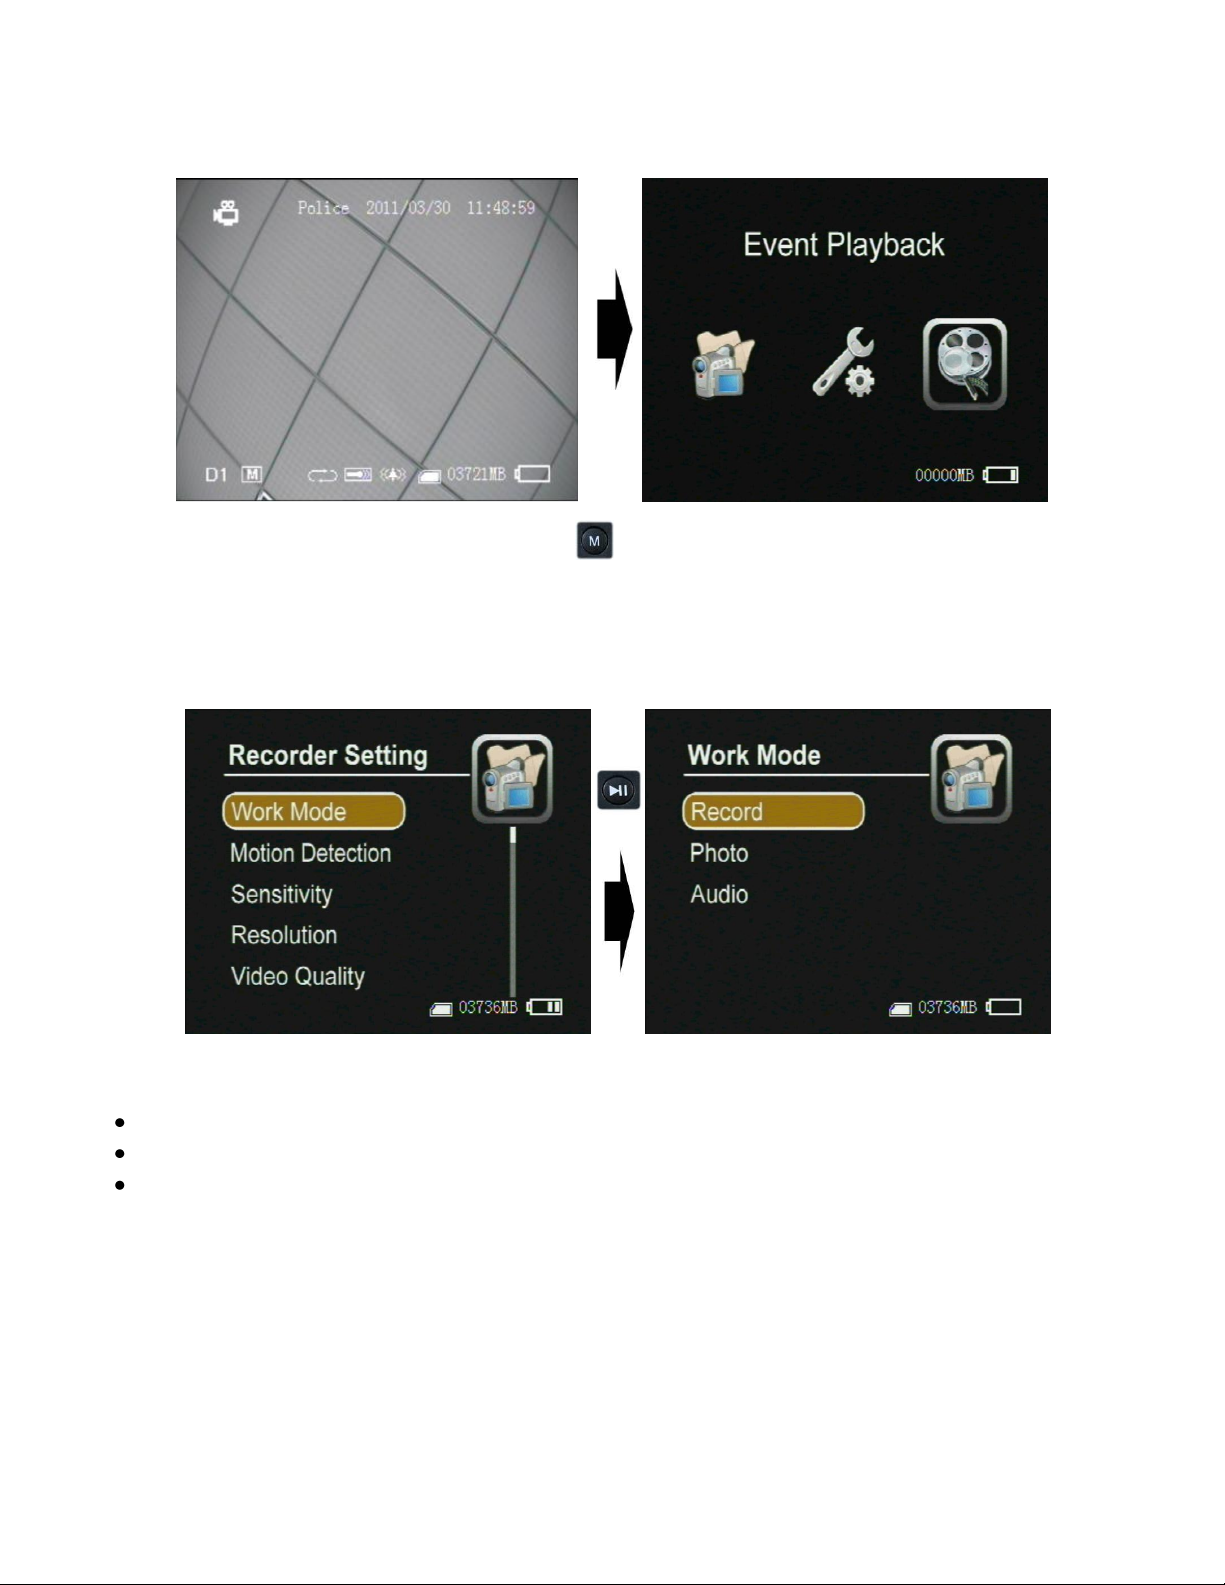
V. Menu Access
To access the device menus, press the Menu button . There are three sub-menus: Recorder Setting, System
Setting & Event Playback. See Device Menu & Settings section for a breakdown of each.
VI. Recording Modes
There are three recording modes on this device. To switch modes, access them under Work Mode in the
Recorder Setting menu.
Record - Video recording mode. Recordings will be saved as AVI files in the “Record Files” folder.
Photo - Still picture mode. Photos will be saved as JPG files in the “Photo Files” folder.
Audio - Audio only recording mode. Recordings will be saved as WAV files in the “Audio Files”
folder.
Page 7

7
VII. Make a Recording
In any of the three recording modes, a recording can be made in one of three ways once a memory card has
been inserted and AV input device attached for video or photos:
1. With the device powered on, slide the Stop/Record switch from Stop to Rec to begin recording
or take a photo. To stop the recording or prepare to take another photo, return the switch to the Stop
position. Repeat the process for additional recordings or photos.
2. To have a recording started or photo taken immediately upon turning the device on using the Power
On/off switch, slide the Record/Stop button from Stop to Rec while the unit is off. Once fully booted,
the device will be recording or take a photo. To stop the recording or prepare to take another photo,
return the switch to the Stop position. Refer to #1 above for additional recordings while powered on.
3. With the device turned off, plug the wired remote into the AV Out , making sure the switch is up
on the same side as the cable. To turn the device on and start a recording or take a photo, press the
switch down in the direction of the cable. To stop the recording or prepare to take another photo and turn
the device off, press the switch down in the opposite direction away from the cable.
Note: If recording in Video mode and Motion Detection is turned on in the menu, a recording will not start
until motion is detected by the camera.
VIII. Motion Detection
When Motion Detection is turned On in the Recorder Setting menu, the DVR will automatically
record or take a photo when motion is detected while using a camera.
o Video Mode – The Stop/Record switch must be moved to Rec for motion detection to begin. To
stop motion detection, return the switch to Stop.
o Photo Mode – A photo will be taken once motion is detected, regardless of which position the
Stop/Record switch is in.
Page 8

8
The Sensitivity of the motion detection may be adjusted between High, Medium and Low.
File Access, Playback & Management
I. File Access on the Device
Files may be accessed through the Event Playback menu, where they are sorted by recording type.
Access the Event Playback menu by pressing the Menu Button and navigating to it.
Page 9

9
II. Playback on the Device
i. Video Playback
Files are stored in folders by date. Navigate to and select the desired folder to view the recorded
video files.
Once the desired file is selected, press the Play button to start playback.
To adjust the volume of the internal speaker, repeatedly press either the Up or Down
button to reach the desired level.
To fast forward or reverse, press and hold either the Up or Down button for
approximately 2 seconds. Playback can be done at speeds of 2x, 4x, 8x or 20x in either direction. To
increase the speed of the fast forward or reverse to the next level, repeat the process.
ii. Browse Photos
Files are stored in folders by date. Navigate to and select the desired folder to view the photos files.
Once the desired file is selected, press the Play button to view the photo.
To browse through other photos while viewing, repeatedly press either the Up or Down
button to navigate through all photos in the current folder.
Page 10

10
iii. Audio Playback
Files are stored in folders by date. Navigate to and select the desired folder to play the audio files.
Once the desired file is selected, press the Play button to start playback.
III. Managing the Files
i. Deleting Files on the Device
1. Select the folder or file to be deleted
2. Press the Menu button
3. Enter and confirm the password(default is 000000) by pressing the Enter button
Page 11

11
4. To delete the selected folder or file, select Current. To delete the selected folder or all files in the
same folder as the selected file, select All.
5. To confirm your selection and delete the folder or file(s), select Yes. To go back to change your
selection or to cancel the process, select No.
ii. File Access & Managing on the Device from a Computer
1. With the device off or powered on, Connect the device to a computer using the included USB cable.
2. If the device is off, power it on. Once recognized by the computer, the device will ask for a
password before finalizing the connection.
3. Enter and confirm the password(default is 000000) by pressing the Enter button
Page 12

12
4. The device will be shown as a removable disk in the computer’s file browser. The Video, Photo and
Audio folders are contained within the DCIM folder.
5. Copy, delete and backup files as desired.
6. When finished, remember to always disconnect the device within the computer’s operating system
using the Safely Remove Hardware function.
7. Once disconnected from the OS, the USB cable may be removed. Once removed, the device will
automatically power down.
Page 13

13
Device Menu & Settings
I. Recorder Setting
Mode – Recoding mode
o Video – Video recording
o Photo – Still pictures
o Audio – Audio only
Motion Detection – Video or photo recording triggered by motion across the video input
o Off
o On
Sensitivity – If Motion Detection is On, the level of the detection may be adjusted here
o High
o Medium
o Low
Resolution – Resolution of recorded video and photos
o 720x576
o 720x480
o 640x480
Video Quality – Quality of recorded video at any given resolution
o High (8Mbps)
o Medium (3.5Mbps)
o Low (2.5Mbps)
Time Stamp – Toggles the time stamp shown on the On Screen Display
o Off
o On
Page 14

14
File Length – The maximum duration of a recorded video or audio file in minutes. Once the maximum
length is reach, the device will automatically create a new file and continue recording without
interruption.
o 5 Min
o 10 Min
o 15 Min
o 30 Min
o 60Min
Frame Rate – The rate of frames per second(FPS) during video recording
o 15 FPS
o 30 FPS
Audio Record Volume – Volume control for audio recording by the device
Microphone Select – Audio input selection for recording
o Internal Mic
o External Mic
Overwrite – Choice to have new files overwrite old ones on the memory card once it is full and out of
additional memory. When turned on, the oldest files will be deleted as new ones are recorded.
o Off – Recording will be stopped when the memory card is full
o On – Recording will continue by deleting the oldest files in succession as new ones are added
II. System Setting
Language – Menu and OSD language
o English
o Simple Chinese
o Traditional Chinese
Date Time – Date and time setup
Page 15

15
Password Protection – Password menu for USB connection, deleting files & formatting the memory
card. By default, all are enabled and the password is 000000
o USB Password – For allowing the device to connect to a computer and access the memory
Enable
Set – Change the password
Disable
o Delete Password – For allowing access to delete files from the device
Enable
Set – Change the password
Disable
o Format Password – For allowing access to format the memory card
Enable
Set – Change the password
Disable
Video Output – Switch from using the device’s built-in display to an external monitor via the AV Out
and included video cable
o LCD – Device’s built-in display
o PAL – Output PAL video(Euro)
o NTSC – Output NTSC video(US)
Power Save – Power saving menu for device and LCD
o Power Off – The time in minutes before the device will automatically turn off after no activity
5 Min
10 Min
20Min
Never
o LCD Off – The time in seconds or minutes before the display will automatically turn off after
no activity
10 Sec
1 Min
5 Min
10 Min
Never
Vibe Alert – Toggles vibration alerts on or off
o Off – No alerts
o On – Vibrates when any of the following conditions occur
No video signal
No memory card
Recording started
Recording stopped
Battery is low
Page 16

16
Beep – Confirmation beep any time a button is pushed
o Off
o On
Format – Erase all data stored on the memory card(password protected)
o No – Cancels and returns to the menu
o Yes – Confirms and formats the memory card
Firmware Update – Used to update the firmware
o No – Cancels and returns to the menu
o Yes – Confirms and starts the upgrade process from firmware file on the memory card
SD Card Info – Displays memory card capacity and free space
Default Setup – Returns all settings and options to factory default
o No – Cancels and returns to the menu
o Yes – Confirms and resets the device
Version – Displays the current firmware revision number
III. Event Playback
Video Files – Video files stored in folders by date
Photo Files – Photo files stored in folders by date and hour(24h)
Audio Files – Audio files stored in folders by date
All Files – All files stored
Page 17

17
Specifications
Video Compression
MPEG4
Video File Format
AVI
Video Resolution
720x576(D1); 720x480(D1); 640x480(VGA)
Frame Per Second
15fps; 30fps
Photo File Format
JPEG
Built-in Display
High Resolution 2.5” TFT True Color LCD
Storage
SD card, up to 32GB
AV Input
2.5mm, supports 5V(400mA MAX) power supply to camera
AV Output
2.5mm, PAL or NTSC
Multiple Recording Modes
Manual; Auto; Motion Detection
Time Stamp
Supported
Computer Connection
Mini USB
Power Input
5.0V DC
Battery
3.7V 1000mAH Li-ion
Power Consumption
200mA
Continuous Recording Time
~2.5 hours
Size
79mm x 51mm x 22mm (3.11in x 2.01in x 0.87in)
Weight
85g (3oz), including battery
 Loading...