

KJB DVR266WFA, DVR266WF, DVR264WFA User Manual
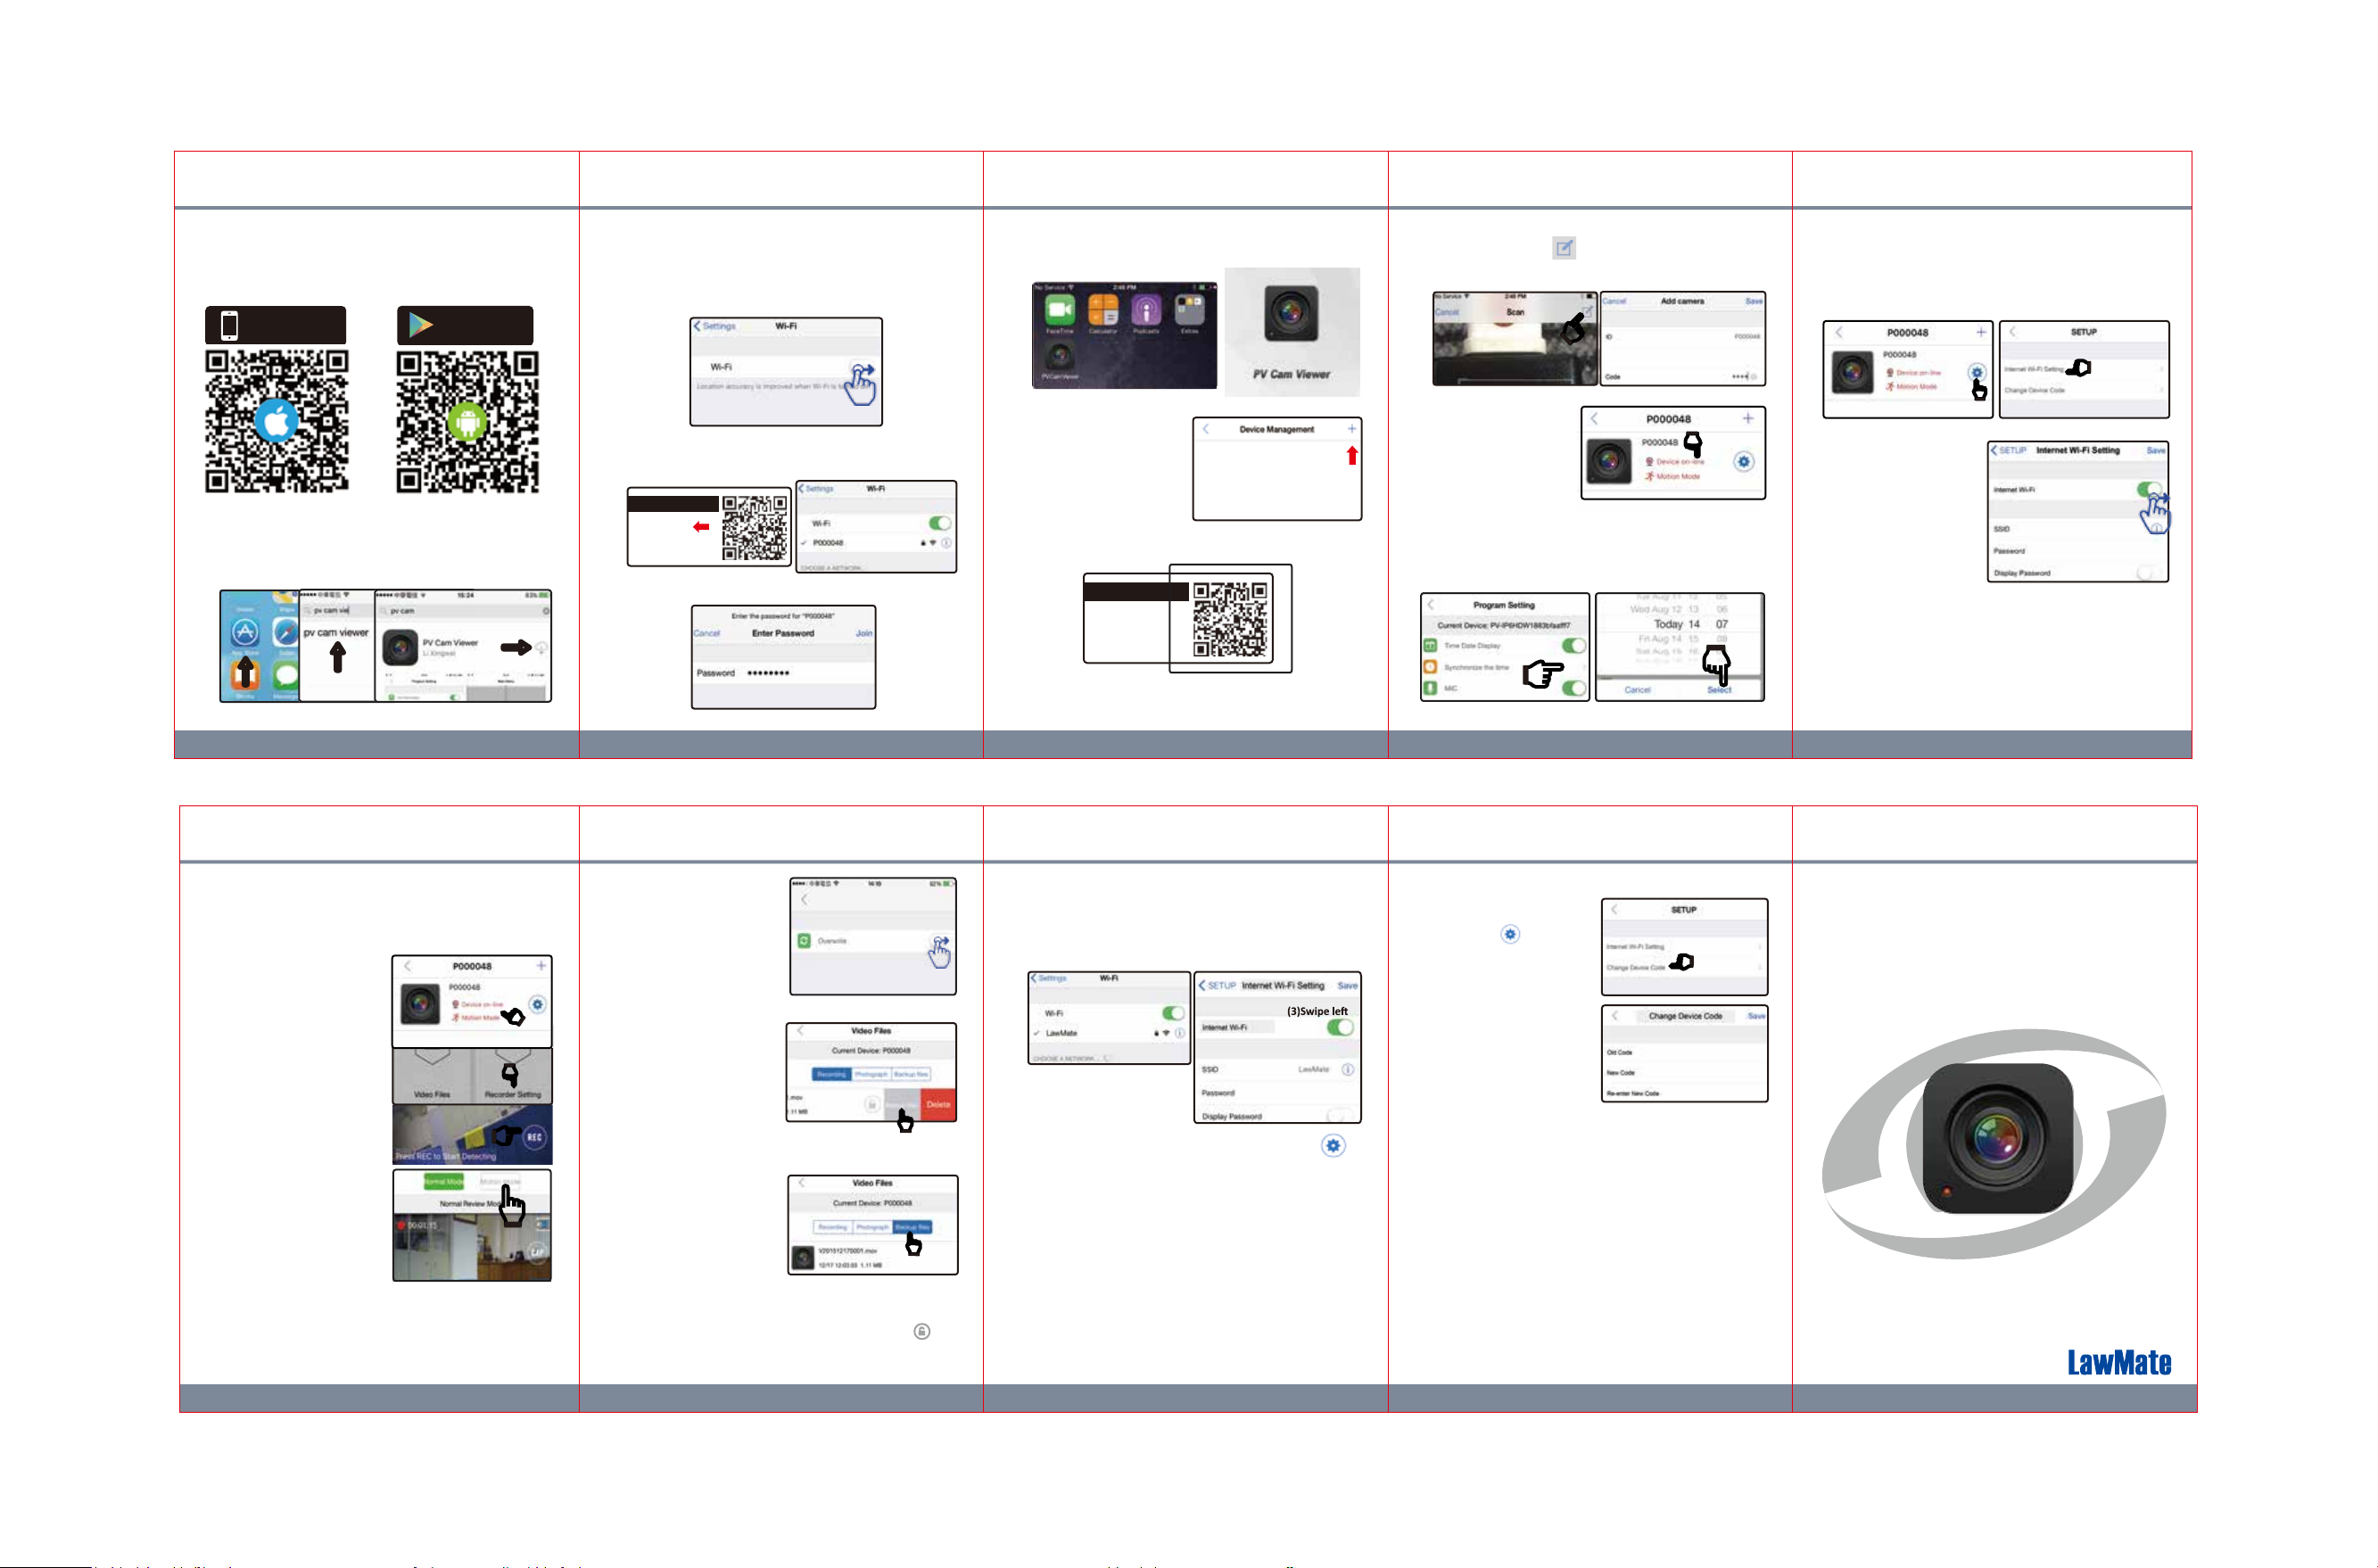
1. Install the App “PV Cam Viewer”
We provide 2 methods to install PV Cam Viewer app.
(1) Scan the QR code on this page with the QR code reader on
your smart phone. The app will be downloaded automacally.
Available on the
App Store
Getit on
Google play
2. Configure Device Wi-Fi (P2P connection)
(1) To connect your device with your phone, turn on the
Wi-Fi funcon on your device.
(2) Go to Sengs >> Wi-Fi on your smart phone, and turn on
Wi-Fi funcon.
(5) Return to the home screen and start the app “PV Cam
Viewer”.
B
: Press the pencil icon on the upper right corner, and
manually enter the ID and code, which are displayed on the
device.
4. Configure Internet Wi-Fi (IP connection)
To remotely control your device through the internet, please
follow these steps.
(1) Make sure the device is added and on-line, and press the
gear icon on the right of the device. Then, go to Internet
Wi-Fi Seng.
(2) To manually install PV Cam Viewer, go to App Store(iOS) or
Play Store (Android) on your phone. Enter “PV Cam Viewer”
to search and download the App.
Once “PV Cam Viewer” icon shows on your phone, the app is
successfully installed.
1 2 3 4 5
5. Stream Live View
With the lnternet Wi-Fi (IP connecon) successfully connected,
you can start to remotely control your camera and remotely
stream live view.
(1) Go to Device Management,
and tap on the device you
want to operate.
(2) Go to Recorder Seng on
Main Menu. A live view will
be displayed on screen.
Note: If you go to Program
Seng, the ongoing recording
will pause, and restart again
when you exit it.
(3) Press REC to start recording.
Press STOP to stop recording.
(4) To change the recording
mode, please press STOP
to pause the recording first,
and then tap on the mode
you want.
(5) To take a snap shot, please press STOP first, and tap on CAP.
You could go to Main Menu > Video Files >Photograph to
check your photos.
(3) Enable the Wi-Fi to search for the name of Wi-Fi network
which is displayed as ID on the device.(For example: the ID
is here is P000048.)
PV Cam Viewer
ID:P000048
Code:1234
(4) Join the network and enter the passwoed“88888888”.
(6)To turn on the overwrite
funcon, go to Recorder
Seng > SETUP when
there is no ongoing recording.
Swipe right to turn on
Overwrite funcon.
6. Download Videos and Photos
(1)To back up files to your
phone, please go to
Recording in Video Files,
find the video file you
want to back up and
swipe it to the le. Then,
select Backup files.
Note: Only when the device and smartphone are connected to
the same Wi-Fi internet that you can download videos on app.
(2)Go to Backup files to
check if the file is successfully
backed up in your phone.
*Files in
stored in your phone.
*Files in Recording or
Photograph are stored in
the memory card.
Backup files
are
7. Lock up the files
If you want to protect the files from being overwrien or
deleted, go to Video Files, and tap on the grey lock icon of
the file you would like to lock up. When the icon turns blue,
the file is successfully locked up.
(6) To add device to Device
Management, go to Device
Management on the App,
press the + on the upper right
corner of the screen. Next,
select method A or B to
proceed on.
A
: Scan the QR code on you the device. This is the quickest way
to add the camera.
PV Cam Viewer
ID:P000048
Code:1234
Put the QR code of the device in
the rectangular box
8. Change Internet Wi-Fi (IP connection) Setting
(1) Make sure your phone and device both are connected to the
same Wi-Fi Internet. (For example, here theyare both connected
to LawMate.)
Wi-Fi Seng on phone
(1)
(2) Go to Main Menu > Device Management > gear icon >
Internet Wi-Fi Seng.
(3) If you want to turn off the Internet Wi-Fi (IP connecon) on
device, please swipe it to the le. Device will automacally
restore to P2P connecon.
(4) If you want to change to another Internet Wi-Fi access, please
enter the new SSID & new Password, and press Save.
Note:
a. If you relocate the device and can’t complete step (1) here,
please default the device and start over from the guide on P.2
b. If the info “Do not Support Internet Wi-Fi seng” pops up,
please make sure step (1) is done correctly.
Wi-Fi Seng on device
(4)
(4)
When the informaon
Device on-line appears
on Device Management,
it means the Device Wi-Fi
(P2P connecon) is
successfully configured.
3. Synchronize the Time
It’s important to sync the me on device and your phone before
the first recording. Please go to Program Seng on main menu,
tap on Synchronize the me, and enter the cor
rect me.
(2) Turn on the Internet
Wi-Fi,enter the SSID
and Password of your
Internet Wi-Fi, and press
Save.
(3) Check the LED indicator
on the device to make
sure the Internet Wi-Fi
(IP connecon) is
successfully configured.
Note:
a. Once the Internet Wi-Fi (IP) is successfully configured, the
device will remember the Internet Wi-Fi access and
automacally connect to it the next me you turn on the
device.
b. If you want to change the IP connecon from A Internet to B
Internet, please default the device , or refer to instrucon on P.8
9. Change Device Code
(1) Go to Device management
on Main Menu, tap on the
gear icon of the device
you want. Then, select
Change Device Code.
(2)
(2) Enter the informaon asked
(Old Code/New Code/
Re-enter New Code), and
(1)
then tap on Save.
PV-Cam Viewer
for IP Cam
App Store/Play Store
Installation Quick Guide
10. Troble Shooting
(1) Why the message “Do not support xxx” pops up when I want
to change some sengs in Program Seng ?
Please note that
Password
And Format SD Card can only be done when the phone and
device are connected to the same Internet Wi-Fi.
(2) Why the P2P or IP is configured, but I don’t see any device
gets online in
Please try refresh the page by swiping it down.
SSID Visible and Modify Device Wi-Fi
can only be changed with P2P connecon.
Device Management?
9876
LawMate, innovation never stops
®
V2.0
 Loading...