

Page 1
1
Flash Drive DVR Manual
Page 2

2
Working Environment: Please abide by the laws concerning your area.
Any illegal use of this product is prohibited; otherwise it is at
your own risks.
Working Temperature: Please use this product i n normal room
temperatures and not in abnormal temperatures.
Working Humidity: Please use it in an environment where the
moisture is fit for human beings to live in. Do not use in an
overly-humid place. This product is not waterproof, so please
do not expose it to water.
Shooting Environment: Please expose it to a sufficient light source.
Don’t expose the camera di rectly to hard light sources, such
as sun light, etc., to prevent the optics from being damaged.
Sanitary Requirements: Please don’t use this product when the dust
density is excessive, so as to avoid the camera lens and other
parts from being polluted by the dust.
Waste Disposal: Please protect the environment and discard the
product properly. Do not throw this product in fire, as it could
possibly explode.
Notice
Page 3

3
This is a new generation of miniature digital DVR
housed in an ultra-small USB flash drive body with a HD
resolution camera and battery. W ith i t, you can capture
high quality videos, take pictures, or use for personal
monitoring and security. Used as a PC webcam, you can
enjoy on-line video chatting or conferencing. This device
also features removable memory with a built in memory
card slot. The DVR features a motion detection mode
which i s the perfect tool fo r monitoring and security use.
The combination of a compact design, multi-functional HD
DVR, and high reliability will inspire confidence in its use.
Place one in your home and office for security monitoring
each one while you are away.
Introduction
Page 4

4
● Sleek Flash Drive Design
The 360-degree rotating cover provides a comfortable handle at
any angle. The high-speed USB 2.0 port allows for fast data transfers.
● High Definition Camera
Video: 1280 x 960 Resolution AVI Files
Camera: 1600 x 1200 Resolution JPEG Files
● Webcam
May be used as a high definition webcam for enjoying on-line
video chats with your family and friends.
● High Capacity Memory Storage
Compatible with up to a 32GB memory card, it can be used as a
portable storage drive to hold various types of data.
● Extended Video Recording
The inner lithium battery allows for up to one hour of video
recording time.
● Motion Detection Video Recording
When an object moves in front of the camera, the DVR wi ll
quickly begin recording the object in motion.
● Record Video While Charging
Can record in continuous or motion mode while charging.
Features
Page 5

5
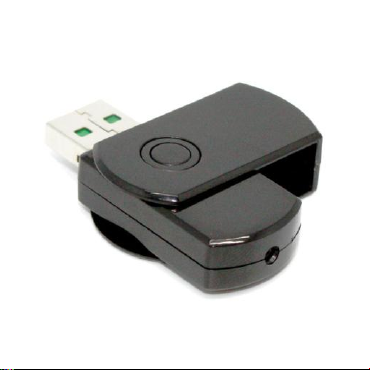
Product Diagram
Page 6

6
1. Turn On: Press and hold the mode button for approximately 2
seconds. The indicator light will come on as the device searches for a
memory card.
Card Inserted: The indicator light will flash once and then stay lit.
This means the device is in Standby mode and is ready to be operated
by the user.
No Card: The device will turn off after the indicator light flashes
three times.
Full Card: The device will turn off after the indicator light flashes six
times.
2. Take Pictures: When the device is in Standby mode, short press the
mode button twice in a row. The light will flash once indicating the
picture is saved to the memory card and the device is back in Standby
mode.
Basic Functions
Page 7

7
3. Record Video: When the device is in Standby mode, short press
the mode button once. Whi le recording, the indicator l ight will flash
slowly to remind you that it is in video mode. Short press the button
again to save video and put the device back into Standby mode.
The maximum single file length is 30 minutes, after which a new
file is started. The DVR will automatically stop recording if the
memory card is full or the battery is low, powering off immediately
after the video file is saved.
4. Low Battery: To prevent possible corruption of any saved files, the
charge level of the lithium battery is constantly monitored. If the
battery is low, the device will flash the indicator light three times in a
row and then immediately power off. I n this case, the user should
charge unit before powering it on again.
5. Turn Off: In Standby mode, press and hold the mode button for
approximately three seconds. The indicator light wi ll flash two times
in a row, and the device will power off.
In Standby mode, to save power the device will power off
automatically after one minute without activity.
Page 8

8
6. Flash Drive: With the device turned off, connect it to a computer
USB port. In this mode, you can access the files from your computer
like any other type of removable storage.
7. Webcam Mode: With the device turned off, connect it to a
computer USB port and short press the mode button once. The
computer may install drivers before the device is available to be used
as a webcam.
8. T ime Stamp: The device is capable of taking pictures and videos
with a time and date stamp. To modify the time stamp, follow the
steps below:
-Turn off the device, connect it to a computer USB port, and
search for the text file: time.txt in the root directory of the device
memory card.
-The content of the file is: 2012-05-01 23:59:59. Modify the time
and date in this format, save the text file, and then s afely eject the
device from the computer.
-Turn on the device. Upon powering on, the new time and da te
will be saved to the device memory.
Page 9

9
9. Charging the Battery: The device can be charged by connecting it
to a computer or other 5V charger with a U SB cable. If the indicator
light flashes, it means that the device is being charged. If the
indicator light stays on, it means that the device is fully charged.
The charge time is approximately 2-3 hours.
10. Recording While Cha rging: With the device turned on and in
Standby mode, connect it to a computer USB port. The DVR will now
be in Mo tion Detection mode. When m otion occurs in front of and
is detected by the camera, video recording will begin. While
recording, the indicator light will flash slowly. Recording will
continue for as long as motion is detected, but will stop 2 minutes
after motion is no longer detected. The maximum file length is 30
minutes, after which a new file is started and the recording
continues. When not recording and monitoring for motion, the
indicator light will flash quickly.
Motion Detection mode can be exited into Standby mode. To
enter Standby mode, short press the mode button on ce. The mode
button may now be used to start and stop recordings or to take
pictures, as detailed in prior instructions.
Page 10

10
11. Instructions of the LED Indicator Light:
-No Card: LED indicator light shuts off after flashing 3 times.
-Full Card: LED indicator light shuts off after flashing for 6 times.
-Standby: LED indicator stays on.
-Motion Detection Standby: LED indicator flashes quickly.
-Video Recording: LED indicator light flashes slowly.
-Low Battery: LED indicator light will shut off in a default way 3
times (the default way: the first two flashes is 0.5 seconds earlier than
the third one).
-Charging: LED indicator light flashing slowly.
-Full Charge: LED indicator light stays lit.
Page 11

11
Video Format
AVI
Video Resolution
1280*960
Frame Rate of Video
30 fps
Picture Format
JPG
Picture Resolution
1600*1200
Battery Life
60 minutes(approx.)
Charging Voltage
DC 5V
Types of Ports
USB 2.0
Memory Card Slot
Micro SD
Specifications
 Loading...