

Page 1
Warranty Information
The manufacturer warrants their products to be free from defects in material or workmanship for a period
of one year from the date of the original purpose. The limited warranty stated above is subject to these
terms and conditions.
TERMS AND CONDITIONS
Limitation on Warranties: All merchandise carries a one (1) Year Manufacturer’s Limited Warranty
on parts and labor. SELLER MAKES NO WARRANTY, EXPRESSED OR IMPLIED, INCLUDING ANY
WARRANTY OR FITNESS FOR ANY PARTICULAR PURPOSE OR MERCHANTABILITY. No agent,
employee or representative of Seller’s are authorized to bind the Seller to any affirmation, representation, or warranty, oral or written, unless by separate written instrument designed by Seller,
which by its terms state that it is included as part of this agreement.
Claims: Receipt of goods shall be deemed acceptance of the goods received. All claims for defective goods or revocation of acceptances, for shortages, for delays, or failures in shipment or
delivery, or for any cause shall be deemed waived and released by the Buyer unless it is made in
writing within (7) days after receipt of goods. All claims must state specifically and in reasonable
detail the nature of all objections, and must be accompanied by delivery receipt or photocopy of
the sales order or packing slip. Any delivery not placed in dispute in a timely manner shall be
paid for by the Buyer and all uncontested amounts due shall be paid by the Buyer with terms
specified. As a condition to making a claim for missing or damaged goods sent, the Customer is
responsible for initiating and pursuing with the carrier.
Limitation on Seller’s Liability: Seller’s liability will be limited to replacement or repair of defective
goods upon receipt of goods in a timely manner per paragraph two herein. In no event will Seller
be liable for consequential or special damages or for transportation, installation, removal, adjust-
ment or other expenses or losses which may arise in connection with the use or installation of the
goods; late delivery, failure to deliver or from any other cause. Not withstanding the terms of this
Agreement, if there should arise any liability of Seller, such liability shall be limited to an amount
equal to one-half (1/2) the costs of the goods or $250.00, whichever is less.
Returned Material: In no case will the seller give a refund. Seller will accept most goods for ex-
change or credit, at the Seller’s discretion within 30 days of purchase date. In no case are goods
to be returned without first obtaining Seller’s permission. Only unused goods as currently manu-
factured, in original unopened packaging and which has been paid for by Buyer in accordance
with Seller’s payment terms will be considered for exchange or credit upon receipt of proof of
purchase. Special ordered items and obsolete items cannot be returned for credit. Material ac-
cepted for credit will be subject to a 15% restocking charge for service and handling. Seller will
not be obliged to replace any product that has been abused, improperly installed or otherwise
misused. Items must be returned in their original packaging, securely packed to reach the Seller
without damage.
Governing Law: This agreement shall be governed by the laws of the State of Tennessee.
IT IS THE USER’S RESPONSIBILITY TO ENSURE THAT THIS EQUIPMENT IS USED IN ACCORDANCE
WITH THE LAW(S) OF THE JURISDICTION IN WHICH THIS EQUIPMENT IS UTILIZED.
DO NOT ATTEMPT TO RETURN PRODUCT TO ORIGINAL MANUFACTURER, AS THIS PRODUCT HAS
BEEN MODIFIED AND IS NO LONGER SUBJECT TO ORIGINAL MANUFACTURER’S WARRANTY. IN
THE CASE OF A DEFECTIVE PRODUCT, CONTACT PLACE OF PURCHASE FOR RETURN PROCEDURE.
THIS EQUIPMENT HAS BEEN TESTED AND HAS BEEN FOUND TO BE IN COMPLIANCE WITH THE
LIMITS FOR A CLASS B DIGITAL DEVICE, PURSUANT TO PART 15 OF THE FCC RULES. THESE LIM-
ITS ARE DESIGNED TO PROVIDE REASONABLE PROTECTIONS AGAINST HARMFUL INTERFERENCE
IN A RESIDENTIAL INSTALLATION. THIS EQUIPMENT USES, GENERATES AND CAN RADIATE RA-
DIO FREQUENCY ENERGY AND IF NOT INSTALLED AND USED IN ACCORDANCE WITH INSTRUC-
TIONS, MAY CAUSE HARMFUL INTERFERENCE TO RADIO COMMUNICATIONS.
Part 15 Low Power:
ANY CHANGES OR MODIFICATIONS TO THIS EQUIPMENT WITHOUT THE EXPRESS AUTHORIZA-
TION OF THE MANUFACTURER COULD VOID THE USER’S AUTHORITY TO OPERATE THIS EQUIP-
MENT. (RULE 15.21 OF THE FCC)
XTREMELIFE DVR
WITH PIR &
LONG LIFE BATTERY
16 1
Page 2
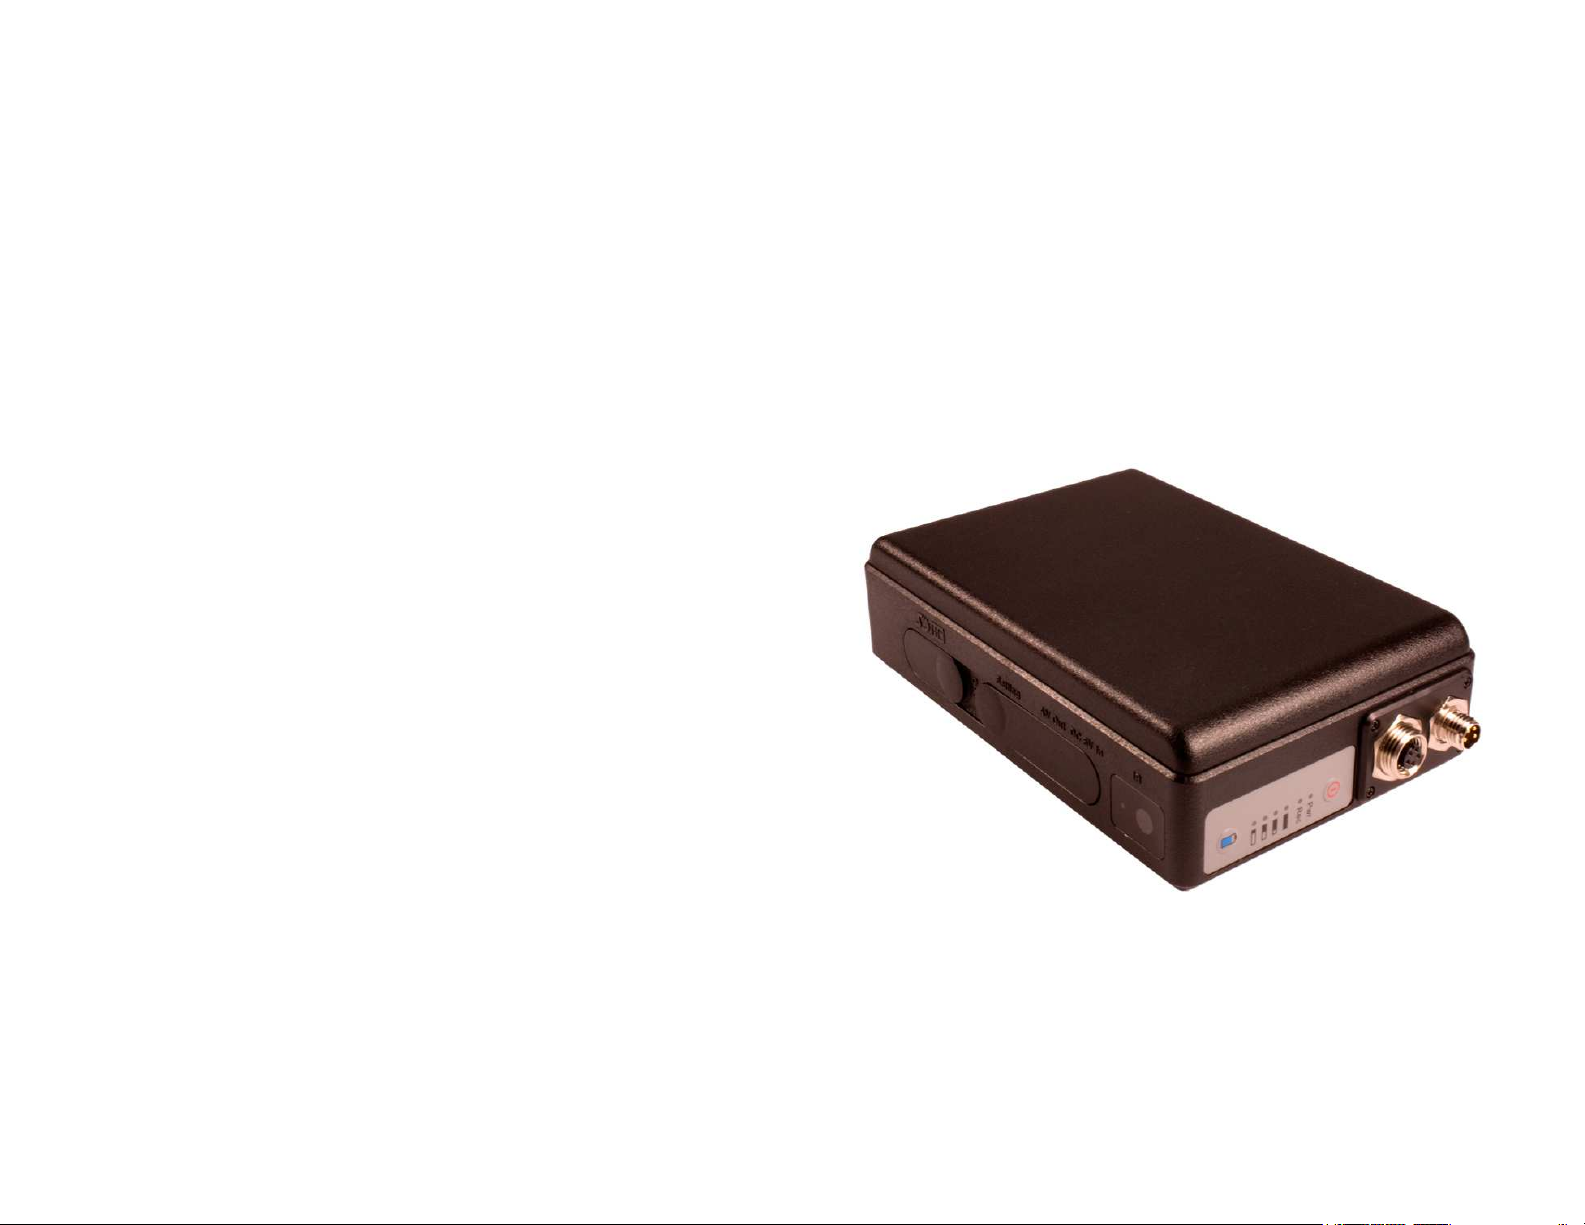
Congratulations and Thank You
for purchasing the Extremelife DVR with battery!
The Extremelife system is an all-in-one DVR with PIR and long life battery. All you need to do is
charge it attach the included PIR, attach a camera (sold separate in some cases) turn it on, insert
an SD card and the system will begin to record when it detects heat / motion.
The Extremelife system has many advanced features and functions but the best feature is already
preset for your quick set up.
Quick Set up Guide
See diagrams below
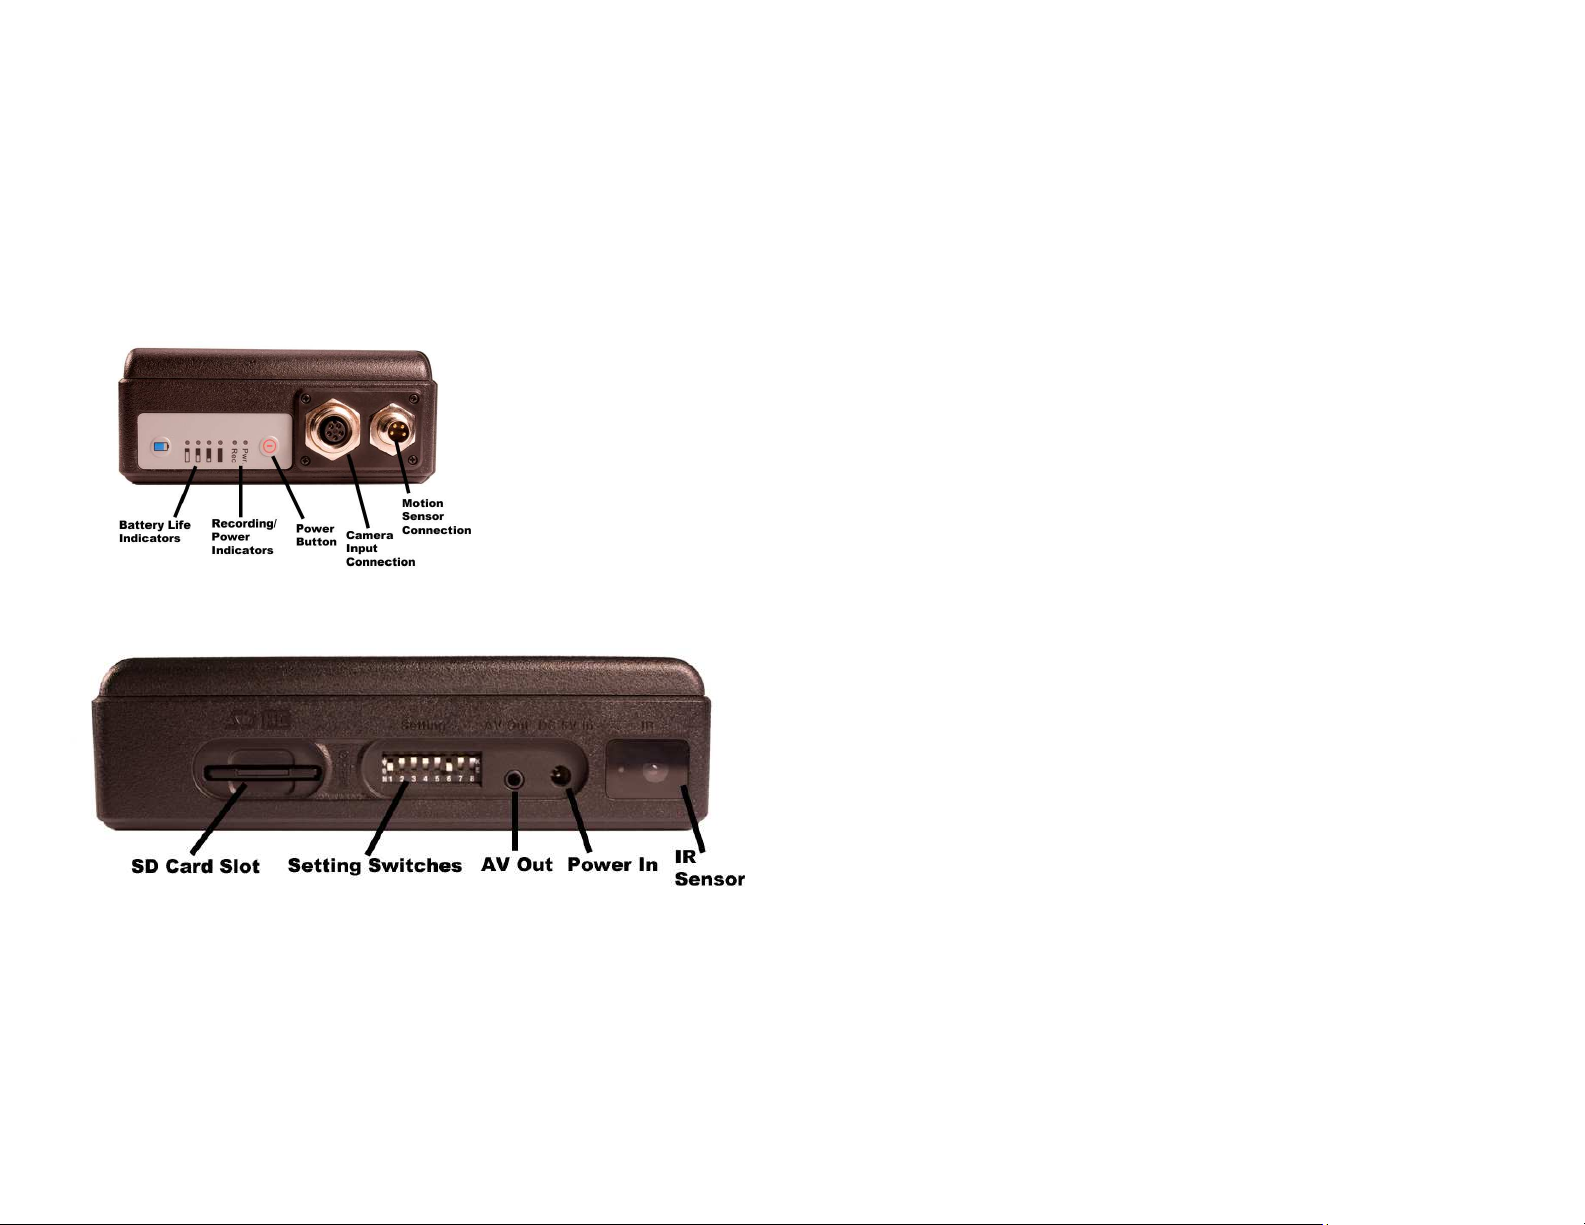
Fully charge unit for 18 hours prior to use for the best results.
Insert SD card into slot
Push all switches in the up position to record with the factory default settings. (see below)
Press the power button for 1 second,
the power LED will illuminate blue,
then it will blink every 3 seconds.
To check the battery life press and
hold the battery button.
Attach the camera in the camera port
Attach the PIR sensor (included) into
the correct port
Use caution when plugging in the
camera and PIR, line up pins so that
the fit is correct, do not force the
camera and PIR plugs in unit.
Factory Default settings using the switches:
15 second clips (to change the clip length see chart on page 3)
PIR sensitivity: Low (to change the PIR sensitivity see chart on page 3)
To turn the unit off, press and hold the power key until the blue light goes off.
If you wish to change factory default setting you would need to go through the
entire menu and pick your desired selections. See Advanced Features instructions to
change default settings beginning on page 4
2 15
FAQ
What is a PIR?
A Passive Infrared sensor (PIR sensor) is an electronic device that measures infrared (IR) light
radiating from objects in its field of view. PIR sensors are often used in the construction of PIRbased motion detectors. Apparent motion is detected when an infrared source with one temperature,
such as a human, passes in front of an infrared source with another temperature, such as a wall. The
PIR will pick up from a distance of approximately 30 feet.
Safety & Precautions
All the recorded files are stored in the IMAGE/VIDEO folder.
If the file is corrupted so that it cannot be played, The system will return to the file detailed list.
The player can distinguish an unlimited number of files/folders. However, within a folder, only up to
999 files can be distinguished.
The supported video file is AVI
All data in the device may be deleted due to excessive impact, lightning, power surge etc., the manufacturer does not warranty losses caused in the above conditions, please protect and back up the data
in the device properly.
Avoid heavy vibration while recording, which might damage the hard disc or other components inside the unit.
Please do not apply heavy pressure to your Extremelife the player may be damaged.
If the card does not slide in smoothly, do not force or push it, which might damage the memory card
& the unit.
Check and make sure the card is plugged in facing the right side.
When you take out the SD card, push the card in, then it will spring out, then pull the sd card from
the unit.
Do not use harsh chemicals on the unit, If you want to remove dust please clean the body with a soft
dry cloth, if dirt or stains are left, you can clean it with a small amount of cleansing liquid. Do not
immerse in any liquid.
Page 3
If the recording environment is motionless, recording will stop, “detecting” will appear in
the bottom of screen until the sensor detects motion, the recording will start again, and the
same event will be repeated.
In Motion Detect Mode , Press SETUP button, the setting items appear:
Resolution (352*288 /640*480/720*56/1024*768/1280*720/1280*960)
Quality (Good/Norma/ Low)
Frame Rate ( 1 / 5/ 15 /20/25)
Audio (Enable/Disable)
Frame Counter Stamp (On/Off)
Timestamp (On/Off)
Device ID Stamp (ON/Off)
Display (LCD/TV/BOTH)
Motion Detect Level ( High/Medium/Low)
Motion Detect Duration (30 sec/1min/3 min/ 5 min/ 10min)
Motion Detect Zone >Press |u to select the area for target of motion detect.
Safety Precautions and Notes
Use only the included power supply to operate your Extremelife system
(AC: 120 Volt, 60 Hz ONLY, if outside the US and Canada
a special adaptor may be required).
To avoid electrical shock, do not attempt to open the unit.
Opening the unit Voids the warranty
To prevent fire or shock hazard, do not expose this product to direct rain or moisture.
Do not operate near bath tub, sink, or swimming pool.
Avoid operation in moist environments.
Do not overload electrical outlets or extension cords as this may result in fire
or electric shock, this unit works only on 120 Volt .
Power surges or over voltage (i.e. 220 Volt) will damage the unit and void the
warranty. A surge suppressor and other adaptors may be required and are
the responsibility of the user.
Features and Functions of the Extremelife DVR
F
ULLY CHARGE THE BATTERY FOR
B
ATTERY LIFE
THE
MAXIMUM SD CARD YOU CAN USE IN THIS UNIT IS
: C
ONTINOUS USE APPROXIMATELY
1
2
18
HOURS
4
5
20
HOURS
/
STANDBY APPROXIMATELY
32GB
R
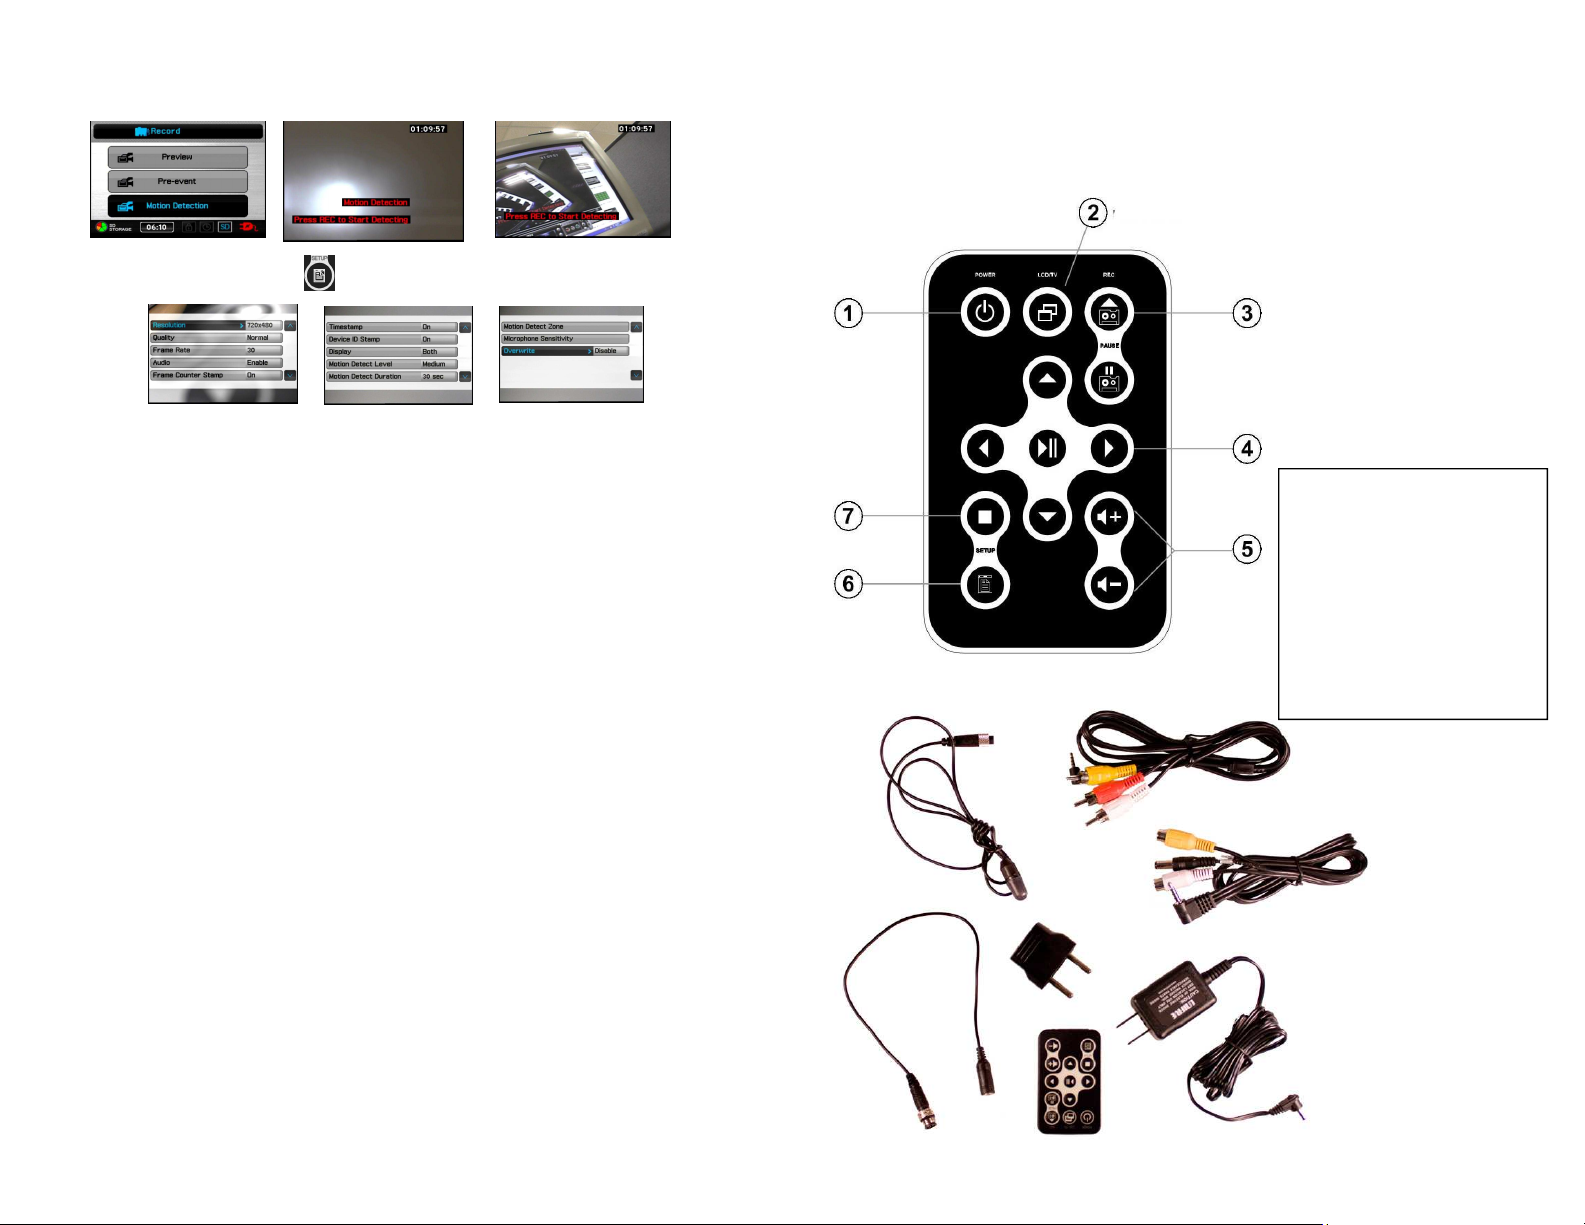
EMOTE CONTROL FUNCTIONS
1– P
OWER BUTTON
2– LCD/TV S
3– R
ECORD
4– N
AVIGATION
5–
VOLUME
6–
SETUP
7–
ESCAPE
WITCH
/
/
STOP
PAUSE
375
/
PREVIEW
DAYS
Switch Settings / Record Time
1 down = 15 seconds
2 down = 30 seconds
3 down = 45 seconds
4 down = 60 seconds
5 down = Motion High
6 down = Motion Med
7 down = Motion Low
8 down = Use Menu
8 up = Use switch settings
3
Accessories
1– PIR Sensor
2– Camera adapter
3– RCA in and out
Cables
4– Euro adapter
5– Remote Control
6– AC Adapter
6
314
Page 4

Menu and Settings
To view Main Menu
Push switch 8 down & connect to monitor as shown below
Press the Setup button on the remote to enter the main menu
Use the remote to navigate through the screens (see diagram page 3)
Video file playback
Browse images and picture
External video source recording
Functions setting
In File List Mode: Press SETUP button the
setting items appear:
Start Slideshow
Image Thumbanil ( On/Off)
Playback Slideshow (No/All)
Slideshow Duration (3 sec/ 5 sec/ 7 sec/10 sec)
Delete Directory
Connect an external Camera
Select Record function then press to enter record page
Preview
Before connecting an external camera, there’s no signal on the screen; after connecting, screen will show up preview mode and stand by to record.
Press REC button on the remote control; Press STOP to finish recording.
Switch 8 in the
down position
Switches 1-8 in the
up position
In Preview mode: Press SETUP, the setting items appear:
Resolution (352*288 /640*480/720*56/1024*768/1280*720/1280*960)
Quality (Good/Normal/Low)
Frame Rate( 1 / 5/ 15 /20/30)
Audio (Enable/Disable)
Frame Counter Stamp (On/Off)
Timestamp (On/Off)
Device ID Stamp (On/Off)
Display (LCD/TV/Both)
Microphone Sensitivity
Overwrite
AV in on
monitor
AV Out
Exremelife
DVR
Motion Detect (Press REC to start recording)
Select Motion Detection and press to enter.
Press REC button on the remote controller to start Recording. Press STOP button to
finish recording.
4 13
Page 5

Operations in Main Menu
Press IMAGE to choose the newest Photo file and then to select the photo file
In the MAIN MENU mode, press the SETUP button on the remote control to enter the
SETTINGS mode; or use the navigation buttons to navigate to the SETTINGS, and press
center pause button.
to browse; Press to the upper file folder listed in date; Press once more to the
upper level / MyRecord.
Start slideshow
In File list Mode or Image Browsing Mode, press SETUP to show the setting items,
select “Start Slideshow” to start the Slide Show; Press / to choose Slide Show
then press to start slide show. Press to stop Slide Show and return to the file
list.
While selecting photo in a image file Press SETUP button , the setting items
appear:
Press ESC button to escape Setting Mode.
To navigate the submenu press
To select a sub menu press
Resolution
(352*288 /640*480/720*576/1024*768
/1280*720/1280*960)
Quality (Good/Normal/Low)
Frame Rate( 1 / 5/ 15 /20/25)
Audio (Enable/Disable)
(not available in all models)
Frame Counter Stamp (On/Off)
Timestamp (On/Off)
Device ID Stamp (On/Off)
Display (LCD/TV/Both)
Microphone sensitivity
(not available in all models)
During Photo Browsing: Press SETUP button , the setting items appear
Start Slideshow, Image Thumbnail ( On/Off), Delete
(On/Off), Deletion Lock (On/Off), Playback Slideshow (One/All), Slideshow Time (3/5/7/10 sec), File
Information
Start Slideshow, Playback Slideshow (All/No), Slideshow Duration (3 sec/ 5 sec/ 7 sec/10 sec), Display (LCD/TV/BOTH)
File Information( Tap it to read file information)
Press STOP to return to the upper level.
Press on Pre-event to start setting each function as below.
512
Page 6

Pre-event cont.
Reverse Playback
Resolution
(352*288 /640*480/720*576/1024*768/1280*720
/1280*960)
Quality (Good/Normal/Low)
Frame Rate ( 1 / 5/ 15 /20/25)
Audio (Enable/ Unable) (not available on all models)
Frame Counter Stamp (On/Off)
Timestamp (On/Off)
Device ID Stamp (ON/Off)
Display (LCD/TV/BOTH)
Pre-Event Duration (30 sec,15 sec)
Motion Detection Press to start setting each function as below.
Two times reverse playback: Press during normal playback, the video file will be
played with a speed two times faster, Press to resume the normal playback speed.
Four times reverse playback: Press twice during normal playback, the video file
will be played with a speed four times faster, Press to resume the normal playback
speed.
Eight times reverse playback: Press three times during normal playback, the video
file will be played with a speed eight times faster, Press to resume the normal playback speed.
Pause Press to pause the video, Press again to resume the normal playback
speed.
Stop Press ESC button to stop playing and return to File List mode.
During Video Playback Press pause button, the video will be
paused, and the setting items will appear
Resolution
(352*288 /640*480/720*57
6/1024*768/1280*720/1280
*960)
Quality (Good/Normal/
Low)
Frame Rate ( 1 / 5/
15 /20/25)
Audio (Enable/ Unable)
(not available on all models)
Frame Counter Stamp (On/
Off)
Timestamp (On/Off)
Device ID Stamp (ON/Off)
Display (LCD/TV/BOTH)
Motion detection level
(LOW/Medium/High)
Motion Detect Record
time
(30sec/1min/3min/5min/10
min)
Motion Detect Zone
Microphone sensitivity
(not available on all models)
Over-write (Disable/
Enable)
6 11
In File List mode Press button, the setting items will appear:
In the upper-file Press button, the setting items will appear:
Page 7

Press on the VIDEO option on the Main Menu to open the newest files
Choose the files to play the video as below. Then Press ESC button to enter
Setting Date and Time
Press Date and time to select.
MyRecord file, Press ESC button to enter the main menu.
Fast Forward Playback:
Double Speed Playback: Press during normal playback, the video file will be played
with a speed two times faster, press to pause the video, Press again to resume
the normal playback speed.
4 Times Speed Playback: Press twice during normal playback, the video file will be
played with a speed four times faster, press to pause the video, Press again to
resume the normal playback speed.
8 times Speed Playback: Press three times during normal playback, the video file
will be played with a speed eight times faster; press to pause the video, Press
again to resume the normal playback speed.
Slow motion function
1/2 Speed slow motion: Press after pausing the playback, Press once, the video
file will be played in 1/2 speed slow motion; Press again to resume the normal playback speed.
1/4 Times Speed Playback: Press after pausing the playback, Press twice, the
video file will be played in 1/4 speed slow motion; Press again to resume the normal
playback speed.
1/8 times Speed Playback: Press after pausing the playback, Press three times,
the video file will be played in 1/8 speed slow motion; Press again to resume the normal playback speed.
In the sub-menu bar / , Press / to enter the last or next
item/page.
Press to finish the selection.
Press on Date Time Format to select.
Choose the language for Operating interface
Press on Language to select.
Pre-set Recording Mode >
set up the screen
to be automatically returned to
which recording mode
Resume to pre-set duration >
Setting how long to be
resumed to the
Pre-Set mode
Timer recording > set up the timing to
recording mode
In Timer recording setting,
Press to select one blank column in order
to reset the timer.
710
Page 8

Once timer setting is set, the screen will appear as below
Notice: you need to set the setting to “ ON” to book the reserved recording successfully;
the reservation will be executed only when the device is in Powered on state
Indicator > Setting to turn on/off the indicator (LED)
Back light out duration
to turn off the backlight during
the device is not used.
Storage option > accepts SD card only, up to 32GB
Storage information > show
the size and the free
space of the storage.
Storage capacity Icon
SD card needs to be inserted to slot then will be displayed in the
Firmware upgrade > Insert the SD card which contains updated software into the device
and press enter button, after the system is updated, it will reboot automatically; if the
message “Update Error” is shown, it means that there are errors during updating, it
might be that the software is incomplete or the memory card has some problem, please
use another memory card, or reboot the device after inserting the memory card.
Push < or > to select ok or Cancel for Firmware Upgrade, after select press < or > confirm
the setting.
Restore factory setting: If you would like to change
The settings back to factory default
push < or > to confirm.
This will erase all previous
Optional settings.
Power on password: when unit is turned off if this function is set to “ON” you will be
required to enter a password to access the unit.
left-bottom side of screen。Press to the last page
Format memory > allows user to format SD card
(this will erase ALL files on the SD card)
TV-out settings
Slideshow duration > time duration for slideshow
Set power on password: Press / on the remote control to choose your
six-character and then confirm these characters once more pressing, button
to complete the setting.
Write your password in a safe place.
8 9
 Loading...