

Page 1
Specifications
Dimension
Weight
Power
Battery charging time
Battery life
Detecting Frequency
Scan indication
Warning mode
Scanning band
Detecting Distance
* Specification may change without notice.
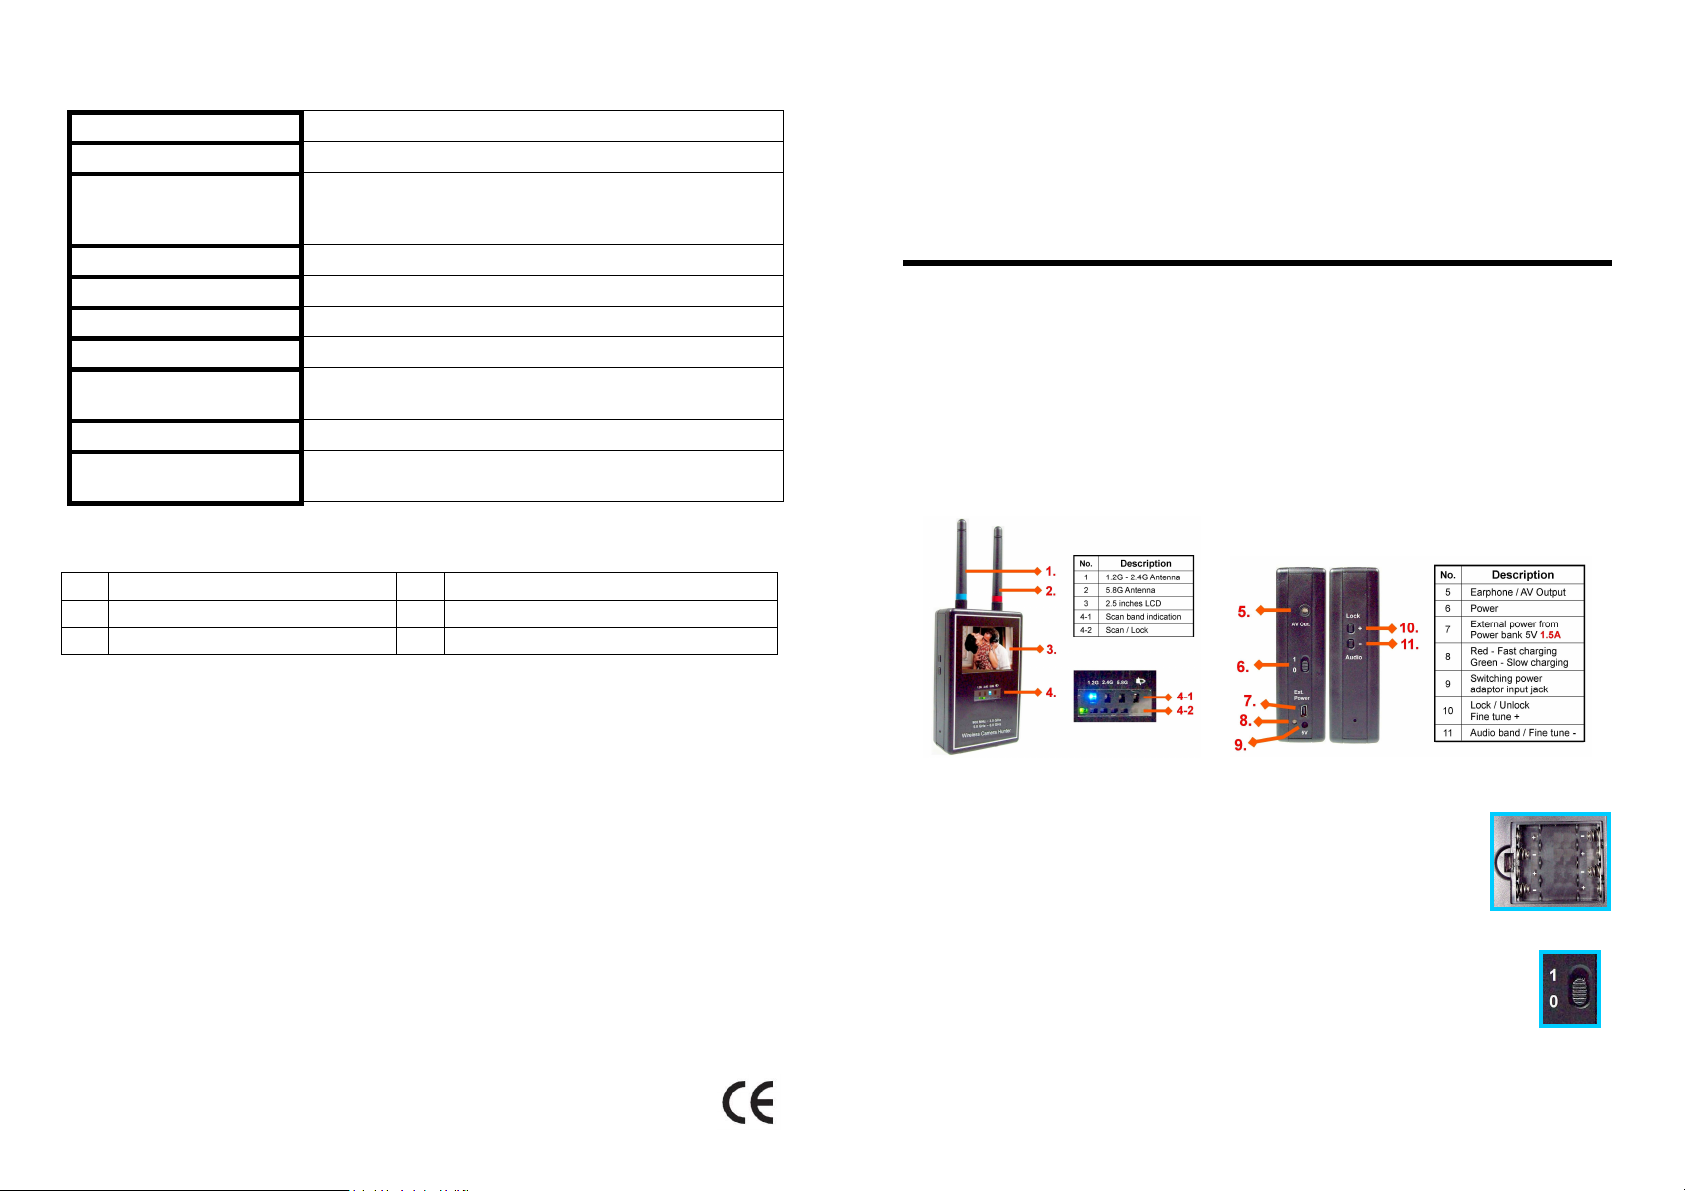
L 11.6 x W 7 x T 3.3 cm (including antenna: L 19 cm)
about 215g (not include battery)
1. Switching power adaptor
2. AAA / UM-4 dry battery or rechargeable battery
3. Support external power bank (5V 1.5A and more)
About 4 hours for full charge
About 2 hours after full charge
900 MHz – 3.0 GHz, 5.0 – 6.0 GHz
Image and Frequency of scanned video signal
1. Beep and vibration
2. Silent detection through earphone
1.2 GHz - 2.4 GHz - 5.8 GHz three bands cycle scanning
up to 200 feet (depending on output power of source
transmitter)
DD9005 Mini Wireless Camera Hunter
900 MHz - 3.0 GHz, 5.0 – 6.0 GHz Full band video scanner
User's Manual
Thank you for purchasing the Mini Wireless Camera Hunter. Please first read over this
manual for proper use, save this manual and keep it handy.
This device is designed for easy and direct use, no annoying software setting.
The operation flow has 8 steps as follows.
1. Install battery 2. Switch on 3. Auto scan
4. Image display 5. Lock image 6. fine tune image
7. Audio demodulation 8. Unlock image
PACKAGE CONTENTS
1.
Video scanner
2.
Detachable SMA antenna x 2
3.
AV output cable x 1
4.
Switching power adaptor x 1
5.
Earphone x 1
6.
Rechargeable batteries x 4(optional)
WARNING
Use this device as an auxiliary, supplemental help or aid to prevent the risks caused by cellular
phone communications. This device does not take the place of all the supervisions. Performance of
this Radio frequency (RF) product will be affected by the circumstance of use. The producer and
marketing group accepts no liability for any loss or damage by malfunction or misuse.
COPYRIGHT
No part of this manual may be reproduced, transmitted, transcribed, or translated into any language
in any form by any means, electrical or mechanical, including photocopying, recording, or information
and retrieval systems, without the express written permission of manufacturer. Products mentioned
in this manual are for identification purposes only. All brand names appearing in this manual may or
may not be registered trademarks or copyrights of their respective companies. The manufacturer
reserves the right to change or modify the specifications of any one or all of these products as
deemed necessary at any time without prior notification. The manufacturer may further revise this
manual from time to time without prior notice.
©Copyright 2014, All rights reserved.
4
Made in Taiwan
06.2014
1.
INSTALL BATTERY
: Battery compartment is located in
the rear side. Remove the battery cover, install AAA / UM-4
battery x 4 according to the + – indication, then put on the
battery cover. This device is available both dry battery and
rechargeable battery. Note: Never connect the battery
charger or external power bank when to use dry battery inside.
2.
SWITCH ON
: The power switch is located in the center of right
side. Set at 1 to switch on, set at 0 to switch off.
3.
AUTO SCAN: After switch on, this device will scan wireless
video signal from 900 MHz to 6.0 GHz automatically. There are
2 rows LED displays under the LCD screen.
1
Page 2
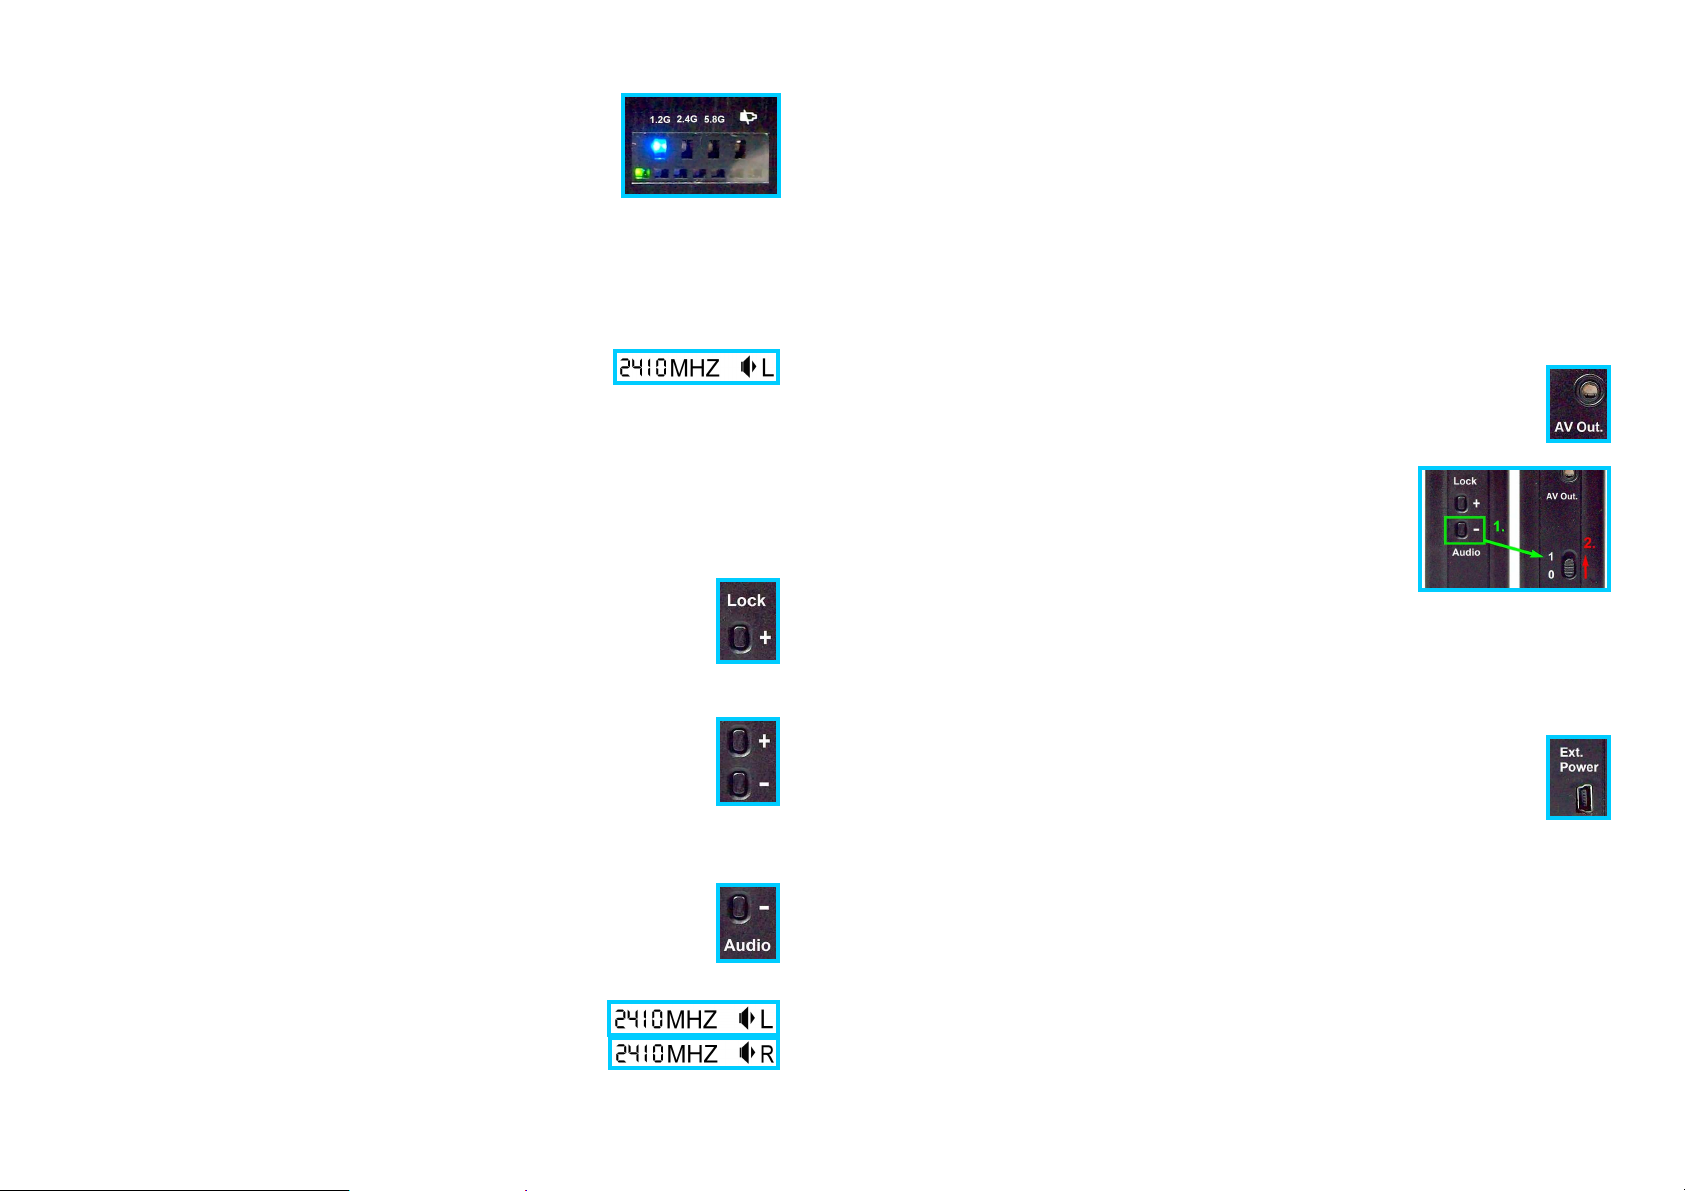
3.1 The upper row is scanning band indication and
battery low indication. Three blue LEDs indicate
1.2GHz - 2.4GHz - 5.8GHz three frequency bands
individually for user to know the scanning status
clearly. The LED at very right side is low battery
warning (Bat Low), it will go red when battery power runs down.
3.2 The lower row is indication of scanning and image lock. During
scanning, the green LEDs will shuttle to-and-fro. When receive video
signal, user can lock the image, then green LED will still.
4.
IMAGE DISPLAY
signal, the image will display on screen and the
frequency of the image will appear in the left bottom side of screen. The
duration of image display on screen is depended on the video signal
strength, the stronger the longer.
This device keeps scanning, the image will fade away when scan to other
frequency and the screen will shut down to save power. When detects next
video signal, the screen will light up again to display the image.
: When detects wireless video
5.
LOCK IMAGE
the (+) button in left side over 1.5 seconds to lock the image. When
hear beep once, the image is locked. The scan will stop and the
blue and screen LEDs will still. The frequency on screen will be
fixed and blink in black and white.
6.
FINE TUNE IMAGE
left side to tune the image at its best resolution. Press the (+) once,
beep once and you will find the frequency in the left bottom side of
screen will be increased. Press the (–) once, beep once and you
will find the frequency in the left bottom side of screen will be
decreased.
7.
AUDIO DEMODULATION
Plug the earphone into the jack in right upper side to hear the audio
of image. If you can not hear the audio, press and hold the (–)
button in left side over 1.5 seconds to shift the audio frequency.
When hear beep once, the bottom of screen will appear L,
it means the frequency of audio demodulation is 6.5 MHz.
Press and hold the (–) button in left side over 1.5 seconds
again, the audio demodulation will shift to R, it means the
frequency of audio demodulation is 6.0 MHz.
2
: When detects significant image, press and hold
: After image locked, press the buttons + – in
: This is unique technology in its kind.
Most of the audio of wireless video cameras are 6.0 and 6.5 MHz. If you can
not hear the audio both setting of L and R, the scanned wireless camera
might not have audio demodulation. Press and hold the (–) button in left side,
the audio demodulation will be shifting between L and R (6.5 and 6.0 MHz)
over every 1.5 seconds.
8.
UNLOCK IMAGE
hold the (+) button in left side over 1.5 seconds to unlock the image. When
hear beep once, the image is unlocked. The scan will continue and the blue
and screen LEDs will start to blink. The frequency will not appear on screen
until the image appears on screen.
9.
VIDEO / AUDIO OUTPUT
by earphone and AV output. Plug in the AV output cable and
connect it with DVR to record the scanned image and audio.
10.
WARNING MODE SETTING
three kinds of warning mode, 1. Beep and vibration
2. Vibration 3. Beep, factory default setting is
“Beep and vibration”. To change the warning mode,
switch off this device. First press the (–) button in left
side, and use another hand to switch on, this device
will enter “Warning mode setting”.
Press the (–) button in left side once, the warning mode will shift from 1. Beep
and vibration 2. Vibration 3. Beep cyclic. After set the preferred warning
mode, press both (+) (–) buttons to save your setting.
11.
EXTERNAL POWER BANK
right bottom side for connecting with Power bank (5V 1.5A or more)
to continue the scan job when the battery power is exhausted.
NOTICE 1: Never connect with computer or notebook which do not have
enough power for this device.
NOTICE 2: Remove the DRY battery inside before connecting with power
bank or battery charger.
: After knowing the content of image clearly, press and
: The jack in right upper side is shared
: This device has
: This device has a USB port in
NOTICE OF USE
1. Unauthorized repair or disassembly of this device will void all the warranty.
2. Avoid water.
3. Do not store this device in an excessively hot place.
4. Avoid knocks or dropping this device.
3
 Loading...