

Page 1
MQ-L500 User's Manual
Digital Voice Recorder & Cellphone Portable Charger
Certification No.:
MSIP-REM-ESO-MQ-L500
MQ-L500 User's Manual
MADE IN KOREA
Digital Voice Recorder & Cellphone Portable Charger
Caution in use
Please be sure to read user's manual before use and use product safely and properly.
Warning -
* The pictures in user's manual can be different from the real thing and contents can be changed without prior notice to improve performance.
* To use product with other devices, check the compatibility each other first.
* We are not responsible for the loss of recordings caused by misuse, after-sale service, others.
* We are not responsible for the damage caused by the use of product and for the third party's claim for compensation.
* Decomposition, remodeling, impact or usage at low temperature, high temperature, humid place can be the cause of breakdown.
Name of each part
ⓐCharging terminal for external device
ⓑCharging/USB terminal for body
ⓒBattery button
ⓓBattery remains LED
ⓔRecording LED
ⓕMicrophone
ⓖRecording switch
Composition
Do not leave product alone in high temperature more than 40 degrees like a car, or that can be the cause of explosion and fire.
ⓕ
ⓐ
ⓔ
ⓑ
ⓒ
ⓓ
ⓖ
Using magnet
You can install product easily by using magnet.
* Attach magnet on the groove of product and put product near steel desk,
steel electronic appliances, etc. and product is attached.
* When you detach product in separating, magnet can be attached to the installation place.
Body
USB cable
Magnet
User’s Manual
Detach magnet and keep it.
Place to attach magnet
Magnet
Charging body
After connectng USB cable to body charging terminal(ⓑ), charge it by connecting to the charging adaptor(option) or PC USB port.
* In charging by connecting product to PC with USB cable, in case of low power supply current, charging speed can be slow.
* During charging, product and charger can be a little hot. That is normal phenomenon and does not influence the life or function of product.
* During charging, like below picture, blinking LED is changed to lighting in order according to battery capacity.
When charging is completed, all LED are turned on.
<Battery status during charging>
0% . . . . . . . . . . . . . . . . . . . 100%
Battery type
Battery capacity
Power input
Power output
Body charging time
AC/DC adaptor - about 3 hours, PC - about 5 hours
Li-ion
3,000mAh(3.7V)
DC 5V, 1A
DC 5V, 2A(Max)
*Charging time condition :
- AC/DC adaptor is data measured by using 5V/2A product.
- PC is data measured by connecting USB cable to the USB port at the rear of PC.
Checking battery remains
You can check battery remains by pressing batteryr button(ⓒ).
* Battery remains is indicated for 20 seconds.
* If the battery remains indication is 『 』, charge the battery
<Battery remains indication>
Charge the battery . . 30% . . 60% . . 100%
Charging
adaptor
USB
cable
Lights-out(turned off)
Blinking(flickering)
Lighting(turned on)
Body
Connecting it to PC
After connecting USB cable to the USB terminal(ⓑ) of body, connect the other end to the USB port of PC.
* To use it on PC, keep recording switch(ⓖ) in the state of stop.
* You can use the functions of "copy, delete, playback, format" on PC in the same way as general USB memory.
* When it is connected to PC, "MemoQ(removable disk)" is created, double-click it, and there is the folder of VOICE.
Stop
* In separating product from PC, perform "safe removal of hardware" to prevent data damage.
USB cable Body
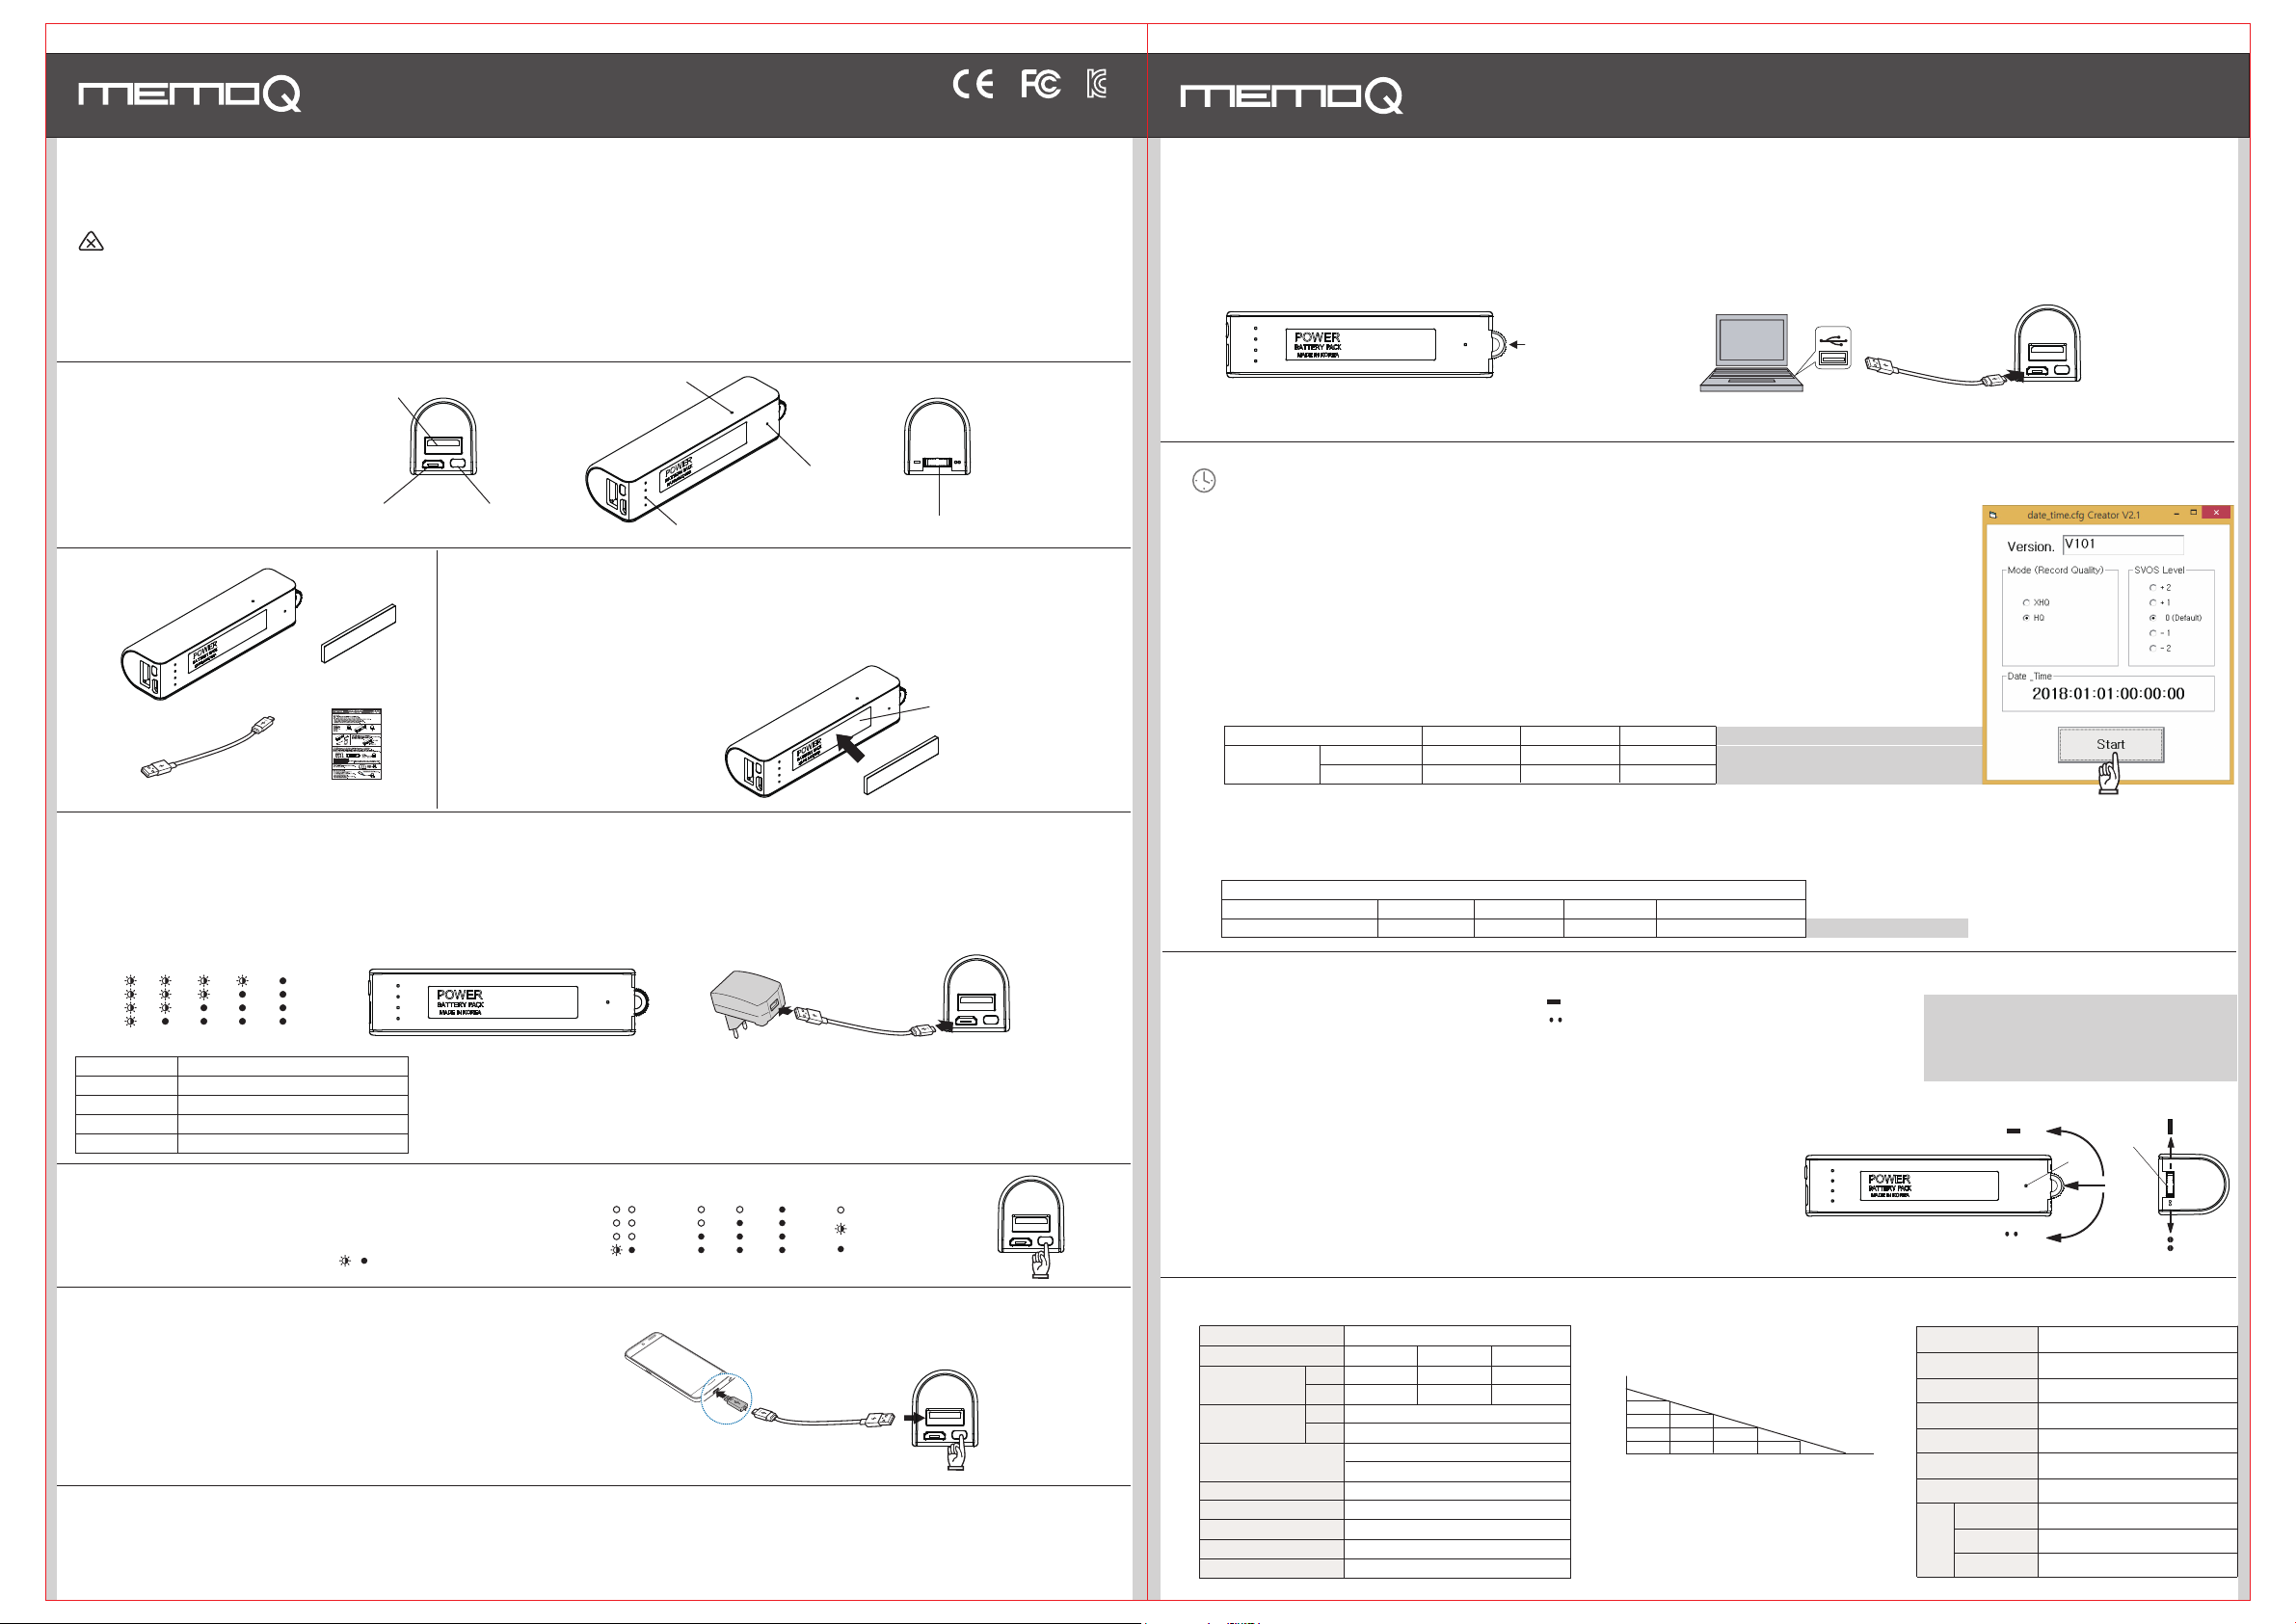
Time setting
1) After USB connection on PC, perform the program of '
and the right window of "date_time.cfg Creator" appears.
2) Click the button of "Start" in the window of "
date_time.cfg Creator
3) Separate product from PC, and recording LED(ⓔ) blinks rapidly and time setting is completed.
Caution-1. Date and time set in PC is set up automatically.
(Time to click the button of Start is set up at the point of separating product.)
Caution-2. When battery is discharged, date is initialized.
Before record, perform time setting again and use it.
Time Setup
' saved in product by double-click,
", and file of "
date_time.cfg
" is created in product.
Recording sound quality setting
* In Mode(Recording Quality) within right window of "date_time.cfg Creator",
select XHQ or HQ and click the button of "Start", and setting is completed.
Memory
Recording time
XHQ
(Super High Quality)
HQ(High Quality)
8GB 16GB 32GB
about 144hrs about 288hrs about 576hrs
about 288hrs about 576hrs about 1152hrs
* Basic setting is "HQ".
* Recording time is the standard of memory capacity
* Recording time is the standard of memory capacity
and is different from the hours of battery use
and is different from the hours of battery use
(continuous recording time).
(continuous recording time).
SVOS level setting
* You can set up the volume of sound to start recording in sound detection recording.
* In SVOS Level within right window of "
date_time.cfg Creator
", select one among "+2, +1, 0, -1, -2" and click the button of "Start", and setting is completed.
* Please change after testing according to place and situation.
-2 -1 0 +1 +2
(response to loud sound) . . . (basic setting) . . . (response to low sound)
SVOS Level
* Basic setting is "0".
Recording(continuous recording / super voice operated system / recording by external power)
* When you turn recording switch(ⓖ) to the direction of 『 』, continuous recording starts after about 5 seconds.
* When you turn recording switch(ⓖ) to the direction of 『 』, super voice operated system(SVOS) starts after
about 5 seconds. In case of super voice operated system, if there is no sound for 1 minute during recording, it
saves recording and is converted to standby mode and start recording again automatically when sound is detected.
(Max recording standby time : about 150 days)
* When you move the slot of recording switch(ⓖ) to the center, recording stops and current recordings are saved.
Recording file is saved in the folder of VOICE as a format of MP3.
*『Recording by external power』 (refer to "charging body")
When you connect it into PC or USB adaptor during recording, you can record for a long time.
While you record for a long time,
recording LED(ⓔ)
blinks in the interval of 5 seconds and
Continuous Recording
you can record up to the recording time per memory.
* In case of continuous recording, recording less than 5 hours is saved to one file and
recording more than 5 hours is split and saved by the unit of 5 hours.
* When recording files exceed 9,999, recording is not possible any more.
* We recommend continuous recording if you can control
recording start and stop with voice recorder carried and
we recommend SVOS recording when you install voice
recorder in specific place and can not control recording
start and stop.
SVOS
『 』
『 』
ⓖ
ⓔ
Stop
Charging external device from body
After connecting USB cable to charging terminal for external device,
connect the other end to the connector of external device.
Press battery button(ⓒ), and the charging of external device starts.
* When charging is completed, power is turned off automatically.
* This product is used as an auxiliary battery and
the batteries of some devices can not be charged completely.
* During recording, it can not charge external device.
Formatting
* When you format MemoQ(removable disk), all data of product are deleted.
** Caution : It supports the format type of FAT32 only. If you change to other type, product does not work properly.
** Caution : Data deleted once can not be restored.
* In charging cellphone, battery is consumed a lot.
For recording, use it after recharging body.
Specifications
Model
Memory
Recording time
Hours of
battery use
Super Voice Operated
System(SVOS)
Max number of recording files
Dimension, Weight
Battery type
Usage environment
Accessory
XHQ
HQ
XHQ
HQ
MQ-L500
8GB 16GB 32GB
about 144 hrs about 288 hrs about 576 hrs
about 288 hrs about 576 hrs about 1152 hrs
about 12 days
about 14 days
Recording standby time : about 150 days
Basic setting level : about 60dB(A)
9,999 files
93(W) x 27(H) x 23(D)mm, 75g
3.7V, Li-ion, 3,000mAh
Temperature:0~ 40℃, Humidity:20~80%
USB cable, magnet, User's manual
Battery remains
(Recordable day)
In SVOS, recordable day after
standby time of no recording
14
11
11
8
5
2
0
0 30 60 90 120 150
8
5
(Standby day)
Paid service
- Defect caused by careless use.
- Defect caused by user's internal modification.
- Defect caused by natural disasters like fire,
salt damage, flood, earthquake, etc.
- Defect out of warranty period.
Warranty Card
Product name
Model no.
Purchasing date
2
0
Purchasing place
Tel.
Etc.
Warranty Period
Name
Address
Tel.
Customer
Voice Recorder & Portable Charger
MQ-L500
1 year from purchasing date
 Loading...