

Page 1

kitvision.co.uk
All trad emarks a re acknowledg ed as the proper ty of their respe ctive owners.
Unless o therwise state d their use does n ot imply th at the trademark o wner
is aliate d with Kit vision or endor ses the pro ducts herein.
Prop 65 WARNI NG: This product m ay contain a chemi cal known to the Sta te of California to ca use
cance r, birth defe cts, or other repro ductive harm. Pro position 65, Cal ifornia Health & S afety Code.
Please recycle this packaging responsibly.
Action Camera
USER MANUAL
© Kitvision is a tradema rk of Kondor Limite d, 2018. Christchurch, Dor set, BH23 4FL, UK
JB. 5794-c / US / K VACTCAM2 / Made in China
Page 2

Please read this manual carefully before use.
Contents
3 Box contents
4 Functions
5 Turning the powe r on and o
5 Charging the battery
5 Removi ng the batter y
6 Inser ting th e memory ca rd
6 Format ting a micro SD card
7 Changing the mode of the c amera
8 Video mode
9 Photo mode
9 Playback mode
9 Setup mode
10 Setup mode – Available setting s
14 Deleting and protecting media
14 Shortcuts
15 Conne cting the came ra to a PC
15 Waterpro of case
16 Specications
18 Care for yo ur Kit visi on
Action Camera
18 Troubleshooting
Box contents
• Kitvision Action Camera
• 30 m waterproof case
• Bicycle mount
• Camera clip with screw
• Flat adhesive mount
• 90 degre e adaptor
• Action ca mera to ¼" tripod adaptor
• Mounting straps
• Micro USB c able
• Batter y
• 2 x ad hesive pads
• User manual
32
Page 3
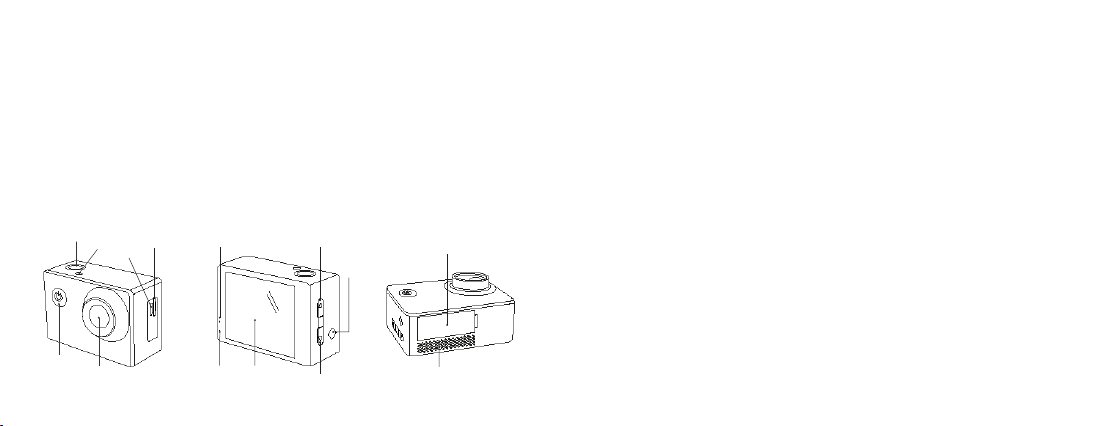
Functions
1. S hut t er/O k
2. LED indicator
3. Power/Mode
4. Lens
5. Built-in microphone
6. Micro SD card s lot
7. Micro USB input
1
2
7
3
4
Instructions for use
8. Power indicator
9. Charging indicator
10. Built-in LCD
11. U p
12. D own
13. Built-in speaker
14. Battery cove r
6
118
13
14
Turning the power on and o
1. Long press Power/Mod e (3) to turn on the cam era. Wh en turned on, th e camera
will make a ‘chime’ sound eect
2. Long press Power/Mode (3) to tur n power o
Charging the battery
The camera has a built-in rechargeable lithium battery. Please fully charge the battery
before use.
1. Turn o the cam era
2. Connect the micro USB connector of the USB cable to the camera and the other end
to a PC/mains charger USB port
3. The Charging indicator (9) will be solid red whilst charging
Note: The c amera body may b e warm af ter ex tended use. This is nor mal.
Removing the battery
1. Ensure the cam era is powered o and not charging
109
12
5
2. Lift the B atter y cover (14)
3. Pull the bat tery tab to remove the rechargeable batter y
54
Page 4

Inser ting the memory card
The Kitvision Action Camera doe sn’t have any intern al memory. To be able to record
video o r capture photos using the camera, you must have your micro SD card inserte d
(32 GB max, not included ).
1. Ensure the cam era is tur ned o
2. Insert your memory card into the micro SD card slot (6)
3. The camera us es the FAT32 ling system. If the mic ro SD card is incompatible,
it will need formatting
Formatting a micro SD card
Your Kitvision Action Ca mera can form at a micro SD card to ensure it f unctions correctly.
CAUTION: THIS WILL DELETE ALL DATA AND MEDIA from the micro SD Card
1. Insert your memory card into the micro SD card slot (6)
2. Turn on the camera and press Power/Mode (3) three times to enter s etup mode.
If in another mod e, press Power/Mod e (3) until the setup m ode icon is visible
3. Use Up (11) and Down (12) to navigate through the set tings
4. Highlight ‘Format’ and press Shutter/Ok (1)
5. Use Down (12) to highlig ht ‘OK’ and press Shutte r/Ok (1)
Changing the mode of the camera
The cam era has 4 dierent modes: Photo mode, Video mod e, Playback mode
and Setup mode.
• The corresponding i con will display in the top left of the LCD to indicate the
selected mode
Icon Mode Description
Video mode For recording video clips
Photo mode For taking still photos
Playback mode For viewing captured le s
Setup mode For changing camera settings
76
Page 5

Video mode
1. Turn on the camera and it will start in Video mode automatically. If in an other mode,
press Power/Mode (3) until the video icon is v isible
2. Use the LCD (10) to view your s hot, then press S hutte r/Ok (1) to start rec ording
– when rec ording, the LED indicator (2) will ash, th e LCD (10) will show how long
it has been recording for
3. Press Shutter/Ok (1) again to stop recording
Note: The c amera will stop record ing and save automatica lly when the me mor y
capacity is f ull or it has run out of battery power.
Note: For optimum audio quality, use the camera without the waterproof case.
When us ing the c amera without a case, p lease take extra care a nd make sure
it does n ot get wet.
Note: Before recording, if you require audio for your footage, ensure audio is turne d on.
Photo mode
1. Turn on the camera and press Power/Mode (3) once to enter Photo mod e. If in
anothe r mode, press Power/Mode (3) until the p hoto icon is visi ble
2. Use the LCD (10) to view your s hot, and p ress Sh utter/OK (1) to take a still imag e
– after the image has been taken, the LED indicator (2) will as h
Playback mode
1. Turn on the camera and press Power/Mode (3) t wice to enter Play back mo de.
If in another mod e, press Power/Mod e (3) until the playback icon is visible
2. Use Up (11) and Down (12) to navigate throug h your le s
3. When view ing a video, press Shut ter/Ok (1) to play and pa use
Setup mode
1. Turn on the camera and press Power/Mode (3) three times to enter S etup mode.
If in another mod e, press Power/Mod e (3) until the setup i con is visibl e
2. Use Up (11) and Down (12) to navigate through the set tings
3. Press Shutter/Ok (1) to enter the sub menu for the highlig hted set ting
4. Use Up (11) and Down (12) to navigate through the available o ptions
5. Press Shutter/Ok (1) to select the highlighted optio n
98
Page 6

Setup mode – Available settings
MENU FUNCTION
Video resolution
Date sta mp
Motion detection
Loop recording
Change the resolution for when in vid eo mod e. Higher resolutions
will record in better qu alit y but will take up more mem ory
[1280 x 720p] / [640 x 480p]
This fu nctio n can be used to add a v isibl e time and date sta mp
to the media. Please note you must also manually set this using
the ‘Date/Time’ setting
[OFF] / [O N]
This fu nctio n can be used to start a recordin g when motion is
detected in front of the cam era
[OFF] / [O N]
This fun ction ca n be used to break up video les. When this option
is turned on and the camera is recording, a vide o will automati cally
be split into small er les based on th e chose n time fra me
[OFF] / [1Min] / [3Min] / [5Min]
Record audio
Exposure
Camera resolution
Delete
Protect
Volume
This fu nctio n can be used to mute the microphon e
[OFF] / [O N]
This fu nctio n will change how light o r dark your media will a ppear
[+2.0] / [+5/3] / [+4/3] / [+1.0] / [+2/3] / [+1/3] / [+0.0] / [-1/3] /
[-2/3] / [-1.0] / [-4/3] / [-5/3] / [-2.0]
Change the resolution for when in photo mode. Higher resolutions
will take better quality images but will take up more memor y
[5MP] / [3MP] / [2MP] / [1.3MP]
This fu nctio n can be used to permane ntly de lete media
[Dele te Current] / [De lete All]
This fu nctio n can be used to prote ct media from being ove rwr itten
[Lock Curren t] / [Unlo ck Current] / [Lock All ] / [Unlock All ]
Adjust the built-in speakers volume
[0-8]
[con tinued ...]
1110
Page 7

Format
Language
Auto power o
Screen saver
Default setting
Set up your micro SD Card to be used with your Kit vision Acti on
Camera. CAUTION: T HIS WILL DELETE ALL DATA AND MEDIA
[Cancel] / [OK]
Change the lan guage of the camera
[Engli sh] / [Simp lied Chinese] / [Traditional Chinese] /
[Japanese] / [French] / [German] / [Korea n] / [Thai] /
[Portuguese] / [Russian] / [Spanish] / [Hungarian]
This fu nction can be us ed to turn th e came ra o afte r a specied
time frame of inactivity
[O] / [1Min] / [3Min] / [5Min]
This function can be use d to turn the display o af ter a spe cied
time frame of inactivity
[O] / [1Min] / [2Min] / [3Min]
This fu nctio n can be used to reset the camera back to its default
factor y settings. This will not delete any media
[Cancel] / [OK]
Frequency
Delay pictures
Date/Time
Version
Changes the T V output between 50 Hz (PAL) and 60 Hz ( NTSC)
[50 Hz] / [60 Hz]
This fu nctio n can be used to create a 3 seco nd delay betwe en
when you press Shutter/OK (1) and when an im age is captured
[OFF] / [O N]
Change the date/ time on the camera. Use U p (11) and Down (12)
to alter the numbe r and Shutter/OK (1) to proceed to the nex t option
[Year / Month / Day / Hour / Minute]
Select this option to view your model number and rmware version
1312
Page 8

Deleting and protecting media
1. Turn on the camera and press Power/Mode (3) t wice to enter Play back mo de. If in
anothe r mode, press Power/Mode (3) until the p layback icon i s visible
2. Use Up (11) and Down (12) to navigate through your les until you have your chosen
le on screen
3. Press Power/Mode (3) to enter Setup m ode. Use Up (11) and Down (12) to navigate
through to the ‘Delete’ or ‘Protect’ option, an d press Shutter/Ok (1) to conrm and
follow the on screen instructions
• Choosin g to delete/lock /unl ock cur rent will only ae ct the media that was being
viewed b efore the setup mo de was entered
• Choosing to delete/lock/unlock all will aec t all media
Shortcuts
Can be used when in Vide o mode
1. Press Up (11) to activate and de-activate the ‘Rec ord Audio’ setti ng
Can be used when in Vide o or Photo m ode
2. Press Down (12) to manua lly activate the s creensaver
Connecting the camera to a PC
There are two ways to download l es from th e camera’s micro SD to a computer:
• By conne cting the micro SD card to a compute r using a c ard reader (not includ ed)
• By conne cting the camera to a computer us ing the s uppli ed micro USB cable
To upload your les to a computer, select ‘Mass storage’ from the options displayed.
Waterproof case
The Kitvision Action Camera inc ludes a case that is water proof up to 3 0 metres.
When us ing the c amera in a wet environment, always use the waterproof case.
It is recommended that the case be used at all times for protection reasons.
• You are ad vise d to test the waterpro of case e mpty by submerging it i n water to
ensure that it does not malfunction
• Make sure th e seal is clean before use. Wax, oil, dir t, sand or other po or conditions
will wea ken the bond and m ay cause damag e to the cam era
• Before use ensure the case is closed and the clip is rmly in pl ace to ensure the sea l
has full contact over the entire surface
[con tinued ...]
1514
Page 9

Using the waterproof case
1. Open the wate rproof case by re leasing the clip on the top of the ca se. To do so,
pull the f ront of the clip backwards and re move the c amera
2. Insert the came ra correctly so that the case cl oses e asily and provides a ti ght sea l
3. Position th e clip so that it ma kes a connecti on with the top of the rear doo r, and push
the clip d own to loc k it in place
4. Use the waterproof ca se’s external spring but tons to operate the c amera
Specications
Lens
Video resolution
Image resolution
Display
Working temp
Waterproof
90 degree
720P / VGA
5 MP / 3 MP / 2 MP / 1.3 MP
2" LCD
–10~+50°
30 m
USB interfac e
Storage
Batter y
Recor ding time (per charge)
Dimensions
Video format
Image format
Audio
White balance
Shutter control
Operation System Compatibility
USB 2.0
TF Supported (up to 32 GB)
3.7 V, 900 mAh rech argeable batter y
up to 90 minutes
H59.2 x W41 x D29.8 (mm)
AVI
JPEG
WAV (Bitrate: 176 kbps)
Auto
Electronic
Windows 98 / me / XP / Vista / 7 / Mac OS / Linu x
1716
Page 10

Care for your Kitvision Action Camera
Please DON’T:
• Get the camera wet, unless seale d in the in cluded waterproof ca se
• Drop the ca mera as this will invalidate you r warra nty
• Open up the camera in any way other tha n expla ined in this manual
• E xpose the cam era to extreme temperatures or r apid change s of hot to col d or vice versa
Please DO:
• Clean the camera with a soft dr y cloth a nd no dete rgents
Troubleshooting
We hope you’ve n ow got all the infor matio n you nee d to get sta rted, but if you’re
having p roble ms with a nything, ple ase feel free to c ontact us at:
[email protected] or visit www.kitvision.co.uk
Please d o not attempt to open th is product in any way ot her than explai ned in this manual . Making any attem pt
to open the p roduct or carr y out repair voids a ny and all warran ties.
We apologise for any inconvenience caused by minor inconsistencies in these instructions, which may occur as
a result of p roduct improvem ent and develop ment.
1918
 Loading...