

OM-CX1ZZZ-CEE-02
/005
Original Instruction
This equipment should not be installed,operated or
maintained by any person who has not read and
understood all the contents of this manual. Failure to
read and comply with the contents of this manual can
result in serious bodily injury or death, and/or property
damage.
Issued August, 2011. Revised November, 2019 (Revision 05)

Table of Contents
Introduction ........................................................................................................ 2
Intended Purpose .............................................................................................. 2
Safety precautions ............................................................................................ 3
Chapter 1 Operation ......................................................................................... 5
Chapter 2 Inspection ...................................................................................... 17
Chapter 3 Troubleshooting ............................................................................ 33
WARRANTY ...................................................................................................... 40
Introduction
This Instruction Manual is intended for those operating the KITO model CX chain hoist. Separate document;
Disassembly/Reassembly Manual is also available for the relevant person (Note). Please contact KITO or your dealer
for the material.
Note : A person who is authorized by the business entity as having thorough knowledge and expertise on the
structure and devices of a chain hoist, or a person with similar thorough knowledge and expertise and capable of
understanding periodic inspection, and Disassembly/Reassembly Manual.
When these conditions are not satisfied, consult KITO or your dealer, or request maintenance.
Intended Purpose
This manual chain hoist is designed and manufactured to lift and lower a load manually within a normal work
environment. Movement in the horizontal direction is also enabled by combining with a trolley.
- Reproduction of this document, in whole or in part, without prior consent is prohibited.
- This document is subject to change without prior notice.
- This document was prepared with the utmost care. However, the customer is kindly requested to inform us of
any question, error or unclear point included in the document.
2

Safety precautions
Improper use of this manual chain hoist may result in danger, such as falling of the lifted load. Before installation,
operation, maintenance and inspection, be sure to read this manual carefully, comply with its instructions and operate
the product correctly. Prior to operation, all the safety and operating information, and safety precautions must be fully
understood. In this manual, precautions are classified into three categories: "Danger", "Warning" and "Caution". In
addition, read the instruction manuals of the equipment (such as trolley) related to the operation of the manual chain
hoist, and follow the instructions.
Description of signal words
DANGER indicates an imminently hazardous situation, which, if not avoided,
will result in death or serious injury.
WARNING indicates a potentially hazardous situation, which, if not avoided,
could result in death or serious injury.
CAUTION indicates a potentially hazardous situation, which, if not avoided, may
result in minor or moderate injury.
However, even CAUTION situations may result in serious injury or death depending on circumstances.
Ensure all precautions are recognized as important and complied with. After reading this manual, ensure it
remains readily available for users.
Description of safety symbols
Means a "Prohibited" action or a thing "You must not do".
Prohibited
Mandatory
Specific prohibited actions are shown in the safety symbol or described near the same.
Means a "Mandatory Action" or "Do as indicated".
The specific required action is shown in the safety symbol or described near the same.
Disclaimer
- KITO shall not be liable for any damage incurred due to fire, natural disasters such as earthquake and lightning,
actions of a third party, other accidents, intentional or accidental improper operation or misuse by customer, and
operation under conditions exceeding the operating environmental conditions.
- KITO shall not be liable for any incidental damage incurred, due to the use or inability to use this product (loss of
business profit, interruption of business, and damage to the lifted load).
- KITO shall not be liable for any damage incurred due to negligence concerning the instructions in this manual, or
operation under a condition exceeding the range defined in the specifications.
- KITO shall not be liable for any damage arising from malfunction due to the combination of the chain hoist used
with other equipment, unrelated to KITO.
Restricted usage
- The product is intended for use only in the region or the country where it was purchased. Due to the differences in
regulations and standards, it is not for use outside of the region or the country where it was purchased.
- This product is not designed nor manufactured to transport people. Do not use the product to transport people.
- This product is designed and manufactured for the purpose of lifting and lowering a load manually under normal
operating environmental conditions. Do not lift or lower loads using electric power. Movement in a horizontal
direction is enabled by combining with a trolley. Decide on and judge the appropriateness of use in accordance
with the intended purpose of the product design and manufacture.
- Since this chain hoist is used under diverse conditions, the customer should judge whether the product would be
used appropriately by carrying out analysis and tests if necessary. Ensuring the product performance and safety
are the responsibility of the person who judges the appropriateness.
3
Operators
- Before operating the product, read this manual and that of related equipment thoroughly to understand the
contents.
- Be sure to wear the proper clothing and personal protective equipment when using and operating the product.
Handling & Maintenance
Do not handle the chain hoist in any of the following manners.
Handling the chain hoist in the manner described below may result in death or severe injury:
Prohibited
- Only suitably competent persons are allowed to disassemble or repair the chain hoist.
Separate document; Disassembly/Reassembly Manual is provided for such competent persons. Disassembly and repair shall
be carried out in accordance with the document and page 17 to 39.
- Do not enter into any area below a lifted load or moving range thereof. Do not transport a load over people or allow people to
enter into the moving range of a lifted load.
- Do not remodel the product and its accessories.
- Do not adjust or disassemble the Bottom Yoke and Overload Limiter (a device to prevent excessive overload).
Mandatory
Prohibited
Mandatory
Comply with the following instructions when handling the chain hoist.
Failure to comply with these instructions may result in death or severe injury:
- Before operating the product, fully understand the contents of this manual and the caution labels.
- Carry out daily inspection before operation.
- Request the competent person to carry out periodic inspection (monthly, annually), or ask KITO.
- Keep the record of the periodic inspections.
- When not in use of the chain hoist, store it at any place where appropriate for the weight and size.
Do not drag or throw the chain hoist when carrying.
The chain hoist may be broken or damaged and any fall of the lifted load during use may result in injury or physical damage to
property.
Follow the operating environmental conditions (refer to page 11) when using the chain
hoist.
Use of chain hoist beyond the conditions may result in injury or physical damage to property.
4
Mandatory
When discarding the product, disassemble it to ensure it is not reused, and discard in
accordance with locale government regulations and ordinances or the rules defined by
the business entity.
Contact your local government and related division for details.
Refer to Disassembly/Reassembly Manual for how to disassemble the chain hoist, or consult with KITO.

Chapter 1
Operation
Table of Contents
Safety precautions ............................................................................................ 6
Unpacking ........................................................................................................ 10
Main parts......................................................................................................... 10
Specifications .................................................................................................. 11
Operating environmental conditions ............................................................. 11
Installation ........................................................................................................ 11
Preoperational check ...................................................................................... 11
Operation .......................................................................................................... 12
Maintenance and storage ............................................................................... 13
Inspection classification ................................................................................. 14
Daily inspection ............................................................................................... 15
Parts list ........................................................................................................... 16
5

Safety precautions
Mounting
Avoid the following when mounting the chain hoist.
Failure to comply with these instructions may result in death or severe injury:
Prohibited
- Ensure that only trained or competent persons install the chain hoist.
- Do not install the chain hoist within the range of movement of other devices (equipment), such as a trolley.
Mandatory
Mandatory
Comply with the following instructions when installing the chain
hoist.
Failure to comply with these instructions may result in death or severe injury:
- Check that the structure for mounting the chain hoist has sufficient strength.
- Fix the Top Hook to the structure securely.
- Before using the chain hoist with a trolley, read the Instruction Manual of the trolley carefully
and install it by adjusting the rail width.
- Install a stopper at both ends of the traversing rail for the trolley.
Comply with the following instructions when installing the chain
hoist.
Failure to comply with these instructions may result in injury or damage to property:
- Install the chain hoist to avoid impeding the hoist.
- Install the Load Chain with sufficient length for lifting work.
- If the adjustment of the bottom of the hand chain between 500 mm and 1000 mm from the
ground is required, consult KITO.
Traversing rail
Trolley
Stopper
Lift
Before use
Mandatory
Mandatory
6
Before moving the load, warn all the surrounding people.
Failure to comply with these instructions may result in death or severe injury.
Check the following before using the chain hoist.
If a defect is found while checking the chain hoist, stop using it, place a notice indicating "failure/inspection in progress" and request
a competent person to carry out inspection and repair.
Failure to comply with these instructions may result in death or severe injury:
- Carry out daily inspection before operation (refer to page 15).
- Check to see whether there is any defect in the sling.
- Check to use a proper chain hoist for your purpose, capacity and lift.
- Check the work environment to see if the work area is secure to pull the hand chain vertically and to maintain a good view
without any obstacles to monitor the operation.
- Check to see if the footing is secure.

Operation
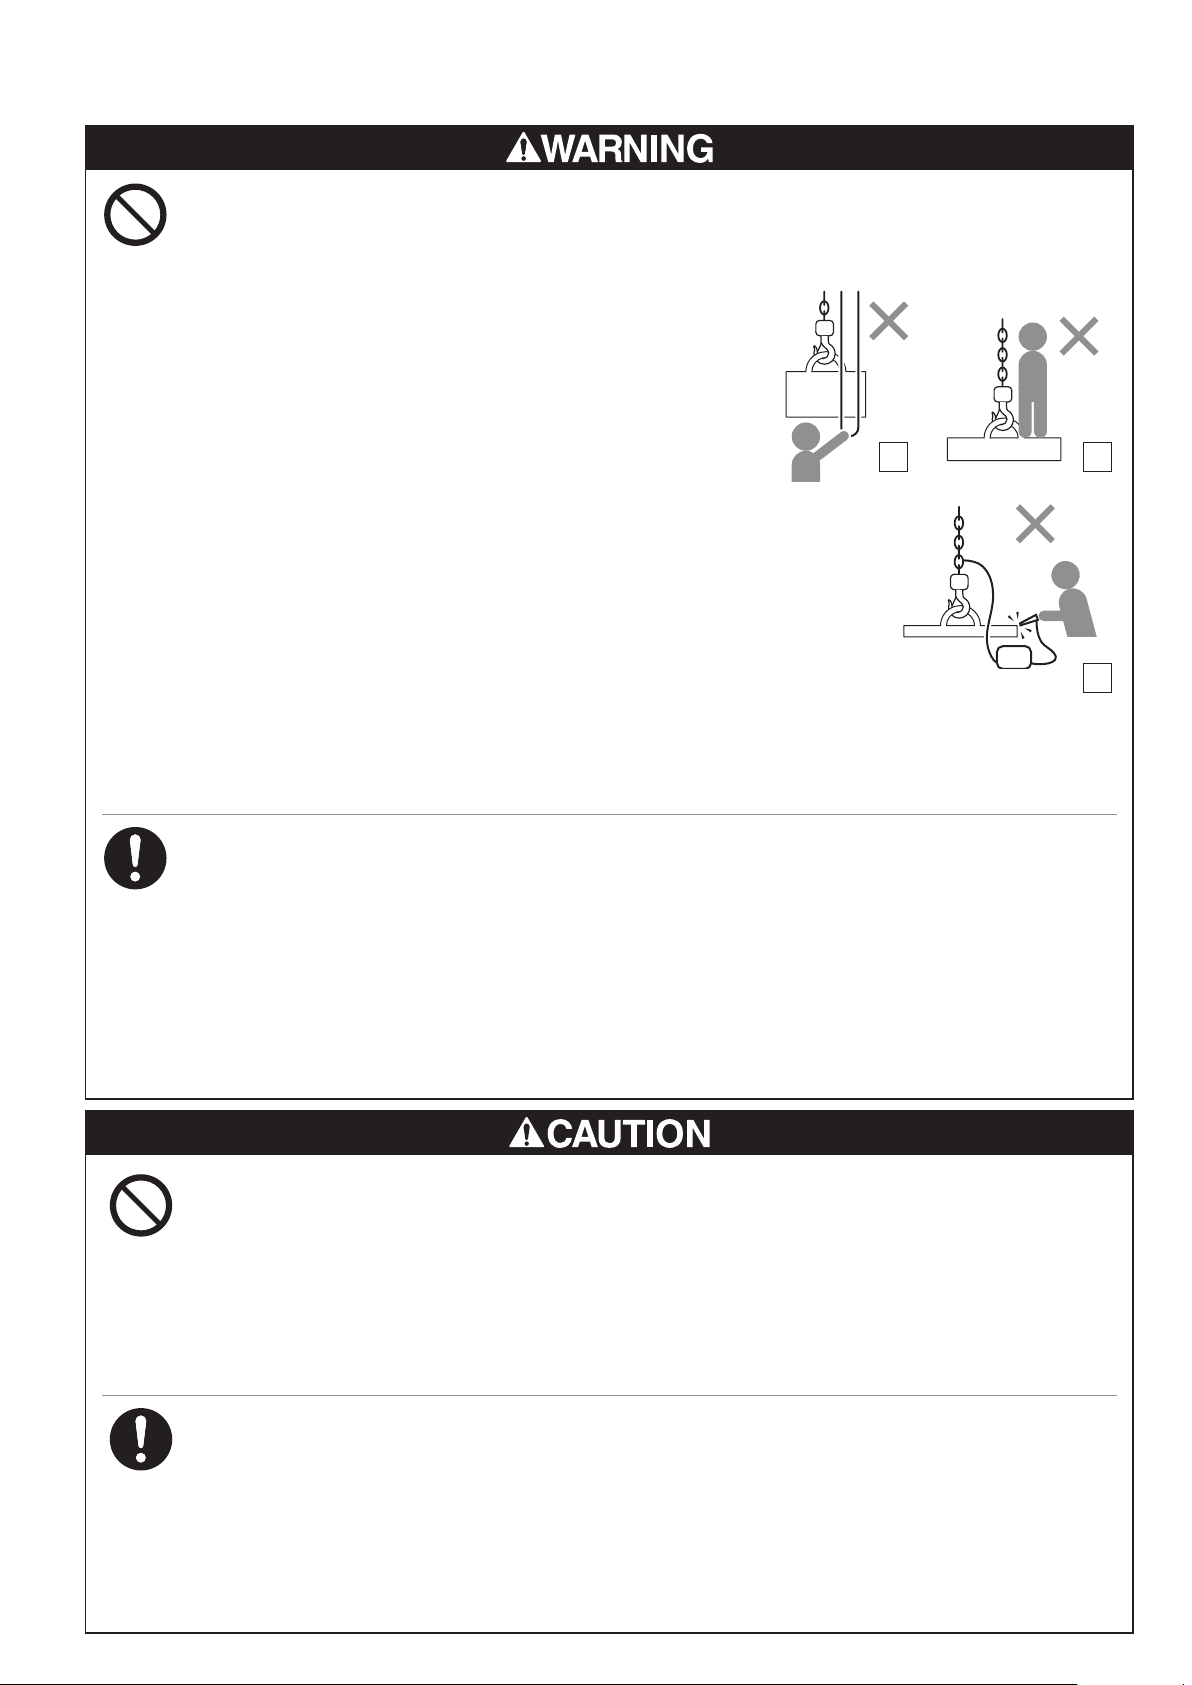
Do not use the chain hoist in the following manners.
Failure to comply with these instructions may result in death or severe injury.
Prohibited
<General>
<Slinging>
- The Load Chain is exclusively designed for this model of chain hoist. Do not use chains of other models of chain hoist.
Ensure that a competent person replaces the chain with an authorized part for this model, referring to Disassembly/Reassembly
Manual.
- Operate the chain hoist using only manual force.
- Do not leave a lifted load unattended for an extended period.
A
- Do not use a Hook without a Latch.
- Do not apply a load to the tip of the hook or latch.
<Fig. A>
- Do not use the load chain as a sling. <Fig. B>
- Do not operate the load chain while it is in contact with any
sharp edges, e.g. of a steel plate. <Fig. C>
B C
<Lifting>
- Do not lift more than the rated load. <Fig. D>
- Do not cause the load to come into contact with the load or
hand chains.
- Do not lift the load while holding the load chain.
- Do not swing the lifted load.
- Do not use the chain hoist without a straight line present
between the top and bottom hooks relative to the load direction. <Fig. E>
- Do not swing the load when lifting it off the ground. <Fig. F>
- In the situation where the chain hoist is to be used as a sling by connecting it to a crane, be
certain to convey the fact of this intended usage to KITO beforehand to confirm whether this
type of use is possible.
- Do not impede the hand chain with a lifted load or a member of the structure caught on the
chain.
Overload
D
E
F
- Do not use the chain hoist as a fulcrum. <Fig. G>
- When lifting off a load from a pallet, lift the load to avoid
exposing to shock, such as the load falling. <Fig. H>
- Do not lift or lower excessively.
- Before use, confirm the minimum distance between the
hook and load (minimum headroom) and lift in technical
data.
- Do not repeatedly operate the overload limiter (slipping action).
- If the overload limiter is activated, stop the lifting operation immediately and ensure that the chain hoist is in a no load state.
G
(Continued on the following page)
H
7
Operation
Do not use the chain hoist in the following manners.
Failure to comply with these instructions may result in death or severe injury.
Prohibited
<Transportation/Move>
<Post-lifting Work>
(continued from the previous page)
- Do not operate the chain hoist underneath the load or transport a load
over people. <Fig. I>
- Do not ride on a lifted load and do not use the chain hoist to support, lift,
or transport people. <Fig. J>
- Do not strike the stopper of the traversing rail or the structure with the
chain hoist or the trolley.
I J
- Do not execute welding or cutting work on a suspended steel plate.
- Do no use the load chain as the earth for welding work. <Fig. K>
- When repairing or disassembling, ensure that the chain hoist is placed down on the floor and
that only competent persons maintain the chain hoist.
- Ensure that the hand chain is pulled by a single person.
Mandatory
Prohibited
<Abnormality/failure>
- Do not use a damaged chain hoist or one generating abnormal sounds.
- Do not use the chain hoist if one of the following defects is found in the load chain.
Deformation, twists, kinks, flaws, cracks, adhesion of foreign matter, corrosion, and abnormal meshing.
- Heavy elongation or abrasion.
- Do not use the load chain hoist out of order or under repair.
Follow the instructions below when using the chain hoist.
Failure to comply with these instructions may result in death or severe injury:
- If any abnormality is detected during use, immediately stop using of the chain hoist, indicate "failure/repair in progress" and
request a competent person to perform maintenance and repair.
- When the manual force becomes excessive, stop operation immediately.
- Use sling appropriate for the weight and shape of a load. Improper slinging may result in an unsafe situation, such as the falling
of the lifted load.
- When any abnormality is observed during the operation, stop the operation immediately, indicate "FAILURE" and contact with
the maintenance engineers.
- When inspecting and repairing, be sure to indicate "INSPECTION" and carry out without lifting a load.
Do not use the chain hoist in the following manners.
Failure to comply with these instructions may result in death or severe injury:
- Do not operate the chain hoist as the hand chain is tangled or twisted.
- Do not expose the chain hoist to sparks from welding.
- Do not use an overload limiter for measuring the weight of the load.
- Do not apply a load to the hook tip or hook latch.
- Do not impede the lifted load or hand chain with other structures.
- If a load bounces up and down significantly when lowering the load, do not operate the chain hoist until the bouncing reduces.
K
Observe the following instructions when using the chain hoist.
Failure to comply with these instructions may result in death or severe injury:
Mandatory
- Unwind any twists in the load chain before lifting a load.
- If the load and hand chains are entangled or twisted, stop the operation immediately and reset the entangled or twisted chains.
- When lifting a load with two hoists, choose each hoist whose lifting capacity exceeds the load and operate the respective chain
hoist to keep the load lifted horizontal.
- There are risks of overheating of the braking system during prolonged lowering of loads.
If you are considering of the use under such condition, consult KITO.
8
Maintenance inspection / storage
Only competent persons are allowed to carry out maintenance inspection of the chain
hoist.
Mandatory
Mandatory
Failure to comply with these instructions may result in death or serious injury:
- The competent person should carry out maintenance inspection in accordance with page 17 to 39 and Disassembly/
Reassembly Manual.
- Do not cut, extend, or weld the load and hand chains.
- Do not apply oil to the braking part.
Comply with the following instructions when carrying out maintenance inspection and
storing the chain hoist.
Failure to comply with these instructions may result in injury or physical damage to property:
- To avoid misuse of the chain hoist under repair, apply a label indicating "failure/inspection in progress" on the chain hoist.
- When storing the chain hoist, wipe off dust and waterdrop, apply oil to the neck of the hook and load chain and store the hoist
indoors when not used for lifting loads.
- When replacing a part, use only an authorized part for the KITO model CX chain hoist.
Even though the part is an authorized one for KITO chain hoist, it may not be used for different model.
- Wear protection equipment such as protection goggles and gloves depending on the work contents. Especially, wear helmet
and safety belt when carrying the high lift work.
- Pay attention to work method, work procedure and work posture.
- Remove the oil or grease attached to the product or spilt on the floor.And keep the work area clean when disassembling the
product.
9
Unpacking
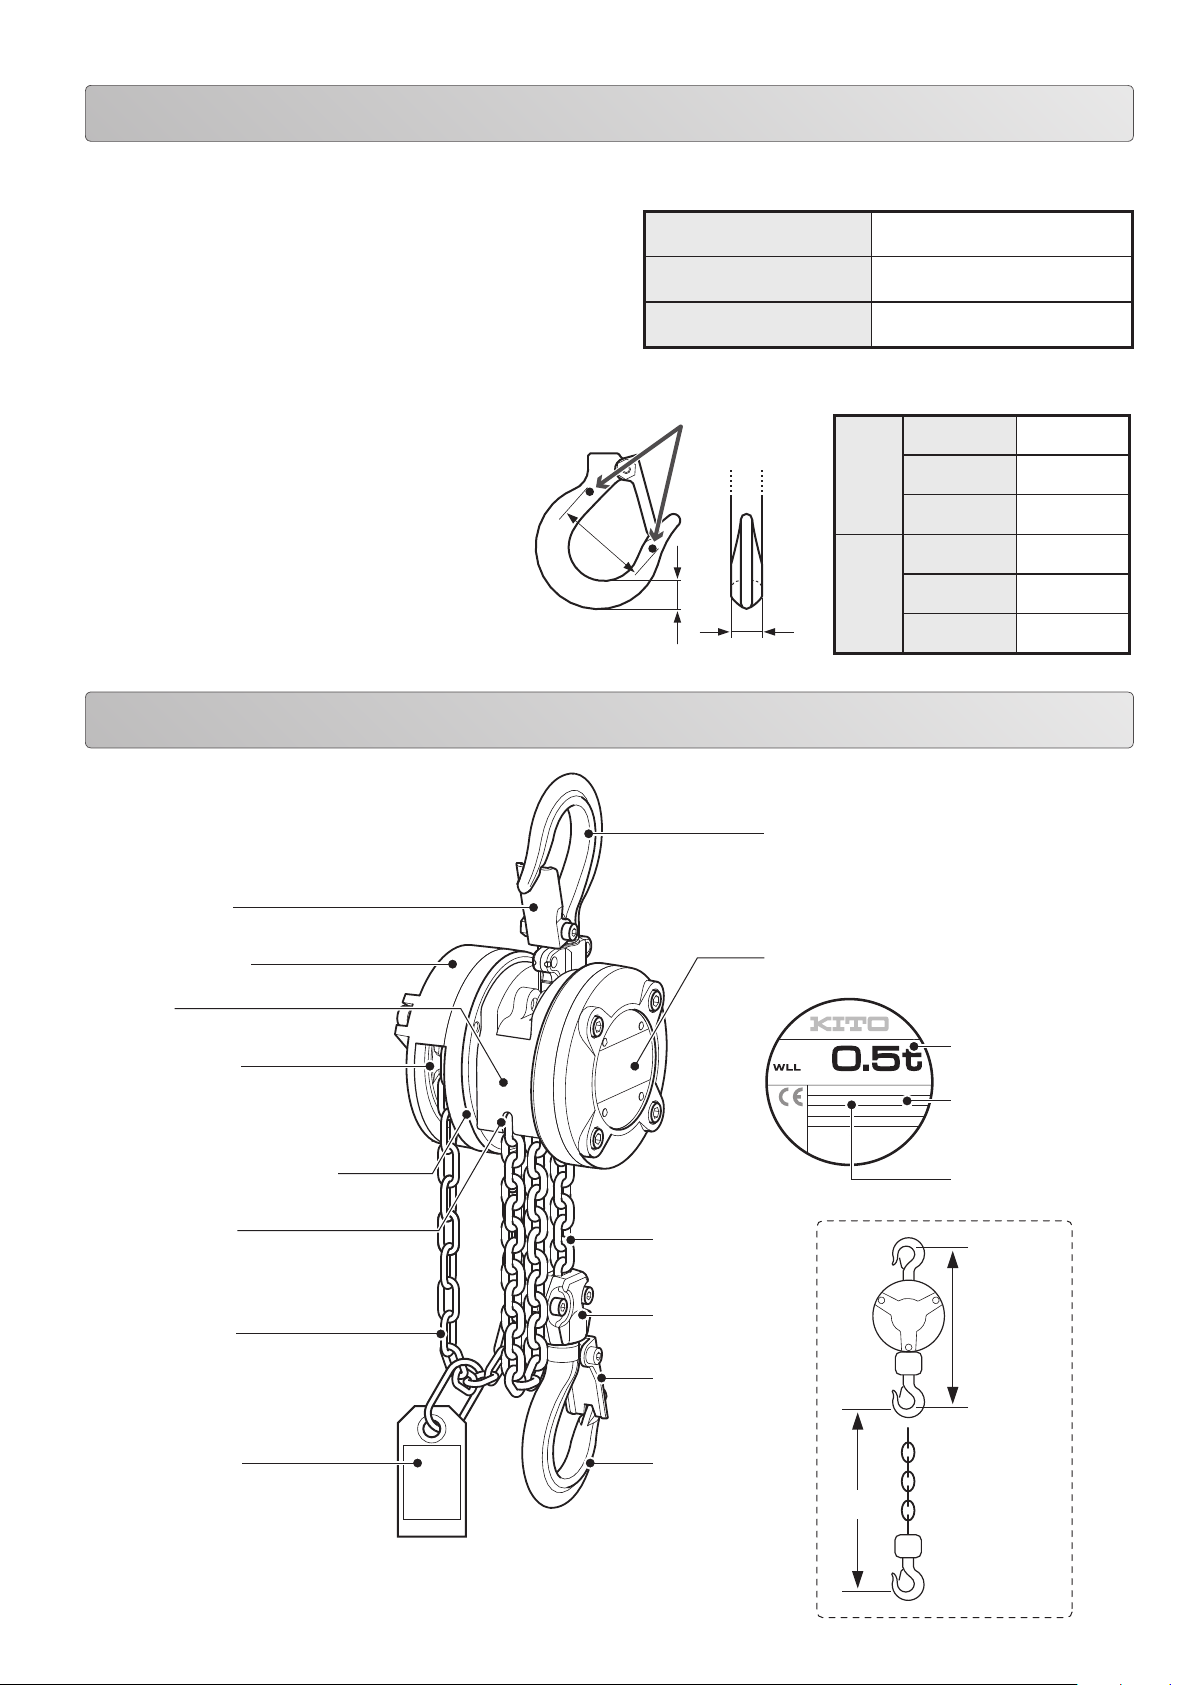
b
- Check that the information on the box and the product match the details of your order.
- Check to see whether the product has been deformed or damaged by an accident in transit.
- Fill in the blank provided in the right table with the Lot NO. (written
on the nameplate on the product), the date of purchase, and the
name of the store where you purchased the product.
* When requesting repair or ordering a chain hoist part, please
inform us of these pieces of information together.
Lot NO. CX1A-
Date of purchase
Store
- Fill in the spaces provided in the right table with
the distance "a" between embossed marks, the
hook width "b" and the thickness "c" for both the
top and bottom hook. (These figures are referred in
maintenance.)
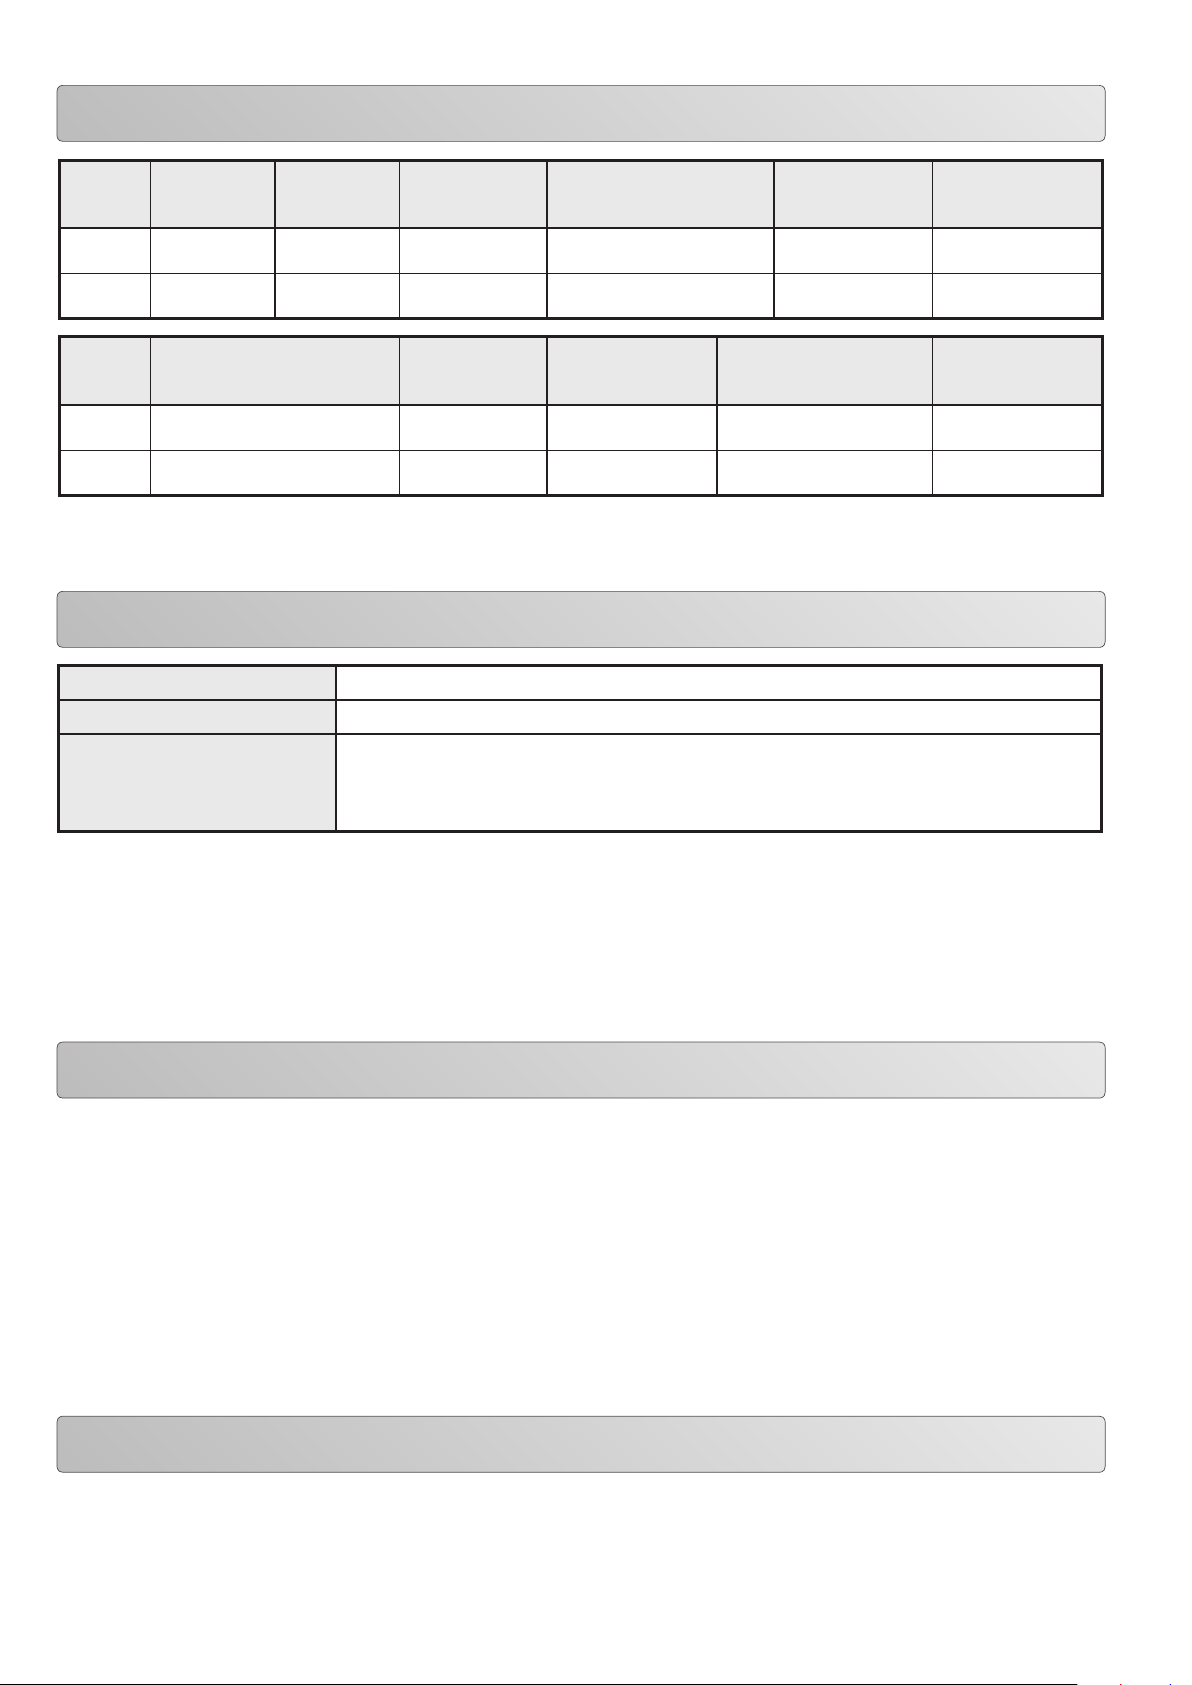
Main parts
Hook latch
Wheel cover
Body
Hand wheel
Over load limiter (OLL)
built-in
Brake (built into the body)
Embossed mark
a
c
Top
hook
Bottom
hook
Top hook
Nameplate
(rating / warning)
Equipped with OVERLOAD LIMITER
CODE:
LOAD CHAIN:
LOT No: CX1A
SERIAL No:
MFG.YEAR:
Yamanashi 409-3853 Japan
MADE IN JAPAN
Dimensions when new
Dimension a
Dimension b
Dimension c
Dimension a
Dimension b
Dimension c
Rated load
(ex. of CX005)
LOT No.
Model
mm
mm
mm
mm
mm
mm
10
Load chain
Load chain end at no-load side
Hand chain
Warning tag
Load chain
Bottom yoke
Latch
Bottom hook
Minimum
Headroom
Lift
Specifications
Product
code
CX003 0.25 2.5 217 2 147[15] 33.8
CX005 0.5 2.5 260 2.5 187 [19] 42.8
Product
code
CX003 3.2 x 9.0 1 0.313 0.4 2.4
CX005 4.3 x 12.0 1 0.625 0.9 4.5
This device was tested according to the required static and dynamic load test provided on the European standard EN 13157.
Rated load
(t)
Load chain diameter x pitch
Standard lift
(m)
(mm)
Minimum
Headroom (mm)
Chain fall lines
Standard length of the hand
chain double fold (m)
Test Load
(t)
*1: Average hand pull to lift the rated load.
*2: Length of the hand chain necessary to lift a load 1m.
Weight for additional 1m
Pull to lift Load
(N) [kgf]
of lift (kg/m)
*1
Hand chain length
for 1m lifting*2 (m)
Operating environmental conditions
Operating temperature range -40°C to +60°C
Operating humidity range Use the hoist at under 100%RH. This product cannot be used in water.
Standard materials are used.
Materials
Special materials such as sparkless materials and asbestos are not used.
With regard to the environmental load substances, 6 substances defined in the
RoHS directives are not contained in this product.
Mass
(kg)
Do not use the chain hoist in the following environments:
- In an alkaline/acidic atmosphere
- In an organic solvent/explosive atmosphere
Incidentally, when you wish to use the chain hoist in environments other than the aforementioned normal use environments, such as one with a high
salt content, or in an environment where outdoor use in particular is extensive, it may be possible to use the chain hoist by carrying out maintenance
inspection frequently. In such cases, consult with KITO beforehand.
Installation
Read the "Safety precautions : Mounting" on page 6 carefully before use and follow the instructions.
- The safety factor of the chain hoist is 4:1. The hoist may lift and hold a load more than the rated load. Check that the structure for mounting the
chain hoist has sufficient strength.
- Only allow trained or competent persons to install the chain hoist.
- Do not install the chain hoist within the moving range of other devices (equipment), such as a trolley.
- Before using the chain hoist with a trolley, read the Instruction Manual of the trolley carefully and install it by adjusting the rail width.
Install a stopper at both ends of the traversing rail for the trolley.
- If the adjustment of the bottom of the hand chain between 500 mm and 1000 mm from the ground is required, consult KITO.
Note: KITO TS trolley (Models TSP005) can be connected to this hoist. When using the CX003 by connecting to a
trolley, change the capacity on the trolley nameplate to 250kg, corresponding to CX003. For details, contact
KITO.
Preoperational check
Read the "Safety precautions : Mounting" on page 6 and "Safety precautions : Maintenance" on page 9 carefully
before use and follow the instructions.
The user must carry out a daily inspection before operation.
Even if the chain hoist is permanently installed and used for the same purpose repeatedly, check all the works for the
day and check to ensure that it does not exceed the rated load on each occasion.
11

Operation
Read the "Safety precautions" Operation on pages 7 to 9 carefully before use and follow the instructions.
Correct way to lift a load
Hang on the axis of
the hook.
Avoid the dangerous hooking method shown in the following diagrams.
The holding object or
the sling is not hooked
in the correct position.
More than 60 degrees.
The angle is too wide.
60 degrees or less.
The hook latch does
not close.
Operation method
Wheel cover side
The load is applied at
the tip of the hook.
Lowering
When the hand chain on the left,
as viewed from the wheel cover
side, is pulled down (in a DN
direction), the load is lowered.
This product is designed for a rated load to be hoisted by pulling the hand chain with a force shown in the "Pull to lift
load" table below or less. If an excessive load is applied, the overload limiter will operate. In this situation, immediately
stop the operation and lighten the load.
Pull to lift load:
CX003 147 N (15kgf)
CX005 187 N (19kgf)
Lifting
When the hand chain on the right,
as viewed from the wheel cover
side, is pulled down (in an UP
direction), the load is lifted.
12

Overload limiter (OLL)
Do not adjust or disassemble Overload Limiter (OLL).
Failure to comply with these instructions may result in death or serious injury.
This product is equipped with an overload limiter (OLL: a device to prevent an excessive overload) as standard.
An excessive overload via the hand chain activates OLL which slips the hand wheel to prevent damage to the
product.
When OLL operates, the maximum load to the product is approximately 2.4 times of the rated load.
If OLL operates, reduce a load to less than the rated load. Also check that the structure for mounting the chain
hoist (including a trolley) has no damage.
Maintenance and storage
Read the "Safety precautions : Maintenance, inspection/storage" on page 9 carefully after use and follow the
instructions.
Care
- Do not drag or throw the chain hoist when carrying.
- Never apply oil to the braking part.
- Wipe off dust and moisture, and apply oil to the neck of hook and the load chain.
Storage
- When not in use, ensure that it does not encumber other works.
- Store the hoist in a dry area indoors.
- When installing outdoors, cover the hoist to avoid exposure to rain or store in a place with covering against rain.
- Before storing the hoist, pull the hand chain by about 10cm to lower the hook and ensure that the brake is released.
Tool
- To disassemble or reassemble the hoist, prepare for the following tools.
.
No
1 Hexagon wrench 4mm
2 Snap ring pliers For disassembling and reassembling the pawl and cam guide
Hexagon wrench
3
2.5mm
4 Hexagon wrench 3mm For disassembling and reassembling the bottom yoke and hook latch
Tool name Application
For disassembling and reassembling the frames A and B, gear case, and
wheel cover
For disassembling and reassembling the end pin
5 Wrench 7mm For disassembling and reassembling the bottom yoke and hook latch
6 Long nose pliers For the cam guide
7 Torque wrench For checking a tightening force
13

Inspection Classification
To maintain continuous and satisfactory operation, a regular inspection procedure must be initiated to replace worn or
damaged parts before they become unsafe.
INSPECTION Classification
Inspection intervals must be determined by individual application and are based on the type of service to which the hoist will be subjected and the
degree of exposure to wear, deterioration or malfunction of the critical components.
The type of service to which the hoist is subjected can be classified below.
- Normal Service – service that involves operation with randomly distributed loads within the rated load limit, or uniform loads less that 65% of
rated load for not more than 15% of the time.
- Heavy Service – service that involves operation within the rated load limit which exceeds normal service.
- Severe Service – service that involves normal or heavy service with abnormal operating conditions.
The three general classifications are herein designated as DAILY, FREQUENT and PERIODIC, with respective intervals between inspections as
defined below.
DAILY Inspection – visual examinations by the operator or other competent person before daily operation.
FREQUENT Inspection – visual examinations by the competent person with intervals per the following criteria:
- Normal service – monthly
- Heavy service – weekly to monthly
- Severe service – daily to weekly
Records are not required.
PERIODIC Inspection – disassembly/reassembly inspection by the competent person with intervals per the following criteria:
- Normal service – yearly
- Heavy service – semiannually – 6 months
- Severe service – quarterly – 3 months
Records are to be kept for continuing evaluation of the condition of the hoist.
14

Daily inspection
Inspections include the "Daily inspection" carried out by the operator, using the product before use, and a more
thorough "Frequent/Periodic inspection (page 17 to 31)" carried out by a competent person with sufficient knowledge,
who can disassemble the chain hoist.
- Be sure to carry out these inspections in order to use the chain hoist safely.
- Separate document; Disassembly/Reassembly Manual is also available for the competent person. Please contact KITO or your dealer for the
material.
Hook
- To ensure both the top/bottom hooks
have no deformation or flaws.
- For the neck part of both the top /
bottom hooks to rotate smoothly.
- To ensure no looseness in the bolts and
nuts fixing the bottom yoke.
Appearance
- For the nameplate to be fixed firmly and
for the displayed contents to be clear and
legible.
- No loosend or fallen-out bolts and nuts.
- To have no flaws and damages to the
appearance.
Latch
- For the latch to be closed.
- For the latch to have no deformation or
flaws.
- For the latch to open/close smooth-ly.
Body
End at no-load side
Hand chain
-
For the hand chain to have no deformation,
flaws, twists or kinks.
Load chain
- For the end at the no-load side to be fixed to the
body.
- To have no deformation, flaws, twists or kinks.
- To have no conspicuous rust
* Remove rust, when it is observed.
- For the load chain to be oiled.
* If it is not oiled, remove the dust and moisture on the
load chain and apply the lubricant JIS K 2246 class
1, No.1 (code: NP-9) rust preventive oil equivalent
(DAPHNE OIL COAT RL-44, IDEMITSU KOSAN
Co., LTD. recommended) Consult KITO if the usage
environment does not allow the application of
lubricating oil to the load chain.
Lifting
To carry out a lifting operation with one hand
while lightly pulling the load chain on the bottom
hook side with the other.
- To be able to hear the pawl of the brake
device sounds clicks and to move smoothly
- Bottom hook should stop when the
operation is stopped.
* If the bottom hook is entangled with the
load or hand chain, untangle the chain.
Lowering
To carry out a lowering operation with one hand
while lightly pulling the load chain on the bottom
hook side with the other.
- To make no noise during the lowering and
move smoothly.
- Bottom hook should stop when the
operation is stopped.
- If the hoist cannot be lowered, check that
bottom hook is not lowered excessively,
ant then carry out the lowering operation
by strongly pulling the hand chain for a
moment. If it is still unable to lower, consult
with the competent person, or contact
KITO.
If there are any abnormalities, consult the competent
person or contact KITO.
15

Parts List
18
32
23
31
36
35
22
27
24
23
26
28
34
25
33
29
10
2
1
12
30
11
15
14
13 21 19
17
18
9
20
16
CX005
8
7
5
6
16
Fig.
Part No. Part Name
No.
1 1001 Top hook Set 1
2 071 Hook latch Assembly 1
3 1021
4 071 Hook latch Assembly 1
3 1021 Bottom hook set 1
4 071 Hook latch Assembly 1
5 841 Load chain 1
6 041 Chain pin 1
7 042 Split pin 1
8 049 Slotted nut 1
9 5103
10 101 Frame A 1
11 102 Frame B 1
12 6104 Body assembly 1
13 106 Socket head cap screw 4
14 107 Spring lock washer 4
15 116 Load sheave 1
16 162 Chain guide 1
17 108 Socket head cap screw 4
18 109 Conical lock washer 7
Bottom hook set
with 2.5m Load chain
Gear Case Assembly (Europe)
Gear Case Assembly (Other) 1
38
37
Parts
per
Hoist
CX003 CX005
L1XA003-1001 L1XA005-1001
L1XA003-1071 L1XA005-1071
C1XA003-1011
1
L1XA003-1071
-
-
-
-
-
-
C1XG003-5103 C1XG005-5103
1
C1XD003-5103 C1XD005-5103
C1XA003-9101 C1XA005-9101
C1XA003-9102 C1XA005-9102
C1XA003-6104 C1XA005-6104
J1BE1-0502525
J1WS011-20050
C1XA003-9116 C1XA005-9116
C1XA003-9162 C1XA005-9162
J1BE2-0501515
C1XA003-9109 C1XA003-9109
4
Part code
L1XA005-1021
L1XA005-1071
KAUN043-0000
L1LA005-9041
J1PW02-016008
L1LA005-9049
J1BE1-0503522
J1WS011-20050
J1BE2-0501515
4
3
3
Fig.
Part No. Part Name
No.
19 111 Pinion 1
20 112 Gear #2 2
-
-
21 114 Load gear 1
22 5115 Hand wheel assembly 1
23 117 Snap ring 2
24 151 Friction plate 2
25 152 Ratchet disc 1
26 153 Friction disc 1
27 154 Bushing 1
28 155 Pawl 1
29 5179 Pawl spring assembly 1
30 163 Top pin 1
31 171 Wheel cover 1
32 176 Socket head cap screw 3
33 177 End pin 1
34 178 Hexagon socket set screw 1
35 203 Cam guide 1
36 842 Hand chain 1
37 933
38 045 Chain stopper link 1
Warning tag (Europe) 1
Warning tag(Other) 1
Parts
per
Hoist
C1XA003-9111 C1XA005-9111
C1XA003-9112 C1XA005-9112
C1XA003-9114 C1XA005-9114
C1XA003-5115 C1XA005-5115
J1SS000-00009 J1SS000-00009
C1XA003-9151 C1XA005-9151
C1XA003-9152 C1XA005-9152
C1XA003-9153 C1XA005-9153
C1XA003-9154 C1XA005-9154
C1XA003-9155 C1XA003-9155
C1XA003-5179 C1XA005-5179
C1XA003-9163 C1XA005-9163
C1XA003-9171 C1XA005-9171
J1BE2-0503022 J1BE2-0503522
C1XA003-9177 C1XA005-9177
J1TB011-05008 J1TB011-06008
C1XA003-9203 C1XA003-9203
K7SX025-0000 K7NZ035J0000
ER1BS9686
E7AR003S9886 E7AR003S9886
L5BA008-9045 L5BA016-9045
Part code
CX003 CX005
ER1BS9686

Table of Contents
Chapter 2
Inspection
Safety precautions .......................................................................................... 18
Recommendation for Inspection .................................................................... 20
Inspection Standard ........................................................................................ 20
Frequent Inspection .................................................................................. 21
Periodic Inspection .................................................................................... 24
Preoperational Test ................................................................................... 29
Inspection Check Sheet .................................................................................. 30
17

Safety precautions
This chapter for Chain Hoist includes important contents to prevent injury to persons performing inspection, users and
other persons and damage to property, and to disassemble/reassemble the Chain Hoist safely and correctly.
Before performing the inspection, be sure to read and follow page 5 to 16 since its contents are also important for
inspection.
Disassembly/reassembly of Chain Hoist is essential for inspection. Refer to the separate Disassembly/reassembly
Manual to perform inspection correctly.
Person to perform inspection
Inspection shall be performed only by a competent person*
* Person who is authorized by company to have expertise on the structure and device of Chain Hoist, or has
expertise and is capable of understanding page 17 to 31 and Disassembly/reassembly Manual.
When this requirement is not satisfied, consult with KITO, or request KITO for inspection.
Inspection in general
Mandatory
Prohibited
Prohibited
Prohibited
Only competent persons to perform inspection of the Chain Hoist.
Inspection performed by anyone other than a competent person may result in death or severe injury.
Do not use parts beyond their discard limit or criteria and unauthorized parts for KITO
Chain Hoist Model CX003/005.
Even though the part is an authorized part for KITO Chain Hoist, it may not be used for a different model.
Use parts correctly in accordance with the Disassembly/reassembly Manual.
Failure to do so may result in death or severe injury.
Do not perform inspection of Chain Hoist subject to a load.
When performing inspection of a Chain Hoist, place it on a floor and perform the inspection.
Performing inspection of a Chain Hoist subject to a load may result in death or severe injury.
Do not lubricate the Friction Plate.
The Friction Plate is of the dry type.
Lubricating the Friction Plate may result in death or severe injury due to insufficient braking.
18
Do not use any oil (grease, rust preventive oil, etc.) in areas near a fire or spark.
Otherwise, this may result in ignition.
Prohibited

Mandatory
Mandatory
Mandatory
Perform inspection (frequent, periodic).
Failure of inspection (frequent, periodic) causes death or severe injury.
Inspection may need to be performed earlier than inspection cycle depending on the condition of use. Inspect the hoist at
appropriate interval in consideration of the result of daily checks and operating noise.
When any defect is observed during inspection, stop using the Chain Hoist, indicate
Failure/Inspection underway and consult with the competent person, KITO or your dealer
for inspection and repair.
Use of a product with a defect may result in death or severe injury.
When annual inspection is completed, perform functional inspection (operational check)
to confirm the correct operation in accordance with the Disassembly/reassembly Manual.
Failure to do so may result in death or severe injury.
Mandatory
Mandatory
Compare the throat opening and thickness of the Top and Bottom Hooks with those when
purchased and ensure these dimensions do not exceed the criteria.
Failure to do so may result in injury or damage to property.
When any defect is observed during inspection, stop using the Chain Hoist, indicate
Failure/Inspection underway and consult with the competent person or KITO for repair.
Use of a faulty Chain Hoist may result in death or severe injury.
19

Recommendation for Inspection
Inspection is the first step to safety operation. Carry out daily inspection and
periodic inspection.
- Ensure that the operater refers to page 5 to 16 and carry out daily inspection.
- This chapter is composed of frequent and periodic inspection items (About each classification, refer to page 14).
- Inspection shall be performed by a competent person (with expertise), or consult with KITO.
- Inspection items are specified based on standard environment and conditions. Consult with KITO when using the Chain Hoist under special
environment or conditions.
- Periodic inspection needs disassembly/reassembly. Refer to the separate Disassembly/reassembly Manual for correct inspection.
Inspection Standard
Only competent persons are allowed to inspect the chain hoist.
Anyone other than a competent person inspecting may result in death or severe injury.
Mandatory
Prohibited
Prohibited
Mandatory
Mandatory
Do not use parts beyond their discard limit or criteria and unauthorized parts for the KITO
Chain Hoist Model CX003/005.
Even if the part is an authorized part for KITO Chain Hoist, it may not be used for a different model.
Use parts correctly in accordance with the Disassembly/reassembly Manual.
Failure to do so may result in death or severe injury.
Do not perform inspection of a Chain Hoist subject to a load.
Before performing inspection of a Chain Hoist, place it on a floor.
Performing inspection of a Chain Hoist subject to a load may result in death or severe injury.
Perform inspection within a specified period.
Failure of inspection (frequent, periodic) causes death or severe injury.
Inspection may need to be performed earlier than inspection cycle depending on the condition of use. Inspect the hoist at
appropriate interval in consideration of the result of daily checks and operating noise.
If a defect is found while checking the chain hoist, stop using it, place a notice indicating
"failure/inspection underway" and request a competent person or KITO to carry out repair.
Use of a product with a defect may result in death or severe injury.
20

Frequent Inspection
Check the Chain Hoist under the installation state or
on the workbench.
NOTE
Check the following items in addition to the daily inspection items.
Before a frequent inspection, perform the daily inspection.
Item Method Discard limit or criteria Action
Basic
function
Top and
Bottom
Hooks
Suspend a light load and lift/
lower it.
• Lifting operation should make regular click
sounds of the Pawl of the brake unit and
perform smoothly.
• Sounds should be at a constant level or no
irregular clicks should be heard.
• No sounds should be made when lowering.
• It should be free of any heavy pulling force.
• There should be no slip in braking.
Visual check • The hook should not be signicantly twisted
or deformed.
• Should be free of any deep notches of aws.
• Should be free of any loosened or omitted
rivets, bolts or nuts.
• Should be free of any foreign matter such as
sputter on the Hook.
Measure the dimensions of
each "a", "b" and "c" of the
Top and Bottom Hooks using
calipers.
Compare the deformation and
thickness of the Top and Bottom
Hooks with those of when
Embossed mark
purchased to check they are not
beyond the criteria.
Using Hook with dimensions beyond the criterion
a
may result in injury or damage to property.
Disassemble the Chain
Hoist to verify that
the hoist is properly
assembled and the
components are free of
defects.
Replace the Top Hook
Set or the Bottom Hook
Complete Set.
Replace the Top Hook
Set or the Bottom Hook
Complete Set.
c
b
Standard Limit
Dimension a
Dimension b 5% or more wear
Dimension c 5% or more wear
The nominal values are indicated
below for reference, however, the Hook
dimensions have tolerances to some
extent because it is forged and thermally
treated.
Rated
load (t)
0.25 39 11
0.5 45.5 12
Not to exceed the dimension when
purchased
Dimension a Dimension b Dimension c
Standard
Standard
Limit
Standard
10.5 12.5 11.9
11.4 15 14.3
Limit
(Continued on the following page)
21

Item Method Discard limit or criteria Action
Top and
Bottom
Check the deformation of the
Hook neck visually.
Hooks
Neck
Rotate Hook. • Should rotate smoothly. Replace the Top Hook
Latch Move Latch for a few times.
• The neck should not be deformed or twisted
beyond the discard limit.
Do not use Hook without Latch.
Failure to do so may result in death or severe
injury.
Replace the Top Hook
Set or the Bottom Hook
Complete Set.
Set or the Bottom Hook
Complete Set.
Replace Latch.
Load
Chain
Check abrasion visually and
using calipers.
Pitch length for 5 links
d
• Should securely close the hook throat.
• Should move smoothly.
NOTE
Carefully check the position, especially where
the Load Chain engages with the Load Sheave.
Rated
load (t)
• Check abrasion of Load Chain by measuring
the total length of 5 links of chain.
However, when the chain diameter is
excessively worn with visual check, replace
the Load Chain.
• For measuring control, measure the chain
diameter, referring to the limit value in the
above table.
Needle tip calipers are needed to measure
pitch length of 5 links and the wire diameter.
Pitch length for 5 links (mm) Chain diameter (d)mm
Standard Limit
0.25 45.5 46.8 3.2 2.9
0.5
60.5 62.3 4.3 3.9
Nominal
diameter
Limit
Replace the Bottom
Hook Complete Set.
22

Item Method Discard limit or criteria Action
Load
Chain
Visually ensure the Load
Chain is free of corrosion
(rust).
Visually check Load Chain
has no deformation or aws.
• Should be free of excessive corrosion (rust). Replace the Bottom
Hook Complete Set.
NOTE
- When abrasion of Load Chain is observed,
also check the Load Sheave for safety's
sake. (Refer to the item of Load Sheave
in the "Lifting mechanism" page of Annual
Inspection.)
- Apply lubricant JIS K 2246 class 1, No.1 (code:
NP-9) rust preventive oil equivalent (DAPHNE
OIL COAT RL-44, IDEMITSU KOSAN Co.,
LTD. recommended)
Replace the Bottom
Hook Complete Set.
Do not perform any prohibited
items in page 5 to 16. Use the
Load Chain correctly.
• Should have no deformations such as
distortion.
• Should have no deep aws.
Visually check to see if there
are any sputter on the Chain
Hoist.
• Should be free of sputter. Replace the Bottom
Hook Complete Set.
NOTE
Keep the Chain Hoist away from welding
sparks.
(Continued on the following page)
23

Worn position
Periodic Inspection
Disassemble the Chain Hoist and check each part in
detail.
When this inspection is completed, reassemble
the Chain Hoist correctly in accordance with the
Disassembly/reassembly Manual.
NOTE
Check the following items in addition to the frequent inspection items.
Perform disassembly/reassembly work correctly, referring to the
separate Disassembly/reassembly Manual.
Item Method Discard limit or criteria Action
Top Hook Measure the diameter of the
hole of the Top Yoke to insert
the Top Pin, using calipers.
When the hole is an oval
hole, measure the maximum
diameter of the oval hole.
Hole to insert Top Pin
Top Yoke
Bottom
Hook
Check the abrasion at the
worn position of the Chain of
Bottom Hook (indicated with
an arrow).
Hole diameter (d) mm
Rated load (t)
0.25 8.3 8.8
0.5
d
For Top Pin
Standard Limit
10.3 10.8
• Load Chain should be free of excessive
abrasion and deformation at the worn position
of the chain on the Bottom Yoke side.
• Perform measuring control of the chain
diameter, referring to the Frequent Inspection
(Page 21). Load Chain should not beyond the
limit of chain diameter.
• A point caliper is needed to measure the
abrasion (of chain diameter).
Replace the Top Hook
Set.
Replace the Bottom Hook
Complete Set.
24
CX003
Worn position
CX005
d
• For CX005, the diameter (d) of the chain pin
hole should not excess the limit below.
Chain pin hole diameter (mm)
Standard 10.3
Limit 10.8

Item Method Discard limit or criteria Action
Braking
mecha-
nism
Visually check the braking
surface to ensure no
abrasions or aws.
Check the crack of the
Friction Plate visually and
measure the abrasion using
calipers.
t
Two-ply
Do not lubricate the Friction
Plate.
The Friction Plate is a dry type brake.
Lubricating the Friction Plate may result in death
or severe injury due to insufficient braking.
• Should free of scars or gouged aws on the
braking surface of the Friction Disc, Friction
Plate, Ratchet Disc, and Hand Wheel
Assembly.
• The braking surface of the above mentioned
parts should not be excessively worn with
the tool marks erased and surface lustered.
• The Friction Plate should be free of chips or
cracks.
Thickness of two Friction Plates
Rated load (t)
0.25 5.0 4.5
0.5
Dimension t (mm)
Standard Limit
5.0 4.5
Replace the scarred or
worn parts.
Replace both Friction
Plates.
Measure the abrasion of
Bushing using a vernier
caliper.
A
Heat the Bushing with a
match ame to check that it is
impregnated with oil.
• Should be uniform in thickness. Replace the Bushing.
Rated load (t)
0.25 1.4 1.2
0.5
Dimension A (mm)
Standard Limit
2.0 1.8
Soak the Bushing in
turbine oil for a day and
Do not use any oil (grease, rust
wipe off excessive oil.
preventive oil, etc.) in areas near
a fire or spark.
Failure to do so may result in ignition.
• Bushing should be sufciently impregnated
with oil (such that oil oozes off the surface
when heated).
NOTE
For replacing or assembling Bushing, soak it in
turbine oil for a day, and wipe excessive oil from
its surface before reuse.
(Continued on the following page)
25

Item Method Discard limit or criteria Action
contact
contact
contact
Braking
mecha-
nism
Measure the abrasion of the
Ratchet Disc with a vernier
caliper.
D
One point
Two-point
250kg
D
Rated load (t)
0.25 33.8 32.4
0.5
Dimension D (mm)
Standard Limit
44.3 42.9
Replace the Ratchet
Disc.
Two- point
contact
Two-point
500kg
Visually check Pawl. • The Pawl should not be worn with a step on
the tip.
Abrasion
Visually check Pawl Spring
Assembly.
Visually check corrosion
(rust).
Measure the abrasion of the
Friction Disc in contact with
the Bushing (as shown in the
following gure with a dotted
• Should be free of deformations, aws,
breaks or poor spring.
• Each part should be free of excessive
corrosion (rust).
Rated load (t)
0.25 16.4 15.6
0.5
Dimension D (mm)
Standard Limit
21.9 21.1
line) with a vernier caliper.
D
Replace the Pawl.
Replace Pawl Spring
Assembly.
Replace any rusty part.
Replace Friction Disc.
26
4mm

Item Method Discard limit or criteria Action
Lifting
mecha-
nism
Visually check the abrasion
and aw of the Load Sheave.
Pocket and Tooth
Visually check the abrasion
and aw on tooth of the Load
Gear and Gear #2.
Visually check the
deformation of the Pinion.
Visually check the abrasion
and aw on the tooth of the
Pinion.
Visually check the abrasion
and aw of the Hand Wheel.
• Should be free of abrasion in the Pocket
or run-on aws on the Tooth of the Load
Sheave.
• Should be free of chips of tooth, stepped
abrasions, and aws.
• Pinion should be free of deformation, such
as bend.
• Should be free of chips of tooth, stepped
abrasions, and aws.
• Should be free of abrasion in the Pocket,
run-on aws or breaks on the Tooth of the
Hand Wheel.
Replace the Load
Sheave.
Replace the Load Gear
and the Gear #2.
Replace the Pinion.
Replace the Pinion.
Replace the Hand Wheel
Assembly.
Pocket
and Tooth
Visually check the
deformation of the Cam
Guide.
Visually check the Hand
Chain.
Body Visually check and measure
the bearing hole for Top Pin
with a vernier caliper.
a
• Cam Guide should be free of signicant
deformation.
NOTE
Deformed Cam Guide results from excessively
lowering. Instruct the operator on proper use of
the Chain Hoist.
• Should be free of deformation, such as
torsion.
• Should be free of signicant deformations or
aws.
• The dimensional difference between "a" and
"b" should be 0.5mm or less.
Replace the Cam Guide.
Replace the Hand Chain.
Replace Body Assembly.
b
(Continued on the following page)
27

Item Method Discard limit or criteria Action
A
b
b
b
Body Visually check the Pawl Shaft. • Pawl shaft should be secured to Body. Replace the Body
Assembly.
Pawl Shaft
Visually check and measure
the bearing hole of Frames
A and B for the Load Sheave
with a vernier caliper.
a
Frame A
a
Frame B
Visually check and measure
the bearing holes of Frame
B for the Gear with a vernier
caliper.
a
Visually check the
deformation and aw of the
Gear Case.
• Should be free of substantial deformations
or aws.
• The dimensional difference between "a" and
"b" should be 0.5mm or less.
• Should be free of signicant deformations or
aws.
• The dimensional difference between "a" and
"b" should be 0.5mm or less.
• Should be free of deformation of the Frame.
• Should be free of signicant deformations,
aws or cracks.
Replace the Frame A or
B.
Replace the Frame B.
Replace the Gear Case
Assembly.
28
Visually check and measure
the abrasion of holes of the
Gear Case for the Plain
Bearings with a vernier
caliper.
Plain Bearing
a
b
Visually check and measure
the deformation and abrasion
of the Top Pin with a vernier
caliper.
• Should be free of signicant deformations or
aws.
• The dimensional difference between "a" and
"b" should be 0.5mm or less.
• Signicantly deformed Top Pin has reached
the discard limit.
Rated load (t)
0.25 8 7.6
0.5
Dimension A (mm)
Standard Limit
10 9.6
Replace the Gear Case
Assembly.
Replace the Top Pin.

Item Method Discard limit or criteria Action
d
Others Visually check the
deformation of the Chain
Guide.
Chain Guide
Visually check and measure
the deformation, abrasion and
corrosion (rust) of the End
Pin with a vernier caliper.
• Should be free of crushed grooves,
deformations or cracks.
• The End Pin should be free of signicant
deformation.
• Should be free of aws or deformations.
• Should be free of signicant corrosion (rust).
(Measure dimension d.)
Rated load (t)
0.25 3.9 3.7
0.5
End Pin diameter (mm)
Standard Limit
5 4.8
Replace the Chain
Guide.
Replace the End Pin.
Preoperational Test
When the periodic inspection is
completed, perform a preoperational
test to check that the hoist operates
correctly.
Failure to do so may result in death or severe injury.
Item Method Discard limit or criteria Action
No load
test
Rated
load test
Repeat lifting and lowering a
few times.
Lift and lower the rated load
for 20 to 30cm.
Perform the items in the
"Basic function" of Frequent
Inspection.
• The Chain Hoist should be operated with a
light pulling force.
• The Chain Hoist should have regular click
sounds of Pawl when lifting.
• The Chain Hoist should have regular click
sounds of Pawl and run smoothly when
lifting.
• The sound should be at a constant level with
no irregular clicks.
• The Chain Hoist should make no sound
when lowering.
• It should be free of a heavy pulling force.
• It should be free of slip in braking.
Disassemble the Chain
Hoist to verify that the
hoist is assembled
properly and the
components are free of
defects.
29

KITO Chain Hoist Model CX
Inspection Check Sheet (for Model CX003/005)
Type Rated Load Lot No. Control No. Date of Installation Installed Place
Check mark example: ○= Good, △= To be replaced (adjusted) at next inspection, ×= Defective. To be replaced (adjusted)
Range Category Check Item
Nameplate (from daily check)
Appearance of Body and others (from daily check)
Loosened or omitted nuts (from daily check)
Lifting / lowering
Abnormal sound
Hand pulling force
Brake
Throat opening
Abrasion of Hook, Gap at Neck
Deformation, flaw
Loosened or missing bolts or nuts (from the daily check)
Rotation of Hook
Latch
Torsion (from daily check)
Oil application (from daily check)
Abrasion
Corrosion (rust)
Frequent
Inspection
Appearance
Function
Top/Bottom
Hook
Load Chain
Date of Check
30
Inspected by
Checked by
Deformation, flaw
Sputter
Inspector
Competent person

NOTE
When any defect is observed during inspection,
stop using the Chain Hoist, indicate Failure/
Mandatory
Inspection underway and consult with the
competent person or KITO for repair.
Use of a faulty Chain Hoist may result in death or severe injury.
Check mark example: ○= Good, △= To be replaced (adjusted) at next inspection, =Defective. To be replaced (adjusted)
This Check Sheet is a standard sample based on
KITO frequent and periodic inspection. Customers
should decide upon their own format of the check
sheet according to the operation environment
and conditions of the customer, and perform the
inspection. Be sure to include all check items into
the check sheet.
Range Category Check Item
Deformation of hole to combine the Top Yoke
Deformation of Bottom hook connection hole (for CX005 only)
Abrasion of the first link of Chain at the load end.
Abrasion and flaw on the braking surface
Abrasion and crack on the Friction Plate
Abrasion of Bushing
Oil impregnation of Bushing
Abrasion of Ratchet Disc
Abrasion of Pawl
Deformation and abrasion of Pawl Spring
Corrosion (rust)
Abrasion of contact surface of Bushing of Friction Disc
Abrasion and flaw of Load Sheave
Abrasion and flaw of Load Gear and Gear #2
Deformation of Pinion
Abrasion and flaw of Hand Wheel
Deformation of Cam Guide
Periodic
Inspection
Top/Bottom
Hook
Braking
mechanism
Lifting
mechanism
Date of Check
Body
Others
Test
Inspected by
Checked by
Torsion and deformation of Hand Chain
Abrasion and flaw on tooth of Pinion
Deformation of hole for Top Pin
Deformation of holes on Frames A and B for bearing
Deformation and flaw of Gear Case
Abrasion of plain bearing of Gear Case
Deformation and abrasion of Top Pin
Deformation of Chain Guide
Deformation, abrasion, and corrosion (rust) of End Pin
No load test
Rated load test
Inspector
Competent person
31

32

Chapter 3
Troubleshooting
Table of Contents
Introduction ...................................................................................................... 34
Safety Precautions .......................................................................................... 34
Troubleshooting .............................................................................................. 35
Lifting up failure ......................................................................................... 35
Lowering failure ......................................................................................... 37
33

Introduction
When a defect is observed while using the Chain Hoist or during its inspection, stop using the Chain Hoist and
repair (maintain) the hoist. This chapter describes how to troubleshoot causes of the failure and defect and to take
countermeasures for Competent person.
When a defect is found, stop using the Chain Hoist immediately and check the cause.
Most of the causes of failure or defect of the Chain Hoist come from improper usage. Carefully read Owner's
•
Manual of Chain Hoist and use the Chain Hoist correctly. Also, inform operators of the result of repair
(maintenance) and direct them to operate the Chain Hoist properly.
For repair (maintenance) of Chain Hoist, perform the repair (maintenance) correctly in accordance with
•
page 17 to 31 and separate "Disassembly/reassembly Manual".
Competent person is those authorized by the company as having expertise on the structure and device of a Chain
Hoist, or with appropriate expertise and capable of understanding page 17 to 31 and Disassembly/reassembly
Manual.
When this requirement is not satisfied, consult with KITO or your dealer.
Safety Precautions
This Troubleshooting for the Chain Hoist includes important contents to prevent injury to persons performing repair
(maintenance), users and others, and damage to property, and to perform repair (maintenance) of the Chain Hoist
safely and correctly.
Before performing repair (maintenance), be sure to read and follow page 5 to 16 since its contents are also important
for repair (maintenance).
Person to perform repair (maintenance)
Repair (maintenance) shall be performed by a competent person, or consult with KITO or your dealer.
Repair (maintenance) in general
Only competent persons are allowed to perform repair (maintenance) of the Chain Hoist.
Repair (maintenance) by anyone other than a Competent person may result in death or severe injury.
Mandatory
When replacing parts, only use parts authorized by KITO for use in the CX003/005 Chain Hoist
Models.
Mandatory
Even if the part is an authorized part for the KITO Chain Hoist, it may not be used for a different model.
Use parts correctly in accordance with the Disassembly/reassembly Manual.
After disassembling/reassembling, perform the operation check described in the Disassembly/reassembly Manual.
Failure to do so may result in death or severe injury.
34

Troubleshooting
Lifting up failure
Checking sounds from the hoist is a critical inspection point. Note the operating sound of the Chain Hoist.
For lifting, the Chain Hoist makes clicking sounds.
•
For lowering, the Chain Hoist does not make clicking sounds.
•
Symptom Cause Action
Cannot lift load.
The Pawl sounds weak
or irregularly.
• The Ratchet Disc is assembled with
its wrong side tting, as shown in the
gure.
Pawl
Rachet Disc
Reassemble the Pawl and Ratchet Disc to
ensure they engage correctly.
The Pawl makes no
sounds.
Cannot operate
manually.
• The Pawl is wrongly assembled
upside down, as shown in the gure.
Pawl
Rachet Disc
• The Pawl Shaft and Pawl clogged with
dust or rust caused by a long-term
negligent maintenance may make
poor contact for the Pawl and Ratchet
Disc.
• The positions of the "O" and "V" marks
on Gear #2 are not set correctly.
Reassemble the Pawl in the correct direction.
Perform periodic disassembly and inspection
to remove dust and rust.
Replace if found rusty signicantly.
Any irregularities such as rust may deteriorate
Pawl Spring. Replace if found rusty.
Reassemble Gears correctly.
When reassembly is completed, be sure to
perform an operational test and check that
the hoist operates smoothly.
* Assemble Gear #2 with the "O" and "V"
marks set around the Pinion as shown in
the gure.
Cannot lift the rated
load or less.
• The Load Chain is installed as twisted
or tangled, and is caught between the
Chain Guide and Load Sheave.
• Fault of Overload Limiter (OLL:
a device to prevent an excessive
overload) due to frequent lifting of an
excessive overload.
• Cam Guide contacts the inner upper
left corner of the Hand Wheel.
Pinion
Gear #2Gear #2
Reassemble the Load Chain correctly, being
careful not to assemble it twisted or tangled.
(Refer to separate Disassembly/reassembly
Manual.)
Stop using the Chain Hoist. Replace the
Hand Wheel Assembly.
Lift the rated load or less and avoid frequent
use of overload limiter.
Reassemble properly. (Refer to separate
Disassembly/reassembly Manual.)
(Continued on the following page)
35

Symptom Cause Action
Sometimes fails to lift load.
Pawl sounds weak.
Pawl sounds irregularly.
• Pawl Spring Assembly lacks spring, or
breaks.
• Pawl does not return to original
position due to accumulated rust
(corrosion).
Replace Pawl Spring Assembly.
Perform disassembly inspection regularly.
Hand Chain slips.
• Missing Pawl Spring Assembly causes
poor return.
• Poor return of Pawl due to misassembly. (Pawl Spring is caught
between the step of Pawl Shaft and
the Pawl.)
• Frequently extended use causes Pawl
or Ratchet Disc to wear with poor
engagement.
• Abrasion of sprocket of Hand Wheel.
• Elongation or abrasion of Hand Chain.
• Wrong size of Hand Chain.
Length when purchased (guideline)
a
Rated load (t) a b
0.25 14.2 2.5
0.5 20 3.5
Reassemble the hoist correctly.
When reassembly is completed, be sure to
perform an operational test, and check that
the pawl sounds click.
Replace Pawl Spring Assembly.
Perform disassembly inspection regularly.
Replace Hand Wheel Assembly.
Perform disassembly inspection regularly.
Use proper Hand Chain.
Lift a load normally but
Pawl clicking sounds
are weak (with regular
clicks).
Heavy pulling force at
no load (with occasional
squeaking sound).
Lift load only halfway
but not further.
• Weakened or broken Pawl Spring
Assembly causes insufcient force of
Pawl.
• Poor return of Pawl due to misassembly. (Pawl Spring is caught
between the step of Pawl Shaft and
the Pawl.)
• Poor gear engagement.
• Abrasion of gear tooth ank.
• Lack of lubricant caused by a longterm negligent maintenance may
result in abrasion or breakage.
• Load Chain of the Bottom Hook or
Hand Chain is entangled or twisted.
Replace the Pawl Spring Assembly.
Perform disassembly inspection regularly.
Reassemble the hoist correctly.
When reassembly is completed, be sure to
perform an operational test, and check that
the pawl sounds click.
Replace Gear.
Perform disassembly inspection regularly.
Be sure to check that the Bottom Hook is not
entangled or twisted with the Load Chain or
Hand Chain.
36
• The Overload Limiter (OLL: a device
to prevent an excessive overload) is
activated.
Reduce the load to less than the rated load.

Lowering failure
Friction Disc
Friction Disc
Lowering failure is mainly due to a deficiency of the brake.
Symptom Cause Action
Not lower load. • Leaving the Chain Hoist loaded for a
long time or subjecting to mechanical
impact during work may lock the
brake.
• Rust locks the brake. Replace the rusted part.
Hard to lower load. • Caw Guide contacts the inner upper
right corner of the Hand Wheel.
Load falls when
lowering starts.
• A foreign object between friction
surfaces.
Do not lubricate the Friction Plate.
The Friction Plate is of the dry type.
Lubricating the Friction Plate may result in death or
severe injury due to insufficient braking.
Pull the Hand Chain strongly for lowering for
a moment to release the brake.
Perform disassembly inspection regularly.
Reassemble (Refer to separate Disassembly/
reassembly Manual.)
Disassemble the Chain Hoist, remove the
object, and then reassemble.
Replace the Friction Plate if scratched.
• Brake slip caused by signicant rust. Reassemble the rusted part.
• Mis-assembly of the Friction Plate.
Friction Plates are set at only one side
as shown below, or one Friction Plate
is missing.
Rachet Disc
Friction Plates
Bushing
• Friction Plate is cracked. Replace cracked Friction Plate.
Load drifts. • Slight dust on the brake surface.
• The brake surface has oil, such as
grease, attached.
Use according to operating conditions in
page 5 to 16. After use, store the Chain Hoist
in accordance with the Maintenance and
storage in page 5 to 16.
Reassemble Friction Plates correctly as
below.
Rachet Disc
Friction Plates
Bushing
Disassemble the Chain Hoist, remove the
dust or oil, and then reassemble.
Replace the Friction Plate if scratched.
Perform disassembly inspection regularly
according to the operating environment.
• Abrasion of Friction Plate due to
frequent extended operation.
Worn Load Chain. • Lack of lubricant (frequent extended
use).
Replace worn Friction Plate.
Perform disassembly inspection regularly,
according to the frequency of operation.
Replace the abraded Load Chain.
Always apply oil to the Load Chain in
accordance with page 5 to 16. Also perform
disassembly inspection regularly.
(Continued on the following page)
37

Symptom Cause Action
Scarred or deformed
Load Chain.
• Mis-assembly causes Load Chain to
twist.
• Load Chain is entangled with Hand
Chain.
• Load Chain is in contact with an
obstacle.
• Overload elongates the Load Chain. Replace the Load Chain.
Assemble Load Chain correctly in accordance
with the Disassembly/reassembly Manual.
Before use, be sure to check that the Load
Chain is not entangled with the Hand Chain.
Prevent interference of Load Chain by other
object.
Do not wind the Load Chain around the load.
Use the hoist under the rated load.
Rust or corrosion. • Lack of oil.
• The use of a Chain Hoist exposed to
the rain
• Inuenced by seawater, chemicals,
etc
Broken Load Chain. • May result from combination with
the causes described in page 37/38,
including impact load.
• Welding heat affects strength.
• Entangled Load Chain.
Do not lift the load beyond the
rated load.
Failure to do so may result in death or severe
injury.
Thorough safety control in accordance with
the operating environment.
Remove dirt and water, and
apply oil to the neck of the Hook
and Load Chains, and then store
the Chain Hoist indoors.
Failure to do so may result in injury or damage
to property.
Cutting of Load Chain may
result in severe accidents,
including fatalities. Conduct
appropriate maintenance,
including correct handling, daily
check and inspection.
38

Symptom Cause Action
Stretched Hook. • Overload.
The Hook is to open gradually under
more than double the rated load.
• Lifting a load at the tip of the Hook. Replace the Hook.
• Improper hooking of the sling or the
use of a sling of inappropriate size
relative to the Hook.
• Slinging angle too wide.
Replace the Hook.
Hook opening indicates
overload. Do not lift the load
beyond the rated load.
Lifting a load beyond the rated load may result
in death or severe injury.
Lift a load at the center of the Hook saddle.
Replace the Hook.
Use a sling appropriate for the work.
The slinging angle should be 60 degrees or
less.
Bent hook neck. • Lifting a load at the tip of the Hook.
• Applied force from an oblique direction
to the Hook being xed.
Twisted Hook. • Winding the Load Chain around the
load.
60 degrees or less.
Replace the Hook.
Lift a load at the center of Hook
saddle.
Lifting a load at a position other than the center
of the hook saddle may cause to break the
Hook and result in death or severe injury.
Lift a load while the Top and Bottom Hooks
are aligned straight with the load direction.
Replace the Hook.
Do not wind the Load Chain around the load
as a sling.
Detached Latch. • Hook deformed by overload.
• Improper sling size to hook.
• Sling hooked on latch.
Replace the Hook.
Sling a load correctly.
39

WARRANTY
KITO Corporation (referred to after as KITO) extends the following warranty to the original purchaser (referred to after
as Purchaser) of new products manufactured by KITO (KITO’s Products)
KITO warrants that KITO’s Products, when shipped, shall be free from defects in workmanship and/or materials under
normal use and service and KITO shall, at the election of KITO, repair or replace free of charge any parts or items
which are proven to have said defects, provided that all claims for defects under this warranty shall be made in writing
immediately upon discovery and, if there is anything within one (1) year from the date of purchase of KITO’s Products
by Purchaser and provided, further, that defective parts or items shall be kept for examination by KITO or its authorized
agents or returned to KITO’s factory or authorized service center upon request by KITO.
KITO does not warrant components of products provided by other manufacturers. However to the extent possible, KITO
will assign to Purchaser applicable warranties of such other manufacturers.
Except for the repair or replacement mentioned above which is KITO’s sole liability and purchaser’s exclusive remedy
under this warranty, KITO shall not be responsible for any other claims arising out of the purchase and use of KITO’s
Products, regardless of whether Purchaser’s claims are based on breach of contract tort or other theories, including
claims for any damages whether direct, indirect incidental or consequential.
This warranty is conditional upon the installation, maintenance and use of KITO’s Products pursuant to the product
manuals prepared in accordance with content instructions by KITO. This warranty shall not apply to KITO’s Products
which have been subject to negligence, misuse, abuse, misapplication or any improper use or combination or improper
fittings, alignment or maintenance.
KITO shall not be responsible for any loss or damage caused by transportation, prolonged or improper storage or
normal wear and tear of KITO’s Products or for loss of operating time.
This warranty shall not apply to KITO’s Products which have been fitted with or repaired with parts, components or
items not supplied or approved by KITO or which have been modified or altered.
THIS WARRANTY IS IN LIEU OF ALL OTHER WARRANTIES. EXPRESS OR IMPLIED, INCLUDING BUT NOT
LIMITED TO ANY WARRANTY OF MERCHANTABILITY OR OF FITNESS FOR A PARTICULAR PURPOSE.
40

< Memo >
41

< Memo >
42

Contents of EC declaration of conformity
We, KITO Corporation,
2000 Tsuijiarai, Showa-cho,
Nakakoma-gun, Yamanashi-ken, 409-3815, Japan
declare under our sole responsibility that the products:
Manual chain hoist CX, model CX1
in capacities of 250 kg and 500kg
to which this declaration relates are in conformity with the following EC directives and standards.
EC directives:
Machinery Directive 2006/42/EC
Harmonized standards:
EN ISO 12100:2010 Risk assessment and risk reduction
EN 818-7:2002+A1+2008 Short link chain for lifting purposes,
increased quality, grade V, certified by
Fachausschuss Metall und
Oberflächenbehandlung
EN 13157:2004+A1+2009 Hand powered cranes
Authorized representative for the arrangement of the technical documents:
Udo Kleinevoß
Technical manager
Kito Europe GmbH. 40549 Düsseldorf
43

www.kito.com
KITO Europe GmbH
Heerdter Lohweg 93, D-40549 Düsseldorf, Germany
TEL: +49-(0)211-528009-0
FAX: +49-(0)211-528009-59
E-mail: info@kito.net
URL: http://www.kito.net/
KITO corporation
Tokyo Head Office:
SHINJUKU NS Building 9F, 2-4-1, Nishi-Shinjuku, Shinjuku-ku, Tokyo 163-0809, Japan
http://www.kito.com
Head Office & Factory:
2000 Tsuijiarai Showa-Cho, Nakakoma-Gun, Yamanashi 409-3853, Japan
 Loading...