

KITO CB005, CB010, CB015, CB020, CB030 Owner Manual And Safety Manual
...
OM-M3MNGZ-CEE-00
OWNER'S (OPERATOR'S) MANUAL
AND SAFETY INSTRUCTIONS
FOR KITO MANUAL CHAIN HOIST
M3 SERIES
ALWAYS SAVE THIS BOOK FOR FUTURE
REFERENCE.
Original Instruction
Issued January2010. Revised July, 2016 (revision 4)

CONTENTS
1. DEFINITIONS ................................................................................................................................................. 1
2. INTENDED PURPOSE .................................................................................................................................. 1
3. MOUNTING .................................................................................................................................................... 1
4. BEFORE USE .................................................................................................................................................. 2
4.1 Safety summary ........................................................................................................................................ 2
4.2 Safety instructions ..................................................................................................................................... 2
5. MAIN SPECIFICATIONS ............................................................................................................................. 5
6. OPERATION ................................................................................................................................................... 7
6.1 Intended purpose of hoist operation .......................................................................................................... 7
6.2 Safety working environment ..................................................................................................................... 7
6.3 Operation .................................................................................................................................................. 7
6.4 Hoist storage ............................................................................................................................................. 7
6.5 Optional overload limiter .......................................................................................................................... 8
7. INSPECTION .................................................................................................................................................. 9
7.1 Outline ...................................................................................................................................................... 9
7.2 Daily inspection ........................................................................................................................................ 9
7.3 Periodic inspection .................................................................................................................................. 10
8. MAINTENANCE AND STARGE ................................................................................................................ 15
8.1 Lubrication .............................................................................................................................................. 15
8.2 Overhaul, assembly and adjustment........................................................................................................ 16
9. TROUBLESHOOTING ................................................................................................................................ 25
10. WARRANTY ................................................................................................................................................. 26
11. PARTS LIST .................................................................................................................................................. 27
12. CONTENTS OF EC DECLARATION OF CONFORMITY ............................................................... 33
— 1 —
1. DEFINITIONS
: Indicates a potentially hazardous situation which, if not avoided, could result
in death or serious injury.
: Indicates a potentially hazardous situation which, if not avoided, may result in
minor or moderate injury. It may also be used to alert against unsafe practices.
WLL: Indicates maximum mass (working load limit) which a hoist is designed to support in
general service.
2. INTENDED PURPOSE
This hoist has been designed for vertically lifting and lowering loads, by hand, under normal atmospheric
conditions of the work place.
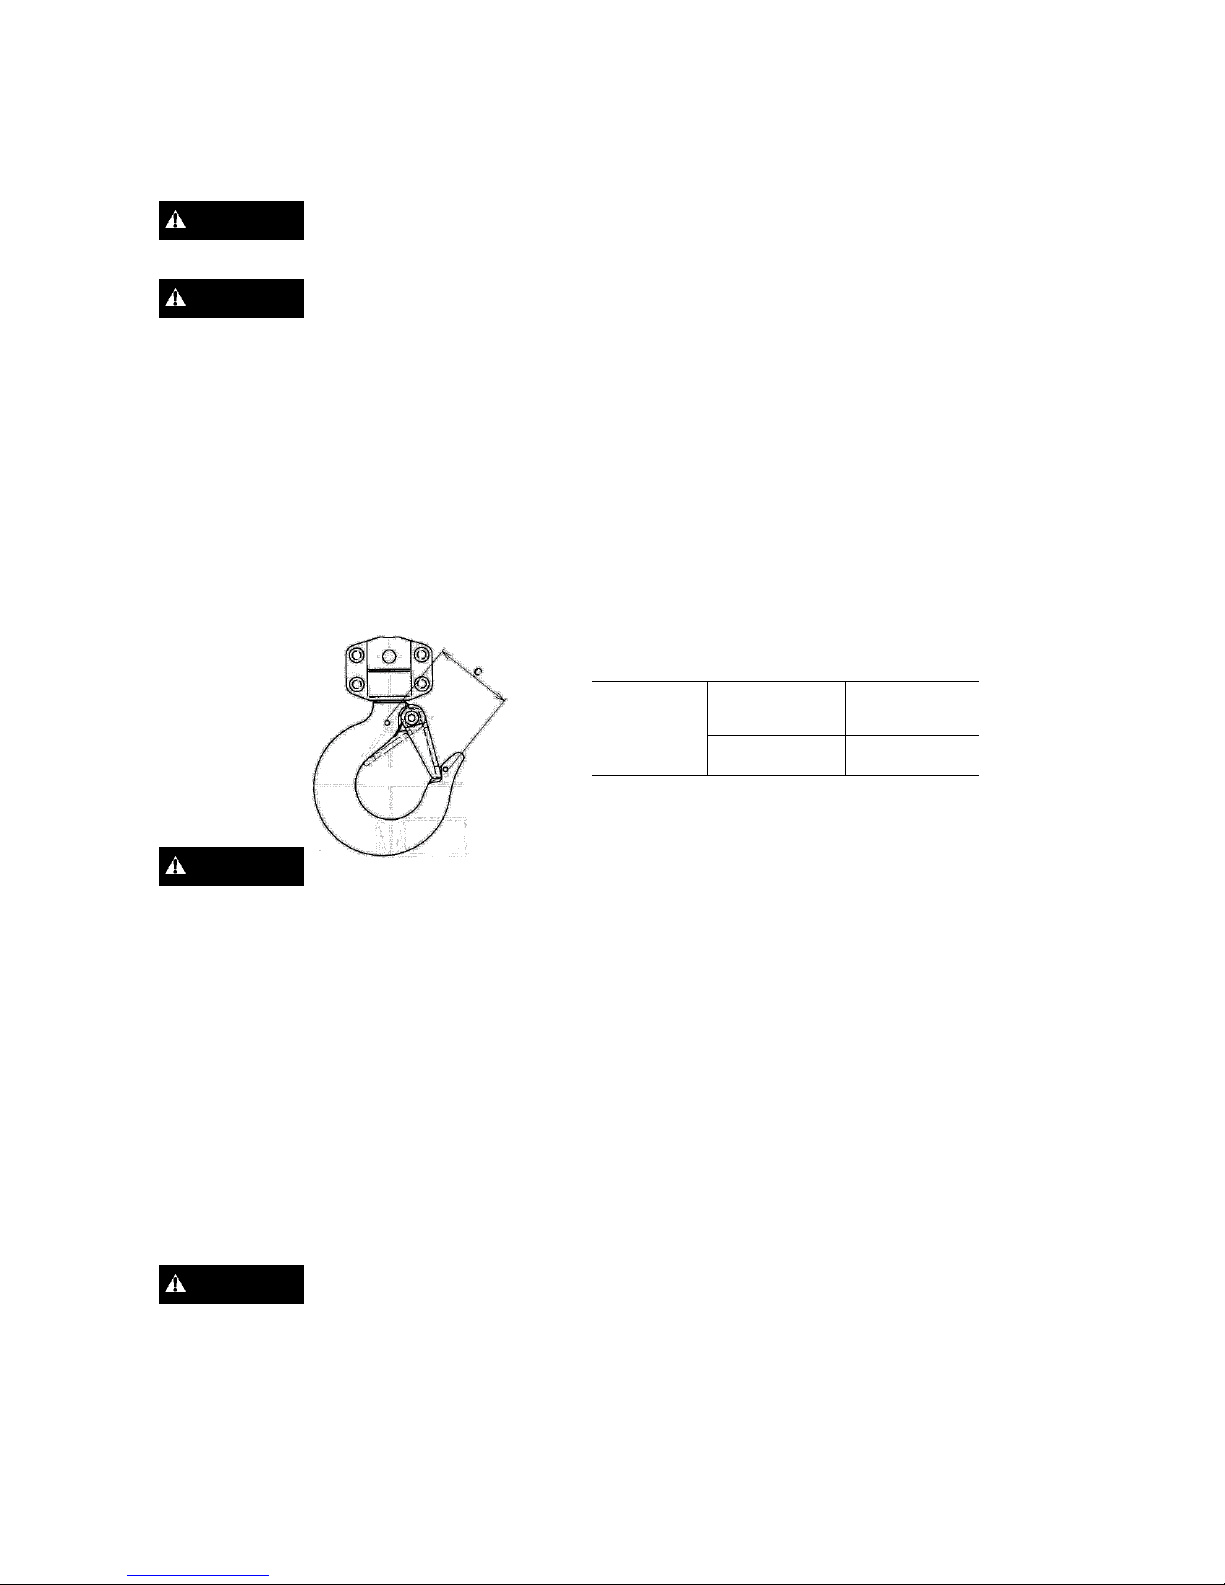
3. MOUNTING
Before mounting the hoist, fill in the following table with the opening dimension “c” between embossed marks
on the top and bottom hook as records preparing for periodic inspection.
ALWAYS Avoid the following when mounting the chain hoist.
Failure to comply with these instructions may result in death or severe injury.
- Ensure that only trained or competent persons install the chain hoist.
- Do not install the chain hoist within the range of movement of other devices (equipment), such as a
trolley.
ALWAYS Comply with the following instructions when installing the chain hoist.
Failure to comply with these instructions may result in death or severe injury.
- The safety factor of the manual chain hoist is 4:1. The hoist may lift and hold a load more than the
rated load check that the structure for mounting the chain hoist has sufficient strength.
- Fix the Top Hook to the structure securely.
- Before using the chain hoist with a trolley, read the Instruction Manual of the trolley carefully and
install it by adjusting the rail width.
- Install a stopper at both ends of the traversing rail for the trolley.
ALWAYS Comply with the following instructions when installing the chain hoist.
Failure to comply with these instructions may result in injury or damage to property.
- Install the chain hoist at appropriate place avoiding obstacles.
- Install the Load Chain with sufficient length for lifting work.
WARNING
CAUTION
WARNING
CAUTION
Dimension c
Top hook
(if applicable)
mm
Bottom hook
mm
— 2 —
4. BEFORE USE
4.1 Safety summary
Danger exists when heavy loads are transported, particularly when the equipment is not being used properly or
is poorly maintained. Because accidents and serious injury could result, special safety precautions apply to the
operation, maintenance and inspection of the KITO manual chain hoist M3 series.
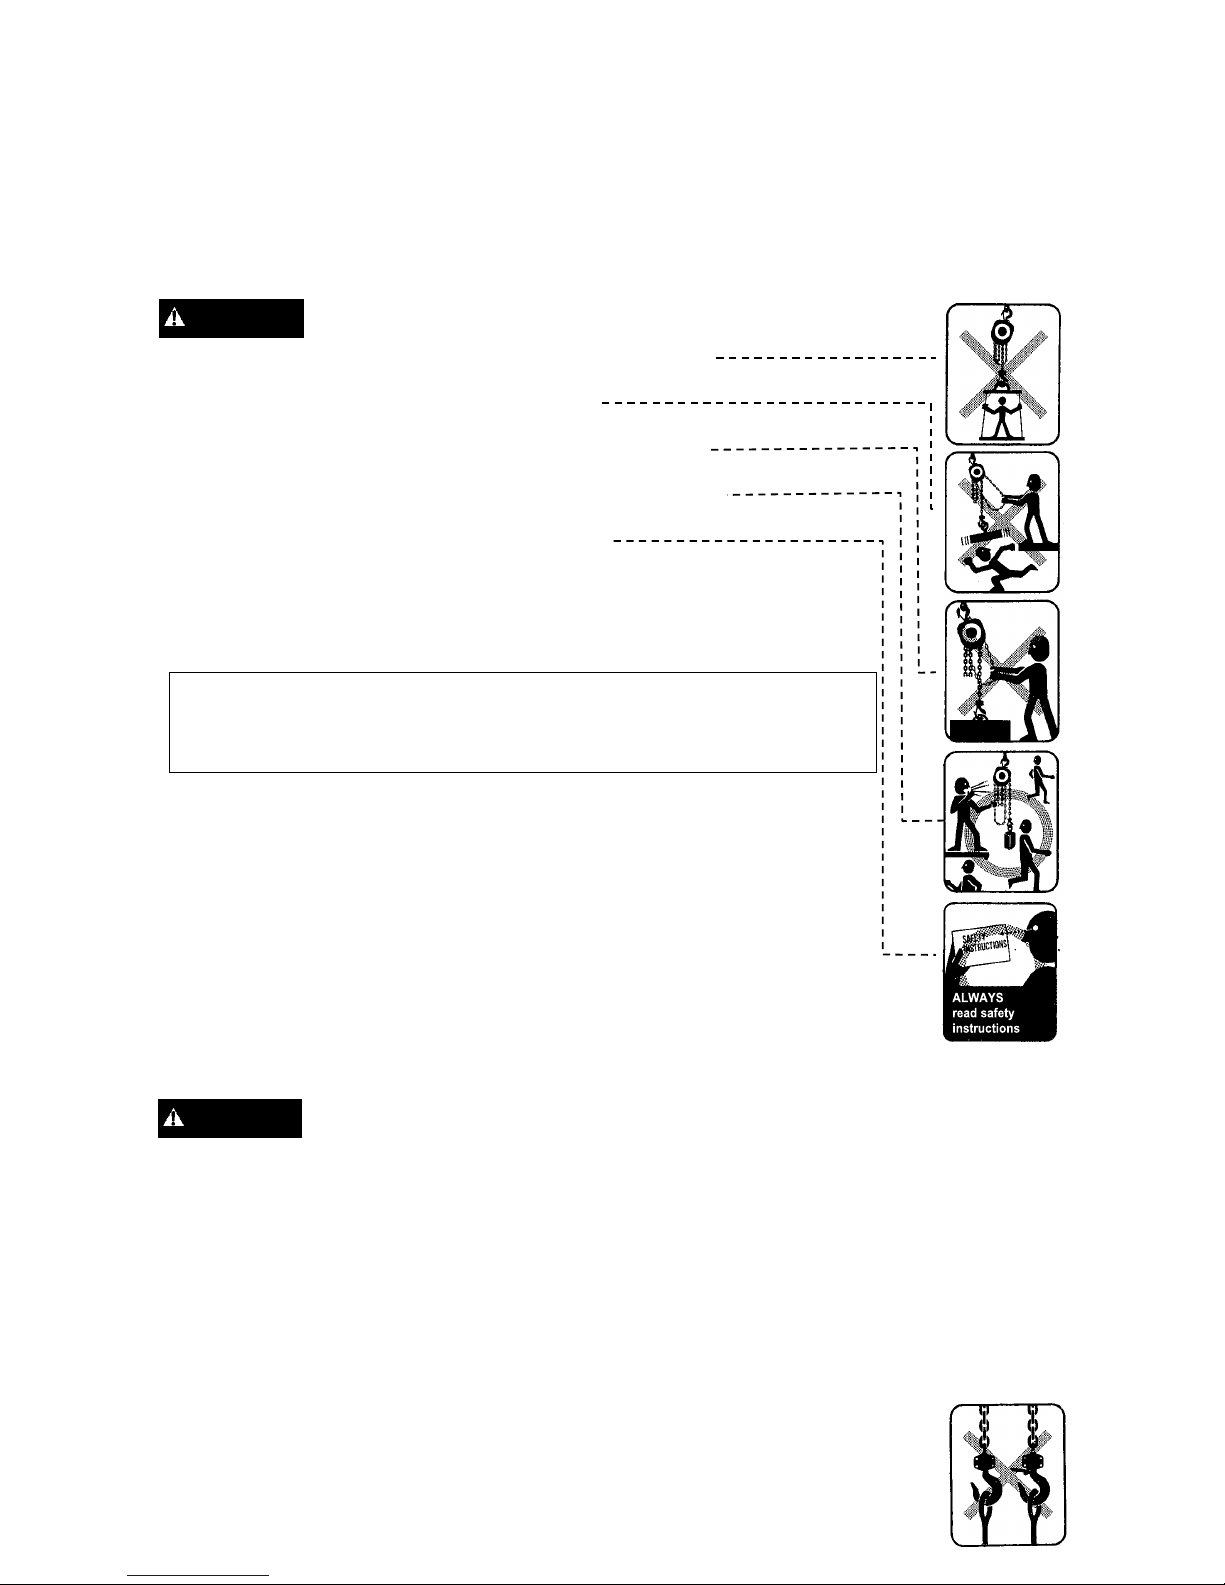
NEVER use a hoist for lifting, supporting or transporting people.
NEVER lift or transport loads over or near people.
NEVER lift more than WLL which is shown on the name plate.
ALWAYS let people around you know when a lift is about to begin.
ALWAYS read the operation and safety instructions.
Remember proper rigging and lifting techniques are the responsibility of the operator.
Check all applicable safety codes, regulations and other applicable laws for further
information about the safe use of your hoist.
More detailed safety information is contained in the following pages. For
additional information, please contact KITO Corporation or your authorized KITO
dealer.
4.2 Safety instructions
4.2.1 Before use
ALWAYS be sure to wear the proper clothing and personal protective equipment when using and operating the
product.
ALWAYS allow the instructed (trained in safety and operation) people to operate the hoist.
ALWAYS check the hoist before daily use according to the “Daily inspection” (Refer to 7.2).
ALWAYS make sure that the chain length is long enough for the intended job.
WARNING
WARNING
OVER LOAD
— 3 —
ALWAYS check that the hook latches work properly and replace missing or broken hook
latches (Refer to 7.3).
ALWAYS check the brake (Refer to 7.3).
ALWAYS oil the load chain regularly (Refer to 8.1.2).
ALWAYS use two hoists which each has WLL equal to or more than the load to be lifted
whenever you must use two hoists to lift a load. This will provide adequate
protection in the event that a sudden load shift or failure of one hoist occurs.
NEVER use a hoist without a hoist name plate.
NEVER use modified or deformed hooks.
NEVER use non-authentic KITO chains on the hoist.
4.2.2 While operation
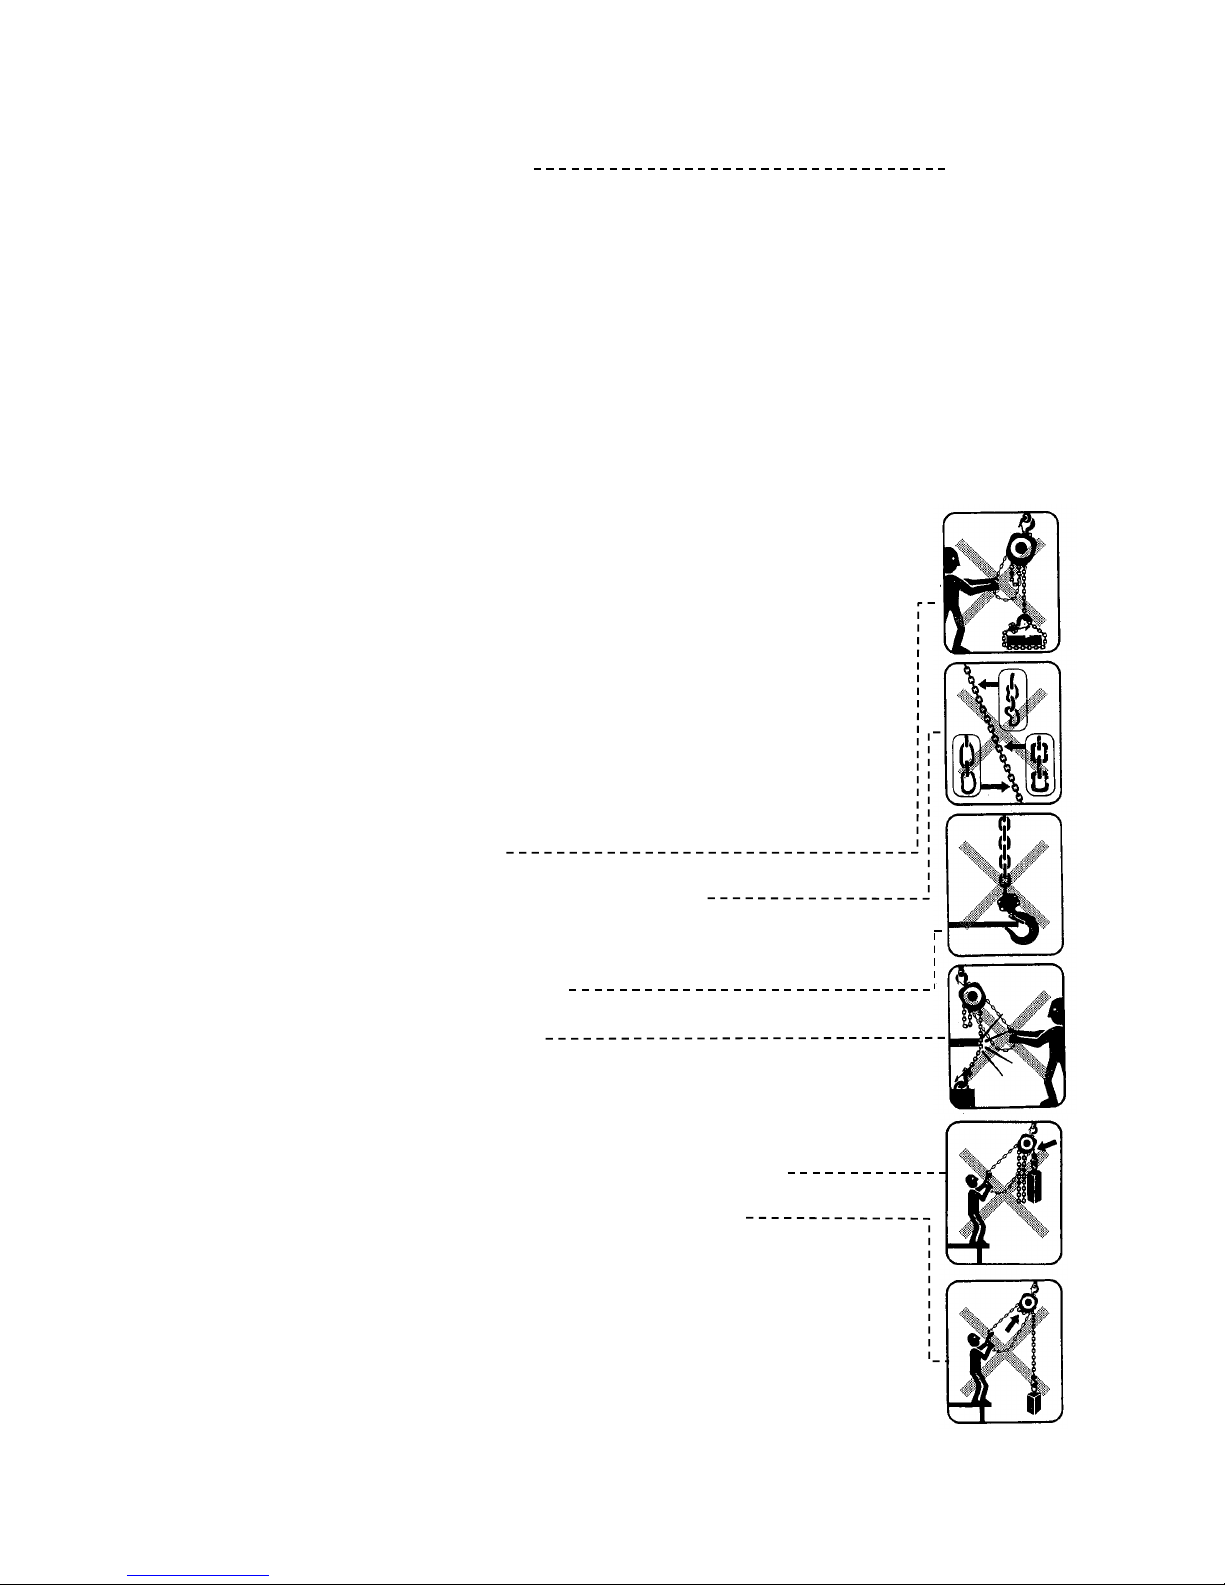
ALWAYS make sure that the load is properly seated in the hook.
ALWAYS tighten the slack out of the chain and sling when starting a lift to prevent a sudden
loading.
ALWAYS when any abnormality is observed during the operation, stop the operation
immediately, indicate “FAILURE” and contact with the maintenance engineers.
ALWAYS when inspecting and repairing, be sure to indicate “INSPECTION” and carry out
without lifting a load.
NEVER operate a hoist unless the load is centered under the hoist.
NEVER use the hoist chain as a sling.
NEVER use a twisted, kinked, damaged or stretched load chain.
NEVER swing a suspended load.
NEVER support a load on the tip of the hook.
NEVER contact the lad chain over an edge.
NEVER weld or cut a load suspended by a hoist.
NEVER use the hoist chain as a welding electrode.
NEVER operate a hoist so far that the bottom hook touches the hoist body.
NEVER operate a hoist so far that the load chain pulls the anchorage.
NEVER operate a hoist if excessive noise occurs.
NEVER use a capsized load chain.
4.2.3 After operation
ALWAYS set the load down safely after carrying.

— 4 —
NEVER suspend a load for an extended period of time.
NEVER leave a suspended load unattended.
NEVER throw a hoist.
4.2.4 Maintenance
ALWAYS let the qualified service personnel inspect the hoist periodically (Refer to 7.3).
NEVER splice, add and weld a load chain for extension.
4.2.5 Others
ALWAYS consult the manufacturer or your dealer if you plan to use a hoist in an excessively
corrosive environment (saltwater, sea air and/or acid, explosive environment or
other corrosive compounds, etc.).
NEVER use a hoist which has been taken out of service until the hoist has been properly
repaired or replaced.
NEVER remove or obscure the warning tags and labels.
Warning tags are installed on the hand chain.
— 5 —
5. MAIN SPECIFICATIONS
0.5 to 2 t
3 to 5 t
7.5 t
10 t
20 t

— 6 —
Specifications
Code
WLL
(t)
Std. lift
(m)
Chain pull
to lift
full load
(N)
Hand chain
length for 1m
lifting* (m)
Test load
(t)
Net
weight
(kg)
Load chain
dia. (mm) x
pitch (mm)
Load
chain
fall (lines)
Weight for
additional
one meter of
lift
(kg)
CB005
0.5
2.5
240
25
0.75
10
5.0 x 15.1
1
1.5
CB010 1 2.5
290
43
1.5
11.5
6.3 x 19.1
1
1.8
CB015
1.5
2.5
350
57
2.36
14.5
7.1 x 21.2
1
2.1
CB020 2 3.0
360
70 3 20
8.0 x 24.2
1
2.3
CB030 3 3.0
360
114
4.75
24
7.1 x 21.2
2
3.2
CB050 5 3.0
340
198
7.5
41
9.0 x 27.2
2
4.4
CB075
7.5
3.5
350
297
11.25
63
9.0 x 27.2
3
6.2
CB100
10
3.5
360
396
15
83
9.0 x 27.2
4
7.9
CB150
15
3.5
370
594
22.5
155
9.0 x 27.2
6
11.4
CB200
20
3.5
360 x 2
396 x 2
30
235
9.0 x 27.2
8
15.8
Remark: Any lift of chain is available on request.
*Length of the hand chain necessary to lift a load 1m.
This device was tested according to the required static and dynamic load test provided on the European standard EN13157.
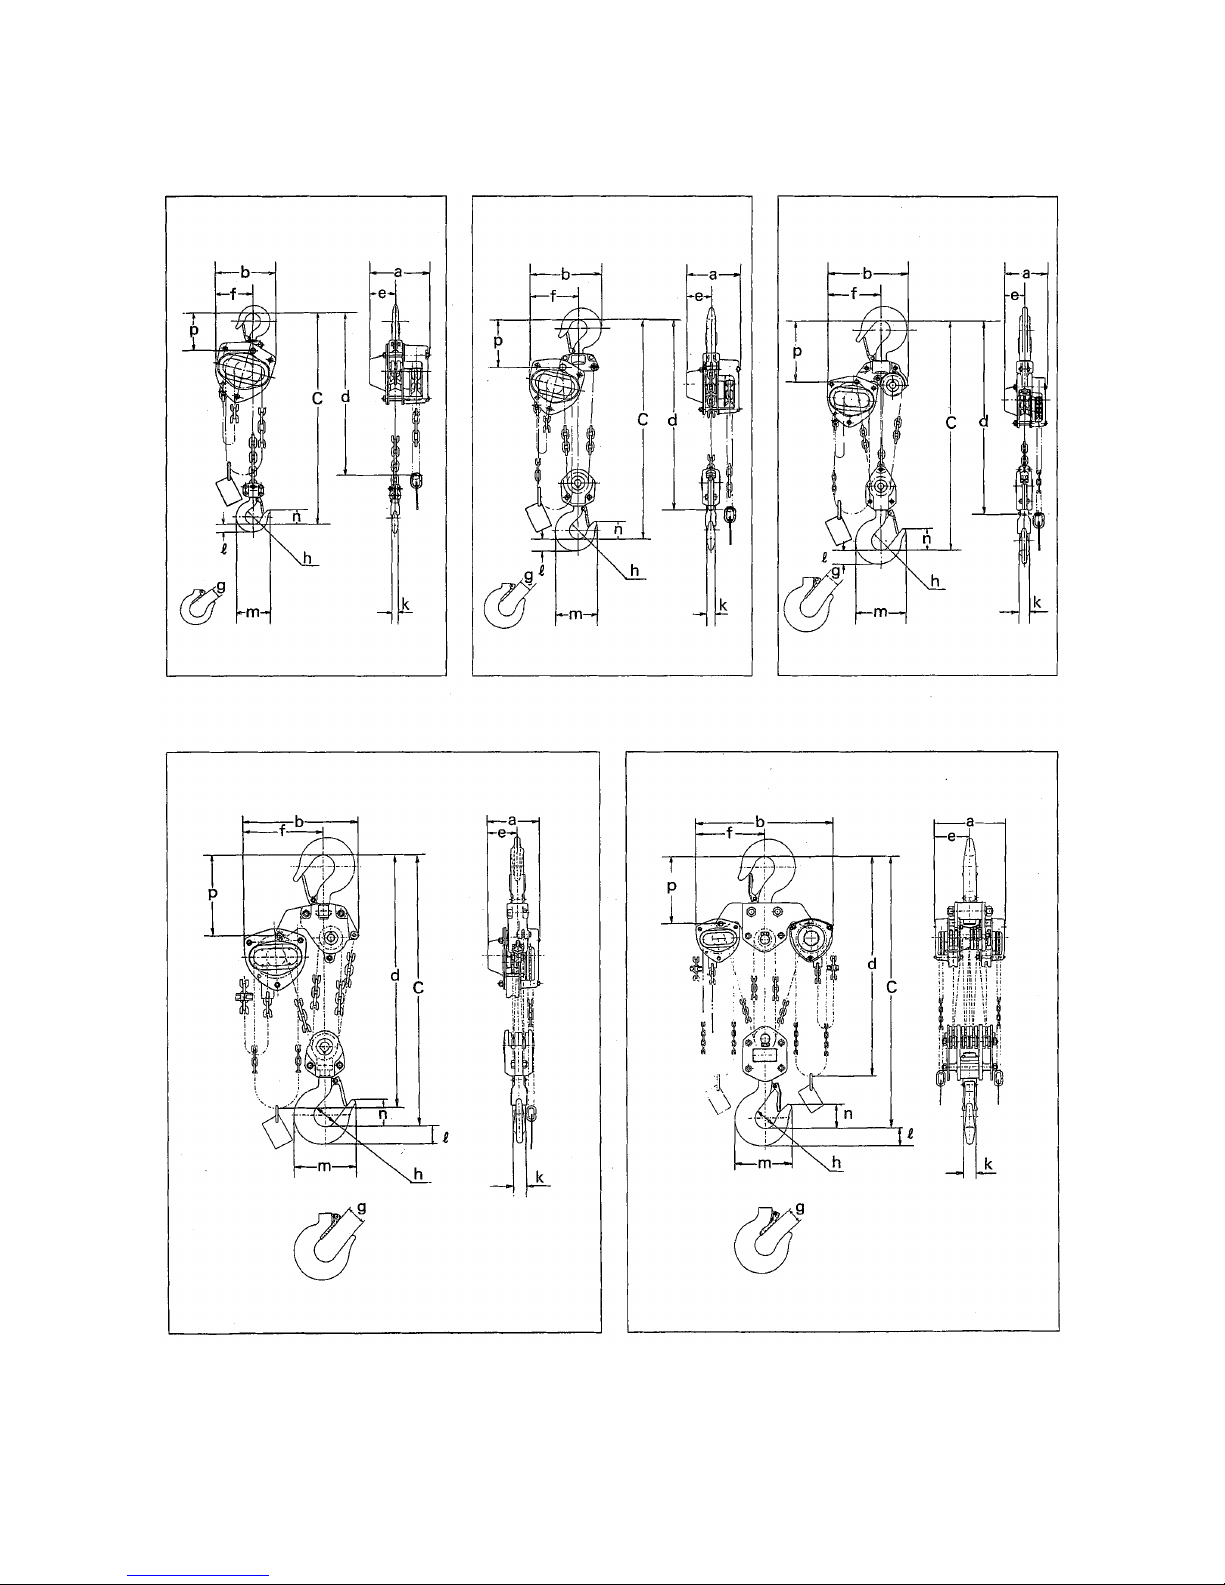
Dimensions
Code
WLL
(t)
Min. distance
between hooks
C (mm)
a
(mm)
b
(mm)
d
(mm)
e
(mm)
f
(mm)
g
(mm)
h
(mm)
k
(mm) ℓ (mm)
m
(mm)
n
(mm)
p
(mm)
CB005
0.5
285
158
161
2.5
69
99
27
35.5
12.1
17
77
35
89
CB010 1 295
162
161
2.5
71
99
29
42.5
16
21.8
93
11
101
CB015
1.5
350
171
182
2.5
78
112
34
47.5
19.5
26.5
106
47
119
CB020 2 375
182
202 3 87
125
36
50
21.8
30
116
49
124
CB030 3 510
171
235
3.1
78
162
42.5
56
27.2
37.5
138
57
148
CB050 5 600
192
282
3.6
91
194
46.5
63
34.5
47.5
161
67.5
172
CB075
7.5
770
192
373
4.2
91
253
72.5
85
47.5
63
231
97.5
275
CB100
10
760
192
438
4.2
111
308
72.5
85
47.5
63
231
97.5
295
CB150
15
1020
268
492
4.7
119
337
80
100
60
80
275
110
320
CB200
20
1180
374
746
4.8
187
373
81
110
67
90
301
125
351
Allowable ambient conditions:
Operation temperature: -40C to +60C
Operation humidity: 100%
Non-asbestos material:
Friction plates are made of asbestos free material.
— 7 —
6. OPERATION
6.1 Intended purpose of hoist operation
This hoist has been designed for vertically lifting and lowering loads, by hand, under normal atmospheric conditions
of the work place.
However, since dealing with heavy loads may involve unexpected danger, all the “Safety instructions” (Refer to
4.2) must be followed.
6.2 Safety working environment
The operator must be aware of the following points while using the hoist.
(1) The operator must have a clear and unobstructed view of the entire travel area before operating the hoist. When
not possible, a second or more persons must serve as scouts in the nearby area.
(2) The operator must check if the entire travel area is safe and secure before operating the hoist.
6.3 Operation
Always take care hand or clothes not to be caught in a chain, idle sheave
or other moving parts.
(1) Face the hand chain wheel side of the hoist.
(2) To raise the load, pull hand chain clockwise.
(3) To lower the load, pull hand chain counterclockwise.
(4) There are risks of overheating of the breaking system during
prolonged lowering of loads. If you are considering the use under
such condition, consult KITO.
Remark: The clicking sound of the pawl when a load is being raised
indicates normal operation.
6.4 Hoist storage
Observe the following points when storing the hoist.
ALWAYS store the hoist in no load condition.
ALWAYS wipe off all dirt and water.
ALWAYS oil the chain, top pin, chain pin and hook latches.
ALWAYS hang in a dry place.
ALWAYS check the hoist for abnormalities when using the hoist after a period of non-use
according to the periodic inspection procedures (Refer to 7.3).
Hand wheel
[40]
Hand chain
[48]
Counterclockwise
Clockwise
Fig. 5-1 Hand wheel rotation
WARNING
WARNING
CAUTION
CAUTION
— 8 —
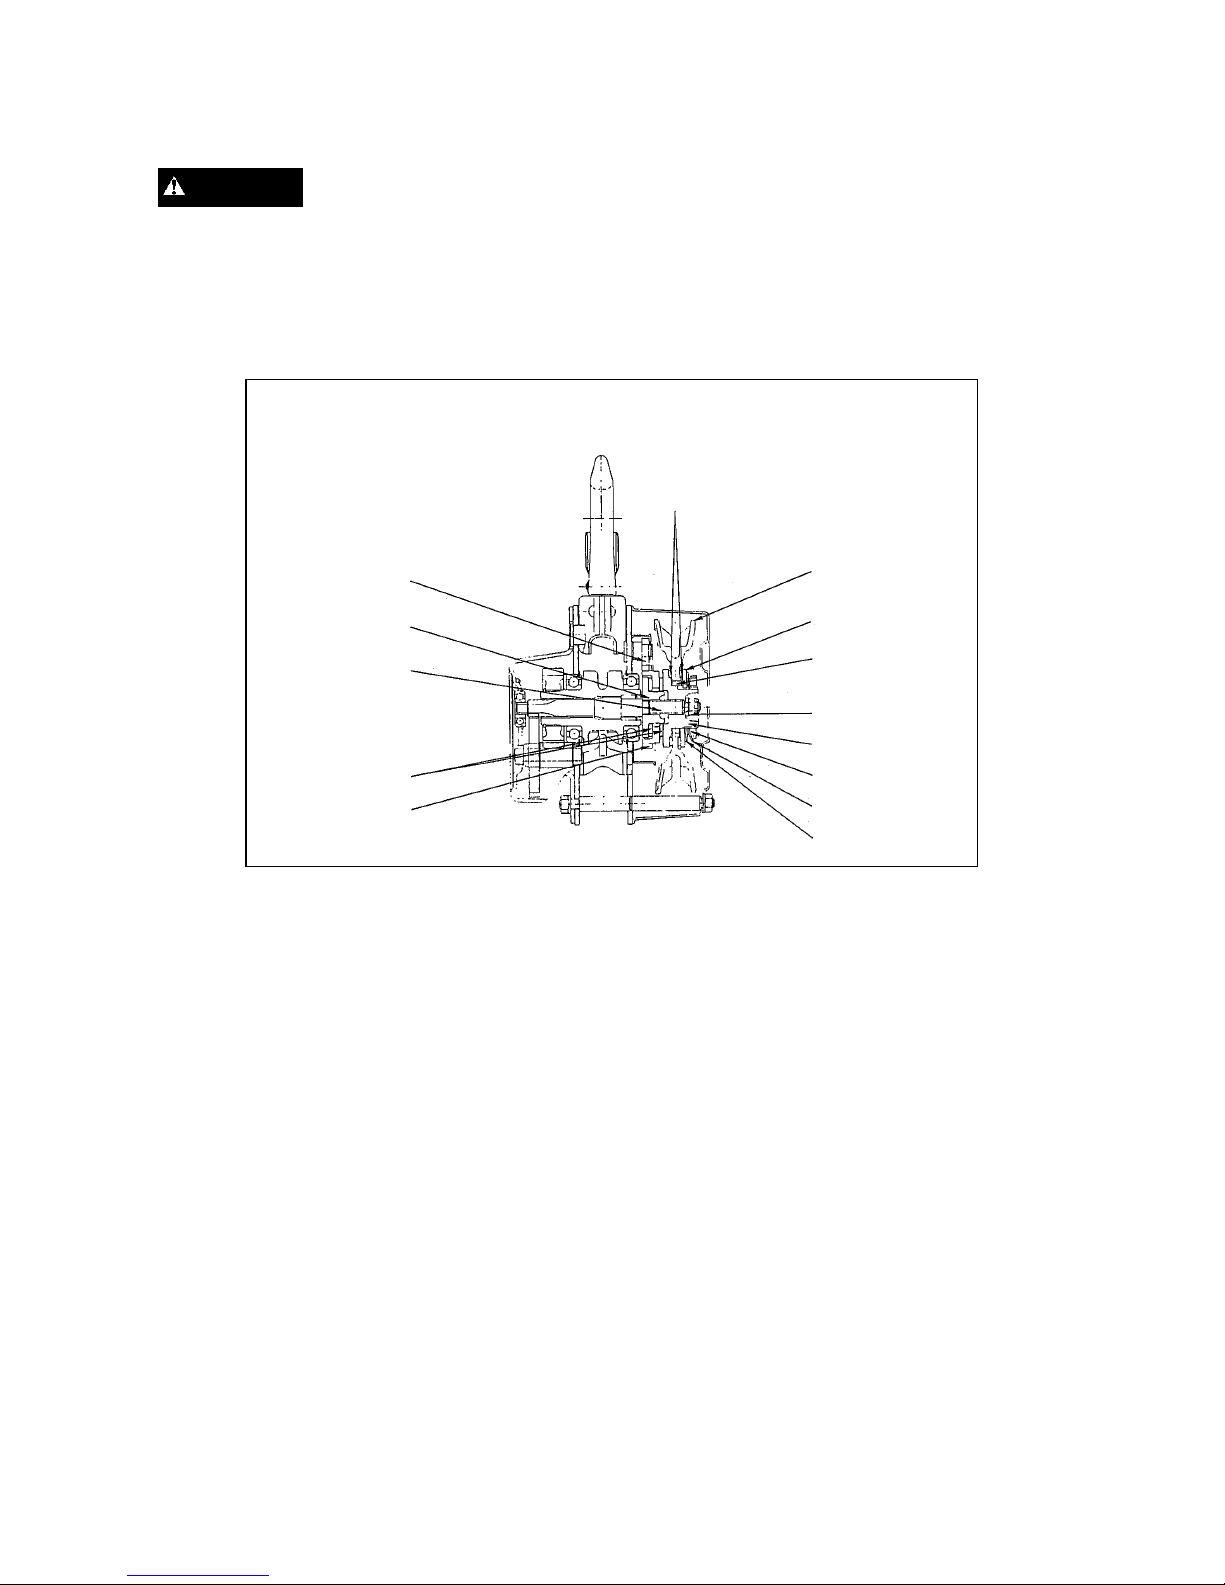
6.5 Optional overload limiter
NEVER disassemble or attempt to adjust the overload limiter assembly. Any attempt to do so will void the
warranty. Contact your KITO dealer, if service is required.
The overload limiter device has been developed to avoid overloading. When an applied load exceeds the preset
value, the hand chain wheel rotates idly. The device is a friction clutch mechanism which is concentrically equipped
on pinion shaft between hand chain wheel and mechanical brake.
Fig. 5-2 Overload limiter
Note:
When the overload limiter operates, the maximum load to the product is approximately 1.8 times of the rated
load.
If the overload limiter operates, reduce the load to less than the rated load.
Also check that the structure for mounting the chain hoist (including a trolley) has no damage.
Pawl
Friction disc
Pinion
Friction plate
Ratchet disc
Spring disc
Washer
Adjust nut
Female thread
Slotted nut
Wheel roller
Spring disc seat
Hand wheel
Clutch plate
WARNING
— 9 —
7. INSPECTION
7.1 Outline
There are two types of inspection, the daily inspection performed by the operator before using the hoist, and
the more thorough periodic inspection performed by qualified service personnel who have the authority to
remove the hoist from service.
7.2 Daily inspection
Before each work shift, check the following points:
Item
Inspection method
Discard limit/criteria
Remedy
1. Name plate
Check visually.
Every description should be clear and
visible.
Replace the name plate.
2. Hook latches
(Top/bottom)
Check visually.
The top and bottom hook latches shall be
in proper condition.
Replace the latch or hook.
3. Hook
Check visually.
The openings of the top and bottom
hooks shall not be apparently too wide.
Replace the hook.
Check visually.
No wear, deformation or damage.
Replace the hook.
Turn the swivels by
hand.
The swivels should rotate freely.
Replace the hook.
4. Load chain
Check visually.
No twisting.
Replace the deformed chain.
Check visually.
No excessive rust or corrosion.
Replace the load chain.
5. Brake
Facing the hand chain
side, operate the hoist
with no load.
The pawl should emit a clear clicking
sound while lifting.
Repair if impure noise or no
sound.
6. Sound
Listen to the noises.
There should be no irregular noises from
hand chain, load chain or gears.
Replace the noisy parts.
7. Miscellaneous
Check visually.
No missing nuts and/or split pins.
Replace the parts.

— 10 —
7.3 Periodic inspection
Periodic inspection shall be made at the interval shown below and should follow the given procedures.
NORMAL (Normal use): Annual inspection
HEAVY (Frequent use): Semiannual inspection
SEVERE (Excessively frequent use): Quarterly inspection
Figures in parentheses are Fig. No. in “PARTS LIST”. (Refer to page 27 to 32.)
Item
Inspection method
Discard limit/criteria
Remedy
Indications
Check visually.
WLL indication is clear.
Attach the name plate.
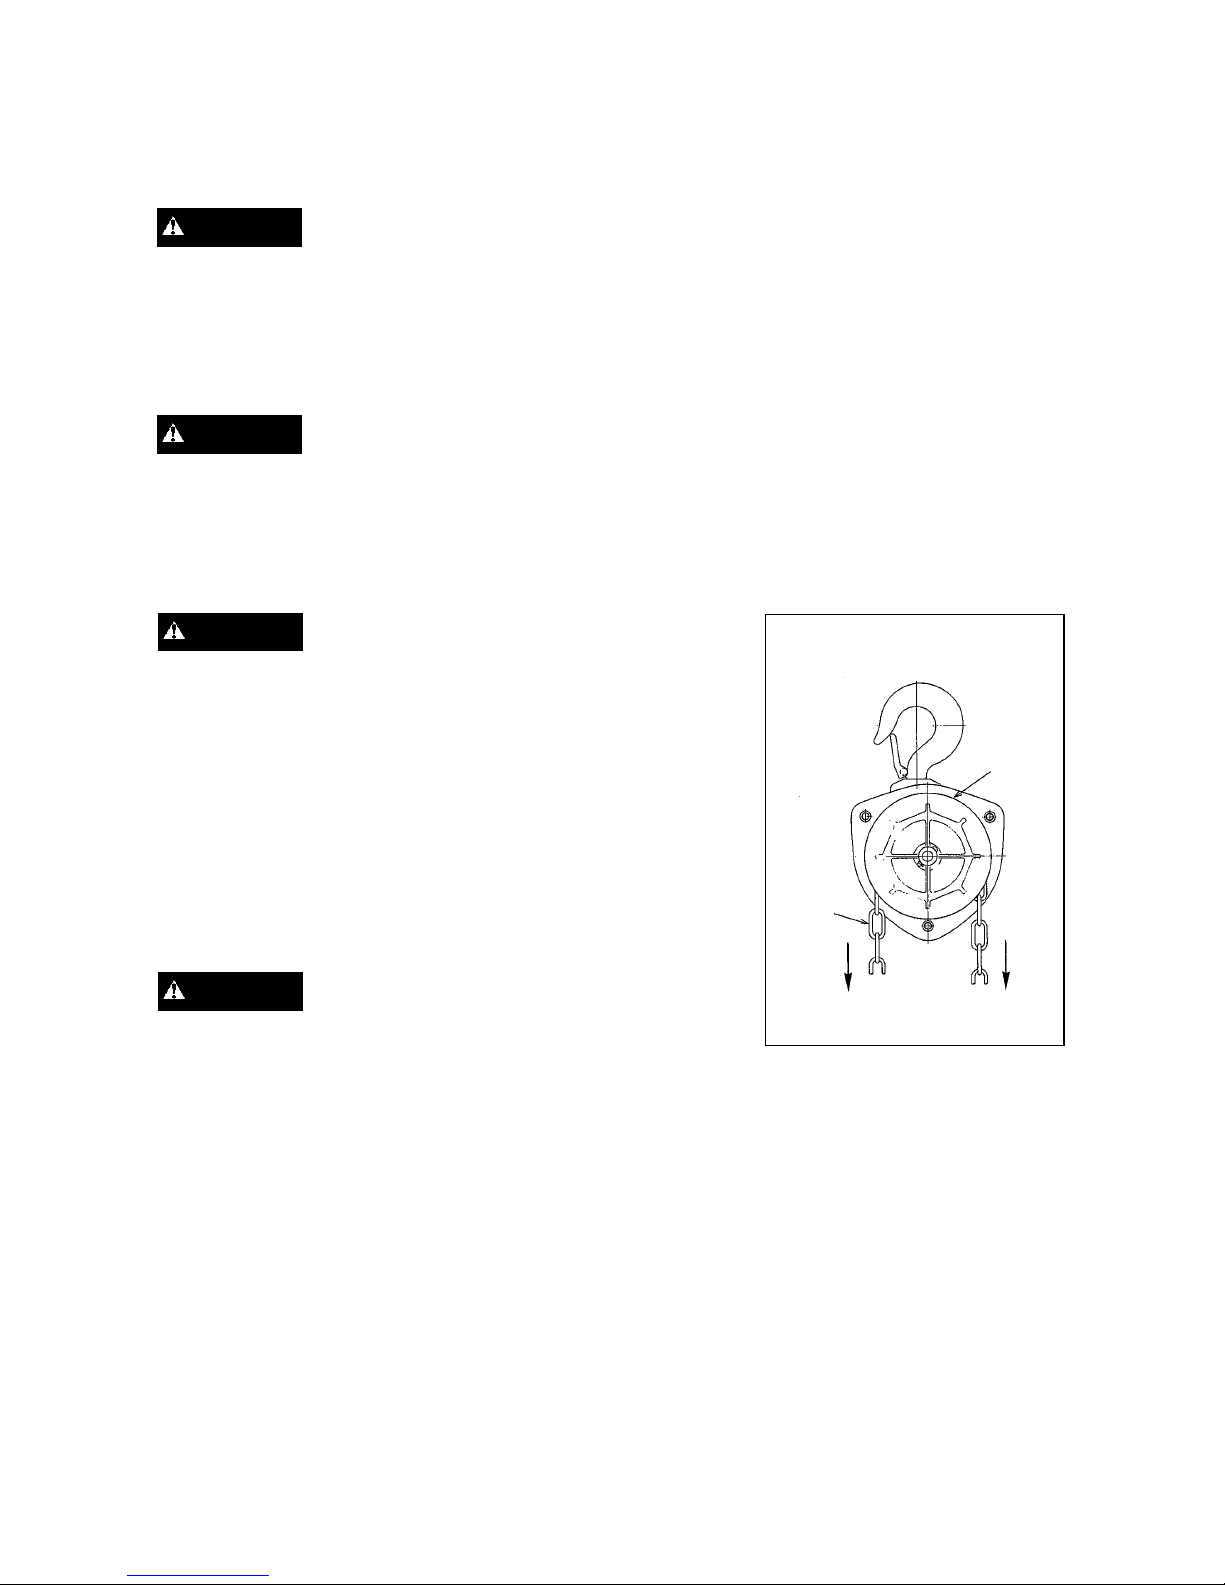
Hook [1, 6, 55, 78]
(Top and bottom)
1. Deformation/
twist of hook
opening
Measure dimension “c”
at time of purchase with
slide calipers.
No deformation comparing with original
shape (at time of purchase).
Replace the hook.
Check visually.
Twist shall not be large enough to detect
visually.
Replace the hook.
2. Wear
Measure “a” and “b”
with slide calipers.
NEVER use the hook if dimension “a” or
“b” becomes less than 90% of normal.
Replace the hook.
3. Hook damage
Check visually.
No great damage permitted such as bend,
deep scratch and torsion, etc.
Replace the hook.
4. Hook movement
Swivel hook.
Shall swivel smoothly.
Replace the hook.
WLL
(t)
a (mm)
b (mm)
Normal
Discard
Normal
Discard
0.5
17.0
15.3
12.1
10.9 1 21.8
19.6
16.0
14.4
1.5
26.5
23.9
19.5
17.6
2
30.0
27.0
21.8
19.6 3 37.5
33.8
27.2
24.5 5 47.5
42.8
34.5
31.1
7.5
63.0
56.7
47.5
42.8
10
63.0
56.7
47.5
42.8
15
80.0
72.0
50.0
45.0
20
90.0
81.0
56.0
50.4
 Loading...