

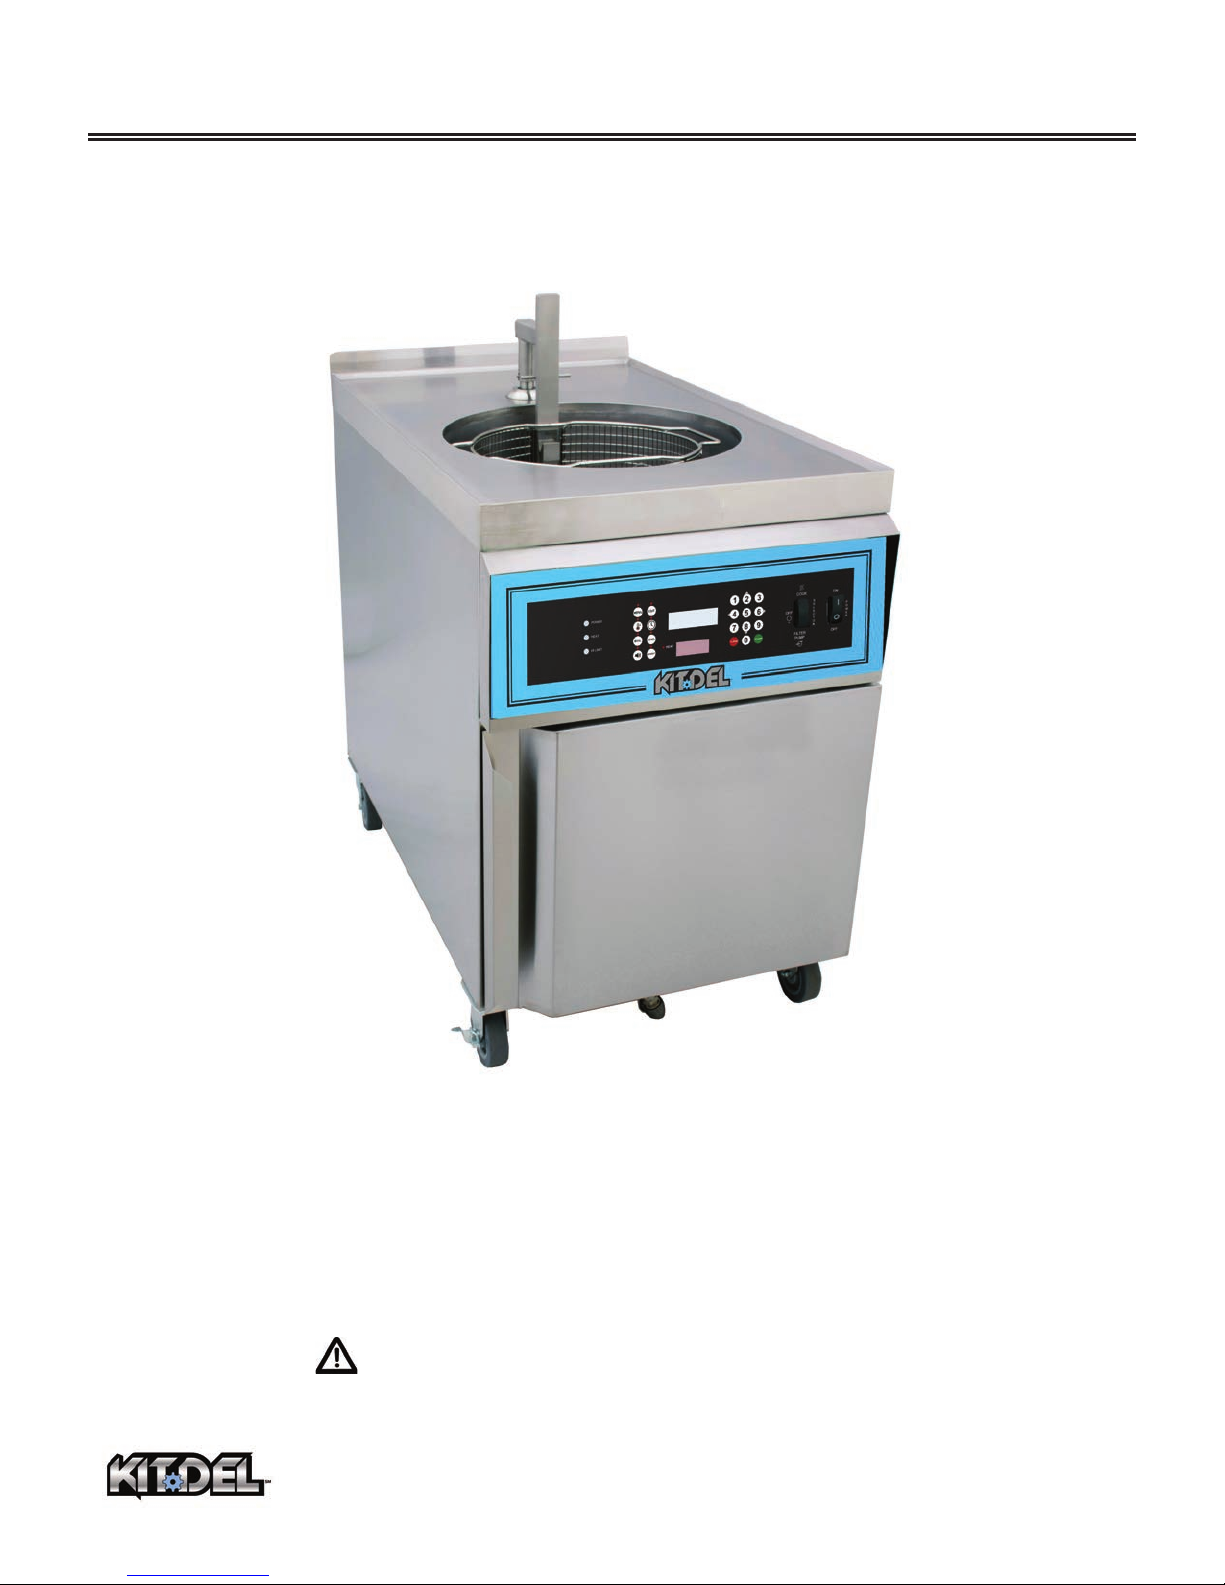
KitDel KD-EAL Series, KD-EAL-45-C, KD-EAL-60-C, KD-EAL-75-C Operation & Service Manual
Operations & Service Manual
KD-E AL S ERIES
ELECTRIC FRYERS
Models:
KD-EAL-45-C
KD-EAL-60-C
KD-EAL-75-C
CAUTION: Read this Manual before using this appliance.
PO Box 160 ▪ 170 Commerce Drive ▪ Holts Summit, MO 65043 USA
www.KitDel.com ▪ Email: Support@KitDel.com
Toll Free 855.632.3373 ▪ Fax 573.896.9583
Form 60831-KD (Rel. Oct.2017, Rev. A)


LIMITED WARRANTY
• Subject to the terms and conditions of this Limited Warranty as herein stated, Equipment and Parts
purchased new, from an authorized representative, are warranted by the Manufacturer as to defects in
material or workmanship for a period of twenty-four (24) months from the date of installation, provided,
however, that with regard to labor costs in connection with this warranty, see below. All installations must
be made by a qualified kitchen equipment service agent in accordance with all applicable codes and/or
regulations in the jurisdiction in which installed. Limited warranty coverage is extended to the original owner
only and is void if the unit is resold.
• During the Limited Warranty period, units will be replaced or reconditioned, at manufacturer’s factory, any
part or parts of this unit which manufacturer’s inspectors judge defective, provided the unit has been
properly installed, subjected to normal usage, and operated and serviced properly. This Limited Warranty
does not cover cosmetic damage, and damage due to acts of God, accident, misuse, alteration, negligence,
abuse of the unit or the use of unorthodox repair methods. All parts replaced under this Limited Warranty
carry only the unexpired term of this Limited Warranty. Limited Warranty service may be furnished only by
an authorized service agents.
• If Limited Warranty service is requested, factory-authorized service representatives will be dispatched to
repair, recondition, replace or inspect subject units with such labor being rendered without cost to owner for
twenty-four (24) months from the date of installation. Otherwise, service, including labor and transportation
charges or other expenses, in connection with the removal or installation of any part or parts supplied under
this Limited Warranty, are specified on the original sales contract between the purchaser and the authorized
representative.
• Failure to use manufacturer OEM replacement Parts and Filters may void the factory warranty.
• The Manufacturer reserves the right to change or improve its equipment and parts in any way without
obligation to alter such equipment or parts previously manufactured.
• The Manufacturer makes no further warranties, express or implied including implied warranties of
merchantability or fitness for a particular purpose, and has no other obligation or liability not specifically
stated herein.
• Repair or replacement as provided under this Limited Warranty is the exclusive remedy. Manufacturer shall
not be liable for any incidental or consequential damages for breach of any express or implied warranty on
this product, except to the extent prohibited by applicable law. Any implied warranty of merchantability or
fitness for a particular purpose on this product is limited in duration to the duration of this limited warranty.
• Used equipment or parts, or equipment and parts, not purchased from an authorized representative, carry
no warranties, express or implied.


Table of Contents KD-EAL Series Fryers
Safety vii
Safety Overview . . . . . . . . . . . . . . . . . . . . . . . . . . . . . . . . . . . . . . . . . . . . . . . . . . . . . . . . . . . . . . . . . . . . . . . . . . . . . . . vii
Specific Safety Precautions . . . . . . . . . . . . . . . . . . . . . . . . . . . . . . . . . . . . . . . . . . . . . . . . . . . . . . . . . . . . . . . . . . . . . . viii
1. Introduction . . . . . . . . . . . . . . . . . . . . . . . . . . . . . . . . . . . . . . . . . . . . . . . . . . . . . 1
1.1 Construction . . . . . . . . . . . . . . . . . . . . . . . . . . . . . . . . . . . . . . . . . . . . . . . . . . . . . . . . . . . . . . . . . . . . . . . . . 1
1.2 Standard Features . . . . . . . . . . . . . . . . . . . . . . . . . . . . . . . . . . . . . . . . . . . . . . . . . . . . . . . . . . . . . . . . . . . . 1
1.3 Specifications . . . . . . . . . . . . . . . . . . . . . . . . . . . . . . . . . . . . . . . . . . . . . . . . . . . . . . . . . . . . . . . . . . . . . . . . 2
1.3.1 Overall Dimensions for KD-EAL Series Fryer . . . . . . . . . . . . . . . . . . . . . . . . . . . . . . . . . . . . . . . . . . . . . . . 2
1.3.2 Listing Certifications. . . . . . . . . . . . . . . . . . . . . . . . . . . . . . . . . . . . . . . . . . . . . . . . . . . . . . . . . . . . . . . . . . . 3
1.3.3 Basket Sizes. . . . . . . . . . . . . . . . . . . . . . . . . . . . . . . . . . . . . . . . . . . . . . . . . . . . . . . . . . . . . . . . . . . . . . . . . . 3
1.3.4 Cooking Capacity . . . . . . . . . . . . . . . . . . . . . . . . . . . . . . . . . . . . . . . . . . . . . . . . . . . . . . . . . . . . . . . . . . . . . 3
2. Installation . . . . . . . . . . . . . . . . . . . . . . . . . . . . . . . . . . . . . . . . . . . . . . . . . . . . . . 5
2.1 Location . . . . . . . . . . . . . . . . . . . . . . . . . . . . . . . . . . . . . . . . . . . . . . . . . . . . . . . . . . . . . . . . . . . . . . . . . . . . . 5
2.2 Unpacking . . . . . . . . . . . . . . . . . . . . . . . . . . . . . . . . . . . . . . . . . . . . . . . . . . . . . . . . . . . . . . . . . . . . . . . . . . . 6
2.3 Electrical Requirements . . . . . . . . . . . . . . . . . . . . . . . . . . . . . . . . . . . . . . . . . . . . . . . . . . . . . . . . . . . . . . . . 7
2.4 Electrical Connections . . . . . . . . . . . . . . . . . . . . . . . . . . . . . . . . . . . . . . . . . . . . . . . . . . . . . . . . . . . . . . . . . 8
2.4.1 Routing conduit . . . . . . . . . . . . . . . . . . . . . . . . . . . . . . . . . . . . . . . . . . . . . . . . . . . . . . . . . . . . . . . . . . . . . . 9
2.4.2 Service Box Connections . . . . . . . . . . . . . . . . . . . . . . . . . . . . . . . . . . . . . . . . . . . . . . . . . . . . . . . . . . . . . . . 9
2.5 Ventilation of Fryer . . . . . . . . . . . . . . . . . . . . . . . . . . . . . . . . . . . . . . . . . . . . . . . . . . . . . . . . . . . . . . . . . . 10
2.6 Changing the Door Swing . . . . . . . . . . . . . . . . . . . . . . . . . . . . . . . . . . . . . . . . . . . . . . . . . . . . . . . . . . . . . 10
3. Overview. . . . . . . . . . . . . . . . . . . . . . . . . . . . . . . . . . . . . . . . . . . . . . . . . . . . . . . 13
3.1 Control Panel . . . . . . . . . . . . . . . . . . . . . . . . . . . . . . . . . . . . . . . . . . . . . . . . . . . . . . . . . . . . . . . . . . . . . . . 14
3.2 Lower Cabinet Area . . . . . . . . . . . . . . . . . . . . . . . . . . . . . . . . . . . . . . . . . . . . . . . . . . . . . . . . . . . . . . . . . . 16
3.3 Filter Pan Assembly . . . . . . . . . . . . . . . . . . . . . . . . . . . . . . . . . . . . . . . . . . . . . . . . . . . . . . . . . . . . . . . . . . 18
3.4 Basket and Elevator Assembly . . . . . . . . . . . . . . . . . . . . . . . . . . . . . . . . . . . . . . . . . . . . . . . . . . . . . . . . . 20
3.5 Accessories (Included) . . . . . . . . . . . . . . . . . . . . . . . . . . . . . . . . . . . . . . . . . . . . . . . . . . . . . . . . . . . . . . . . 22
3.6 Accessories (Not Included, Purchased Separately) . . . . . . . . . . . . . . . . . . . . . . . . . . . . . . . . . . . . . . . . . 24
4. Unit Preparation . . . . . . . . . . . . . . . . . . . . . . . . . . . . . . . . . . . . . . . . . . . . . . . . 27
4.1 Set-up for Initial Testing of Unit . . . . . . . . . . . . . . . . . . . . . . . . . . . . . . . . . . . . . . . . . . . . . . . . . . . . . . . . 27
4.2 Power Test . . . . . . . . . . . . . . . . . . . . . . . . . . . . . . . . . . . . . . . . . . . . . . . . . . . . . . . . . . . . . . . . . . . . . . . . . 28
4.3 Heating Element Test. . . . . . . . . . . . . . . . . . . . . . . . . . . . . . . . . . . . . . . . . . . . . . . . . . . . . . . . . . . . . . . . . 28
4.4 Filter Pump Test . . . . . . . . . . . . . . . . . . . . . . . . . . . . . . . . . . . . . . . . . . . . . . . . . . . . . . . . . . . . . . . . . . . . . 29
4.5 Perform Boil Out Procedure . . . . . . . . . . . . . . . . . . . . . . . . . . . . . . . . . . . . . . . . . . . . . . . . . . . . . . . . . . . 29
4.6 Clean Filter Pan & Accessories . . . . . . . . . . . . . . . . . . . . . . . . . . . . . . . . . . . . . . . . . . . . . . . . . . . . . . . . . 29
5. Fryer Operation . . . . . . . . . . . . . . . . . . . . . . . . . . . . . . . . . . . . . . . . . . . . . . . . . 31
5.1 Computer Cooking Controller . . . . . . . . . . . . . . . . . . . . . . . . . . . . . . . . . . . . . . . . . . . . . . . . . . . . . . . . . . 32
5.1.1 Keys and Functions. . . . . . . . . . . . . . . . . . . . . . . . . . . . . . . . . . . . . . . . . . . . . . . . . . . . . . . . . . . . . . . . . . . 32
5.1.2 General Operation - Computer Cooking Controller . . . . . . . . . . . . . . . . . . . . . . . . . . . . . . . . . . . . . . . . 34
5.1.3 Set a Manual Temperature and Cook Time . . . . . . . . . . . . . . . . . . . . . . . . . . . . . . . . . . . . . . . . . . . . . . . 35
5.1.4 Working with Menus . . . . . . . . . . . . . . . . . . . . . . . . . . . . . . . . . . . . . . . . . . . . . . . . . . . . . . . . . . . . . . . . . 36
iii

KD-EAL Series Fryers Table of Contents
5.1.4.1 Editing a Menu Preset . . . . . . . . . . . . . . . . . . . . . . . . . . . . . . . . . . . . . . . . . . . . . . . . . . . . . . . . . . . . . . . . 37
5.1.4.2 Selecting a Menu Preset . . . . . . . . . . . . . . . . . . . . . . . . . . . . . . . . . . . . . . . . . . . . . . . . . . . . . . . . . . . . . . 40
5.1.5 Cooking . . . . . . . . . . . . . . . . . . . . . . . . . . . . . . . . . . . . . . . . . . . . . . . . . . . . . . . . . . . . . . . . . . . . . . . . . . . . 41
5.1.6 Other Controller Features . . . . . . . . . . . . . . . . . . . . . . . . . . . . . . . . . . . . . . . . . . . . . . . . . . . . . . . . . . . . . 41
5.1.6.1 Manually Operating the Basket Lift . . . . . . . . . . . . . . . . . . . . . . . . . . . . . . . . . . . . . . . . . . . . . . . . . . . . . 41
5.1.6.2 COOL Mode. . . . . . . . . . . . . . . . . . . . . . . . . . . . . . . . . . . . . . . . . . . . . . . . . . . . . . . . . . . . . . . . . . . . . . . . . 42
5.1.6.3 AUTO-COOL Feature. . . . . . . . . . . . . . . . . . . . . . . . . . . . . . . . . . . . . . . . . . . . . . . . . . . . . . . . . . . . . . . . . . 42
5.1.6.4 BOIL OUT Mode . . . . . . . . . . . . . . . . . . . . . . . . . . . . . . . . . . . . . . . . . . . . . . . . . . . . . . . . . . . . . . . . . . . . . 42
5.1.7 Access and Edit User Settings . . . . . . . . . . . . . . . . . . . . . . . . . . . . . . . . . . . . . . . . . . . . . . . . . . . . . . . . . . 43
5.1.8 PASSWORD Protection. . . . . . . . . . . . . . . . . . . . . . . . . . . . . . . . . . . . . . . . . . . . . . . . . . . . . . . . . . . . . . . . 44
5.1.9 Start-up Procedure. . . . . . . . . . . . . . . . . . . . . . . . . . . . . . . . . . . . . . . . . . . . . . . . . . . . . . . . . . . . . . . . . . . 44
5.1.10 Controller Errors and Alarms. . . . . . . . . . . . . . . . . . . . . . . . . . . . . . . . . . . . . . . . . . . . . . . . . . . . . . . . . . . 45
5.1.10.1 Resolving Controller Errors and Alarms . . . . . . . . . . . . . . . . . . . . . . . . . . . . . . . . . . . . . . . . . . . . . . . . . . 46
5.2 Cooking Procedures . . . . . . . . . . . . . . . . . . . . . . . . . . . . . . . . . . . . . . . . . . . . . . . . . . . . . . . . . . . . . . . . . . 48
5.3 Filtering Cooking Oil. . . . . . . . . . . . . . . . . . . . . . . . . . . . . . . . . . . . . . . . . . . . . . . . . . . . . . . . . . . . . . . . . . 52
5.4 Removing Used Cooking Oil from Fryer . . . . . . . . . . . . . . . . . . . . . . . . . . . . . . . . . . . . . . . . . . . . . . . . . . 55
5.5 Normal Shutdown . . . . . . . . . . . . . . . . . . . . . . . . . . . . . . . . . . . . . . . . . . . . . . . . . . . . . . . . . . . . . . . . . . . 58
5.6 Emergency Shutdown . . . . . . . . . . . . . . . . . . . . . . . . . . . . . . . . . . . . . . . . . . . . . . . . . . . . . . . . . . . . . . . . 58
6. Cleaning . . . . . . . . . . . . . . . . . . . . . . . . . . . . . . . . . . . . . . . . . . . . . . . . . . . . . . . 59
6.1 Boil-Out Procedure (Cleaning the Fry Pot). . . . . . . . . . . . . . . . . . . . . . . . . . . . . . . . . . . . . . . . . . . . . . . . 59
6.2 Cleaning the Filter Pan & Replacing Filter Media . . . . . . . . . . . . . . . . . . . . . . . . . . . . . . . . . . . . . . . . . . 62
7. Troubleshooting . . . . . . . . . . . . . . . . . . . . . . . . . . . . . . . . . . . . . . . . . . . . . . . . . 64
7.1 Temperature Control System . . . . . . . . . . . . . . . . . . . . . . . . . . . . . . . . . . . . . . . . . . . . . . . . . . . . . . . . . . 64
7.2 Oil Filtration System. . . . . . . . . . . . . . . . . . . . . . . . . . . . . . . . . . . . . . . . . . . . . . . . . . . . . . . . . . . . . . . . . . 66
7.3 Basket Elevator System . . . . . . . . . . . . . . . . . . . . . . . . . . . . . . . . . . . . . . . . . . . . . . . . . . . . . . . . . . . . . . . 67
8. Parts List . . . . . . . . . . . . . . . . . . . . . . . . . . . . . . . . . . . . . . . . . . . . . . . . . . . . . . . 69
8.1 Parts Ordering and Service Information. . . . . . . . . . . . . . . . . . . . . . . . . . . . . . . . . . . . . . . . . . . . . . . . . . 69
8.2 Control Panel & Front Header. . . . . . . . . . . . . . . . . . . . . . . . . . . . . . . . . . . . . . . . . . . . . . . . . . . . . . . . . . 70
8.3 Front Lower Cabinet . . . . . . . . . . . . . . . . . . . . . . . . . . . . . . . . . . . . . . . . . . . . . . . . . . . . . . . . . . . . . . . . . 72
8.4 Fry Pot . . . . . . . . . . . . . . . . . . . . . . . . . . . . . . . . . . . . . . . . . . . . . . . . . . . . . . . . . . . . . . . . . . . . . . . . . . . . . 74
8.5 Rear Lower Cabinet . . . . . . . . . . . . . . . . . . . . . . . . . . . . . . . . . . . . . . . . . . . . . . . . . . . . . . . . . . . . . . . . . . 76
8.6 Basket Cover and Basket . . . . . . . . . . . . . . . . . . . . . . . . . . . . . . . . . . . . . . . . . . . . . . . . . . . . . . . . . . . . . . 78
8.7 Filter Pan . . . . . . . . . . . . . . . . . . . . . . . . . . . . . . . . . . . . . . . . . . . . . . . . . . . . . . . . . . . . . . . . . . . . . . . . . . . 80
iv

Table of Contents KD-EAL Series Fryers
v

vi

Safety KD-EAL Series Fryers
Safety Overview
The instructions contained in this manual have been prepared to aid you in learning the proper procedures for
installing, operating and servicing your new KD-EAL Series Electric Fryer.
Throughout this manual, safety precautions are identified through the use of the safety alert symbol and three
signal words: DANGER
apply. Suggested, recommended, or other noteworthy information is identified through the use of NOTES, or be
noted as IMPORTANT!. Additionally, certain words are used to indicate a specific meaning or to add emphasis as
follows:
Shall: understood to be mandatory.
Should: understood to be advisory.
May: understood to be permissive.
Will: indicates a future event or condition to occur.
Hazard Alert Symbols are used in conjunction with key words DANGER, WARNING, and CAUTION to
alert user to potential personal injury hazards and/or poor operating practices. These will immediately precede
precautionary measures pertaining to such hazards or practices. Adhere to all safety messages, following these
symbols to avoid possible injury, or even death. Failure to do so may also void the factory warranty.
, WARNING and CAUTION. All safety alert information precedes the tasks to which they
• Indicates an imminently hazardous situation which, if not avoided, will result in serious personal injury, even
death.
• Indicates a potentially hazardous situation which, if not avoided, could result in serious injury, even death.
• Indicates a potentially hazardous situation which, if not avoided, may result in minor to moderate injury. This
notification is also used as an alert to unsafe practices.
• If used without the safety alert symbol, this alert indicates a potentially hazardous situation which, if not avoided,
may result in equipment and/or property damage, and may void the factory warranty.
NOTE or IMPORTANT!:
•Identifies suggested, recommended, or other important information.
vii
KD-EAL Series Fryers Safety
Specific Safety Precautions
For your safety, please observe the following precautions when operating or servicing this Appliance. Adhering to
the following important safety information will help to prevent personal injury and/or damage to the equipment.
• Before cleaning or performing maintenance, place power switch in the OFF position, and turn OFF power at the
electrical panel supplying power to remove all power from the appliance.
• DO NOT wash down the Fryer interior or exterior with water from a spray hose.
• Failure to comply with these DANGER notices will result in serious injury, even death; or equipment and
property damage and may void the factory warranty.
• Prior to installation, consult a qualified electrician to ensure that installation will comply with all electrical
requirements and codes.
• The unit must be adequately and properly grounded. Improper grounding may result in electrical shock to the
user. Always refer to local electrical code to ensure proper grounding of this or any other electrical equipment.
• Check the rating label on the unit to determine the proper power supply required. Always consult with an
electrician, or other qualified service technician, to ensure that circuit breakers and wiring are of sufficient rating
and gauge to power this equipment. A Wiring Diagram has been provided with the unit as an aid for
technicians. The unit must be installed and electrically grounded in accordance with local codes, or in the
absence of local codes, in accordance with the National Electrical Code, NFPA 70.
• Improper installation, adjustment, alteration, service or maintenance could result in serious injury, even death;
equipment and/or property damage; and will potentially void the factory warranty.
• DO NOT use or store flammable liquids, or materials that produce flammable vapors, in the vicinity of this or
any other appliance!
• DO NOT for any reason stand or step onto the top of the appliance, and DO NOT allow other
persons to do the same. Cooking oil in the fry pot can be in excess of 330°F (166°C) and bodily
contact will cause extremely serious injury. Covers used to cover cooking vats/pots are not
designed to, and WILL NOT
, support the weight of a person.
• Failure to comply with WARNING notices could result in serious injury, even death; equipment and/or property
damage; and will potentially void the factory warranty.
viii
Safety KD-EAL Series Fryers
• The appliance must remain in an upright (vertical) position.
• Exercise care when removing wooden crate framework, and the unit from shipping pallet.
• DO NOT operate the appliance, unless its components and their intended functions are fully understood (see
Section 3). Once you have read and fully understand Section 3, follow the manual instructions precisely in order
to prevent equipment damage or malfunction.
• Parts of the Fryer become very HOT during operation! Temperatures inside the cabinet may exceed 150°F
(65.5°C). Exercise caution when operating, loading/unloading food products, and cleaning/servicing. It is
recommended that thermal protective gear (gloves or mitts) be worn while attended the appliance to avoid
personal injury.
• Before operation, be sure the Fryer is positioned in a stable, safe location with the casters in the locked position.
Some jurisdictions may require special anchoring for this type appliance; check local code.
Allow the appliance to cool down at least 15-20 minutes before cleaning or servicing.
•
• This appliance is not intended for use by persons (including children) with reduced physical, sensory, or mental
capabilities, or lack of experience and knowledge, unless they have been given adequate instruction and/or
supervision concerning its use by a person responsible for their safety. Children should not be allowed to play
with, or around, this appliance.
• Prior to sale, cooked food products must be maintained at a temperature of 150°F (65.5°C) minimum, or in
accordance with governing health regulations.
• Failure to comply with CAUTION notices may result in minor to moderate personal injury, equipment or
property damage, and potentially void the warranty.
ix
KD-EAL Series Fryers Safety
• Components exposed on the Control Panel surface are impact-sensitive. To avoid damage and maintain proper
operation, exercise care when working around, or using rolling carts or tables, near the appliance.
• DO NOT install the unit near combustible walls and materials. Failure to maintain safe distance may result in
fire.
• When cleaning the appliance:
- DO NOT steam clean.
- DO NOT use products containing chlorine, or other corrosive chemicals.
- DO NOT use abrasive products, steel wool or scouring pads.
- DO NOT use oven cleaners.
• DO NOT alter, add attachments, or otherwise modify this equipment!
• Comply with all appropriate state and/or local heath regulations regarding the cleaning and sanitization of
foodservice equipment.
• Failure to comply with these CAUTION notices may result in equipment or property damage, and void the
factory warranty.
x

Introduction KD-EAL Series Fryers
1. Introduction
Thank you for choosing a KD-EAL Series Fryer from KitDel℠. Every unit is thoroughly inspected and tested prior to
shipment, and with proper care and maintenance will provide years of trouble-free service.
To help protect your investment in this state-of-the-art cooking equipment, we recommend that you take a few
moments to become familiar with the installation, operational, cleaning, and maintenance procedures contained in
this Manual. Adherence to these recommended procedures will minimize the potential for costly “downtime” and
future repair expense. Please retain this manual for future reference.
NOTE: Due to continuing improvements and product enhancements, some material shown in this manual might differ
slightly from the current model. Please retain this manual for future reference.
1.1 Construction
430 Series Stainless Steel; various gauge.
Double-wall cabinet design.
Incoloy heating elements.
1.2 Standard Features
Computer Controller - Controls cooking oil temperature and cook time. Features fifty (50) programmabpe Menu
Item cooking presets. Monitors unit status and displays various operational warnings {LOW OIL LEVEL, DRAIN OPEN,
etc) and instructions. Features BOIL OUT program, COOL MODE, FORCE FILTER function, Password option, multiple
language, and enhanced safeguards against accidental cooking oil fire.
Automatic Basket Lift
at the conclusion of the cook cycle.
Built-in Oil Filtration System
HP pump designed to perform a filter cycle within approximately five (5) minutes.
- Automatically lowers product when cook cycle is started ... lifts cooked product from hot oil
- Completely self-contained; helps to extend the life of cooking oil. Equipped with 1/2
1

KD-EAL Series Fryers Introduction
= ±.010
. = ±.031
24 1/16
611.58
38 15/16
988.24
61 1/2
1561.91
MAX WITH DOOR OPEN
1.3 Specifications
1.3.1 Overall Dimensions: KD-EAL Series Fryer
Inches {mm}
2
Introduction KD-EAL Series Fryers
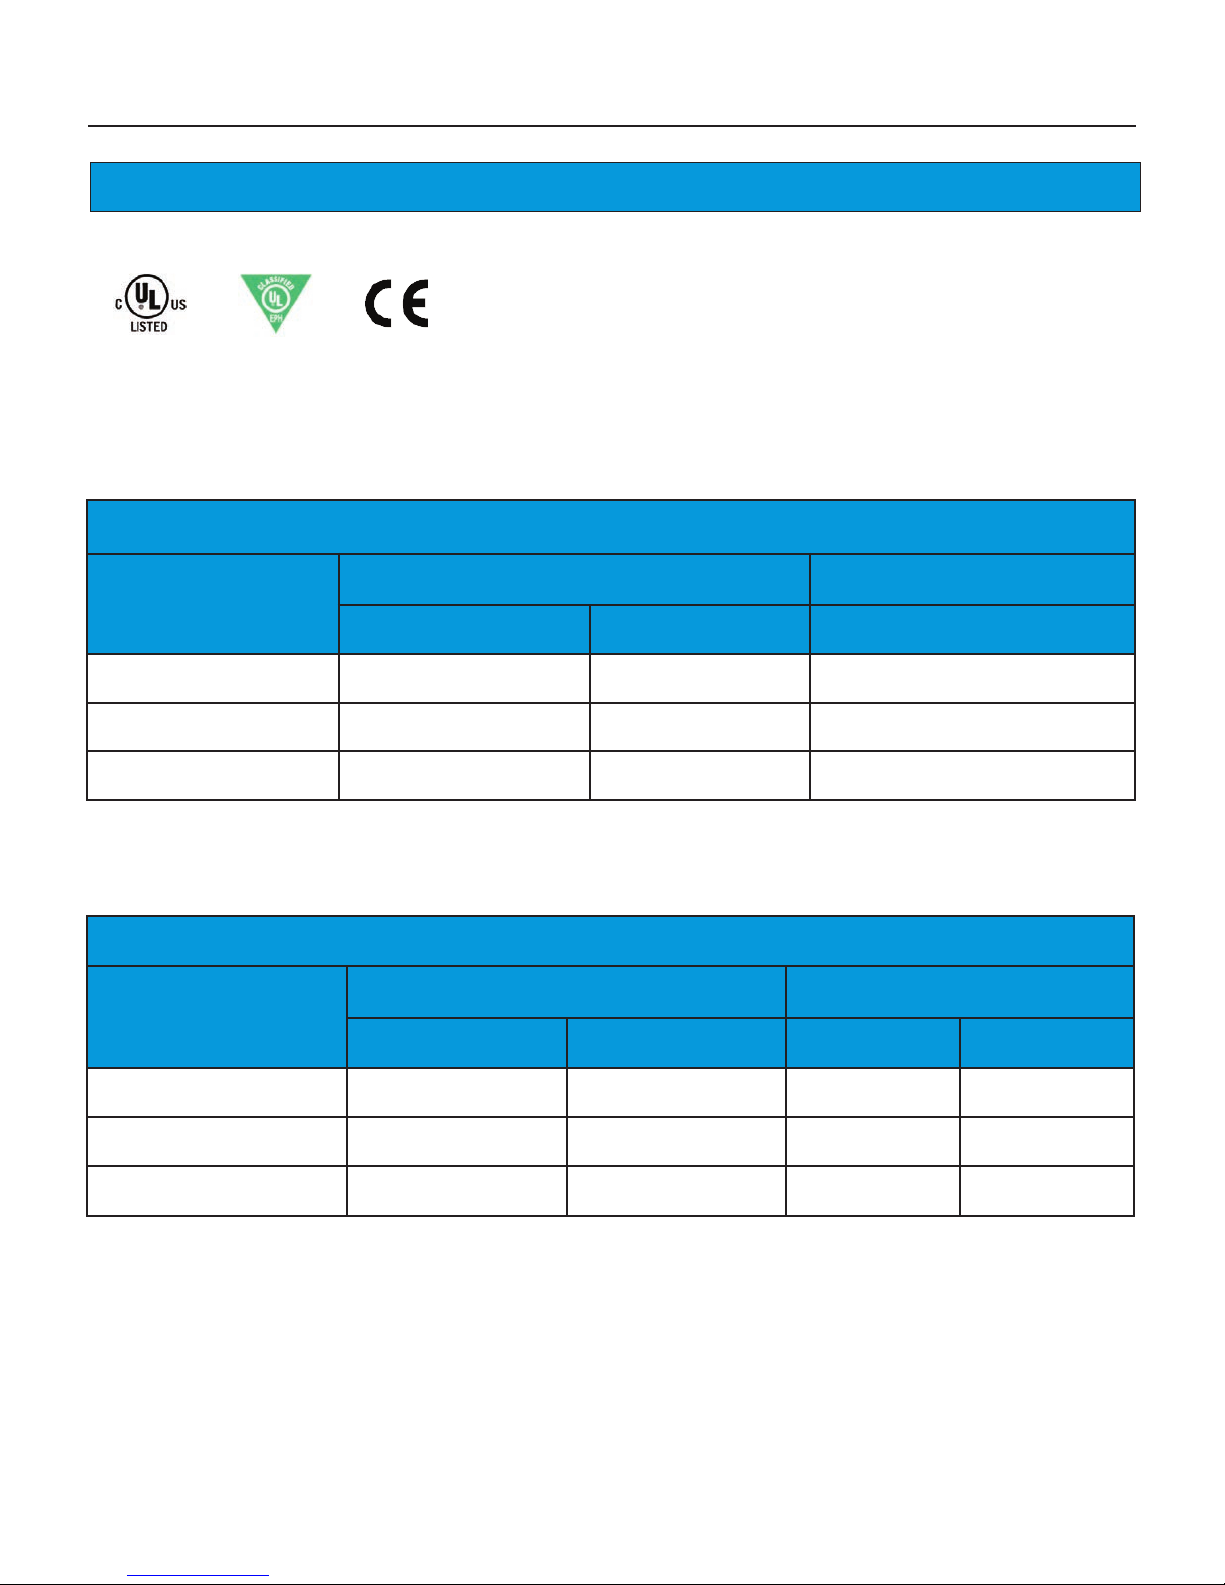
1.3.2 Agency Certifications
1.3.3 Basket Sizes
Basket Size Volume
Model
Diameter: in[mm] Height: in[mm] Cubic inch [Cu m]
KD-EAL-45 12-3/8 [314.2] 10-1/4 [260.4] 1,231.8 [.020]
KD-EAL-60 14-3/4 [374.7] 10-1/4 [260.4] 1,751.5 [.029]
KD-EAL-75 14-3/4 [374.7] 12-3/4 [323.9] 2,178.6 [.036]
1.3.4 Cooking Capacity
Cooking Oil Capacity Chicken Capacity
Model
Lb [kg] Gal [l] Lb [kg] Piece Count*
KD-EAL-45 45 [21] 5.8 [21.9] 14 [6.3] 40*
KD-EAL-60 60 [27] 7.8 [29.5] 19 [8.6] 56*
KD-EAL-75 75 [37] 9.7 [36.7] 24 [10.8] 72*
* Approximate - based on bone-in, 8-way cut, 2-3/4 lbs per head
3

KD-EAL Series Fryers Introduction
4
Installation KD-EAL Series Fryers
2. Installation
This section provides a summary of procedures for proper installation of the Model KD-EAL Series Electric Fryer. To
prevent personal injury or equipment damage, please ensure these steps and procedures followed precisely.
Please retain this Manual for future reference.
2.1 Location
DO NOT ALTER, ADD ATTACHMENTS, OR OTHERWISE MODIFY THIS EQUIPMENT.
1. Keep the appliance and surrounding area free and clear of combustible materials ... 3” (7.6 cm) minimum
clearance.
2. A wiring diagram for this appliance has been provided and should be attached inside the cabinet door. Be
sure that it corresponds with the Fryer model and electrical specifications (voltage, phase, Hz).
3. Ensure that the appliance is electrically grounded in accordance with local code, or in the absence of local
code, with the current National Electrical Code, ANSI/NFPA 70
4. Allow adequate space for future servicing and proper operation of the appliance. Provide adequate
ventilation in the operating area, as required.
5. Always consult with a certified electrician, or other qualified service technician, prior to installation to be
certain that the voltage and amp rating of the available electrical supply are adequate to power the
appliance.
6. Make sure the unit is installed in a stable position and will not unintentionally move. The unit features
locking casters ... be sure they are locked. Some jurisdictions may require special anchoring of the unit.
7. This appliance is to be installed, used and maintained in accordance with the Standard for Ventilation
Control, and Fire Protection of Commercial Cooking Operations, NFPA 96.
.
Following these steps will help to ensure safe and proper installation. If there are any questions concerning these
procedures, please contact
KitDel℠ for assistance ... 855.632.3373.
5

KD-EAL Series Fryers Installation
2.2 Unpacking
The appliance is shipped on a wooden pallet; secured with high-tensile plastic strapping and enclosed by a wooden
framework. The entire unit is wrapped in machine-applied stretch wrap.
• The appliance must remain in an upright (vertical) position during the unpacking process.
• Exercise care when removing the wooden framework from around the unit.
• Exercise care when lifting and moving the unit.
• Failure to comply with these CAUTION notices may result in minor or moderate injury, equipment or property
damage, and void the factory warranty.
IMPORTANT!
If crate exhibited evidence of damage or mishandling, immediately inspect the unit and all accessory items and
notify the freight carrier of any damages. Typically it is the purchaser’s responsibility to file and negotiate
freight damage claims.
1. Carefully cut and remove the plastic shipping wrap and strapping. Remove and set aside all auxiliary items
packed with the unit. Some items are packed inside the Filter Pan, which is inside the appliance cabinet.
Remove and place all of these items in a safe place for future use.
2. Use safe work practices, and appropriate tools, to remove the wooden crating from around the unit.
3. Carefully remove the appliance from the shipping pallet. The unit is very heavy and great care should be
taken when lifting and moving it to prevent personal injury or damage to the appliance or property. Always
use appropriate handling equipment and sufficient manpower.
6
Installation KD-EAL Series Fryers
2.3 Electrical Requirements
• Fryers must be properly grounded. Improper grounding may result in electrical shock to the user. Always refer
to local electrical code to ensure that proper grounding techniques are used for this or any other electrical
equipment. Always consult with a certified electrician, or other qualified service technician, to ensure that the
electrical circuit is of sufficient rating for supplying power to this appliance.
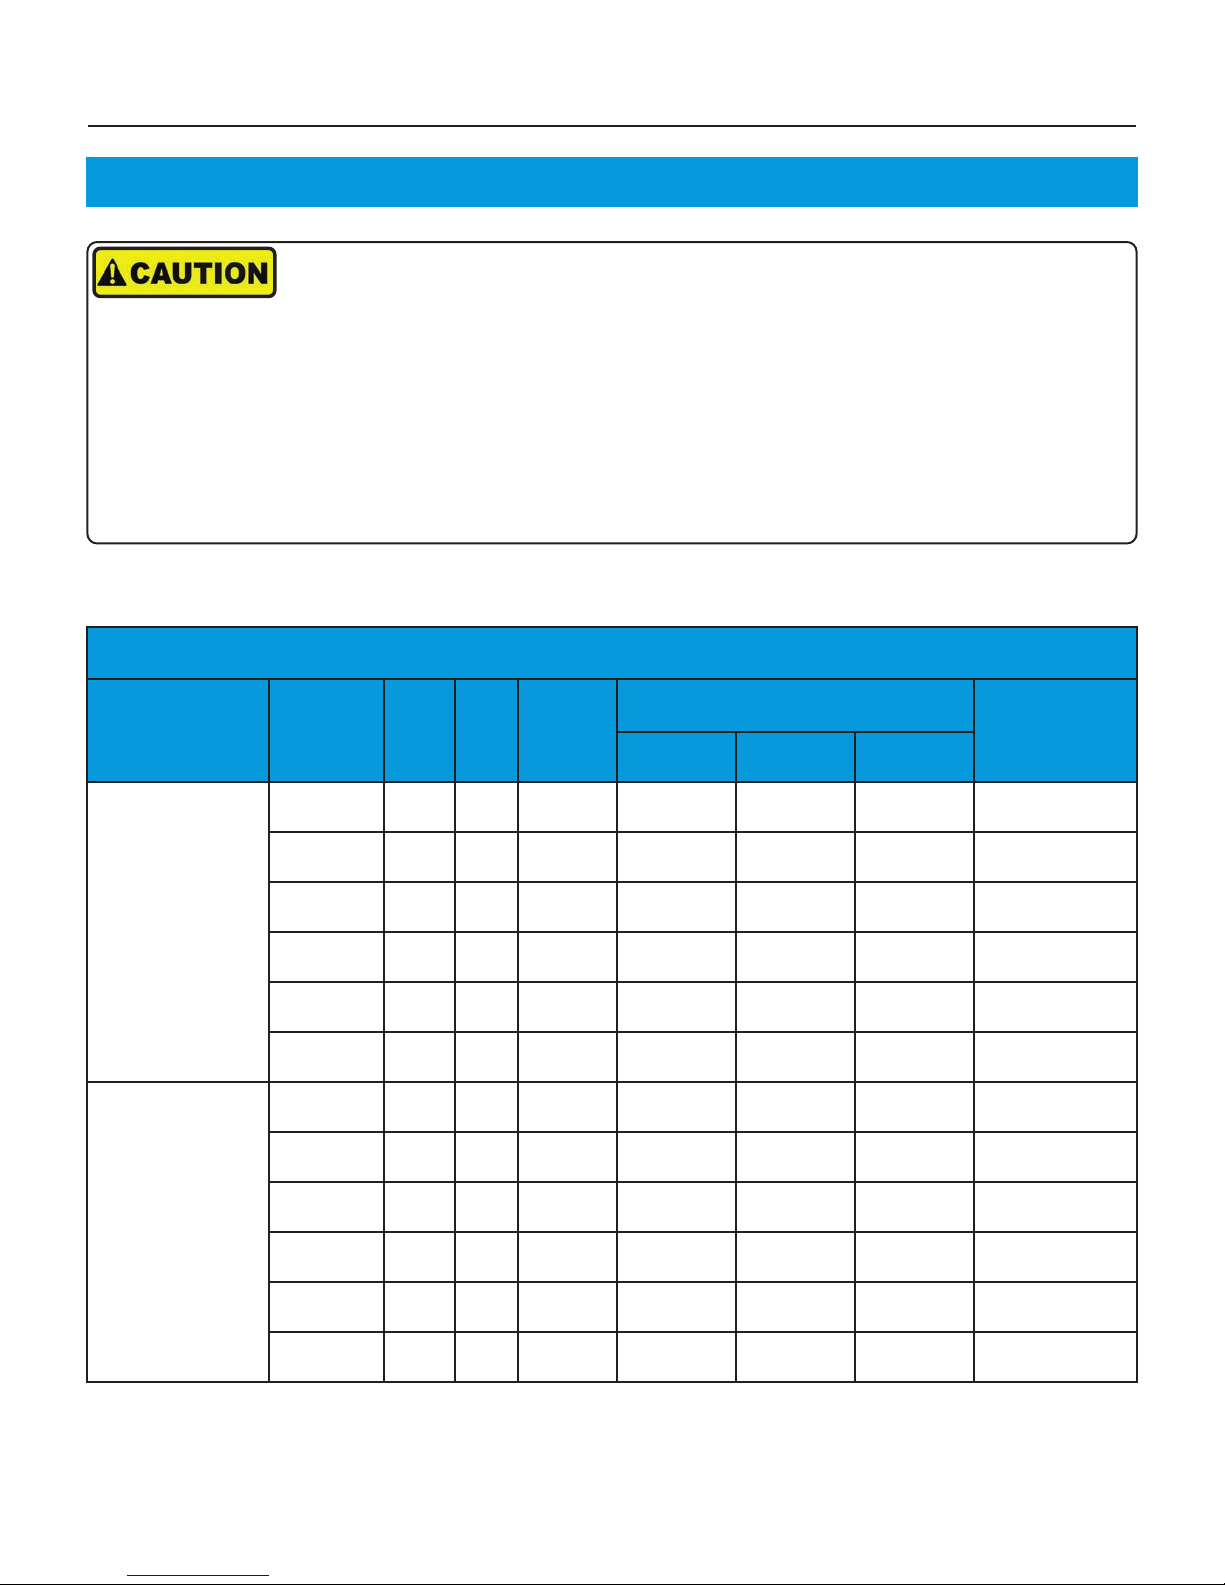
• Fryers are available from the factory for the various voltage, phase and Hz shown in Table 2.3 below. To determine
the correct power supply for the appliance, check the serial label found on the rear panel of the Fryer, or inside the
cabinet.
Table 2.3 Electrical Requirements -
Model Voltage Hz Ph kW
208 60 1 10.0 48 48 -- 60
208 60 3 10.0 29 29 29 40
240 60 1 10.0 42 42 -- 50
KD-EAL-45
240 60 3 10.0 25 25 25 35
380 50 3 9.6 14 14 14 20
415 50 3 10.0 14 14 14 20
208 60 1 15.0 72 72 -- 100
208 60 3 15.0 43 43 43 60
240 60 1 15.0 63 63 -- 80
KD-EAL-60
240 60 3 15.0 38 38 38 50
Continued on next page
Amps
L1 L2 L3
Breaker
Required
380 50 3 14.8 21 21 21 30
415 50 3 15.0 21 21 21 30
7
KD-EAL Series Fryers Installation
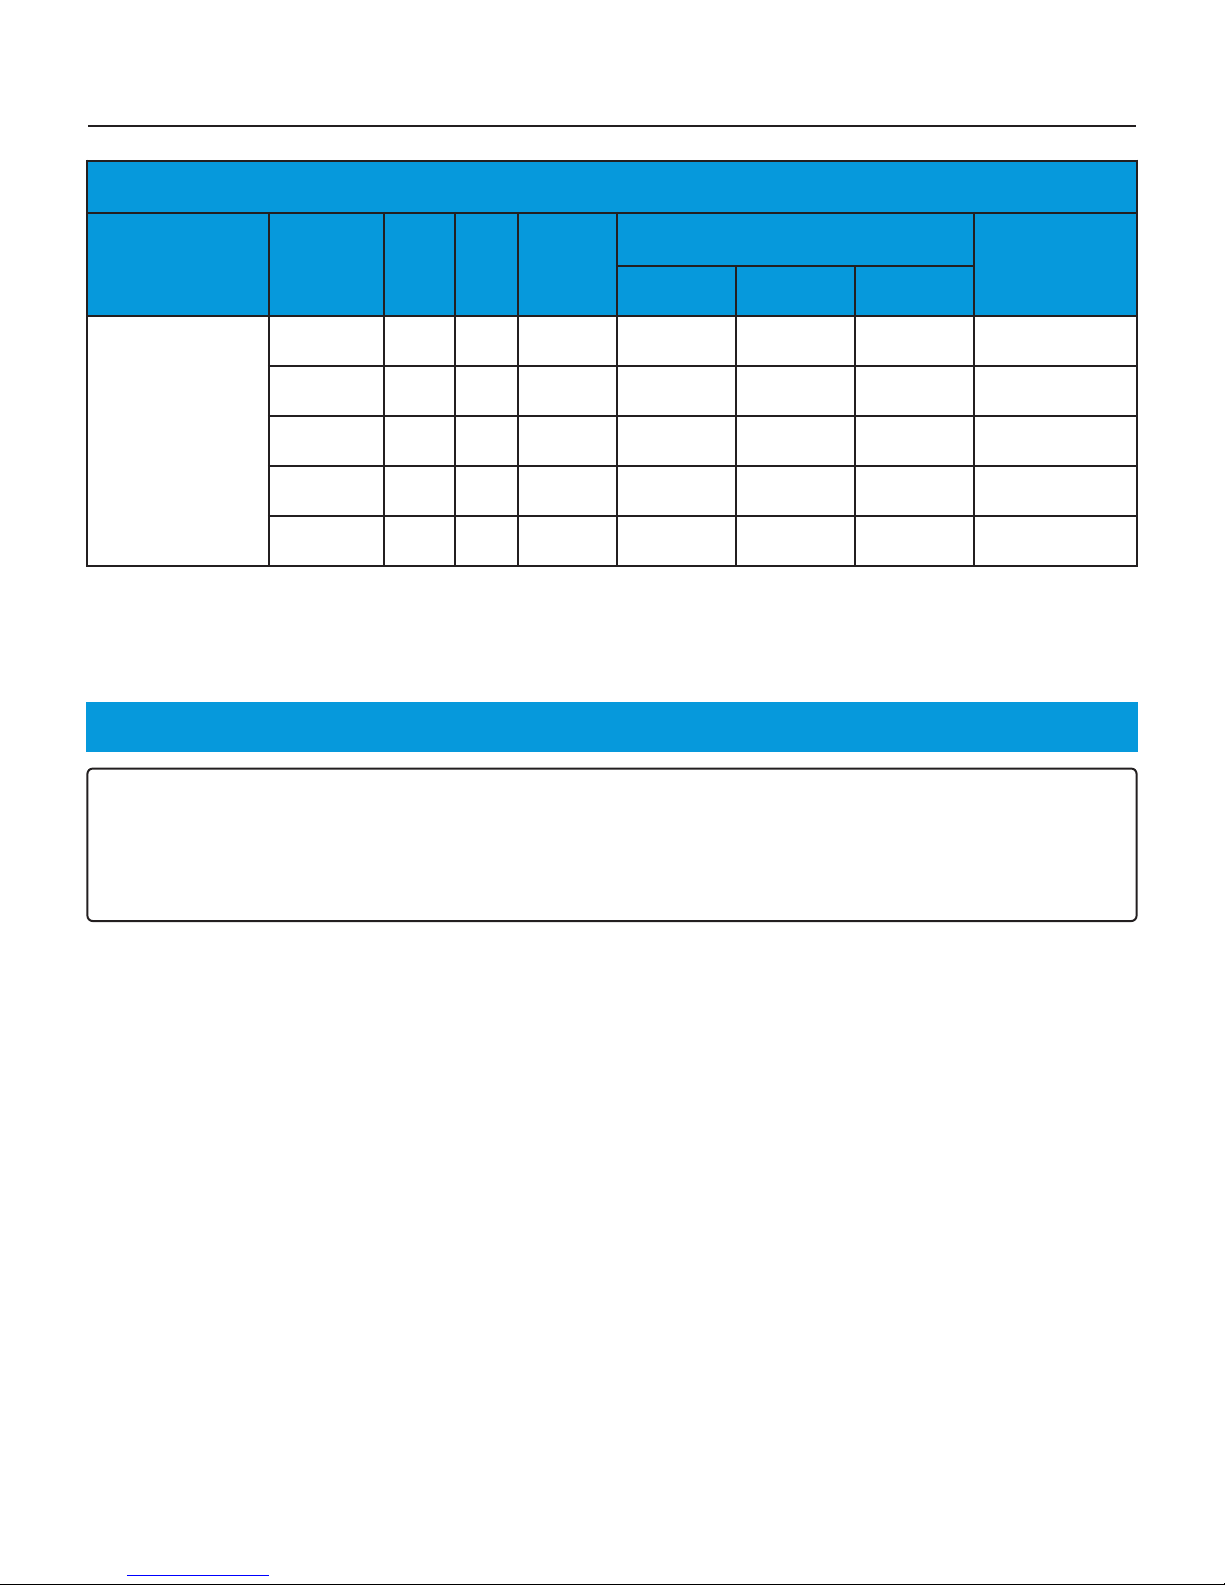
Table 2.3 Electrical Requirements -
Model Voltage Hz Ph kW
208 60 3 20.0 58 58 58 80
240 60 3 20.0 49 49 49 60
KD-EAL-75
480 60 3 20.0 25 25 25 35
380 50 3 19.2 28 28 28 35
415 50 3 20.0 28 28 28 35
2.4 Electrical Connections
Continued
Amps
L1 L2 L3
Breaker
Required
NOTE:
Electrical installation materials (breakers, conduit, fittings, wire, etc.) and installation labor shall be supplied by
the Purchaser. Work should be performed by a qualified electrician, or service technician.
Installation must comply with local code requirements.
regard to installation and use of this appliance.
1. As needed, install appropriately sized circuit breaker in electrical service panel. See Table 2.3.
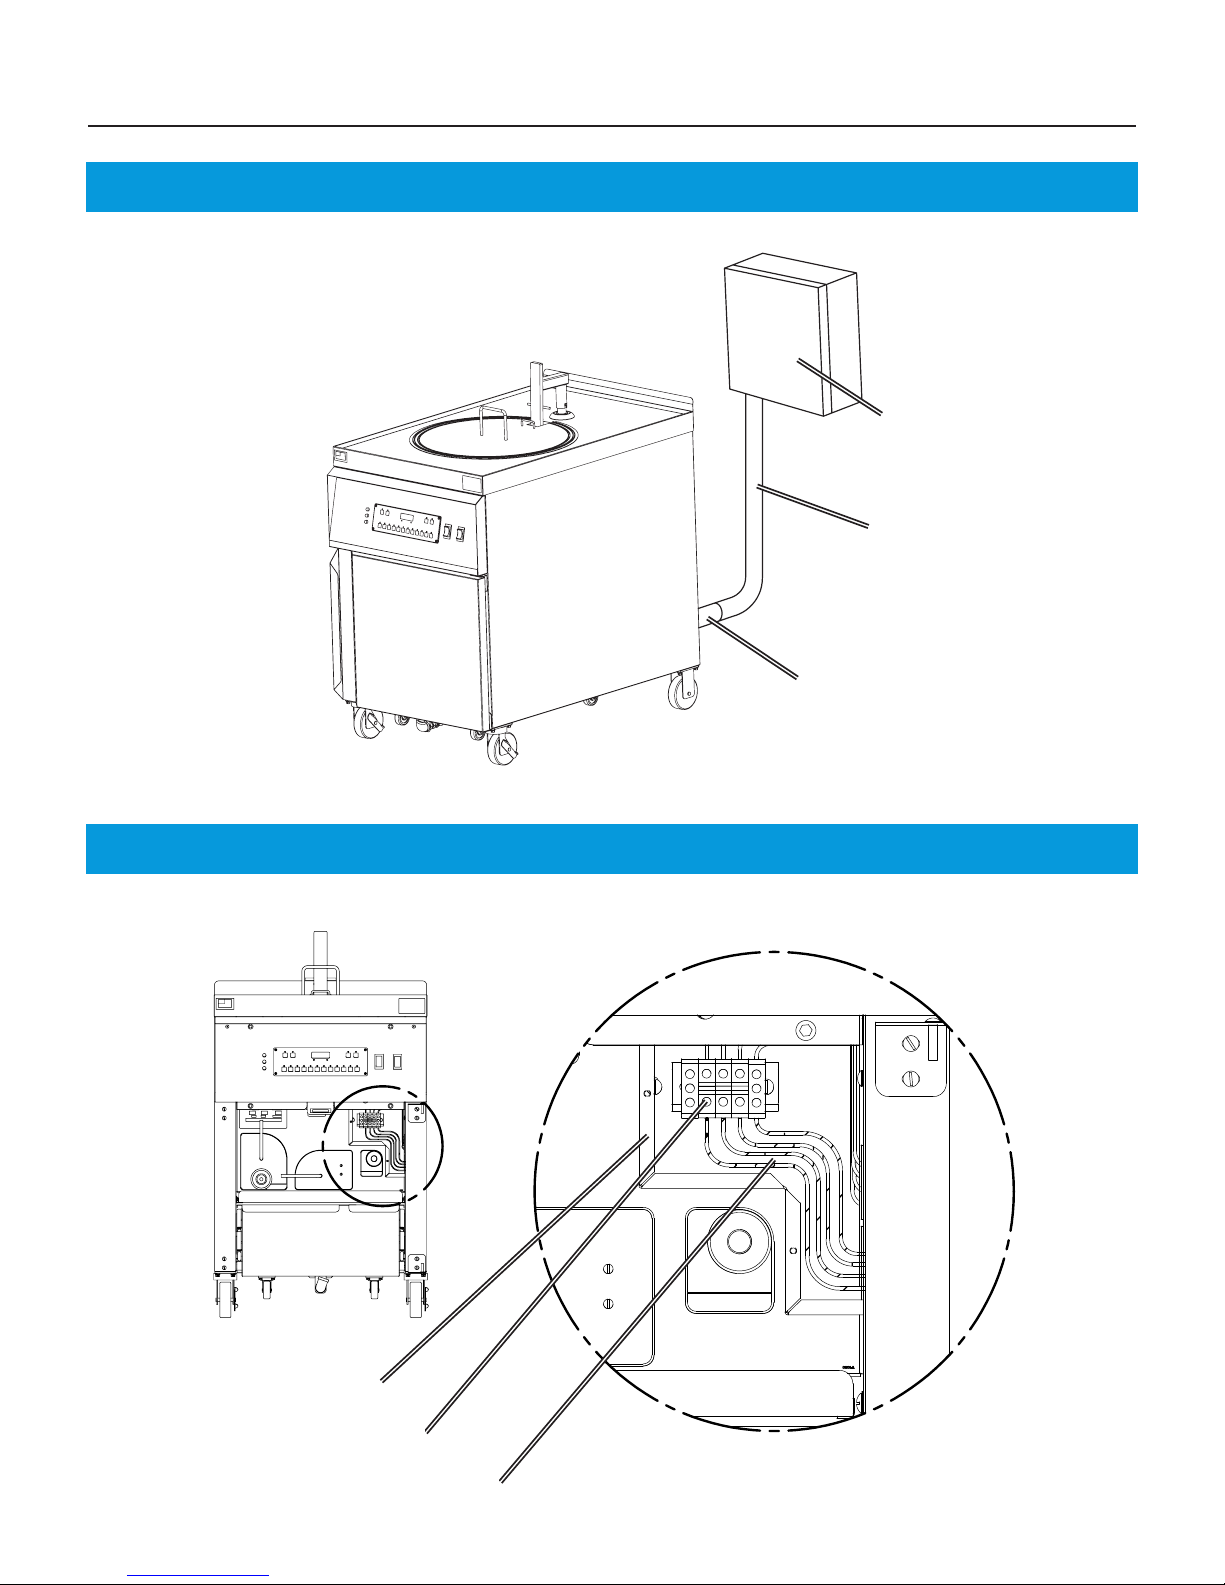
2. Connect 1-1/4” flexible conduit from electrical panel to the Fryer. Attach conduit to rear of the Fryer with
appropriate fittings. Allow enough length so that the Fryer can be moved for cleaning and servicing. See
Figure 2.4.1.
3. Open Fryer Cabinet Door and remove Service Entrance Box Cover. See Figure 2.4.2.
4. Route appropriately sized power wires from the circuit breaker in the service panel through the cabinet side
wire-run to the front Service Box.
5. Connect power wires to the appropriate Terminal Blocks in the Service Entrance Box. See Figure 2.4.2.
6. Reinstall Service Entrance Box Cover and close the cabinet door.
KITDEL℠ is not responsible for code compliance with
8
Installation KD-EAL Series Fryers
A
DETAIL A
2.4.1 Conduit Routing
Main Electrical
Panel
1-1/4” Flexible
Conduit
1-1/4” Straight or 90°
Connector
2.4.2 Service Box Connections
Service Entrance Box
Terminal Blocks
Power Wires from Main
Circuit Breaker Panel
9
KD-EAL Series Fryers Installation
2.5 Ventilation of Fryer
NOTE:
Guidelines and local code for ventilation system requirements may differ from locale to locale. Always consult
with the local authorities to ensure compliance.
Consult a professional, certified ventilation specialist or HVAC company for assistance in specifying the proper hood
and/or ventilation system for this Fryer.
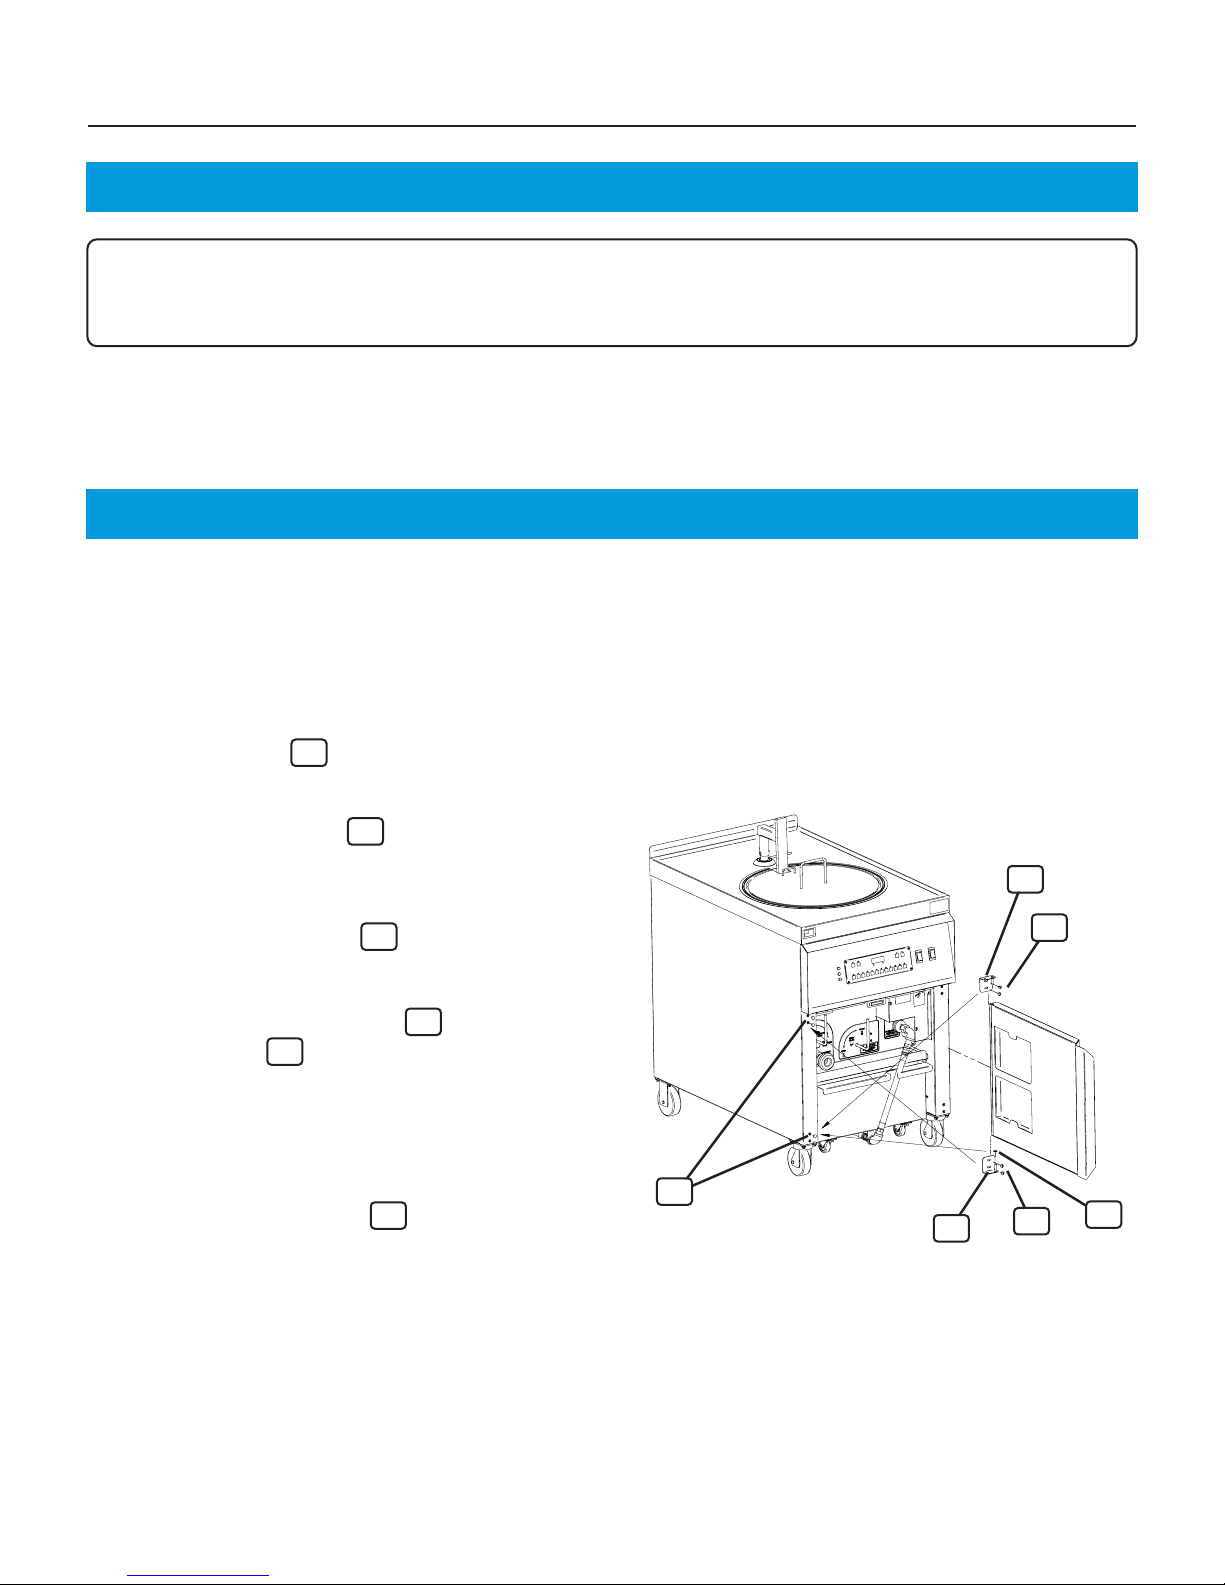
2.6 Changing the Door Swing
Certain situations may require that the door swing direction be reversed to allow for easier access to the lower
cabinet. Follow the procedure below to change door swing direction.
1. Disconnect power.
2. Remove (4) screws on the left side of the lower
cabinet.
3. Support door; remove (4) screws holding the
top and bottom hinges to the lower cabinet to
remove Cabinet Door.
4. Remove the plastic washer from the bottom
hinge and save.
5. Flip the top-right hinge, move it to the bottom
left cabinet side and attach; do not tighten.
Place the plastic washer on the hinge pin.
6. Flip the Cabinet Door and hang on the bottom-left
hinge pin.
7. Flip the bottom-right hinge, move it the top
left, insert pin into Door and attach hinge to
cabinet side; do not tighten.
1
2
3
4
3
5
4
2
1
5
2
3
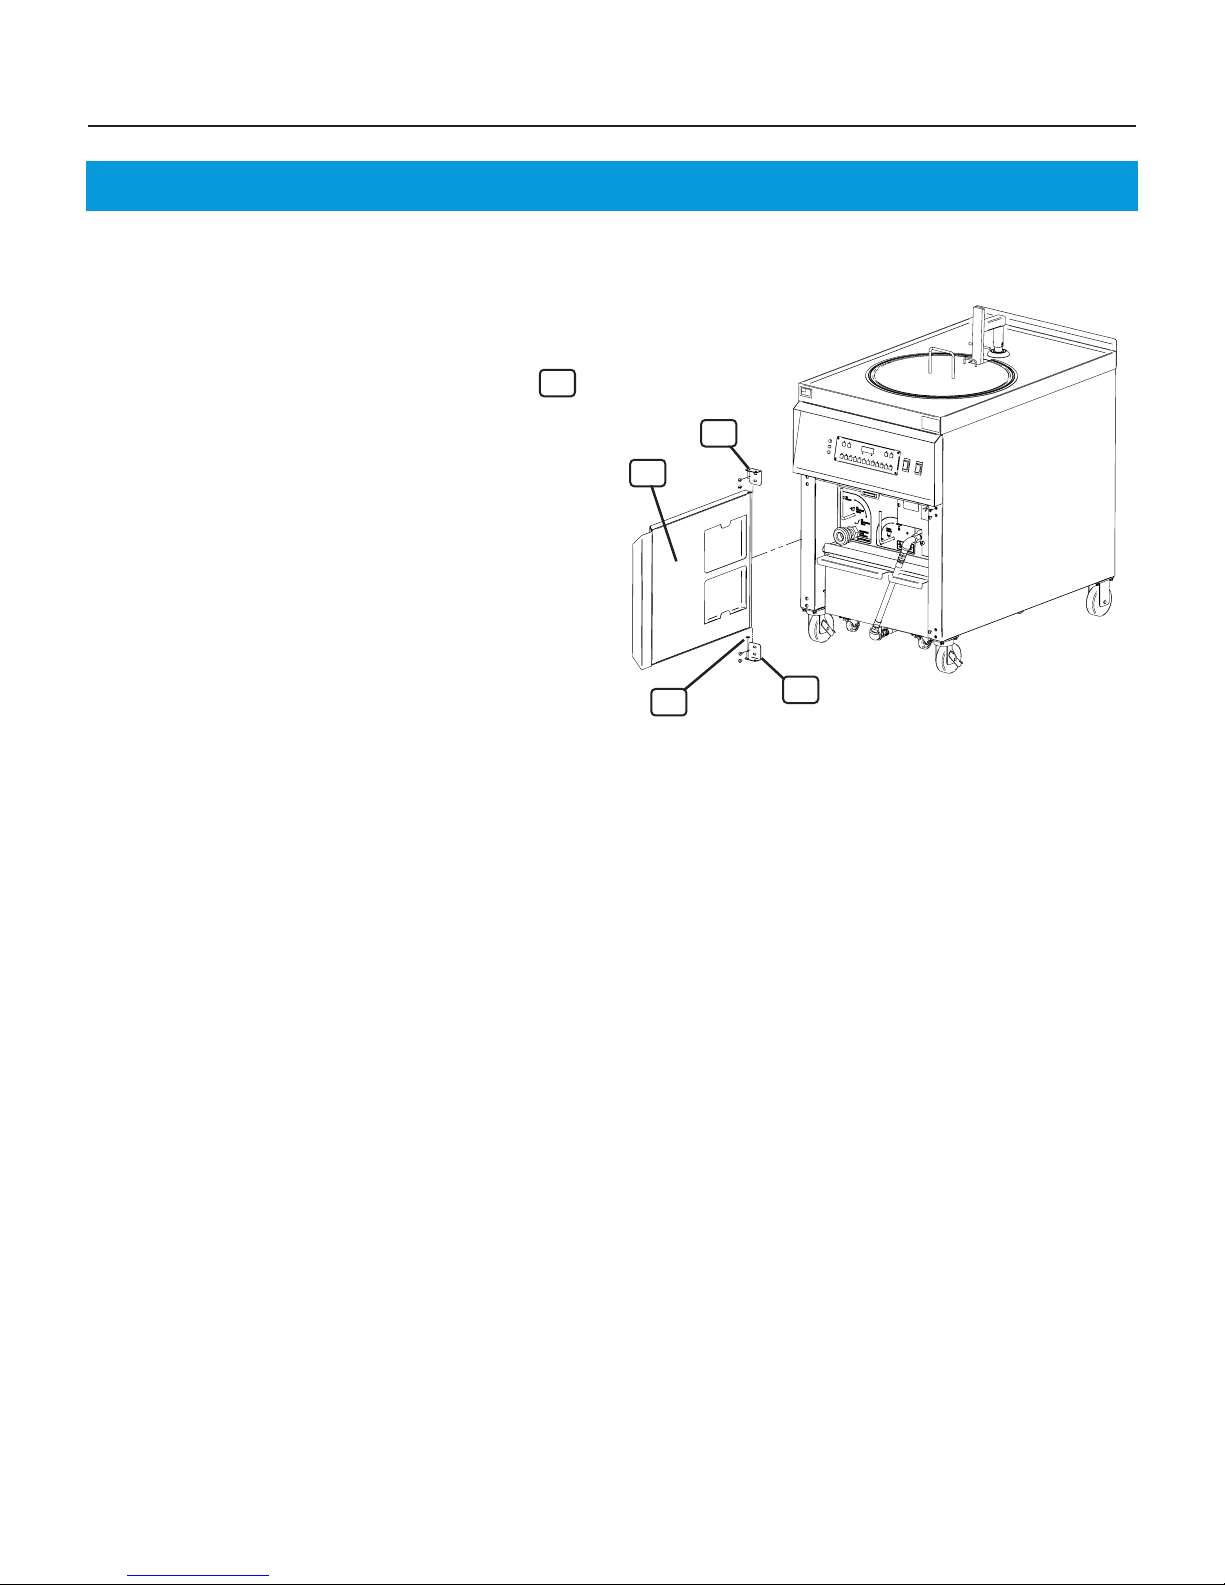
8. Check door swing and levelness; adjust as needed
and securely tighten screw.
9. Install (4) screws to right-side of the lower cabinet
to fill holes.
10
Installation KD-EAL Series Fryers
2.6 Changing the Door Swing - continued
10. Reconnect power.
11. After reversing, the door label will be upsidedown.
If desired, a new Quick Reference Door Label
(Part No. 60802) may be ordered to apply over the
existing label.
*6
5
*6
* Not shown
3
4
11

KD-EAL Series Fryers Installation
NOTES:
12
Overview KD-EAL Series Fryers
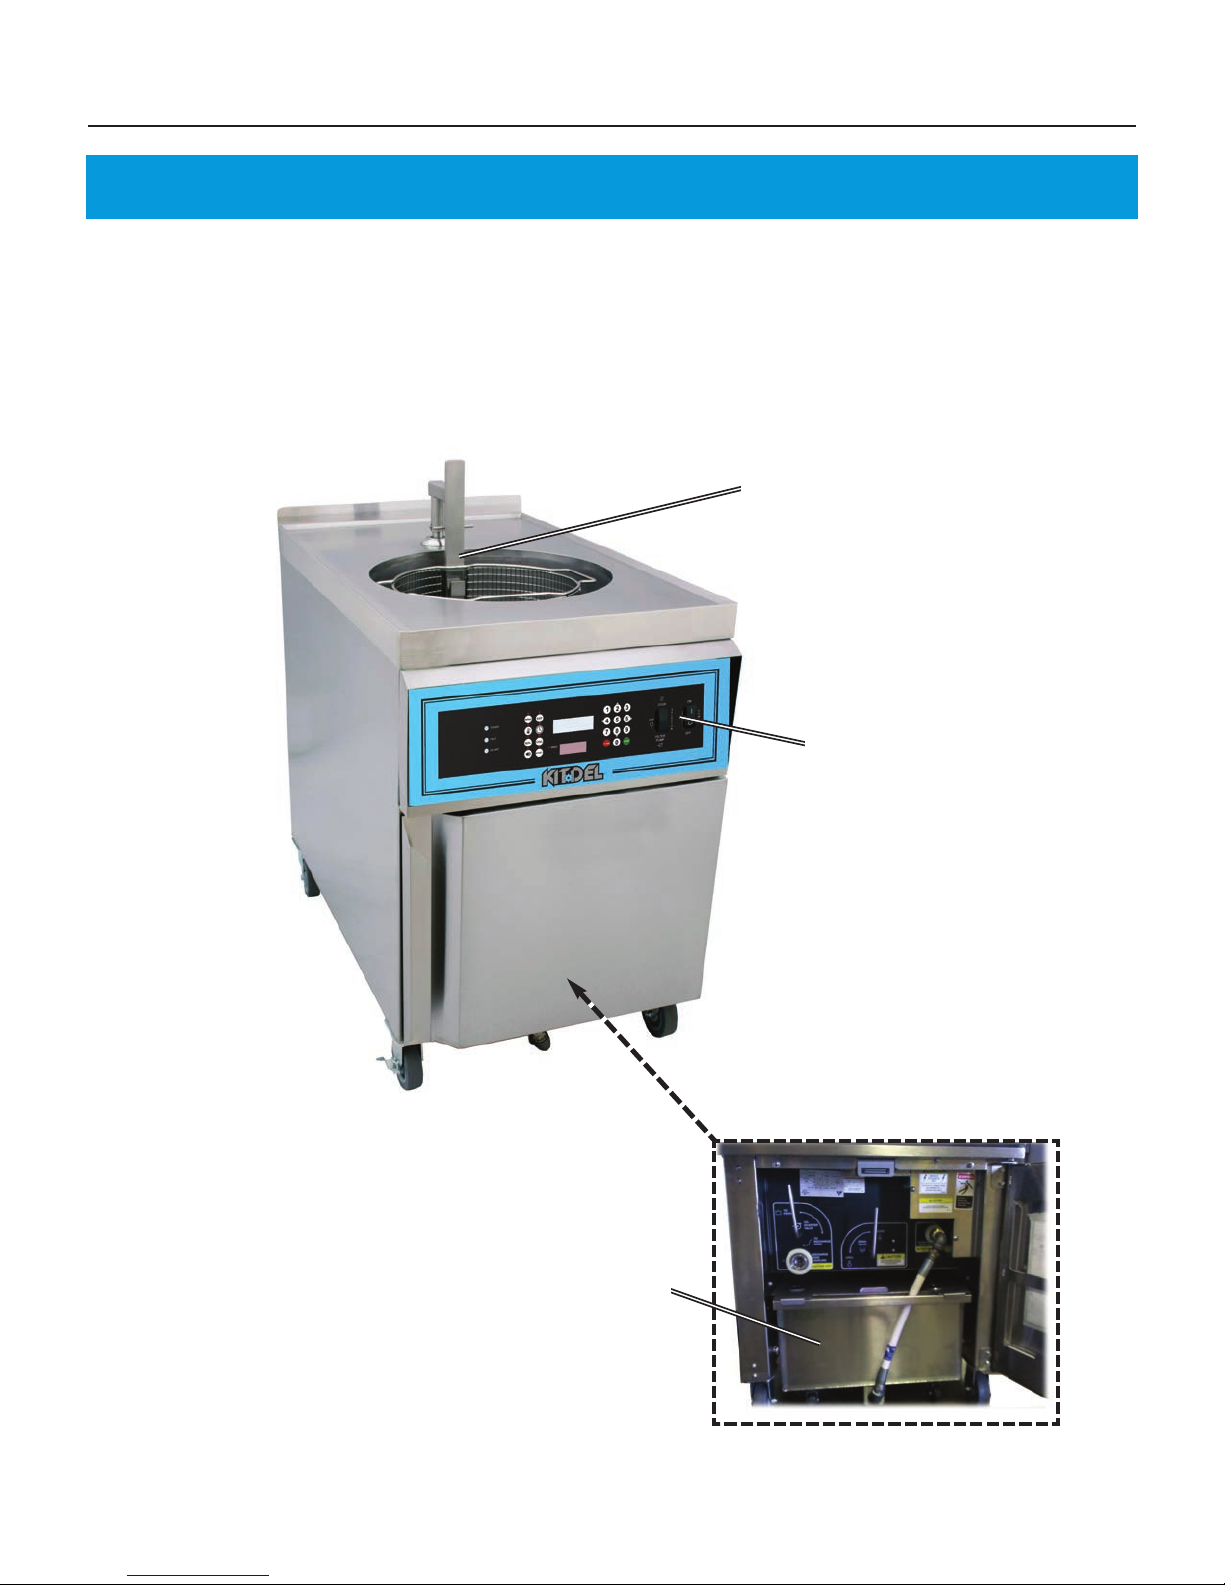
3. Overview
The following section provides a brief overview of the components, functions, and accessories of the KD-EAL Series
Electric Fryer. Please review this section carefully before attempting to operate the appliance.
Basket & Elevator
Assembly
Figure 3.4
Filter Pan Assembly
Figure 3.3
Control Panel
Figure 3.1
Lower Cabinet
Figure 3.2
13
KD-EAL Series Fryers Overview
3.1 Control Panel
6
4
5
3.1
3
3.2
2
1
14
Overview KD-EAL Series Fryers
3.1 Control Panel
Item Description Function
1 Power Switch
2 Selector Switch
Controller
3
[Displays]
Controller
3.1
[Function Keys]
Controller
3.2
[Keypad, START, CLEAR]
The Power Switch (ON/OFF). Press top portion to place in the ON
position for operation.
The Selector Switch; 3-position switch to select operation mode ...
COOK-OFF-FILTER PUMP. Heating elements will only operate when in
the COOK position. The switch is placed in the FILTER PUMP position to
run the Filter Pump. Center position is OFF.
The CC10 Computer Controller controls Fryer operation, cooking oil
temperature, cook time, etc. Stores 50 programmable menu item
preset cooking parameters. Upper Display shows various messages and
information - fryer status, user instructions, menu preset info, errors,
alarms, etc. Lower 7-Segment Display shows actual and setpoint temp,
timer countdown & other various information.
Pressing these various function keys will initate certain actions such as
setting cook temp & time, selecting menu cooking presets, editing
presets, silencing alarms, operating basket lift, start “boil-out”, etc.
Controller keypad used for inputting values. The [4] [6] and [2] [8] keys
will be activated as directional arrow keys for certain activities. [START]
and [CLEAR] keys are used to start certain functions and to clear, or
escape, certain actions once started.
4 High-Limit Indicator
5 Heat Indicator Light
6 Power Indicator Light
The Red High-Limit Light illuminates when the overheating safety
control shuts down the Fryer heating elements. Should this light come
on, discontinue operation and refer to the Troubleshooting Section.
NEVER COOK IN A FRYER THAT CONTINUES TO GIVE A HI-LIMIT ALARM!
The Amber Heat Light illuminates when the heating elements are
energized. When set-point temperature is reached, the light turns OFF.
The light cycles ON and OFF during normal operation.
The Green Power Light is on whenever the Power Switch is in the ON
position.
15
KD-EAL Series Fryers Overview
3.2 Lower Cabinet Area
1
2
3
4
5
6
Due to continuing improvements and product enhancements, illustrations might differ slightly from actual unit.
16
87
9
Overview KD-EAL Series Fryers
3.2 Lower Cabinet Area
Item Description Function
1 Diverter Valve Handle
2 Serial Label
3
4 Drain Valve Handle
5
6
7 Filter Pan See Section 3.3
Quick Disconnect for
Oil Discharge Hose
Quick Disconnect for
Filter Pan Hose
Filter Pan Quick
Disconnect Hose
Changes Filter Pump discharge ... directs it to either the Cook Pot or to
the Oil Discharge Hose.
Show appliance information ... serial number, model, voltage, phase,
cycle (Hz) and watts.
Fitting for connecting the Oil Discharge Hose to remove waste oil from
the Cook Pot.
Operates the Cook Pot Drain Valve. Always be sure that valve is closed
prior to adding cooking oil or boil out solution. As a safety precaution,
heating elements are disabled if valve is not completely CLOSED.
Fitting for connecting the Filter Pan hose to the Oil Filtration System.
See Section 3.3
8 Filter Pan Cover
9 Cabinet Door
Helps minimize splash when hot oil is drained from Cook Pot into the
Filter Pan. Also helps guard against foreign material contamination
during the filtering process. Sits atop Filter Pan and is easily removed
for cleaning.
Provides access to lower cabinet functions. Swing of the Cabinet Door is
field reversible, if desired.
17
 Loading...