

Kitchen Star VE-CG40U User Manual
DIGITAL STILL CAMERA
OPERATION MANUAL
Valid for warranty service in the U.S. only
CONSUMER LIMITED WARRANTY
SHARP ELECTRONICS CORPORATION warrants to the first consumer purchaser that this Sharp brand
product (the “Product”), when shipped in its original container, will be free from defective workmanship
and materials, and agrees that it will, at its option, either repair the defect or replace the defective
Product or part thereof with a new or remanufactured equivalent at no charge to the purchaser for parts
or labor for the period(s) set forth below.
This warranty does not apply to any appearance items of the Product nor to the additional excluded
item(s) set forth below nor to any Product the exterior of which has been damaged or defaced, which
has been subjected to improper voltage or other misuse, abnormal service or handling, or which has
been altered or modified in design or construction.
In order to enforce the rights under this limited warranty, the purchaser should follow the steps set forth
below and provide proof of purchase to the servicer.
The limited warranty described herein is in addition to whatever implied warranties may be granted to
purchasers by law. ALL IMPLIED WARRANTIES INCLUDING THE WARRANTIES OF MERCHANTABILITY
AND FITNESS FOR USE ARE LIMITED TO THE PERIOD(S) FROM THE DATE OF PURCHASE SET FORTH
BELOW. Some states do not allow limitations on how long an implied warranty lasts, so the above
limitation may not apply to you.
Neither the sales personnel of the seller nor any other person is authorized to make any warranties other
than those described herein, or to extend the duration of any warranties beyond the time period
described herein on behalf of Sharp.
The warranties described herein shall be the sole and exclusive warranties granted by Sharp and shall
be the sole and exclusive remedy available to the purchaser. Correction of defects, in the manner and
for the period of time described herein, shall constitute complete fulfillment of all liabilities and
responsibilities of Sharp to the purchaser with respect to the Product, and shall constitute full
satisfaction of all claims, whether based on contract, negligence, strict liability or otherwise. In no event
shall Sharp be liable, or in any way responsible, for any damages or defects in the Product which were
caused by repairs or attempted repairs performed by anyone other than an authorized servicer. Nor
shall Sharp be liable or in any way responsible for any incidental or consequential economic or property
damage. Some states do not allow the exclusion of incidental or consequential damages, so the above
exclusion may not apply to you.
THIS WARRANTY GIVES YOU SPECIFIC LEGAL RIGHTS. YOU MAY ALSO HAVE OTHER RIGHTS
WHICH VARY FROM STATE TO STATE.
Model Specific Section
Your Product Model
Number & Description:
Warranty Period for this Product:
Additional Item(s) Excluded
from Warranty Coverage (if any):
Where to Obtain Service:
What to do to Obtain Service:
TO OBTAIN SUPPLY, ACCESSORY OR PRODUCT INFORMATION, GO TO OUR WEBSITE AT www.sharpusa.com
VE-CG40U Digital still camera
(Be sure to have this information available when you need service
for your Product.)
One (1) year parts and ninety (90) days labor from date of purchase.
Disk Media supplied with this Product is warranted for replacement
only and limited to ninety (90) days from date of purchase. Nonrechargeable batteries are excluded from warranty coverage.
From a Sharp Authorized Servicer located in the United States. To
find the location of the nearest Sharp Authorized Servicer, call Sharp
toll free at 1-800-BE-SHARP.
Ship prepaid or carry in your Product to a Sharp Authorized Servicer.
Be sure to have Proof of Purchase available. If you ship the Product, be sure it is insured and packaged securely.
OR CALL 1-800-BE-SHARP
SHARP ELECTRONICS CORPORATION
Sharp Plaza, Mahwah, New Jersey 07430-2135
SHARP CORPORATION
Osaka, Japan
Printed in Japan
TINSEA013WJZZ
02P09-J-G
MODEL
VE-CG40U
Important
For assistance in reporting the theft or
this product, record on the line
model number and serial number which
are located on the bottom of the unit.
Please retain this information.
Model No.:
Serial No.:
loss of
below the
Operation References
Preparation
Basic Operations
Useful Features
Advanced Features
Appendix

ii
• All other brand or product names are registered trademarks or trademarks of their respective
in the United States and/or other countries.
Matsushita Electric Industrial Co., Ltd.
holders.
*Specifications are subject to change without notice.
thin-film transistors*, giving you fine picture detail. Occasionally, a pixel may appear on the screen as
a fixed point of blue, green, red, or black. Please note that this does not affect the performance of
your digital still camera.
The LCD panel of this digital still camera is a very high technology product with more than 134,000
Trademarks
• Microsoft and Windows are either registered trademarks or trademarks of Microsoft Corporation
• DPOF is a trademark of CANON INC., Eastman Kodak Company, Fuji Photo Film Co., Ltd. and
NOTE
CAUTION
If the AC adapter is misplaced or
needs to be replaced, obtain the
same type of adapter from a SHARP
service center or your local dealer.
Important Information for Consumers in the U.S.
Thank you for purchasing this digital still camera from SHARP.
The digital still camera will enhance your home digital picture enjoyment and allow you to
capture those special moments. Please read this operation manual to familiarize yourself
with the features of this digital still camera, so that you will get the most out of it. The captur-
ing techniques section will help you fully enjoy the many features this digital still camera
offers, and expand your digital imaging world.
WARNING: TO REDUCE THE RISK OF FIRE OR ELECTRIC SHOCK,
DO NOT EXPOSE THIS APPLIANCE TO RAIN OR
MOISTURE.
COPYRIGHT WARNING
It is the intent of SHARP that this unit be
used in full compliance with the copyright
laws of the United States and that prior per-
mission be obtained from copyright owners
whenever necessary.

RESPONSIBLE PARTY:
SHARP ELECTRONICS CORPORATION
Sharp Plaza, Mahwah, New Jersey 07430
Phone: 1-800-BE-SHARP
C Consult the dealer or an experienced radio/TV technician for help.
CReorient or relocate the receiving antenna.
C Increase the separation between the equipment and receiver.
C Connect the equipment into an outlet on a circuit different from that to which the
receiver is connected.
DECLARATION OF CONFORMITY
Sharp Digital Still Camera, Model VE-CG40U
This device complies with Part 15 of the FCC Rules. Operation is subject to the follow-
ing two conditions: (1) This device may not cause harmful interference, and (2) this
device must accept any interference received, including interference that may cause
undesired operation.
equipment off and on, the user is encouraged to try to correct the interference by
one or more of the following measures:
terference to radio communications. However, there is no guarantee that interfer-
ence will not occur in a particular installation. If this equipment does cause harmful
interference to radio or television reception, which can be determined by turning the
INFORMATION
This equipment has been tested and found to comply with the limits for a Class B
digital device, pursuant to Part 15 of the FCC Rules. These limits are designed to
provide reasonable protection against harmful interference in a residential installa-
tion. This equipment generates, uses, and can radiate radio frequency energy and,
if not installed and used in accordance with the instructions, may cause harmful in-
WARNINGCFCC Regulations state that any unauthorized changes or modifica-
tions to this equipment not expressly approved by the manufacturer could void the
user’s authority to operate this equipment.
iii

iv
10. VentilationCSlots and openings in the
stops, excessive force,
and uneven surfaces
may cause the product
and cart combination to overturn.
cabinet are provided for ventilation and
to ensure reliable operation of the
product and to protect it from overheat-
ing, and these openings must not be
blocked or covered. The openings
9. A product and cart
facturer, or sold with the product. Any
mounting of the product should follow
the manufacturer’s instructions, and
should use a mounting accessory
recommended by the manufacturer.
combination should be
moved with care. Quick
8. AccessoriesCDo not place this product
on an unstable cart, stand, tripod,
bracket, or table. The product may fall,
or table recommended by the manu-
Use only with a
cart, stand,
tripod, bracket,
causing serious injury to a child or
adult, and
serious damage
to the product.
7. Water and MoistureCDo not use this
product near waterCfor example, near
a bath tub, wash bowl, kitchen sink, or
laundry tub; in a wet basement; or near
a swimming pool; and the like.
6. AttachmentsCDo not use attachments
not recommended by the product
manufacturer as they may cause
hazards.
5. CleaningCUnplug this product from the
wall outlet before cleaning. Do not use
liquid cleaners or aerosol cleaners. Use
a damp cloth for cleaning.
3. Heed WarningsCAll warnings on the
4. Follow InstructionsCAll operating and
operating instructions should be
retained for future reference.
product and in the operating instruc-
tions should be adhered to.
use instructions should be followed.
1. Read InstructionsCAll the safety and
2. Retain InstructionsCThe safety and
operating instructions should be read
before the product is operated.
IMPORTANT SAFEGUARDS
14. LightningCFor added protection for this
plugs, convenience receptacles, and
the point where they exit from the
product.
product during a lightning storm, or
when it is left unattended and unused
for long periods of time, unplug it from
the wall outlet and disconnect the
antenna or cable system. This will
prevent damage to the product due to
lightning and power-line surges.
13. Power-Cord ProtectionCPower-supply
having one blade wider than the other).
This plug will fit into the power outlet
only one way. This is a safety feature. If
you are unable to insert the plug fully
into the outlet, try reversing the plug. If
the plug should still fail to fit, contact
your electrician to replace your obsolete
outlet. Do not defeat the safety purpose
of the polarized plug.
cords should be routed so that they are
not likely to be walked on or pinched by
items placed upon or against them,
paying particular attention to cords at
12. Grounding or PolarizationCThis product
supply to your home, consult your
product dealer or local power company.
For products intended to operate from
battery power, or other sources, refer to
the operating instructions.
may be equipped with a polarized
alternating-current line plug (a plug
11. Power SourcesCThis product should be
operated only from the type of power
source indicated on the marking label. If
you are not sure of the type of power
proper ventilation is provided or the
manufacturer’s instructions have been
adhered to.
a built-in
installation
such as a
bookcase or
rack unless
should never be blocked by placing the
product on a bed, sofa, rug, or other
similar surface. This product should not
be placed in

d. If the product does not operate
normally by following the operating
instructions. Adjust only those
controls that are covered by the
operating instructions as an im-
proper adjustment of other controls
may result in damage and will often
require extensive work by a qualified
technician to restore the product to
its normal operation,
19. Damage Requiring ServiceCUnplug
this product from the wall outlet and
refer servicing to qualified service
personnel under the following condi-
tions:
a. When the power-supply cord or plug
b. If liquid has been spilled, or objects
c. If the product has been exposed to
is damaged,
have fallen into the product,
rain or water,
18. ServicingCDo not attempt to service
a fire or electric shock. Never spill liquid
of any kind on the product.
this product yourself as opening or
removing covers may expose you to
dangerous voltage or other hazards.
Refer all servicing to qualified service
personnel.
as they may touch
dangerous
voltage points or
short-out parts
that could result in
17. Object and Liquid EntryCNever push
outlets, extension cords, or integral
convenience receptacles as this can
result in a risk of fire or electric shock.
objects of any kind into this product
through openings
16. OverloadingCDo not overload wall
electric light or power circuits, or where
it can fall into such power lines or
circuits. When installing an outside
antenna system, extreme care should
be taken to keep from touching such
power lines or circuits as contact with
them might be fatal.
15. Power LinesCAn outside antenna
system should not be located in the
vicinity of overhead power lines or other
23. HeatCThe product should be situated
away from heat sources such as
radiators, heat registers, stoves, or
other products (including amplifiers)
that produce heat.
22. Wall or Ceiling MountingCThe product
in proper operating condition.
should be mounted to a wall or ceiling
only as recommended by the manufac-
turer.
21. Safety CheckCUpon completion of any
result in fire, electric shock, or other
hazards.
service or repairs to this product, ask
the service technician to perform safety
checks to determine that the product is
the same characteristics as the original
part. Unauthorized substitutions may
20. Replacement PartsCWhen replacement
parts are required, be sure the service
technician has used replacement parts
specified by the manufacturer or have
e. If the product has been dropped or
f. When the product exhibits a distinct
damaged in any way, and
change in performanceCthis
indicates a need for service.
v

vi
Contents
Operation References
Part Names .................................................................... 1
On-screen Display Index ............................................... 3
Warning Indicators ......................................................... 4
Turning the On-screen Display and Backlight On/Off ... 6
Precautions ................................................................................................................ ix
Quick Start .................................................................................................................. x
Supplied Accessories ..............................................................................................viii
Important Information for Consumers in the U.S. ....................................................... ii
IMPORTANT SAFEGUARDS ...................................................................................... iv
Contents ..................................................................................................................... vi
Using Quick Shot ......................................................... 28
Using Automatic Gamma Bracketing .......................... 27
Using Automatic Exposure Bracketing ........................ 26
Using the Self Timer ..................................................... 25
Selecting the Shooting Mode ....................................... 24
Selecting Image Size and Quality ................................ 23
Useful Features
Using the Controls ....................................................... 21
Using the Menu Screen ............................................... 22
Capturing
Previewing on a TV screen .......................................... 20
Zooming a Preview Image ........................................... 19
Deleting One Stored Image ......................................... 19
Previewing Images....................................................... 17
Previewing
Using Macro Shot ........................................................ 16
Using the Flash ............................................................ 16
Auto Focus ................................................................... 15
Basic Operations
Capturing
Capturing a Still Image in Auto Mode .......................... 13
Capturing a Motion Image ........................................... 14
Zooming ....................................................................... 15
Using the Lens Cap ..................................................... 12
Using the Wrist Strap ................................................... 12
Adjusting the Diopter ................................................... 11
Setting the Date and Time ........................................... 10
Inserting and Removing a Card ..................................... 9
Preparation
Inserting and Removing the AA Batteries ...................... 7
Powering the Camera from an AC Outlet....................... 8
Remaining Battery Power Display ................................. 6

Note:
• Before requesting service, please read “Troubleshooting” carefully (see pages 62 and 63).
Guía de operación rápida en español ........................................................................ 65
Specifications .............................................................. 64
Trouble Shooting .......................................................... 62
Appendix
Useful Information ........................................................ 60
Transferring Data on Card to Computer ...................... 57
Changing the Language for the On-Screen Display ... 56
Turning off the Confirmation Sound ............................. 55
Turning off the Speaker ................................................ 54
Restoring the Latest Image Deleted ............................ 54
Setting the File Numbering Method ............................. 53
Setting the Time for Automatic Power Off .................... 53
Formatting the Card ..................................................... 52
Setting to Factory Presettings ...................................... 52
Selecting the Display Style of Date and Time .............. 51
Displaying the Date and Time ..................................... 51
Gamma Correction....................................................... 50
Setting the Light Sensitivity .......................................... 49
Setting the White Balance ............................................ 48
Setting the Metering Mode .......................................... 47
Scene Select Mode ...................................................... 46
Advanced Features
Program AE Mode........................................................ 41
Aperture Priority Mode ................................................. 42
Shutter Speed Priority Mode ........................................ 43
Manual Exposure Control Mode .................................. 45
Previewing an Image with Sound................................. 40
Adding Sound to a Still Image ..................................... 39
Deleting All Images ...................................................... 38
Printing Order Information ........................................... 36
Previewing in a Slide Show .......................................... 35
Using Image Effects..................................................... 34
Protecting the Images .................................................. 33
Previewing
Useful Features
Using the Frame Guide for Recording ......................... 29
Setting the Digital Zoom .............................................. 30
Turning off the Quick View ........................................... 31
Capturing a Still Image with Sound ............................. 32
vii
Appendix
Advanced Features
Useful Features
Basic Operations
Preparation
Operation References

viii
* The part number for the AC adapter supplied with this digital still camera is valid only in the U.S. and
Latin America. If this digital still camera was purchased outside of these areas, the part number may
be different. Please refer to the part number printed on the label of the supplied AC adapter.
QCNWGA018WJPZ
USB cable
UADP-A013WJZZ*
AC adapter
Supplied Accessories
CDSKAA008WJ01
CD-ROM
UBNDTA003WJZZ
Wrist Strap
GCOVAA115WJSA
Lens cap
AA Alkaline Battery G4
SD Memory Card
(16 MB)
QCNWGA016WJZZ
Audio/video cable

close proximity to
lighting equipment.
The heat from incan-
descent lights may de-
form the digital still
camera, or cause it to
malfunction.
• This digital still camera is equipped with a
• Avoid placing the
moving lens. Do not hit or press it hard.
digital still camera in
will generate noise in the re-
corded image.
• Avoid shocks and drop-
mission source may cause buzzing or im-
age deterioration.
ping.
Do not drop or otherwise
subject the digital still cam-
era to hard shocks or strong
vibrations. Bumping or strik-
ing the unit during recording
• Using the digital still camera near a broad-
may adversely affect re-
corded images.
casting station or other powerful trans-
• Avoid magnetic sources.
Using the digital still cam-
era near strong fluorescent
lights, motors, televisions,
or other magnetic sources
may damage the CCD sensor or LCD screen
surface. Be particularly careful when record-
ing outside.
• Do not aim the lens at the sun.
Do not allow direct sunlight to strike the digital
still camera lens or LCD monitor screen,
whether or not recording is in progress, as it
• When the digital still camera is not in use,
remember to remove the card, turn off the
power, and disconnect the digital still cam-
era from the power source.
check if the scene was captured properly.
please perform the operation test, then
• Before recording an important scene,
Precautions
• When using your digital still camera in a
tripod.
cold environment, the LCD monitor screen
often appears less bright immediately after
the power is turned on. This is not a mal-
function. To prevent the digital still camera
from becoming too cold, wrap it in a thick
cloth, blanket, etc.
• Some small, portable tri-
pods may be difficult to at-
tach and may not be sturdy
enough to support your
digital still camera. Be sure
to use only a strong, stable
Be sure to keep
the unit in a
well-ventilated location.
ments can
cause malfunc-
tions or cause
mildew to form
on the lenses.
• Avoid situations where water, sand, dust or
other foreign matter could get on or inside
the digital still camera, and do not use or
leave your digital still camera in areas with
excessive smoke, steam or moisture.
Such environ-
sources; this can result
in severe damage to the
unit casing and circuitry.
store the unit in an
unventilated car in the
summer, in direct sun-
light, or near strong heat
• Be aware of the temperature and humidity.
You can use your digital still camera at 32°F
to 104°F (0°C to L40°C), and at 30% to 80%
relative humidity. Do not
• Always respect prohibitions or restrictions
on the use of electronic equipment on
commercial flights or in other sensitive ar-
eas.
ix
x
Quick Start
Still Image (p. 17) Movie (p. 18)
Previewing
Still Image (p. 13) Movie (p. 14)
Capturing
Clipped corner
Inserting the supplied SD Memory Card (p. 9)
Inserting the AA batteries (p. 7)
Write protect switch
For details on the use of each part, refer to the page number indicated in parentheses.
Part Names
Bottom view
Wrist strap loop
Power button
Front view
Operation References
Battery compartment door release (p. 7)
Tripod socket
Shutter button (pp. 13, 14)
Zoom lens
(p. 12)
Flash sensor
Self timer indicator
(p. 25)
(p. 21)
Mode Dial (p. 21)
Microphone
Flash
1
Operation References
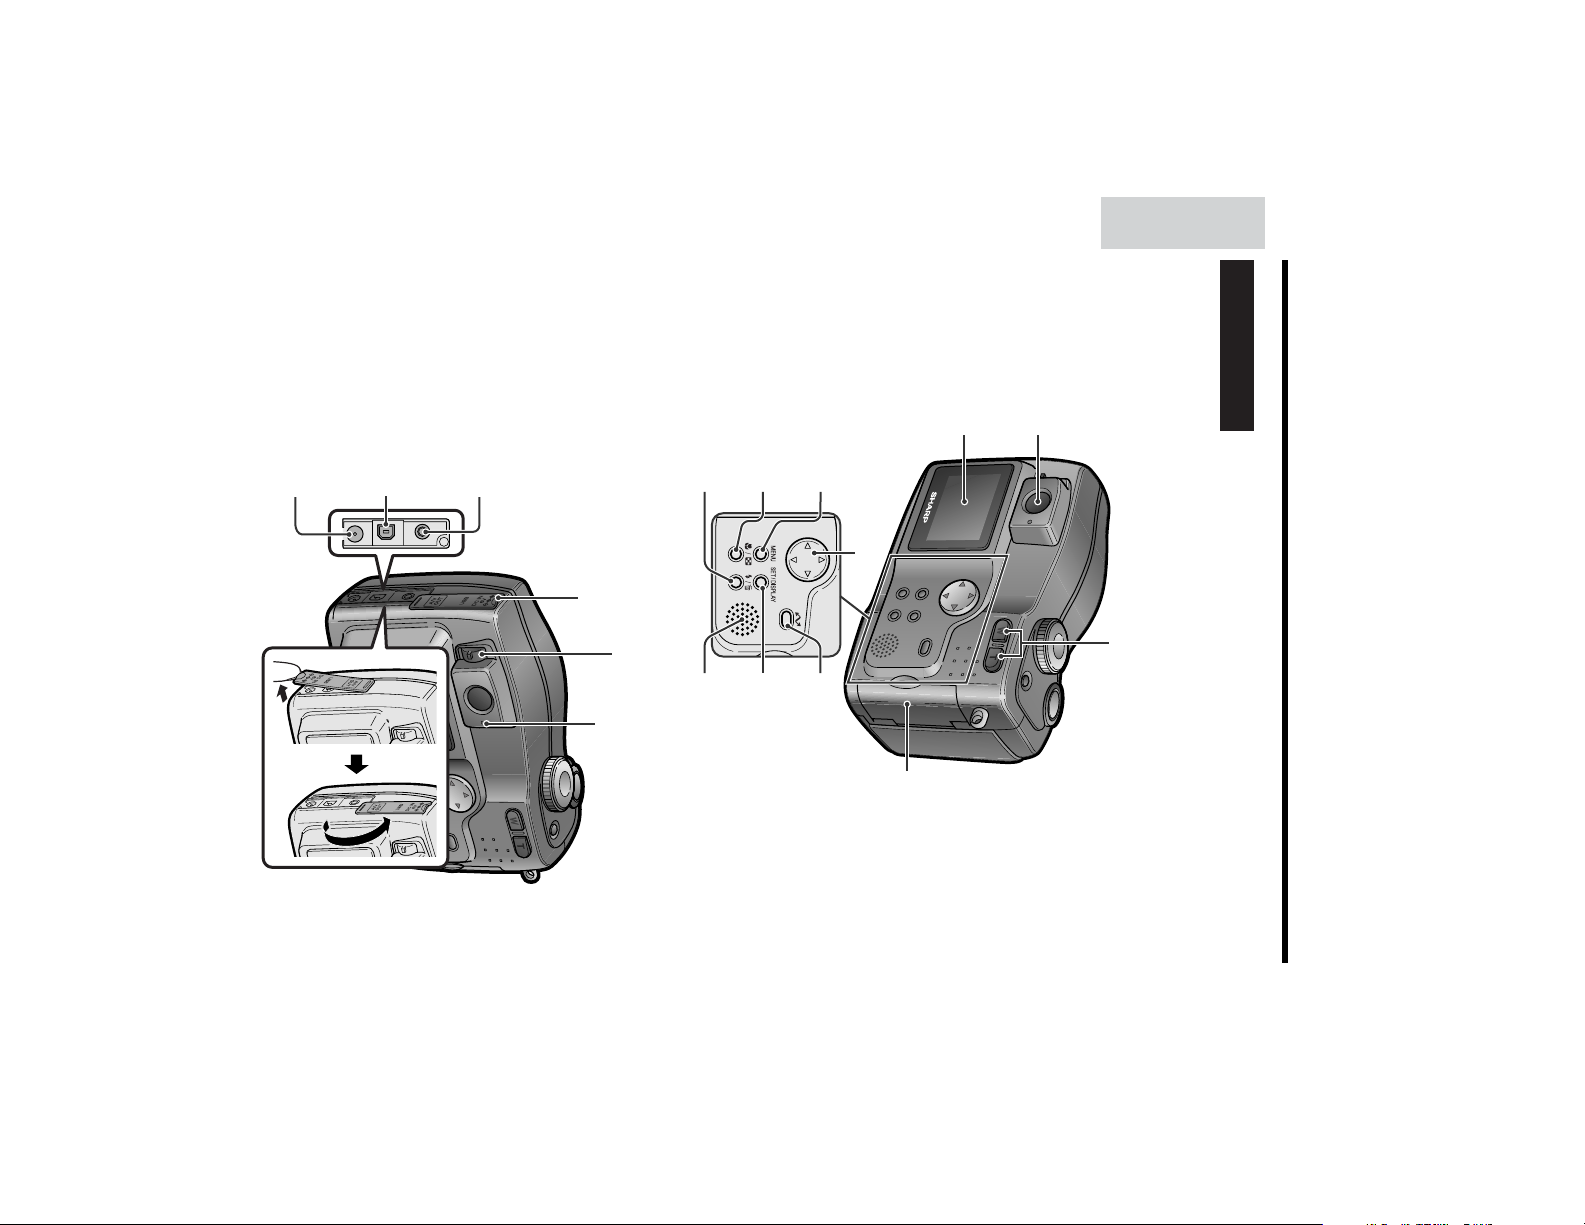
2
Operation References
Operation References
Thumbnail ($) (p. 18)
USB terminal (p. 57)
DC IN jack (p. 8)
A/V OUT jack (p. 20)
Jack cover (pp. 8, 20, 57)
Status indicator (p. 13)
Diopter control (p. 11)
Delete (@) (p. 19)
button
Flash (q) (p. 16)/
button
Speaker
MENU button (p. 21)
Macro (%) (p. 16)/
Operation button (p. 21)
SET/DISPLAY button (p. 21)
Data transfer (!) button (p. 57)
LCD screen
Card slot cover (p. 9)
Viewfinder
angle, T: telephoto) (p. 15)
Power Zoom buttons (W: wide
Rear view
Note: The menus and screen shots shown in this manual are for explanation purposes only
M
OV I E
WH I TE BALANCE
RETURN
and may vary slightly from actual operating conditions.
FRAME GUIDE
For details on the use of each function, refer to the page number indicated.
PREV I EW
DELETE ALL
DUBBING
RETURN
PROTEC T
PRINT
SL IDE SHOW
IMAGE EFFECT
ORDE R
In w mode (Thumbnail)
p. 36
In w mode (Full-display)
p. 6
p. 21
p. 49
p. 16
ISO
In [, ], ;, ', ,, . or = mode
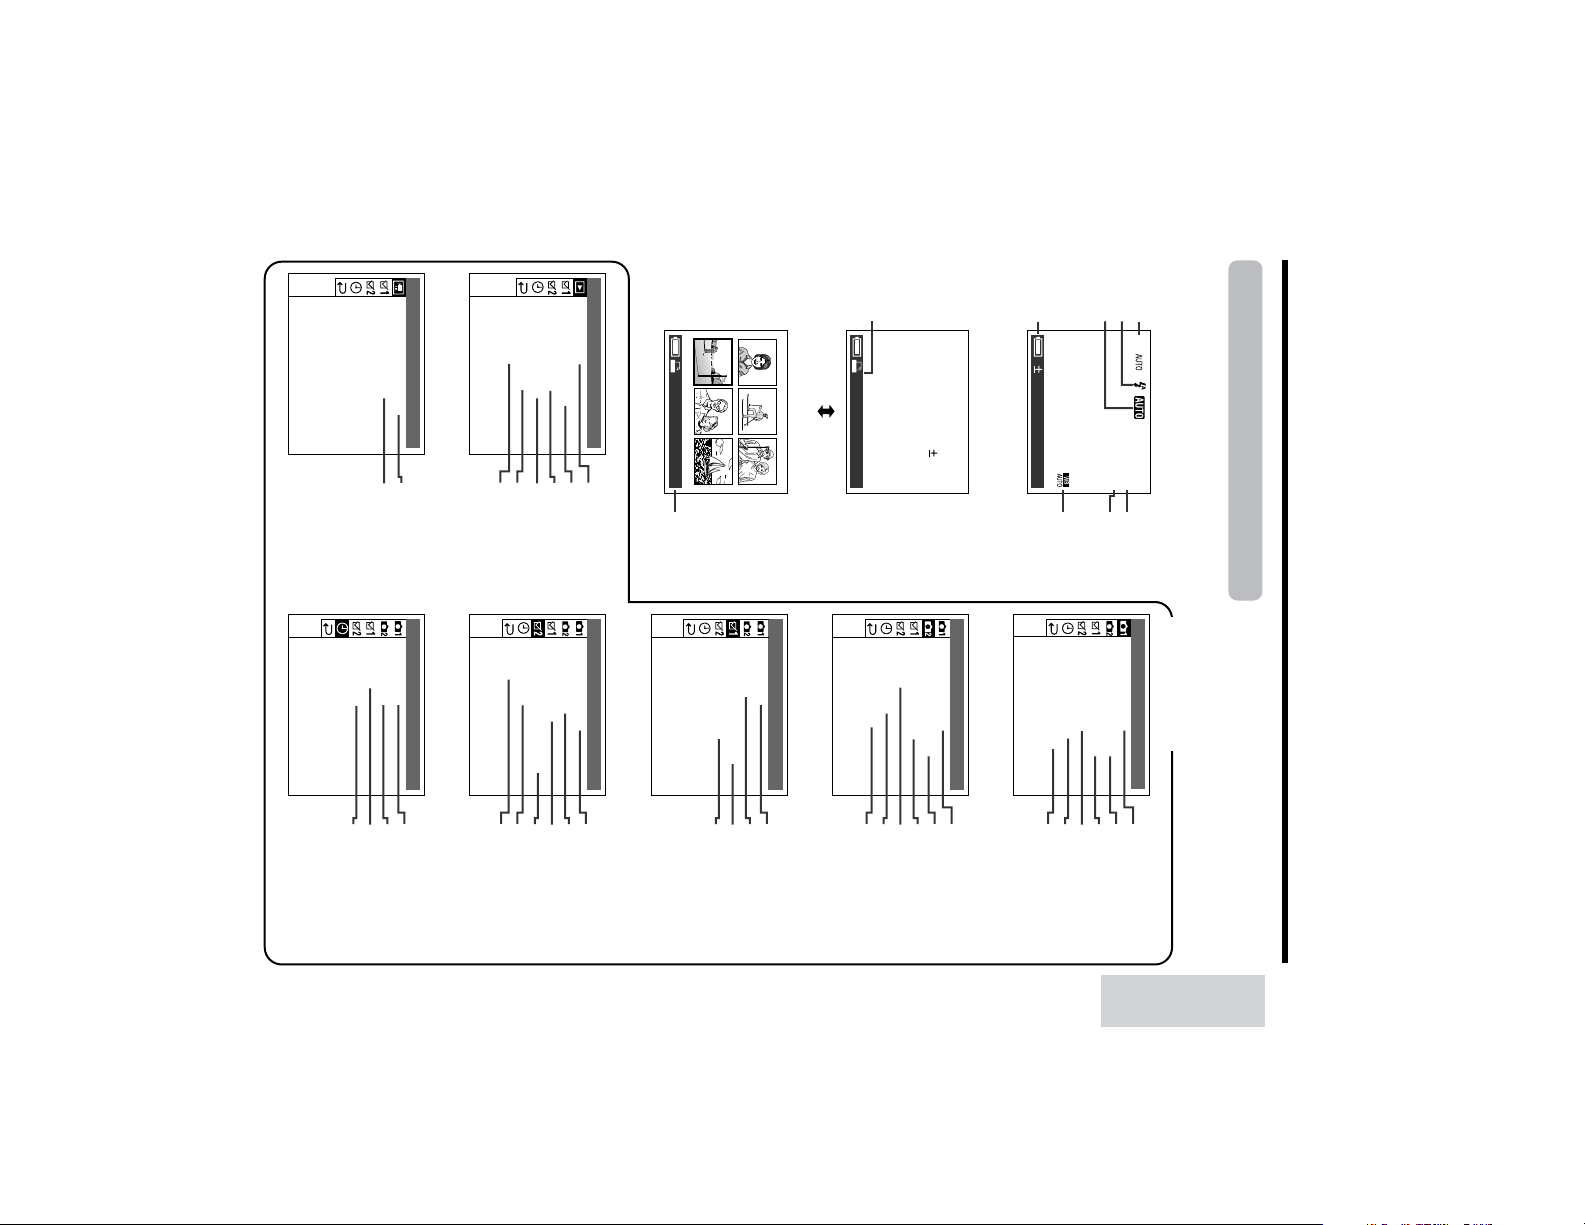
On-screen Display Index
1000 0
0100
RETURN
VOI CE REC.
p. 32
MET ER ING
p. 47
6.5F
GAMMA
p. 50
500/1
SENSI T IV I TY
p. 49
EV0.0
WH ITE BALANCE
Fine
QUICK VIEW
p. 31
p. 48
[
2448
]
CAPTURE 2
005EV /16.5F0.0
RETURN
p. 48
DIGITAL ZOOM
p. 30
QU I CK SHOT
FRAME GUIDE
p. 29
SHOOTING MODE
p. 24
p. 28
Fine
p. 23
IMAGE QUALITY
IMAGE S I ZE
p. 23
[
2448
0100
]
p. 23
CAPTURE 1
p. 23
Menu screens
RETURN
SETTING
STYLE
p. 51
p. 10
p. 29
12H 2/4H
p. 11
p. 48
DISPLAY
p. 51
1000 0
0100
p. 33
p. 34
p. 35
p. 36
p. 38
p. 39
p. 53
DATE TIME/
RETURN
BEEP
SPEAKER
p. 54
p. 55
UNDO LAST IMAGE
p. 54
VIDEO OUT
p. 20
LANGUAGE
p. 56
PC CONNEC T
SETTING 2
RETURN
p. 59
AUTO OFFPOWER
FILE NUMBER
p. 53
FORMAT
p. 53
DEFAUL T
p. 52
SETTING 1
p. 52
3
Operation References

4
DISCONNECTED
PRINT SETT I NG
TO IMAGES999
BATTERY
TO TRANSFER THE DATA
CANNOT READ
THE DATAIMAGE
STOPPED
PROCESS ING WAS
READ
OFF ON AGA IN/
LENS ERROR
TURN PO
IS
CARD SLOT COVER
OPEN
IS TOO LOW
ONLY
IS SETCARD TO
W
ER
IS FULLCARD
Operation References
NO CARD
NO IMAGE S
If a warning indicator appears on the screen, follow the specified instructions.
Warning Indicators
Warning indicators Description of warning
Operation References
NO.MAX. IMAGE
IS UP
Improper connection. Check the USB connection and
make sure the card is firmly inserted in its slot (see page 9,
57).
You cannot set the print order to more than 999 images.
available) (see page 7).
charged Ni-MH rechargeable batteries (commercially
The selected image cannot be read by this camera.
Replace the batteries with new AA alkaline batteries or fully
operation procedure is correct.
The camera failed to process the data. Make sure the
The card is write-protected (see pages 9, 60).
You cannot record any image with a file number bigger
than 999-9999. Format the card or replace it with a new
one.
and the lens barrel is obstructed (e.g. by a hand, flat
surface, lens cap), it may freeze after making contact three
times. In such case, turn the power off, remove the
obstruction then power on again.
If you power on the camera in any of the capture modes
The card slot cover is open. Close the cover.
The capacity of the card is full and cannot store any more
images. Delete unnecessary images (see page 19) or
replace the card with a new one (see page 9).
The card has no images recorded in the format the camera
can recognize.
The card is not inserted or is inserted improperly. Check
that it is properly inserted (see page 9).

* Formatting a card erases all stored images, including delete-protected images. Be sure to backup
important data on your computer or other media before formatting the card.
FORMAT THE CARD
ACCESS ERRORCARD
The images in the card are corrupted or recorded in a
format which is not compatible with this camera. Format
the card for use with this camera (see page 52).*
The memory card has not been formatted for use with this
camera. If the card contains important data, transfer it to
another storage device before formatting (see page 52).*
FULL?
Delete a few unneeded images and try transferring again.
W
IS MEMORYCARD
IS SET TOCARD
RITE PROTECT?
You cannot transfer data to a computer if the card is full.
You cannot transfer data using the transfer button if the
card is write-protected. Set the switch to the unlocked
position and try transferring again (see page 9, 57).
Warning indicators Description of warning
5
Operation References

6
• You cannot turn the LCD screen backlight off in
w mode.
Note:
In w mode
mode.
• The examples shown are the screens for [
Note:
ISO
Operation References
backlight. Each time you press this button, the
screen changes as shown below.
In [, ], ;, ', ,, . or = mode
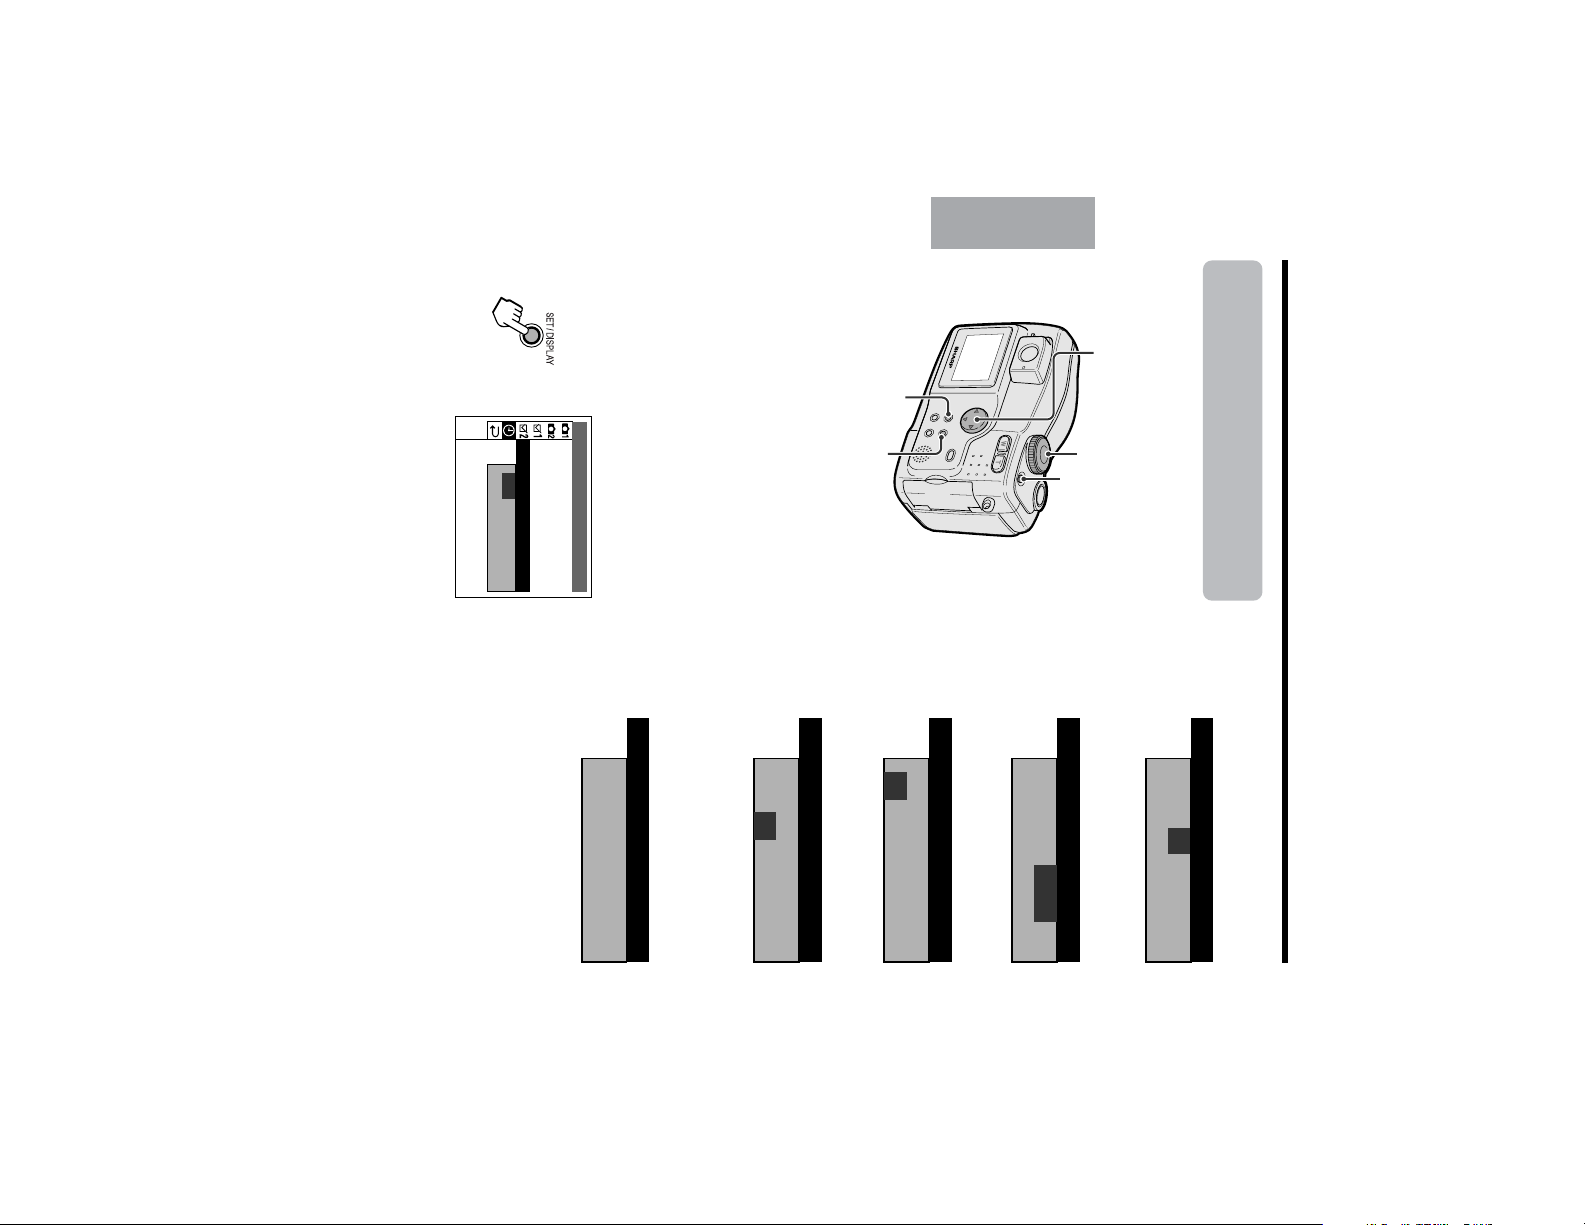
Use the DISPLAY button to turn on/off the on-
screen displays, or to turn off the LCD screen
Turning the On-screen
Display and Backlight
On/Off
Operation References
1000 0
0100
1000 0
0100
some functions may not work properly.
[
Fine
2448
500/1
EV0.0
6.5F
]
• Use the remaining battery power indicator only
• The indicator may change to a higher or lower
• In cold environments, the red indicator may
• Use of the zoom functions when the warning
• When the battery power becomes very low,
some menu items may not be selectable or
appear sooner.
indicator is displayed may cause the camera to
suddenly lose power.
as an approximate value.
level if the power is turned off and then on again.
LCD screen backlight off
Notes:
• When the battery runs down completely, the
status indicator blinks red and the power shuts
down.
005EV /16.5F0.0
on,
On-screen displays off
(Red)
Warning indicator
power indicator
LCD screen backlight
(Green)
Remaining battery
005EV /16.5F0.0
LCD screen backlight
on,
On-screen displays on
[
Fine
2448
1000
]
This camera can display the remaining battery
power indicator during operation. If the battery
power becomes very low, replace the batteries
with new ones (see page 7).
Remaining Battery
Power Display
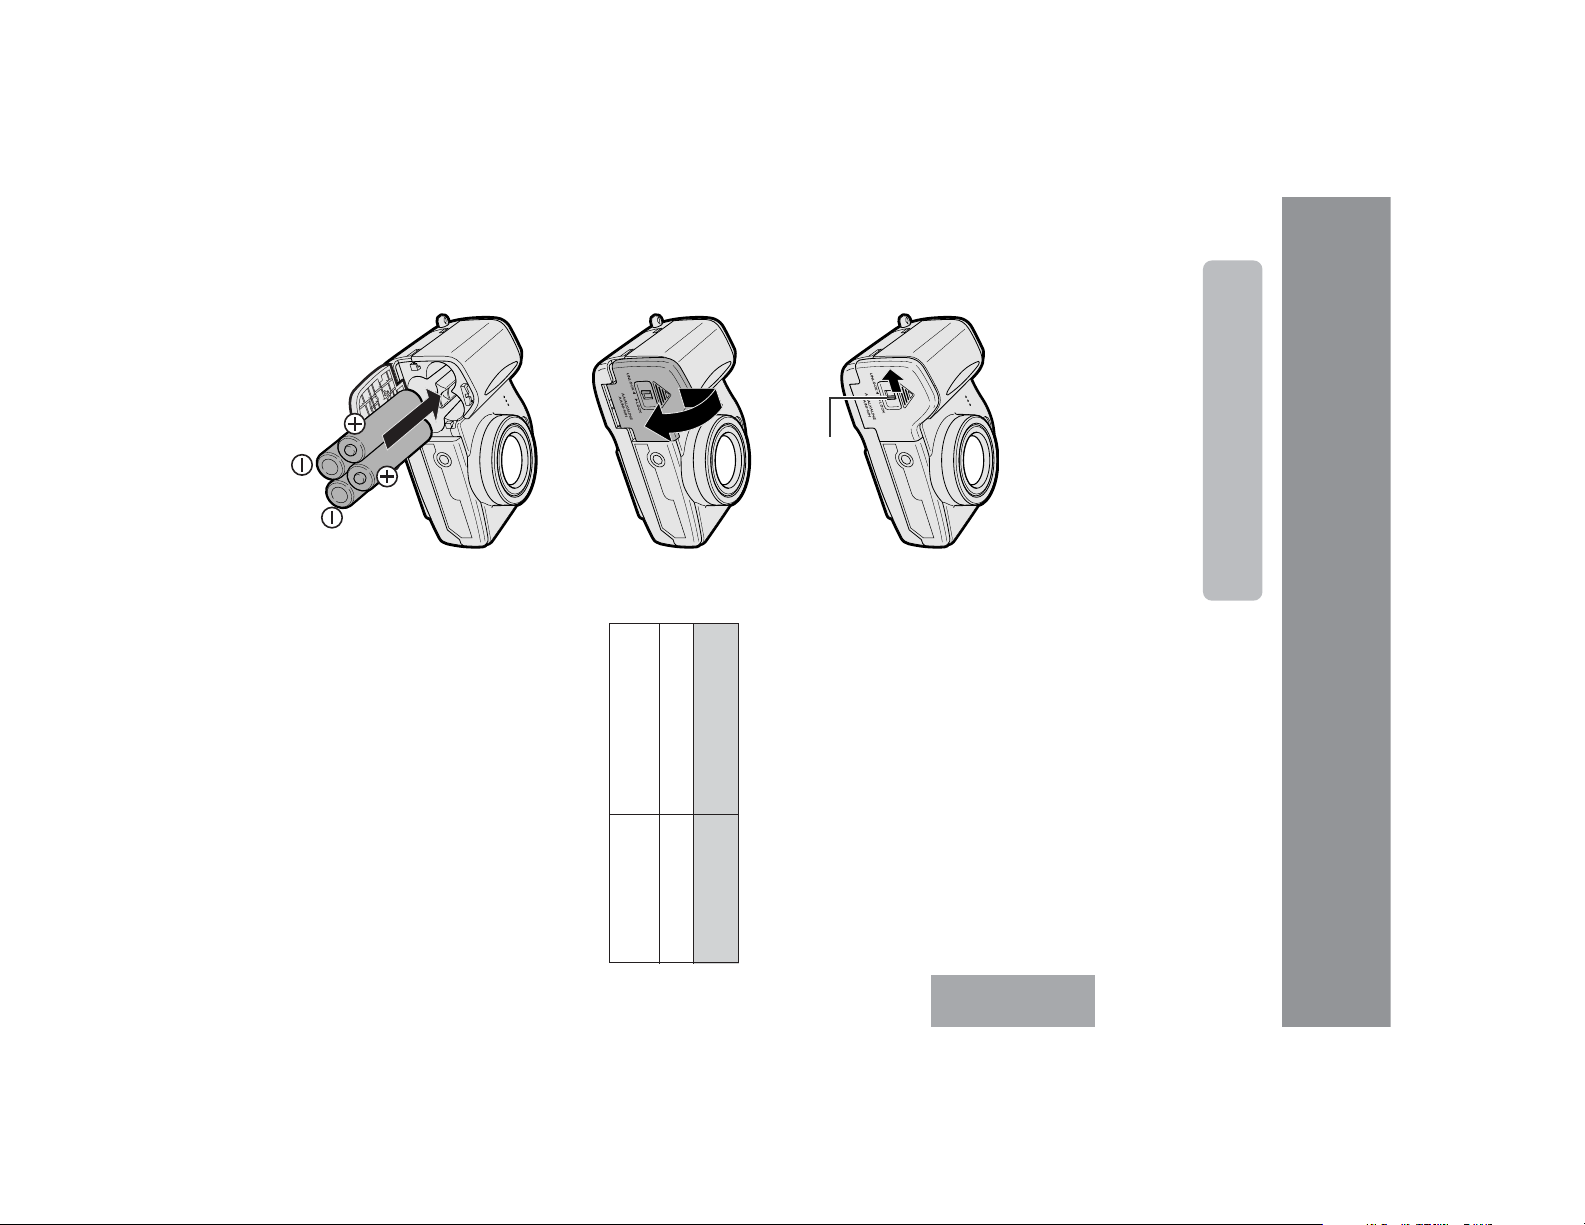
5 Close the door, then slide the battery
compartment door release to LOCK.
• The number of images you can record with
commercially available batteries may differ from
the supplied AA alkaline batteries in the table
above.
4 Insert the AA batteries as shown below.
Notes:
• Images taken per usage, based on standard
• Using the zoom (see page 15) and other
testing.
functions or turning the power on and off
frequently will increase power consumption.
This may result in a decrease in the actual
recording number compared to the numbers
listed above.
Rechargeable Ni-MH
(1600 mAh)
200
3 Slide the door, then open it in the
direction of arrow.
The table below shows the approximate
number of recordable images when using
AA Alkaline (supplied)
100
different types of batteries.
Battery type
number of images
Approximate
Battery compartment
door release
Battery performance
(commercially available).
supplied AA (R6 or UM/SUM-3) alkaline
batteries.
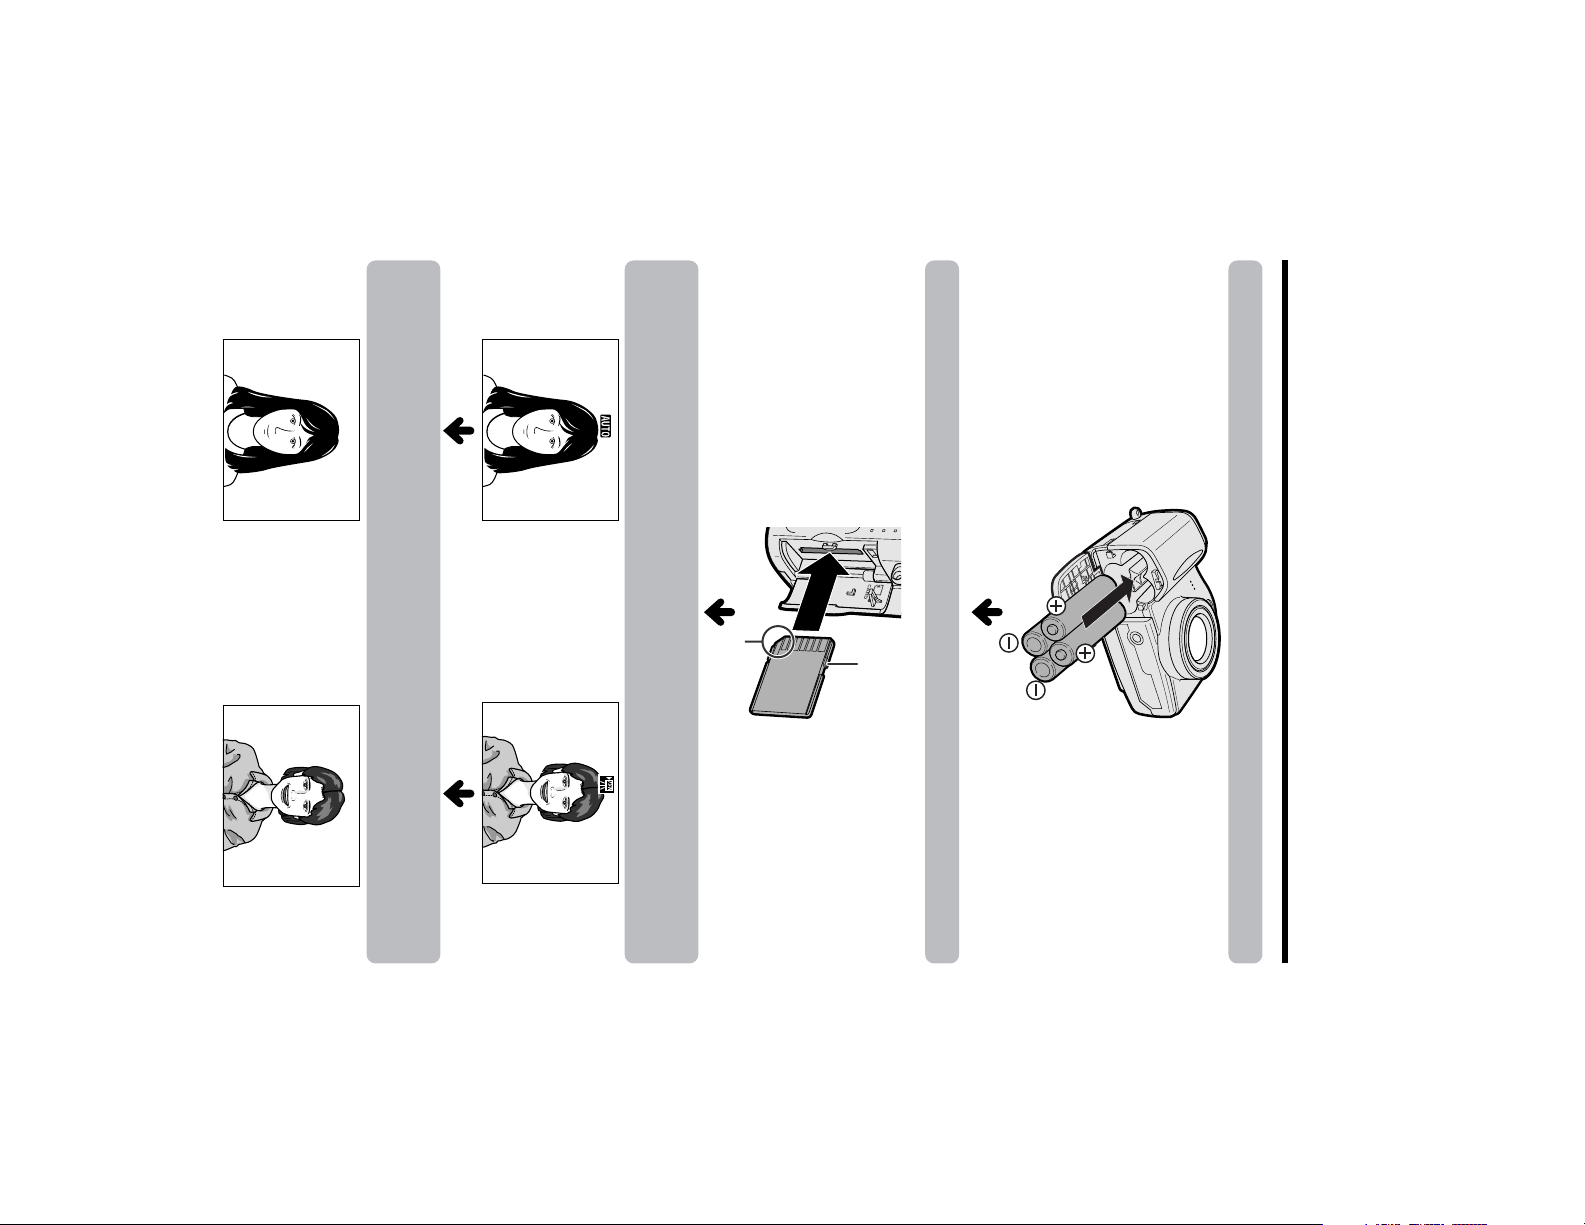
Inserting
1 Make sure that the power is off.
2 Slide the battery compartment door
release to UNLOCK.
Notes:
• Remove the batteries from the camera if you will
• Do not use old and new batteries together or
• When the batteries are depleted, replace them
pressure.
batteries of different brand together.
with new AA (R6 or UM/SUM-3) alkaline batteries
or fully charged Ni-MH rechargeable batteries
• Make sure that the battery compartment door
unreadable and unwritable.
not use the camera for a long period of time.
release is set to LOCK during operation. If it is
not, the batteries may fall out or camera
operation may fail because of poor contact
• BEFORE REMOVING THE BATTERIES,
ALWAYS STOP OPERATIONS AND TURN THE
POWER OFF. Removing the batteries during
operation may destroy the card, rendering it
Before operation, you need to insert the
Inserting and Removing
the AA Batteries
Removing
Perform steps 1 to 3 in “Inserting”, then
remove the batteries.
Preparation
7
Preparation
8
4 Press the Power button until the camera
turns on.
To AC outlet
DC IN jack
DC plug
Jack cover
Preparation
3 Insert the DC plug into the DC IN jack
(1), then plug the AC adapter into a
power outlet (2).
1 Make sure that the power is off.
2 Open the jack cover (see page 2).
for use with this camera, and should not be used
as a power supply for other equipment.
• The AC adapter attaches directly, so use close
to an outlet and be careful that it does not
detach.
• The supplied AC adapter is specially designed
• Remove the DC plug from the camera if you will
may destroy the card, rendering it unreadable
and unwritable.
not use the camera for a long period of time.
Powering the Camera
from an AC Outlet
Notes:
• BEFORE REMOVING THE DC PLUG, ALWAYS
STOP OPERATIONS AND TURN THE POWER
OFF. Removing the DC plug during operation
You can power the camera from a power outlet
by using the supplied AC adapter.
Note:
Preparation
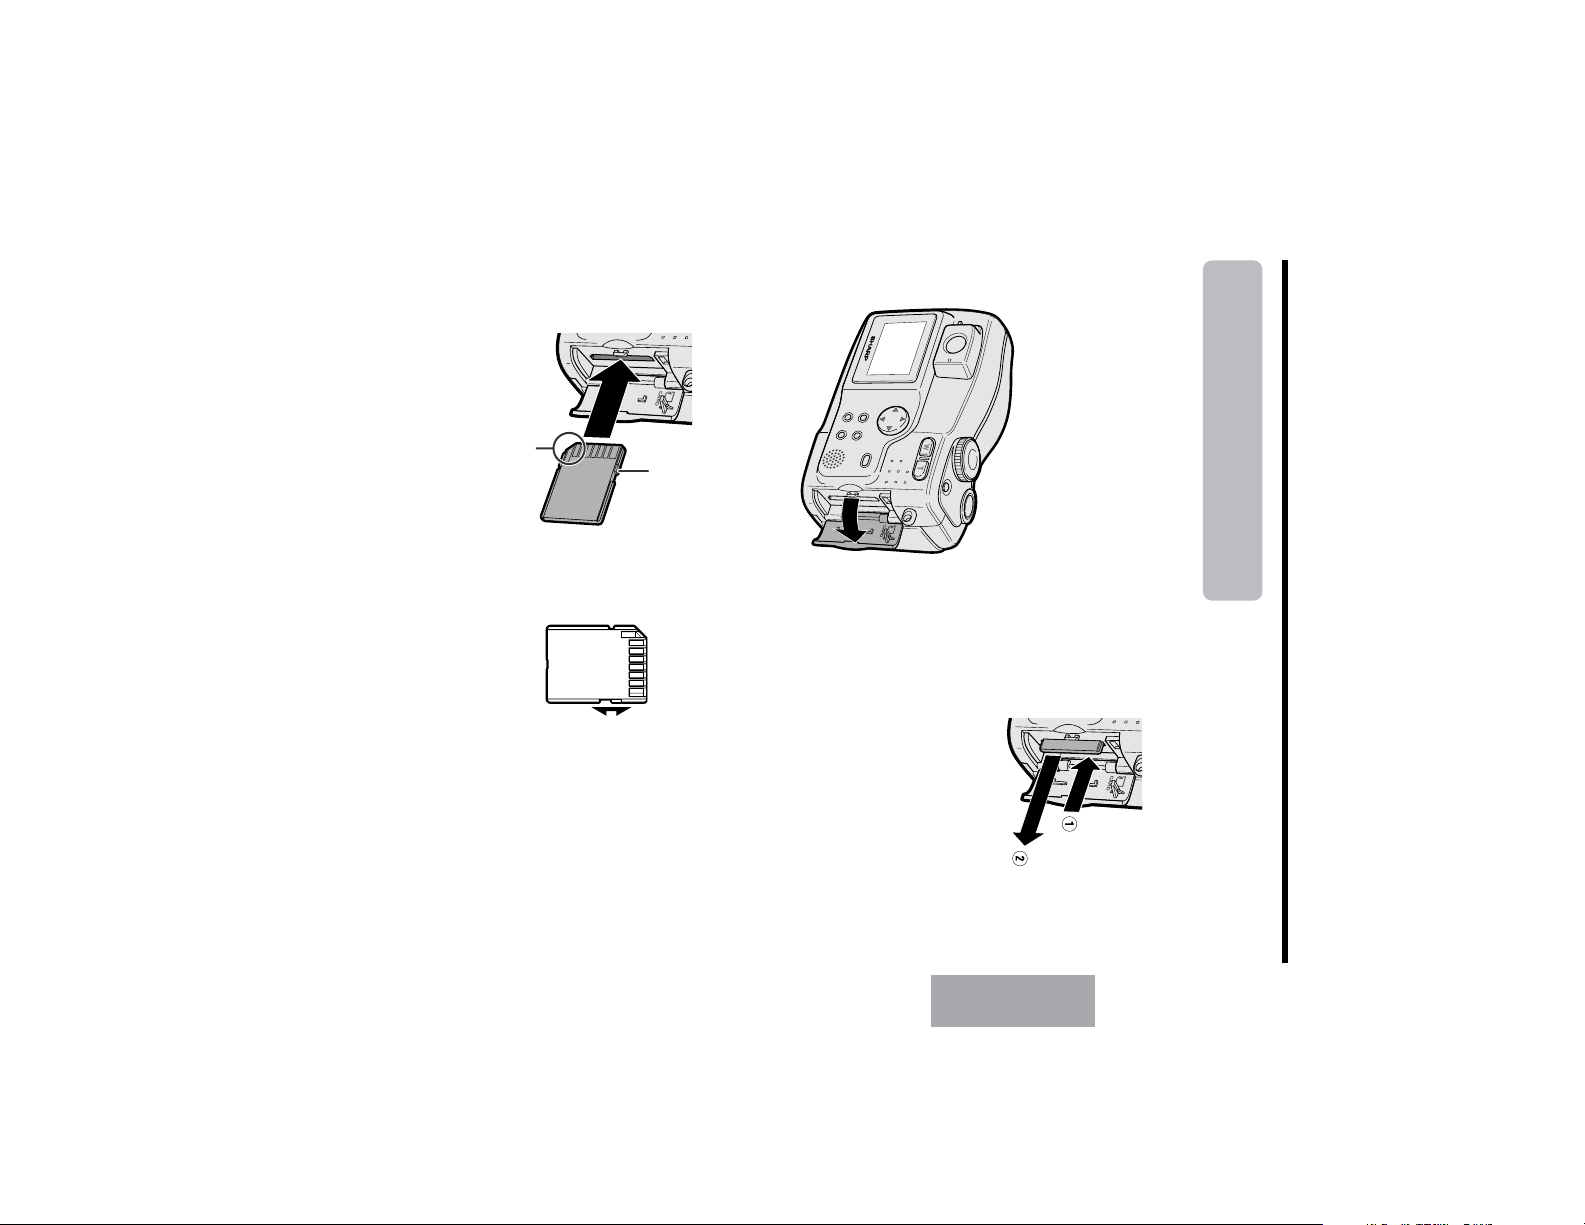
4 Close the card slot cover.
Clipped corner
Write protect switch
delete data or format the card.
Back view
Unlocked position
Locked position
3 Make sure the SD Memory Card’s write-
protect switch is in the unlocked position.
Then insert the card into the slot as
shown below, and push it fully.
Notes:
• The supplied card is preformatted for immediate
• See page 60 for more information on the cards
About the write protect switch
SD Memory Cards have a write protect switch.
When the switch is set to the locked position,
you cannot record/delete data or format the
card. Set it to the unlocked position to record/
• Do not remove the card from the camera
intended for use with this camera.
while recording data on the card (S indicator
blinks during recording). This may delete the
recorded image or damage the card.
use.
2 Open the card slot cover in the direction
of arrow.
shown below.
(1). Then pull the card straight out (2) as
push the card and release your finger slowly
Inserting and Removing
a Card
Removing
Perform steps 1 and 2 in “Inserting“, then
You can use an SD Memory Card for storing
images.
Inserting
1 Make sure that the power is off.
9
Preparation
10
3 Press the SET button.
Preparation
Note:
1 Press the Power button until the camera
2 Press the MENU button until the menu
screen appears.
(see page 51).
turns on.
• Setting procedure will vary depending on the
settings of “STYLE” and “12H/24H” in the DATE/
TIME screen. The example below shows a
“MMM.DD.YYYY” style with a 12H time setting
MENU button
Example: Setting the date to June 2, 2003 and
the time to 1:30 pm.
Available in w, [, ], ;, ', ,, . or = mode
Operation button
Setting the Date and
Time
Preparation
DATE TIME/
RETURN
21
:
0MA
0
screen instead of the date and time values.
DISPLAY
SETTING
STYLE
12H/ 24H
.1.JAN
2
0
0
2
Note:
• If you capture an image without setting the date
and time, under bars will display in the preview
• The internal clock starts up once the
second hand begins to blink.
then press the SET button.
SETTING
03MP:00:1
.2.JUN
3002
8 Press m or l to select “30” (minute),
SET button
7 Press m or l to select “1” (hour), then
press the SET button.
SETTING
00 MP:1
.2.JUN
3002
00MA:21
.2.JUN
3002
6 Press m or l to select “2003” (year),
then press the SET button.
SETTING
00MA:21
Mode dial
Power button
SETTING
.2.JUN
2002
5 Press m or l to select “2” (day), then
press the SET button.
4 Press m or l to select “JUN” (month),
then press the SET button.
SETTING
00MA:21
2002.1.JUN
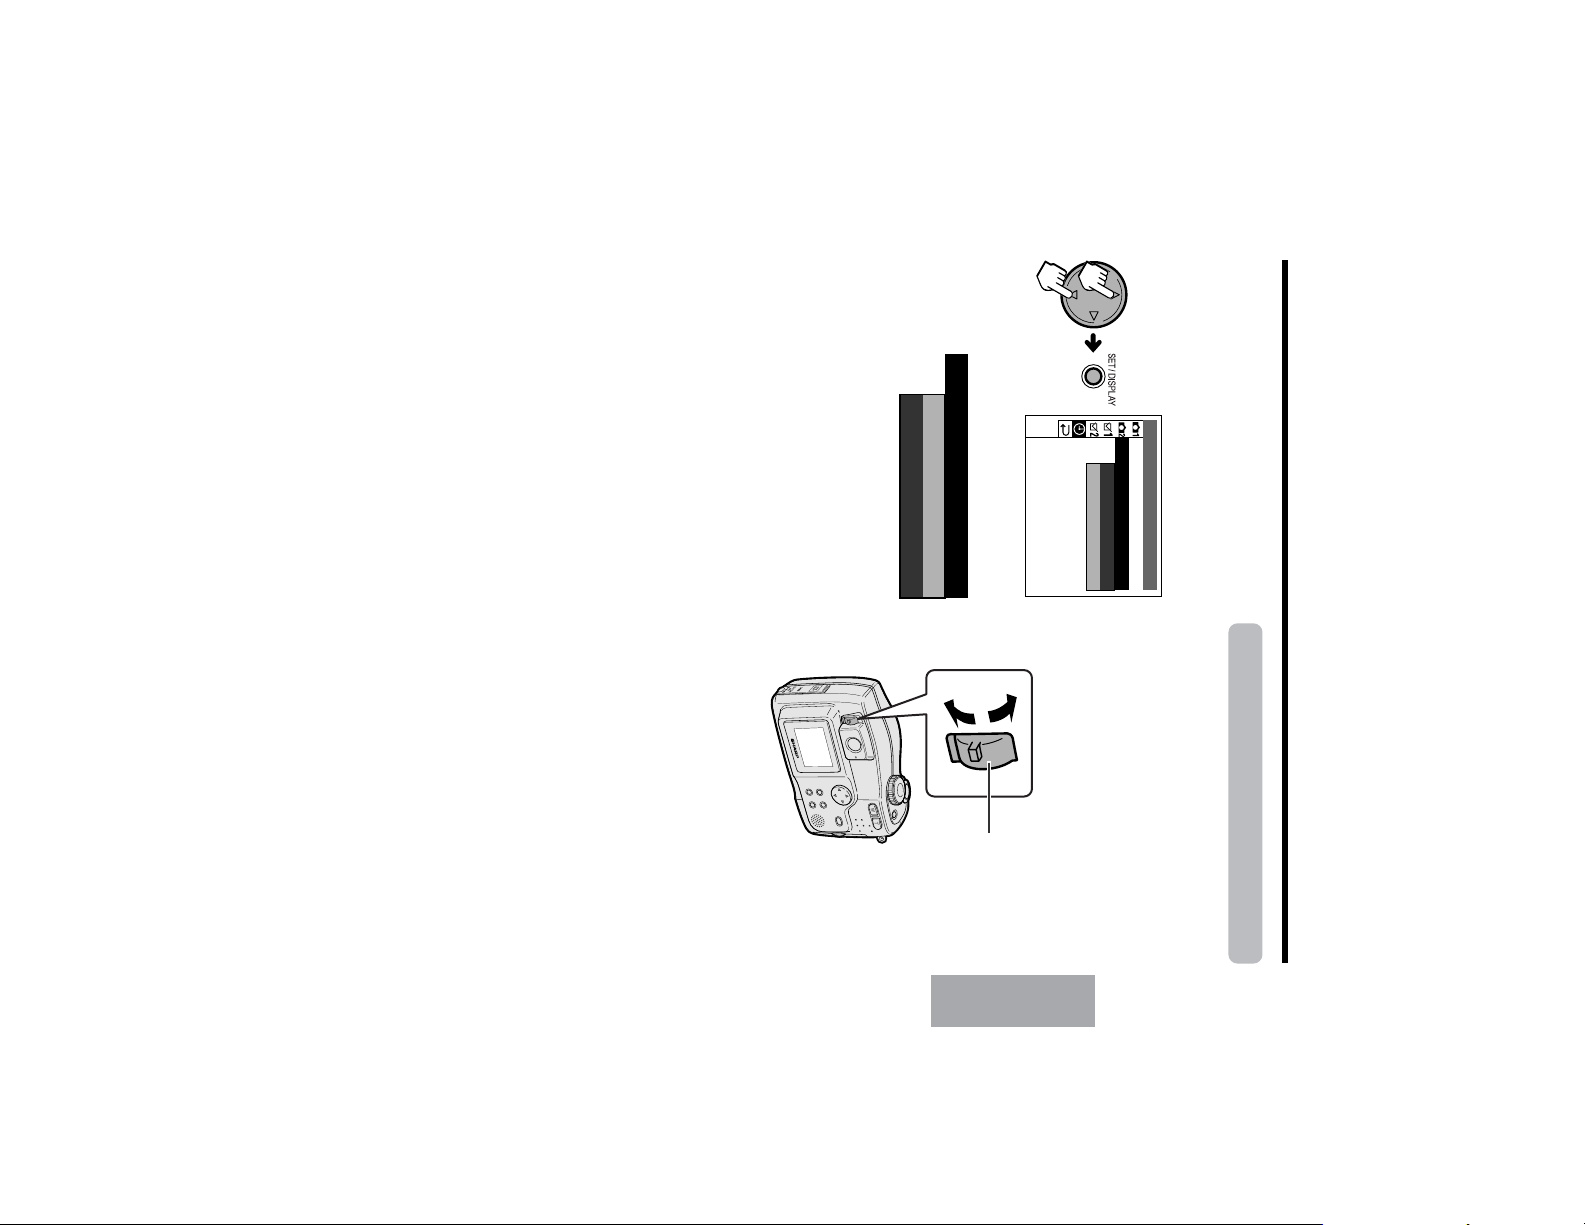
3 Press the MENU button to turn off the
Notes:
• To cancel the clock setting procedure, press the
• If the date and time have been set, the CAPTURE
MENU button at any step.
1 screen (O) appears in step 2. Select
“SETTING” in the DATE/TIME screen (/) using
the Operation button and the SET button.
menu screen.
press the SET button.
12H
12H
24H
/24H
2 Press l or m to select “24H”, then
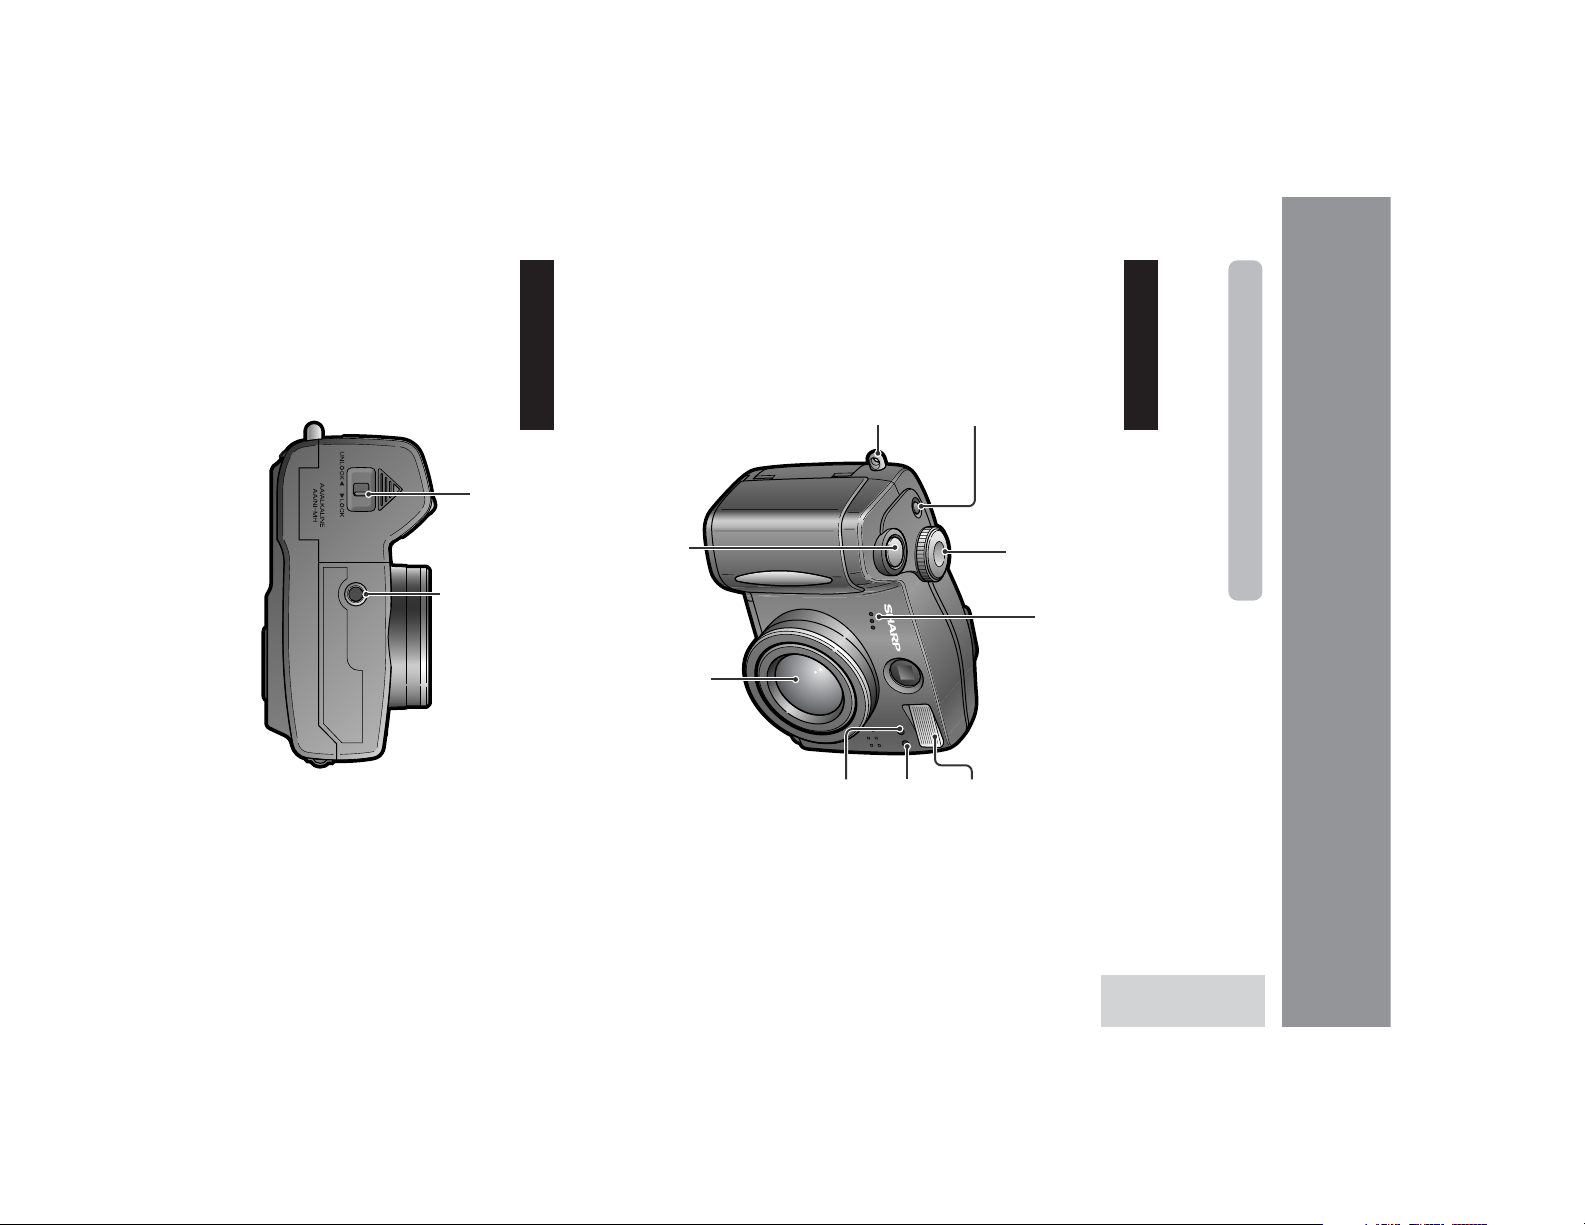
Diopter control
Changing to the 24-hour Time Mode
1 After performing step 8 above, press l
or m to select “12H/24H”, then press the
SET button.
DATE TIME/
SETTING
STYLE
42H
21H
2 While looking through the viewfinder,
DISPLAY
12H/ 24H
turns on.
Adjust the diopter according to your eyesight
when the picture in the viewfinder is not clear.
1 Press the Power button until the camera
Adjusting the Diopter
RETURN
turn the Diopter Control until the subject
is seen clearly.
11
Preparation

12
Note:
• Remove the lens cap before you power on the
camera. The camera may freeze if the lens cap
remains attached. In such case, press the Power
button to power off, remove the lens cap and
press the Power button again to power on.
Preparation
Notes:
• Make sure the wrist strap attaches firmly to the
• Do not swing the camera by the strap.
wrist strap loop.
Always attach the lens cap when not using
the camera.
Attach the wrist strap to the wrist strap loop
as shown below.
Using the Wrist Strap
Attach the strap of the lens cap to the wrist
strap as shown below.
Using the Lens Cap
Preparation
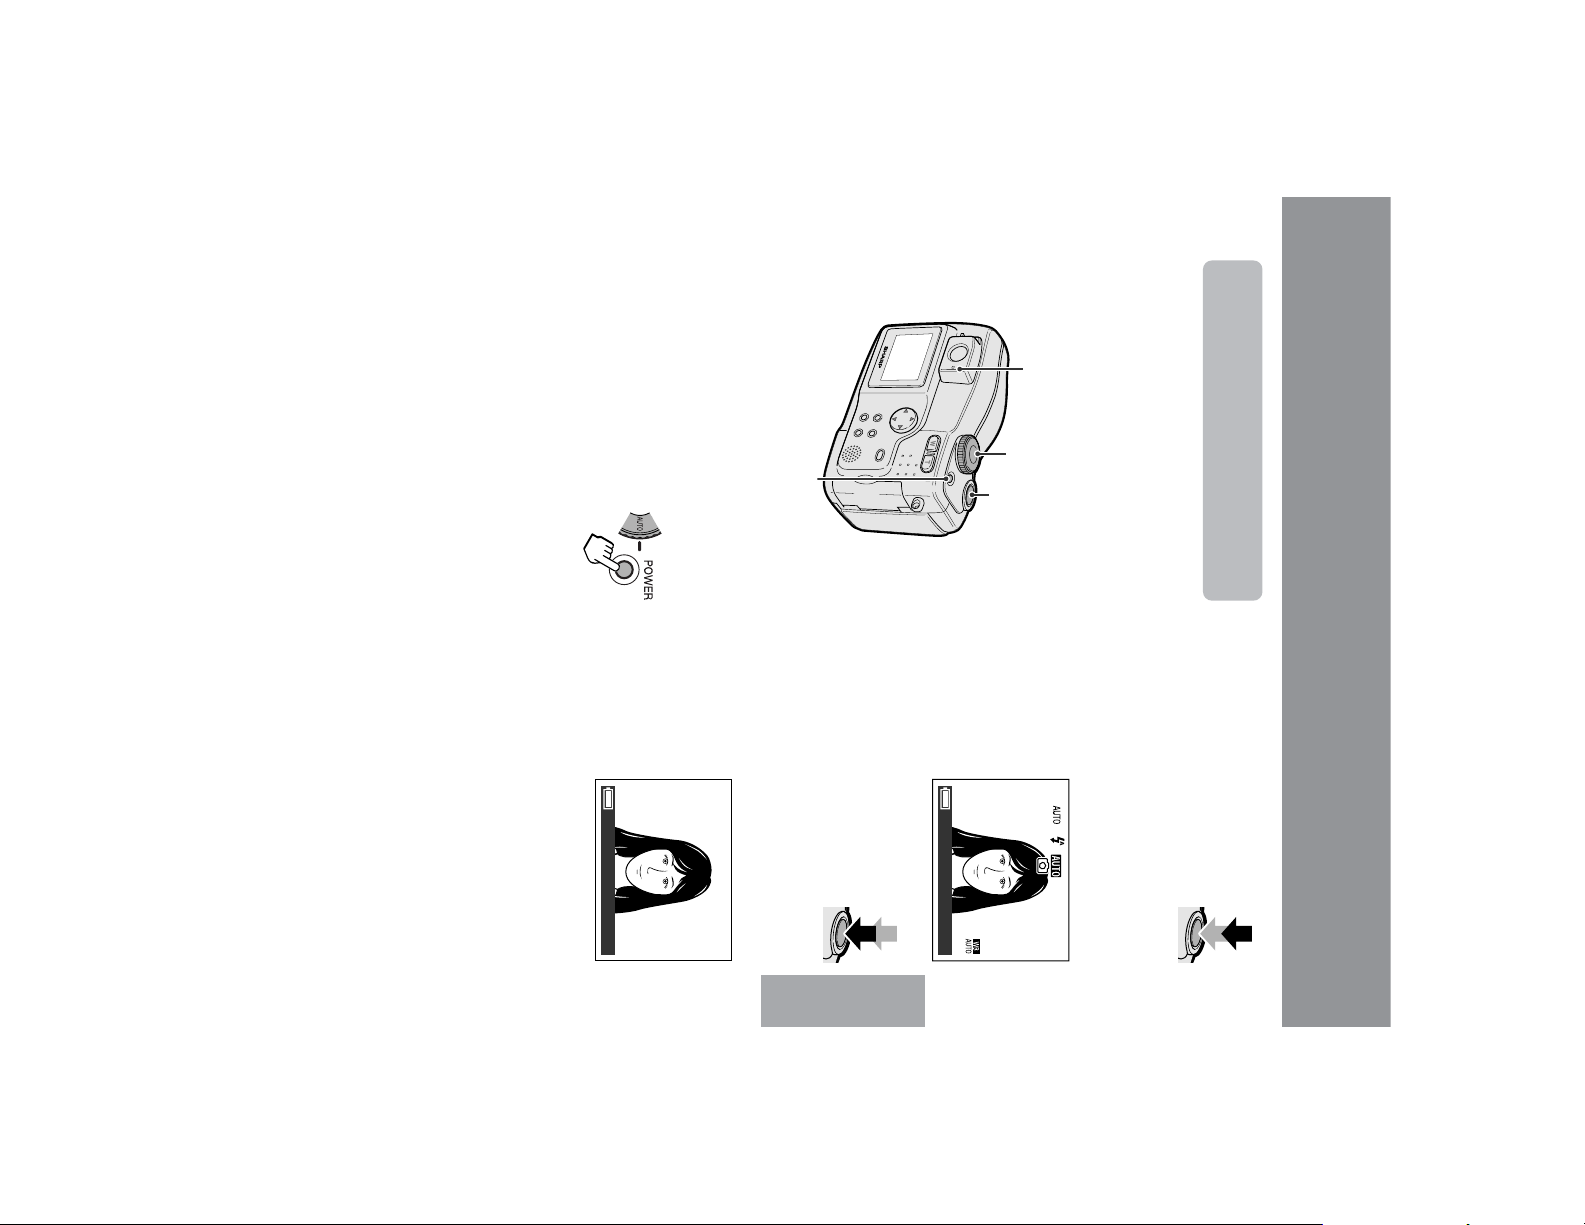
4 Press the Power button
until the camera turns on.
Basic Operations
1 Insert a card into the camera (see page
2 Remove the lens cap.
3 Set the Mode Dial to “[”.
9).
• Before you start, perform the procedures
described on pages 7 to 12 to prepare your
camera for capturing images.
Status indicator
in Auto Mode
In Auto Mode, the camera automatically sets
the best aperture, shutter speed, exposure
value and white balance. Light metering is set
to Center mode.
Capturing
Capturing a Still Image
13
Notes:
• Do not turn the power off while the status
• Remove the lens cap before powering on the
indicator is blinking in step 6.
camera.
Shutter button and make sure the status
indicator lights up, then perform steps 5
and 6.
• To capture another image, release the
005/16.5F
Power button
6 Press the Shutter button fully to
capture the image.
• When the QUICK VIEW menu item is set
to “ON”, the captured image displays on
the LCD screen for a few seconds.
• The status indicator blinks while
data is being recorded on the
card, and stops blinking when
recording completes.
005/16.5F
Basic Operations
Mode dial
Shutter button
ISO 0 100
[
Fine
2448
]
5 Press the Shutter button half-
way down to focus on the
subject.
• The camera automatically
focuses on the subject. While
focusing, you will see the status
indicator blinks green and v blinks
white in the display. When the camera
locks into focus, they stop blinking and
light up.
14
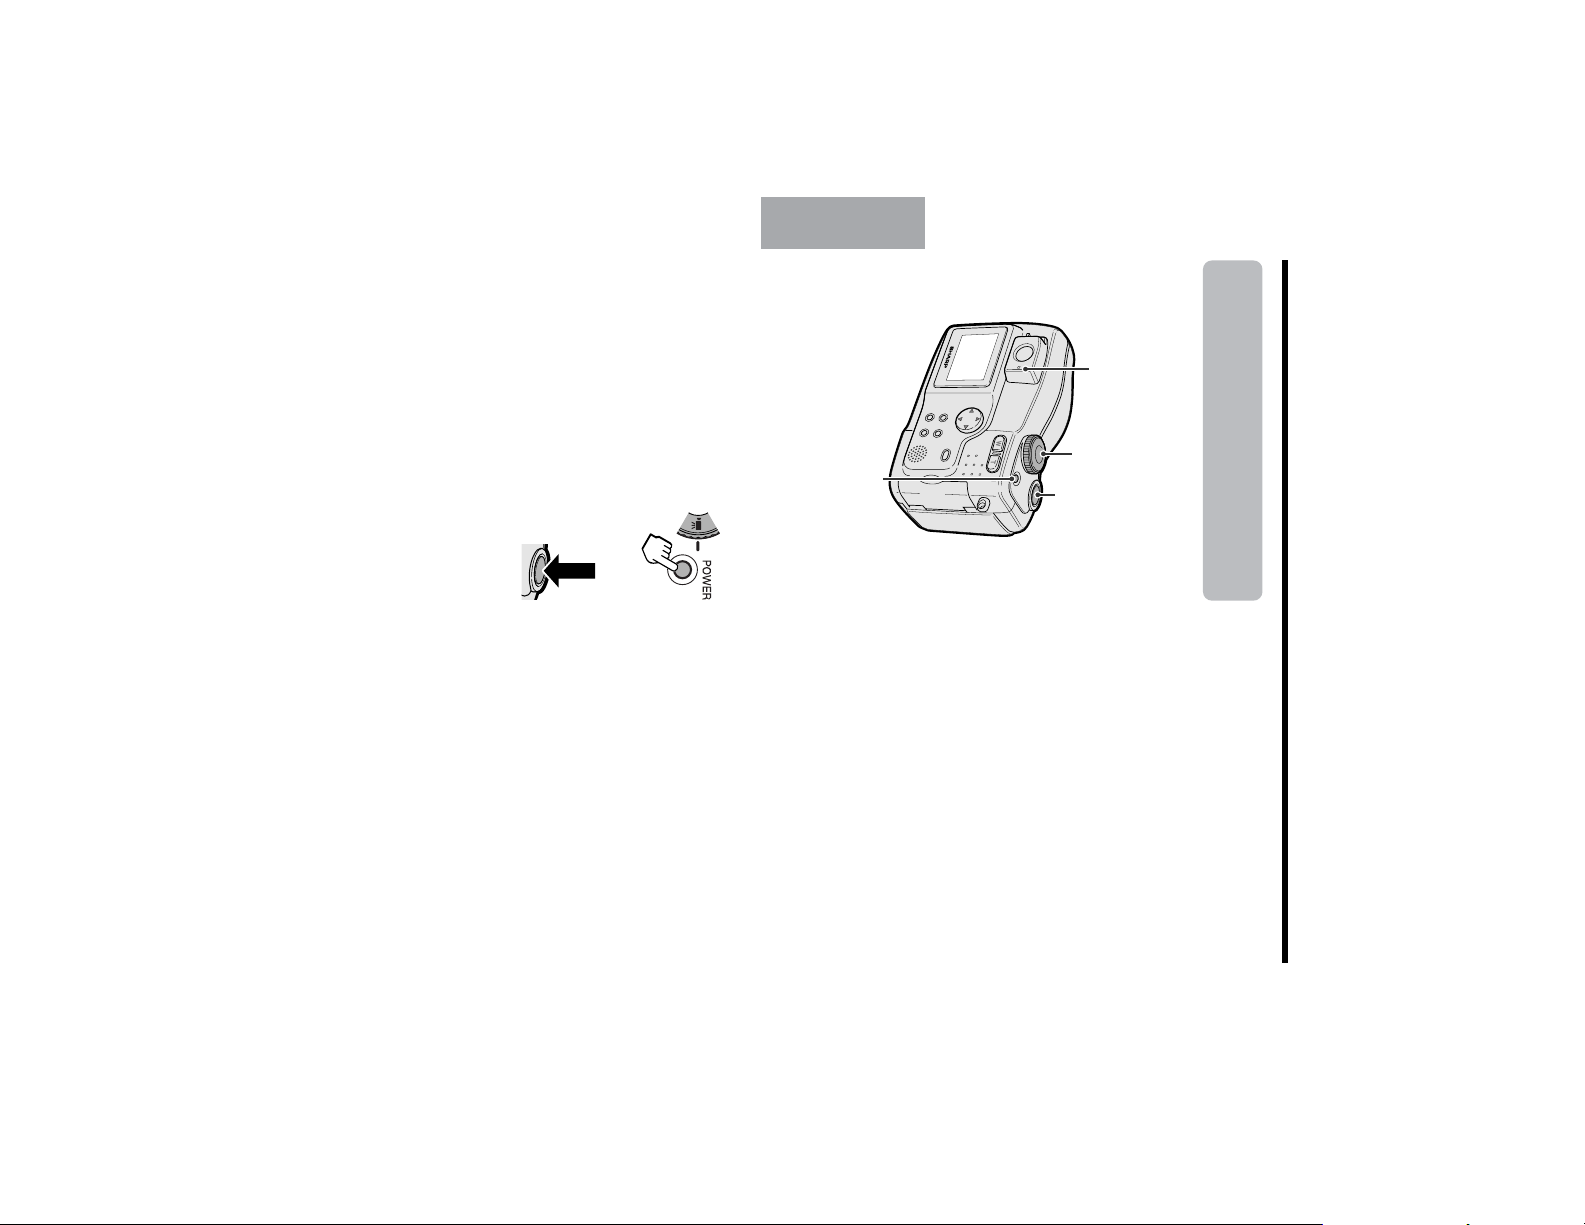
5 Press the Shutter button fully to
begin capturing.
4 Press the Power button
until the camera turns on.
Basic Operations
2 Remove the lens cap.
3 Set the Mode Dial to “=”.
1 Insert a card into the camera (see page
9).
You can take a moving picture up to 30
seconds in the same way as you do with a
video camera and record that image on the
card.
Status indicator
Basic Operations
Capturing a Motion
Image
Capturing
Power button
• The following settings are not available in movie
image.
image mode.
- Self timer
- Exposure value setting
- Gamma setting
Mode dial
Shutter button
To pause capturing
Press the Shutter button fully again.
Notes:
• You cannot use the zoom, digital zoom and the
• If the card becomes full during motion image
• The camera captures the motion image in
• See page 18 for how to playback a motion
320K240 pixels.
flash for capturing motion images.
capture, the camera automatically stops
recording.
Note:
• See page 30 for how to use the digital zoom.
Zoom range indicator
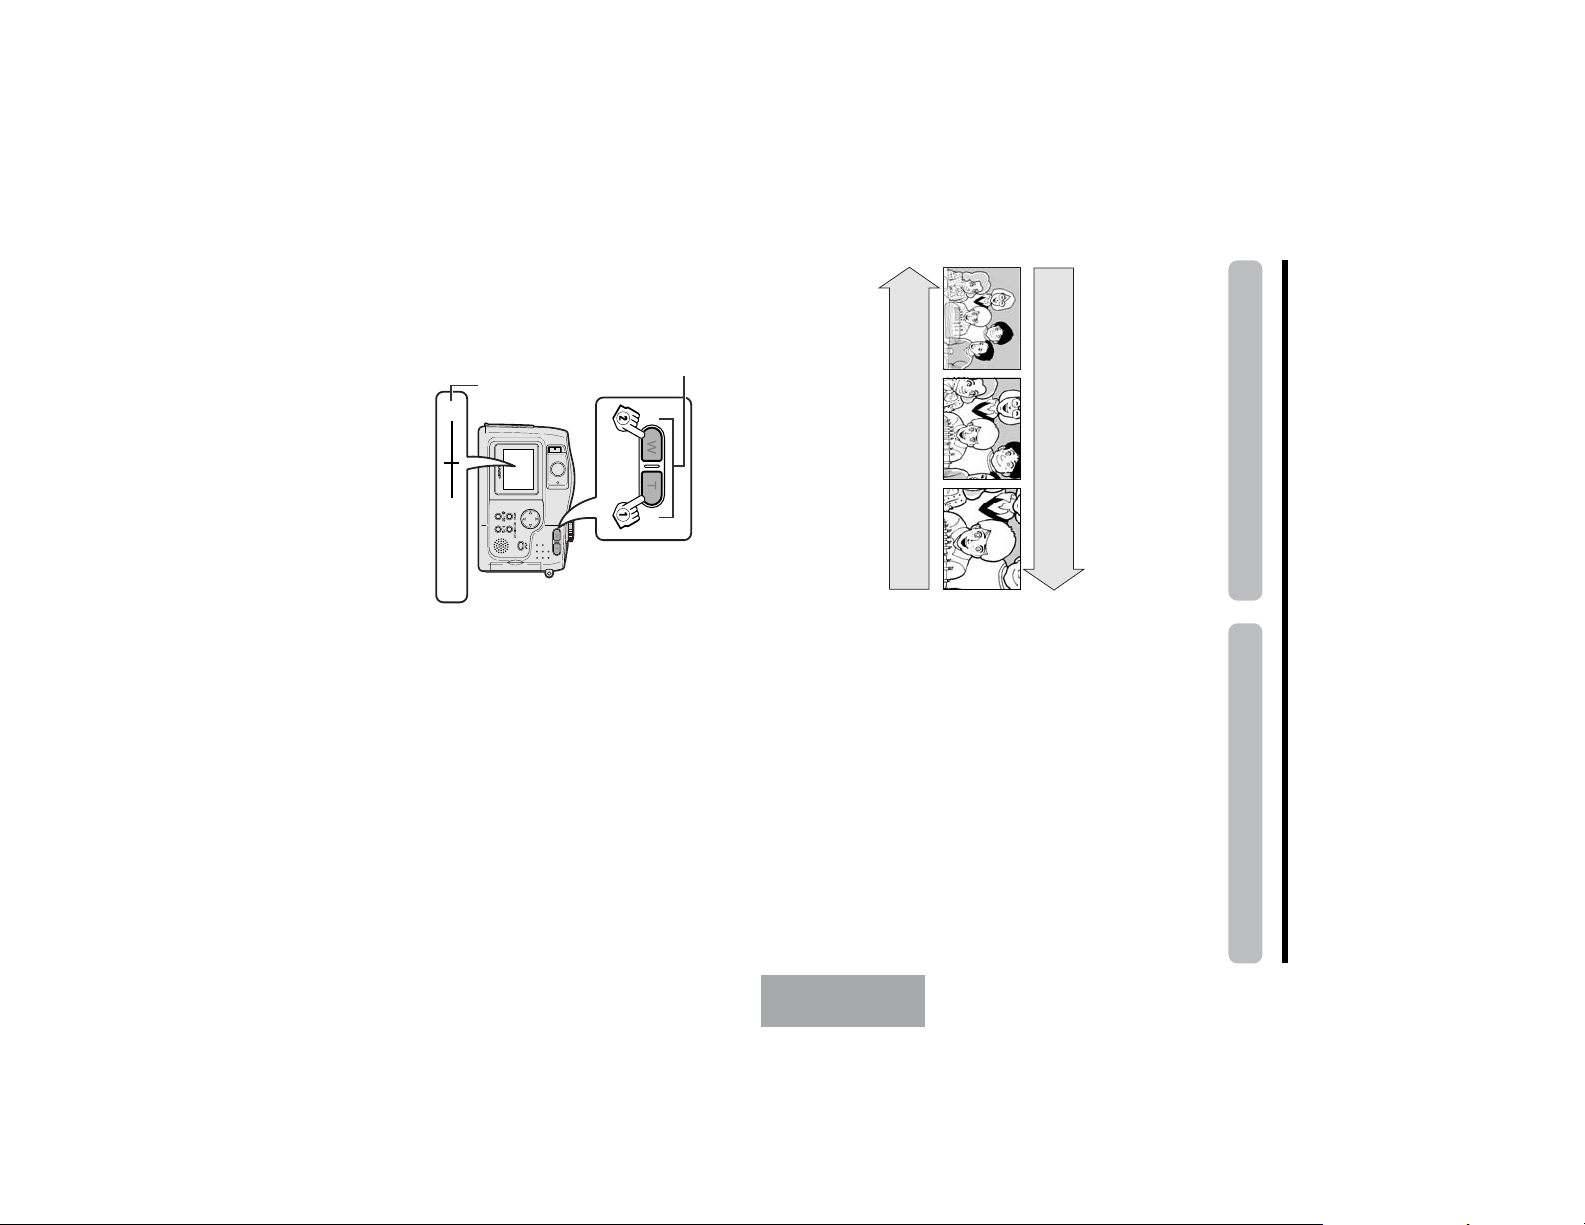
buttons
WT3ZOOM
fluorescent lighting.
Zooming in
Press the Power Zoom “T” (telephoto) button
to get a close-up view (1).
Zooming out
Press the Power Zoom “W” (wide angle)
button to get a wide field of view (2).
• The zoom range indicator shows you the current
zoom setting.
Power zoom
– Background is too bright.
– Subject has horizontal stripes.
– Subject is shot through a dirty or wet
– Light reflects off the subject.
– Two subjects at different distances overlap
– Subject has fine, repeated patterns.
– Subjects at different distances appear in
– Fast-speed shutter being used under
the center of the frame at the same time.
window.
in the same frame.
Zooming out (when you want to include
the surroundings)
– Subject is too dark.
– Lack of contrast, e.g. snow scene.
– Fast-moving subject.
or farther from a subject without physically
changing your position.
When using the optical zoom, you can enlarge
the subject up to 3K.
Zooming in (when you want to center
attention on the subject)
on most types of subjects. The camera
automatically focuses on the subject in the
center of the frame.
Notes:
• If no subject is in the center of the frame, the
• If there is no subject to focus on, the camera will
• Auto Focus may not work in the situations
comes into the frame.
described below. If v lights up red, the
camera cannot auto-focus. Try focusing again
in a different angle or composition.
focus area will expand and the subject nearest
the center will be focused on.
automatically zoom out until a focusable subject
Zooming allows you to move visually closer to
The camera is designed to automatically focus
Zooming
Available in [, ], ;, ', ,, . or = mode
Auto Focus
Available in [, ], ;, ', ,, . or = mode
15
Basic Operations
 Loading...