

Page 1
Installation Instructions
Washer
IMPORTANT:
Read and save
these instructions.
IMPORTANT
Installer: Leave lnstallafion Instructions
Homeowner: Keep Installation InstrucGons
Save Installation Instruclions lor local
with the homeowner.
for future reference.
electrical inspector’s use.
Page 2
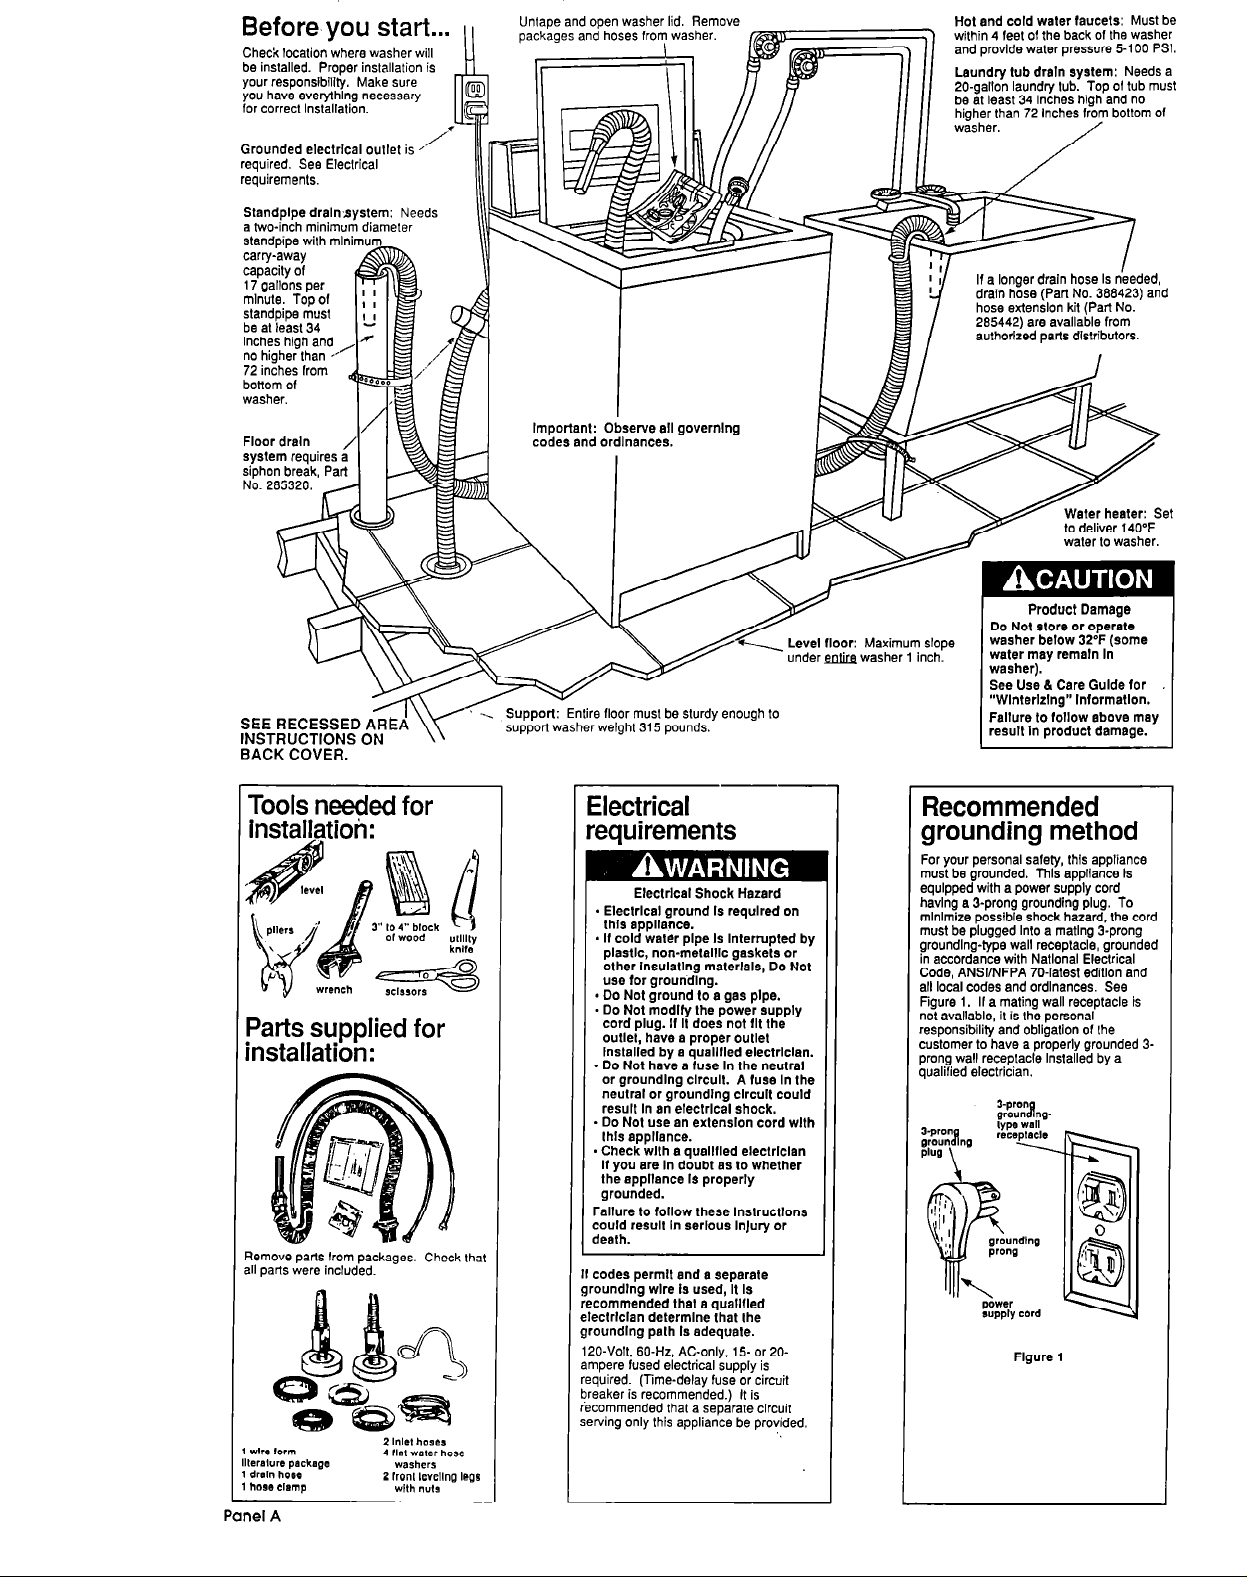
Before you start...
Check location where washer will
be installed. ProDer installation is
your responsiblll$. Make sure
you have everyihlng necessary
for correct Installation.
Grounded electrlcal outlet is ’
required. See Eleclrical
requirements.
Standplpe dralnaystem: Needs
a two-inch minimum diameler
standpipe with mlnimumcarry-away
capacitv of
1 i gall&s per
minute. Topof , ,
StandDiDe mUSt , I
72 inches lrom
bonom of
washer.
Floor drain /
c
/’
Unlape and open washer lid. Remove
packages and hoses from washer. within 4 feet of the back of the washer
I I I I II II
// // II II
Important:
codes and
Observe all governlng
ordinances.
HOI and cold waler faucets: Must be
and provide water Pressure 5-100 PSI.
Laundry tub dreln system: Needs a
9n.n*llnn 1=1ln,+ tub. Top 01 tub must
IIIUII -, ,,,_,, , L .,,ches from bottom of
w&her.
If a longer drain hose Is n!?eded,
drain hose (Pat-l No. 388423) and
hose extenslon kit (Part No.
285442) are avallable from
authorlzed parts distributors
hes high and no
/
SEE
RECESSED A&!
INSTRUCTIONS ON
BACK COVER.
Tools needed for
installation:
Parts supplied for
installation:
Remove parts lrom packages. Check that
111 parts were included.
Support: Entire floor must be sturdy enough to
support washer weight 315 pounds.
--
3ectrical
Oequirements
Eleclrlcel Shock Hazard
- Electrlcal ground Is required on
this appliance.
* If cold water plpe Is Interrupted by
plastic, non-melalllc gaskets or
other lnsulatlng malerlals, Do Not
use for groundlng.
* Do Not ground to a gas plpe.
- Do No1 modify Ihe power supply
cord plug. If It does not Ilt the
outlet, have a proper outlel
lnslelled bye quaillIed electrlclan.
- Do Not have a fuse In the neulral
or grounding clrcult. A fuse In Ihe
neulral or grounding clrcult could
result In an electrlcal shock.
- Do Not use an extenslon cord wlth
lhls appliance.
- Check wlth a qualllled eleclrlclan
If you are In doubt as to whether
the eppllance IS properly
grounded.
Failure to follow these lnstructlons
could result In serious InJury or
death.
codes permit and a separate
,oundlng wire is used, II Is
commended that a quallfled
eclrlclan determlne lhat the
oundlng path Is adequate.
!O-Volt. 60-H& AC-only. 15. or 20-
npere fused electrical supply is
quired. (Time-delay fuse or circuit
eaker is recommended.) It is
commended that a separate circuif
Wing Only lhis appliance be provided.
Level floor: Maximum slope
under m washer 1 inch.
Recommended
grounding method
For your personal salety, thls appliance
must be grounded. Thls appliance is
equlpped with a power supply cord
havlng a 3-prong grounding plug. To
mlnlmize possible shock hazard. the cord
must be plugged Into a matlng 3.prong
grounding-type wall receptacle, grounded
in accordance with Natlonal Electrical
Code, ANSI/NFPA 70.latest editlon and
all local codes and ordinances. See
Figure 1. II a mating wall receptacle is
not avallable, it is the personal
responsibility and obligation of Ihe
customer to have a properly grounded 3prong wall receplacle Installed by a
qualified electrician.
Product Damage
Do Not store or operale
washer below 32°F (some
water may remain In
washer).
Figure 1
Panel A
Page 3

Now start...
With washer In laundry area.
completely out of the
1.
Remove tape that covers shipping strap.
Pull to complelely remove the shipping
slrap horn the inside of the washer.
Pull rinnly lo remove Ihe other end of
shipping strap from the back ol the
washer. The shlpping strap plug must be
completely removed from the washer for
the sel&leveling legs lo be released.
Save the shlpplng strap for use In
Step 17.
Numbers
correspond to
steps.
Read, then remove label that
2
I covers power cord and drain
connector. Peel the tape down and off
each side of cabinet.
Use new hoses and washers that came
with your washer.
@
washer
nserl a flat washer Into each end of the
ilel hoses. Check thal washers are firmly
#eated in couplings.
Attach hose lo bollom inlet valve
4
n opening first; then second hose lo
,p inlet. Tighten couplings by hand.
‘hen use pliers lo make an addilional
No-thirds turn.
Place hose
5
n clamp over
vasher drain
:onneclor. Push
:oupling end of drain
lose onto washer
:onnector. Use
)liers to open clamp
md slide clamp over
lrain hose. Check
of good fit.
Slide nozzle
6
n end ot drain
hose through the
small “loop” In the
wire form. Wrap the
hook end of the wire
form around the drain
hose lo form a “hook
shape.”
I
~ Slide washer onto cardboard or
hardboard before
floor.
Failure to do so may cause damage
to floor coverlng.
7
hose into laundry tub or slandpipe. Check
for proper length or drain hose.
8
If drain hose
s loo long jisconnect.
Remove clamp
and couplings.
Estimate
englh of drain
Tose needed.
:ti (lewible
snd of hose.
Floor Damage
movlna across
Move washer close lo Ilnal
n position. Put ‘hook” end ol drain
n
(Do not cut hook-shaped end of drain
hose.) Push and lwisl coupling securely
onto drain hose. (You should leeI lop of
hose through coupling.) Slide clamp over
coupling and hose. Reinstall drain hose.
(See Slep 5.)
DO NOT FORCE EXCESS LENGTH OF
DRAIN HOSE DOWN THE STANDPIPE.
THIS COULD CAUSE SIPHONING.
I
Before attaching waler inlet
9
I hose, run waler through both
faucets into a bucket. This will gel rid ol
particles in the waler lines that might clog
hoses.
10
faucet. Attach lop hose (inlet marked ‘C)
!o cold waler faucet. Tighten coupling lo
leueel by hand: then use pliers to make
‘inal two-thirds turn.
Attach bottom hose (inlel
n marked “H”) lo hot waler
Panel 0
Page 4

14
Genlly lower washer to floor.
Move washer to Its flnal locatlon.
Remove cardboard or hardboard
from under washer.
Slide washer onto cardboard or
hardboard before moving across
floor.
Failure lo do so may cause damage
to floor covering.
Tilt washer backward and
H remove wood brace.
D
u
m
___-- -
Check that hose is not twisted or
kinked and Is securely In place.
f drain hose cannot be strapped in place,
I musl be cuf exaclly lo len$h so the
‘hook” end is held lightly over Ihe edge of
he tub or standpipe.
Me: I, warher Is moved Lo adjurt drain horn, lha
vashsr mu.,
IS. Place cardboard under Lha washer and
:arefully move washor lo avoid damaging floor
:overing.
ba lavalad agaln. Rapea
Slap*
IS-
adjust rear self-leveling legs. Gently
lower washer lo floor. Check levelness o
!he washer by placing a carpenlets level
,n top of the washer, firs1 side lo side;
hen front lo back.
1
icrew Ihe front legs up or down lo adjust.
Make final check with level.
Nhen washer is level, use
Nrench to turn nuts on front leg!
JP
tightly against washer base.
f nuts are not tight against
w&y?; base, tha washer may
Secure the drain hose to the tub or
standplpe with the shlpplng strap
removed from the back of the washer.
Failure to properly secure drain hose
could result In waler damage.
Property Damage
18
SURE YOU HAVE CORRECT
:LECTRICAL SUPPLY AND
3ECOMMENDED GROUNDING
nstalled. See parls list, Panel A. If the1
s an extra part, go back lhrough sleps I
,ee which slep was skipped.
20
ouplings if lhere is leaking.
CHECK ELECTRICAL
W REQUIREMENTS. BE
q Check lhat all oarts are no’
Turn on waler faucets and
q check for leaks. Tighlen
---
n Carefully till washer backward
ii
Jnlil front of washer is 3-J inches off of
lwr. Insert piece of wood as brace.
12
vithln l/2” of base.
13
nseri legs into
:orrecl holes al
lath front comer
d washer until
buts touch washer.
)o not tiahlen nuis
Panel C
Use legs and ntis from pads
n package. Screw nut down to
n
6
I
N
leasure and mark a poinf approximalely
li
5 inches from Ihe plug end of the
sl
lipping strap. Cul the shipping slrap al
tt
lis point.
C
heck that hose Is not twlsted or
ki
Inked and Is securely In place.
F
‘ul “hook” end of drain hose in tub or
S
landpipe. Tightly wrap the shipping sfrap
a
round the drain hose and tub or
S
tandpipe or inlet hose as shown in
F
‘igures A-C. Push plug into the nearest
h
018 in the shipping strap.
Check that you have all of
q your tools. Check that the
lipping strapwith 3 colterpins and plug
as removed from Ihe back of Ihe washc
Id used lo secure Ihe drain hose.
22
23
Jide to fully understand your new
isher. Now start the washer and allow
complele the regular cycle.
To get the most efflclent use
from your washer, read your
KitchenAid Use and Care
Guide. Keep Installation
lnstrucllons and Guide close
lo washer for easy reference.
Untape electrical cord and
W plug into grounded oullet.
Take a few minules and
q read Ihe Use and Care
Page 5

Recessed area
iristructions.
This washer may be Installed In a
recessed area or closet.
The installation spacing is in inches and is
minimum allowable.
Additional spacing should be considered for
ease of installation and servicing.
If closet door is inslalled, the minimum air
openings in top and bottom are required.
Louvered doors with air openings in lop and
bottom are acceplable.
Companion appliance spacing should be
considered.
c
7--
17”
A-
0 0
El
0”jW
I- +I-
Front view
(door not shown)
00
Closet door
II
a- 0”
--it--
Minimum installation spacing
1
MIN.
Side view
Closet door
3L
48 sa.
IN.
1
t
24$fT
-.
7
4 .._
3”
1
0
1
3”
-.-
T
Front view
If you need
assistance...
The KitchenAid Consumer Assislance Center
will answer any questions about operating or
mainlaining your washer not covered in the
Installation Instructions. The KitchenAid
Consumer Assistance Center is open 24
hours a day, 7 days a week. Jusl dial (800)
422-1230 -the call is free.
When you call, you will need the washer
model number and serial number. Both
numbers can be found on the serial/rating
plate located under the washer lid and on top
of the washer.
Par-l No. 3356581
Q 1991 KilchenAid
If you need service...
In the event that your KitchenAId appliance
should need service, call the dealer from
whom you purchased the appliance or a
KitchenAid-authorized service company. A
KitchenAid-authorized service company is
listed In the Ye!low Pages of your telephone
directory under ‘Appliances - Household Major - Service or Repair”. You can also
obtain the service company’s name and
telephone number by dialing, free, within the
conlinental United States, the KitchenAid
Consumer Assistance Center telephone
number, (800) 422-1230. A special operator
Prepared by KitchenAid@. St. Joseph. Michigan 49085
will lell you the name and number of your
nearest KitchenAid-aulhorized service
company.
Maintain the quality built into your KitchenAid
appliance - call a KilchenAid-authorized
service company.
Prinled in U.S.A
 Loading...