


Shave Ice Attachment
KSMSIA
W11499125A.indb 1W11499125A.indb 1 10/14/2021 12:55:08 PM10/14/2021 12:55:08 PM

PARTS AND FEATURES
3
2
5 6
1
7
4
8
1 Detachable Ice Cup
2 Ice Cup Pusher
3 Main Upper Housing
4 Convenient Storage Box
2
W11499125A.indb 2W11499125A.indb 2 10/14/2021 12:55:08 PM10/14/2021 12:55:08 PM
5 Fine Shave Blade
6 Coarse Shave Blade
7 Ice Cup Sleeve
8 Plastic Ice Mold w/Lid (x4)

ENGLISH
PRODUCT SAFETY
IMPORTANT SAFEGUARDS
When using electrical appliances, basic safety precautions should always be
followed, including the following:
1. Read all instructions.
2. This appliance is not intended for use by persons (including children) with
reduced physical, sensory, or mental capabilities, or lack of experience or
knowledge, unless they are closely supervised and instructed concerning use of
the appliance by a person responsible for their safety.
3. Close supervision is necessary when any appliance is used by or near children.
Children should be supervised to ensure that they do not play with the appliance.
4. Never leave the appliance unattended while it is in operation.
5. Avoid contacting moving parts. Keep ngers out of discharge opening.
6. The use of attachments not recommended or sold by KitchenAid may cause re,
electric shock, or injury.
7. Do not use the appliance outdoors.
8. Turn the appliance OFF/0, unplug from outlet and detach the attachment from
appliance before cleaning and when not in use. Turn the appliance OFF/0 and
make sure the motor stops completely before putting on or taking off parts.
9. Allow the appliance to cool completely before putting on or taking off parts, and
before cleaning the appliance.
10. Blades are sharp. Handle Carefully.
11. Also see the Important Safeguards section included in the Stand Mixer Use and
Care Guide.
SAVE THESE INSTRUCTIONS
This product is designed for household use only.
3
W11499125A.indb 3W11499125A.indb 3 10/14/2021 12:55:08 PM10/14/2021 12:55:08 PM

GETTING STARTED
The Shave Ice Attachment is compatible with all household KitchenAid Stand Mixers.
Set the Blades to Shave Ice as per requirement.
Name Icon Intended Use Speed
Coarse Shave
Blade
Fine Shave
Blade
NOTE: For detailed instructions on swapping blades, please see “CHANGING THE
BLADE” section.
TEMPERING THE ICE PUCKS
Tempering Ice means allowing the ice to adjust at room temperature until it
develops a glossy, wet look and is clear from all sides. Tempering is an
important step for producing the lightest and fluffiest shave ice. Many factors
determine the amount of time it takes to temper. In most cases, your ice puck
should be ready to use in 10 minutes or less.
NOTE: Ice pucks made with plain water require tempering. For mixed base recipes, refer
to the recipe details for tempering instructions.
The Ice Molds are used for best performance for both coarse and fine shaving. It's easy to
get shave ice from tempered ice out of the molds.
TIP: For the fluffiest shave ice, we recommend tempering the ice puck for 10 minutes,
and then using the Fine Shaving Blade.
For coarser ice shaving /
ice chips.
For a fine, fluffy, snow-
like ice shaving texture.
10
10
PRODUCT USAGE
ICE PUCK PREPARATION
1
Fill the ice mold with water or flavored ice
base mixture of your choice.
NOTE: To keep the mold from
overflowing while freezing, be sure not to
fill past the fill line visible just below the
rim of the mold.
NOTE: See “Tips for Great Results” sections for more details on Ice Puck Preparation.
4
W11499125A.indb 4W11499125A.indb 4 10/14/2021 12:55:09 PM10/14/2021 12:55:09 PM
2
Affix the lid to the top of the mold and
place it in the freezer for 12 to 24 hours.
NOTE: Freezing time may vary and will
depend both on the temperature of your
freezer as well as the sugar or alcohol
content of your mixture.

ENGLISH
PRODUCT USAGE
SET UP & ASSEMBLY - PREPARING TO MAKE SHAVE ICE
Before using your Shave Ice Attachment, clean it by following the detailed instructions in
“CARE & CLEANING” section.
1
2
After removing the ice molds from the
freezer, press firmly on the bottom and
sides to help release the puck from the
mold.
3
Turn the Stand Mixer OFF (0) and then
unplug.
For Plain Ice recipes, allow ice to rest
for up to 10 minutes - this is called
“Tempering” and is recommended to
achieve ideal Shave Ice results.
4
For Stand Mixer with a hinged
attachment hub cover: Flip up to open.
For Stand Mixer with a removable
attachment hub cover: Turn the
attachment knob counterclockwise to
remove the attachment hub cover.
5
W11499125A.indb 5W11499125A.indb 5 10/14/2021 12:55:09 PM10/14/2021 12:55:09 PM

PRODUCT USAGE
5
Insert the Main Housing into the
attachment hub, make sure the power
shaft fits into the square hub socket. If
necessary, rotate the attachment back
and forth for proper fitment. The pin on
the attachment housing will fit into the
notch of the hub rim when in the proper
position.
7
6
Tighten the Stand Mixer attachment hub
knob clockwise until the attachment is
completely secured into the Stand Mixer.
8
Ensure that the upper lever of the
housing is rotated all the way to left. If
not, rotate it to the left until it clicks into
place. This will ready the attachment
for use and must be completed before
loading the Ice Puck into the Ice Cup and
attaching it to the housing.
OPTIONAL : If you wish to change the
blade, grip the blade from the bottom
and rotate it to right to unlock and
remove.
6
W11499125A.indb 6W11499125A.indb 6 10/14/2021 12:55:10 PM10/14/2021 12:55:10 PM
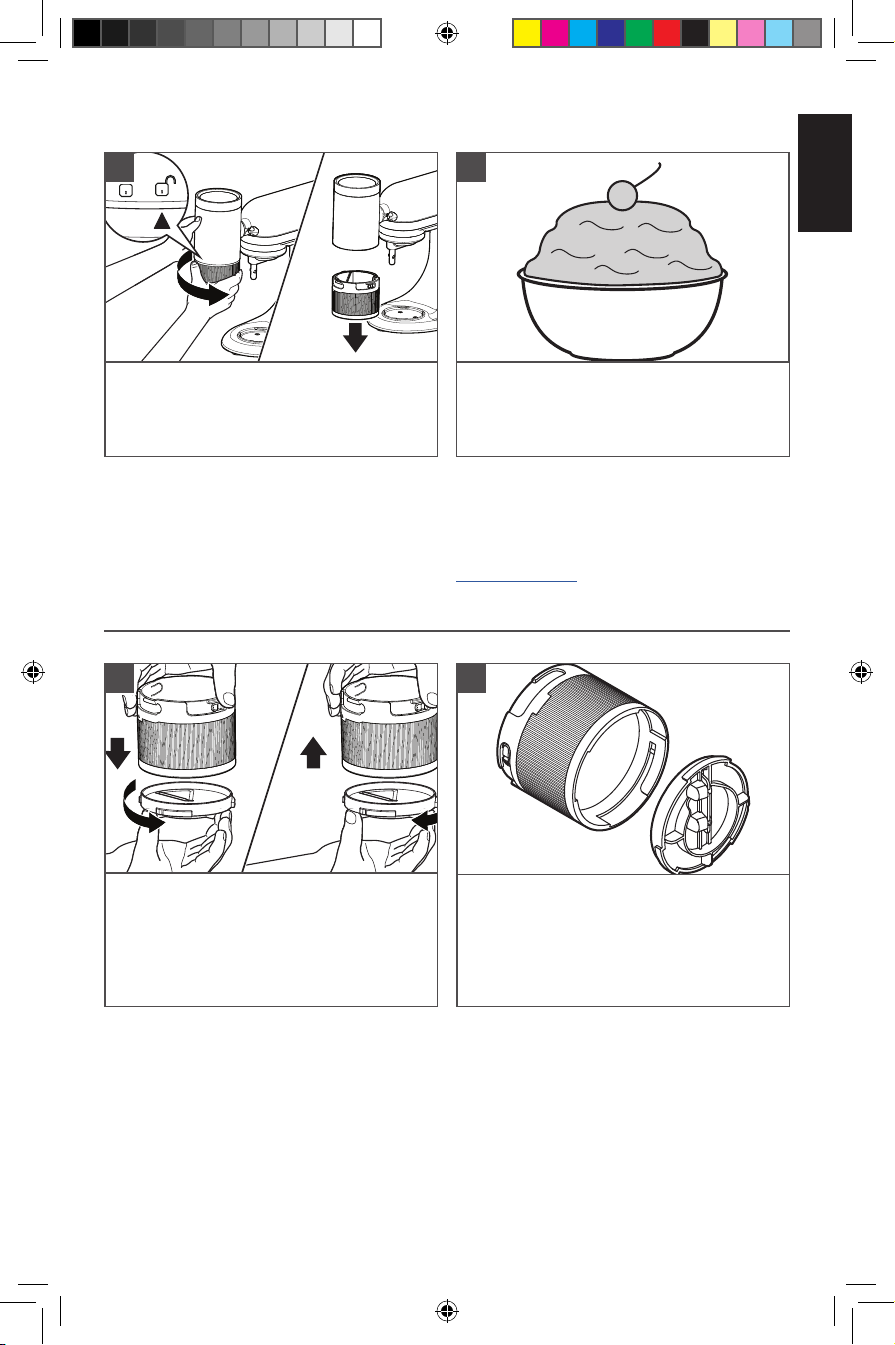
Remove the Ice Cup from the housing
by rotating it to the right and pulling
downward. Take note of the small
indicator arrow which must line up with
the Lock and Unlock symbols on the
housing.

ENGLISH
PRODUCT USAGE
ASSEMBLY
1
Grip the blade from the bottom and slowly
insert it into the bottom of the Ice Cup
by aligning the interlocking tabs. Once
inserted, rotate the blade to the left until
you hear a "Click", to properly lock the
blade in place.
NOTE: Each of the interlocking tabs is
unique size, ensuring the blade can only be
installed in the correct position.
3
2
Insert the Ice Cup Sleeve into the
Detachable Ice Cup, then insert a
prepared Ice Puck. Be sure to insert the
ice puck with the cross hatches facing
upward.
4
Attach the Detachable Ice Cup to the
bottom side of the main housing, rotating
it to the left to lock it in place.
NOTE: The small indicator arrow on the
Detachable Ice Cup that should line up
with the Lock and Unlock symbols on the
main housing.
W11499125A.indb 7W11499125A.indb 7 10/14/2021 12:55:10 PM10/14/2021 12:55:10 PM
Release the top lever by gently rotating it
to the right. The spring will engage as the
Ice Pusher clamps down on the ice puck.
The Shave Ice Attachment is properly
loaded and ready to use.
7

PRODUCT USAGE
SHAVING ICE
1
Place a serving dish of your choice
beneath the Shave Ice Attachment. Do
this before starting the mixer.
2
WARNING
Electrical Shock Hazard
Plug into a grounded 3 prong
outlet.
Do not remove ground prong.
Do not use an adapter.
Do not use an extension cord.
Failure to follow these instructions
can result in death, fire, or
electrical shock.
3
Plug the Stand Mixer into a grounded
outlet Set the mixer to the highest speed
to begin shaving.
NOTE: For best results, consider rotating
the dish as the ice shaves to create a
more even, cone-shaped mound of ice.
8
W11499125A.indb 8W11499125A.indb 8 10/14/2021 12:55:11 PM10/14/2021 12:55:11 PM
Once shaving is complete, turn off the
mixer and return the upper lever to the
leftmost locked position.
ENGLISH
PRODUCT USAGE
4
Remove the Ice Cup from the housing
by rotating it to the right and pulling
downward. Discard any remaining ice.
CHANGING THE BLADE
1
5
Finish your Shave Ice dessert with a
variety of flavorings or toppings of your
choice.
See below for additional tips, tricks and
recipes to help make the most of your
Shave Ice experience.
For even more recipes and inspiration, visit
KitchenAid.com
2
Grip the blade from the bottom and
rotate to the left to remove, or to the
right to install.
Once inserted, rotate the blade to the left
until you hear a "Click", to properly lock
the blade in place.
W11499125A.indb 9W11499125A.indb 9 10/14/2021 12:55:11 PM10/14/2021 12:55:11 PM
Each of the interlocking tabs is unique
size, ensuring the blade can only be
installed in the correct position.
9

CARE AND CLEANING
IMPORTANT: Allow the appliance to cool completely before putting on or taking off
parts, and before cleaning the appliance.
NOTE: Disassemble the unit properly before cleaning. For instructions, refer to the
SET UP & ASSEMBLY section steps 7, 8, and optional.
1
The following parts are dishwashersafe, top rack only: Detachable Ice Cup,
Fine and Coarse Blades, Plastic Ice Molds,
Ice Cup Pusher, Ice Cup Sleeve and Lids.
TIPS FOR GREAT RESULTS
Setting Up Your Shave Ice Attachment
• It is recommended that you install
your Shave Ice Attachment on the Stand
Mixer first, before completing any other
set up step.
• To more easily install the clear plastic
Ice Cup into the Upper Housing, look
for the small black indicator arrow. This
arrow must line up with the Lock/Unlock
icons on the Upper Housing.
• When switching blades, please note
that the blades feature 3 uniquely
sized tabs that must line up with their
corresponding slots in the bottom of
the ice cup. If the tabs are lined up
incorrectly, the blade will not install.
Making Shave Ice
2
Do not immerse Housing in water or
other liquid. Wipe clean with a warm,
damp cloth, and dry thoroughly with a
soft cloth before re-use or storing.
• Tempering is an important part of
making great Shave Ice since an ice puck
straight out of the freezer is actually
TOO COLD to shave. Tempering means
allowing your ice puck(s) to warm slightly
at room temperature, until the outside
of the puck has a nice glossy sheen to it.
This typically takes about 10 minutes.
NOTE: Ice pucks made with plain water
require tempering. For mixed base
recipes, refer to the recipe details for
tempering instructions.
• Some Shave Ice recipes, particularly
those with ingredients frozen into the ice
puck, may shave better with either the
Fine or Coarse blade. It is recommended
that you try out recipes with each blade
to see which produces your desired
result.
10
W11499125A.indb 10W11499125A.indb 10 10/14/2021 12:55:11 PM10/14/2021 12:55:11 PM

ENGLISH
TIPS FOR GREAT RESULTS
Preparing Your Ice Molds
• It is important to note the subtle fill
line just below the top rim of the Ice
Molds. Please do not fill the molds
beyond this line as it may negatively
affect freezing.
• Allow ice molds to freeze for a
minimum of 12 hours. Note that some
mixed base recipes may require more
time to freeze due to a variety of
ingredients.
• For recipes with sugar, there is a
delicate balance between a mixture that
is sweet to the taste but still capable of
freezing hard enough to shave. Please
follow recipes as closely as possible to
ensure great results.
• For recipes with Alcohol, you should
not exceed an above over 8% within the
mixture. This will help ensure the mixture
freezes hard enough to shave.
• Consider removing frozen ice pucks
from the molds and storing them in
another container inside your freezer.
This is referred to as “Ice Harvesting”
and will help ensure you always have
ice on hand when the occasion calls for
Shave Ice.
Shave Ice Troubleshooting Tips
• Fine Blade Creates Coarse Ice - This
can occur if the ice is still too cold.
Consider extending the tempering time.
Alternatively, check the blade for any
possible damage as this can affect shave
performance.
• Puck Does Not Shave - This can occur
when a recipe mixture is too soft or too
hard. If the mixture is too soft, it may
contain too much sugar or alcohol to
freeze properly. Consider revisiting the
recipe. If the mixture is too hard, the
puck may need to temper for longer. See
"Making Shave Ice".
• If issues persist, please contact
KitchenAid customer service. Visit www.
KitchenAid.com for contact information
specific to your region.
FOR DETAILED INFORMATION ON USING THE SHAVE ICE ATTACHMENT
Visit www.kitchenaid.com or additional instructions, videos, inspiring recipes, and tips on
how to use your Shave Ice Attachment.
11
W11499125A.indb 11W11499125A.indb 11 10/14/2021 12:55:11 PM10/14/2021 12:55:11 PM

SHAVE ICE RECIPES
Make it Your Own!
EVERYDAY SHAVE ICE
Make the pucks. Pour water into the Plastic Ice Molds and freeze for 12-24 hours.
Ingredients:
• 1 frozen ice puck
• Shave ice syrup of choice
Allow the ice puck to rest at room temperature (temper) until the outside of the puck has
a nice glossy sheen. Place the ice puck into KitchenAid Shave Ice Attachment. Place a
bowl under the attachment, turn speed to 10, and shave the ice. Pack the ice into a small
bowl or cup (a 4” wide x 2” tall bowl is ideal) as firm as possible, then drizzle with desired
amount of syrups. Enjoy.
For a creamier shave ice version:
Place a small scoop of vanilla ice cream in your bowl (a 4” x 2” tall bowl is ideal) and then
pack the shave ice around and on top of it. Top with syrups of choice, and then top with a
drizzle of sweetened condensed milk.
CREATIVE NOTE: Add additional toppings like a sprinkle of matcha, fresh diced fruit,
caramel sauce, gummy candies, whipped cream.
Customize it More!
SHAVE ICE COFFEE ‘N CREAM
Ingredients:
• 1 puck of frozen coffee
• 1 cup of milk of choice, cold
• 1 scoop of vanilla ice cream
Instructions:
Make the ice pucks. Pour leftover coffee into the plastic ice molds and freeze for 12-24
hours. This recipe DOES NOT require tempering.
Place the coffee puck into KitchenAid Shave Ice Attachment. Place a bowl under the attachment, turn speed to 10, and shave the coffee.
Evenly distribute the shave coffee between two cups. Add 1 cup of milk to each cup and
whisk briskly with a fork. Add a scoop of vanilla ice cream and serve with a spoon.
CREATIVE NOTE: You can also make this with no milk for more of a traditional shave ice
treat. Just place your scoop of ice cream into the bowl first. Shave the coffee then pack
the shave coffee around and over the ice cream. Top with a drizzle of heavy cream or
sweetened condensed milk. (1 Puck = 1 Coffee Shave Ice)
12
W11499125A.indb 12W11499125A.indb 12 10/14/2021 12:55:12 PM10/14/2021 12:55:12 PM

ENGLISH
SHAVE ICE RECIPES
Get Creative!
JUICY SLUSHEES
1 frozen puck = 1-10 ounce slushee
Ingredients:
• 1 puck of frozen juice (apple, orange, cranberry - no pulp)
• Sparkling water, chilled
Instructions:
Make the ice pucks. Pour juice into the Plastic Ice Molds and freeze for 12-24 hours. This
recipe DOES NOT require tempering.
Place the frozen juice puck into KitchenAid Shave Ice Attachment. Align the arrow on the
canister with the unlocked symbol then twist counter clockwise to lock in place. Place a
bowl under the attachment, turn speed to 10, and shave the juice.
Place the shave juice into a glass, add ¾ cup of sparkling water, and whisk briskly with a
fork. Enjoy.
Try Something New!
FRUITY LEMONADE FREEZE
Frozen fruit pucks (Makes 2):
• 8 Ounces Fruit of choice (frozen or fresh)
• 1 cup of water
• 1 tablespoon honey
Instructions:
For Frozen Pucks: Blend 8 ounces of fruit of choice with 1 cup of water and 1 tablespoon
of honey. Pour the mixture through a fine mesh sieve to remove any pulp or seeds. Then,
pour into the plastic ice molds and freeze for 12-24 hours. This recipe DOES NOT require
tempering.
For Lemonade:
1 frozen fruit puck
Lemonade of choice, cold
Place the fruit puck into KitchenAid Shave Ice Attachment. Align the arrow on the
canister with the unlocked symbol then twist counter clockwise to lock in place. Place a
bowl under the attachment, turn speed to 10, and shave the fruit puree.
Add the shave puree into a glass of choice. Add ¾ cup of lemonade and whisk briskly
with a fork. Enjoy!
CREATIVE NOTE: You can replace the lemonade with your favorite iced tea.
13
W11499125A.indb 13W11499125A.indb 13 10/14/2021 12:55:12 PM10/14/2021 12:55:12 PM

WARRANTY AND SERVICE
KITCHENAID® SHAVE ICE ATTACHMENT WARRANTY FOR THE 50
UNITED STATES, THE DISTRICT OF COLUMBIA, PUERTO RICO, AND
CANADA
This warranty extends to the purchaser and any succeeding owner for Shave Ice operated in
the 50 United States, the District of Columbia, Puerto Rico, and Canada.
Length of Warranty: One Year Full Warranty from date of purchase.
KitchenAid Will Pay
for Your Choice of:
Hassle-Free Replacement of your Shave Ice. See the next page
for details on how to arrange for service, or call the Customer
eXperience Center toll-free at 1-800-541-6390.
OR
The replacement parts and repair labor costs to correct defects
in materials and workmanship. Service must be provided by an
Authorized KitchenAid Service Center.
KitchenAid Will
Not Pay for:
DISCLAIMER OF IMPLIED WARRANTIES; LIMITATION OF REMEDIES
IMPLIED WARRANTIES, INCLUDING TO THE EXTENT APPLICABLE WARRANTIES OF
MERCHANTABILITY OR FITNESS FOR A PARTICULAR PURPOSE, ARE EXCLUDED TO THE
EXTENT LEGALLY PERMISSIBLE. ANY IMPLIED WARRANTIES THAT MAY BE IMPOSED
BY LAW ARE LIMITED TO ONE YEAR, OR THE SHORTEST PERIOD ALLOWED BY LAW.
SOME STATES AND PROVINCES DO NOT ALLOW LIMITATIONS OR EXCLUSIONS ON
HOW LONG AN IMPLIED WARRANTY OF MERCHANTABILITY OR FITNESS LASTS, SO THE
ABOVE LIMITATIONS OR EXCLUSIONS MAY NOT APPLY TO YOU.
IF THIS PRODUCT FAILS TO WORK AS WARRANTED, CUSTOMER’S SOLE AND EXCLUSIVE
REMEDY SHALL BE REPAIR OR REPLACEMENT ACCORDING TO THE TERMS OF THIS
LIMITED WARRANTY. KITCHENAID AND KITCHENAID CANADA DO NOT ASSUME ANY
RESPONSIBILITY FOR INCIDENTAL OR CONSEQUENTIAL DAMAGES. This warranty gives
you specific legal rights and you may also have other rights which vary from state to state or
province to province.
A. Repairs when your Shave Ice is used in other than normal single
family home use.
B. Damage resulting from accident, alteration, misuse or abuse.
C. Any shipping or handling costs to deliver your
Shave Ice to an Authorized Service Center.
D. Replacement parts or repair labor costs for Shave Ice
attachments operated outside the 50 United States, District of
Columbia, Puerto Rico, and Canada.
14
W11499125A.indb 14W11499125A.indb 14 10/14/2021 12:55:12 PM10/14/2021 12:55:12 PM

ENGLISH
WARRANTY AND SERVICE
HASSLE-FREE REPLACEMENT WARRANTY—50 UNITED STATES,
DISTRICT OF COLUMBIA, AND PUERTO RICO
We’re so confident the quality of our products
meets the exacting standards of KitchenAid
that, if your Shave Ice should fail within
the first year of ownership, KitchenAid will
arrange to deliver an identical or comparable
replacement to your door free of charge
and arrange to have your original Shave Ice
returned to us. Your replacement unit will also
be covered by our one year limited warranty.
If your Shave Ice should fail within the first
year of ownership, simply call our toll-free
Customer eXperience Center at
1-800-541-6390 Monday through Friday.
Please have your original sales receipt
available when you call. Proof of purchase
will be required to initiate the claim. Give the
consultant your complete shipping address
(no P.O. Box numbers, please).
When you receive your replacement Shave
Ice, use the carton, packing materials, and
prepaid shipping label to pack up your
original Shave Ice and send it back to
KitchenAid.
HASSLE-FREE REPLACEMENT WARRANTY—CANADA
We’re so confident the quality of our
products meets the exacting standards of
the KitchenAid brand that, if your Shave Ice
should fail within the first year of ownership,
we will replace your Shave Ice with an
identical or comparable replacement. Your
replacement unit will also be covered by our
one year limited warranty.
If your Shave Ice should fail within the first
year of ownership, simply call our toll-free
Customer eXperience Center at
1-800-807-6777 Monday through Friday.
Please have your original sales receipt
available when you call. Proof of purchase
will be required to initiate the claim. Give the
consultant your complete shipping address.
When you receive your replacement Shave
Ice, use the carton, packing materials, and
prepaid shipping label to pack up your
original Shave Ice and send it back to
KitchenAid.
ARRANGING FOR SERVICE AFTER THE WARRANTY EXPIRES,
OR ORDERING ACCESSORIES AND REPLACEMENT PARTS
In the United States and Puerto Rico:
For service information, or to order
accessories or replacement parts, call
toll-free at 1-800-541-6390 or write to:
Customer eXperience Center,
KitchenAid Small Appliances,
P.O. Box 218, St. Joseph, MI 49085-0218
Outside the United States and Puerto Rico:
Consult your local KitchenAid dealer or the
store where you purchased the Shave Ice for
information on how to obtain service.
For service information in Canada:
Call toll-free 1-800-807-6777.
For service information in Mexico:
Call toll-free 01-800-0022-767.
®/™ ©2021 KitchenAid. All rights reserved. The design of the stand mixer is a trademark
in the U.S. and elsewhere. Used under license in Canada.
15
W11499125A.indb 15W11499125A.indb 15 10/14/2021 12:55:12 PM10/14/2021 12:55:12 PM

W11499125A.indb 16W11499125A.indb 16 10/14/2021 12:55:12 PM10/14/2021 12:55:12 PM

FRANÇAIS
PIÈCES ET CARACTÉRISTIQUES
3
4
2
5 6
1
7
8
1 Tasse à glace amovible
2 Poussoir de coupe à glace
3 Boîtier principal supérieur
4 Boîte de rangement pratique
W11499125A.indb 17W11499125A.indb 17 10/14/2021 12:55:12 PM10/14/2021 12:55:12 PM
5 Lame de râpage fin
6 Lame de râpage grossier
7 Manchon de coupe à glace
8 Moule à glace en plastique avec
couvercle (x4)
17

SÉCURITÉ DU PRODUIT
CONSIGNES DE SÉCURITÉ
IMPORTANTES
Lors de l’utilisation d’appareils électriques, certaines précautions élémentaires
de sécurité doivent toujours être observées, incluant les suivantes:
1. Lire toutes les instructions.
2. Cet appareil ne convient pas à une utilisation par des personnes (y compris des
enfants) à capacités physiques, sensorielles ou mentales réduites, ou possédant
un manque d’expérience ou de connaissances, à moins qu’elles ne soient
placées sous supervision ou qu’elles aient reçu des instructions concernant
l’utilisation de l’appareil par une personne responsable de leur sécurité.
3. Une surveillance attentive s’impose lorsqu’un appareil ménager est utilisé par ou
à proximité d’enfants. Les enfants doivent être surveillés an de s’assurer qu’ils
ne jouent pas avec l’appareil.
4. Ne jamais laisser l’appareil sans surveillance pendant son utilisation.
5. Éviter tout contact avec les pièces mobiles. Tenir les doigts à l’écart de l’orice de sortie.
6. L’utilisation d’accessoires non recommandés ou non vendus par KitchenAid peut
causer un incendie, une décharge électrique ou des blessures.
7. Ne pas utiliser l’appareil à l’extérieur.
8. Éteindre l’appareil (OFF/0), le débrancher de la prise et détacher l’accessoire de
l’appareil avant de le nettoyer et lorsqu’il n’est pas utilisé. Éteindre l’appareil (OFF/0) et
s’assurer que le moteur s’arrête complètement avant de poser ou de retirer des pièces.
9. Attendre que l’appareil ait refroidi complètement avant d’installer ou de retirer
des pièces, et avant de nettoyer l’appareil.
10. Les lames sont tranchantes. Manipuler avec précaution.
11. Voir aussi les mesures de protection importantes du guide d’utilisation et
d’entretien du batteur sur socle.
CONSERVER CES INSTRUCTIONS
18
W11499125A.indb 18W11499125A.indb 18 10/14/2021 12:55:12 PM10/14/2021 12:55:12 PM
Ce produit est conçu uniquement pour un usage domestique.

FRANÇAIS
MISE EN PLACE
L’accessoire pour granité hawaïen est compatible avec tous les batteurs sur socle
KitchenAid domestiques. Régler les lames pour râper la glace selon les besoins.
Nom Icône Utilisation prévue Vitesse
Lame de râpage
grossier
Lame de
râpagefin
REMARQUE: Pour des instructions détaillées sur le remplacement des lames, voir la
section « CHANGEMENT DE LA LAME ».
TEMPÉRER LES RONDELLES DE GLACE
Tempérer la glace signifie permettre à la glace de s’ajuster à température
ambiante jusqu’à ce qu’elle développe un aspect brillant et humide et qu’elle
soit claire de tous les côtés. Le tempérage est une étape importante pour
produire de la glace râpée la plus légère et la plus onctueuse. De nombreux
facteurs déterminent le temps qu’il faut pour tempérer. Dans la plupart des
cas, la rondelle de glace devrait être prête à l’emploi en 10 minutes ou moins.
REMARQUE: Les rondelles de glace faites avec de l’eau pure doivent être tempérées.
Pour les recettes de base mélangées, se référer aux détails de la recette pour les
instructions de tempérage.
Les moules à glace sont utilisés pour de meilleures performances pour le râpage grossier
et fin. Il est facile d’obtenir de la glace pilée de la glace tempérée des moules.
ASTUCE: Pour obtenir de la glace granuleuse, nous recommandons de tempérer la
rondelle de glace pendant 10 minutes, puis d’utiliser la lame de rasage fine.
Pour des copeaux de glace
plus grossiers.
Pour une texture de râpage
de glace fine, onctueuse et
semblable à de la neige.
10
10
UTILISATION DU PRODUIT
PRÉPARATION DES RONDELLES DE GLACE
1
Remplir le moule à glace avec de
l’eau ou un mélange de base de
glacearomatisée de son choix.
REMARQUE: Pour éviter que le moule
ne déborde pendant la congélation,
s’assurer de ne pas remplir au-delà de
la ligne de remplissage visible juste en
dessous du bord du moule.
REMARQUE: Voir les sections « Conseils d’utilisation pour de bons résultats » pour plus
de détails sur la préparation des rondelles de glace.
W11499125A.indb 19W11499125A.indb 19 10/14/2021 12:55:12 PM10/14/2021 12:55:12 PM
2
Fixer le couvercle sur le dessus du moule
et le placer au congélateur pendant12 à
24 heures.
REMARQUE: Le temps de congélation
peut varier et dépendra à la fois de la
température de votre congélateur ainsi
que de la teneur en sucre ou en alcool
de votre mélange.
19

UTILISATION DU PRODUIT
INSTALLATION ET ASSEMBLAGE – PRÉPARATION POUR FAIRE
DUGRANITÉ HAWAÏEN
Avant d’utiliser l’accessoire pour granité hawaïen, le nettoyer en suivant les instructions
détaillées de la section « ENTRETIEN ET NETTOYAGE ».
1
Après avoir retiré les moules à glace du
congélateur, appuyer fermement sur le
fond et les côtés pour aider à libérer la
rondelle du moule.
3
Déplacer le bouton d’alimentation vers
« OFF/0 » (arrêt/0), puis débrancher le
batteur sur socle.
2
Pour les recettes de glace d’eau pure,
laisser la glace reposer dans le moule
pendant au moins 10 minutes – c’est ce
qu’on appelle le « tempérage » et est
recommandé pour réaliser du granité
hawaïen.
4
Pour les batteurs sur socle dont la
prise à accessoires multifonction est
équipée d’un couvercle à charnière:
Relever le couvercle pour ouvrir.
Pour les batteurs sur socle dont la
prise à accessoires multifonction est
équipée d’un couvercle amovible:
Tourner le bouton de l’accessoire dans le
sens antihoraire pour retirer le couvercle
de la prise à accessoires.
20
W11499125A.indb 20W11499125A.indb 20 10/14/2021 12:55:13 PM10/14/2021 12:55:13 PM

FRANÇAIS
UTILISATION DU PRODUIT
5
Insérer le boîtier de l’accessoire dans
la prise à accessoires en s’assurant que
l’arbre de commande s’adapte à la
douille de prise carrée. Si nécessaire,
faire tourner l’accessoire d’avant en
arrière pour bien ajuster. Lorsque
l’accessoire est correctement positionné,
le goujon sur l’accessoire s’insère dans
l’encoche du pourtour de la prise.
7
6
Serrer le bouton de la prise à
accessoires du batteur sur socle en
senshoraire jusqu’à ce que l’accessoire
y soit parfaitement fixé.
8
S’assurer que le levier supérieur du
boîtier est tourné complètement vers
la gauche. Sinon, le faire pivoter vers
la gauche jusqu’à ce qu’il s’enclenche.
Cela préparera l’accessoire à l’utilisation
et doit être terminé avant de charger la
rondelle de glace dans la coupe à glace
et de la fixer au boîtier.
FACULTATIF: Si l’on souhaite changer
la lame, saisir la lame par le bas
et la tourner vers la droite pour la
déverrouiller et la retirer.
W11499125A.indb 21W11499125A.indb 21 10/14/2021 12:55:13 PM10/14/2021 12:55:13 PM
Retirer la coupe à glace du boîtier en
la faisant pivoter vers la droite et en la
tirant vers le bas. Prendre note de la
petite flèche indicatrice qui doit s’aligner
avec les symboles de verrouillage et de
déverrouillage sur le boîtier.
21

UTILISATION DU PRODUIT
ASSEMBLAGE
1
Saisir la lame par le bas et l’insérer
lentement dans le bas de la coupe à glace
en alignant les languettes de verrouillage.
Une fois insérée, tourner la lame vers la
gauche jusqu’à ce qu’un « déclic » se fait
entendre, pour verrouiller correctement
lalame en place.
REMARQUE: Chacune des languettes
de verrouillage est de taille unique,
garantissant que la lame ne peut être
installée que dans la bonne position.
3
2
Insérer le manchon de coupe à glace
dans la coupe à glace amovible, puis
insérer une rondelle de glace préparée.
S’assurer d’insérer la rondelle de glace
avec la croix vers le haut.
4
Fixer la coupe à glace amovible au bas
du boîtier principal, en la tournant vers
lagauche pour la verrouiller en place.
REMARQUE: La petite flèche indicatrice
sur la coupe à glace amovible doit s’aligner
avec les symboles de verrouillage et de
déverrouillage sur le boîtier principal.
22
W11499125A.indb 22W11499125A.indb 22 10/14/2021 12:55:13 PM10/14/2021 12:55:13 PM
Relâcher le levier supérieur en le
tournant doucement vers la droite.
Leressort s’enclenchera lorsque le
poussoir à glace se fixe sur la rondelle
de glace. L’accessoire pour granité
hawaïen est correctement chargé et
prêtà l’emploi.

FRANÇAIS
UTILISATION DU PRODUIT
RÂPAGE DE LA GLACE
1
Placer un plat de service de votre choix
sous l’accessoire pour granité hawaïen.
Le faire avant de démarrer le batteur
sursocle.
2
AVERTISSEMENT
Risque de choc électrique
Brancher sur une prise à 3 alvéoles
reliée à la terre.
Ne pas enlever la broche de liaison
à la terre.
Ne pas utiliser un câble de
rallonge.
Le non-respect de ces instructions
peut causer un décès, un incendie
ou un choc électrique.
3
Brancher le batteur sur socle à une prise
mise à la terre. Régler le batteur à la
vitesse la plus élevée pour commencer
le râpage.
REMARQUE: Pour de meilleurs
résultats, penser à faire pivoter le plat
pendant que la glace est râpée pour
créer un monticule de glace en forme
decône plus uniforme.
W11499125A.indb 23W11499125A.indb 23 10/14/2021 12:55:14 PM10/14/2021 12:55:14 PM
Une fois le râpage terminé, éteindre le
batteur sur socle et remettre le levier
supérieur dans la position verrouillée
laplus à gauche.
23

UTILISATION DU PRODUIT
4
Retirer la coupe à glace du boîtier en
la faisant pivoter vers la droite et en
la tirant vers le bas. Jeter toute glace
restante.
CHANGEMENT DE LAME
1
5
Terminer le dessert granité hawaïen avec
une variété d’arômes ou de garnitures
de votre choix.
Voir ci-dessous pour des conseils, astuces
et recettes supplémentaires pour profiter
pleinement de l’expérience de glace râpée.
Pour encore plus de recettes et
d’inspiration, se rendre sur KitchenAid.com
2
Saisir la lame par le bas et la tourner
vers la gauche pour la retirer ou vers
ladroite pour l’installer.
Une fois insérée, tourner la lame vers la
gauche jusqu’à ce qu’un « déclic » se fait
entendre, pour verrouiller correctement
la lame en place.
24
W11499125A.indb 24W11499125A.indb 24 10/14/2021 12:55:15 PM10/14/2021 12:55:15 PM
Chacune des languettes de verrouillage
est de taille unique, garantissant que la
lame ne peut être installée que dans la
bonne position.

FRANÇAIS
ENTRETIEN ET NETTOYAGE
IMPORTANT: Attendre que l’appareil ait refroidi complètement avant d’installer ou de
retirer des pièces, et avant de nettoyer l’appareil.
REMARQUE: Pour obtenir des instructions, se reporter aux étapes7, 8 et optionnelles
de la section INSTALLATION ET ASSEMBLAGE.
1
Les pièces suivantes sont lavables au
lave-vaisselle, dans le panier supérieur
uniquement: coupe à glace amovible,
lames fines et grossières, moules à glace
en plastique, poussoir à coupe à glace,
manchon et couvercles pour coupe à glace.
2
Ne pas immerger le boîtier dans de l’eau
ou tout autre liquide. Essuyer à l’aide
d’un chiffon propre et humide, puis
bien sécher avec un chiffon doux avant
d’utiliser de nouveau ou de ranger.
CONSEILS D’UTILISATION POUR DES
RÉSULTATS IMPECCABLES
Mise en place de l’accessoire à glace râpée
• Il est recommandé d’installer
l’accessoire à glace râpée sur le batteur
sur socle avant d’effectuer toute autre
étape de mise en place.
• Pour simplifier l’installation,
commencer par placer la coupe à glace
transparente dans le boîtier supérieur,
chercher une petite flèche indicatrice
noire. Cette flèche doit être alignée avec
l’icône de verrouillage/déverrouillage du
boîtier supérieur.
• Lors du remplacement des lames,
prendre note que les lames possèdent
3languettes de taille unique qui doivent
s’aligner avec leur fente correspondante
à la base de la coupe à glace. Si les
languettes ne sont pas bien alignées,
lalame ne s’installera pas.
Produire de la glace râpée
• Le tempérage est une partie
importante pour râper efficacement
de la glace puisqu’une rondelle qui
vient juste d’être sortie du congélateur
est encore TROP FROIDE pour être
râpée. Letempérage signifie de laisser
la rondelle réchauffer légèrement à
température de la pièce, jusqu’à ce
queson extérieur soit lustré. Cetteétape
prend habituellement environ 10 minutes.
REMARQUE: Les rondelles de glace
faites avec de l’eau pure doivent être
tempérées. Pour les recettes de base
mélangées, se référer aux détails de
la recette pour les instructions de
tempérage.
• Certaines recettes de glace râpée,
particulièrement celle avec des
ingrédients congelés dans la rondelle
deglace, peuvent être plus faciles à
râper avec la lame fine ou grossière.
Nous vous recommandons d’essayer nos
recettes avec chacune des lames pour
voir laquelle produit les résultats désirés.
25
W11499125A.indb 25W11499125A.indb 25 10/14/2021 12:55:15 PM10/14/2021 12:55:15 PM

CONSEILS D’UTILISATION POUR DES
RÉSULTATS IMPECCABLES
Préparation des moules à glace
• Il est important de noter la subtile
ligne de remplissage située juste sous
le rebord supérieur des moules à glace.
Ilne faut pas remplir les moules au-delà
de cette ligne, car cela pourrait nuire à la
congélation.
• Laisser les moules à glace dans le
congélateur un minimum de 12 heures.
À noter que certaines recettes peuvent
demander plus de temps à geler en
raison des différents ingrédients.
• Pour les recettes avec du sucre, il y
a un équilibre fragile pour obtenir un
mélange sucré au goût capable d’être
suffisamment congelé pour être rasé.
Suivre les recettes aussi précisément que
possible pour assurer de bons résultats.
• Pour les recettes avec de l’alcool, il ne
faut pas dépasser un VOL de 8% dans
le mélange. Ceci aidera à assurer que le
mélange gèle suffisamment pour être rasé.
• Les rondelles de glace devraient être
retirées des moules et rangées dans
un autre contenant à l’intérieur du
congélateur. Il s’agit de la « récolte de
glace », elle vous assurera de toujours
avoir de la glace à portée de mains pour
les occasions où il faut râper de la glace.
Conseils de dépannage pour le rasage
dela glace
• La lame fine produit de la glace
grossière – Cette situation peut se
produire si la glace est encore trop
froide. Prolonger la durée de tempérage.
Vérifier aussi que la lame n’est pas
endommagée puisque cela peut nuire
àl’efficacité du rasage.
• Impossible de râper la rondelle –
Cecipeut se produire lorsque le mélange
d’une recette est trop mou ou dur. Si le
mélange est trop mou, il peut contenir
trop de sucre ou d’alcool pour geler
correctement. Il faudra possiblement
revoir la recette. Si le mélange est trop
dur, la rondelle devra être tempérée plus
longtemps. Voir « Produire de la glace
râpée ».
• Si le problème persiste, communiquer
avec le service à la clientèle de
KitchenAid. Visiter le www.KitchenAid.com
pour obtenir les coordonnées spécifiques
à votre région.
POUR OBTENIR DES INFORMATIONS DÉTAILLÉES SUR L’UTILISATION DE
L’ACCESSOIRE À GLACE RÂPÉE
Visiter le www.kitchenaid.com pour obtenir des instructions supplémentaires, des vidéos,
des recettes inspirantes et des conseils sur la façon d’utiliser votre accessoire à glace râpée.
26
W11499125A.indb 26W11499125A.indb 26 10/14/2021 12:55:15 PM10/14/2021 12:55:15 PM

FRANÇAIS
RECETTES DE GRANITÉ HAWAÏEN
Faites-en vos recettes!
GRANITÉ HAWAÏEN TOUS LES JOURS
Préparer les rondelles. Ajouter de l’eau dans les moules à glace en plastique et laisser
geler pendant 12 à 24 heures.
Ingrédients:
• 1 rondelle de glace
• Sirop de votre choix pour granité hawaïen
Laisser la rondelle de glace tempérer à la température de la pièce jusqu’à ce que son
extérieur devienne lustré. Placer la rondelle de glace dans l’accessoire pour granité
hawaïen KitchenAid. Placer un bol sous l’accessoire, mettre la vitesse à 10 et râper la glace.
Tasser la glace dans un petit bol ou une tasse (un bol de 4po de large x 2po de haut est
idéal) aussi fermement que possible, puis ajouter le sirop de votre choix. Profitez-en!
Pour une version de glace râpée plus crémeuse:
Placer une petite boule de crème glacée à la vanille dans le bol (un bol de 4po de large
x 2po de haut est idéal), puis tasser la glace râpée autour et sur le dessus de la crème
glacée. Ajouter le sirop de votre choix, puis saupoudrer de lait concentré sucré.
REMARQUE CRÉATIVE: Ajouter d’autres garnitures comme des flocons de matcha, des
cubes de fruits frais, un sirop de caramel, des bonbons gélatine ou de la crème fouettée.
Faites-en votre recette!
GLACE RÂPÉE AU CAFÉ ET À LA CRÈME
Ingrédients:
• 1 rondelle de café gelée
• 1 tasse de lait de votre choix, froid
• 1 boule de crème glacée à la vanille
Instructions:
Préparer les rondelles. Verser un restant de café dans les moules à glace en plastique
etgeler pendant 12 à 24 heures. Cette recette NE nécessite PAS de tempérage.
Placer la rondelle de café gelée dans l’accessoire pour granité hawaïen KitchenAid.
Placer un bol sous l’accessoire, mettre la vitesse à 10 et râper la glace de café.
Distribuer de façon égale la glace de café râpée dans deux tasses. Ajouter 1 tasse de lait
dans chaque tasse et fouetter énergiquement avec une fourchette. Ajouter une boule de
crème glacée à la vanille, puis servir avec une cuillère.
REMARQUE CRÉATIVE: Il est aussi possible de préparer cette recette sans lait pour
créer une gourmandise à la glace râpée plus traditionnelle. Placer simplement la boule de
crème glacée en premier dans le bol. Râpé la glace de café, puis tasser la glace de café
râpée autour et sur la crème glacée. Ajouter un filet de crème riche en matière grasse
ousaupoudrer de lait concentré sucré. (1 rondelle = 1 glace de café râpée)
27
W11499125A.indb 27W11499125A.indb 27 10/14/2021 12:55:15 PM10/14/2021 12:55:15 PM

RECETTES DE GRANITÉ HAWAÏEN
Faire preuve de créativité!
BARBOTINE AU JUS
1 rondelle gelée = 1 à 10oz de barbotine
Ingrédients:
• 1 rondelle de jus gelée (pomme, orange, canneberge – sans pulpe)
• Eau gazeuse, froide
Instructions:
Préparer les rondelles. Verser un jus dans les moules à glace en plastique etgeler
pendant 12 à 24 heures. Cette recette NE nécessite PAS de tempérage.
Placer la rondelle de jus gelé dans l’accessoire pour granité hawaïen KitchenAid.
Alignerla flèche du récipient avec le symbole de déverrouillage, puis tourner dans
lesensantihoraire pour verrouiller en place. Placer un bol sous l’accessoire, mettre la
vitesse à 10 et râper la glace de jus.
Mettre la glace de jus râpée dans un verre, ajouter ¾ de tasse d’eau gazeuse et fouetter
énergiquement avec une fourchette. Profitez-en!
Essayer du nouveau!
LIMONADE FRUITÉE GLACÉE
Rondelles de fruits gelés (préparation pour 2):
• 8oz de fruits de votre choix (surgelés ou frais)
• 1 tasse d’eau
• 1 cuillère à soupe de miel
Instructions:
Pour les rondelles gelées: Mélanger 8oz de fruits de votre choix avec 1 tasse d’eau et
1 cuillère à soupe de miel. Verser le mélange dans un tamis à mailles fines pour retirer la
pulpe et les graines. Verser ensuite dans les moules à glace en plastique et geler pendant
12 à 24 heures. Cette recette NE nécessite PAS de tempérage.
Pour la limonade:
1 rondelle de fruits gelée
La limonade de votre choix, froide
Placer la rondelle de fruits dans l’accessoire pour granité hawaïen KitchenAid.
Aligner la flèche du récipient avec le symbole de déverrouillage, puis tourner dans le sens
antihoraire pour verrouiller en place. Placer un bol sous l’accessoire, mettre la vitesseà 10
et râper la glace de purée de fruits.
Ajouter la purée râpée dans un verre de votre choix. Ajouter ¾ de tasse de limonade et
fouetter énergiquement avec une fourchette. Profitez-en!
REMARQUE CRÉATIVE: Il est possible de remplacer la limonade par votre thé glacé préféré.
28
W11499125A.indb 28W11499125A.indb 28 10/14/2021 12:55:15 PM10/14/2021 12:55:15 PM

FRANÇAIS
GARANTIE ET SERVICE
GARANTIE DE L’ACCESSOIRE POUR GRANITÉ HAWAÏEN KITCHENAID®
POUR LES 50 ÉTATS DES ÉTATS-UNIS, LE DISTRICT FÉDÉRAL DE
COLUMBIA, PORTO RICO ET LE CANADA
La présente garantie couvre l’acheteur et les propriétaires suivants de l’accessoire pour granité
hawaïen lorsqu’il est utilisé dans les 50 États des États-Unis, le district fédéral de Columbia,
àPorto Rico et au Canada.
Durée de la garantie: Garantie complète d’un an à compter de la date d’achat.
KitchenAid prendra en
charge les éléments
suivants à votre choix:
Remplacement sans difficulté de votre accessoire pour granité
hawaïen. Voir la page suivante pour plus de détails concernant
la procédure à suivre pour un dépannage, ou appeler le numéro
sansfrais 1800541-6390 du Centre eXpérience clientèle.
OU
Le coût des pièces de rechange et de la main-d’œuvre pour
corriger les vices de matériaux et de fabrication. L’intervention
de dépannage doit être effectuée par un centre de dépannage
KitchenAid agréé.
KitchenAid ne paiera
pas pour:
CLAUSE D’EXONÉRATION DE RESPONSABILITÉ AU TITRE DES GARANTIES
IMPLICITES; LIMITATION DES RECOURS
LES GARANTIES IMPLICITES, Y COMPRIS DANS LA MESURE APPLICABLE LES GARANTIES
DE QUALITÉ MARCHANDE OU D’APTITUDE À UN USAGE PARTICULIER, SONT EXCLUES
DANS LA MESURE AUTORISÉE PAR LA LOI. TOUTE GARANTIE IMPLICITE POUVANT
ÊTRE IMPOSÉE PAR LA LOI EST LIMITÉE À UN AN OU À LA PLUS COURTE PÉRIODE
AUTORISÉE PAR LA LOI. CERTAINES JURIDICTIONS NE PERMETTENT PAS LA LIMITATION
DE LA DURÉE DE VALIDITÉ DES GARANTIES IMPLICITES DE QUALITÉ MARCHANDE
OU D’APTITUDE À UN USAGE PARTICULIER; PAR CONSÉQUENT, LES LIMITATIONS OU
EXCLUSIONS STIPULÉES DANS LES PRÉSENTES PEUVENT NE PAS ÊTRE APPLICABLES.
SI CE PRODUIT NE FONCTIONNE PAS TEL QUE GARANTI, LE SEUL ET UNIQUE RECOURS
DU CLIENT CONSISTE À EN OBTENIR LA RÉPARATION OU LE REMPLACEMENT
CONFORMÉMENT AUX TERMES DE LA PRÉSENTE GARANTIE LIMITÉE. KITCHENAID
ETKITCHENAID CANADA DÉCLINENT TOUTE RESPONSABILITÉ AU TITRE DES
DOMMAGES FORTUITS OU INDIRECTS. Cette garantie vous confère des droits juridiques
spécifiques et vous pouvez également jouir d’autres droits qui peuvent varier d’un État à
l’autre ou d’une province à l’autre.
A. Les réparations lorsque l’accessoire pour granité hawaïen est
utilisé à des fins autres qu’un usage domestique unifamilial
normal.
B. Les dommages causés par: accident, altération, mauvaise
utilisation ou abus.
C. Tous frais d’expédition ou de manutention pour livrer l’accessoire
pour granité hawaïen à un centre de réparation agréé.
D. Les frais des pièces de rechange ou de main-d’œuvre pour les
accessoires pour granité hawaïen lorsqu’il est utilisé à l’extérieur
des 50 États des États-Unis, du district fédéral de Columbia,
dePorto Rico et du Canada.
29
W11499125A.indb 29W11499125A.indb 29 10/14/2021 12:55:15 PM10/14/2021 12:55:15 PM

GARANTIE ET SERVICE
GARANTIE DE REMPLACEMENT SANS DIFFICULTÉ POUR LES 50 ÉTATS
DES ÉTATS-UNIS, LE DISTRICT FÉDÉRAL DE COLUMBIA ET PORTO RICO
Nous sommes tellement certains que la
qualité de nos produits satisfait aux normes
rigoureuses de KitchenAid que si l’accessoire
pour granité hawaïen cesse de fonctionner
au cours de la première année suivant son
acquisition, KitchenAid prendra les mesures
nécessaires pour faire livrer gratuitement à
votre porte un appareil de remplacement
identique ou comparable et prendra les
dispositions nécessaires pour que l’accessoire
pour granité hawaïen d’origine nous soit
retourné. L’accessoire de remplacement
seraégalement couvert par notre garantie
limitée d’un an.
Si l’accessoire pour granité hawaïen cesse de
fonctionner durant la première année suivant
son acquisition, il suffit d’appeler notre Centre
eXpérience clientèle au 1 800 541-6390,
du lundi au vendredi. Veuillez avoir l’original
de votre reçu de vente à portée de main au
moment de votre appel. Une preuve d’achat
est indispensable pour que votre réclamation
puisse être traitée. Fournissez votre adresse
de livraison complète au représentant (aucune
boîte postale).
Après avoir reçu l’accessoire pour granité
hawaïen de rechange, utiliser le carton,
les matériaux d’emballage et l’étiquette
d’expédition prépayée pour emballer
l’accessoire pour granité hawaïen d’origine
etle renvoyer à KitchenAid.
GARANTIE DE REMPLACEMENT SANS DIFFICULTÉ POUR LE CANADA
Nous sommes tellement certains que la
qualité de nos produits satisfait aux normes
exigeantes de la marque KitchenAid que si
l’accessoire pour granité hawaïen cesse de
fonctionner au cours de la première année
suivant son acquisition, nous remplacerons
l’accessoire pour granité hawaïen par un
accessoire de remplacement identique ou
comparable. L’accessoire de remplacement
sera également couvert par notre garantie
limitée d’un an.
Si l’accessoire pour granité hawaïen cesse de
fonctionner durant la première année suivant
son acquisition, il suffit d’appeler notre Centre
eXpérience clientèle au 1 800807-6777,
du lundi au vendredi. Veuillez avoir l’original
de votre reçu de vente à portée de main
au moment de votre appel. Une preuve
d’achat est indispensable pour que votre
réclamation puisse être traitée. Il vous faudra
fournir votre adresse de livraison complète au
représentant.
Après avoir reçu l’accessoire pour granité
hawaïen de rechange, utiliser le carton,
les matériaux d’emballage et l’étiquette
d’expédition prépayée pour emballer
l’accessoire pour granité hawaïen d’origine
etle renvoyer à KitchenAid.
OBTENIR UN DÉPANNAGE UNE FOIS LA GARANTIE EXPIRÉE OU
COMMANDER DES ACCESSOIRES ET DES PIÈCES DE RECHANGE
Aux États-Unis et à Porto Rico:
Pour des informations sur le service
de dépannage ou pour commander
des accessoires ou des pièces de
rechange, composer le numéro sans
frais1800541-6390 ou écrire à:
Customer eXperience Center,
KitchenAid Small Appliances,
P.O. Box218, St. Joseph, MI 49085-0218
®/™ ©2021 KitchenAid. Tous droits réservés. La forme du batteur sur socle est une
marque de commerce aux É.-U. et dans d’autres pays. Utilisé sous licence au Canada.
30
W11499125A.indb 30W11499125A.indb 30 10/14/2021 12:55:15 PM10/14/2021 12:55:15 PM
En dehors des États-Unis et de Porto Rico:
Consulter le revendeur KitchenAid local ou
le détaillant auprès duquel l’accessoire pour
granité hawaïen a été acheté pour savoir
comment obtenir un dépannage.
Pour des informations concernant toute
intervention de dépannage au Canada:
Composer sans frais le 1800807-6777.
Pour des informations concernant toute
intervention de dépannage au Mexique:
Composer sans frais le 01-800-0022-767.

ESPAÑOL
PIEZAS Y CARACTERÍSTICAS
3
2
5 6
4
1
7
1 Copa de hielo desmontable
2 Empujador del recipiente para hielo
3 Carcasa superior principal
4 Conveniente caja de almacenamiento
8
5 Cuchilla de raspado fino
6 Cuchilla de raspado grueso
7 Manguito del recipiente para hielo
8 Molde de hielo plástico con tapa (x4)
31
W11499125A.indb 31W11499125A.indb 31 10/14/2021 12:55:16 PM10/14/2021 12:55:16 PM

SEGURIDAD DEL PRODUCTO
MEDIDAS DE PRECAUCIÓN
IMPORTANTES
Al utilizar electrodomésticos eléctricos, se deben seguir las precauciones
básicas de seguridad, entre las que se incluyen las siguientes:
1. Lea todas las instrucciones.
2. Este aparato no ha sido diseñado para ser usado por personas (incluidos niños) con
capacidades físicas, sensoriales, mentales reducidas, o con falta de experiencia y
conocimiento, a menos que lo hagan bajo supervisión o siguiendo las instrucciones
relativas al uso del aparato, a cargo de una persona responsable por su seguridad.
3. Se debe supervisar atentamente a los niños cuando usen cualquier
electrodoméstico o cuando estos se usen cerca de ellos. Los niños deben ser
supervisados para garantizar que no jueguen con el electrodoméstico.
4. Nunca deje el electrodoméstico sin supervisión mientras está en funcionamiento.
5. Evite tocar las piezas que estén en movimiento. Mantenga los dedos fuera de la
abertura de descarga.
6. El uso de accesorios no recomendados ni vendidos por KitchenAid puede
provocar un incendio, una descarga eléctrica o lesiones.
7. No utilice el electrodoméstico en exteriores.
8. Apague el aparato, desenchúfelo del tomacorriente y separe el accesorio
del aparato antes de limpiarlo y cuando no esté en uso. Apague el aparato y
asegúrese de que el motor pare completamente antes de meter o sacar las piezas.
9. Deje que el aparato se enfríe completamente antes de colocar o quitar piezas y
antes de limpiar el aparato.
32
W11499125A.indb 32W11499125A.indb 32 10/14/2021 12:55:16 PM10/14/2021 12:55:16 PM

ESPAÑOL
SEGURIDAD DEL PRODUCTO
10. Las cuchillas son losas. Manipúlelas con cuidado.
11. Asimismo, consulte la sección sobre Medidas de seguridad importantes
incluidas en el Manual de instrucciones y cuidado de la batidora de pedestal.
GUARDE ESTAS INSTRUCCIONES
Este producto está diseñado únicamente para uso doméstico.
INTRODUCCIÓN
El accesorio para raspar hielo es compatible con todas las batidores de pedestal
domésticas de KitchenAid. Fije las cuchillas para raspar hielo según el requerimiento.
Nombre Ícono Uso indicado Velocidad
Cuchilla de
raspado grueso
Cuchilla de
raspado fino
NOTA: Para ver instrucciones detalladas sobre cómo cambiar las cuchillas, consulte la
sección “CÓMO CAMBIAR LA CUCHILLA”.
CÓMO TEMPLAR LOS DISCOS DE HIELO
Templar hielo significa permitir que el hielo se ajuste a temperatura ambiente
hasta que desarrolle un aspecto brillante y húmedo y sea transparente por
todos lados. El templado es un paso importante para producir el raspado más
ligero y esponjoso. Muchos factores determinan la cantidad de tiempo que se
tarda en templar. En la mayoría de los casos, los discos de hielo deben estar
listos en 10 minutos o menos.
NOTA: Los discos de hielo que se hagan con agua de la llave requieren templado. Para recetas
de base mixta, consulte los detalles de la receta para obtener instrucciones de templado.
Los moldes de hielo se usan para obtener un mejor desempeño tanto para el raspado
fino como para el grueso. Es fácil sacar hielo raspado de hielo templado de los moldes.
CONSEJO: Para obtener el raspado más esponjoso, recomendamos templar el disco de
hielo durante 10 minutos y luego usar la cuchilla de raspado fino.
Para raspados/trozos de hielo
más gruesos.
Para una textura fina, esponjosa
y parecida a la nieve.
10
10
33
W11499125A.indb 33W11499125A.indb 33 10/14/2021 12:55:16 PM10/14/2021 12:55:16 PM

USO DEL PRODUCTO
PREPARACIÓN DEL CUBO DE HIELO
1
Llene el molde de hielo con agua o la
mezcla de base de hielo con sabor de
suelección.
NOTA: Para evitar que el molde se
desborde mientras se congela, asegúrese
de no sobrepasar la línea de llenado
visible justo debajo del borde del molde.
NOTA: Consulte las secciones “Consejos para grandes resultados” para ver más detalles
sobre la preparación del disco de hielo.
2
Coloque la tapa en la parte superior
del molde y colóquelo en el congelador
durante 12 a 24 horas.
NOTA: El tiempo de congelación
puede variar y dependerá tanto de la
temperatura de su congelador como
del contenido de azúcar o alcohol en
sumezcla.
CONFIGURACIÓN Y MONTAJE - PREPARACIÓN PARA HACER RASPADOS
Antes de usar su accesorio para raspar hielo, límpielo siguiendo las instrucciones
detalladas en la sección “CUIDADO Y LIMPIEZA”.
1
2
Después de sacar los moldes de hielo
del congelador, presione firmemente en
la parte inferior y los lados para ayudar
aliberar el disco del molde.
34
W11499125A.indb 34W11499125A.indb 34 10/14/2021 12:55:16 PM10/14/2021 12:55:16 PM
En el caso de las recetas de hielo natural,
deje que el hielo repose durante un
máximo de 10 minutos; esto se denomina
“templado” y se recomienda para lograr
resultados ideales de hielo raspado.

ESPAÑOL
USO DEL PRODUCTO
3
Ponga el control de velocidades
de la batidora de pedestal en la
posición “OFF/0” (Apagado/0) y
luegodesenchufe.
5
4
Para batidoras de pedestal con una
cubierta de receptáculo para accesorio
con bisagra: Levante para abrir.
Para batidoras con base con una
cubierta de receptáculo para accesorio
desmontable: Gire la perilla del
aditamento en el sentido contrario a las
agujas del reloj para quitar la cubierta
del receptáculo para aditamentos.
6
Inserte la carcasa principal en el cubo
del accesorio, asegúrese de que el
eje de potencia encaje en el casquillo
cuadrado del cubo. Si es necesario, gire
el accesorio hacia atrás y hacia delante
para obtener un ajuste adecuado. El eje
del alojamiento del accesorio encajará
en la muesca del borde del receptáculo
cuando esté en la posición correcta.
W11499125A.indb 35W11499125A.indb 35 10/14/2021 12:55:17 PM10/14/2021 12:55:17 PM
Ajuste la perilla del receptáculo para
accesorios de la batidora de pedestal
hacia la derecha hasta que el accesorio
quede completamente fijo en la
batidora.
35

USO DEL PRODUCTO
7
Asegúrese de que la palanca superior de
la carcasa se haya girado completamente
a la izquierda. De no ser así, gírela
hacia la izquierda hasta que escuche un
chasquido. Esto preparará el accesorio
para su uso y debe completarse antes
de cargar el disco de hielo en la copa
ycolocarlo en la carcasa.
8
Retire el recipiente para hielo de la
carcasa girándolo hacia la derecha
y tirando hacia abajo. Note que la
pequeña flecha indicadora debe
alinearse con los símbolos de bloqueo
ydesbloqueo de la carcasa.
OPCIONAL: Si desea cambiar la cuchilla,
sujétela desde la parte inferior y gírela
hacia la derecha para desbloquearla y
retirarla.
36
W11499125A.indb 36W11499125A.indb 36 10/14/2021 12:55:17 PM10/14/2021 12:55:17 PM

ESPAÑOL
USO DEL PRODUCTO
PARA ARMAR
1
Sujete la cuchilla desde la parte inferior e
insértela lentamente en la parte inferior
del recipiente para hielo alineando las
pestañas entrelazadas. Una vez insertada,
gire la cuchilla hacia la izquierda hasta
que escuche un “clic“, para bloquear
correctamente la hoja en su lugar.
NOTA: Cada una de las pestañas
entrelazadas tiene un tamaño único,
loque garantiza que la cuchilla solo
puedainstalarse en la posición correcta.
3
2
Inserte el manguito del recipiente
de hielo en el recipiente para hielo
desmontable, luego inserte un disco de
hielo preparado. Asegúrese de insertar
el disco de hielo con las tramas cruzadas
hacia arriba.
4
Coloque el recipiente para hielo
desmontable en la parte inferior de
la carcasa principal, girándola hacia la
izquierda para bloquearla en su lugar.
NOTA: La pequeña flecha indicadora en
el recipiente para hielo desmontable que
debe alinearse con los símbolos de bloqueo
y desbloqueo de la carcasa principal.
W11499125A.indb 37W11499125A.indb 37 10/14/2021 12:55:18 PM10/14/2021 12:55:18 PM
Suelte la palanca superior girándola
suavemente hacia la derecha. El resorte
se activará cuando el empujador apriete
el disco de hielo. El accesorio para
raspar está correctamente cargado y
listo para usar.
37

USO DEL PRODUCTO
RASPADO
1
Coloque un plato para servir de su
elección debajo del accesorio para
raspar hielo. Haga esto antes de
encender la batidora.
2
ADVERTENCIA
Peligro de Choque Eléctrico
Conecte a un contacto de pared de
conexión a tierra de 3 terminales.
No quite la terminal de conexión a
tierra.
No use un adaptador.
No use un cable eléctrico de
extensión.
No seguir estas instrucciones
puede ocasionar la muerte,
incendio o choque eléctrico.
3
Enchufe la batidora de pedestal a un
tomacorriente con conexión a tierra.
Ajuste la batidora a la velocidad más
alta para comenzar a raspar.
NOTA: Para obtener los mejores
resultados, considere rotar el plato
a medida que el hielo se raspa para
crearun montículo de hielo más
uniforme y en forma de cono.
38
W11499125A.indb 38W11499125A.indb 38 10/14/2021 12:55:18 PM10/14/2021 12:55:18 PM
Una vez que termine de raspar, apague
la batidora y vuelva a colocar la palanca
superior en la posición de bloqueo más
a la izquierda.

ESPAÑOL
USO DEL PRODUCTO
4
Retire el recipiente para hielo de la
carcasa girándolo hacia la derecha y
tirando hacia abajo. Deseche el hielo
restante.
CÓMO CAMBIAR LAS CUCHILLAS
1
5
Termine su postre de raspado con una
variedad de condimentos o aderezos de
su elección.
A continuación encontrará más consejos,
trucos y recetas para aprovechar al máximo
su experiencia con el accesorio para raspados.
Para ver más recetas e inspirarse, visite
KitchenAid.com
2
Agarre la cuchilla desde la parte inferior
y gírela hacia la izquierda para quitarla o
hacia la derecha para instalarla.
Una vez insertada, gire la cuchilla hacia
la izquierda hasta que escuche un “clic“,
para bloquear correctamente la hoja en
su lugar.
W11499125A.indb 39W11499125A.indb 39 10/14/2021 12:55:19 PM10/14/2021 12:55:19 PM
Cada una de las pestañas entrelazadas
tiene un tamaño único, lo que garantiza
que la cuchilla solo pueda instalarse en
la posición correcta.
39

CUIDADO Y LIMPIEZA
IMPORTANTE: Deje que el aparato se enfríe completamente antes de colocar o quitar
piezas y antes de limpiar el aparato.
NOTA: Para obtener instrucciones, consulte la sección MONTAJE E INSTALACIÓN, pasos
7, 8 y opcional.
1
Las siguientes piezas pueden lavarse
en el lavavajillas, pero solo en la
canasta superior: Recipiente para hielo
desmontable, Cuchillas finas y gruesas,
Moldes plásticos para hielo, Empujador
del recipiente de hielo, manguito y Tapas.
2
No sumerja la carcasa en el agua ni
en otros líquidos. Limpie con un paño
húmedo templado y seque bien con un
paño suave antes de volver a usar o de
guardar el aparato.
CONSEJOS PARA OBTENER LOS MEJORES
RESULTADOS
Configuración de su accesorio para
raspar hielo
• Se recomienda que primero instale el
accesorio para raspar hielo en la batidora
con base, antes de completar cualquier
otro paso de instalación.
• Para instalar más fácilmente el
recipiente de plástico transparente para
el hielo de plástico en la carcasa superior,
busque la pequeña flecha indicadora
negra. Esta flecha debe alinearse con
los iconos de bloque /desbloqueo de la
carcasa superior.
• Cuando cambie las cuchillas, tenga en
cuenta que estas cuentan con 3 pestañas
de tamaño único que deben alinearse
con sus ranuras correspondientes en la
parte inferior del recipiente para el hielo.
La cuchilla no se instalará i las pestañas
no están alineadas correctamente.
Cómo hacer raspados
• El templado es una parte importante
para hacer un buen raspado, ya que
un disco de hielo recién sacado del
congelador está DEMASIADO FRÍO
para raspar. Atemperar significa permitir
que los discos de hielo se calienten
ligeramente a temperatura ambiente,
hasta que el exterior del disco tenga un
brillo agradable. Esto suele tardar unos
10 minutos.
NOTA: Los discos de hielo que se hagan
con agua de la llave requieren templado.
Para recetas de base mixta, consulte
los detalles de la receta para obtener
instrucciones de templado.
• Algunas recetas de raspados,
particularmente aquellas con
ingredientes congelados en el disco
de hielo, pueden rasparse mejor con la
cuchilla fina o la gruesa. Se recomienda
que pruebe recetas con cada cuchilla
para ver cuál produce el resultado
deseado.
40
W11499125A.indb 40W11499125A.indb 40 10/14/2021 12:55:19 PM10/14/2021 12:55:19 PM

ESPAÑOL
CONSEJOS PARA OBTENER LOS MEJORES
RESULTADOS
Para preparar sus moldes para hielo
• Es importante notar la sutil línea de
llenado justo debajo del borde superior
de los moldes para hielo. No llene
los moldes más allá de esta línea, ya
que puede afectar negativamente la
congelación.
• Deje que los moldes de hielo se
congelen durante un mínimo de
12horas. Tenga en cuenta que algunas
recetas de base mixta pueden requerir
más tiempo para congelarse debido a la
variedad de ingredientes.
• En el caso de recetas con azúcar, existe
un delicado equilibrio entre una mezcla
dulce al gusto, pero capaz de congelarse
lo suficiente como para rasparse. Siga
las recetas lo más de cerca posible para
garantizar excelentes resultados.
• Para recetas con alcohol, no debe
exceder un APV superior al 8 % dentro
de la mezcla. Esto ayudará a asegurar
que la mezcla se congele lo suficiente
para poder rasparse.
• Considere quitar los discos de
hielo congelados de los moldes y
guardarlos en otro recipiente dentro
desu congelador. Esto se conoce como
“Recolección de hielo“ y ayudará a
garantizar que siempre tenga hielo a
lamano cuando la ocasión lo requiera.
Consejos para la resolución de problemas
con los raspados
• La cuchilla fina crea hielo grueso:
esto puede ocurrir si el hielo aún está
demasiado frío. Considere extender
el tiempo de templado. De forma
alternativa, revise la cuchilla y busque
de posibles daños, ya que esto puede
afectar el desempeño al raspar.
• El disco no se raspa, esto puede
ocurrir cuando la mezcla de una receta
es demasiado blanda o demasiado dura.
Si la mezcla es demasiado blanda, puede
contener demasiada azúcar o alcohol
para poder congelarse correctamente.
Considere revisar la receta. Si la mezcla
está demasiado dura, es posible que sea
necesario templar el disco durante más
tiempo. Consulte “para hacer raspados“.
• Si los problemas persisten,
comuníquese con el servicio de
atención al cliente de KitchenAid.
Visitewww.KitchenAid.com para obtener
información de contacto específica de su
región.
PARA OBTENER INFORMACIÓN DETALLADA SOBRE EL USO DEL ADITAMENTO
PARA RASPAR HIELO Visite www.kitchenaid.com o instrucciones y videos adicionales,
recetas inspiradoras y consejos sobre cómo usar su accesorio para raspar hielo.
41
W11499125A.indb 41W11499125A.indb 41 10/14/2021 12:55:19 PM10/14/2021 12:55:19 PM

RECETAS DE RASPADOS
¡Haga los suyos!
RASPADO PARA TODOS LOS DÍAS
Haga los discos. Vierta agua en los moldes plásticos para hielo y congele durante 12-24 horas.
Ingredientes:
• 1 disco de hielo congelado
• Jarabe para raspados de su elección
Permita que el disco de hielo repose a temperatura ambiente (templar) hasta que la
parte exterior del disco tenga un brillo agradable. Coloque el disco de hielo en el
accesorio para raspar hielo de KitchenAid. Coloque un tazón bajo el accesorio, encienda
la velocidad a 10 y raspe el hielo. Apriete el hielo en un tazón o taza pequeño (un tazón
de 4" de ancho x 2" de alto es ideal) lo más firme posible, luego salpique con la cantidad
deseada de jarabes. Disfrute.
Para una versión más cremosa de raspado:
Coloque una pequeña bola de helado de vainilla en su tazón (un tazón de 4"x 2" de alto
es ideal) y luego coloque hielo raspado alrededor y encima. Cubra con los jarabes de su
elección y luego cubra con un chorrito de leche condensada.
NOTA CREATIVA: Agregue ingredientes adicionales como una pizca de matcha, fruta
fresca cortada en cubitos, salsa de caramelo, gomitas, crema batida.
¡Personalícelo más!
RASPADO DE CAFÉ Y CREMA
Ingredientes:
• 1 disco de café congelado
• 1 taza de leche de su elección, fría
• 1 cucharada de helado de vainilla
Instrucciones:
Haga los discos de hielo. Vierta el café sobrante en los moldes de hielo de plástico y
congele durante 12-24 horas. Esta receta NO necesita templado.
Coloque el disco de café en el accesorio para raspar hielo KitchenAid. Coloque un
recipiente debajo del accesorio, gire la velocidad a 10 y raspe el café.
Distribuya uniformemente el café raspado entre dos tazas. Agregue 1 taza de leche a
cada taza y bata enérgicamente con un tenedor. Agregue una bola de helado de vainilla
ysirva con una cuchara.
NOTA CREATIVA: También puede hacerlo sin leche para obtener un postre de raspado
más tradicional. Primero coloque su bola de helado en el tazón. Raspe el café y luego
colóquelo alrededor y sobre el helado. Cubra con un chorrito de crema espesa o leche
condensada azucarada. (1 disco = 1 raspado de café)
42
W11499125A.indb 42W11499125A.indb 42 10/14/2021 12:55:20 PM10/14/2021 12:55:20 PM

ESPAÑOL
RECETAS DE RASPADOS
¡Use su creatividad!
GRANIZADOS JUGOSOS
1 disco congelado = 1-10 onzas de granizado
Ingredientes:
• 1 disco de jugo congelado (manzana, naranja, arándano, sin pulpa)
• Agua con gas, fría
Instrucciones:
Haga los discos de hielo. Vierta el jugo en los moldes de hielo de plástico y congele
durante 12-24 horas. Esta receta NO necesita templado.
Coloque el disco de jugo congelado en el accesorio para raspados de KitchenAid.
Alinee la flecha en el recipiente con el símbolo de desbloqueo y luego gírela en sentido
contrario a las agujas del reloj para bloquear en su lugar. Coloque un recipiente debajo
del accesorio, gire la velocidad a 10 y raspe el jugo.
Coloque el jugo raspado en un vaso, agregue ¾ de taza de agua con gas y mezcle
enérgicamente con un tenedor. Disfrute.
¡Pruebe algo nuevo!
CONGELADO DE LIMONADA FRUTAL
Discos de fruta congelada (rinde 2):
• 8 onzas de fruta a elección (congelada o fresca)
• 1 taza de agua
• 1 cucharada de miel
Instrucciones:
Para los discos congelados: Licue 8 onzas de fruta de su elección con 1 taza de agua y
1cucharada de miel. Vierta la mezcla a través de un colador de malla fina para eliminar la
pulpa o las semillas. Luego, vierta en los moldes de hielo de plástico y congele durante
12-24 horas. Esta receta NO necesita templado.
Para la limonada:
1 disco de fruta congelada
Limonada a elección, fría
Coloque el disco de frutas en el accesorio para raspados de KitchenAid. Alinee la flecha
del recipiente con el símbolo de desbloqueo y gire en sentido contrario a las agujas del
reloj para bloquear. Coloque un recipiente debajo del accesorio, gire la velocidad a 10 y
raspe el puré de frutas.
Agregue el puré raspado en un vaso de su elección. Agregue ¾ de taza de limonada y
bata enérgicamente con un tenedor. ¡Disfrute!
NOTA CREATIVA: Puede reemplazar la limonada con su te helado favorito.
43
W11499125A.indb 43W11499125A.indb 43 10/14/2021 12:55:20 PM10/14/2021 12:55:20 PM

GARANTÍA Y SERVICIO
GARANTÍA DEL ACCESORIO PARA HACER RASPADOS DE KITCHENAID®
PARA LOS 50 ESTADOS DE ESTADOS UNIDOS, EL DISTRITO DE
COLUMBIA, PUERTO RICO Y CANADÁ
Esta garantía se extiende al comprador y a cualquier propietario subsiguiente para el accesorio
para hacer raspados operado en los 50 estados de Estados Unidos, el Distrito de Columbia,
Puerto Rico y Canadá.
Duración de la garantía: Garantía completa de un año a partir de la fecha de compra.
KitchenAid pagará
por lo siguiente,
asuelección:
KitchenAid no
pagarápor:
EXCLUSIÓN DE GARANTÍAS IMPLÍCITAS; LIMITACIÓN DE RECURSOS
LAS GARANTÍAS IMPLÍCITAS, INCLUIDAS EN LA MEDIDA QUE CORRESPONDA
LAS GARANTÍAS DE COMERCIABILIDAD O DE IDONEIDAD PARA UN PROPÓSITO
PARTICULAR, QUEDAN EXCLUIDAS EN LA MEDIDA EN QUE ESTÉ PERMITIDO POR LEY.
TODA GARANTÍA IMPLÍCITA QUE SEA IMPUESTA POR LEY SERÁ LIMITADA A UN AÑO O
AL PERÍODO MÁS CORTO PERMITIDO POR LEY. ALGUNOS ESTADOS Y PROVINCIAS NO
PERMITEN LAS LIMITACIONES O EXCLUSIONES ACERCA DE CUÁNTO DEBE DURAR UNA
GARANTÍA IMPLÍCITA DE COMERCIABILIDAD O DE IDONEIDAD, DE MODO QUE LAS
LIMITACIONES O EXCLUSIONES ARRIBA MENCIONADAS PUEDEN NO APLICARSE EN
SUCASO.
SI ESTE PRODUCTO NO FUNCIONA COMO SE HA GARANTIZADO, EL ÚNICO Y
EXCLUSIVO RECURSO DEL CLIENTE SERÁ EL DE REPARARLO O REEMPLAZARLO
SEGÚN LOS TÉRMINOS DE ESTA GARANTÍA LIMITADA. KITCHENAID Y KITCHENAID
CANADÁ NO ASUMEN NINGUNA RESPONSABILIDAD POR DAÑOS INCIDENTALES
OCONSECUENTES. Esta garantía le otorga derechos legales específicos y puede que
también tenga otros derechos que varíen de un estado a otro o de una provincia a otra.
Reemplazo sin dificultades de su raspador de hielo. Consulte la
página siguiente para obtener detalles acerca de cómo obtener
servicio técnico o llame sin cargo a nuestro Centro para la
eXperiencia del cliente al 1-800-541-6390.
O BIEN
El costo de las piezas de repuesto y de la mano de obra de
reparación para corregir los defectos de los materiales y de la
mano de obra. El servicio debe ser proporcionado por un centro
de servicio autorizado por KitchenAid.
A. Reparaciones cuando su raspador de hielo se haya utilizado
para un uso distinto al doméstico normal de una sola familia.
B. Daños causados por accidente, alteración, uso indebido o
abuso.
C. Cualquier gasto de envío o manejo para entregar su raspador
de hielo a un centro de servicio autorizado.
D. Piezas de repuesto o costos de mano de obra de reparación
para los accesorios del raspador de hielo operado fuera de los
50 estados de Estados Unidos, el Distrito de Columbia, Puerto
Rico y Canadá.
44
W11499125A.indb 44W11499125A.indb 44 10/14/2021 12:55:20 PM10/14/2021 12:55:20 PM

ESPAÑOL
GARANTÍA Y SERVICIO
GARANTÍA DE REEMPLAZO SIN DIFICULTADES: EN LOS 50 ESTADOS DE
LOS ESTADOS UNIDOS, EL DISTRITO DE COLUMBIA Y PUERTO RICO
Confiamos tanto en que la calidad de nuestros
productos cumple con las exigentes normas
de KitchenAid que, si el raspador de hielo
presentara alguna falla durante el primer año
de compra, KitchenAid hará arreglos para
entregar un reemplazo idéntico o comparable
a su domicilio sin cargo y gestionará la
devolución de su raspador de hielo original
a nosotros. La unidad de reemplazo también
estará cubierta por nuestra garantía limitada
de un año.
Si su raspador de hielo fallara durante
el primer año después de la compra,
simplemente llame a nuestro Centro
para la eXperiencia del cliente sin cargo
al 1-800-541-6390, de lunes a viernes.
Tenga a mano el recibo de compra original
cuando llame. Se requerirá el comprobante
de compra para iniciar una reclamación.
Proporcione al consultor su dirección de envío
completa (nonúmeros de apartado postal).
Cuando reciba su raspador de hielo de
reemplazo, use la caja, el material de
embalaje y la etiqueta de envío prepagada
para empacar su raspador de hielo original
ydevolverlo a KitchenAid.
GARANTÍA DE REEMPLAZO SIN DIFICULTADES: CANADÁ
Confiamos tanto en que la calidad de nuestros
productos cumple con las exigentes normas
de la marca KitchenAid que, si su raspador de
hielo presentara alguna falla durante el primer
año después de la compra, reemplazaremos
su raspador de hielo con un producto idéntico
o similar. La unidad de reemplazo también
estará cubierta por nuestra garantía limitada
de un año.
Si su raspador de hielo fallara durante
el primer año después de la compra,
simplemente llame a nuestro Centro
para la eXperiencia del cliente sin cargo
al 1-800-807-6777, de lunes a viernes.
Tenga a mano el recibo de compra original
cuando llame. Se requerirá el comprobante
de compra para iniciar una reclamación.
Proporcione al asesor su dirección de
envíocompleta.
Cuando reciba su raspador de hielo de
reemplazo, use la caja, el material de
embalaje y la etiqueta de envío prepagada
para empacar su raspador de hielo original
ydevolverlo a KitchenAid.
CÓMO OBTENER SERVICIO TÉCNICO DESPUÉS DE QUE EXPIRE LA
GARANTÍA O CÓMO PEDIR ACCESORIOS Y PIEZAS DE REPUESTO
En los Estados Unidos y Puerto Rico:
Para obtener información acerca del servicio
técnico o para pedir accesorios o piezas de
repuesto, llame sin costo al 1-800-541-6390
o escriba a:
Customer eXperience Center,
KitchenAid Small Appliances,
P.O. Box 218, St. Joseph, MI 49085-0218
Fuera de Estados Unidos y Puerto Rico:
Consulte al distribuidor local de KitchenAid
o a la tienda donde compró su raspador de
hielo para pedir información sobre cómo
obtener el servicio.
Para obtener información acerca del servicio
en Canadá:
Llame sin costo al 1-800-807-6777.
Para obtener información acerca del servicio
en México:
Llame sin costo al 01-800-0022-767.
®/™ ©2021 KitchenAid. Todos los derechos reservados. El diseño de la batidora es una
marca comercial en EE.UU. y en otros países. Usado bajo licencia en Canadá.
45
W11499125A.indb 45W11499125A.indb 45 10/14/2021 12:55:20 PM10/14/2021 12:55:20 PM

W11499125A.indb 46W11499125A.indb 46 10/14/2021 12:55:20 PM10/14/2021 12:55:20 PM

W11499125A.indb 47W11499125A.indb 47 10/14/2021 12:55:20 PM10/14/2021 12:55:20 PM

DISCOVER MORE. DÉCOUVREZ PLUS. DESCUBRA MÁS.
KITCHENAID.COM/QUICKSTART
PRODUCT QUESTIONS OR RETURNS
QUESTIONS SUR LE PRODUIT OU LES RETOURS
PREGUNTAS SOBRE EL PRODUCTO O DEVOLUCIÓNES
USA: 1.800.541.6390 | KitchenAid.com
CANADA: 1.800.807.6777 | KitchenAid.ca
MEXICO: KitchenAid.com.mx
LATIN AMERICA: KitchenAid-Latam.com
®/™ ©2021 KitchenAid. All rights reserved. The design of the Stand Mixer is a trademark in the U.S.
Tous droits réservés. La forme du batteur sur socle est une marque decommerce aux É.-U. et dans
Todos los derechos reservados. El diseño de la batidora es una marca comercial en EE.UU. y en otros
W11499125A
W11499125A.indb 48W11499125A.indb 48 10/14/2021 12:55:20 PM10/14/2021 12:55:20 PM
and elsewhere. Used under license in Canada.
d’autres pays Utilisé sous licence au Canada.
países. Usado bajo licencia en Canadá.
10/21
 Loading...