

KitchenAid KV25G0XER User Manual

BOWL LIFT STAND MIXER
INSTRUCTIONS AND RECIPES
1
1
FOR THE WAY IT’S MADE.
™
®
1-800-541-6390
Details Inside

We’re so confident
the quality of our
products meets the
exacting standards of
KitchenAid that, if your
Stand Mixer should fail
within the first year of ownership,
KitchenAid will arrange to deliver an
identical or comparable replacement
to your door free of charge and
arrange to have your “failed” Stand
Mixer returned to us. Your
replacement unit will also be covered
by our one year full warranty. Please
follow these instructions to receive
this quality service.
If you reside in the 50 United
States and your KitchenAid
®
Stand
Mixer should fail within the first year
of ownership, simply call our toll-free
Customer Satisfaction Center at
1-800-541-6390, 8 a.m. to 8 p.m.,
Monday through Friday, 10 a.m. to
5 p.m., Saturday, Eastern Time. Give
the consultant your complete shipping
address. (No P.O. Box Numbers,
please.)
When you receive your replacement
Stand Mixer, use the carton and
packing materials to pack-up your
“failed” Stand Mixer. In the carton,
include your name and address on a
sheet of paper along with a copy of
the proof of purchase (register receipt,
credit card charge slip, etc.).
For a detailed explanation of
warranty terms and conditions,
including how to arrange for service
outside the United States, see pages 3
and 4.
Hassle-Free Replacement Warranty
Proof of Purchase & Product Registration
Always keep a copy of the sales
receipt showing the date of purchase
of your Stand Mixer. Proof of
purchase will assure you of inwarranty service.
Before you use your Stand Mixer,
please fill out and mail your product
registration card packed with the
unit. This card will enable us to
contact you in the unlikely event of a
product safety notification and assist
us in complying with the provisions
of the Consumer Product Safety Act.
This card does not verify your
warranty.
Please complete the following for
your personal records:
Model Number _______________________________________________________
Serial Number ________________________________________________________
Date Purchased _______________________________________________________
Store Name __________________________________________________________

1
Table of Contents
Hassle-Free Replacement Warranty...........................................Inside Front Cover
Product Registration Card........................................................Inside Front Cover
Important Safeguards........................................................................................2
Warranty...........................................................................................................3
For the 50 United States and District of Columbia.......................................3
For Puerto Rico ...........................................................................................4
Arranging for Service after the Warranty Expires.........................................4
Arranging for Service Outside the 50 United States and Puerto Rico...........4
Ordering Accessories and Replacement Parts.....................................................4
Electrical Requirements......................................................................................5
Troubleshooting Problems.................................................................................5
About Your Mixer
Bowl Lift Stand Mixer Features...........................................................................6
Assembling Your Bowl Lift Mixer .......................................................................7
Assembling Your Pouring Shield........................................................................8
Using Your KitchenAid®Attachments ................................................................9
Mixing Time ......................................................................................................9
Mixer Use..........................................................................................................9
Care and Cleaning...........................................................................................10
Beater to Bowl Clearance .................................................................................10
Speed Control Guide - 10 Speed Mixers ..........................................................11
Mixing Tips ......................................................................................................12
Egg Whites...............................................................................................13
Whipped Cream........................................................................................13
Attachments and Accessories - General Instructions ........................................14
Appetizers, Entrees, and Vegetables................................................................15
Cakes and Frostings.........................................................................................25
Cookies, Bars, and Candies..............................................................................38
Pies and Desserts.............................................................................................48
Yeast Breads and Quick Breads........................................................................53
General Instructions for Mixing and Kneading Yeast Dough......................53
Bread Making Tips....................................................................................54
KitchenAid
®
Attachments and Accessories .......................................................78

2
IMPORTANT SAFEGUARDS
When using electrical appliances, basic safety precautions should always be
followed including the following:
1. Read all instructions
2. To protect against risk of electrical shock, do not put Stand Mixer in water
or other liquid.
3. Close supervision is necessary when any appliance is used by or near
children.
4. Unplug Stand Mixer from outlet when not in use, before putting on or
taking off parts and before cleaning.
5. Avoid contacting moving parts. Keep hands, hair, clothing, as well as
spatulas and other utensils away from beater during operation to reduce
the risk of injury to persons and/or damage to the Stand Mixer.
6. Do not operate Stand Mixer with a damaged cord or plug or after the Stand
Mixer malfunctions, or is dropped or damaged in any manner. Return
appliance to the nearest authorized service center for examination, repair or
electrical or mechanical adjustment. Call the KitchenAid Customer
Satisfaction Center at 1-800-541-6390 for more information.
7. The use of attachments not recommended or sold by KitchenAid may cause
fire, electrical shock or injury.
8. Do not use the Stand Mixer outdoors.
9. Do not let the cord hang over edge of table or counter.
10. Remove flat beater, wire whip or dough hook from Stand Mixer before washing.
11. This product is designed for household use only.
SAVE THESE INSTRUCTIONS
Your safety and the safety of others are very important.
We have provided many important safety messages in this manual and on your
appliance. Always read and obey all safety messages.
This is the safety alert symbol.
This symbol alerts you to potential hazards that can kill or hurt
you and others.
All safety messages will follow the safety alert symbol and either
the word “DANGER” or “WARNING.” These words mean:
You can be killed or seriously
injured if you don’t immediately
follow instructions.
You can be killed or seriously
injured if you don’t follow
instructions.
All safety messages will tell you what the potential hazard is, tell you how to
reduce the chance of injury, and tell you what can happen if the instructions are
not followed.not followed.
DANGER
WARNING

3
Length of
Warranty:
One Year Full Warranty
from date of purchase.
KitchenAid Will Pay
For Your Choice of:
Hassle-Free
Replacement of your
Stand Mixer. See inside
front cover for details
on how to arrange for
service, or call the
Customer Satisfaction
Center toll-free at
1-800-541-6390.
OR
The replacement parts
and repair labor costs
to correct defects in
materials and
workmanship. Service
must be provided by an
Authorized KitchenAid
Service Center. See the
KitchenAid®Stand
Mixer Warranty for
Puerto Rico on page 4
for details on how to
arrange for service.
KitchenAid Will Not
Pay For:
A. Repairs when Stand
Mixer is used in
other than normal
single family home
use.
B. Damage resulting
from accident,
alteration, misuse or
abuse.
C. Any shipping or
handling costs to
deliver your Stand
Mixer to an
Authorized Service
Center.
D. Replacement parts
or repair labor costs
for Stand Mixers
operated outside the
50 United States
and District of
Columbia.
KITCHENAID DOES NOT ASSUME ANY RESPONSIBILITY FOR INCIDENTAL
OR CONSEQUENTIAL DAMAGES. Some states do not allow the exclusion or
limitation of incidental or consequential damages, so this exclusion may not
apply to you. This warranty gives you specific legal rights and you may also
have other rights which vary from state to state.
This warranty extends to the purchaser and any succeeding owner for Stand
Mixers operated in the 50 United States and District of Columbia.
KitchenAid®Stand Mixer Warranty for
the 50 United States and District of Columbia
4
KitchenAid®Stand Mixer Warranty
for Puerto Rico
A limited one year warranty extends
to the purchaser and any succeeding
owner for Stand Mixers operated in
Puerto Rico. During the warranty
period, all service must be handled by
an Authorized KitchenAid Service
Center. Please bring the Stand Mixer,
or ship it prepaid and insured, to the
nearest Authorized Service Center. Call
toll-free 1-800-541-6390 to learn the
location of a Service Center near you.
Your repaired Stand Mixer will be
returned to you prepaid and insured.
For service information, call toll-free
1-800-541-6390 or write to:
Customer Satisfaction Center,
KitchenAid Portable Appliances, P.O.
Box 218, St. Joseph, MI 49085-0218.
Arranging for Service
after the Warranty Expires
Consult your local KitchenAid dealer
or the store where you purchased the
Stand Mixer for information on how
to obtain service.
Arranging for Service Outside
the 50 United States and Puerto Rico
To order accessories or replacement
parts for your Stand Mixer, call tollfree 1-800-541-6390 or write to:
Customer Satisfaction Center,
KitchenAid Portable Appliances, P.O.
Box 218, St. Joseph, MI 49085-0218.
Ordering Accessories and Replacement Parts
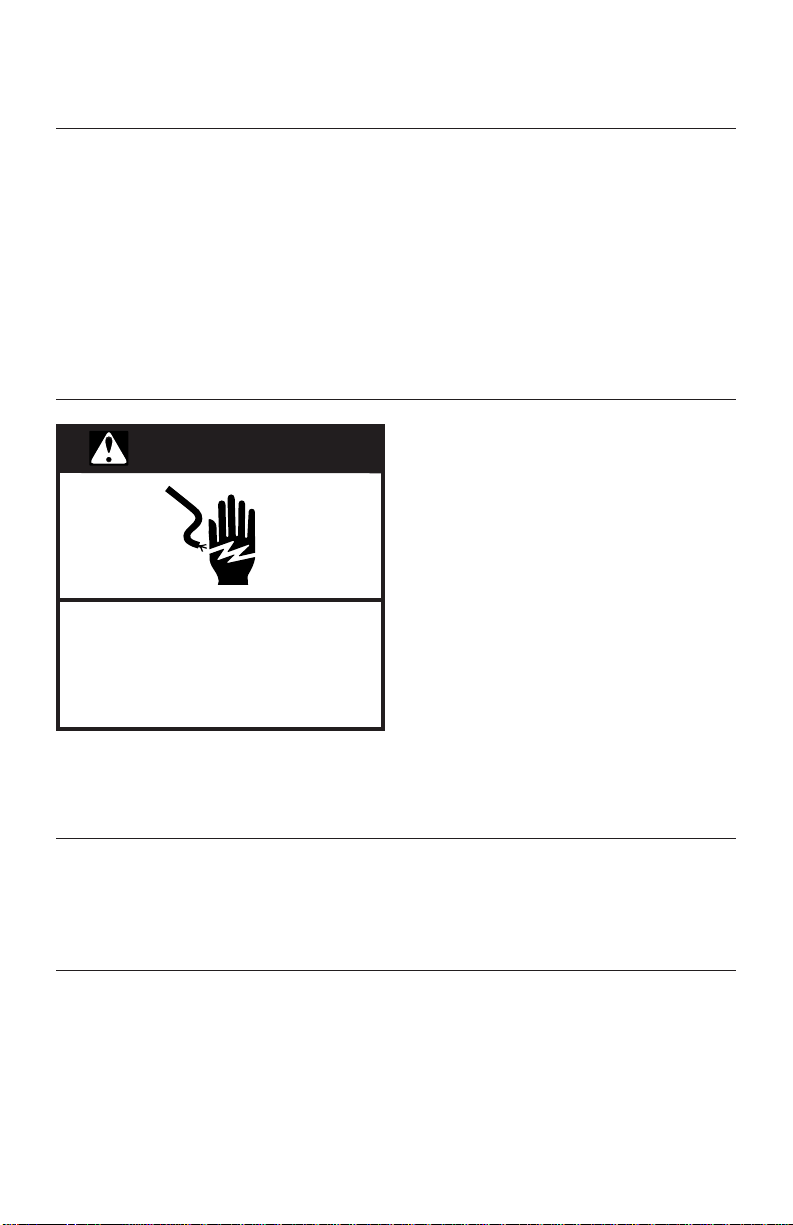
WARNING
Electrical Shock Hazard
Unplug before servicing.
Failure to do so can result in
death or electrical shock.

5
Please read the following before
calling your service center.
1. The Stand Mixer may warm up
during use. Under heavy loads with
extended mixing time periods, you
may not be able to comfortably
touch the top of the unit. This is
normal.
2. The Stand Mixer may emit a
pungent odor, especially when
new. This is common with electric
motors.
3. If the flat beater hits the bowl,
stop the Stand Mixer. See “Beater
to Bowl Clearance,” page 10.
Keep a copy of the sales receipt
showing the date of purchase. Proof
of purchase will assure you of
in-warranty service.
If your Stand Mixer should
malfunction or fail to operate,
please check the following:
- Is the Stand Mixer plugged in?
- Is the fuse in the circuit to the Stand
Mixer in working order? If you have
a circuit breaker box, be sure the
circuit is closed.
- Turn the Stand Mixer off for 10-15
seconds, then turn it back on. If the
mixer still does not start, allow it to
cool for 30 minutes before turning it
back on.
- If the problem is not due to one of
the above items, see “Arranging for
Service” on page 4.
- Do not return the Stand Mixer to
the retailer as they do not provide
service.
Electrical Requirements
Volts: 120 A.C. only. Hertz: 60
The wattage rating for your Stand
Mixer is printed on the serial plate.
Do not use an extension cord. If the
power supply cord is too short, have a
qualified electrician or serviceman
install an outlet near the appliance.
Troubleshooting Problems
WARNING
Electrical Shock Hazard
Plug into a grounded 3 prong
outlet.
Do not remove ground prong.
Do not use an adapter.
Do not use an extension cord.
Failure to follow these
instructions can result in
death, fire, or electrical shock.
6
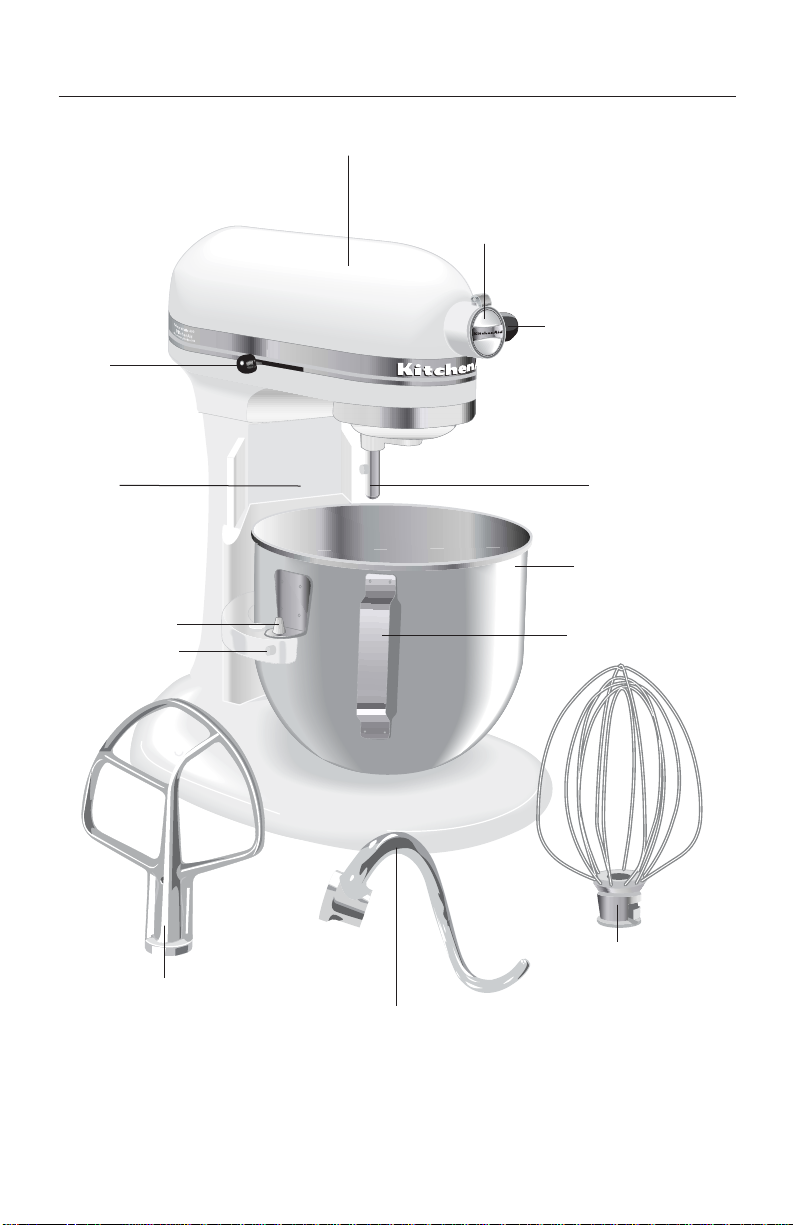
Bowl Lift Stand Mixer Features
Motor Head
Bowl Height
Adjustment
Screw
Bowl Lift Handle
(not shown)
Attachment
Knob
Attachment Hub
(see page 14)
Locating Pins
Wire Whip
Flat Beater
PowerKnead™
Spiral Dough Hook
Speed
Control
Knob
Bowl Support
Beater
Shaft
Stainless Steel
Bowl
Bowl Handle
R
E
S
E
T
O
S
TIR
F
F
/0
2
4
6
8
1
0
7
Assembling Your Bowl Lift Mixer
To Attach Bowl
1. Be sure speed control is OFF and
Stand Mixer is unplugged.
2. Place bowl lift handle in down
position.
3. Fit bowl supports over locating pins.
4. Press down on back of bowl until
bowl pin snaps into spring latch.
5. Raise bowl before mixing.
6. Plug into a grounded 3 prong
outlet.
To Raise Bowl
1. Rotate handle to straight-up
position.
2. Bowl must always be in raised,
locked position when mixing.
To Lower Bowl
1. Rotate handle back and down.
To Remove Bowl
1. Be sure speed control is OFF and
Stand Mixer is unplugged.
2. Place bowl lift handle in down
position
3. Remove flat beater, wire whip, or
spiral dough hook.
4. Grasp bowl handle and lift straight
up and off locating pins.
To Attach Flat Beater,
Wire Whip, or PowerKnead™
Spiral Dough Hook
1. Slide speed control to OFF and
unplug.
2. Slip flat beater on beater shaft.
3. Turn beater to left, hooking beater
over the pin on shaft.
4. Plug into a grounded 3 prong
outlet.
To Remove Flat Beater,
Wire Whip, or PowerKnead™
Spiral Dough Hook
1. Slide speed control to OFF and
unplug.
2. Press beater upward and turn
right.
3. Pull beater from beater shaft.
Household Stand Mixer
Speed Control
Plug into a grounded 3 prong outlet.
Speed control lever should always be
set on lowest speed for starting, then
gradually moved to desired higher
speed to avoid splashing ingredients
out of bowl. See page 11 for Speed
Control Guide.
Auto-Reset Motor Protection
If the Stand Mixer stops due to
overload, slide the speed control lever
to OFF. After a few minutes, the
stand mixer will automatically reset.
Slide the Speed Control Lever to the
desired speed and continue mixing.
If the unit does not restart, see
“Troubleshooting Problems” on
page 5.
Pin
Raise
RESET
OFF/0
STIR
2
4
10
6
8
8
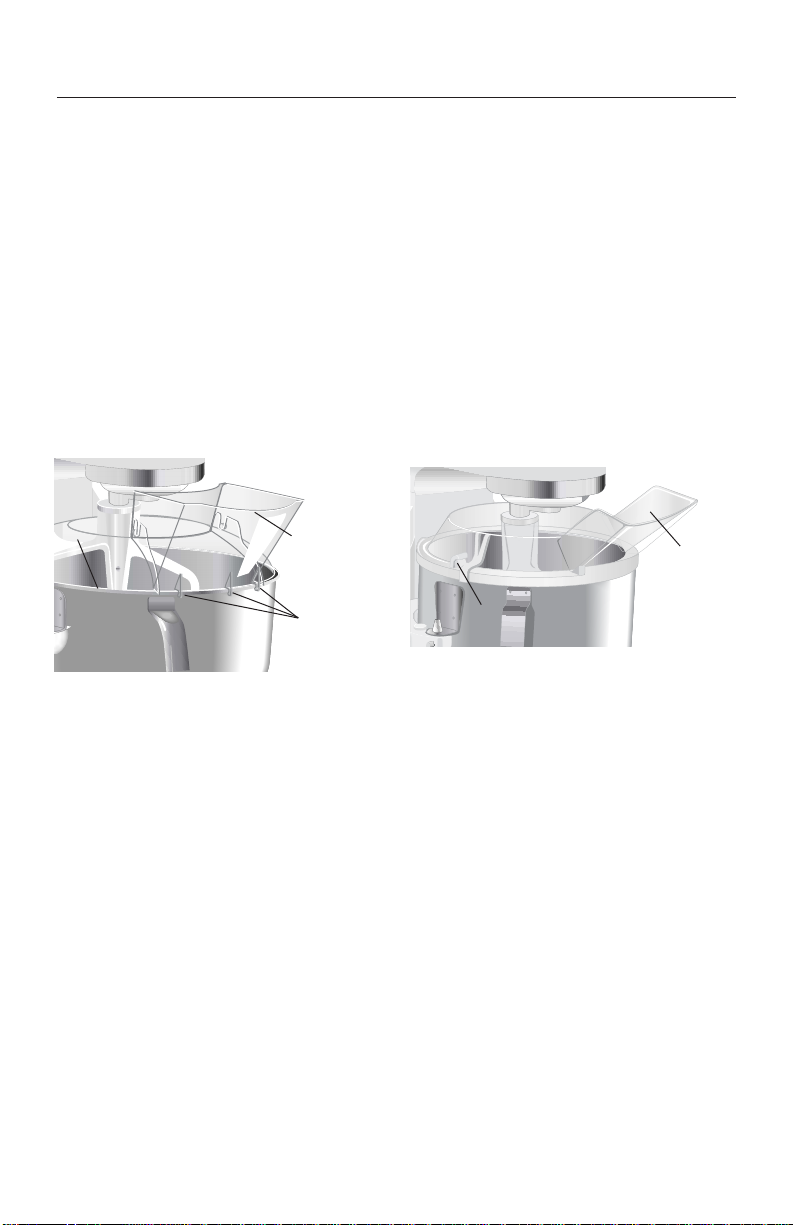
To Attach Wide Mouth
Pouring Shield (fits all 6-quart and
KV 5-quart bowl-lift models)
1. Be sure speed control is OFF and
Stand Mixer is unplugged.
2. Place bowl lift handle in down
position.
3. Attach desired accessory (flat
beater, PowerKnead™ Spiral Dough
Hook or wire whip) and bowl.
4. Place bowl lift handle in up position.
5. Slide pouring shield collar around
beater shaft, centering collar over rim
of bowl. Then, rotate opening in
collar toward front of Stand Mixer.
6. Fit tabs on the side of pouring
chute into notches on the collar.
7. Fit the three notched guides on
bottom of chute along rim of bowl.
To Remove Wide Mouth
Pouring Shield
1. Be sure speed control is OFF and
Stand Mixer is unplugged.
2. Remove pouring chute from collar.
3. Slide pouring shield collar off bowl.
4. Place bowl lift handle in down
position and remove accessory and
bowl.
To Use Pouring Shield
1. Pour ingredients into bowl through
pouring chute.
2. Important: when using the Wide
Mouth Pouring Shield make sure the
guides on the bottom of the chute
rest on the rim of the bowl to keep
ingredients from falling outside the
bowl as they are added.
Assembling Your Pouring Shield*
Notched
Guides
Pouring
Chute
Pouring
Shield
Collar
To Attach Pouring Shield (fits all
5-quart bowl-lift models except
the 5-quart KV models)
1. Be sure speed control is OFF and
Stand Mixer is unplugged.
2. Place bowl lift handle in down
position.
3. Attach desired accessory (flat
beater, PowerKnead™ Spiral Dough
Hook or wire whip) and bowl.
4. Place bowl lift handle in up
position.
5. Place the back half of the shield
(without the chute) on rim of
the bowl.
6. Insert the tabs on the front half of
the shield (with the chute) under
the tab openings on the back half
of the shield, then lower the shield
to lock into place.
To Remove Pouring Shield
1. Be sure speed control is OFF and
Stand Mixer is unplugged.
2. Lift pouring chute from bowl.
3. Slide back half of the shield off
bowl.
4. Place bowl lift handle in down
position and remove accessory and
bowl.
To Use Pouring Shield
1. Pour ingredients into bowl
through pouring chute.
* If Pouring Shield is included.
Tab
Pouring
Chute

9
Using Your KitchenAid®Attachments
Flat Beater for normal to heavy mixtures:
cakes biscuits
creamed frostings quick breads
candies meat loaf
cookies mashed potatoes
pie pastry
Wire Whip for mixtures that need air incorporated:
eggs sponge cakes
egg whites angel food cakes
heavy cream mayonnaise
boiled frostings some candies
PowerKnead™ Spiral Dough Hook for mixing and kneading
yeast doughs:
breads coffee cakes
rolls buns
pizza dough
Mixing Time
Your KitchenAid®Stand Mixer will mix
faster and more thoroughly than
most other electric Stand Mixers.
Therefore, the mixing time in most
recipes must be adjusted to avoid
overbeating. With cakes, for example,
beating time may be half as long as
with other Stand Mixers.
Mixer Use
NOTE: Do not scrape bowl while
Stand Mixer is operating.
The bowl and beater are designed to
provide thorough mixing without
frequent scraping. Scraping the bowl
once or twice during mixing is usually
sufficient. Turn unit off before
scraping.
The Stand Mixer may warm up during
use. Under heavy loads with extended
mixing time, you may not be able to
comfortably touch the top of the
unit. This is normal.
WARNING
Injury Hazard
Unplug mixer before touching
beaters.
Failure to do so can result in
broken bones, cuts or bruises.
10
Bowl, white flat beater and white
spiral dough hook may be washed in
an automatic dishwasher. Or, clean
them thoroughly in hot sudsy water
and rinse completely before drying.
Wire whip, burnished spiral dough
hook and burnished flat beater
should be hand washed and dried
immediately. Do not wash wire whip,
burnished spiral dough hook and
burnished flat beater in a dishwasher.
Do not store beaters on shaft.
Care and Cleaning
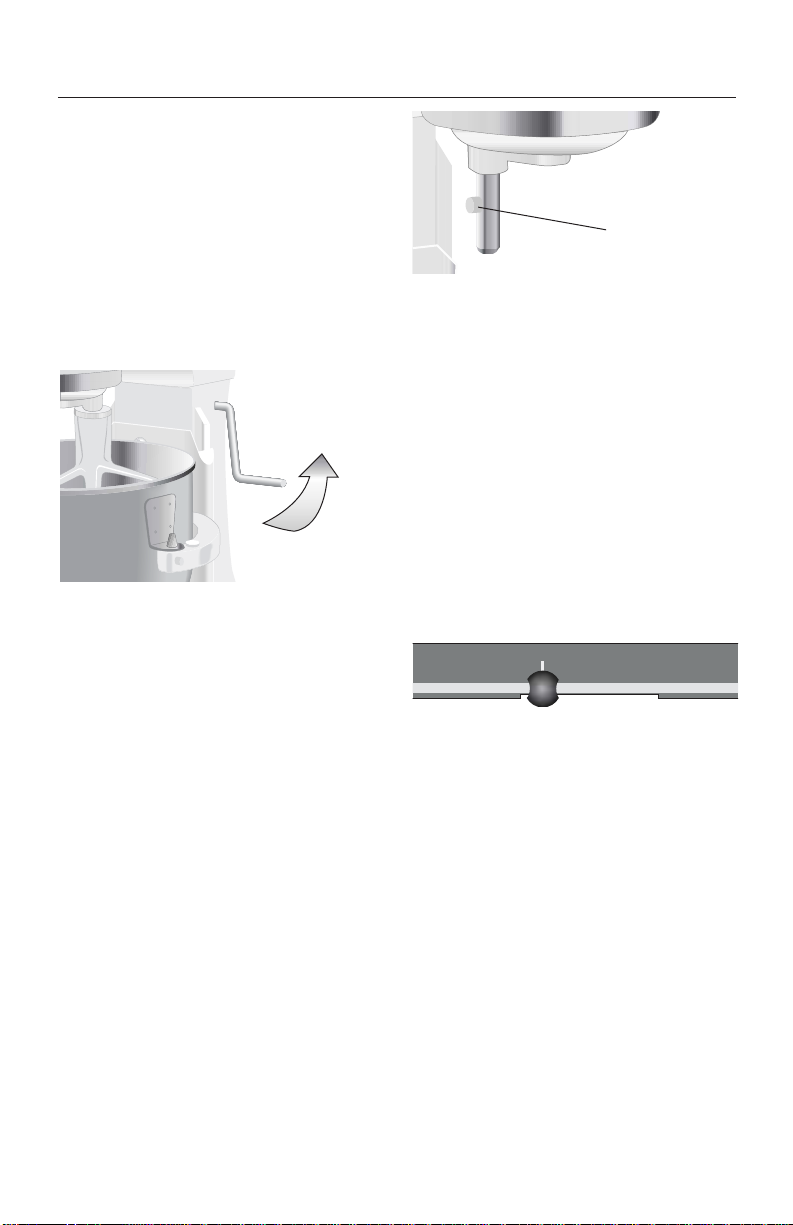
1. Unplug Stand Mixer.
2. Place bowl lift handle in down
position.
3. Attach flat beater.
4. Adjust so flat beater just clears
bottom surface of bowl when in
lifted position by turning screw (A)
clockwise to raise the bowl and
counterclockwise to lower the
bowl. Just a slight turn is all that is
required: the screw will not rotate
more than 1⁄4 turn (90 degrees) in
either direction. (The full range of
adjustment is 1⁄
2 turn, or 180
degrees.)
5. Place bowl lift handle in up
position to check clearance.
6. Repeat steps 4 and 5 if necessary.
NOTE: When properly adjusted, the
flat beater will not strike on the
bottom or side of the bowl. If the flat
beater or the wire whip is so close
that it strikes the bottom of the
bowl, coating may wear off the
beater or wires on whip may wear.
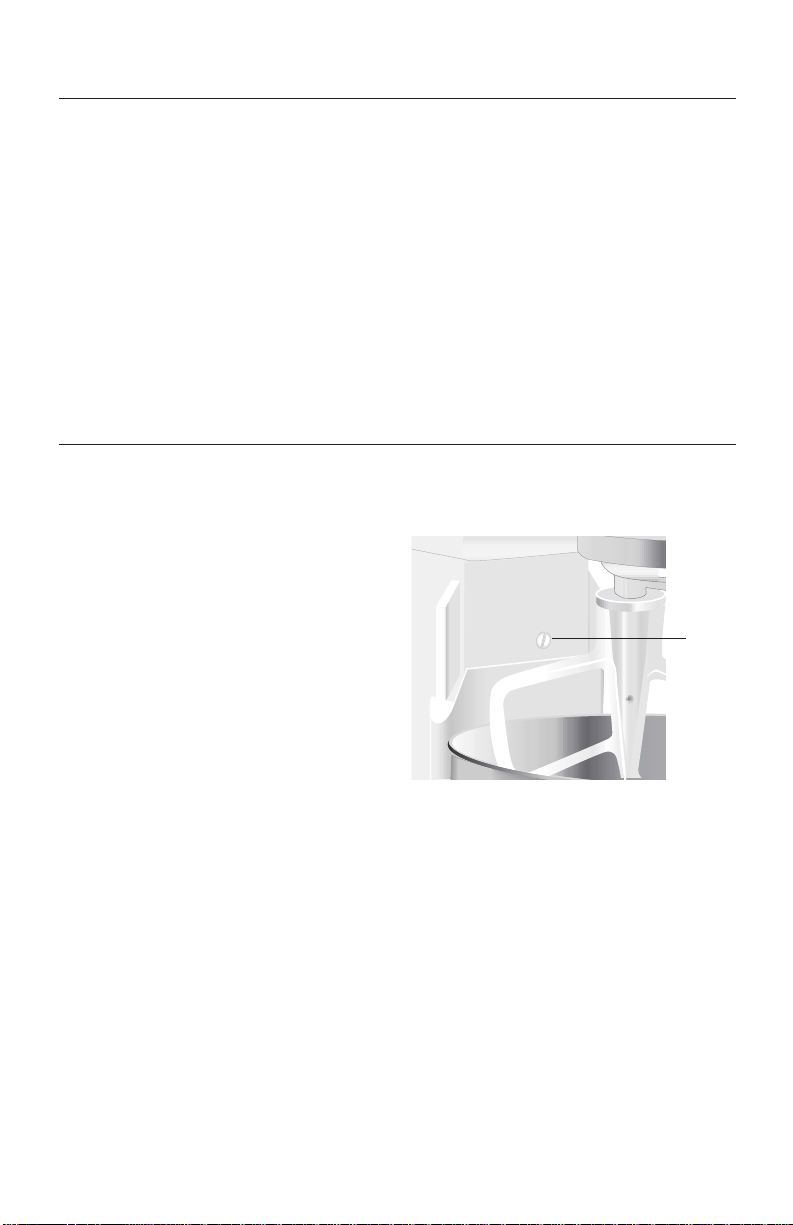
Beater to Bowl Clearance
Your Stand Mixer is adjusted at the factory so the flat beater just clears the
bottom of the bowl. If, for any reason, the flat beater hits the bottom of the
bowl or is too far away from the bowl, you can correct the clearance easily.
NOTE: Always be sure to unplug
Stand Mixer before cleaning. Wipe
Stand Mixer with a soft, damp cloth.
Do not use household/commercial
cleaners. Do not immerse in water.
Wipe off beater shaft frequently,
removing any residue that may
accumulate.
A

11
Speed Control Guide – 10 Speed Mixers
All speeds have the Soft Start™ feature which automatically starts the Stand
Mixer at a lower speed to help prevent ingredient splash-out and “flour puff” at
startup then quickly increases to the selected speed for optimal performance.
Number of Speed
Stir
Speed STIR For slow stirring, combining, mashing,
starting all mixing procedures. Use to
add flour and dry ingredients to batter,
and add liquids to dry ingredients. Do
not use STIR speed to mix or knead
yeast doughs.
2 SLOW MIXING For slow mixing, mashing, faster
stirring. Use to mix and knead yeast
doughs, heavy batters and candies,
start mashing potatoes or other
vegetables, cut shortening into flour,
mix thin or splashy batters. Use with
Can Opener attachment.
4 MIXING, For mixing semi-heavy batters, such as
BEATING cookies. Use to combine sugar and
shortening and to add sugar to egg
whites for meringues. Medium speed for
cake mixes. Use with: Food Grinder,
Rotor Slicer/Shredder, Pasta Roller, and
Fruit/Vegetable Strainer.
6 BEATING, For medium fast beating (creaming) or
CREAMING whipping. Use to finish mixing cake,
doughnut, and other batters. High speed
for cake mixes. Use with Citrus Juicer
attachment.
8 FAST BEATING, For whipping cream, egg whites, and
WHIPPING boiled frostings.
10 FAST WHIPPING For whipping small amounts of cream,
egg whites or for final whipping of
mashed potatoes. Use with Pasta Maker
and Grain Mill attachments.
NOTE: Will not maintain fast speeds
under heavy loads, such as when using
Pasta Maker or Grain Mill attachments.
Use Speed 2 to mix or knead yeast doughs. Use of any other speed creates
high potential for unit failure. The PowerKnead™ Spiral Dough Hook efficiently
kneads most yeast dough within 4 minutes.

12
Mixing Tips
Converting Your Recipe
for the Mixer
The mixing instructions for recipes in
this book can guide you in converting
your own favorite recipes for
preparation with your KitchenAid
®
Stand Mixer. Look for recipes similar
to yours and then adapt your recipes
to use the procedures in the similar
KitchenAid®recipes.
For example, the “quick mix”
method (sometimes referred to as the
“dump” method) is ideal for simple
cakes, such as the Quick Yellow Cake
and Easy White Cake included in this
book. This method calls for
combining dry ingredients with most
or all liquid ingredients in one step.
More elaborate cakes, such as
Caramel Walnut Banana Torte,
should be prepared using the
traditional cake mixing method. With
this method, sugar and the
shortening, butter or margarine are
thoroughly mixed (creamed) before
other ingredients are added.
For all cakes, mixing times may
change because your KitchenAid
®
Stand Mixer works more quickly than
other mixers. In general, mixing a
cake with the KitchenAid®Stand
Mixer will take about half the time
called for in most cake recipes.
To help determine the ideal mixing
time, observe the batter or dough
and mix only until it has the desired
appearance described in your recipe,
such as “smooth and creamy.”
To select the best mixing speeds,
use the Speed Control Guide on
pages 11 and 13.
Adding Ingredients
Always add ingredients as close to
side of bowl as possible, not directly
into moving beater. The Pouring
Shield can be used to simplify adding
ingredients.
NOTE: If ingredients in very bottom
of bowl are not thoroughly mixed,
then the beater is not far enough into
the bowl. See “Beater to Bowl
Clearance,” page 10.
Cake Mixes
When preparing packaged cake
mixes, use Speed 2 for low speed,
Speed 4 for medium speed, and
Speed 6 for high speed. For best
results, mix for the time stated on the
package directions.
Adding Nuts, Raisins, or
Candied Fruits
Follow individual recipes for
guidelines on including these
ingredients. In general, solid materials
should be folded in the last few
seconds of mixing on STIR Speed. The
batter should be thick enough to
prevent the fruit or nuts from sinking
to the bottom of the pan during
baking. Sticky fruits should be dusted
with flour for better distribution in
the batter.
Liquid Mixtures
Mixtures containing large amounts of
liquid ingredients should be mixed at
lower speeds to avoid splashing.
Increase speed only after mixture has
thickened.

13
Egg Whites
Place room temperature egg whites in
clean, dry bowl. Attach bowl and wire
whip. To avoid splashing, gradually
turn to designated speed and whip to
desired stage. See chart below.
AMOUNT SPEED
1 egg white .......GRADUALLY to 10
2-4 egg whites........GRADUALLY to 8
6 or more
egg whites........GRADUALLY to 8
Whipping Stages
With your KitchenAid®Stand Mixer,
egg whites whip quickly. So, watch
carefully to avoid overwhipping. This
list tells you what to expect.
Frothy
Large, uneven air bubbles.
Begins to Hold Shape
Air bubbles are fine and compact;
product is white.
Soft Peak
Tips of peaks fall over when wire
whip is removed.
Almost Stiff
Sharp peaks form when wire whip is
removed, but whites are actually soft.
Stiff but not Dry
Sharp, stiff peaks form when wire
whip is removed. Whites are uniform
in color and glisten.
Stiff and Dry
Sharp, stiff peaks form when wire
whip is removed. Whites are speckled
and dull in appearance.
Whipped Cream
Pour cold whipping cream into chilled
bowl. Attach bowl and wire whip. To
avoid splashing, gradually turn to
designated speed and whip to desired
stage. See chart below.
AMOUNT SPEED
1
⁄4
cup (50 mL)........GRADUALLY to 10
1
⁄2
cup (125 mL) .....GRADUALLY to 10
1 cup (250 mL)........GRADUALLY to 8
1 pint (500 mL).......GRADUALLY to 8
Whipping Stages
Watch cream closely during
whipping. Because your KitchenAid
®
Stand Mixer whips so quickly, there
are just a few seconds between
whipping stages. Look for these
characteristics:
Begins to Thicken
Cream is thick and custard-like.
Holds its Shape
Cream forms soft peaks when wire
whip is removed. Can be folded into
other ingredients when making
desserts and sauces.
Stiff
Cream stands in stiff, sharp peaks
when wire whip is removed. Use for
topping on cakes or desserts, or filling
for cream puffs.

14
®
Attachments and Accessories
To Attach
1. Turn Stand Mixer off and unplug.
2. Loosen attachment knob by
turning it counterclockwise.
3. Flip up hinged hub cover.
4. Insert attachment shaft housing
into attachment hub, making
certain that attachment power
shaft fits into square attachment
hub socket. It may be necessary to
rotate attachment back and forth.
When attachment is in proper
position, the pin on the
attachment will fit into the notch
on the hub rim.
5. Tighten attachment knob by
turning clockwise until attachment
is completely secured to Stand
Mixer.
6. Plug into a grounded 3 prong
outlet.
To Remove
1. Turn Stand Mixer off and unplug.
2. Loosen attachment knob by
turning it counterclockwise. Rotate
attachment slightly back and forth
while pulling out.
3. Replace attachment hub cover.
Tighten attachment knob by
turning it clockwise.
General Information
KitchenAid
®
Attachments are designed to assure long life. The attachment
power shaft and hub socket are of a square design, to eliminate any possibility
of slipping during the transmission of power to the attachment. The hub and
shaft housing are tapered to assure a snug fit, even after prolonged use and
wear. KitchenAid®Attachments require no extra power unit to operate them;
the power unit is built-in.
‡Not part of mixer.
General Instructions
Attachment
Hub Socket
Attachment
Knob
Notch
Pin
Attachment Shaft
Housing
Attachment
Power Shaft‡
Hinged
Hub Cover
Attachment
Housing

15
Crabmeat Dip
1 package (8 oz.) light
cream cheese
1 cup reduced-fat
cottage cheese
1
⁄4 cup reduced-calorie
mayonnaise
1 can (6
1
⁄2 oz.)
crabmeat, flaked
1 tablespoon lemon
juice
3tablespoons chopped
green onions
1
⁄2 teaspoon garlic salt
3 drops hot pepper
sauce
Place cream cheese, cottage cheese, and
mayonnaise in mixer bowl. Attach bowl and flat
beater to mixer. Turn to Speed 6 and beat about 1
minute, or until well blended. Stop and scrape
bowl. Add all remaining ingredients. Turn to Speed
6 and beat about 1 minute, or until all ingredients
are combined.
Refrigerate until well chilled. Serve with assorted
crackers or raw vegetables.
Yield: 24 servings (2 tablespoons per serving).
Per serving: About 42 cal, 4 g pro, 1 g carb, 3 g fat,
12 mg chol, 180 mg sod.
4 ounces light cream
cheese
1
⁄2 cup marshmallow
cream
1 can (8 oz.) crushed
pineapple, well
drained
2 teaspoons grated
orange peel
Place cream cheese in mixer bowl. Attach bowl and
flat beater to mixer. Turn to Speed 2 and mix about
30 seconds. Stop and scrape bowl. Add
marshmallow cream, pineapple, and orange peel.
Turn to Speed 4 and beat about 30 seconds. Stop
and scrape bowl. Turn to Speed 4 and beat about
30 seconds. Refrigerate at least 2 hours. Serve with
sliced fresh fruit, if desired.
Yield: 12 servings (2 tablespoons per serving).
Per serving: About 61 cal, 1 g pro, 11 g carb,
2 g fat, 3 mg chol, 58 mg sod.
Creamy Pineapple Fruit Dip
APPETIZERS, ENTREES, AND VEGETABLES

16
1 package (8 oz.) light
cream cheese
1
⁄2 cup shredded hot
pepper Monterey
Jack cheese
1
⁄4 cup bean or black
bean dip
1
⁄2 cup thick and chunky
salsa
1
⁄2 cup chopped green
onions
1
⁄4 cup sliced pitted ripe
olives
Place cream cheese in mixer bowl. Attach bowl and
flat beater to mixer. Turn to Speed 2 and mix about
30 seconds. Stop and scrape bowl. Add Monterey
Jack cheese. Turn to Speed 2 and mix about
30 seconds.
Spread cheese mixture on 10-inch serving plate to
within 1 or 2 inches of edge. Spread bean dip over
cheese. Spread salsa over bean dip. Top with
onions and olives. Refrigerate until ready to serve.
Serve with tortilla chips, if desired.
Yield: 12 servings (1⁄4 cup per serving).
Per serving: About 70 cal, 4 g pro, 3 g carb,
5 g fat, 12 mg chol, 265 mg sod.
Layered Mexican Dip
2 packages (8 oz.
each) light cream
cheese, softened
1 package (1.25 oz.)
taco seasoning mix
3 eggs
2 cups shredded
Marble-Jack cheese
1 can (4 oz.) green
chilies
1 cup light sour cream
1 cup salsa
Place cream cheese and taco seasoning mix in mixer
bowl. Attach bowl and flat beater to mixer. Turn to
Speed 6 and beat about 11⁄2 minutes, or until fluffy.
Stop and scrape bowl. Turn to Speed 4 and add
eggs, one at a time, beating about 15 seconds after
each addition. Stop and scrape bowl. Add cheese
and green chilies. Turn to STIR Speed and mix 15
seconds.
Pour mixture into greased 9-inch springform pan.
Bake at 350ºF for 40 minutes, or until knife inserted
near center comes out clean. Remove from oven
and spread with sour cream. Return to oven and
bake 5 minutes longer. Cool 15 minutes. Refrigerate
3 to 8 hours. Before serving, remove outer ring and
spread top of cheesecake with salsa. Serve with
taco chips, if desired.
Yield: 20 servings (1 wedge per serving).
Per serving: About 136 cal, 7 g pro, 5 g carb,
9 g fat, 59 mg chol, 421 mg sod.
Fiesta Cheesecake Appetizer

17
1 cup shredded sharp
Cheddar cheese
1 cup shredded Swiss
cheese
1 package (8 oz.) light
cream cheese
2tablespoons chopped
fresh chives
2 teaspoons
Worcestershire sauce
1
⁄4 teaspoon paprika
1
⁄2 teaspoon garlic
powder
1
⁄4 cup finely chopped
pecans
Nutty Cheese Ball
Place all ingredients, except pecans, in mixer bowl.
Attach bowl and flat beater to mixer. Turn to
Speed 4 and beat about 1 minute, or until well
blended.
On waxed paper, shape mixture into a ball. Roll ball
in chopped pecans. Wrap in waxed paper.
Refrigerate until serving time. Serve with assorted
crackers or raw vegetables.
Yield: 24 servings (2 tablespoons per serving).
Per serving: About 65 cal, 4 g pro, 1 g carb, 5 g fat,
13 mg chol, 109 mg sod.
1 baguette loaf, cut
into
1
⁄2-inch slices
2 teaspoons butter or
margarine
1
⁄2 cup finely chopped
onion
1 clove garlic, minced
1 package (9 oz.)
frozen chopped
spinach, thawed and
squeezed dry
1 package (8 oz.) light
cream cheese
1
⁄4 cup roasted red
peppers
1
⁄2 cup shredded
Cheddar cheese
Place baguette slices on baking sheet. Bake at
375°F for 4 to 6 minutes, or until toasted. Set aside.
Melt butter in 10-inch skillet over medium heat.
Add onion and garlic. Cook and stir 2 to 3 minutes,
or until softened. Add spinach. Cook and stir 30 to
60 seconds, or until warm. Cool slightly.
Place cream cheese in mixer bowl. Attach bowl and
flat beater to mixer. Turn to Speed 2, mix about
30 seconds. Add spinach mixture. Continuing on
Speed 2, mix about 30 seconds. Add red peppers.
Continuing on Speed 2, mix about 30 seconds.
Spread spinach mixture on toasted baguette slices.
Top each slice with about 1 teaspoon Cheddar
cheese. Bake at 375°F for 5 to 8 minutes, or
until thoroughly heated and cheese is melted. Serve
warm.
Yield: 12 servings (2 crostini per serving).
Per serving: About 141 cal, 6 g pro, 16 g carb,
6 g fat, 12 mg chol, 324 mg sod.
Spinach and Cheese Crostini

18
Mushroom-Onion Tartlets
Pastry Crusts
4oz. light cream
cheese
3 tablespoons butter
or margarine, divided
3
⁄4
cup plus 1 teaspoon
all-purpose flour
8 oz. fresh
mushrooms, coarsely
chopped
1
⁄2 cup chopped green
onions
Filling
1 egg
1
⁄4 teaspoon dried
thyme leaves
1
⁄2 cup shredded Swiss
cheese
To make Pastry Crusts, place cream cheese and
2 tablespoons butter in mixer bowl. Attach bowl
and flat beater to mixer. Turn to Speed 4 and beat
about 1 minute. Stop and scrape bowl. Add 3⁄
4 cup
flour. Turn to Speed 2 and mix about 1 minute, or
until well blended. Form mixture into a ball. Wrap
in waxed paper and chill 1 hour. Clean mixer bowl
and beater.
To make Filling, melt remaining 1 tablespoon
butter in 10-inch skillet over medium heat. Add
mushrooms and onions. Cook and stir until tender.
Remove from heat. Cool slightly.
Divide chilled dough into 24 pieces. Press each
piece into miniature muffin cup (greased, if
desired).
For Filling, place egg, remaining 1 teaspoon flour,
and thyme in mixer bowl. Attach bowl and flat
beater to mixer. Turn to Speed 6 and beat about
30 seconds. Stir in cheese and cooled mushroom
mixture. Spoon into pastry-lined muffin cups. Bake
at 375°F for 15 to 20 minutes, or until egg mixture
is puffed and golden brown. Serve warm.
Yield: 12 servings (2 tartlets per serving).
Per serving: About 98 cal, 4 g pro, 8 g carb,
6 g fat, 33 mg chol, 83 mg sod.

19
Herbed Whipped Squash
1 large butternut
squash, baked
(about 3 cups
cooked)
1
⁄4 cup butter or
margarine, melted
1
⁄2 teaspoon dried
tarragon leaves
1
⁄
8 teaspoon salt
1
⁄8 teaspoon black
pepper
Scoop cooked squash out of shell and place in
mixer bowl. Attach bowl and wire whip to mixer.
Turn to Speed 4 and beat about 30 seconds. Add
all remaining ingredients. Turn to Speed 2 and
mix about 30 seconds. Turn to Speed 4 and beat
about 2 minutes.
Yield: 6 servings (1⁄2 cup per serving).
Per serving: About 107 cal, 1 g pro, 11 g carb,
7 g fat, 0 mg chol, 137 mg sod.
2 medium sweet
potatoes, cooked
and peeled
1
⁄2 cup low-fat milk
1
⁄3 cup sugar
2 eggs
2 tablespoons butter
or margarine
1
⁄2
teaspoon nutmeg
1
⁄2 teaspoon cinnamon
Crunchy Praline
Topping
2 tablespoons butter
or margarine, melted
3
⁄4 cup corn flakes
1
⁄4 cup chopped
walnuts or pecans
1
⁄4 cup firmly packed
brown sugar
Place potatoes in mixer bowl. Attach bowl and
flat beater to mixer. Turn to Speed 2 and mix
about 30 seconds. Add milk, sugar, eggs,
2 tablespoons butter, nutmeg, and cinnamon.
Turn to Speed 4 and beat about 1 minute. Spread
mixture in greased 9-inch pie plate. Bake at 400°F
for 20 minutes, or until set. Clean bowl and
beater.
Place all Topping ingredients in mixer bowl.
Attach bowl and flat beater to mixer. Turn to STIR
Speed and mix about 15 seconds. Spread on hot
puff. Bake 10 minutes longer.
Yield: 6 servings (1⁄2 cup per serving).
Per serving: About 268 cal, 6 g pro, 35 g carb,
12 g fat, 2 mg chol, 176 mg sod.
Sweet Potato Puff

20
Appetizer Cream Puffs
with Creamy Feta Olive Filling
Cream Puffs
1 cup water
1
⁄2 cup butter or
margarine
1
⁄4 teaspoon salt
1 cup all-purpose flour
4 eggs
Filling
1 package (8 oz.) light
cream cheese
4 oz. crumbled
tomato-basil feta
cheese
1
⁄2 cup light sour cream
1
⁄3 cup finely chopped
kalamata or ripe
olives
1
⁄2 teaspoon lemon
pepper seasoning
To make Cream Puffs, heat water, butter, and
salt in a medium saucepan over high heat to a full
rolling boil. Reduce heat and quickly stir in flour,
mixing vigorously until mixture leaves sides of pan
in a ball.
Place flour mixture in mixer bowl. Attach bowl and
flat beater. Turn to Speed 2 and add eggs, one at a
time, beating about 30 seconds after each addition.
Stop and scrape bowl. Turn to Speed 4 and beat
about 15 seconds.
Drop dough onto greased baking sheets forming
36 mounds, 2 inches apart. Bake at 400ºF for
10 minutes. Reduce heat to 350ºF and bake
25 minutes longer. Turn off oven. Remove pans
from oven. Cut a small slit in side of each puff.
Return pans to oven (turned off) for 10 minutes,
leaving oven door ajar. Cool completely on rack.
To make Filling, combine all ingredients in mixer
bowl. Attach bowl and flat beater. Turn to Speed 2
and mix about 30 seconds, or until blended. Pipe or
spoon about 1 tablespoon filling into each cream
puff.
Yield: 36 servings (1 filled cream puff per serving).
Per serving: About 72 cal, 2 g pro, 4 g carb,
5 g fat, 37 mg chol, 132 mg sod.

21
Mashed Potatoes
5 large potatoes (about
2
1
⁄2 lbs.), peeled,
quartered, and
boiled
1
⁄2 cup low-fat milk,
heated
2 tablespoons butter
or margarine
1 teaspoon salt
1
⁄8 teaspoon black
pepper
Warm mixer bowl and flat beater with hot water;
dry. Place hot potatoes in bowl. Attach bowl and
flat beater to mixer. Gradually turn to Speed 2 and
mix about 1 minute, or until smooth.
Add all remaining ingredients. Turn to Speed 4 and
beat about 30 seconds, or until milk is absorbed.
Gradually turn to Speed 6 and beat about 1 minute,
or until fluffy. Stop and scrape bowl. Exchange flat
beater for wire whip. Turn to Speed 10 and whip
2 to 3 minutes.
Yield: 9 servings (3⁄4 cup per serving).
Per serving: About 111 cal, 2 g pro, 19 g carb,
3 g fat, 8 mg chol, 296 mg sod.
VARIATIONS
Garlic Mashed Potatoes
Substitute 1 teaspoon garlic salt for salt.
Per serving: About 111 cal, 2 g pro, 19 g carb,
3 g fat, 8 mg chol, 239 mg sod.
Mashed Potatoes for a Crowd
Prepare as directed above, using 6 quart mixer
bowl.
Yield: 18 servings (3⁄4 cup per serving).
9 large potatoes (about
5 lbs.), peeled,
quartered, and
boiled
2
⁄3 cups low-fat milk,
heated
3 tablespoons butter
or margarine
1
1
⁄2 teaspoons salt
1
⁄4 teaspoon black
pepper

22
Baked Pastry Shell
(see page 50)
1 tablespoon oil
1 small onion,
chopped
1medium green bell
pepper, chopped
8oz. sliced fresh
mushrooms
6 eggs
1
⁄3 cup low-fat milk
1 tablespoon chopped
fresh parsley
1 teaspoon salt
5 drops hot pepper
sauce
1 cup (4 oz.) reduced-
fat shredded Swiss
cheese
Follow procedure for Baked Pastry Shell. Cool
10 minutes.
Meanwhile, heat oil in large non-stick skillet over
medium-high heat. Add onion and bell pepper.
Cook about 1 minute, stirring frequently. Add
mushrooms. Cook and stir about 2 minutes, or until
vegetables are tender. Set aside.
Place eggs, milk, parsley, salt, and hot pepper sauce
in mixer bowl. Attach bowl and wire whip to mixer.
Turn to Speed 2 and mix 1 to 2 minutes.
Sprinkle half of cheese in pastry shell. Top with
vegetables. Pour egg mixture over vegetables. Top
with remaining cheese. Bake at 350°F for 30 to 35
minutes, or until knife inserted in center comes out
clean. Let stand about 5 minutes before serving.
Yield: 8 servings.
Per serving (filling and crust): About 264 cal,
12 g pro, 17 g carb, 16 g fat, 172 mg chol,
561 mg sod.
Garden Quiche

23
1 cup salsa, divided
2 cups soft bread
crumbs
1 small onion,
chopped
1 egg
1 tablespoon
Worcestershire sauce
1 teaspoon dried
thyme
1
⁄2 teaspoon garlic salt
1
⁄4 teaspoon pepper
1 pound lean ground
beef
1
⁄2
pound ground turkey
Place 3⁄4 cup salsa, bread crumbs, onion, egg,
Worcestershire sauce, thyme, garlic salt, and pepper
in mixer bowl. Attach bowl and flat beater to mixer.
Turn to STIR Speed, mix about 30 seconds. Add
beef and turkey. Continuing on STIR Speed, mix
about 45 seconds, or until blended.
Divide mixture into 3 equal parts. Shape each part
into a loaf about 6x3x12-inches. Place loaves on
rack in shallow baking pan. Spoon remaining salsa
on tops of loaves. Bake at 350°F for 40 to
45 minutes, or until no longer pink in center.
Yield: 6 servings (2 servings per loaf).
Per serving: About 167 cal, 11 g pro, 16 g carb,
6 g fat, 47 mg chol, 426 mg sod.
VARIATION
Mexican Appetizer Meatballs
Form meat mixture into 1-inch balls. Place in
13x9x2-inch rectangular baking pan. Bake at 400°F
for 20 to 25 minutes, or until no longer pink inside.
Serve with salsa, if desired.
Yield: 18 servings (2 meatballs per serving).
Per serving: About 124 cal, 9 g pro, 11 g carb,
5 g fat, 36 mg chol, 287 mg sod.
Meatloaf for a Crowd
Double the ingredients and mix in the 6 quart mixer
bowl.
Yield: 12 servings (1⁄2 loaf per serving).
Mexican Meatloaf

24
Filling
2 tablespoons butter
or margarine
3 boneless, skinless
chicken breast
halves, cut into
1
⁄2-inch pieces
1 medium onion or 3
shallots, sliced
8 ounces button or
crimini mushrooms,
halved or quartered
1 can (14
1
⁄2 oz.) diced
tomatoes, undrained
2 tablespoons flour
1
⁄2 teaspoon dried
thyme leaves
Pastry Topping
1
⁄2 cup water
1
⁄4 cup butter or
margarine, cut up
1
⁄4 teaspoon salt
1
⁄2 cup all-purpose flour
2 eggs
2 oz. sharp Cheddar
cheese, diced
To make Filling, melt butter in large skillet over
medium heat. Add chicken and onion. Cook and
stir 3 minutes. Add mushrooms. Cook and stir
5 minutes. Add tomatoes, flour, and thyme. Cook
and stir until thickened and bubbly. Cover and keep
warm on low heat.
To make Pastry Topping, heat water, butter, and
salt in small saucepan over high heat to a full
rolling boil. Reduce heat and quickly stir in flour,
mixing vigorously until mixture leaves sides of pan
in a ball.
Place flour mixture in mixer bowl. Attach bowl and
flat beater to mixer. Turn to Speed 2 and add eggs,
one at a time, mixing about 30 seconds after each
addition. Stop and scrape bowl. Turn to Speed 4
and beat about 15 seconds. Add cheese. Turn to
STIR Speed and mix about 10 seconds.
Pour hot filling into 2-quart casserole dish sprayed
with no-stick cooking spray. Spoon pastry into
4 mounds on top of chicken mixture. Bake at 400°F
for 35 to 45 minutes, or until pastry is puffed and
browned and filling is bubbly.
Yield: 4 servings.
Per serving: About 507 cal, 39 g pro, 24 g carb,
28 g fat, 240 mg chol, 706 mg sod.
Chicken and Mushroom Casserole
with Cheese Puff Topping
 Loading...