

KitchenAid KUWA244PBL00, KUWA244PWH00, KUWA244PSS00, KUWA244PBS00 Owner’s Manual

®itchen_kid ®
WINE CELLAR
OVERLAY MODEL
For questions about features, operation/performance, parts, accessories or service, call: 1-800-422-1230
In Canada, call for assistance 1-800-461-5681, for installation and service, call: 1-800-807-6777 or visit our website at...
www.kitchenaid.com or www.KitchenAid.ca
CAVE A VIN
MODELE OVERLAY
Au Canada, pour assistance composez le 1-800-461-5681, pour installation ou service composez le 1-800-807-6777 ou visitez notre site web &...
www.KitchenAid.ca
Table of Contents/Table des matieres ............................................................................. 2
2300247

TABLE OF CONTENTS
TABLE DES MATIERES
WINE CELLAR SAFETY ................................................................. 2
Proper Disposal of Your Old Wine Cellar .................................... 3
INSTALLATION REQUIREMENTS ................................................ 3
Tools and Parts ............................................................................ 3
Custom Overlay Frame ................................................................ 3
Location Requirements ................................................................ 5
Electrical Requirements ............................................................... 5
Unpack the Wine Cellar ............................................................... 5
Install Custom Overlay Frame ...................................................... 5
Door Closing ................................................................................. 8
Base Grille .................................................................................... 8
WINE CELLAR USE ........................................................................ 8
Normal Sounds ............................................................................ 8
Using the Control ......................................................................... 8
Wine Racks .................................................................................. 9
Stocking the Wine Cellar .............................................................. 9
Lighting the Wine Cellar ............................................................... 9
WINE CELLAR CARE ..................................................................... 9
Cleaning ........................................................................................ 9
Changing the Light Bulb ............................................................ 10
Vacation and Moving Care ......................................................... 10
TROUBLESHOOTING .................................................................. 10
ASSISTANCE OR SERVICE ......................................................... 11
In the U.S.A ................................................................................ 11
In Canada ................................................................................... 11
Accessories ................................................................................ 12
WAR RANTY .................................................................................. 12
Sr!:CURIT¢: DE LA CAVE ._,VIN .................................................... 13
Mise au rebut de votre vieille cave & vin .................................... 13
EXIGENCES D'INSTALLATION ................................................... 14
Outillage et pieces ...................................................................... 14
Cadre decoratif personnalise ..................................................... 14
Emplacement d'installation ........................................................ 15
Sp6cifications electriques .......................................................... 16
Deballage de la cave a vin ......................................................... 16
Installation du cadre decoratif personnalise .............................. 16
Fermeture de la porte ................................................................. 19
Grille de la base .......................................................................... 19
UTILISATION DE LA CAVE ._,VIN ............................................... 19
Sons normaux ............................................................................ 19
Utilisation de la commande ........................................................ 20
Casiers a vin ............................................................................... 20
Stockage dans la cave a vin ...................................................... 20
¢clairage de la caisse ................................................................. 20
ENTRETIEN DE LA CAVE A VIN .................................................. 21
Nettoyage ................................................................................... 21
Changement de I'ampoule d'eclairage ...................................... 21
Precautions a prendre pour les
vacances et avant un demenagement ....................................... 21
DI_PANNAGE ................................................................................. 22
ASSISTANCE OU SERVICE ......................................................... 23
Aux Ctats-Unis ............................................................................ 23
Au Canada .................................................................................. 23
Accessoires ................................................................................ 23
GARANTIE ..................................................................................... 24
WINE CELLAR SAFETY
Your safety and the safety of others are very important.
We have provided many important safety messages in this manual and on your appliance. Always read and obey all safety
messages.
This is the safety alert symbol.
This symbol alerts you to potential hazards that can kill or hurt you and others.
All safety messages will follow the safety alert symbol and either the word "DANGER" or "WARNING."
These words mean:
You can be killed or seriously injured if you don't immediately
follow instructions.
You can be killed or seriously injured if you don't follow
instructions.
All safety messages will tell you what the potential hazard is, tell you how to reduce the chance of injury, and tell you what can
happen if the instructions are not followed.
IMPORTANT SAFETY INSTRUCTIONS
WARNING: To reduce the risk of fire, electric shock, or injury when using your wine cellar, follow these basic precautions:
• Plug into a grounded 3 prong outlet.
• Do not remove ground prong.
• Do not use an adapter.
• Do not use an extension cord.
• Disconnect power before servicing.
• Replace all parts and panels before operating.
• Remove doors from your old wine cellar.
• Use nonflammable cleaner.
• Keep flammable materials and vapors, such as gasoline,
away from wine cellar.
• Use two or more people to move and install wine cellar.
SAVE THESE INSTRUCTIONS
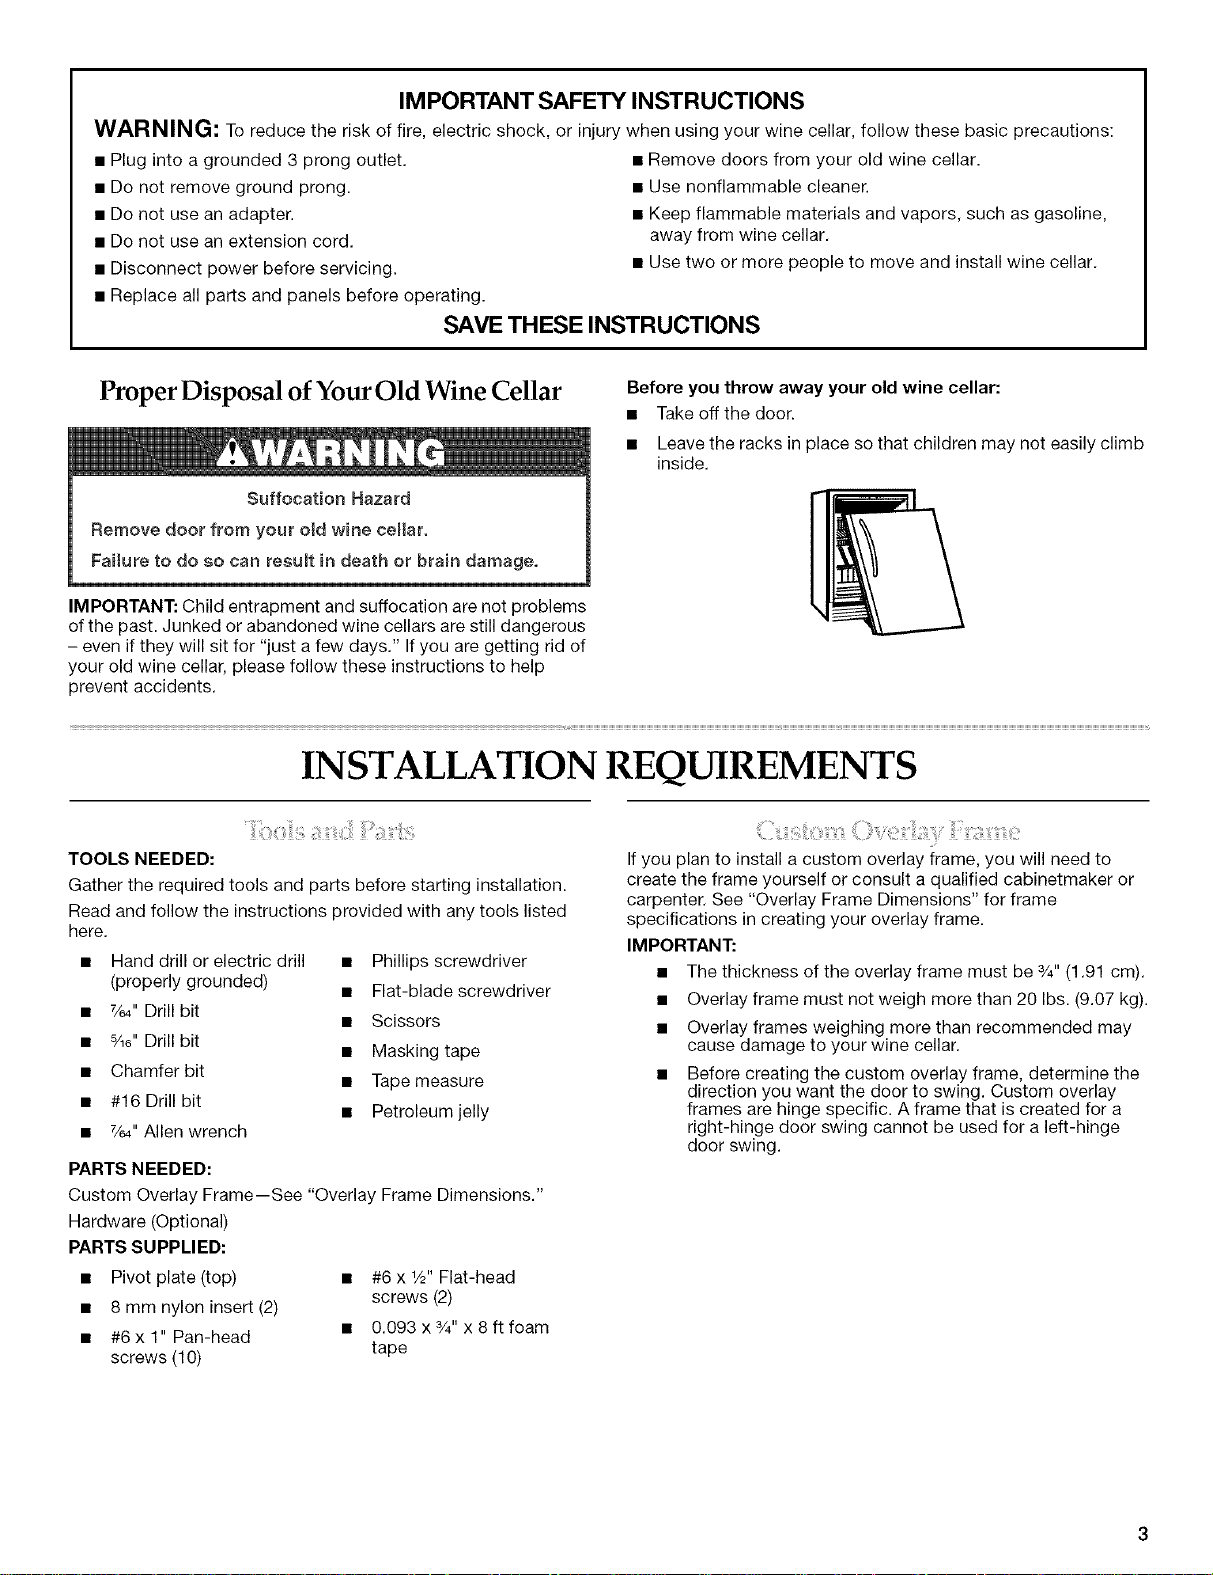
Proper Disposal of Your Old Wine Cellar
IMPORTANT: Child entrapment and suffocation are not problems
of the past. Junked or abandoned wine cellars are still dangerous
- even if they will sit for "just a few days." If you are getting rid of
your old wine cellar, please follow these instructions to help
prevent accidents.
INSTALLATION REQUIREMENTS
TOOLS NEEDED:
Gather the required tools and parts before starting installation.
Read and follow the instructions provided with any tools listed
here.
• Hand drill or electric drill
(properly grounded)
• 7/e4"Drill bit
• 5/16"Drill bit
• Chamfer bit
• #16 Drill bit
• 7/e4"Allen wrench
PARTS NEEDED:
Custom Overlay Frame--See "Overlay Frame Dimensions."
Hardware (Optional)
PARTS SUPPLIED:
• Pivot plate (top) • #6 x 1/2"Flat-head
• 8 mm nylon insert (2)
• #6 x 1" Pan-head • 0.093 x 3/4"x 8 ft foam
screws (1O) tape
• Phillips screwdriver
• Flat-blade screwdriver
• Scissors
• Masking tape
• Tape measure
• Petroleum jelly
screws (2)
Before you throw away your old wine cellar:
• Take off the door.
• Leave the racks in place so that children may not easily climb
inside.
If you plan to install a custom overlay frame, you will need to
create the frame yourself or consult a qualified cabinetmaker or
carpenter. See "Overlay Frame Dimensions" for frame
specifications in creating your overlay frame.
IMPORTANT:
• The thickness of the overlay frame must be 3/4"(1.91 cm).
• Overlay frame must not weigh more than 20 Ibs. (9.07 kg).
• Overlay frames weighing more than recommended may
cause damage to your wine cellar.
• Before creating the custom overlay frame, determine the
direction you want the door to swing. Custom overlay
frames are hinge specific. A frame that is created for a
right-hinge door swing cannot be used for a left-hinge
door swing.
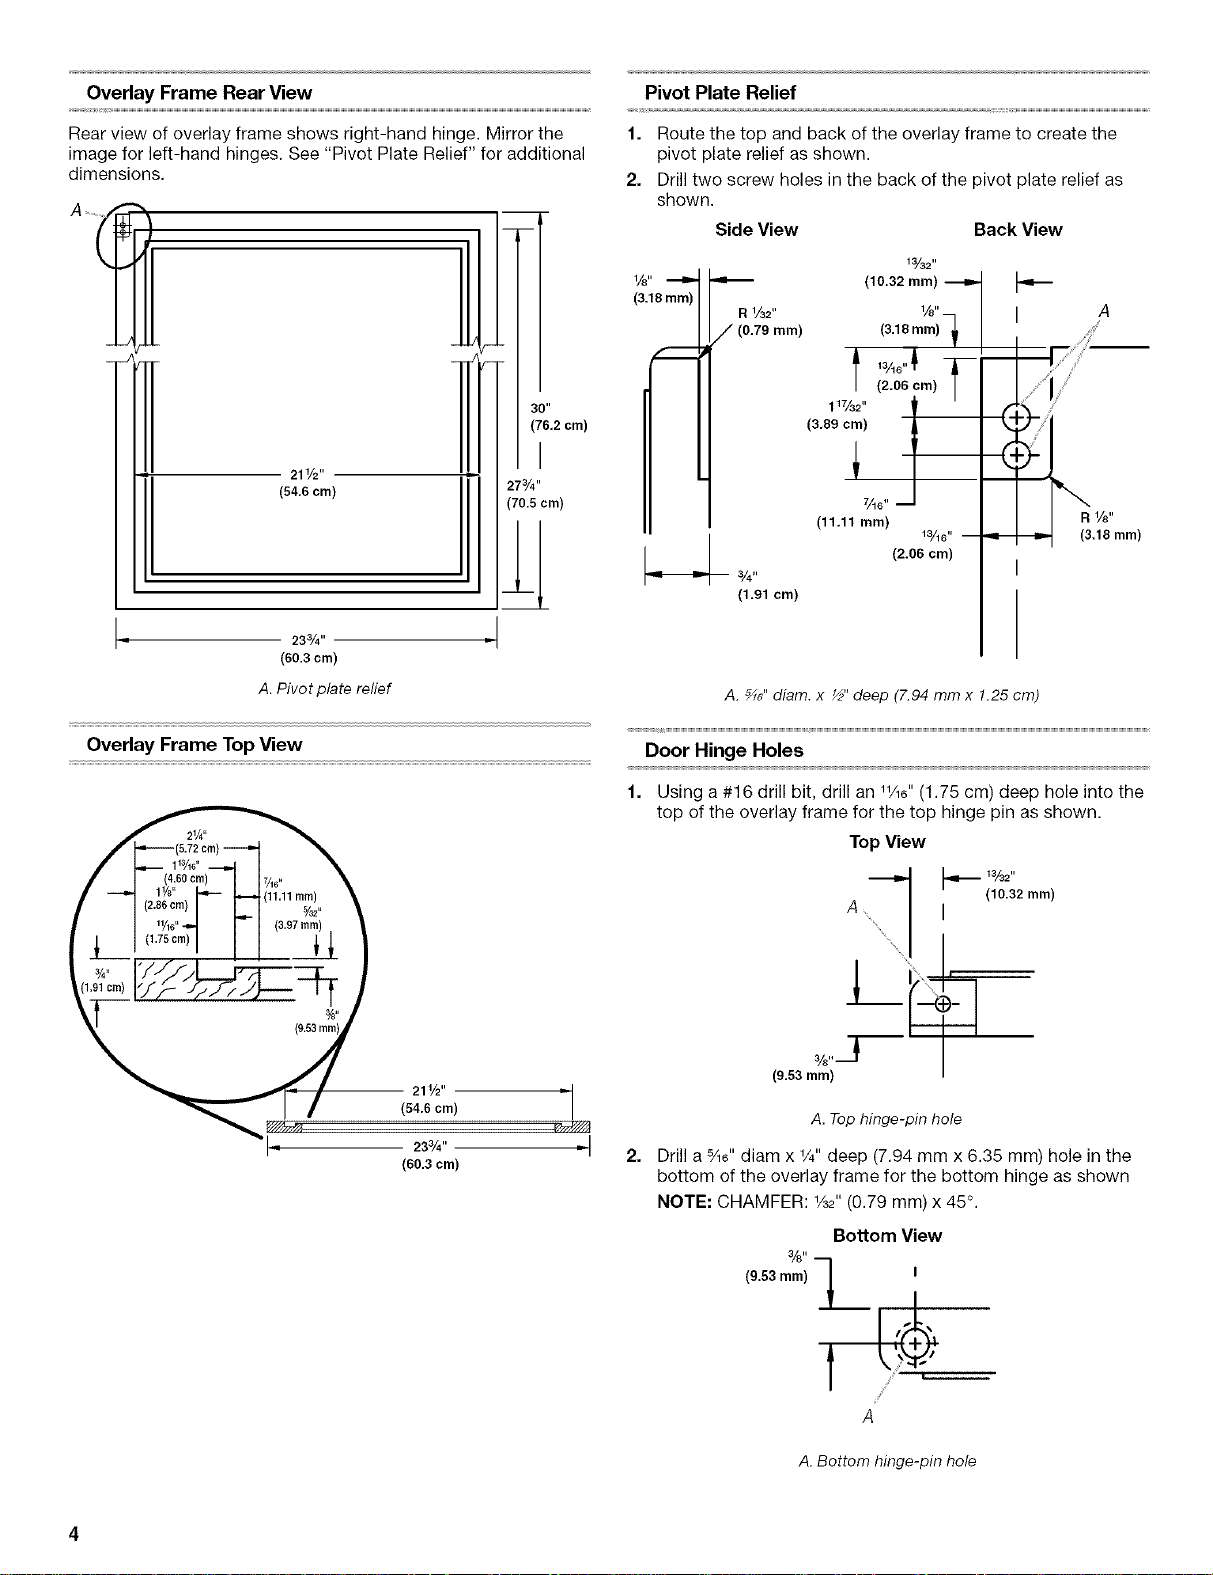
Overlay Frame Rear View
Pivot Plate Relief
Rear view of overlay frame shows right-hand hinge. Mirror the
image for left-hand hinges. See "Pivot Plate Relief" for additional
dimensions.
i
H
30"
(76.2 crn)
211/2''
(54.6 crn)
233/4''
(60.3 cm)
A. Pivot plate relief
I
273/4 ''
(70.5 cm)
1. Route the top and back of the overlay frame to create the
pivot plate relief as shown.
2. Drill two screw holes in the back of the pivot plate relief as
shown.
Side View Back View
1/8"
(3.18 mm)
R 1/32" I A
/ (0.79 ram) (3.18 ram) ....
117/32"
(3,89 cm)
(11.11 mm) R 1/8"
m 3/4.
(1.91 cm)
A. _G" diam. x _" deep 7.94 mm x 1.25 cm)
13/32"
(10.32
7/16"
13/16" (3.16 ram)
(2.06 cm)
I
Overlay Frame TopView
211/2''
(54.6 crn)
233/4" " I
(60,3 cm)
_'///_
Door Hinge Holes
Using a #16 drill bit, drill an 11/16"(1.75 cm) deep hole into the
top of the overlay frame for the top hinge pin as shown.
Top View
13/32"
(10.32 ram)
Ax_
%,,J
(9.53 mm)
A. Top hinge-pin hole
Drill a %6" diam x 1/4"deep (7.94 mm x 6.35 mm) hole in the
bottom of the overlay frame for the bottom hinge as shown
NOTE: CHAMFER: 1/32"(0.79 mm) x 45°.
Bottom View
3/8"
(9.53 turn) I I
A. Bottom hinge-pin hole
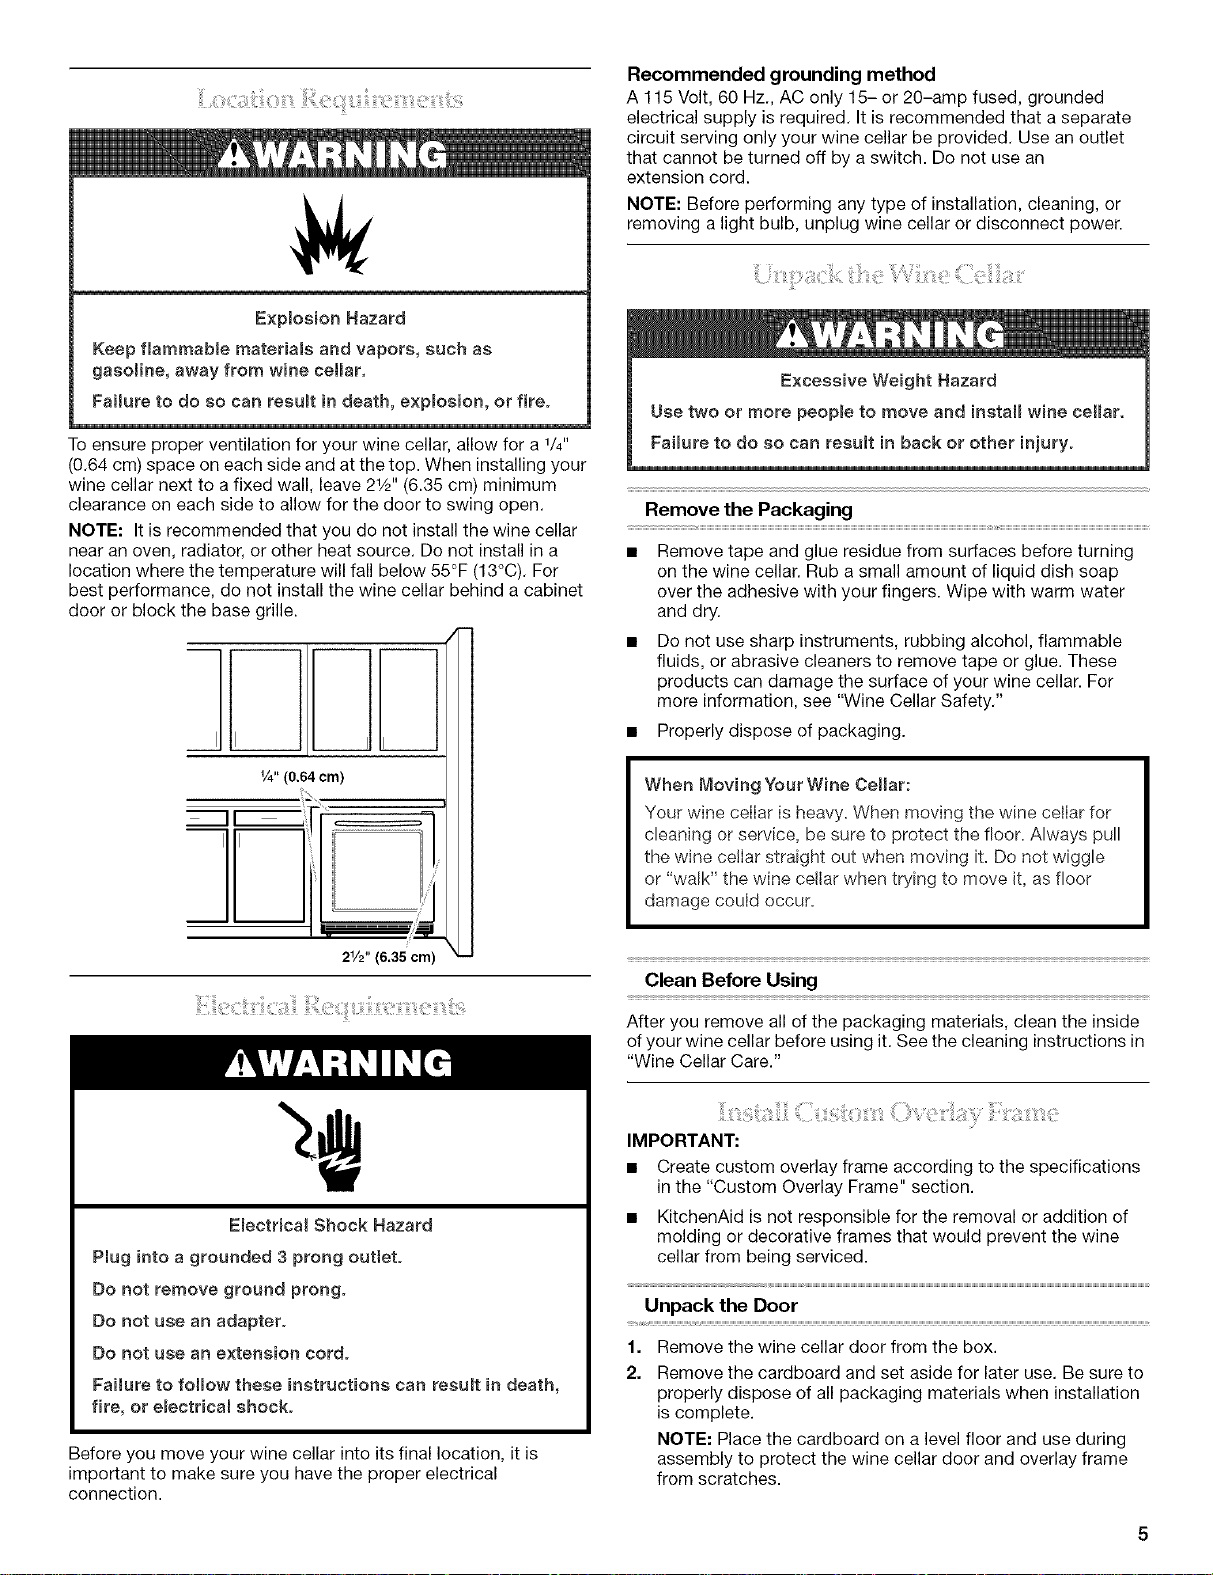
Explosion Hazard
Keep flammab{e materiams and vapors, such as
gaso}ine, away from wine ceHaro
Failure to do so can resu}t in death, expmosion, or fire.
To ensure proper ventilation for your wine cellar, allow for a 1/4"
(0.64 cm) space on each side and at the top. When installing your
wine cellar next to a fixed wall, leave 21/2'' (6.35 cm) minimum
clearance on each side to allow for the door to swing open.
NOTE: It is recommended that you do not install the wine cellar
near an oven, radiator, or other heat source. Do not install in a
location where the temperature will fall below 55°F (13°C). For
best performance, do not install the wine cellar behind a cabinet
door or block the base grille.
,,
Recommended grounding method
A 115 Volt, 60 Hz., AC only 15- or 20-amp fused, grounded
electrical supply is required. It is recommended that a separate
circuit serving only your wine cellar be provided. Use an outlet
that cannot be turned off by a switch. Do not use an
extension cord.
NOTE: Before performing any type of installation, cleaning, or
removing a light bulb, unplug wine cellar or disconnect power.
;: t
Remove the Packaging
Remove tape and glue residue from surfaces before turning
on the wine cellar. Rub a small amount of liquid dish soap
over the adhesive with your fingers. Wipe with warm water
and dry.
Do not use sharp instruments, rubbing alcohol, flammable
fluids, or abrasive cleaners to remove tape or glue. These
products can damage the surface of your wine cellar. For
more information, see "Wine Cellar Safety."
• Properly dispose of packaging.
When Moving Your Wine Cellar:
Your wine cellar is heavy. When moving the wine cellar for
cleaning or service, be sure to protect the floor. Always pu[[
the wine ce{Iar straight out when moving it. Do not wiggle
or "walk" the wine cellar when trying to move it, as floor
damage could occur.
Emectrica{ Shock Hazard
Plug into a grounded 3 prong outlet.
Do not remove ground prong.
Do not use an adapter.
Do not use an extension cord.
Fai{are to follow these instructions can result in death,
fire, or emectrica{ shock.
Before you move your wine cellar into its final location, it is
important to make sure you have the proper electrical
connection.
Clean Before Using
After you remove all of the packaging materials, clean the inside
of your wine cellar before using it. See the cleaning instructions in
"Wine Cellar Care."
IMPORTANT:
• Create custom overlay frame according to the specifications
in the "Custom Overlay Frame" section.
• KitchenAid is not responsible for the removal or addition of
molding or decorative frames that would prevent the wine
cellar from being serviced.
Unpack the Door
1=
Remove the wine cellar door from the box.
2.
Remove the cardboard and set aside for later use. Be sure to
properly dispose of all packaging materials when installation
is complete.
NOTE: Place the cardboard on a level floor and use during
assembly to protect the wine cellar door and overlay frame
from scratches.
Remove the Gasket
1. Place the wine cellar door on the cardboard with the door
gasket facing upward.
Remove the adhesive protection-strip from one piece of the
cut foam tape. Align the edge of the foam tape with the inside
edge of the overlay frame, and adhere tape to the overlay.
Repeat Step 2 for all four sides.
2=
Remove the door gasket by pulling from the middle and
proceeding outward, moving toward the edge.
NOTE: To keep the door gasket from tearing, use care when
pulling it out of the groove.
we
A,,I
.....i.....
I I
A.Door
B. Gasket-outside edges
C.Gasket-middle
Fit Overlay Frame
1. Turn the door over. Fully seat the overlay frame on all four
sides.
2. If there is a gap between the overlay frame and door front,
apply foam tape to the overlay frame. See "Apply Foam
Tape."
A, Not fully seated B. Little or no gap C, Objectionable gap
NOTE: If the overlay frame does not fit securely on all four sides,
review the instructions for "Overlay Frame Dimensions."
Apply Foam Tape (if required}
IMPORTANT:
• Trim each piece of tape after applying it to the overlay
frame.
• Do not allow any overlapping of the foam tape. Damage
to the overlay frame can occur if the foam tape is not
trimmed and fitted correctly.
Cut the foam tape into four pieces: two the width of and two
the height of the overlay frame.
t'
A. Inside edge
Attach the Pivot Plate
1. Tap the nylon inserts into the two holes in the overlay frame.
B
2. Use two #6 screws to attach the pivot plate to the top of the
overlay frame.
C
A
i, ¸¸¸¸,.....
\
A. Overlay frame
B. 8 mm nylon inserts
If required, attach optional cabinet handle to the overlay
frame.
NOTE: If an optional cabinet handle is installed, be sure to
countersink the mounting screws.
Attach the Overlay Frame to the Door
1. Secure the front of the door to the back of the overlay frame
with masking tape.
NOTE: Ensure that all four edges are properly aligned.
C. Pivot plate
D. #6 x _" flat-head screws
B C
A. Back of overlay frame
B. Masking tape
C. Door frame
D. Front of overlay frame
2=
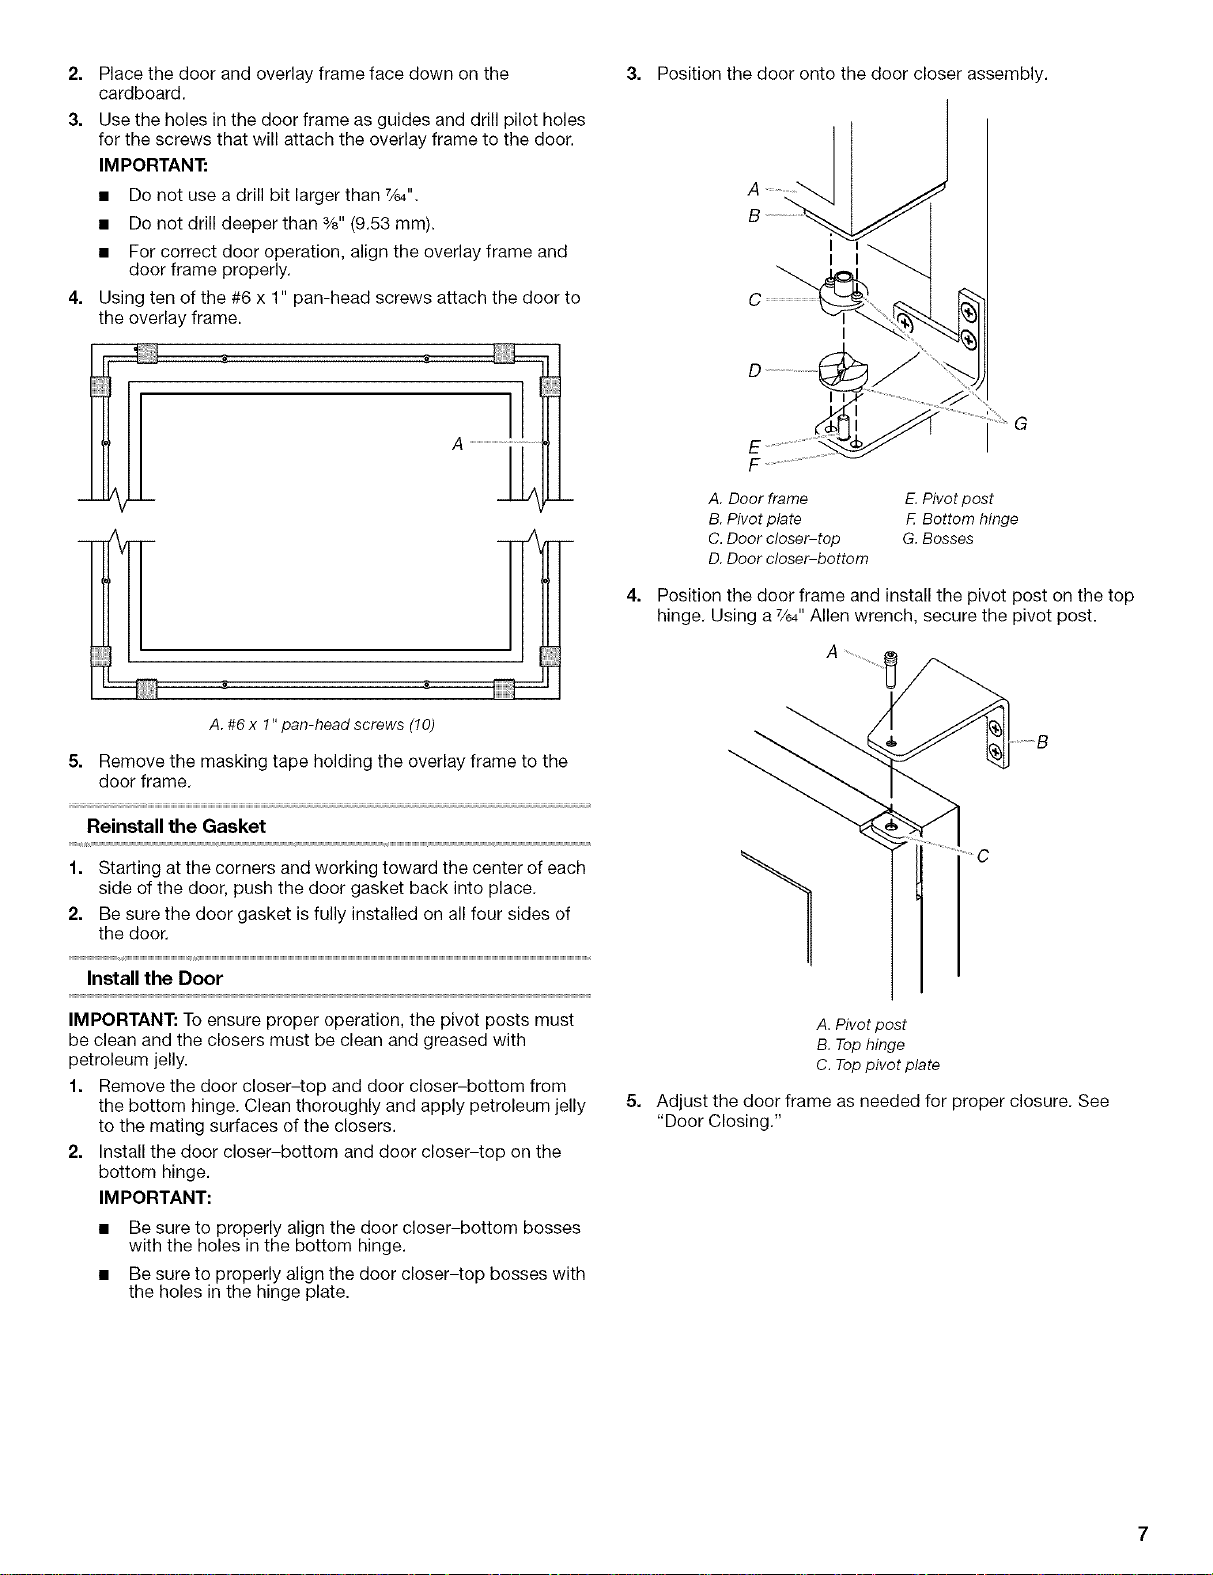
Place the door and overlay frame face down on the
cardboard.
3.
Use the holes in the door frame as guides and drill pilot holes
for the screws that will attach the overlay frame to the door.
IMPORTANT:
• Do not use a drill bit larger than 7/_,,.
• Do not drill deeper than %" (9.53 mm).
• For correct door operation, align the overlay frame and
door frame properly.
4.
Using ten of the #6 x 1" pan-head screws attach the door to
the overlay frame.
_ A ........................
3. Position the door onto the door closer assembly.
A
B
A. Door frame E. Pivot post
B. Pivot plate F. Bottom hinge
C. Door closer-top G. Bosses
D. Door closer-bottom
Position the door frame and install the pivot post on the top
hinge. Using a%4" Allen wrench, secure the pivot post.
A. #6 x 1" pan-head screws (10)
5. Remove the masking tape holding the overlay frame to the
door frame.
Reinstall the Gasket
1. Starting at the corners and working toward the center of each
side of the door, push the door gasket back into place.
2. Be sure the door gasket is fully installed on all four sides of
the door.
Install the Door
IMPORTANT: To ensure proper operation, the pivot posts must
be clean and the closers must be clean and greased with
petroleum jelly.
1. Remove the door closer-top and door closer-bottom from
the bottom hinge. Clean thoroughly and apply petroleum jelly
to the mating surfaces of the closers.
2. Install the door closer-bottom and door closer-top on the
bottom hinge.
IMPORTANT:
• Be sure to properly align the door closer-bottom bosses
with the holes in the bottom hinge.
• Be sure to properly align the door closer-top bosses with
the holes in the hinge plate.
A. Pivot post
B. Top hinge
C. Top pivot plate
5=
Adjust the door frame as needed for proper closure. See
"Door Closing."
Door Closing
Your wine cellar has four leveling legs. If your wine cellar seems
unsteady or you want the door to close more easily, adjust the
wine cellar's tilt using the instructions below.
3. Pull the base grille toward you.
A
A. Screws
Replace the Base Grille:
E_ectrica_ Shock Hazard
P_ug into a grounded 3 prong outlet.
Do not remove ground prong.
Do not use an adapter.
Do not use an extension cord.
Failure to follow these instructions can result in death,
fire, or electrical shock.
1. Plug into a grounded 3 prong outlet.
2=
Move the wine cellar into its final location.
3.
Turn the leveling legs to the right to lower the wine cellar or
turn the leveling legs to the left to raise it. It may take several
turns of the leveling legs to adjust the tilt of the wine cellar.
NOTE: Having someone push against the top of the wine
cellar takes some weight off the leveling legs. This makes it
easier to adjust the leveling legs.
1. Open the wine cellar door.
2. Position the base grille so that the holes are aligned and
replace the three screws.
WINE CELLAR USE
Your new wine cellar may make sounds that your old one didn't
make. Because the sounds are new to you, you might be
concerned about them. Most of the new sounds are normal. Hard
surfaces, such as the flooring and surrounding structures, can
make the sounds seem louder. The following describes the kinds
of sounds and what may be making them.
• Your wine cellar is designed to run more efficiently to keep
your food items at the desired temperatures and to minimize
energy usage. The high efficiency compressor and fans may
cause your wine cellar to run longer than your old one. You
may also hear a pulsating or high-pitched sound from the
compressor or fans adjusting to optimize performance.
• Rattling noises may come from the flow of refrigerant or items
stored inside the wine cellar.
• As each cycle ends, you may hear a gurgling sound due to
the refrigerant flowing in your wine cellar.
• You may hear water running into the drain pan when the wine
cellar is defrosting.
• You may hear clicking sounds when the wine cellar starts or
stops running.
4.
Open the door and check to make sure that it closes as easily
as you like. If not, tilt the wine cellar slightly more to the rear
by turning both front leveling screws to the right. It may take
several more turns, and you should turn both leveling legs the
same amount.
Remove the Base Grille:
1. Open the wine cellar door.
2. Using a Phillips screwdriver, remove the three screws
attaching the base grille to the wine cellar.
For your convenience, your wine cellar control is preset at the
factory. When you first install your wine cellar, make sure that the
control is still preset to the mid-setting as shown.
Colder
Adjusting Controls
The mid-setting indicated in the previous section should be
correct for normal usage. The control is set correctly when
beverages are as cold as you like.
 Loading...