

Page 1
Kitchen kid
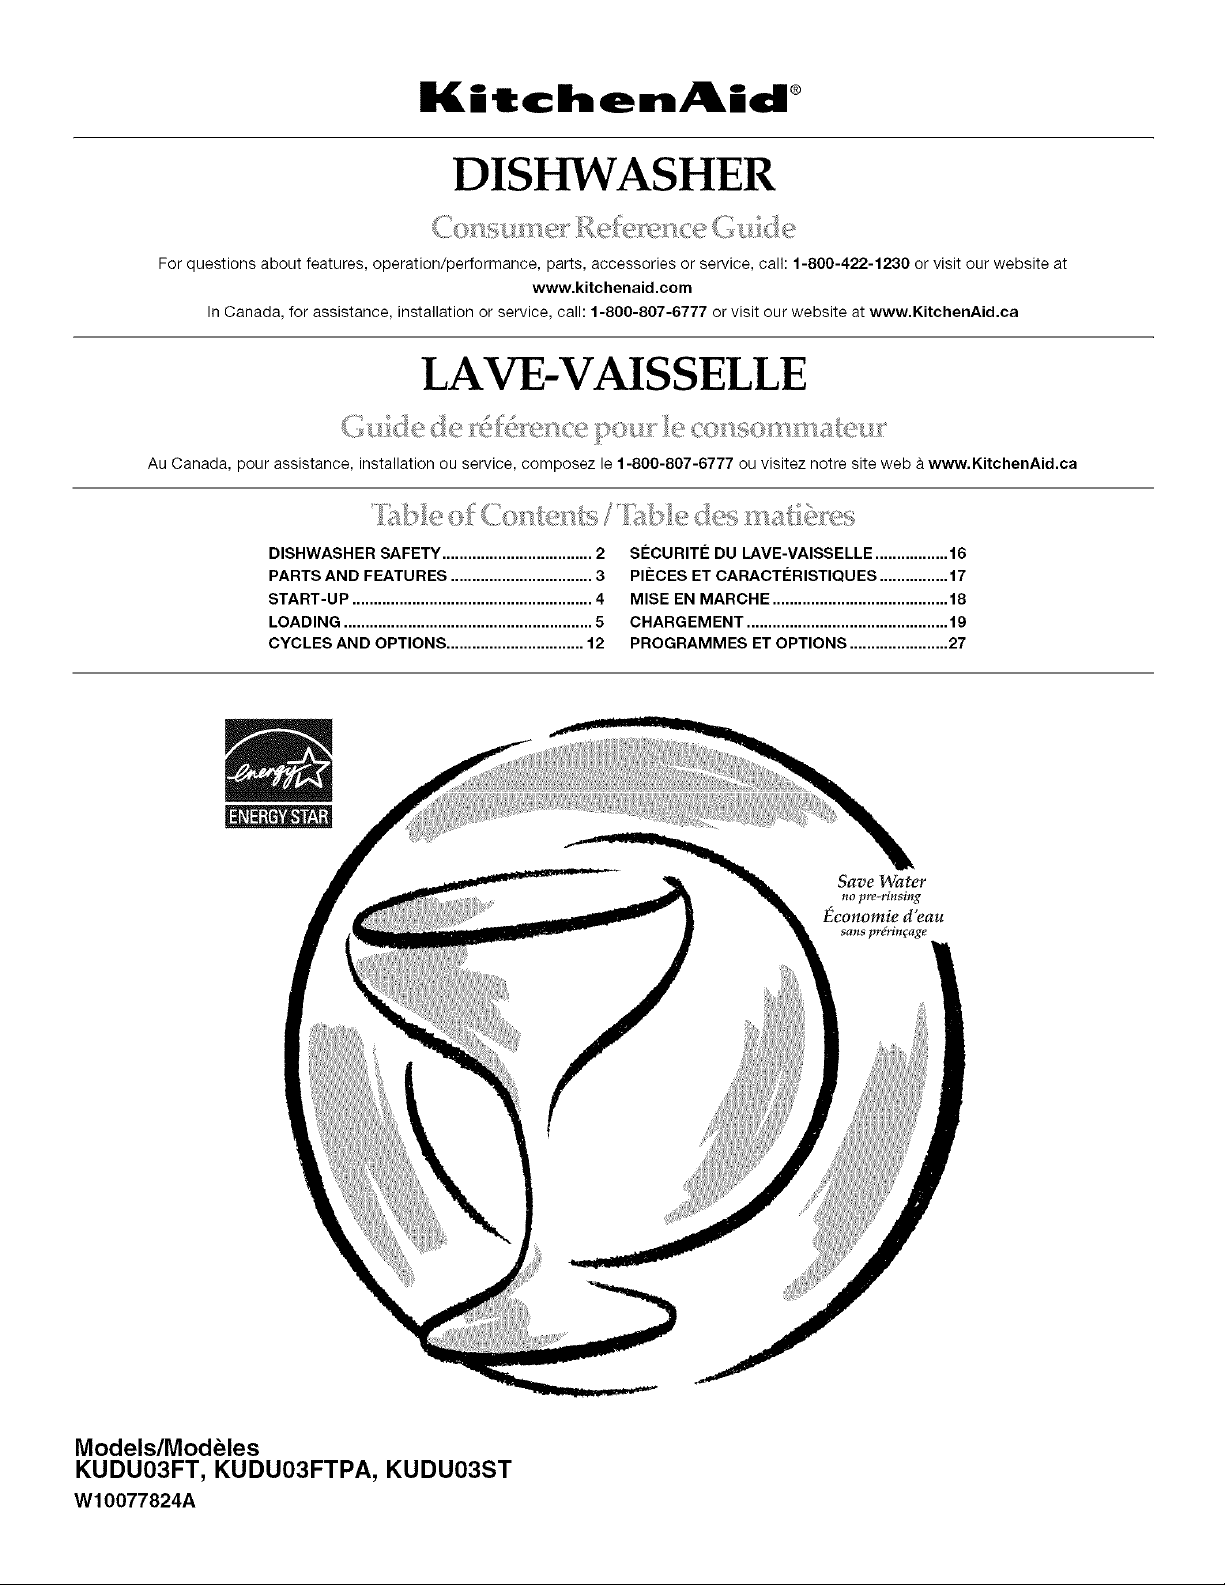
DISHWASHER
For questions about features, operation/performance, parts, accessories or service, call: 1-800-422-1230 or visit our website at
www.kitchenaid.com
In Canada, for assistance, installation or service, call: 1-800-807-6777 or visit our website at www.KitchenAid.ca
LAVE-VAISSELLE
Au Canada, pour assistance, installation ou service, composez le 1-800-807-6777 ou visitez notre site web &www.KitchenAid.ca
DISHWASHER SAFETY ................................... 2 SleCURIT$ DU LAVE-VAISSELLE ................. 16
PARTS AND FEATURES ................................. 3 PISCES ET CARACTCRISTIQUES ................ 17
START-UP ........................................................ 4 MISE EN MARCHE ......................................... 18
LOADING .......................................................... 5 CHARGEMENT ............................................... 19
CYCLES AND OPTIONS ................................ 12 PROGRAMMES ET OPTIONS ....................... 27
Models/Modeles
KUDU03FT, KUDU03FTPA, KUDU03ST
W10077824A
Save Water
no pre-rinsing
Economie d'eau
sans prdrinqage
Page 2
DISHWASHER SAFETY
Your safety and the safety of others are very important.
We have provided many important safety messages in this manual and on your appliance. Always read and obey all safety
messages.
This is the safety alert symbol.
This symbol alerts you to potential hazards that can kill or hurt you and others.
All safety messages will follow the safety alert symbol and either the word "DANGER" or "WARNING."
These words mean:
You can be killed or seriously injured if you don't immediately
follow instructions.
You can be killed or seriously injured if you don't follow
instructions.
All safety messages will tell you what the potential hazard is, tell you how to reduce the chance of injury, and tell you what can
happen if the instructions are not followed.
Tip Over Hazard
Do not use dishwasher until completely installed.
Do not push down on open door.
Doing so can result in serious injury or cuts.
Electrical Shock Hazard
Electrically ground dishwasher.
Connect ground wire to green ground connector in
terminal box.
Do not use an extension cord.
Failure to follow these instructions can result in death,
fire, or electrical shock.
Page 3
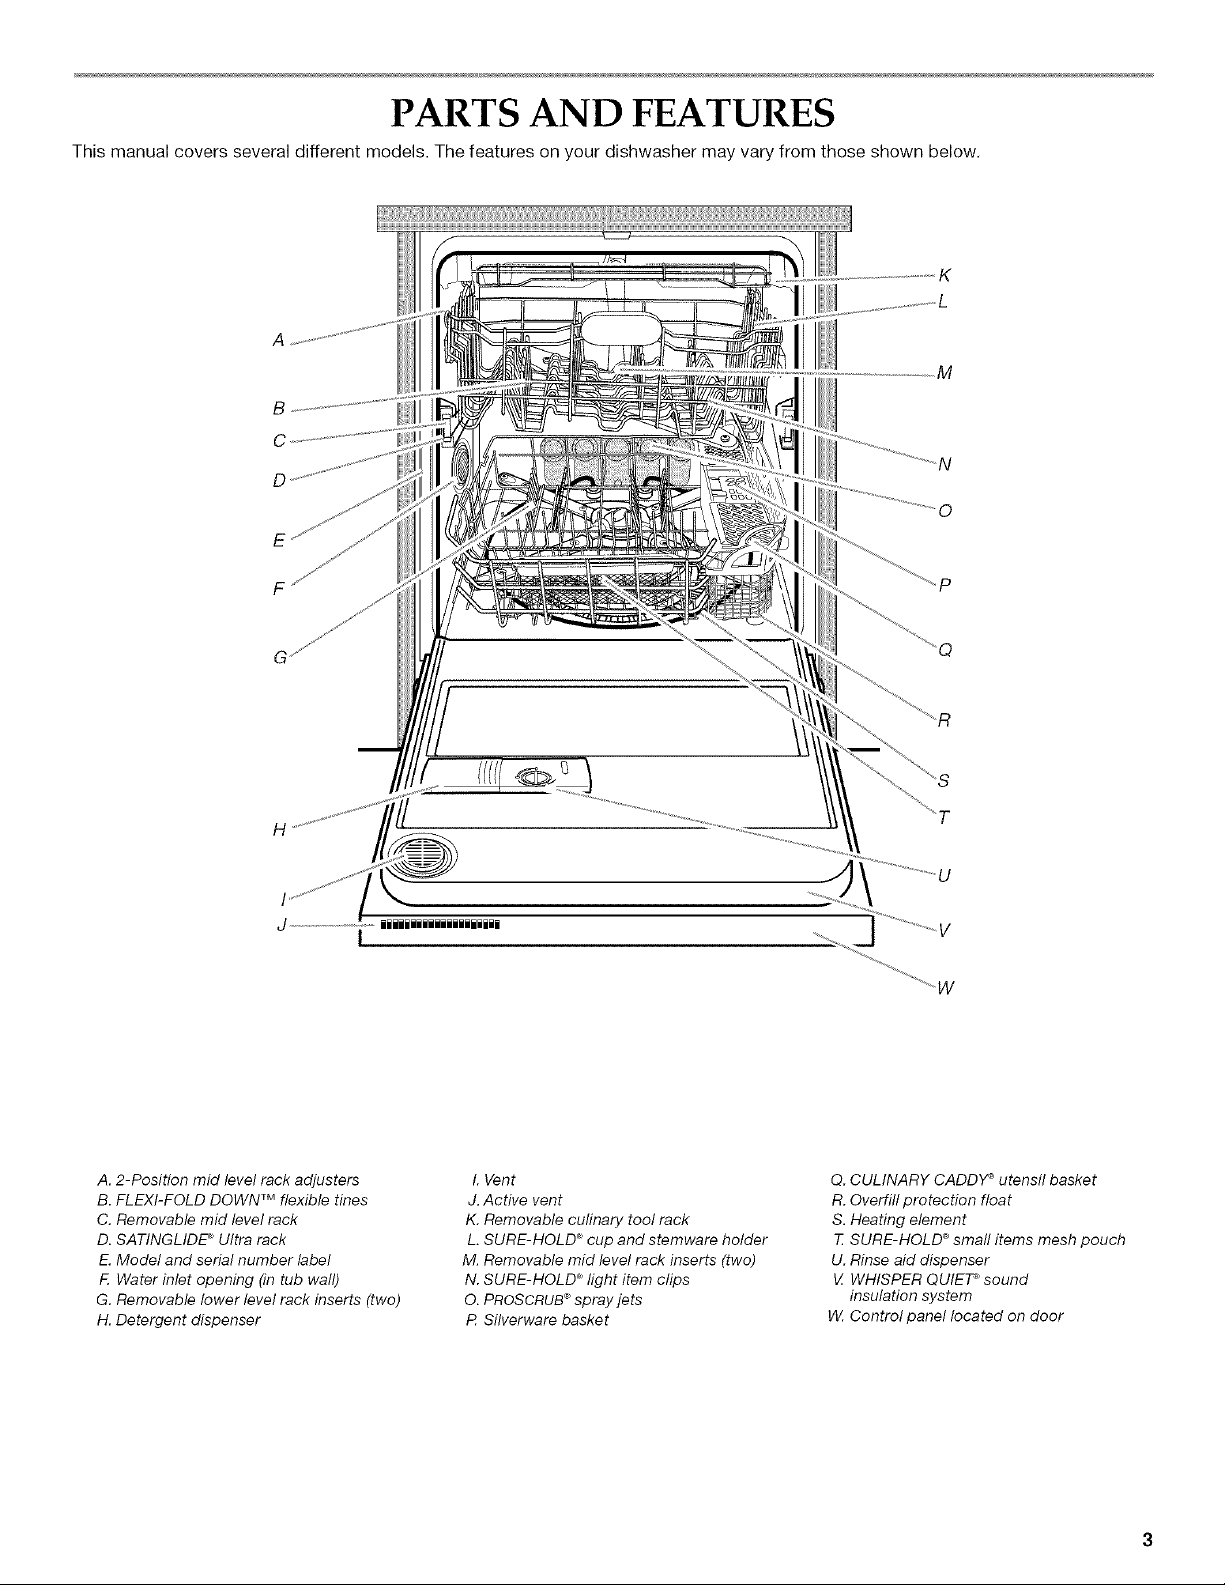
PARTS AND FEATURES
This manual covers several different models. The features on your dishwasher may vary from those shown below.
K
M
B
C
D
J.....................................iiiJiiiiiiiiiiiiiiii
I
A. 2-Position mid level rack adjusters
B. FLEXI-FOLD DOWN TM flexible tines
C. Removable mid level rack
D. SATINGLIDE '_Ultra rack
E. Model and serial number label
E Water inlet opening (in tub wall)
G. Removable lower level rack inserts (two)
H. Detergent dispenser
I. Vent
J. Active vent
K. Removable culinary tool rack
L. SURE-HOLD '_cup and stemware holder
M. Removable mid level rack inserts (two)
N. SURE-HOLD _ light item clips
O. PROSCRUB®spray jets
P Silverware basket
Q. CULINARY CADDY ®utensil basket
R. Overfill protection float
S. Heating element
7_SURE-HOLD ®small items mesh pouch
U. Rinse aid dispenser
_ZWHISPER QUIET _sound
insulation system
14/.Control panel located on door
Page 4
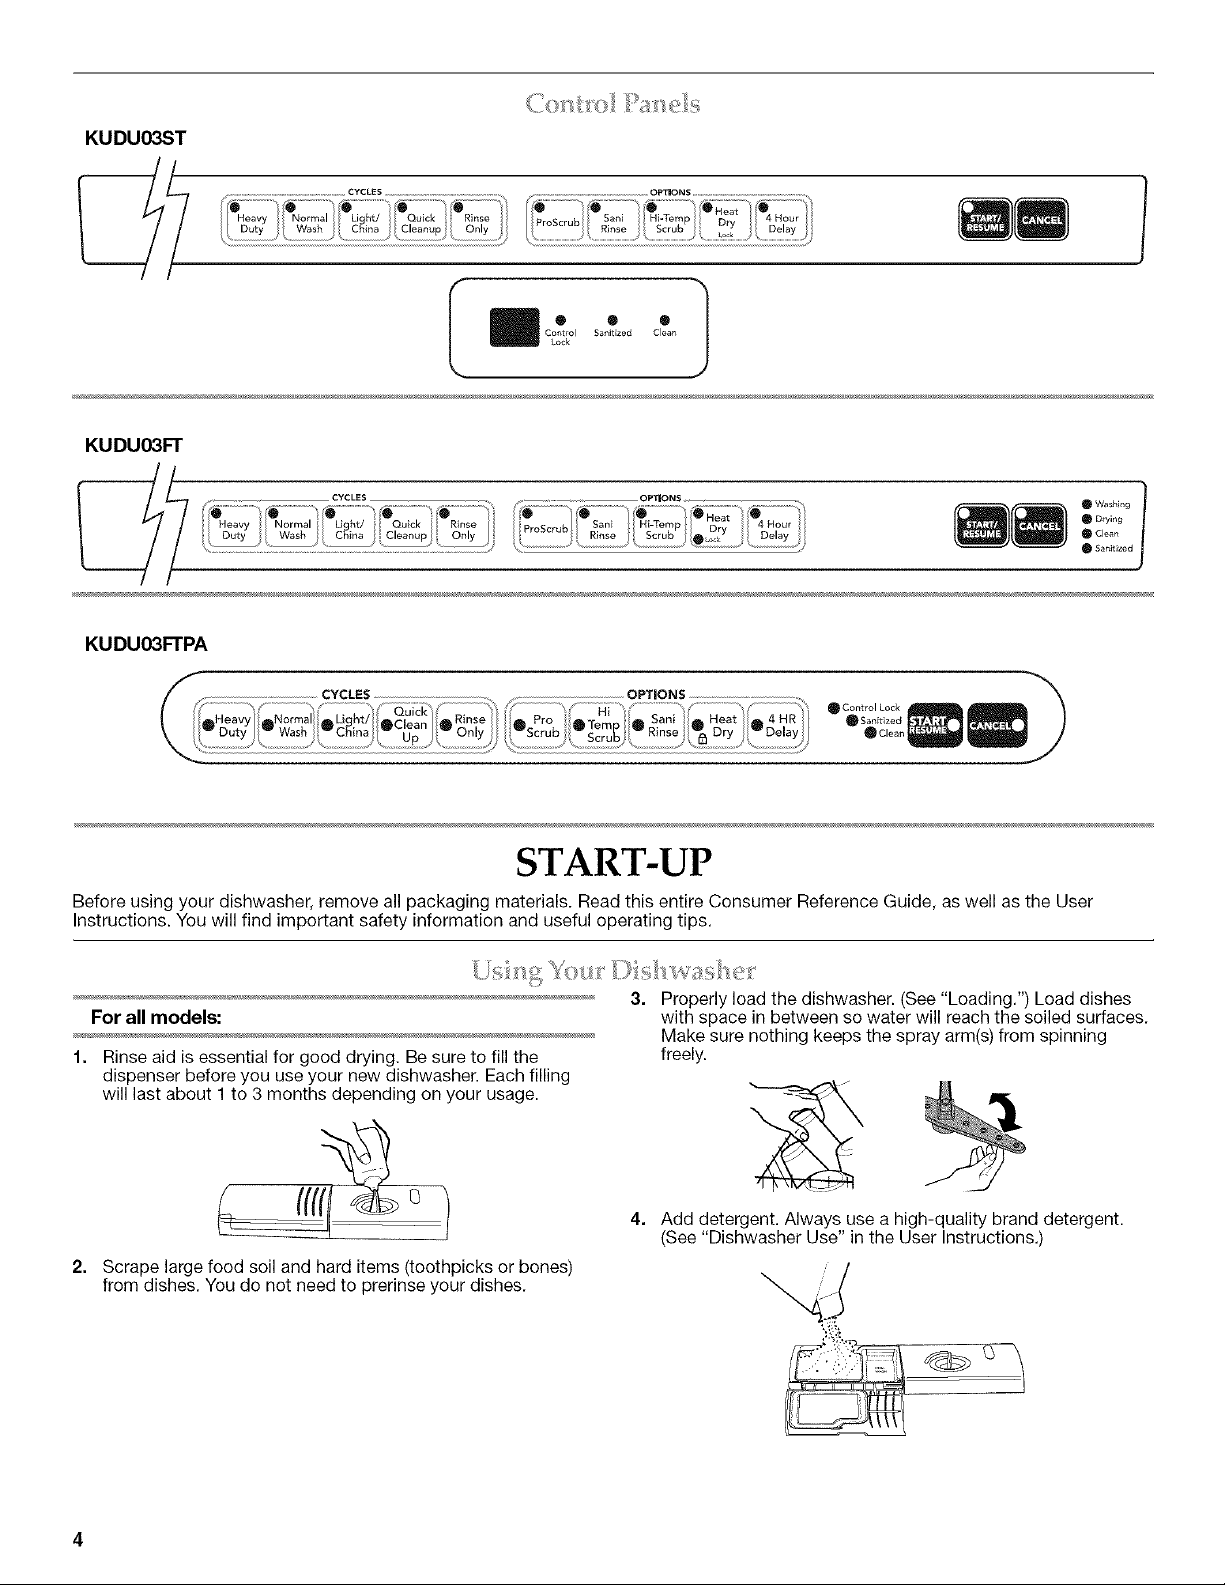
KUDU03ST
@ @ / @ _@ @ ® @ @H_at _ ®
Heavy / Norma Light/ Quick Rinse ProScrub Sani Hi-Temp _ Dr _ 4 Hour
[ Duty /[ Wash [ China _Cleanup [ Only _ / Rnse Scub / Y Deny
L :: "...................................'........................................................................" ..............................................._)
KUDU03FT
__,,_ .............................................................................CYCLES .........................................................................../ OPTIONS................................................... ...........................................
Heavy No rna L ht/ Qu ck g nse
@ @ @C_lna @ @ PoScrub@ @ Sant" H,-Temp@" @ Heat / @4Hour @ Drying
Duty H Wash H Cleanup Only Rinse 4[ Scrub IL , Delay _ Clean
KUDU03FTPA
{ ii_Heavy _mNormal _ Light! i_dlLt.lean i_ Rinse H
\ !!--g,ty--Wa,h--Chi_/---U /--O_ly / WS_,ubW_ E WR°_ _D_y_WD_,y/
CYCLES OpllONS
Control Sanitized Clea_
I|" " "1
CYCLES , ..... ............................................OPT ONS .............................................
Lock
Dy
........................ / %...................... H _ ........................ , .................... ,_ ....................... / _ Sanitized
Pro _Tem _ Sam _ Heat _ 4 HR /
/
START-UP
Before using your dishwasher, remove all packaging materials. Read this entire Consumer Reference Guide, as well as the User
Instructions. You will find important safety information and useful operating tips.
3,
For all models:
1. Rinse aid is essential for good drying. Be sure to fill the
dispenser before you use your new dishwasher. Each filling
will last about 1 to 3 months depending on your usage.
2. Scrape large food soil and hard items (toothpicks or bones)
from dishes, You do not need to prerinse your dishes.
Properly load the dishwasher. (See "Loading.") Load dishes
with space in between so water will reach the soiled surfaces.
Make sure nothing keeps the spray arm(s) from spinning
freely.
\
4. Add detergent. Always use a high-quality brand detergent.
(See "Dishwasher Use" in the User Instructions.)
Page 5
5=
Run hot water at the sink nearest your dishwasher until the
water is hot. Turn off water.
After sensing is complete, the display will show the number of
minutes left in the cycle and the cycle countdown will begin.
6. Press the desired cycle and option selections on the control
panel. (See "Cycles and Options.")
7. Press START/RESUME. Or press START/RESUME to repeat
the same cycle and options as in the previous cycle. The
selected cycle and option lights will glow.
IMPORTANT (For model KUDU03ST):
• When the cycle starts, you will see a rotating pattern of lights
in the display window indicating that the dishwasher is
operating. This pattern will continue for up to 6 minutes while
the multiple sensors check the incoming water temperature,
rinse aid usage and soil level on dishes and cookware. The
sensors then determine the ideal wash for your dish load.
• The cycle countdown pauses while the dishwasher heats the
water to a set temperature. (See "Cycle Selections.")
8. Push door firmly closed within 3 seconds of pressing Start/
Resume.
NOTE: If the dishwasher is not started within 30 seconds after
selecting the cycle and options, it will revert to the last cycle
and options completed.
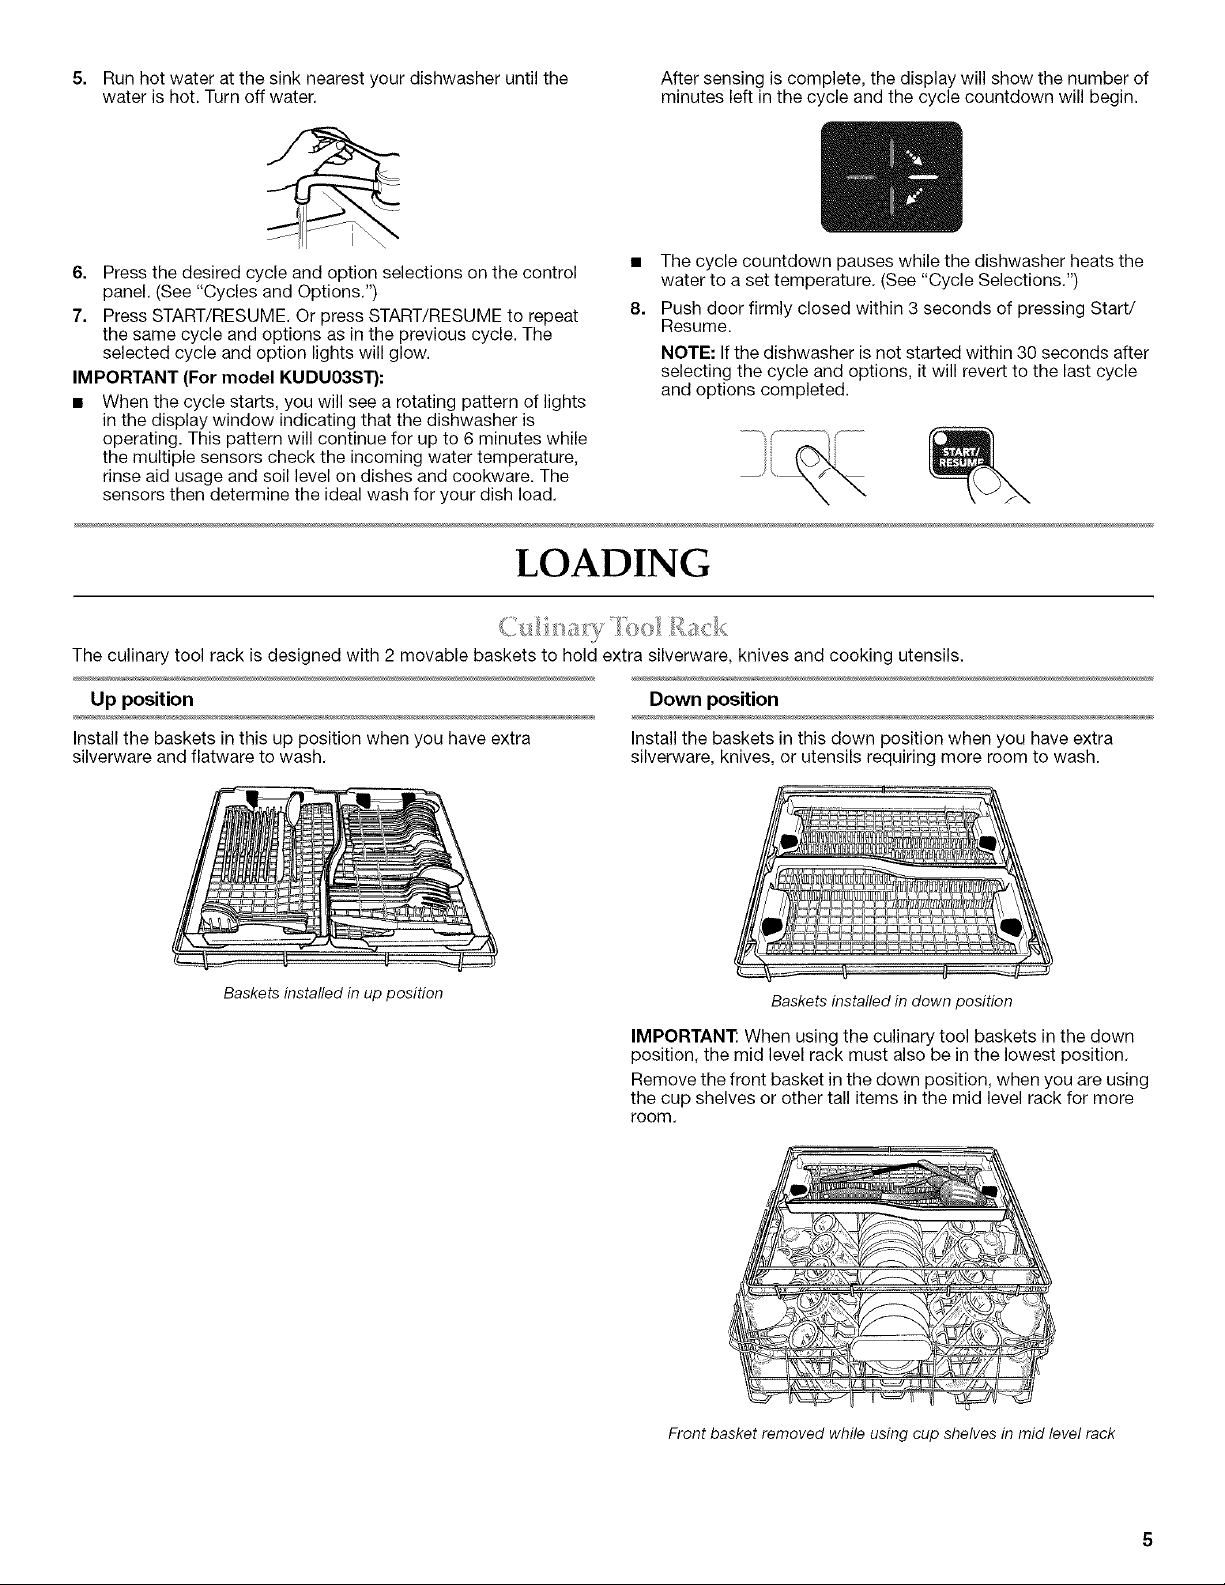
LOADING
The culinary tool rack is designed with 2 movable baskets to hold extra silverware, knives and cooking utensils.
Up position Down position
Install the baskets in this up position when you have extra Install the baskets in this down position when you have extra
silverware and flatware to wash. silverware, knives, or utensils requiring more room to wash.
Baskets installed in up position
Baskets installed in down position
IMPORTANT: When using the culinary tool baskets in the down
position, the mid level rack must also be in the lowest position.
Remove the front basket in the down position, when you are using
the cup shelves or other tall items in the mid level rack for more
room.
Front basket removed while using cup shelves in mid level rack
Page 6
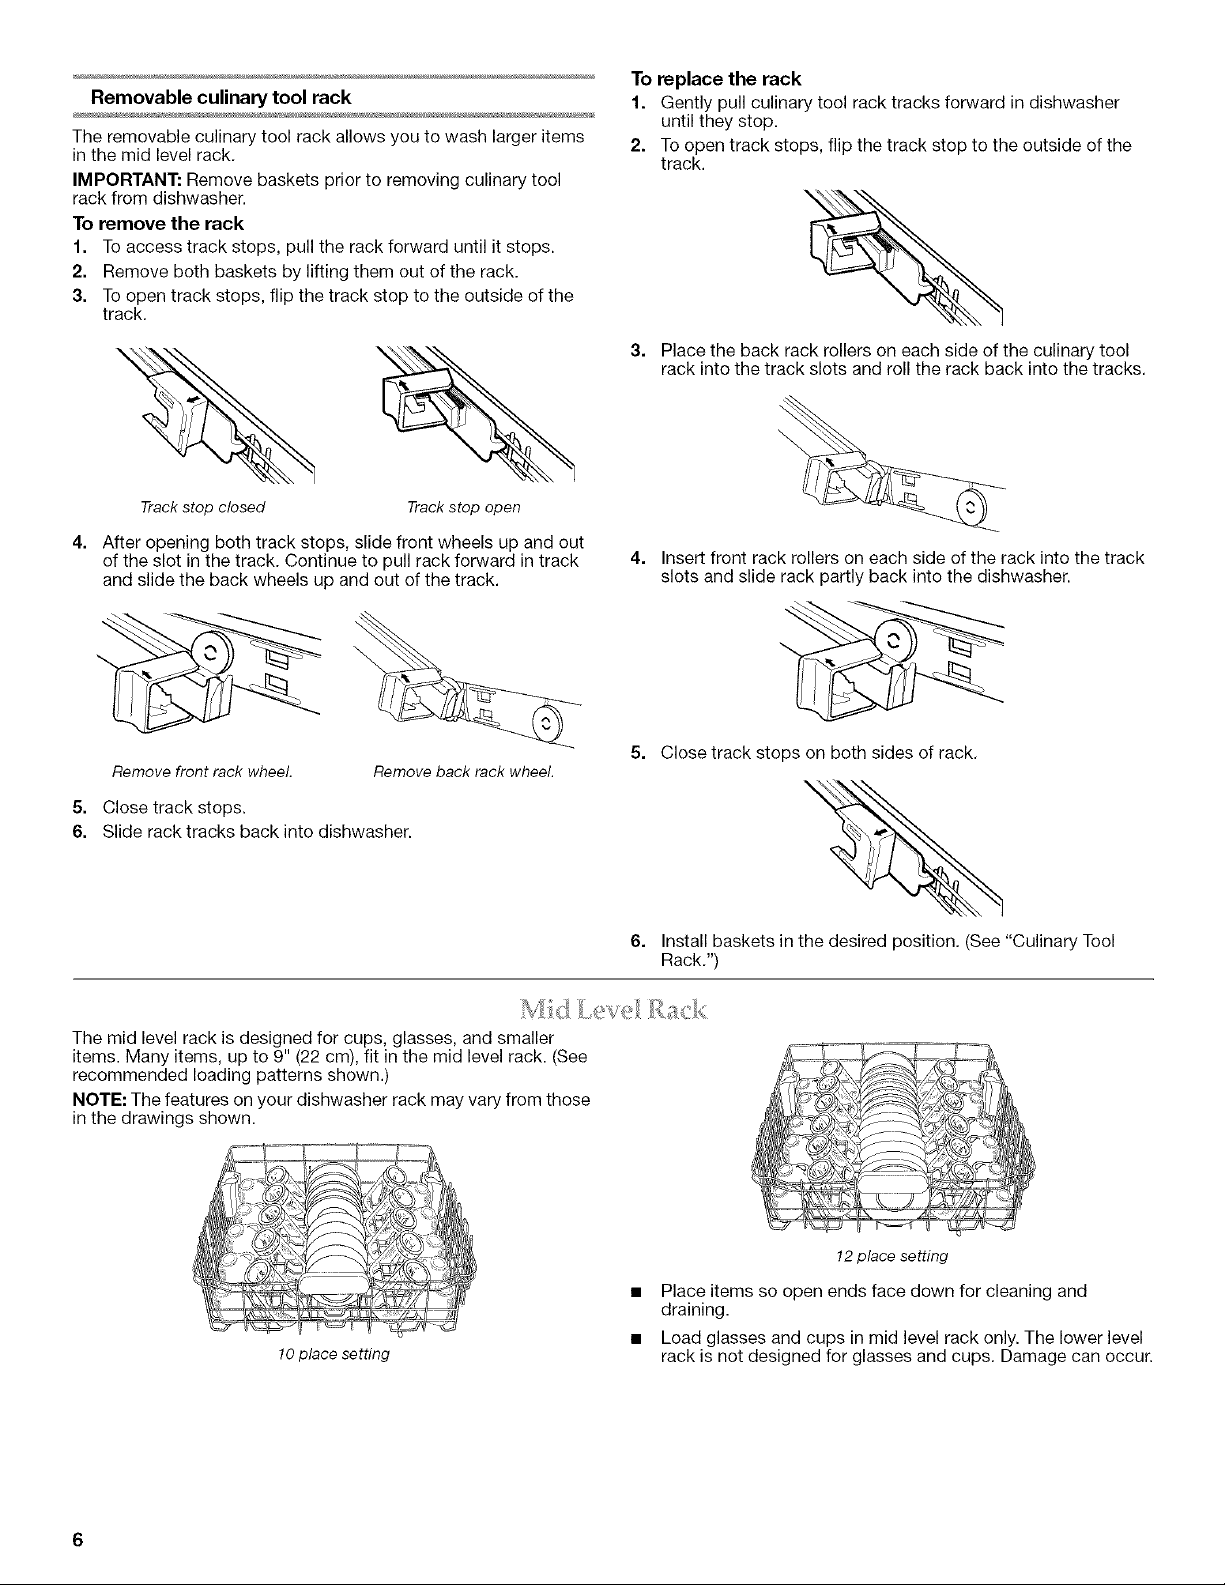
Removable culinary tool rack
The removable culinary tool rack allows you to wash larger items
in the mid level rack.
IMPORTANT: Remove baskets prior to removing culinary tool
rack from dishwasher.
To remove the rack
1. To access track stops, pull the rack forward until it stops.
2. Remove both baskets by lifting them out of the rack.
3. To open track stops, flip the track stop to the outside of the
track.
Track stop closed Track stop open
4.
After opening both track stops, slide front wheels up and out
of the slot in the track. Continue to pull rack forward in track
and slide the back wheels up and out of the track.
To replace the rack
1. Gently pull culinary tool rack tracks forward in dishwasher
until they stop.
2. To open track stops, flip the track stop to the outside of the
track.
3. Place the back rack rollers on each side of the culinary tool
rack into the track slots and roll the rack back into the tracks.
4. Insert front rack rollers on each side of the rack into the track
slots and slide rack partly back into the dishwasher.
Remove front rack wheel. Remove back rack wheel.
5. Close track stops.
6. Slide rack tracks back into dishwasher.
The mid level rack is designed for cups, glasses, and smaller
items. Many items, up to 9" (22 cm), fit in the mid level rack. (See
recommended loading patterns shown.)
NOTE: The features on your dishwasher rack may vary from those
in the drawings shown.
10 place setting
5. Close track stops on both sides of rack.
6. Install baskets in the desired position. (See "Culinary Tool
Rack.")
12place setting
• Place items so open ends face down for cleaning and
draining.
• Load glasses and cups in mid level rack only. The lower level
rack is not designed for glasses and cups. Damage can occur.
Page 7
• Placecupsandglassesintherowsbetweentines.Placing
themoverthetinescanleadtobreakageandwaterspots.
Cup and g_ssload
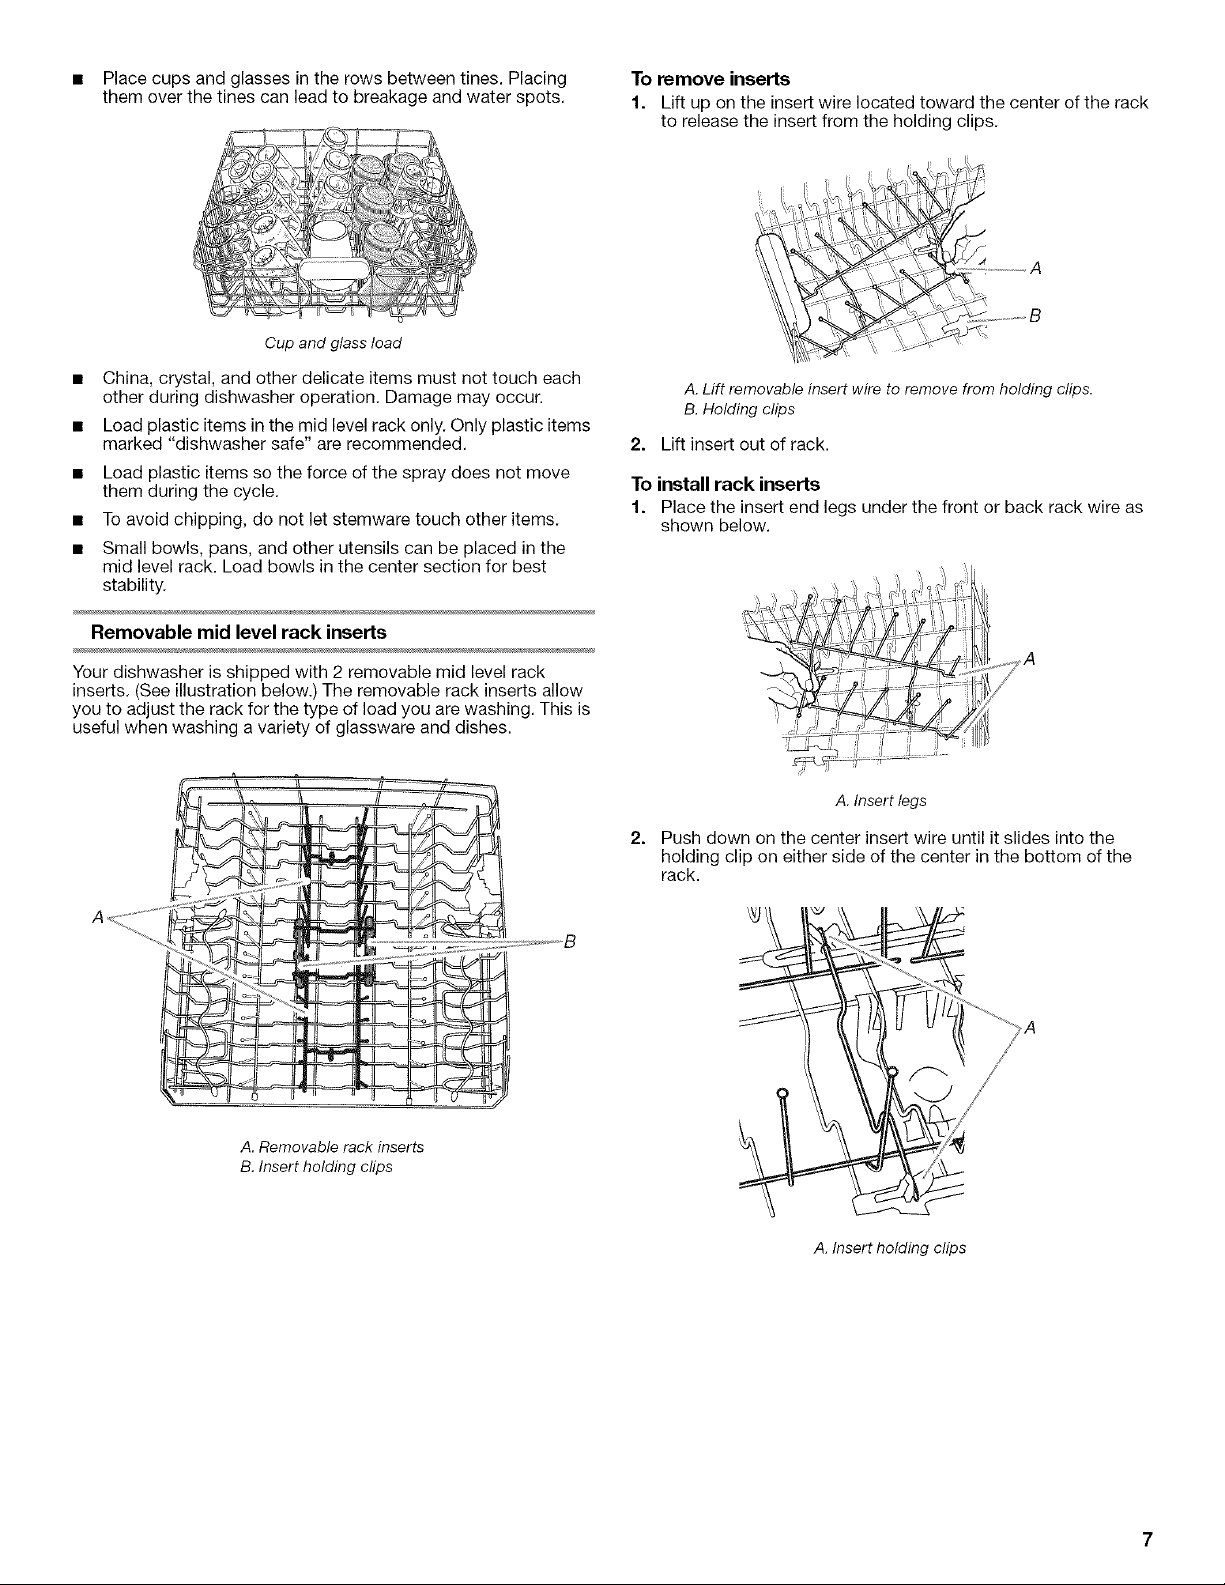
To remove inserts
1. Lift up on the insert wire located toward the center of the rack
to release the insert from the holding clips.
China, crystal, and other delicate items must not touch each
other during dishwasher operation. Damage may occur.
Load plastic items in the mid level rack only. Only plastic items
marked "dishwasher safe" are recommended.
Load plastic items so the force of the spray does not move
them during the cycle.
To avoid chipping, do not let stemware touch other items.
Small bowls, pans, and other utensils can be placed in the
mid level rack. Load bowls in the center section for best
stability.
Removable mid level rack inserts
Your dishwasher is shipped with 2 removable mid level rack
inserts. (See illustration below.) The removable rack inserts allow
you to adjust the rack for the type of load you are washing. This is
useful when washing a variety of glassware and dishes.
...............B
A. Lift removable insert wire to remove from holding clips.
B, Holding clips
2. Lift insert out of rack.
To install rack inserts
1. Place the insert end legs under the front or back rack wire as
shown below.
A.Insert legs
2.
Push down on the center insert wire until it slides into the
holding clip on either side of the center in the bottom of the
rack.
A. Removable rack inserts
B. Insert holding clips
A. Insert holding clips
Page 8
FLEXI-FOLD DOWN TM flexible tines
Adjustable 2-position mid level rack
The row of tines on the left-hand and right-hand sides of the mid
level rack can be adjusted to make room for a variety of dishes.
To adjust the flexible tines
1. Grasp the tip of the tine that is in the tine holder.
2. Gently push the tine out of the holder.
3. Lay the tines down, toward the center of the rack.
SURE-HOLD _ cup and stemware holder
Fold down the extra shelf on the left-hand or right-hand side of
the mid level rack to hold additional cups, stemware or long items
such as utensils and spatulas.
NOTE: Remove the culinary tool basket(s) when washing tall
stemware or other tall items in the mid level rack.
After removing the culinary tool rack (see "Removable culinary
tool rack"), you can raise or lower the mid level rack to fit tall items
in either the mid level or lower level rack. Raise the mid level rack
to accommodate items up to 9" (22 cm) in the mid level rack and
13" (33 cm) in the lower level rack. Lower the mid level rack to
accommodate items up to 11" (28 cm) in both the mid level and
lower level racks. Adjusters are located on each side of the mid
level rack.
IMPORTAN'£ If using the culinary tool baskets in the Down
position, the mid level rack must also be in the lowest position.
To raise the rack
Press both rack adjusters and lift the rack until it is in the up
position and level.
NOTE: The mid level rack adjusters must be level.
To lower the rack
Press both rack adjusters and slide the rack back to its
lower position.
SURE-HOLD _ light item clips
The light item clips hold lightweight plastic items such as cups,
lids, or bowls in place during washing.
To use a clip
1. Pull clip away from tine.
2. Insert item between tine and clip and release clip.
To move a clip
1. Pull the clip up and off the tine.
2. Reposition the clip on another tine.
Removable mid level rack
The removable mid level rack allows you to wash larger items
such as stock pots, roasters, and cookie sheets in the lower level
rack.
IMPORTANT: Remove dishes prior to removing the mid level rack
from dishwasher.
To remove the rack
1. To access track stops, pull the rack forward until it stops and
clicks into place.
2. To open track stops, flip the track stop to the outside of the
track.
Track stop closed Track stop open
3=
After opening both track stops, slide front wheels up and out
of the slot in track. Continue to pull rack forward in track and
slide the back wheels up and out of the track.
\
Removefront rack wheel Removeback rack wheel.
4. Close track stops.
5. Slide rack tracks back into dishwasher.
Page 9
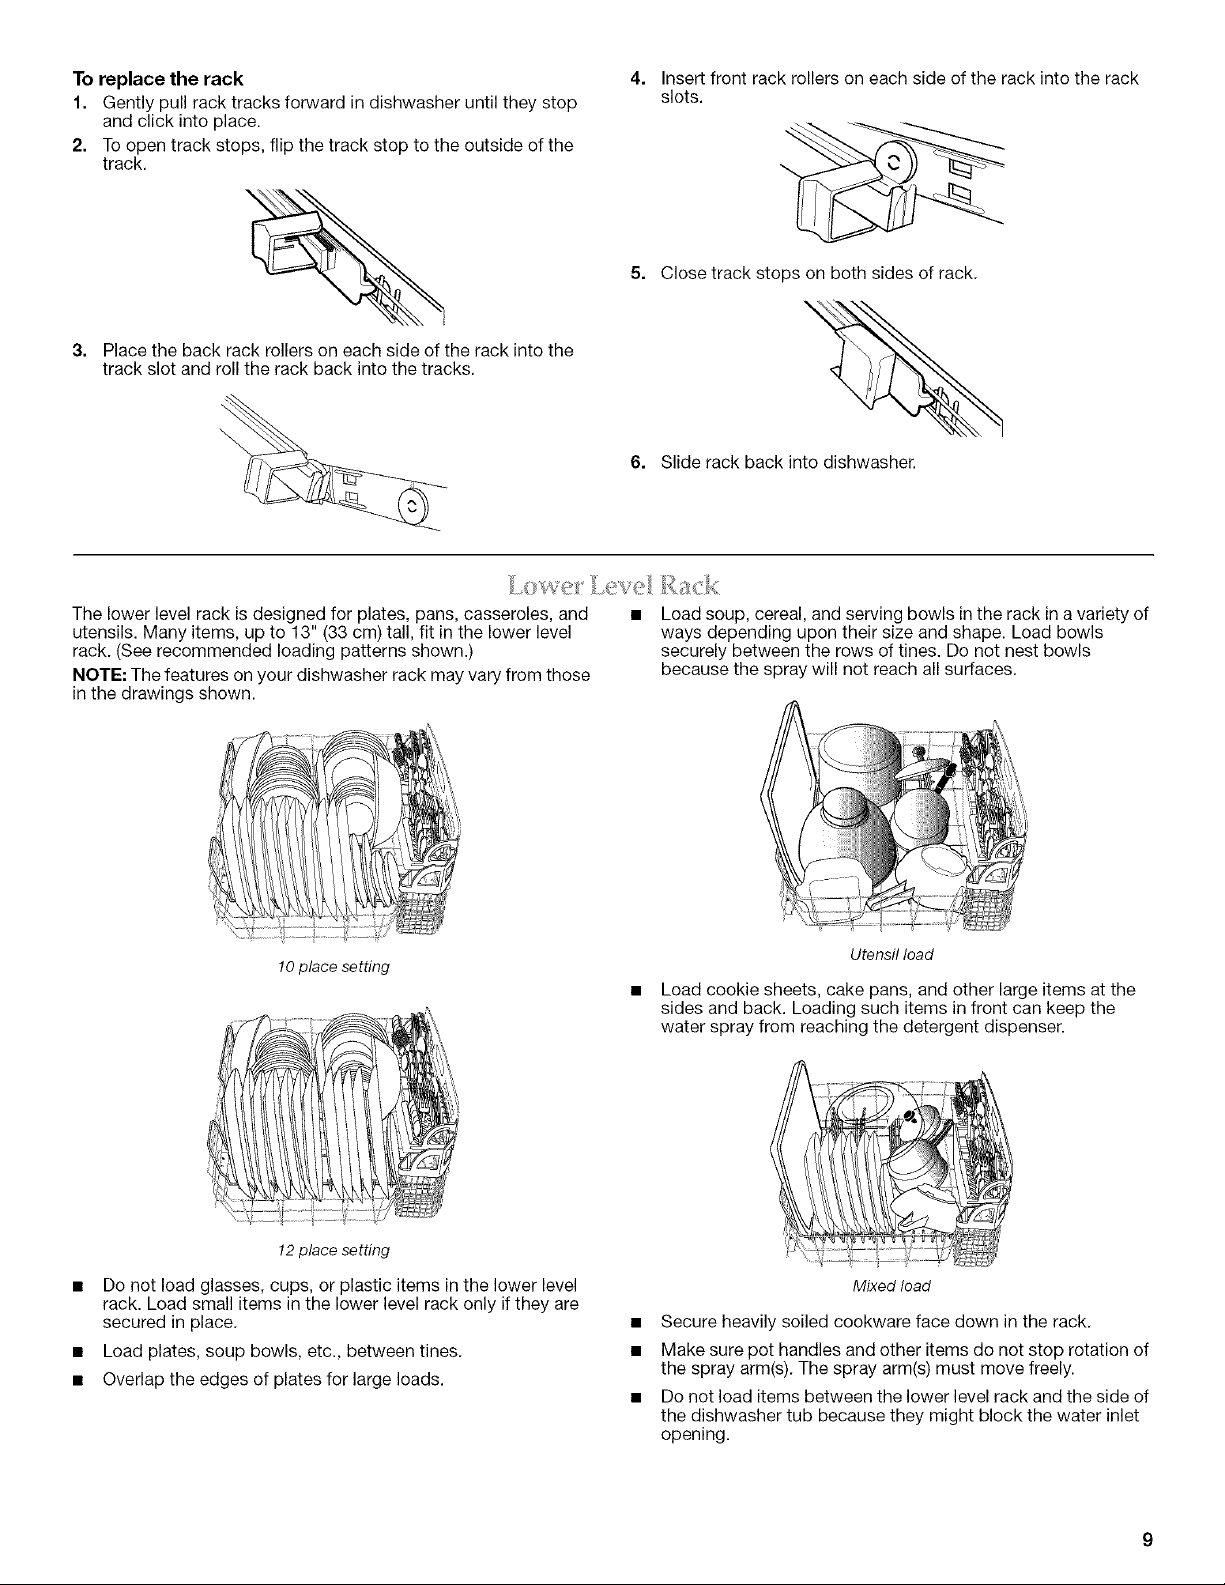
Toreplacetherack
1. Gentlypullracktracksforwardindishwasheruntiltheystop
4. Insertfrontrackrollersoneachsideoftherackintotherack
slots.
andclickintoplace.
2. Toopentrackstops,flipthetrackstoptotheoutsideofthe
track.
5. Closetrackstopsonbothsidesofrack.
3. Placethebackrackrollersoneachsideoftherackintothe
trackslotandrolltherackbackintothetracks.
\
6. Slide rack back into dishwasher.
The lower level rack is designed for plates, pans, casseroles, and • Load soup, cereal, and serving bowls in the rack in a variety of
utensils. Many items, up to 13" (33 cm) tall, fit in the lower level ways depending upon their size and shape. Load bowls
rack. (See recommended loading patterns shown.) securely between the rows of tines. Do not nest bowls
NOTE: The features on your dishwasher rack may vary from those because the spray will not reach all surfaces.
in the drawings shown.
10 place setting
12 place setting
• Do not load glasses, cups, or plastic items in the lower level
rack. Load small items in the lower level rack only if they are
secured in place.
• Load plates, soup bowls, etc., between tines.
• Overlap the edges of plates for large loads.
Utensil load
• Load cookie sheets, cake pans, and other large items at the
sides and back. Loading such items in front can keep the
water spray from reaching the detergent dispenser.
f
Mixed load
• Secure heavily soiled cookware face down in the rack.
• Make sure pot handles and other items do not stop rotation of
the spray arm(s). The spray arm(s) must move freely.
• Do not load items between the lower level rack and the side of
the dishwasher tub because they might block the water inlet
opening.
Page 10
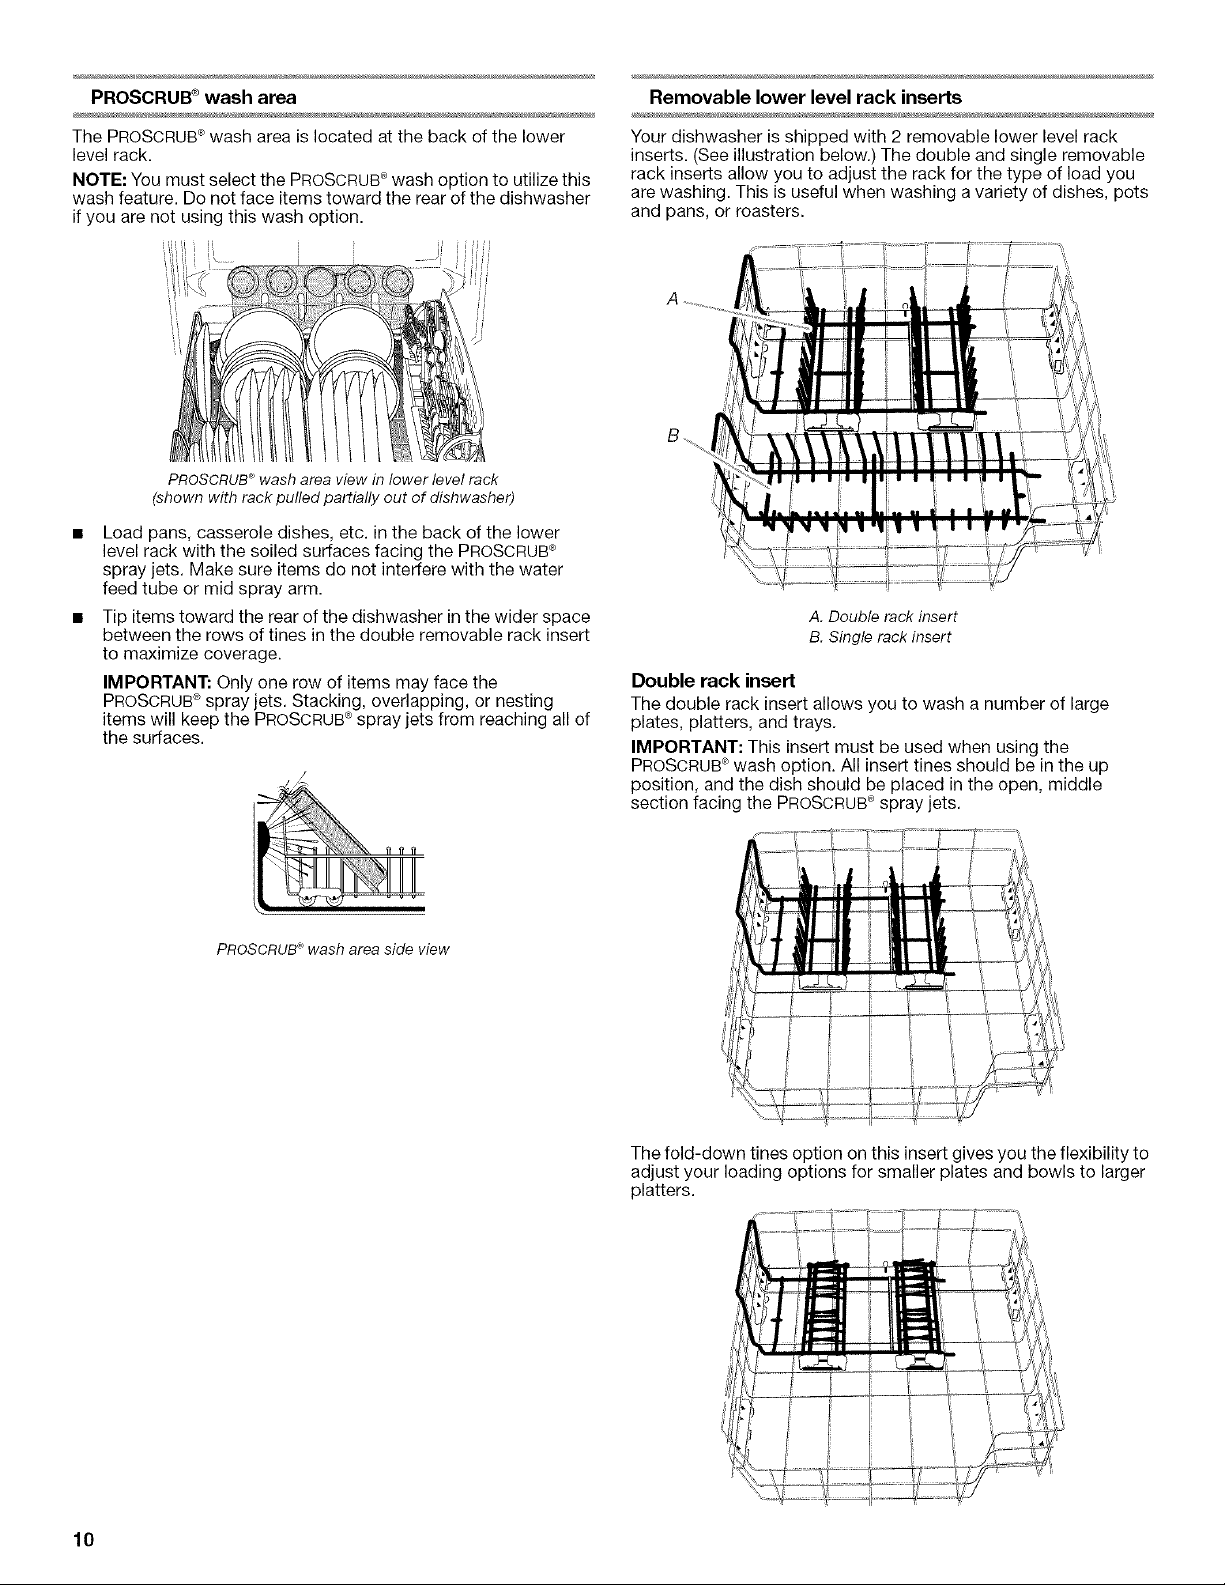
PROSCRUB _ wash area
Removable lower level rack inserts
The PROSCRUB®wash area is located at the back of the lower
level rack.
NOTE: You must select the PROSCRUB®wash option to utilize this
wash feature. Do not face items toward the rear of the dishwasher
if you are not using this wash option.
PROSCRUB'_wash area view in lower level rack
(shown with rack pulled partially out of dishwasher)
Load pans, casserole dishes, etc. in the back of the lower
level rack with the soiled surfaces facing the PROSCRUB®
spray jets. Make sure items do not interfere with the water
feed tube or mid spray arm.
Tip items toward the rear of the dishwasher in the wider space
between the rows of tines in the double removable rack insert
to maximize coverage.
IMPORTANT: Only one row of items may face the
PROSCRUB®spray jets. Stacking, overlapping, or nesting
items will keep the PROSCRUB®spray jets from reaching all of
the surfaces.
/
/,.>
Your dishwasher is shipped with 2 removable lower level rack
inserts. (See illustration below.) The double and single removable
rack inserts allow you to adjust the rack for the type of load you
are washing. This is useful when washing a variety of dishes, pots
and pans, or roasters.
A. Double rack insert
B. Single rack insert
Double rack insert
The double rack insert allows you to wash a number of large
plates, platters, and trays.
IMPORTANT: This insert must be used when using the
PROSCRUB®wash option. All insert tines should be in the up
position, and the dish should be placed in the open, middle
section facing the PROSCRUB®spray jets.
fl fl fl
[
PROSCRUB®wash area side view
The fold-down tines option on this insert gives you the flexibility to
adjust your loading options for smaller plates and bowls to larger
platters.
10
Page 11

Removing this insert allows you to wash larger items such as large
mixing bowls, stock pots, and roasters.
Single rack insert
The single rack insert allows you to wash a number of
medium-sized plates and bowls.
To remove double and single inserts
1. Pull handle out to the right and lift up to release.
2. Push down on insert until handle fits against outer rack edge.
3. When center tab under handle locks in under the middle side
rack wire, the insert is in place. (See illustration.)
To install single insert
1. Place the single insert end legs under the 2nd wire from the
right as shown below.
IMPORTANT: Make sure the 3 hooks at the back of the insert
are installed over the 2nd bottom rack wire from the front of
the rack,
2. Lift insert out of rack.
To install double insert
NOTE: It will be easier to install the inserts if you remove the
silverware basket from the rack.
1. Place the double insert end legs under the 3rd wire from the
right as shown below.
IMPORTANT: Make sure that the curved wires, on the bottom
of the insert, fit over the wires in the bottom of the rack.
A. 3 insert hooks
B.Single insert end legs
2.
Push down on insert until handle fits against outer rack edge.
3. When center tab under handle locks in under the middle side
rack wire, the insert is in place. (See illustration.)
11
Page 12

CULINARY CADDW _utensil basket
Use the utensil basket to hold specialty cooking utensils (serving
spoons, spatulas, and similar items), or overflow silverware items,
The basket hangs on the bottom rack in the right-hand corner.
Load the basket while it is on the bottom rack or remove the
basket for loading on a counter or table.
NOTE: Spin the spray arms. Be sure items in the basket do not
stop the rotation of the spray arms.
SURE-HOLD _ small items mesh pouch
This pouch hangs on the front of the bottom rack. Use it to hold
small items that could otherwise "fly" around inside the
dishwasher during a cycle.
Load the silverware basket while it is in the bottom rack or take
the basket out for loading on a counter or table. (See
recommended loading pattern shown.)
IMPORTANT: Always load items (knives, skewers, etc.) pointing
down.
• Load items with covers down, using the slots, to avoid
silverware nesting.
• When covers are up, mix items in each section of the basket
with some pointing up and some down to avoid nesting.
Spray cannot reach nested items.
Mix silverware to avoid nesting when the cover Is up in the basket.
NOTES:
• Do not load silver or silver-plated silverware with stainless
steel, These metals can be damaged by contact with each
other during washing,
• Some foods (such as salt, vinegar, milk products, fruit juices,
etc.) can pit or corrode silverware. Run a rinse cycle if you do
not have a full load to wash immediately.
• Unload or remove the basket before unloading the racks to
avoid spilling water droplets on the silverware.
CYCLES AND OPTIONS
Select the wash cycle and options desired. Or press START/
RESUME to repeat the same cycle and options as in the previous
cycle.
NOTE: If the last cycle you completed was a rinse cycle, the
dishwasher will run the last full wash cycle and options that you
selected when you press Start/Resume.
• If the power is off or the door is open for an extended period
of time, the Start/Resume button memory will default to the
Normal cycle with heated drying.
• If you do not run the dishwasher daily, close the door to
maintain memory.
A "Q" shows what steps are in each cycle.
Temperatures indicate where extra heat is added.
Water usage is shown in U.S. gallons/liters.
This model meets the ENERGY STAR®guidelines for energy
efficiency.
Cycle time includes dry time. An asterisk ( * ) by the cycle time
indicates the cycle time might be longer depending on the
temperature of the water entering the dishwasher.
• Place small items such as baby bottle caps, jar lids, corncob
holders, etc., in the section(s) with hinged cover(s). Close the
cover to hold small items in place.
A. Center cover open
B. End covers closed
12
Heavy Duty
Use this cycle for heavily soiled pots, pans, casseroles,
regular tableware and hard** water conditions.
Use both detergent dispenser sections.
Pre- Main Rinse Final Dry Mini- Water
Wash Wash Heated mum Usage
• • • • • 95* 6,9-7,8/
140°F * 140°F 26-30
Rinse Time (gal/L)
(min)
(s0oc) (s0oc)
Page 13

Normal
Use this cycle for loads with normal amounts of food soil.
(The energy-usage label is based on this cycle.) During the
main wash, the wash action will repeatedly pause for several
seconds.
Use both detergent dispenser sections.
Pre- Main Pre- Final Dry Mini- Water
Wash Wash Rinset Heated mum Usage
• • O* • • 77* 3.9-7,1/
Light/China
Use this cycle for lightly soiled and delicate loads. During the
heated dry, the heating element cycles on and off.
Rinse Main Pre- Final Dry Mini- Water
• • O* • • 72* 4.6-6,8/
105- 140°F 14.7-27
140°F (60°C)
(40.6-
60°C)
Use main detergent dispenser section.
Wash Rinset Heated mum Usage
115°F * 135°F 17-26
(46°C) (57°C)
Rinse Time (gal/L)
Rinse Time (gal/L)
(min)
(min)
1-Asmall amount of water is run through the pump to remove soil
particles between the main wash and final rinse.
*If the incoming water temperature is less than the
recommended temperature or food soils are heavy, the cycle
will automatically compensate by adding time, heat, and water
as needed.
**Hard water is defined as 7 grains per U.S. gallon and above.
NOTE: The sensor in your dishwasher monitors the soil level.
Cycle time and/or water usage can vary from the numbers above
as the sensor adjusts the cycle for the best wash performance.
For Model KUDU03ST
Open the door slightly to stop the cycle. Wait for the spraying
action to stop before opening the door to gain access to the
control panel. Press CANCEL.
The display shows
m
Your dishwasher starts a 2-minute drain (if needed). Let the
dishwasher drain completely. The light turns off after
2 minutes.
NOTE: If your dishwasher does not need draining, the light turns
off. Select a new cycle and options.
To stop the drain
You can press CANCEL again to stop the drain immediately. Be
sure to drain the dishwasher before starting a new cycle.
Quick Clean Up
Use this cycle for a quick wash to clean dishes prior to
entertaining. Towel drying may be needed.
Use main detergent dispenser section.
Rinse Main Rinse Final Dry Mini- Water
Rinse Only
Use this rinse cycle for rinsing dishes, glasses, and silverware
that will not be washed right away.
Pre- Main Rinse Final Dry Time Water
Wash Wash Heated (min) Usage
Wash Heated mum Usage
• • • • 30* 6.9/26
Do not use detergent with this cycle.
Rinse Time (gal/L)
Rinse (gal/L)
(min)
To clear the indicators
Press CANCEL before starting the dishwasher to clear all options
and cycles.
For Models KUDU03FT, KUDU03FTPA
1. Open the door slightly to stop the cycle. Wait for the spraying
action to stop before opening the door to gain access to the
control panel.
2. Press CANCEL. The Cancel light glows.
3. Close the door firmly. The dishwasher starts a 2-minute drain
(if needed). Let the dishwasher drain completely.
To stop the drain
Open the door and press CANCEL again. Be sure to drain the
dishwasher before starting a new cycle.
To clear the indicators
Press CANCEL before starting the dishwasher to clear all options
and cycles.
• 10 1.8/7
13
Page 14

For Model KUDU03ST
During the first minute of a cycle
1. Open the door.
2. Press a new cycle and/or options.
3. Check the detergent dispensers. They must be filled properly
for the new cycle. (See "Detergent Dispenser" in the User
Instructions for more details.)
4. Press START/RESUME.
5. Close the door firmly within 3 seconds of pressing Start/
Resume. The dishwasher resumes the new cycle and/or
option after a 5-second pause.
After the first minute of a cycle
1. Press CANCEL.
The display shows
II
4. Open the door. Select a new cycle and/or options.
5. Check the detergent dispensers. They must be filled properly
for the new cycle. (See "Detergent Dispenser" in the User
Instructions for more details.)
6. Press START/RESUME.
7. Close the door firmly within 3 seconds of pressing Start/
Resume. The dishwasher resumes the new cycle and/or
option after a 5-second pause.
/%" _ * }
,,,_,:;, 0<!u',,;_.........._} !#i"_oo,......_o;_
You can add an item anytime before the main wash starts. Open
the door and check the detergent dispenser. If the cover is still
closed, you can add items.
To add items
1. Open the door slightly to stop the cycle. Wait for the spraying
action to stop before opening the door.
2. Open the door. If the detergent dispenser cover is still closed,
add the item.
3. Press START/RESUME.
4. Close the door firmly within 3 seconds of pressing Start/
Resume. The dishwasher resumes the cycle after about a
5-second pause.
Your dishwasher starts a 2-minute drain (if needed). Let
the dishwasher drain completely. The light turns off after
2 minutes.
NOTE: If your dishwasher does not need draining, the light
turns off.
2. Open the door.
3. Select a new cycle and/or options.
4. Check the detergent dispensers. They must be filled properly
for the new cycle. (See "Detergent Dispenser" in the User
Instructions for more details.)
5. Press START/RESUME.
6. Close the door firmly. The dishwasher resumes the new cycle
and/or option after a 5-second pause.
For Models KUDU03Fr, KUDU03FTPA
During the first minute of a cycle
1. Open the door.
2. Press a new cycle and/or options.
3. Check the detergent dispensers. They must be filled properly
for the new cycle. (See "Detergent Dispenser" in the User
Instructions for more details.)
4. Press START/RESUME.
5. Close the door firmly within 3 seconds of pressing Start/
Resume. The dishwasher resumes the new cycle and/or
option after a 5-second pause.
After the first minute of a cycle
1. Open the door slightly to stop the cycle. Wait for the spraying
action to stop before opening the door to gain access to the
control panel.
2. Press CANCEL. The Cancel light glows.
3. Close the door. Your dishwasher starts a 2-minute drain (if
needed). Let the dishwasher drain completely.
You can customize your cycles by pressing the options desired. If
you change your mind, press the option again to turn off the
option. Select a different option if desired.
You can change an option anytime before the selected option
begins. For example, you can press HEAT DRY anytime before
drying begins.
Press START/RESUME to repeat the same cycle and options as in
the previous wash cycle.
NOTE: If the last cycle you completed was a rinse cycle, when
you press Start/Resume, the dishwasher runs the last full wash
cycle and options.
PROSCRUB®wash option
Select this option to activate the PROSCRUB®spray jets and
provide intensified water spray to the back of the lower level rack.
The PROSCRUB®wash option provides a concentrated wash
action to pans, casseroles, etc. with tough food soil.
This option may add heat and wash time to the cycle.
NOTE: PROSCRUB®is an option with the Heavy Duty and Normal
wash cycles.
IMPORTANT:
• Load pans, casserole dishes, etc. facing the PROSCRUB®
spray jets in the back of the lower level rack. Tip items toward
the rear of the dish rack to maximize coverage. Only one row
of items may face the PROSCRUB®spray jets. Stacking,
overlapping, or nesting items will keep the PROSCRUB_ spray
jets from reaching all of the surfaces.
• Turn the PROSCRUB®wash option off if not loading items for
this option.
/
14
,
Side view of PROSCRUB®wash area
Page 15

Hi-Temp Scrub
4 Hour Delay
Select this option to heat the water during parts of the cycle, and
add a rinse. Higher water temperatures and an extra rinse help
clean tough soils. Hi-Temp Scrub, with the Heavy Duty cycle,
heats the water in the main wash and the prewash.
Hi-Temp Scrub, with the Normal cycle, raises the water
temperature in the main wash.
This option adds heat, water, and wash time to a cycle.
NOTE: Hi-Temp Scrub is an option with the Heavy Duty and
Normal cycles.
Sani Rinse
Select this option to raise the water temperature in the final rinse
to approximately 155°F (68°C). The Sani Rinse option adds heat
and time to the cycle. This high temperature rinse sanitizes your
dishes and glassware in accordance with NSF/ANSI Standard 184
for Residential Dishwashers. Certified residential dishwashers are
not intended for licensed food establishments.
NOTE: The Heavy Duty cycle automatically uses this option. Sani
Rinse is an option with the Normal cycle. Only these sanitization
cycles have been designed to meet the NSF/ANSl requirements.
Heat Dry
The Heat Dry option in combination with rinse aid will give you
excellent drying results. The energy to use Heat Dry costs pennies
per cycle. Heat Dry is on when the light is lit on the Heat Dry
button. Be sure to load plastic items in the upper rack to avoid
damage.
You may turn off the Heat Dry option by pressing HEAT DRY so
that the light goes off. However, you will have items in your dish
load that will not be dry at the end of the cycle.
NOTE: The Heat Dry option is used in all cycles except Rinse
Only.
Control Lock
Use control lock to avoid unintended use of your dishwasher. You
can also use the control lock feature to avoid unintended cycle or
option changes during a cycle.
When Control Lock is lit, all buttons are disabled.
NOTES:
• The dishwasher door can be opened while the controls are
locked.
• You can turn on the lock while the dishwasher is running.
To turn on the lock
Press and hold HEAT DRY for at least 4 seconds. The Control
Lock light glows.
If you press any pad while your dishwasher is locked, the light
flashes 3 times.
To turn off the lock
Press and hold HEAT DRY for at least 4 seconds. The Control
Lock light turns off.
Select this option to run your dishwasher at a later time or during
off-peak hours. You can add items to the load anytime during the
delay countdown. (See "Adding Items During a Cycle.") The delay
countdown will not continue if the door is not closed firmly.
To delay the start (Model KUDU03ST)
1. Open the door.
2. Select a wash cycle and options. The selected cycle and
option lights will glow.
3. Press 4 HOUR DELAY.
You will see
showing in the display. The 4 Hour Delay light will glow.
4. Press START/RESUME. The Start/Resume light will glow.
5. Close the door firmly.
NOTE: To cancel the delay, open the door and press 4 HOUR
DELAY.To immediately start your dishwasher, press START/
RESUME.
To delay the start (all other models)
1. Open the door.
2. Select a wash cycle and options. The selected cycle and
option lights will glow.
3. Press 4 HOUR DELAY. The 4 Hour Delay light will glow.
4. Press START/RESUME.
5. Close the door firmly within 3 seconds of pressing Start/
Resume.
NOTE: To cancel the delay, open the door and press 4 HOUR
DELAY. To immediately start your dishwasher, press START/
RESUME and close the door firmly within 3 seconds.
Sanitized
If you select the Sani Rinse option, Sanitized light glows when the
Sani Rinse cycle is finished. If your dishwasher did not properly
sanitize your dishes, the light flashes at the end of the cycle. This
can happen if the cycle is interrupted. The light goes off when you
open and close the door or press CANCEL.
Clean
The Clean light glows when a cycle is finished. The light turns off
when you open and close the door or press CANCEL.
15
Page 16

P P
SECURITE DU LAVE-VAISSELLE
Votre s6curit6 et celle des autres est tres importante.
Nous donnons de nombreux messages de securit6 importants dans ce manuel et sur votre appareil menager. Assurez-vous de
toujours lire tousles messages de securit6 et de vous y conformer.
Ce symbole d'alerte de securit6 vous signale les dangers potentiels de deces et de blessures graves & vous
et & d'autres.
Voici le symbole d'alerte de securit&
Tousles messages de securite suivront le symbole d'alerte de securite et le mot "DANGER" ou
"AVERTISSEMENT'. Ces roots signifient :
Risque possible de deces ou de blessure grave si vous ne
suivez pas immediatement lee instructions.
Risque possible de deces ou de blessure grave si vous
ne euivez pas lee instructions.
Tousles messages de securit6 vous diront quel est le danger potentiel et vous disent comment reduire le risque de blessure et
ce qui peut se produire en cas de non-respect des instructions.
Risque de basculement
Ne pas utiliser le lave-vaisselle jusqu'a ce qu'il soit
completement install&
Ne pas appuyer sur la porte ouverte.
Le non-respect de ces instructions peut causer dee
blessures graves ou des coupures.
Risque de choc _lectrique
Relier le lave-vaiseelle a la terre d'une methode
electrique.
Brancher le fil relie a la terre au connecteur vert relie
la terre dane la boite de la borne.
Ne pae utiliser un c_ble de rallonge.
Le non-respect de ces instructions peut causer
un d_ces, un incendie ou un choc electrique.
16
Page 17

PIECES ET CARACTERISTIQUES
Ce manuel couvre plusieurs modeles diff@ents. Les caracteristiques de votre lave-vaisselle peuvent @re differentes de celles illustrees
ci-dessous.
M
B
C
D
E
F
H
J..................................iiiJiiiiiiiiiiiiiiii
I
A. R6gleurs pour les paniers in term6diaires
b deux positions
B. Tiges flexibles
FLEXI-FOLD DOWN TM
C. Panier de niveau interm6diaire amovible
D. Panier SATINGLIDE _ Ultra
E. Plaque signal6tique des num6ros
de modele et de s6rie
F. Ouverture d'arriv#e d'eau
(dans la paroi de la cuve)
G. Insertions amovibles du panier
de niveau inf6rieur (deux)
H. Distributeur de d_tergent
I. Event
J. Event actif
K. Panier amovible pour ustensiles de cuisson
L. Support pour tasses et verres a pied
SURE-HOLD ®
M. Insertions amovibles du panier
de niveau interm6diaire (deux)
N. Attaches pour articles 16gets
SURE-HOLD _
O. Jets d'aspersion PROSCRUB_
P Panier a couverts
Q. Panier a ustensiles
CULINARY CADDY _
R. Dispositff de protection
contre le d_bordement
S. Element de chauffage
7TPoche-filetpourarticles de petite taille
SURE-HOLD _
U. Distributeur d'agent de ringage
_f Systeme d'insonorisation
WHISPER QUIET _
W. Tableau de commande sur la porte
17
Page 18

KUDU03ST
KUDU03FT
L!!
KUDU03FTPA
S CYCLES / OPTIONS
\ !!_Duty --Wash _Chna l- - --Ony Scrub _ P Rnse-Dry _ Deay
Q • / • _Q • ® • OH_t _ ®
Heavy / Norma Light/ Quick Rinse ProScrub 5ani Hi-Temp _ Dr _ 4 Hour
[ Duty /[ Wash [ China _Cleanup [ Only _ / Rnse Scub / Y Deny
Heavy Norma Light/ Quick Rinse ProScrub_ Sant HE-Temp Dry 4 Hour
Duty Wash / China Cleanup Only Rinse Scrub _ _ Delay _ Clean
,_/_.............. * _ .............. _ ................. ' _ Quick _ _................... " H /
CYCLES OpTiONS
@ @
Control Sanitized
Lock
_ _ _ _ San4tlzed
Up _ bCrUD
...................... .......................;/ ...................... ........................ ................
Clean
1
MISE EN MARCHE
Avant d'utiliser le lave-vaisselle, enlever tousles materiaux d'emballage. Lire ce Guide de ref6rence pour le consommateur au complet
ainsi que les instructions pour I'utilisateur. Vous y trouverez des renseignements de s6curite importants ainsi que des conseils
d'utilisation utiles.
3.
Pour tous les modules :
1. L'agent de ringage est essentiel pour un bon sechage. Veiller
remplir le distributeur avant d'utiliser le nouveau lave-
vaisselle. Chaque remplissage durera de 1 a 3 mois selon
I'usage.
2. Oter les particules alimentaires importantes et articles durs
(cure-dents ou os) de la vaisselle. IIn'est pas necessaire de
prerincer la vaisselle.
Bien charger le lave-vaisselle. (Voir "Chargement".) Espacer la
vaisselle pour que I'eau puisse atteindre les surfaces sales.
S'assurer que rien n'emp6che le ou les bras d'aspersion de
tourner librement.
\
4. Ajouter le detergent. Toujours utiliser un detergent d'une
marque de haute qualit& (Voir "Utilisation du lave-vaisselle"
dans les Instructions pour I'utilisateur.)
18
Page 19

5=
Laisser I'eau couler du robinet le plus pres du lave-vaisselle
jusqu'& ce qu'elle soit chaude. Fermer le robinet.
6. Appuyer sur les selections de programme et d'option desires
sur le tableau de commande. (Voir "Programmes et options".)
7. Appuyer sur START/RESUME (mise en marche/
reinitialisation). Ou appuyer sur START/RESUME (mise en
marche/reinitialisation) pour r_peter le m_me programme et
les m_mes options que dans le programme prec6dent. Le
temoin lumineux du programme et des options choisis
s'illuminera.
IMPORTANT (Pour module KUDU03ST) :
• Quand le programme commence, vous verrez un motif rotatif
de lumieres dans la fen_tre d'affichage, indiquant que
I'appareil est en marche. Ce motif continuera pendant une
periode allant jusqu'a 6 minutes pendant que de multiples
detecteurs verifient latemperature de I'eau qui penetre dans
I'appareil, I'usage d'agent de rin(_age et le niveau de salete sur
la vaisselle et les ustensiles de cuisson. Les detecteurs
determinent ensuite le programme ideal pour votre charge de
vaisselle. Apr_s que la detection est completee, I'afficheur
indiquera le hombre de minutes qui restent dans le
programme et le compte a rebours du programme
commencera.
Le compte a rebours du programme fait une pause pendant
que le lave-vaisselle chauffe I'eau a une temperature reglee.
(Voir "Selection des programmes".)
8=
Bien fermer la porte dans un delai de 3 secondes apres avoir
appuye sur Start/Resume (mise en marche/reinitialisation).
REMARQUE :Si le lave-vaisselle n'est pas mis en marche
dans les 30 secondes apres la selection du programme et des
options, il retournera au dernier programme et aux dernieres
options completes.
CHARGEMENT
Le panier pour ustensiles de cuisson est congu avec 2 paniers amovibles pour contenir les couverts, couteaux et ustensiles de cuisson
supplementaires.
Position 61ev6e
Installer les paniers en position elevee en cas de couverts
supplementaires a laver.
Paniors install6s onposition 61ov6o
Position basse
Installer les paniers en position basse en cas de couverts,
couteaux ou ustensiles necessitant plus d'espace pour le lavage.
Paniers install6s en position basse
IMPORTANT : Lors de I'utilisation des paniers pour ustensiles de
cuisson en position basse, le panier de niveau intermediaire dolt
lui aussi _tre place dans la position la plus basse.
19
Page 20

Lorsqu'on utilise los tablettes pour tasses ou d'autres articles de
grande taille dans le panier interm_diaire, retirer le panier avant en
position basso pour plus d'espace.
5. Former los butees d'arr_t.
6. Faire glisser los butees de panier pour los reinstaller dans le
lave-vaisselle.
Pour r6installer le partier
1. Tirer doucement vers I'avant sur los butees du panier pour
ustensiles de cuisson jusqu'& I'arr_t.
2. Pour ouvrir los butees d'arr_t, relever la butee d'arr6t vers
I'exterieur du panier.
Panier avant retir# en cas d'utilisation des tablettes pour
tasses clans le panier interm_diaire
Panier amovible pour ustensiles de cuisson
Le panier amovible pour ustensiles de cuisson vous permet de
laver des articles de plus grande taille dans le panier
intermediaire.
IMPORTANT " Oter los paniers avant de retirer le panier pour
ustensiles de cuisson du lave-vaisselle.
Pour enlever le partier
1. Pour acceder aux butees d'arr_t, tirer le panier vers I'avant
jusqu'& I'arr_t,
2. 0ter los deux paniers en los soulevant hors du panier du lave-
vaisselle.
3. Pour ouvrir los butees d'arr_t, relever la butee d'arr_t vers
I'exterieur du panier.
Butte d'arr_t ferm_e Butte d'arr_t ouverte
4.
Apres ouverture des deux butees d'arr_t, faire glisser los
roues avant vers le haut pour los sortir de la fente dans la
glissiere. Continuer a tirer le panier vers I'avant et faire glisser
los roues arriere vers le haut pour los sortir de la glissiere.
3. Placer los roulettes arriere du panier de chaque c6te du panier
pour ustensiles de cuisson darts les fentes de la glissiere et
faire rouler le panier pour le reinstaller dans les glissieres.
4. Inserer los roulettes avant du panier de chaque c6te du partier
dans los fentes de la glissiere et faire glisser le panier pour le
reintegrer partiellement dans le lave-vaisselle.
5. Former los butees d'arr_t des deux c6tes du panier.
6. Installer los paniers a la position desir6e. (Voir "Panier pour
ustensiles de cuisson".)
Rotifer la roue avant du paniet: Retirer la roue arrieredu panier.
20
Page 21

Le panier intermediaire est con(}u pour le chargement des tasses,
verres et petits articles, De nombreux articles jusqu'a 9"
(22 cm) de hauteur conviennent dans le panier intermediaire. (Voir
les modeles de chargement recommandes ci-dessous.)
REMARQUE : Les caracteristiques sur le panier de votre lave-
vaisselle peuvent differer des illustrations.
Charge pour 10 couverts
Charge pour 12 couverts
Pour faciliter le nettoyage et le drainage, orienter la cavite
ouverte des articles vers le bas.
Charger les verres et les tasses dans le panier intermediaire
seulement. Le panier inferieur n'est pas con(}u pour les verres
et les tasses. IIs pourraient y subir des dommages.
Placer les tasses et verres dans les rangees entre les tiges.
Ces articles places sur les tiges peuvent subir des dommages
et comporter des taches d'eau.
Insertions amovibles du panier de niveau interm_diaire
Le lave-vaisselle a ete expedie avec 2 insertions amovibles du
panier de niveau intermediaire. (Voir I'illustration ci-dessous.) Les
insertions amovibles du panier vous permettent d'ajuster le panier
pour le type de charge a laver. Ceci est utile Iorsqu'on lave une
variete de verres et de vaisselle.
A. Insertions amovibles du panier
B. Agrafes de maintien de I'insertien
Pour enlever les insertions
1. Soulever la broche de I'insertion situee vers le centre du
panier pour degager I'insertion des agrafes de maintien,
Charge de tasses et verres
• Veiller a ce qu'il n'y ait aucun contact entre les articles de
porcelaine, de cristal et autres articles delicats. IIs pourraient
subir des dommages,
• Placer les articles de plastique dans le panier intermediaire
seulement. Ne laver des articles de plastique au lave-vaisselle
que s'ils sont identifies comme "lavable au lave-vaisselle".
• Placer les articles de plastique pour que la force du jet d'eau
ne les deplace pas durant le programme.
• Pour eviter I'ecaillage, veiller ace que les verres a pied ne
touchent pas les autres articles.
• On peut placer dans le panier intermediaire de petits bols ou
moules et autres petits ustensiles. Placer les bols dans la
section centrale pour une meilleure stabilite.
A.Soulever labroche de I'insertion amoviblepour retirer lesagrafes
de maintien.
B.Agrafes de maintien
2. Soulever I'insertion hors du panier.
Pour installer les insertions du partier
1. Placer les pieds du bout de I'insertion sous la broche avant ou
arriere du panier- voir I'illustration ci-dessous,
_A
A.Pieds de I'insertion
21
Page 22

2=
Enfoncer la broche au milieu de I'insertion jusqu'a ce qu'elle
glisse dans I'agrafe de maintien d'un c6te ou de I'autre de la
pattie centrale en bas du panier.
_A
A. Agrafes de maintien de I'insertion
Attaches pour articles I_gers SURE-HOLD c_
Ces attaches maintiennent les articles legers en plastique tels que
les tasses, couvercles ou bols en place pendant le lavage.
Pour utiliser une attache
1. €carter I'attache de la tige.
2. Inserer I'article entre la tige et I'attache et rel&cher I'attache.
Pour d6placer une attache
1. Tirer I'attache vers le haut pour la separer de la tige.
2. Reinstaller I'attache sur une autre tige.
Panier interm6diaire r6glable & 2 positions
Tiges flexibles FLEXI-FOLD DOWN TM
La rangee de tiges sur les c6tes gauche et droit du partier
intermediaire peut 6tre regl6e pour faire de la place pour divers
articles de vaisselle.
Pour ajuster les tiges flexibles
1. Saisir la pointe de la tige qui se trouve dans le support
de la tige.
2. Pousser doucement la tige & I'exterieur du support de latige.
3. Abaisser la rangee de tiges, vers le centre du panier.
Support pour taeses et verres _ pied SURE-HOLD ®
Rabattre la tablette supplementaire sur les c6tes gauche ou droit
du panier intermediaire pour y placer des tasses supplementaires,
verres a pied ou de longs articles tels que des ustensiles et
spatules.
REMARQUE : Enlever le(s) panier(s) pour ustensiles de cuisson
Iorsque vous lavez de grands verres & pied ou d'autres articles de
grande taille dans le panier de niveau intermediaire.
Apres avoir enleve le panier pour ustensiles de cuisson (volt la
section "Panier amovible pour ustensiles de cuisson"), on peut
monter ou baisser le panier intermediaire pour qu'il convienne
des articles de haute taille, soit dans le panier intermediaire, soit
dans le panier inferieur. Monter le panier intermediaire pour
accommoder des articles jusqu'a 9" (22 cm) dans le panier
intermediaire, et jusqu'a 13" (33 cm) dans le panier inf_rieur.
Baisser le panier intermediaire pour accommoder des articles
jusqu'a 11" (28 cm) dans les paniers intermediaire et inferieur. Les
regleurs sont situes de chaque c6te du panier intermediaire.
IMPORTANT :Lots de I'utilisation des paniers pour ustensiles de
cuisson en position basse, le panier de niveau intermediaire dolt
_tre egalement place dans la position la plus basse.
Pour monter le panier
Appuyer sur les deux regleurs et soulever le panier jusqu'& ce qu'il
soit en position superieure eta niveau.
REMARQUE : Les regleurs du panier intermediaire doivent 6tre
niveau.
Pour baieser le panier
Appuyer sur les deux regleurs du panier et faire glisser le panier
sa position inferieure.
Panier amovible de niveau intermL, diaire
22
Le panier amovible de niveau intermediaire permet de laver des
articles de plus grande taille tels que marmites, r6tissoires et t61es
biscuits dans le panier de niveau inferieur.
IMPORTANT :Oter la vaisselle avant de retirer le panier de niveau
intermediaire du lave-vaisselle.
Pour enlever le panier
1. Pour acceder aux butees d'arr_t, tirer le panier vers I'avant
jusqu'a I'arr_t et jusqu'a ce qu'il s'enclenche en place.
Page 23

2. Pour ouvrir les butees d'arr_t, relever la butee d'arr_t vers 5. Fermer les butees d'arr_t des deux c6tes du panier.
I'exterieur de la glissiere.
6. Faire glisser le panier pour le reinstaller dans le lave-vaisselle.
Butte d'arr_t ferm_e Butte d'arr_t ouverte
3.
Apres ouverture des deux butees d'arr_t, faire glisser les
roues avant vers le haut pour les sortir de la fente dans la
glissiere. Continuer &tirer le panier vers I'avant et faire glisser
les roues arriere vers le haut pour les sortir de la glissiere.
\
Retirer la roue avant du partier: Retirer la roue arriere du paniel:
4. Fermer les butees d'arr_t.
5. Faire glisser les butees de panier pour les reinstaller dans le
lave-vaisselle.
Le panier inferieur est congu pour les assiettes, casseroles et
ustensiles. De nombreux articles jusqu'a 13" (33 cm) de hauteur
conviennent dans le panier inferieur. (Voir les modeles de
chargement recommandes ci-dessous.)
REMAROUE : Les caracteristiques sur le panier de votre lave-
vaisselle peuvent differer des illustrations.
Peur r6installer le panier
1. Tirer doucement les butees du panier vers I'avant dans le
lave-vaisselle jusqu'& I'arr_t et jusqu'& ce qu'elles
s'enclenchent en place.
2. Pour ouvrir les butees d'arr_t, relever la butee d'arr_t vers
I'exterieur de la glissiere.
3. Placer les roulettes arriere du panier de chaque c6te du panier
darts la fente de la glissiere et faire rouler le panier pour le
reinstaller dans les glissieres.
\
4. Inserer les roulettes avant du partier de chaque c6te du panier
dans les fentes du partier.
Charge pour 10 couverts
},i
i .......
Charge pour 12couverts
• Ne pas charger dans le partier inferieur des articles comme
verres, tasses ou articles de plastique. Ne charger de petits
articles dans le panier inferieur que s'ils sont bien fixes en
place.
• Charger les assiettes, bols a soupe, etc. entre les tiges.
• Pour une charge importante, placer les bords des assiettes en
chevauchement.
23
Page 24

Charger les bols a soupe, & cereales et de service dans le
panier de diverses fagons selon leur taille et forme. Charger
les bols solidement entre les rangees de tiges. Ne pas
imbriquer les bols car le jet d'eau n'atteindra pas toutes les
surfaces.
Charge d'ustensiles
Charger les plaques a biscuits, moules a g&teaux et autres
gros articles sur les c6tes eta I'arriere. Le chargement de tels
articles a I'avant peut emp_cher le jet d'eau d'atteindre le
distributeur de detergent.
Charger potions, casseroles, etc. & I'arriere du panier de
niveau inferieur avec les surfaces sales en face des jets
d'aspersion PROSCRUB_LVeiller ace que les articles ne
g_nent pas le tuyau d'alimentation en eau ou le bras
d'aspersion intermediaire.
Incliner les articles vers I'arriere de I'unite dans I'espace plus
large compris entre les rangees de tiges de la double insertion
amovible du panier, afin de maximiser la surface couverte.
IMPORTANT : Seulement une rangee d'articles peut _tre en
face des jets d'aspersion PROSCRUB®.Les articles empiles,
ou en chevauchement ou imbriques emp_cheront les jets
d'aspersion PROSCRUB_d'atteindre toutes les surfaces.
/
Vue lat_rale de la zone de lavage PROSCRUBc_
Insertions amovibles du panier de niveau inf_rieur
Le lave-vaisselle a ete expedie avec 2 insertions amovibles du
panier de niveau inferieur. (Voir I'illustration ci-dessous.) Les
insertions amovibles (doubles et simples) du panier vous
permettent d'ajuster le panier pour le type de charge a laver. Ceci
est utile Iors du lavage d'une variete de plats, casseroles et
po_lons ou plats de r6tissage.
Charge mixte
Immobiliser les ustensiles de cuisson tres sales dans le panier,
cavite vers le bas.
Veiller a ce que les poignees des ustensiles et autres articles
n'entravent pas la rotation du ou des bras d'aspersion. Le ou
les bras d'aspersion doivent pouvoir tourner librement.
Ne pas charger d'articles entre le panier inferieur et la paroi
laterale de la cuve du lave-vaisselle. Cela risque de bloquer
I'arrivee d'eau.
Zone de lavage PROSCRUB ®
La zone de lavage PROSCRUB_est situee & I'arriere du panier de
niveau inferieur.
REMARQUE :On dolt selectionner I'option de lavage
PROSCRUB®pour utiliser cette caracteristique de lavage. Ne pas
placer les articles vers I'arriere de I'unite si cette option de lavage
n'est pas utilisee.
A. Insertion double du panier
B. Insertion simple du panier
Vuesur lazone de lavagePROSCRUBdu panier de niveauinf_rieur
®
(repr_sent_avec le panier partiellement sorti du lave-vaisselle)
24
Page 25

Insertion double du panier
L'insertion double du panier vous permet de laver un grand
nombre de grandes assiettes, plats de service et plateaux.
IMPORTANT : Cette insertion dolt _tre utilisee en cas d'utilisation
de I'option de lavage PROSCRUB_L Toutes les tiges d'insertion
doivent 6tre en position elevee et la vaisselle dolt _tre placee dans
la section ouverte, moyenne, face aux jets d'aspersion
PROSCRUB_L
L'option de tiges rabattables sur cette insertion donne une
flexibilite permettant d'ajuster les options de chargement des
assiettes et bols de petite taille aux plats plus grands.
Pour retirer les insertions doubles et simplse
1. Tirer sur la poignee vers la droite et la soulever vers le haut
pour la degager.
2. Soulever I'insertion hors du panier.
Pour installer I'insertion double
REMARQUE : II sera plus facile d'installer les insertions si on
retire le panier a couverts du panier du lave-vaisselle.
1. Placer les pieds du bout de I'insertion double sous la
troisieme broche en partant de la droite - voir I'illustration ci-
dessous.
IMPORTANT : S'assurer que les tiges arquees, en bas de
I'insertion, s'adaptent par-dessus les broches dans la pattie
inferieure du panier.
Le retrait de cette insertion vous permet de laver de plus gros
articles tels que des grands bols melangeurs, marmites et
r6tissoires.
Insertion simple du partier
L'insertion simple du partier permet de laver un grand nombre
d'assiettes et de bols de taille moyenne.
2. Appuyer sur I'insertion jusqu'a ce que la poignee s'enclenche
contre le bord externe du panier.
3=
Lorsque I'onglet central sous la poignee s'enclenche sous la
broche du panier sur le c6te au milieu, I'insertion est en place.
(Voir I'illustration.)
25
Page 26

Pour installer I'insertion simple
1. Placer les pieds du bout de I'insertion simple sous la
deuxieme broche en partant de la droite - voir I'illustration ci-
dessous.
IMPORTANT : S'assurer que les 3 crochets a I'arriere de
I'insertion sont installes par-dessus la deuxieme broche du
panier inferieur en partant de I'avant du panier.
B
A. 3 crochets d'insertion
B. Pieds du bout de I'insertion simple
2=
Appuyer sur I'insertion jusqu'a ce que la poignee s'enclenche
contre le bord externe du panier.
Panier & ustensiles CULINARY CADDY ®
Utiliser le panier a ustensiles pour contenir des ustensiles
speciaux de cuisson (cuillers a servir, spatules et articles
semblables) ou le surplus des couverts.
Le panier a ustensiles se suspend sur le panier inferieur dans le
coin droit. Charger le panier a ustensiles pendant qu'il est sur le
panier inferieur ou enlever le panier pour le charger sur un
comptoir ou une table.
REMARQUE :Tourner les bras d'aspersion pour s'assurer que les
articles dans le panier a ustensiles n'entravent pas la rotation des
bras d'aspersion.
Poche-fllet pour articles de petite taille SURE-HOLD ®
Cette poche se place & I'avant du partier inferieur. L'utiliser pour
tenir les petits articles qui pourraient autrement se deplacer
I'interieur du lave-vaisselle pendant un programme.
3=
Lorsque I'onglet central sous la poignee s'enclenche sous la
broche du panier sur le c6te au milieu, I'insertion est en place.
(Voir I'illustration.)
Charger le panier a couverts alors qu'il est dans le panier inferieur
ou le retirer pour le charger sur un comptoir ou sur une table. (Voir
le schema de chargement recommande ci-dessous.)
IMPORTANT :Toujours charger les articles (couteaux, brochettes,
etc.) pointes vers le bas.
• Charger les articles avec les couvercles vers le bas et utiliser
les fentes pour emp_cher les couverts de s'imbriquer.
Placer les petits articles tels que les capsules de biberons,
couvercles de bocaux, poignees a epis de mais, etc. dans la
ou les sections avec couvercle(s) articule(s). Fermer le
couvercle pour maintenir les petits articles en place.
A. Couvercle central ouvert
B. Couvercles d'extr_mit_s ferm_s
26
Page 27

Lorsque les couvercles sont releves, assortir les articles dans
chaque section du panier, certains vers le haut et d'autres vers
le bas afin que les articles ne s'imbriquent pas. Le jet d'eau ne
peut atteindre les articles imbriques.
Placer les couverts de fagon a _viter qu'ils s'imbriquent Iorsque
le couvercle est relev_ dans le paniel:
PROGRAMMES ET OPTIONS
REMARQUES :
• Ne pas charger d'ustensiles en argent ou plaques argent avec
des articles en acier inoxydable. Ces metaux peuvent _tre
endommages s'ils se touchent durant le lavage.
• Certains aliments (tels que le sel, le vinaigre, les produits
laitiers, les jus de fruits, etc.) peuvent causer des piqQres ou
de la corrosion sur les couverts. Effectuer un programme de
ringage si la charge n'est pas assez pleine pour un lavage
immediat.
• Decharger ou enlever le partier avant de decharger le reste du
lave-vaisselle afin d'eviter que des gouttes d'eau tombent sur
les couverts.
Choisir le programme et les options de lavage desires. Ou
appuyer sur START/RESUME (mise en marche/reinitialisation)
pour rep6ter le m_me programme et la ou les m_mes options que
dans le programme precedent.
REMARQUE : Si le dernier programme acheve etait un ringage, le
lave-vaisselle executera le dernier programme de lavage complet
et les options que vous avez choisies quand vous appuyez sur
Start/Resume (mise en marche/reinitialisation).
• Si I'appareil est mis hors tension ou si la porte est ouverte
pendant une p_riode prolongee, la memoire du bouton Start/
Resume (mise en marche/reinitialisation) reviendra par defaut
au programme Normal avec sechage a chaud.
• Lorsqu'on n'utilise pas le lave-vaisselle tousles jours,
refermer la porte pour conserver les donnees en memoire.
Le "O" indique les etapes de chaque programme.
Les temperatures indiquent ou de la chaleur est ajoutee.
La consommation d'eau est indiquee en gallons am6ricains/litres.
Ce modele satisfait aux directives d'econergie ENERGY STAR®.
La duree du programme inclut la duree de sechage. Un asterisque
(* ) a c6te de la duree du programme indique que la duree du
programme peut _tre plus Iongue selon la temperature de I'eau
entrant dans le lave-vaisselle.
Heavy Duty/lavage intense
Utiliser ce programme pour les marmites, casseroles et la
vaisselle ordinaire tres sales et Iorsque I'eau est dure**.
Utiliser les deux sections du distributeur
de d_tergent.
Pr_- La- Rin- Rin- S_- Dur_e Con-
la- vage 9age 9age chage mini- som-
vage prm- final mum mation
cipal chauf- (min) d'eau
f_ (gal/_
Normal
Utiliser ce programme pour des charges comportant des
quantites normales de debris alimentaires. (Uetiquette de
consommation d'energie est basee sur ce programme.) Lots
du lavage principal, I'action de lavage fera des pauses
repetees pendant quelques secondes.
Utiliser les deux sections du distributeur
de detergent.
Pr_- La- Pr_- Rin- S_- Dur_e Con-
la- rage rin- gage chage mini- sore-
rage prm- 9agei- final mum mation
cipal chauf- (min) d'eau
• 0" • • 77* 3,9-7,1/
105- 140°F 14,7-27
140°F (60°C)
(40,6-
6O°C)
f_ (gal/L)
Light/China/l_ger/porcelaine
Utiliser ce programme pour les charges delicates ou
legerement sales. Pendant le sechage a chaud, I'element de
chauffage fonctionne par intermittence.
Utiliser la section principale du distributeur de
d_tergent.
Rin- La- Pr_- Rin- S_- Dur6e Con-
9age rage rin- 9age chage mini- som-
prm- 9agei" final mum mation
cipal chauf- (min) d'eau
• 0" • • 72* 4,6-6,8/
115°F * 135°F 17-26
(46°0) (57°0)
f_ (gal/L)
• • •
140OF* 140OF
(6O°C) (6O°C)
95* 6,9-7,8/
26-30
27
Page 28

Quick Clean Up/nettoyage rapide
Utiliser ce programme pour un lavage rapide pour nettoyer la
vaisselle avant une reception. Le sechage avec linge de
vaisselle peut _tre necessaire.
Utiliser la section principale du distributeur de
detergent.
Rin- La- Rin- Rin- S_- Dur_e Con-
qage vage gage gage chage mini- som-
• • • • 30* 6,9/26
Rinse Only/ringage seulement
Utiliser ce programme de rin(_age pour rincer la vaisselle, les
verres et les couverts qui ne seront pas laves immediatement.
Pr_- La- Rin- Rin- S_- Dur_e Con-
la- vage _;age _;age chage (min) som-
vage prm- final mation
prm- final mum mation
cipal chauf- (min) d'eau
Ne pas utiliser de d_tergent avec ce
programme.
cipal chauf- d'eau
• 10 1,8/7
f_ (gal/L)
f_ (gal/L}
Pour le med_le KUDU03ST
Ouvrir leg_rement la porte pour arr_ter le programme. Attendre
que I'aspersion s'arr_te avant d'ouvrir la porte pour avoir acces au
tableau de commande. Appuyer sur CANCEL (annulation).
L'afficheur indique
I!
Le lave-vaisselle commence une vidange de 2 minutes (si
necessaire). Laisser le lave-vaisselle se vidanger
completement. La lumiere s'eteint apres 2 minutes.
REMAROUE :Si votre lave-vaisselle n'a pas besoin d'etre
vidange, la lumiere s'eteint. Choisir un nouveau programme et de
nouvelles options.
Pour arr_ter la vidange
On peut appuyer de nouveau sur CANCEL (annulation) pour faire
cesser la vidange imm_diatement. Veiller a vidanger le lave-
vaisselle avant de commencer un nouveau programme.
Pour annuler les indicateurs
Appuyer sur CANCEL (annulation) avant de mettre en marche le
lave-vaisselle pour annulet toutes les options et les programmes.
Pour les modules KUDU03FT, KUDU03FTPA
tUne petite quantite d'eau circule dans la pompe pour eliminer
les saletes entre le lavage principal et le rin(_age final.
*Si la temperature de I'eau a I'entree est inferieure a la
temperature recommandee ou si la vaisselle est tres sale, le
programme compensera automatiquement en ajoutant du
temps, de la chaleur et de I'eau si necessaire.
**L'eau est dure Iorsqu'elle comporte 7 grains par gallon U.S. ou
plus.
REMARQUE : Le detecteur incorpore au lave-vaisselle contr61e le
degre de salete. La duree du programme et/ou la consommation
d'eau peuvent varier etant donne que le detecteur rajuste le
programme pour assurer des performances de lavage optimales.
1. Ouvrir leg_rement la porte pour arr_ter le programme.
Attendre que I'aspersion s'arr_te avant d'ouvrir la porte pour
avoir acces au tableau de commande.
2. Appuyer sur CANCEL (annulation). Le temoin Cancel
(annulation) s'allume.
3. Bien fermer la porte. Le lave-vaisselle commence une vidange
de 2 minutes (si necessaire). Laisser le lave-vaisselle se
vidanger completement.
Pour arr_ter la vidange
Ouvrir la porte et appuyer de nouveau sur CANCEL (annulation).
Veiller a vidanger le lave-vaisselle avant de commencer un
nouveau programme.
Pour annuler les indicateurs
Appuyer sur CANCEL (annulation) avant de mettre le lave-
vaisselle en marche pour annuler I'ensemble des options et
programmes.
28
Page 29

_ _,a__ R: _,er_, __, _ ,, _ }_"a r_, _,e _ ,
Pour le module KUDU03ST
Au cours de la premiere minute d'un programme
1. Ouvrir la porte.
2. Appuyer sur une nouvelle touche de programme et/ou
3. Verifier les distributeurs de detergent. IIs doivent _tre bien
4. Appuyer sur START/RESUME (mise en marche/
5. Bien fermer la porte dans un delai de 3 secondes apres avoir
Apr_s la premiere minute d'un programme
1. Appuyer sur CANCEL (annulation).
.... i _' ...................... _ _""
options.
remplis pour le nouveau programme. (Voir "Distributeur de
detergent" dans les instructions pour I'utilisateur pour plus de
details.)
reinitialisation).
appuye sur Start/Resume (mise en marche/reinitialisation). Le
lave-vaisselle reprend le nouveau programme et/ou I'option
apres une pause de 5 secondes.
L'afficheur indique
I!
Apr_s la premiere minute d'un programme
1. Ouvrir leg_rement la porte pour arr_ter le programme.
Attendre que I'aspersion s'arr_te avant d'ouvrir la porte pour
avoir acces au tableau de commande.
2. Appuyer sur CANCEL (annulation). Le temoin Cancel
(annulation) s'allume.
3. Fermer la porte. Le lave-vaisselle commence une vidange de
2 minutes (au besoin). Laisser le lave-vaisselle se vidanger
completement.
4. Ouvrir la porte. Appuyer sur une nouvelle touche de
programme et/ou options.
5. V_rifier les distributeurs de detergent. IIs doivent _tre bien
remplis pour le nouveau programme. (Voir "Distributeur de
detergent" dans les instructions pour I'utilisateur pour plus de
details.)
6. Appuyer sur START/RESUME (mise en marche/
reinitialisation).
7. Bien fermer la porte dans un delai de 3 secondes apres avoir
appuye sur Start/Resume (mise en marche/reinitialisation). Le
lave-vaisselle reprend le nouveau programme et/ou I'option
apres une pause de 5 secondes.
On peut ajouter un article n'importe quand avant le debut du
lavage principal. Ouvrir la porte et verifier le distributeur de
detergent. Si le distributeur de detergent est encore ferme, on
peut ajouter des articles.
Pour ajouter des articles
Le lave-vaisselle commence une vidange de 2 minutes
(au besoin). Laisser le lave-vaisselle se vidanger
completement. Le temoin s'eteint apres 2 minutes.
REMARQUE : Si le lave-vaisselle n'a pas besoin d'etre
vidange, le temoin s'eteint.
2. Ouvrir la porte.
3. Appuyer sur une nouvelle touche de programme et/ou
options.
4. Verifier les distributeurs de detergent. IIs doivent _tre bien
remplis pour le nouveau programme. (Voir "Distributeur de
detergent" dans les instructions pour I'utilisateur pour plus de
details.)
5. Appuyer sur START/RESUME (mise en marche/
reinitialisation).
6. Bien fermer la porte. Le lave-vaisselle reprend le nouveau
programme et/ou I'option apr_s une pause de 5 secondes.
Pour les modules KUDU03FT, KUDU03FTPA
Au cours de la premiere minute d'un programme
1. Ouvrir la porte.
2. Appuyer sur une nouvelle touche de programme et/ou
options.
3. Verifier les distributeurs de detergent. IIs doivent _tre bien
remplis pour le nouveau programme. (Voir "Distributeur de
detergent" dans les instructions pour I'utilisateur pour plus de
details.)
4. Appuyer sur START/RESUME (mise en marche/
reinitialisation).
5. Bien fermer la porte dans un delai de 3 secondes apres avoir
appuye sur Start/Resume (mise en marche/reinitialisation). Le
lave-vaisselle reprend le nouveau programme et/ou I'option
apres une pause de 5 secondes.
1. Ouvrir leg_rement la porte pour arr_ter le programme.
Attendre que I'aspersion s'arr_te avant d'ouvrir la porte.
2. Ouvrir la porte. Si le couvercle du distributeur de detergent est
encore ferme, ajouter I'article.
3. Appuyer sur START/RESUME (mise en marche/
reinitialisation).
4. Bien fermer la porte dans un delai de 3 secondes apres avoir
appuye sur Start/Resume (mise en marche/reinitialisation). Le
lave-vaisselle se remet alors automatiquement en marche
apres une pause d'environ 5 secondes.
Vous pouvez personnaliser vos programmes en appuyant sur une
option. Si vous changez d'idee, appuyer de nouveau sur I'option
pour I'annuler. Choisir une option differente si desir&
Vous pouvez changer une option a tout moment avant que
I'option choisie ne commence. Par exemple, vous pouvez
appuyer sur HEAT DRY (sechage avec chaleur) a tout moment
avant que le sechage ne commence.
Appuyer sur START/RESUME (mise en marche/reinitialisation)
pour repeter le m_me programme et les m_mes options que dans
le programme de lavage precedent.
REMAROUE :Si le dernier programme termine etait un
programme de ringage, quand vous appuyez sur Start/Resume
(mise en marche/reinitialisation), le lave-vaisselle execute le
dernier programme complet de lavage et les options.
29
Page 30

PROSCRUB _ wash option/
Option de lavage PROSCRUB ®
Selectionner cette option pour activer les jets d'aspersion
PROSCRUB'_et fournir une aspersion intensifiee &I'arriere du
panier de niveau inferieur. L'option de lavage PROSCRUB®procure
une action de lavage concentree pour les po_les, casseroles, etc.
auxquelles adherent des residus alimentaires tres incrustes.
Cette option peut ajouter de la chaleur et accroltre la duree de
lavage du programme.
REMARQUE : PROSCRUBc_est une option avec les programmes
de lavage Heavy Duty (lavage intense) et Normal.
IMPORTANT :
• Charger les po_les et casseroles en les orientant vers les jets
d'aspersion PROSCRUB®a I'arriere du panier de niveau
inferieur. Incliner les articles vers I'arriere du panier pour
maximiser la surface atteinte par les jets. Une seule rangee
d'articles a la fois peut _tre orientee vers les jets d'aspersion
PROSCRUB®.Empiler, faire se chevaucher ou imbriquer les
articles emp_chera les jets d'aspersion PROSCRUB®
d'atteindre toutes les surfaces.
• Desactiver I'option de lavage PROSCRUB'_si I'on ne charge
pas d'articles pour cette option.
/
Sani Rinse/rin<_age sanitaire
Choisir cette option pour augmenter la temperature de I'eau du
ringage final a environ 155°F (68°C). Sani Rinse (rin(_age sanitaire)
augmente la chaleur et la duree du programme. Ce rin(_age
haute temperature assainit la vaisselle et la verrerie conformement
la norme 184 NSF/ANSl pour les lave-vaisselle residentiels. Les
lave-vaisselle residentiels certifies ne sont pas destines aux
etablissements alimentaires autorises.
REMARQUE : Le programme Heavy Duty (lavage intense) utilise
automatiquement cette option. Sani Rinse (ringage sanitaire) est
une option avec le programme Normal. Seuls ces programmes
d'assainissement ont ete con9us pour repondre aux exigences
NSF/ANSl.
Heat Dry/s_chage avec chaleur
L'option Heat Dry (sechage avec chaleur) combinee a I'utilisation
d'un agent de ringage vous donnera d'excellents resultats de
sechage. L'energie requise pour utiliser Heat Dry (sechage avec
chaleur) ne coQte que quelques cents par programme. Heat Dry
(sechage avec chaleur) est active quand le temoin sur le bouton
Heat Dry (s_chage avec chaleur) est allume. S'assurer de bien
charger les articles en plastique dans le panier superieur pour
eviter de les endommager.
L'option Heat Dry peut _tre annulee en appuyant sur HEAT DRY
(sechage avec chaleur); le temoin lumineux s'eteint alors.
Cependant, certains articles dans le lave-vaisselle ne seront pas
secs a la fin du programme.
REMARQUE : L'option Heat Dry (sechage avec chaleur) est
utilisee dans tousles programmes a I'exception de Rinse Only
(rint_age seulement).
Vue lat_rale de la zone de lavage PROSCRUB"_
Hi-Temp Scrub/r_curage & haute temperature
Choisir cette option pour chauffer I'eau durant des parties du
programme et ajouter un ringage. Les temperatures d'eau plus
elevees et le ringage supplementaire aident & nettoyer les saletes
tenaces. L'option Hi-Temp Scrub (recurage a haute temperature),
associee au programme Heavy Duty (lavage intense), chauffe
I'eau au cours du lavage principal et du prelavage. L'option Hi-
Temp Scrub (recurage a haute temperature), associee au
programme Normal, augmente la temperature de I'eau au cours
du lavage principal.
Cette option ajoute de la chaleur, de I'eau et du temps de lavage
au programme.
REMARQUE : Hi-Temp Scrub (recurage a haute temperature) est
une option avec les programmes Heavy Duty (lavage intense) et
Normal.
Control Lock/verrouillage des commandes
Utiliser le verrouillage des commandes pour eviter que le lave-
vaisselle ne soit mis en marche accidentellement. On peut
egalement I'utiliser pour eviter tout changement accidentel dans
le choix du programme ou des options pendant un programme.
Lorsque I'indicateur Control Lock (verrouillage des commandes)
est allume, tousles boutons sont desactives.
REMARQUES :
• On peut ouvrir la porte du lave-vaisselle Iorsque les
commandes sont verrouillees.
• On peut enclencher le dispositif de verrouillage des
commandes Iorsque le lave-vaisselle est en marche.
Pour actionner la commande de verrouillage
Appuyer sur HEAT DRY (sechage avec chaleur) pendant au moins
4 secondes. Control Lock (verrouillage des commandes) s'allume.
Si on appuie sur une touche pendant que le lave-vaisselle est
verrouille, le temoin clignote 3 fois.
Pour _teindre la commande de verrouillage
Appuyer sur HEAT DRY (sechage avec chaleur) pendant au moins
4 secondes. Le temoin s'eteint.
30
Page 31

4 Hour Delay/d_lai de 4 heures
Choisir cette option pour faire fonctionner votre lave-vaisselle plus
tard ou en dehors des heures de pointe. On peut ajouter des
articles a la charge n'importe quand durant le compte a rebours
du delai. (Voir "Addition de vaisselle durant un programme".) Le
compte a rebours du delai ne continuera pas si la porte n'est pas
bien enclenchee.
Pour diff_rer la mise en marche (ModUle KUDU03ST)
1. Ouvrir la porte.
2. Choisir un programme de lavage et des options. Les temoins
lumineux du programme et de I'option selectionnes
s'illumineront.
3. Appuyer sur 4 HOUR DELAY (delai de 4 heures).
Vous constaterez
apparaissant sur I'afficheur. Le temoin lumineux du delai de
4 heures s'illuminera.
4. Appuyer sur START/RESUME (mise en marche/
reinitialisation). Le temoin lumineux Start/Resume s'illuminera.
5. Bien fermer la porte.
REMARQUE : Pour annuler le delai, ouvrir la porte et appuyer sur
4 HOUR DELAY (delai de 4 heures). Pour mettre en marche le
lave-vaisselle immediatement, appuyer sur START/RESUME (mise
en marche/reinitialisation).
................................
Sanitized/assainissement
Lorsqu'on selectionne I'option Sani Rinse, I'indicateur Sanitized
(assainissement) s'allume des que ce programme est termine.
Uindicateur clignote &la fin du programme Iorsque le lave-
vaisselle n'a pas bien lave la vaisselle, comme par exemple
Iorsqu'on a interrompu le programme• L'indicateur lumineux
s'eteint Iorsqu'on ouvre et ferme la porte ou appuie sur CANCEL
(annulation).
Clean/propre
Le temoin Clean (propre) s'allume Iorsqu'un programme est
termine. Cet indicateur s'eteint Iorsqu'on ouvre et ferme la porte
ou appuie sur CANCEL (annulation).
Pour diff_rer la mise en marche (tous les autres modules)
1. Ouvrir la porte.
2. Choisir un programme de lavage et des options• Les temoins
lumineux du programme et de I'option selectionnes
s'illumineront.
3. Appuyer sur 4 HOUR DELAY (delai de 4 heures). Le temoin
lumineux 4 Hour Delay s'illuminera.
4. Appuyer sur START/RESUME (mise en marche/
reinitialisation).
5. Bien fermer la porte dans un delai de 3 secondes apres avoir
appuye sur Start/Resume (mise en marche/reinitialisation).
REMARQUE : Pour annuler le delai, ouvrir la porte et appuyer sur
4 HOUR DELAY (delai de 4 heures). Pour mettre en marche le
lave-vaisselle immediatement, appuyer sur START/RESUME (mise
en marche/reinitialisation) et bien fermer la porte dans les
3 secondes qui suivent.
31
Page 32

W10077824A 2/07
@2007, All rights reserved, ® Registered Trademark/TM Trademark of KitchenAid, U,S,A,, KitchenAid Canada licensee in Canada Printed in U,S,A,
Tous droits reserves, ® Marque deposee/TM Marque de commerce de KitchenAid, U,S.A., Emploi sous licence par KitchenAid Canada au Canada Imprim_ aux E,-U,
 Loading...