

Page 1

DISHWASHER USER INSTRUCTIONS
Thank you for Choosing KitchenAid® Appliances.
We hold our company to the highest quality standards and it is important to us that you have a positive experience owning a
KitchenAid
For your convenience, we have provided an easy to follow User Instruction Book. These instructions include a “Troubleshooting”
section to help you through any problems you may encounter.
For additional information, you can visit the Frequently Asked Questions (FAQs) section of our website at www.kitchenaid.com. If
you need further assistance using your KitchenAid dishwasher, please contact us at 1-800-422-1230. In Canada: visit
www.kitchenaid.ca or call 1-800-807-6777.
Have your complete model and serial number ready. You can find your model and serial number on the label located near the door
on the right-hand or left-hand side of the dishwasher interior.
Para obtener acceso a “Instrucciones para el usuario de la lavavajillas” en español, o para obtener información adicional acerca de
su producto, visite: www.kitchenaid.com
Tenga listo su número completo de modelo y de serie. Puede encontrar su número de modelo y de serie en la etiqueta ubicada
cerca de la puerta, al lado derecho o izquierdo del interior de la lavavajillas.
®
product.
Table of Contents
DISHWASHER SAFETY ............................................................. 2
PARTS AND FEATURES............................................................ 4
START-UP / QUICK REFERENCE
(VARIES BY MODEL) ................................................................. 5
QUICK STEPS............................................................................. 6
DISHWASHER USE.................................................................... 6
CYCLE AND OPTION DESCRIPTIONS .................................... 8
DISHWASHER FEEDBACK SECTION.................................... 10
DISHWASHER FEATURES...................................................... 11
DISHWASHER CARE ............................................................... 12
TROUBLESHOOTING .............................................................. 13
WARRANTY .............................................................................. 16
W10300928C
Page 2

Dishwasher Safety
Your safety and the safety of others are very important.
We have provided many important safety messages in this manual and on your appliance. Always read and obey all safety
messages.
This is the safety alert symbol.
This symbol alerts you to potential hazards that can kill or hurt you and others.
All safety messages will follow the safety alert symbol and either the word “DANGER” or “WARNING.”
These words mean:
You can be killed or seriously injured if you don't immediately
DANGER
WARNING
All safety messages will tell you what the potential hazard is, tell you how to reduce the chance of injury, and tell you what can
happen if the instructions are not followed.
IMPORTANT SAFETY INSTRUCTIONS
WARNING:
■ Read all instructions before using the dishwasher.
■ Use the dishwasher only for its intended function.
■ Use only detergents or rinse agents recommended for use in
a dishwasher, and keep them out of the reach of children.
■ When loading items to be washed:
1) Locate sharp items so that they are not likely to damage
the door seal; and
2) Load sharp knives with the handles up to reduce the risk
of cut-type injuries.
■ Do not wash plastic items unless they are marked
“dishwasher safe” or the equivalent. For plastic items not so
marked, check the manufacturer's recommendations.
■ Do not touch the heating element during or immediately after
use.
■ Do not operate the dishwasher unless all enclosure panels
are properly in place.
When using the dishwasher, follow basic precautions, including the following:
SAVE THESE INSTRUCTIONS
follow instructions.
can be killed or seriously injured if you don't
You
instructions.
■ Do not tamper with controls.
■ Do not abuse, sit on, or stand on the door, lid, or dish racks
of the dishwasher.
■ To reduce the risk of injury, do not allow children to play in
or on the dishwasher.
■ Under certain conditions, hydrogen gas may be produced in
a hot water system that has not been used for two weeks or
more. HYDROGEN GAS IS EXPLOSIVE. If the hot water
system has not been used for such a period, before using
the dishwasher turn on all hot water faucets and let the
water flow from each for several minutes. This will release
any accumulated hydrogen gas. As the gas is flammable,
do not smoke or use an open flame during this time.
■ Remove the door or lid to the washing compartment
when removing an old dishwasher from service or
discarding it.
follow
2
Page 3
GROUNDING INSTRUCTIONS
■
For a grounded, cord-connected dishwasher:
The dishwasher must be grounded. In the event of a
malfunction or breakdown, grounding will reduce the risk of
electric shock by providing a path of least resistance for
electric current. The dishwasher is equipped with a cord
having an equipment-grounding conductor and a grounding
plug. The plug must be plugged into an appropriate outlet
that is installed and grounded in accordance with all local
codes and ordinances.
WARNING: Improper connection of the equipment-
grounding conductor can result in a risk of electric shock.
Check with a qualified electrician or service representative
if you are in doubt whether the dishwasher is properly
grounded. Do not modify the plug provided with the
dishwasher; if it will not fit the outlet, have a proper outlet
installed by a qualified electrician.
■
For a permanently connected dishwasher:
The dishwasher must be connected to a grounded metal,
permanent wiring system, or an equipment-grounding
conductor must be run with the circuit conductors and
connected to the equipment-grounding terminal or lead on
the dishwasher.
SAVE THESE INSTRUCTIONS
WARNING
Tip Over Hazard
Do not use dishwasher until completely installed.
Do not push down on open door.
Doing so can result in serious injury or cuts.
State of California Proposition 65 Warnings:
WARNING: This product contains one or more chemicals known to the State of California to cause cancer.
WARNING: This product contains one or more chemicals known to the State of California to cause birth defects or other
reproductive harm.
3
Page 4

Upper level wash
h
r
)
Water feed tube
Parts and Features
ProScrub® (on some models)
powerful jets target water toward pots,
pans, or casserole dishes loaded in the
back of the dishwasher to clean
stubborn messes. Food disposer-based
wash system has four stainless steel
blades to grind food particles, which are
flushed out the drain at the end of each
cycle.
Model and serial number label
Water inlet opening
Heating element
Rinse aid dispenser reduces spotting
and improves drying.
Detergent dispenser
Active vents
(on some models)
Premium top rack
adjusters
(on some models)
Four stainless steel wash arms spray the
load four times with every revolution.
Lower spray arm
Overfill protection float
Food disposer-based wash system has
four stainless steel blades to grind food
particles, which are flushed out the drain
at the end of each cycle.
Control panel
Flexible fold-down tines
(on some models)
Upper spray arm
Flexible fold-down tines
4
TOP RACK
BOTTOM RACK
Cup shelves wit
stemware holde
(on some models
Rack handle
Silverware basket
Culinary Caddy
Utensil Baset
(on some models)
®
Page 5
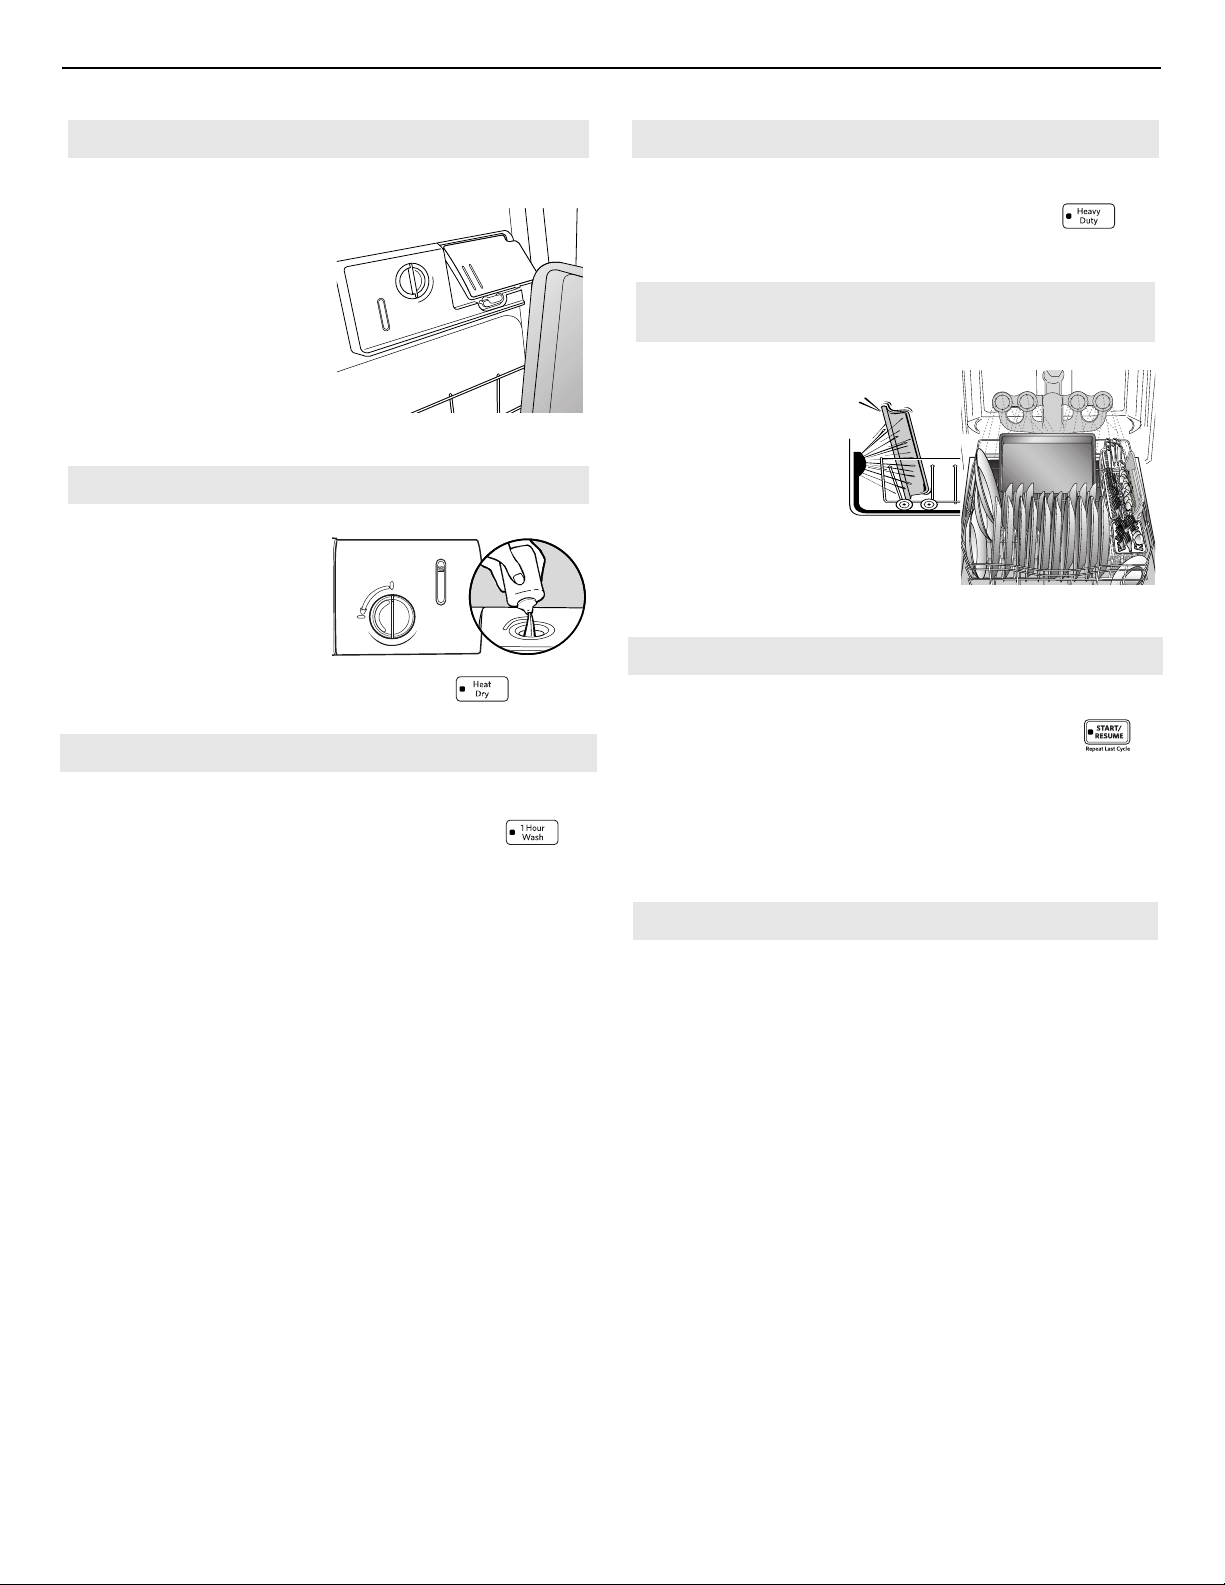
Start-Up / Quick Reference (varies by model)
IMPORTANT: Do not block detergent dispenser.
Tall items placed in the lower
rack may block the dispenser
door. Cookie sheets and
cutting boards loaded on the
left-hand side of the
dishwasher can easily block
the dispenser. If detergent is
inside of the dispenser or on
the bottom of the tub after the
cycle is complete, the
dispenser was blocked.
Drying - Rinse Aid is essential.
You must use a drying agent
such as a rinse aid for good
drying performance (sample
included). Rinse aid along
with the Heat Dry option will
provide best drying and avoid
USE RINSE AID FOR
BETTER DRYING
Lock
Refill
Full
Add
excessive moisture in the
dishwasher interior.
+
1 Hour Wash - When you need fast results.
Efficient dishwashers run longer to save water
and energy, just as driving a car slower saves on
gas. When you need fast results, the 1 Hour Wash
will clean dishes using slightly more water and
energy. Select the Heat Dry option to speed
drying times (adds approximately 35 minutes to
the 1 Hour Wash cycle).
Heavy Duty cycle for tough soil cleaning
The Heavy Duty cycle is recommended for
tough soil loads. Use for hard-to-clean,
heavily soiled pots, pans, casseroles, and
regular tableware. No need to prerinse
dishes; just scrape and load.
ProScrub® Option loading to clean baked-on food
(on some models)
When the ProScrub®
option is selected, it
provides a
concentrated wash
on the back of the
lower dish rack for
hard-to-clean dishes.
Place these dishes
with the soiled
surface of the dish
toward the
ProScrub
®
spray jets
in the lower rack of
the dishwasher.
Press START/RESUME every time you add a dish.
IMPORTANT: If anyone opens the door (such as,
for adding a dish, even during the Delay Hours
option), the START/RESUME button must be
pressed each time.
If the START/RESUME button is located on top of
door: Push door firmly closed within 3 seconds of
pressing START/RESUME. If the door is not
closed within 3 seconds, the start button LED will
flash, an audible tone will be heard, and the cycle
will not start.
Proper Detergent Dosing
It is possible to use too much detergent in your dishwasher.
This can lead to etching of your dishes. See “Add Detergent” in
the “Dishwasher Use” section to determine the amount of
detergent needed based on your water hardness.
5
Page 6
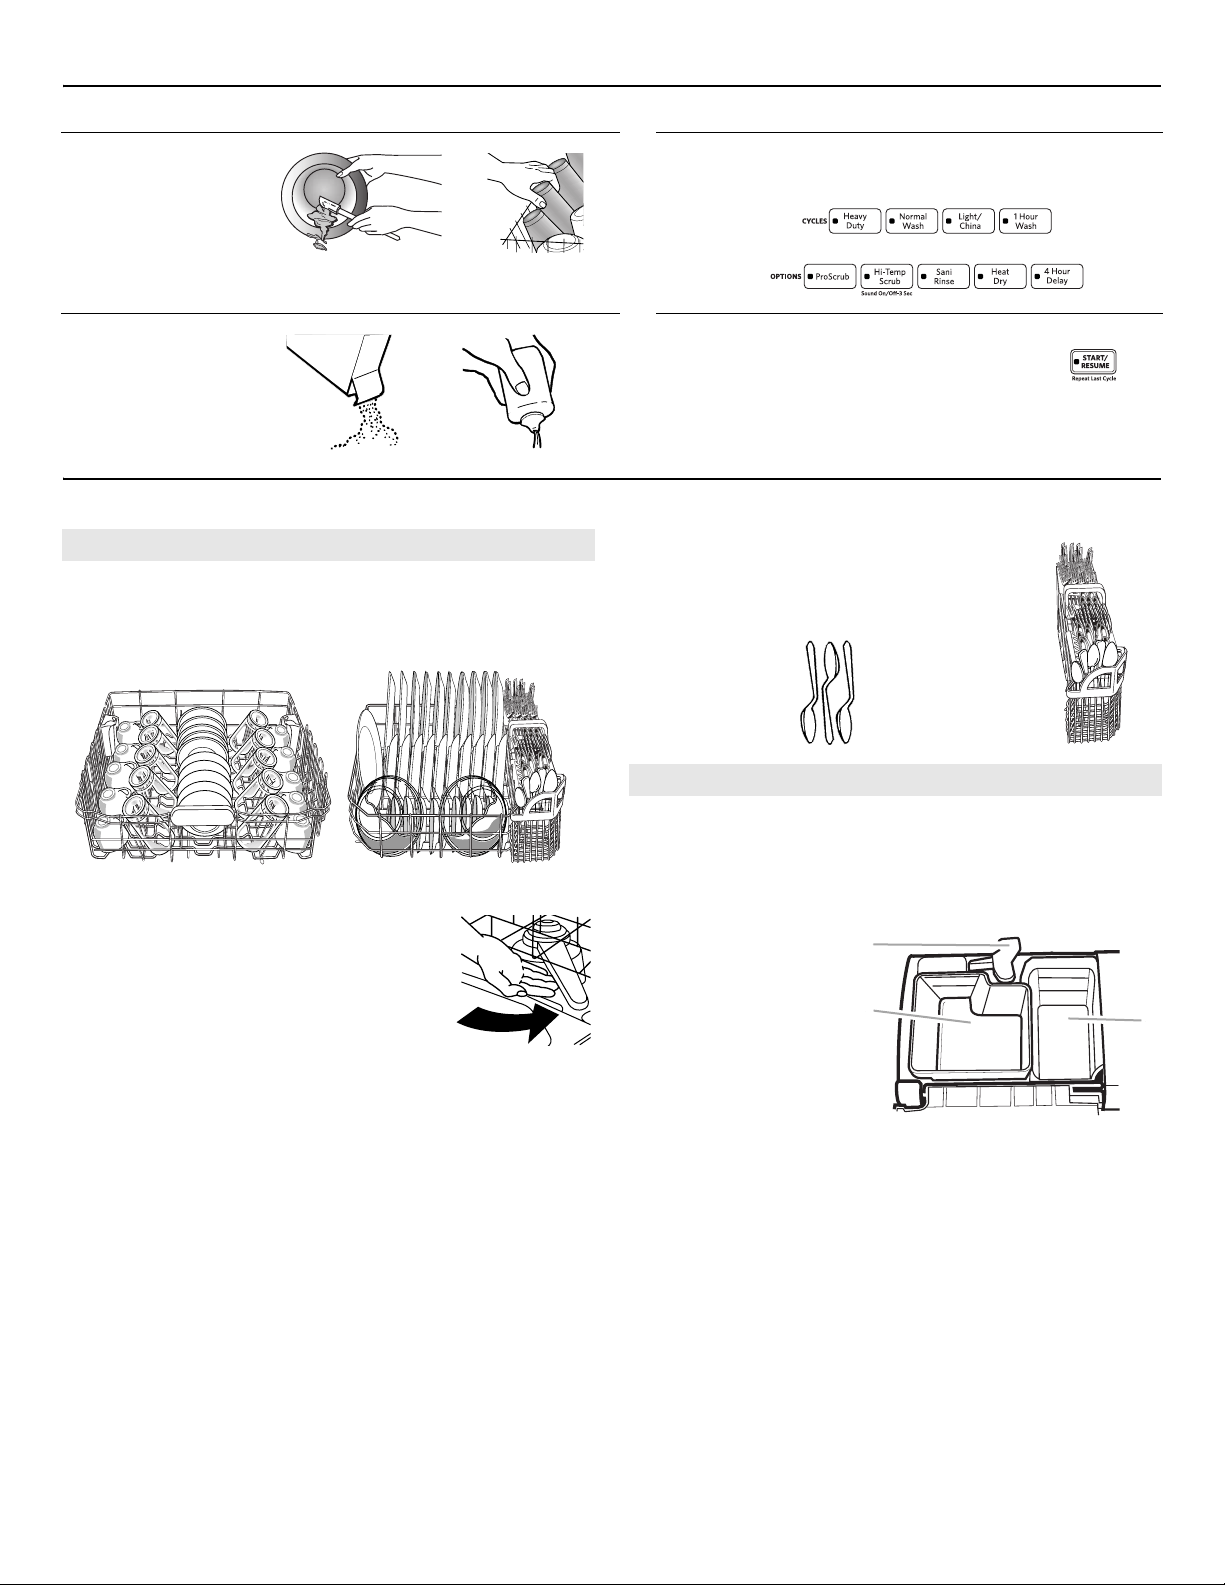
Quick Steps
C
Prepare and load
1
dishwasher.
Add detergent
2
for cleaning and
rinse aid for
drying.
Dishwasher Use
STEP 1
Prepare and Load the Dishwasher
IMPORTANT: Remove leftover food, bones, toothpicks and other
hard items from the dishes. Remove labels from containers before
washing.
Select a cycle and option (cycles and options
vary by model).
3
Start dishwasher.
4
NOTE: If the Start/Resume button is
located on the top of door, push door firmly
closed within 3 seconds of pressing
START/RESUME.
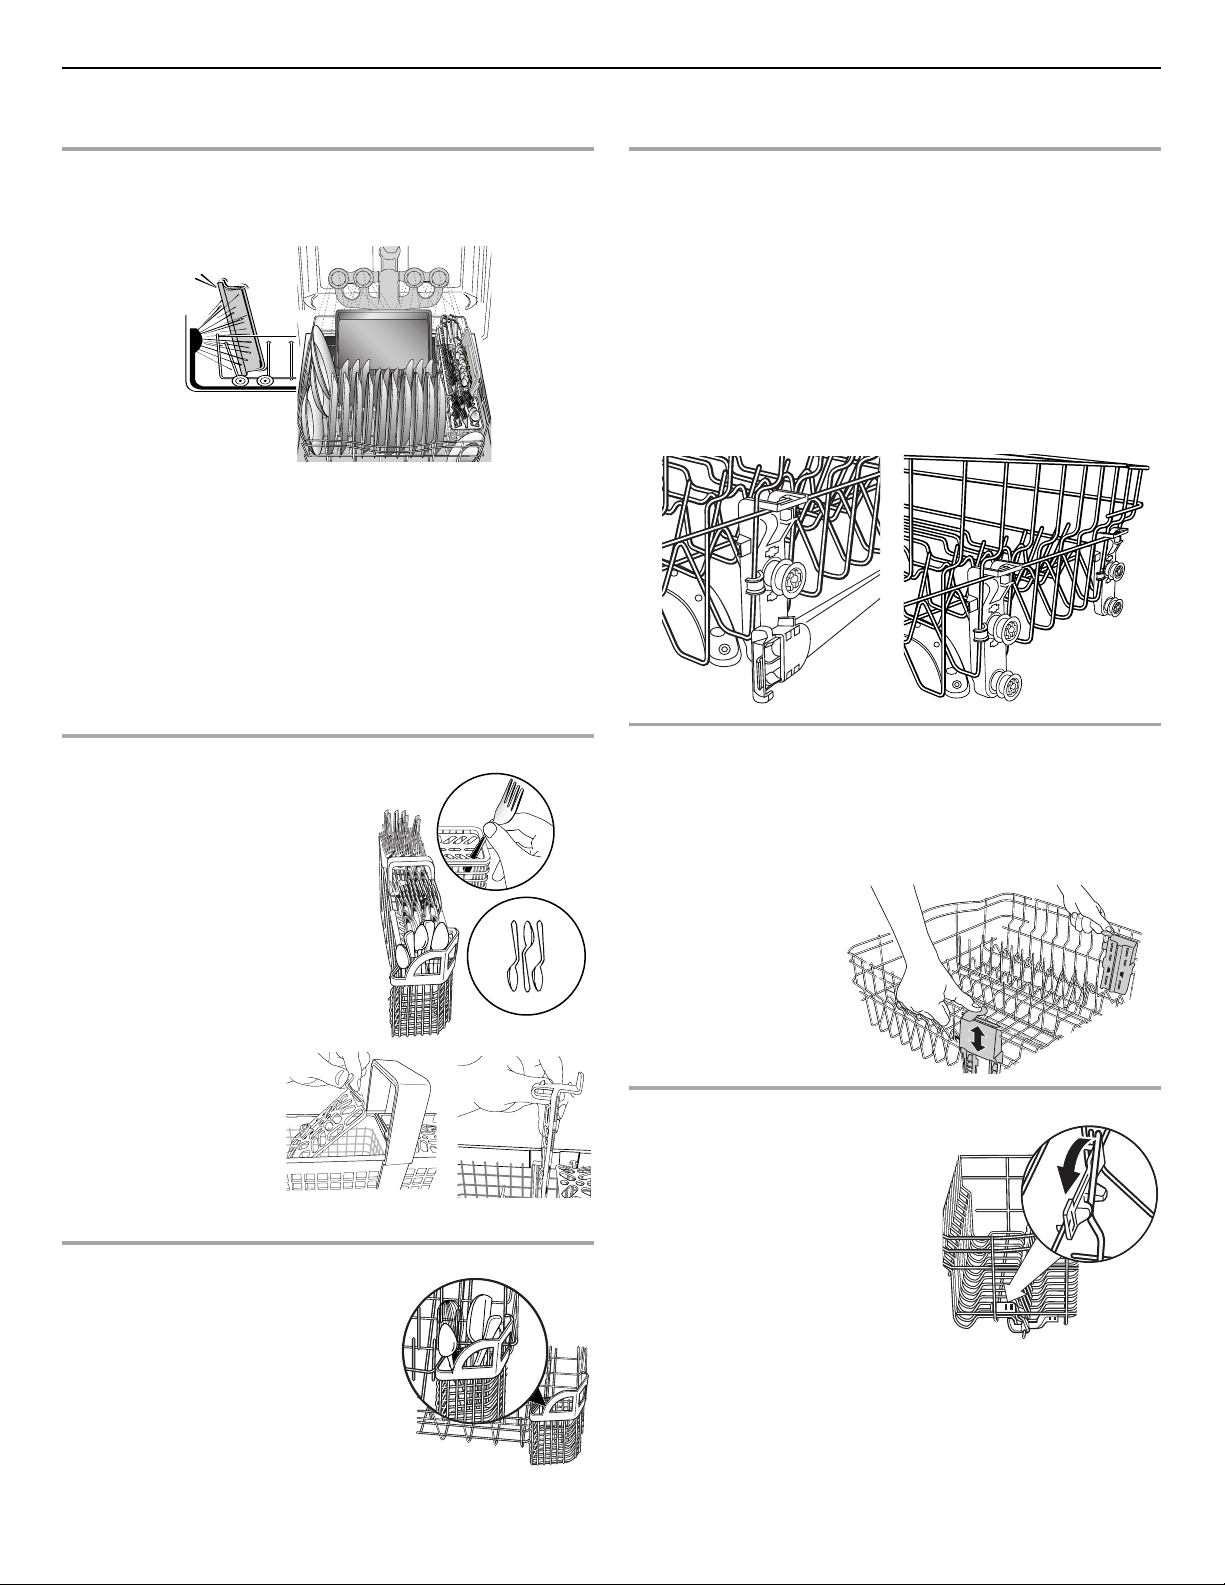
■ When loading silverware, always place sharp
items pointing down. Mix items in each
section of the basket with some pointing up
and some down to avoid nesting. Spray
cannot reach nested items.
Upper rack Lower rack
■ Make sure nothing keeps spray arm(s) from
spinning freely. It is important for the water
spray to reach all soiled surfaces.
■ Make sure that when the dishwasher door is closed no items
are blocking the detergent dispenser.
■ Items should be loaded with soiled surfaces facing down and
inward to the spray as shown. This will improve cleaning and
drying results.
■ Avoid overlapping items like bowls or plates that may trap food.
■ Place plastics, small plates and glasses in the upper rack.
Wash only plastic items marked “dishwasher safe.”
■ To avoid thumping/clattering noises during operation: Load
dishes so they do not touch one another. Make sure lightweight
load items are secured in the racks.
■ Improper loading can cause dishes to be chipped or damaged.
When loading glasses or mugs, it is best to load these items in
between rows of tines instead of loading them over tines, as
shown in the image above.
STEP 2
Add Detergent
NOTE: If you do not plan to run a wash cycle soon, run a Rinse
Only cycle (on some models). Do not use detergent.
■ Use automatic dishwasher detergent only. Add powder, liquid
or tablet detergent just before starting a cycle.
■ Fresh automatic
dishwasher detergent
results in better
cleaning. Store tightly
closed detergent
container in a cool, dry
place.
■ The amount of detergent to use depends on:
How much soil remains on the items - Heavily soiled loads
require more detergent.
The hardness of the water - If you use too little in hard water,
dishes won't be clean. If you use too much in soft water,
glassware will etch.
Soft to Medium Water (0-6 grains per U.S. gallon)
[typical water softener water and some city water]
Medium to Hard Water (7-12 grains per U.S. gallon)
[well water and some city water]
■ Depending on your water hardness, fill the Main Wash section
of the dispenser as shown. Fill the Pre-wash section to the level
shown, if needed.
A
Hard Water
Soft Water
B
MAIN WASH
A. Cover latch
B. Main Wash section
C. Pre-Wash section
Hard Water
Soft Water
PREWASH
6
Page 7

NOTE: Fill amounts shown
are for standard powdered
detergent. Follow
instructions on the package
when using other dishwasher
Hard Water
Soft Water
Main Wash Pre-Wash
Hard Water
Soft Water
detergent types.
Premeasured forms are suitable for all hardness and soil levels.
Always place premeasured detergents in the main compartment
and close the lid.
Add Rinse Aid
■ Your dishwasher is designed to use rinse aid for good drying
performance. Without rinse aid your dishes and dishwasher
interior will have excessive moisture. The Heat Dry option will
not perform as well without rinse aid.
■ Rinse aid keeps water from forming droplets that can
dry as spots or streaks. They also improve drying by
allowing water to drain off of the dishes after the final
rinse.
■ Rinse aid helps to reduce excess moisture on the dish
racks and interior of your dishwasher.
■ Check the rinse aid indicator. Add rinse aid when indicator
drops to “Add” level.
■ To add rinse aid, turn the dispenser cap
to “Refill” and lift off. Pour rinse aid into
the opening until the indicator level is at
“Full.” Replace the dispenser cap and
turn to “Lock.” Make sure cap is fully
locked.
NOTE: For most water conditions, the
factory setting of 2 will give good
results. If you have hard water or notice
rings or spots, try a higher setting. Turn
the arrow adjuster inside the dispenser
by either using your fingers or inserting
a flat-blade screwdriver into the center
of the arrow and turning.
Refill
¹⁄₄
Lock
-
-
-
fill
max
-
-
-
-
-
-
turn to lock
-
6
-
-
fill
max
-
-
-
-
-
-
-
-
6
5
4
-
-
-
-
5
4
3
-
-
-
-
Full
Add
3
2
-
2
1
STEP 3
Select a Cycle (cycles vary by model)
See “Cycle and Option Descriptions” charts in the following
section.
Efficient dishwashers run longer to save water and energy, just as
driving a car slower saves on gas. Typical cycle time is
approximately 2¹⁄₂ hours, but can take less or more time to
complete depending on selections.
Select Options (options vary by model)
See “Cycle and Option Descriptions” charts in the following
section.
You can customize your cycles by pressing the options desired. If
you change your mind, press the option again to turn off the option,
or select a different option. Not all options are available for every
cycle. If an invalid option is selected for a given cycle, the lights will
flash.
STEP 4
Start or Resume a Cycle
1
■ Run hot water at the sink nearest your dishwasher until the
water is hot. Turn off water.
■ Press START/RESUME once to show which
selections you used. Select the wash cycle and
options desired OR press START/RESUME to repeat
the same cycle and options as in the previous wash cycle.
IMPORTANT: If anyone opens the door (such as, for adding a dish,
even during the Delay Hours option), the Start/Resume button
must be pressed each time.
■ If the Start/Resume button is located on top of door, push door
firmly closed within 3 seconds of pressing START/RESUME. If
the door is not closed within 3 seconds, the Start/Resume
button LED will flash, an audible tone will be heard, and the
cycle will not start.
7
Page 8

Cycle and Option Descriptions
This information covers several different models. Your dishwasher may not have all the cycles and options described.
CYCLE SELECTIONS
CYCLES SOIL LEVEL WASH TIME* (MINS.)
W/O OPTIONS
Typical** Max
Use for hard-to-clean, heavily soiled pots, pans,
casseroles, and regular tableware.
Light to Medium 115 165 6.4 (24.3)
Heavy/Baked-On 120 170 6.4 (24.3)
WATER
USAGE
GALLONS
(Liters)
Use for loads with normal amounts of food soil. The
energy-usage label is based on this cycle.
Use for lightly soiled items or china and crystal. Light 75 135 3.9 (14.7)
When you need fast results, the 1 Hour Wash will clean
dishes using slightly more water and energy. Select the
Heat Dry or ProDry™ option to speed drying times (add
approximately 27 to 35 minutes to the 1 Hour Wash
cycle).
Use for rinsing dishes, glasses, and silverware that will
not be washed right away.
Do not use detergent.
Wash times depend on water temperature, heavy soil condition, dish load size and options selected. Adding options will add time to the
cycle.
* Adding options will add time to the cycle. See options information section.
** This is the approximate cycle time obtained with 120°F (49°C) hot water available at the dishwasher. Increase in time results from low
temperature of the incoming water.
OPTION SELECTIONS
OPTIONS CAN BE
SELECTED WITH
WHAT IT DOES ADDED TIME TO CYCLE ADDED
Light 85 - 100 170 3.9 (14.7)
Medium 105 165 4.6 (17.5)
Heavy 120 170 6.4 (24.3)
Medium 80 145 5.5 (20.7)
Heavy 100 160 5.5 (20.7)
All soil levels 60 62 6.4 (24.3)
All soil levels 10 12 1.7 (6.3)
WATER
TYPICAL MAX
GALLONS
(LITERS)
Cleans pans, casseroles,
etc., with tough food soil
to eliminate the need for
soaking and scrubbing of
dirty, baked-on dishes.
Raises the main wash
temperature to improve
cleaning for loads
containing tough, bakedon food.
Heavy Duty
Normal Wash
Heavy Duty
Normal Wash
Activates the
ProScrub
jets to provide
intensified cleaning
power to items at
the back of the
lower rack.
Raises the main
wash temperature
from 105°F (41°C)
to 145°F (63°C) and
the final rinse from
130°F (54°C) to
140°F (60°C).
®
spray
45 85 0 - 1.6
(0 - 6)
45 85 0 - 1.6
(0 - 6)
8
Page 9
OPTION SELECTIONS
OPTIONS CAN BE
Sanitizes dishes and
glassware in accordance
with National Sanitation
Foundation (NSF)/ANSI
Standard 184 for
Residential Dishwashers.
Certified residential
dishwashers are not
intended for licensed food
establishments. The Sani
indicator indicates at the
end of the cycle whether
the Sani Rinse option was
successfully completed. If
the indicator is not
activated, it is probably
due to the cycle being
interrupted.
Dries dishes with heat.
This option with the use of
rinse aid will provide the
best drying performance.
Plastic items are less likely
to deform when loaded in
the top rack. Turn Heat Dry
off for an air dry.
SELECTED WITH
Heavy Duty
Normal Wash
Available with any
cycle except Rinse
Only
WHAT IT DOES ADDED TIME TO CYCLE ADDED
TYPICAL MAX
Raises the main
wash temperature
from 105°F (41°C)
to 145°F (63°C) and
the final rinse from
140°F (60°C) to
155°F (68°C).
Activates the
heating element at
the end of the wash
cycle to speed
drying times. Heat
Dry defaults to ON
when any cycle is
selected except for
1 Hour Wash.
60 105 0 - 1.6
52 52 0
WATER
GALLONS
(LITERS)
(0 - 6)
Runs the dishwasher at a
later time or during offpeak electrical hours.
Select a wash cycle and
options. Press 4 Hour
Delay. Press START/
RESUME. Close the door
firmly.
NOTE: Anytime the door is
opened (such as, to add a
dish), the Start/Resume
button must be pressed
again to resume the delay
countdown.
Control Lock Avoids unintended use of the dishwasher between cycles, or cycle and option changes during a cycle.
To turn on Control Lock, press and hold for 3 seconds. The Control Lock light will stay on for a short time, indicating
that it is activated, and all buttons are disabled. If you press any button while your dishwasher is locked, the light
flashes 3 times. The dishwasher door can still be opened/closed while the controls are locked.
NOTE: You may need to disable Sleep Mode by pressing either START/RESUME or CANCEL, or by opening and
closing the door before you are able to turn Control Lock off.
To turn off Control Lock, press and hold for 3 seconds. The light turns off.
Available with any
cycle
Delays the start of a
cycle up to 4 hours.
240 240 0
9
Page 10

CONTROLS AND CYCLE STATUS
CONTROL PURPOSE COMMENTS
To start or resume a
wash cycle
To reset any cycle or
options during
selection.
To cancel a wash
cycle after it's
started.
To turn the audible
tones on or off.
If the door is opened during a cycle or the power is interrupted, the Start/Resume indicator
flashes. The cycle will not resume until the door is closed and START/RESUME is pressed.
NOTE: If the Start/Resume button is located on top of door, push door firmly closed within
3 seconds of pressing START/RESUME. If the door is not closed within 3 seconds, the
Start/Resume button LED will flash, an audible tone will be heard, and the cycle will not
start.
Press and hold CANCEL/DRAIN to reset any control selections made.
See “Canceling A Cycle After Dishwasher Is Started” and “Changing A Cycle After
Dishwasher Is Started” sections.
Press and hold the Hi-Temp Scrub button for 3 seconds to turn the audible tones on or off.
Only audible tones for confirming button presses can be turned on/off. Important audible
tones, such as indicating a cycle has been interrupted, cannot be deactivated.
Dishwasher Feedback Section
CONTROLS AND CYCLE STATUS
CONTROL PURPOSE COMMENTS
The Cycle Status Indicator
Lights are used to follow the
progress of the dishwasher
cycle. Located on the front
of the dishwasher for front
control models, and located
on the top of the door for
hidden control models.
Clean indicator glows when a cycle is finished.
If you select the Sani Rinse option, when the Sani Rinse cycle is finished,
the Sanitized indicator glows. If your dishwasher did not properly sanitize
your dishes, the light flashes at the end of the cycle. This can happen if the
cycle is interrupted, or the water could not be heated to the required
temperature.
The Clean and Sanitized lights go off when you open and close the door or
press and hold CANCEL.
The Front Indicator Light or
A
Single Exterior Light (A)
shows progress of your
dishwasher cycle by color.
(Available on some hidden
control models only).
The Cycle Status Display is
used to follow the progress
of the dishwasher cycle, and
to show other information.
(Available on some models
instead of Cycle Status
Indicator Lights)
The light will be blue if the dishwasher is washing or rinsing. The light will
be red when the dishwasher is drying. The light will be green to indicate
that the cycle is complete. If the Front Indicator Light is blinking, see
“Troubleshooting” section.
The indicators will inform you if you are able to add a dish to the cycle after
it has started. It will also inform you if the dishwasher is washing, rinsing,
drying, complete, and/or sanitized. They will show whether the control is
locked and/or the delay option is selected. A series of bars will count down
the duration of the cycle remaining from left to right. Each bar equals
approximately 24 minutes of cycle length. The bars will also count down
the delay feature from left to right, and the delay indicator will be activated.
Canceling A Cycle
1. Press and hold the Cancel/Drain button once. The Cancel/
Drain light will turn on. If the Cancel/Drain button is located on
the top of the door, open the door slightly to stop the cycle.
Wait for the spraying action to stop before completely opening
the door. Press and hold the Cancel/Drain button once.
2. Close the door and the dishwasher starts a drain cycle (if water
remains in bottom of dishwasher). Let the dishwasher drain
completely. The Cancel/Drain light turns off after 2 minutes.
Changing A Cycle After Dishwasher Is Started
1. You can interrupt a cycle and restart your dishwasher from the
beginning using the following procedure.
2. Press and hold the Cancel/Drain button twice to reset the
control. If the Cancel/Drain button is located on the top of the
door, open the door slightly to stop the cycle. Wait for the
spraying action to stop before completely opening the door.
Press and hold the Cancel/Drain button twice to reset the
control.
10
3. Select new cycles and options.
4. Press START/RESUME.
Adding A Dish After Dishwasher Is Started
1. Check if Add a Dish indicator is lit. (Available on some models.
Otherwise, proceed to Step 2.)
2. Open the door slightly to stop the cycle. Wait for the spraying
action to stop, then open the door completely.
3. Check whether the detergent dispenser cover is still closed. If
it is open, the wash cycle has already started and adding a
dish is not recommended.
4. If detergent has not yet been used (detergent dispenser cover
is closed), you may add a dish.
5. Press START/RESUME.
Page 11
Dishwasher Features
Your KitchenAid dishwasher may have some or all of these features.
ProScrub® Option Wash Area
The ProScrub® option wash area is located at the back of the lower
level rack.
NOTE: You must select the ProScrub
feature. Make sure items do not interfere with the water feed tube,
spray arms, or ProScrub
■ Keep the last tine row in the back of the lower rack in the 60°
®
spray jets.
angled position when using the ProScrub
■ Load pans, casserole dishes, etc., in the back of the lower dish
rack with the soiled surfaces facing the ProScrub
®
wash option to use this
®
option.
®
spray jets,
and resting on the last row of tines in the angled position.
■ Only one row of items may face the ProScrub
®
spray jets.
Stacking, overlapping or nesting items will keep the ProScrub
spray jets from contacting all of the surfaces.
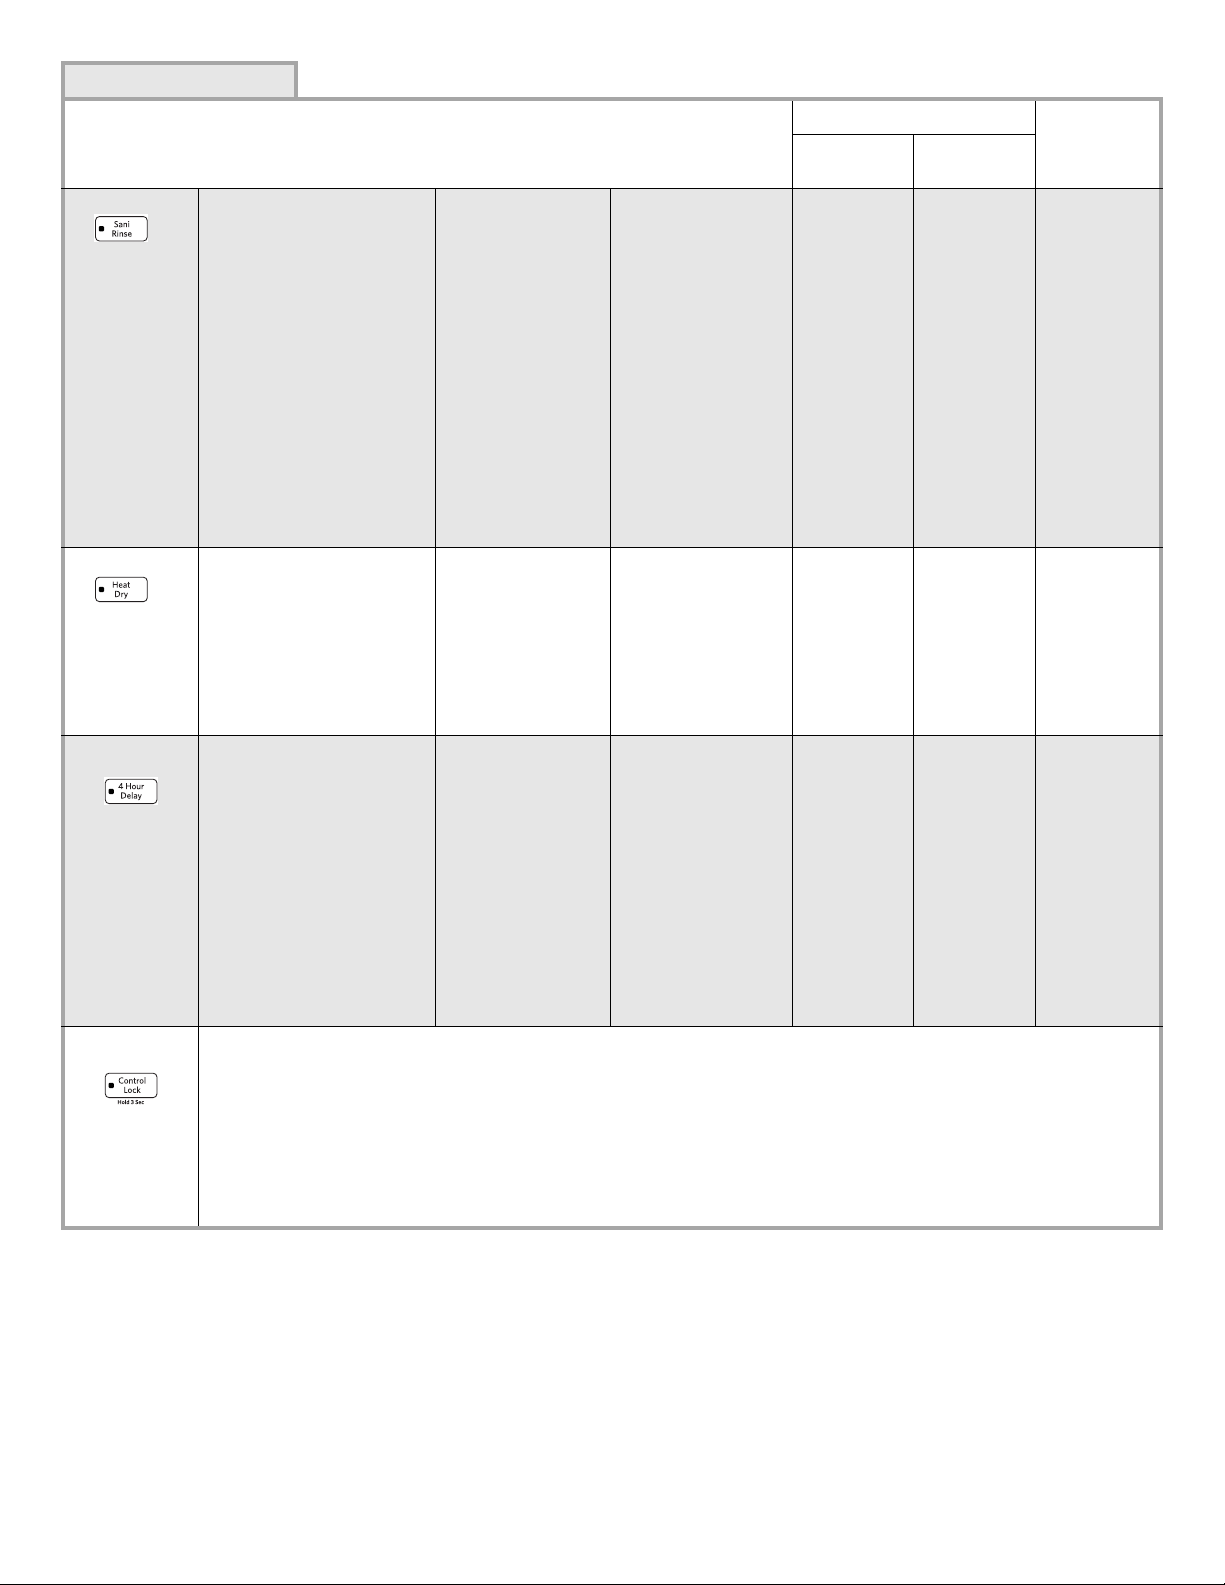
Silverware Basket
Use the slots in the covers to keep
your silverware separated for
optimum wash. There are specially
designed slots (small round holes) for
chopsticks. Mix silverware types to
keep them separated. Load knives
down, forks up, and alternate
spoons, for best cleaning results.
Manual Adjustable 2-Position Top Rack
You can raise or lower the top rack to fit tall items in either the top
or bottom rack. Adjusters are located on each side of the top rack.
Raise the top rack to accommodate items up to 9" (22 cm) in the
top rack and 13" (33 cm) in the bottom rack, or lower the top rack
to accommodate items up to 11" (28 cm) in both the top and
bottom racks.
IMPORTANT: Remove dishes prior to removing the top rack from
the dishwasher.
1. To raise, remove rack and slide lower wheels into the rails as
directed in “Removable Top Rack” section.
2. To lower, remove rack and slide upper wheels into the rails as
directed in “Removable Top Rack” section.
®
Premium Adjustable 2-Position Top Rack
You can raise or lower the top rack to fit tall items in either the top
or bottom rack. Adjusters are located on each side of the top rack.
Each adjuster has 2 preset positions.
To raise the rack, press both rack adjusters and lift the rack until it
is in the Up position and level.
To lower the rack,
press both rack
adjusters and slide the
rack to its Down
position and level.
NOTE: If your silverware
does not fit into the
designated slots, flip the
covers up and push them
down into the basket.
CULINARY CADDY® Utensil Basket
Use the utensil basket to hold specialty
cooking utensils (serving spoons,
spatulas, and similar items), or overflow
silverware items.
The basket hangs on the bottom rack in
the right-hand corner. Load the basket
while it is on the bottom rack or remove
the basket for loading on a counter or
table.
NOTE: Spin the spray arms while the
bottom rack is inside the dishwasher to
be sure items in the basket do not stop the rotation of the arms.
FLEXI-FOLD DOWN™ Flexible Tines
The row of tines on the left-hand and
right-hand sides of the top rack can
be adjusted to make room for a
variety of dishes.
To adjust the fold-down tines:
1. Grasp the tip of the tine that is in
the tine holder.
2. Gently push the tine out of the
holder.
3. Lay the tines down, toward the
center of the rack.
NOTE: The bottom rack may also have 1 or 2 rows of flexible tines
located in the back of the rack. Follow the same instructions to
adjust.
11
Page 12
®
Removable Top Rack (for SatinGlide
The removable top rack allows you to wash larger items such as
pots, roasters, and cookie sheets in the bottom rack.
IMPORTANT: Remove dishes prior to removing the top rack from
dishwasher.
rails)
To rem ove the rac k
To gain access to the track stops, pull the upper rack forward
about halfway out of the tub.
To open, flip the track stop toward the outside of the tub.
After opening both track stops, pull top rack out of the rails.
Track stop closed. Track stop open
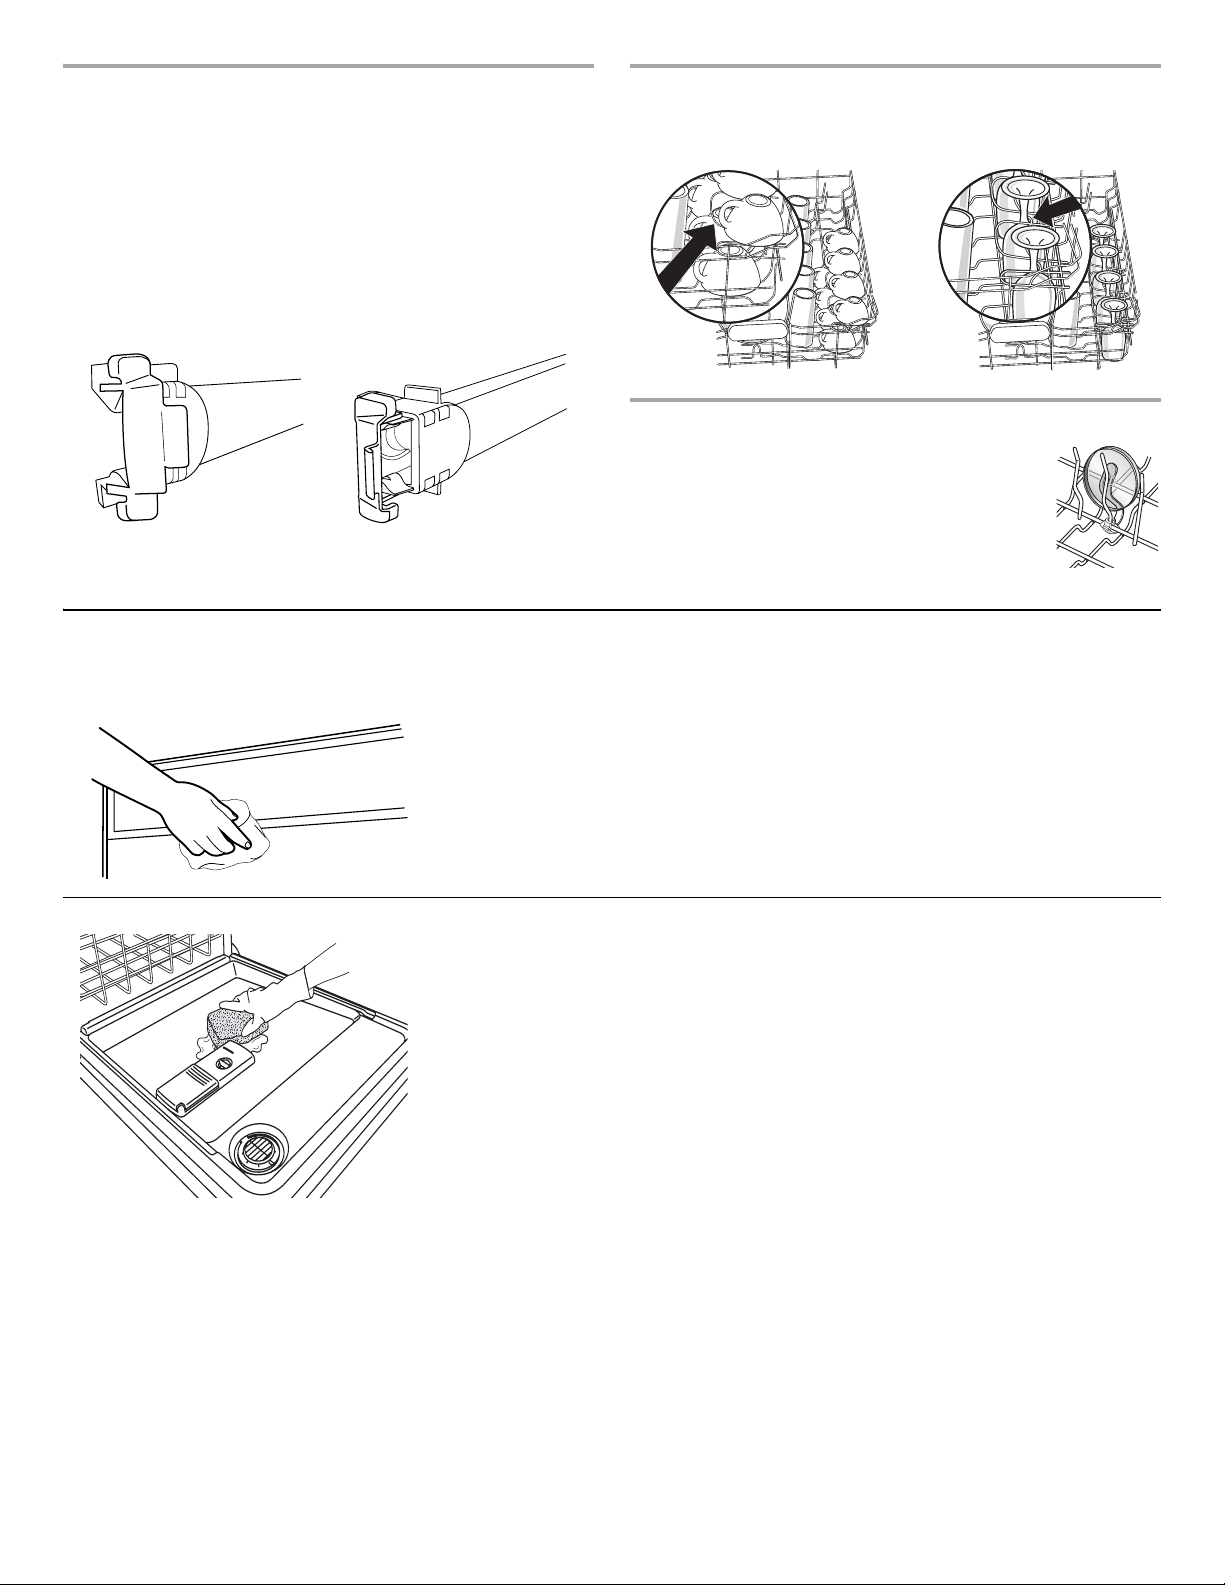
Dishwasher Care
Cleaning
Cleaning the exterior
In most cases, regular use of a soft, damp cloth or sponge and a mild detergent is all that
is necessary to keep the outside of your dishwasher looking nice and clean. If your
dishwasher has a stainless steel exterior, a stainless steel cleaner is recommended.
SURE-HOLD® Cup and Stemware Holder
Fold down the extra shelf on the left-hand or right-hand side of the
top rack to hold additional cups, stemware or long items such as
utensils and spatulas.
SURE-HOLD® Light Item Clips
The light item clips hold lightweight plastic items
such as cups, lids, or bowls in place during
washing.
To move a clip:
1. Pull the clip up and off the tine.
2. Reposition the clip on another tine.
Cleaning the interior
Hard water minerals can cause a white film to build up on the inside surfaces, especially
just beneath the door area.
Do not clean the dishwasher interior until it has cooled. You may want to wear rubber
gloves. Do not use any type of cleanser other than dishwasher detergent because it may
cause foaming or sudsing.
To clean interior
Make a paste with powdered dishwasher detergent on a damp sponge and clean.
OR
Use liquid automatic dishwasher detergent and clean with a damp sponge.
OR
See the vinegar rinse procedure in “Cloudy or Spotted Dishware (and Hard Water
Solution)” in “Troubleshooting” section.
NOTE: Run a normal cycle with dishwasher detergent after cleaning the interior.
12
Page 13

Drain Air Gap
Some state or local plumbing codes require the addition of a drain air gap between a builtin dishwasher and the home drain system. Check the drain air gap when your dishwasher
is not draining well.
The drain air gap is usually located on top of the sink or countertop near the dishwasher.
NOTE: The drain air gap is an external plumbing device that is not part of your
dishwasher. The warranty provided with your dishwasher does not cover service costs
directly associated with the cleaning or repair of the external drain air gap.
To clean the drain air gap
Storing
Storing for the summer
Storing for the winter
First try the solutions suggested here or visit our website and reference FAQs (Frequently Asked Questions)
In the U.S.A., www.kitchenaid.com In Canada, www.kitchenaid.ca
PROBLEM SOLUTION
DISHWASHER DOES
NOT RUN
DETERGENT REMAINS IN
THE DISPENSER OR
TABLET IS ON BOTTOM
OF TUB
CYCLE RUNS TOO LONG NOTES:
NOTE: It is normal for the dishwasher to repeatedly pause several times during a cycle.
If the Start/Resume light is blinking, close the door and push START/RESUME.
Be sure the door is closed and latched.
Be sure you have disabled Sleep Mode by pressing either START/RESUME or CANCEL, or by
opening and closing the door before selecting your cycle/option.
Check that there is not an interference with large casserole dishes and the wash system at the back
of the dishwasher. Adjust loading as necessary to ensure door is closed and latched.
Be sure you have selected a cycle. (See “Cycles and Options Descriptions” section.)
Be sure there is power to the dishwasher. A circuit breaker or fuse may have tripped.
If lights other than Start/Resume blink and the unit will not run, you will need to call for service.
Check for dishware such as cookie sheets, cutting boards, or large containers, etc., that may be
blocking the detergent dispenser from opening properly.
Be sure your detergent is fresh and lump free.
Be sure the cycle has completed (the Clean light is on). If it has not completed, you will need to
resume the cycle by closing the door and pressing START/RESUME.
■ To use less water and reduce energy consumption you will encounter cycles that typically run for
up to 3 hours.
■ A water heater setting of 120°F (49°C) is best, the dishwasher will delay longer while heating
cooler water.
■ Some options will add time to the cycle. (See “Cycles and Options Descriptions” section.) The
Heat Dry option adds approximately ¹⁄₂ hour.
Try the 1 Hour Wash cycle.
Run the hot water at a faucet close to the dishwasher before starting the cycle.
Clean the drain air gap periodically to ensure proper drainage of your dishwasher. With
most types, you lift off the chrome cover. Unscrew the plastic cap. Then check for any soil
buildup. Clean if necessary.
If your dishwasher is not in use during the summer months, turn off the water supply and
power supply to the dishwasher.
Avoid possible water damage to your home and dishwasher due to freezing water lines. If
your dishwasher is left in a seasonal dwelling or could be exposed to near freezing
temperatures, have your dishwasher winterized by authorized service personnel.
Troubleshooting
to possibly avoid the cost of a service call.
13
Page 14

PROBLEM SOLUTION
DISHWASHER NOT DRYING NOTE: Plastic and items with nonstick surfaces are difficult to dry because they have a porous
surface which tends to collect water droplets. Towel drying may be necessary.
Use of rinse aid along with the Heat Dry option is needed for proper drying.
Proper loading of items can affect drying. (See specific loading instructions within this guide.)
Glasses and cups with concave bottoms hold water. This water may spill onto other items when
unloading.
■ Unload the bottom rack first.
■ Locate these items on the more slanted side of the rack for improved results.
WILL NOT FILL Be sure the water is turned on to the dishwasher.
Check that the float is free from obstructions. (See “Parts and Features.”)
Check for suds in the dishwasher. If foam or suds are detected, the dishwasher may not operate
properly or may not fill with water. (See “Blinking Lights” in “Troubleshooting.”)
WATER REMAINS IN THE
TUB/WILL NOT DRAIN
Be sure the cycle has completed (the Clean light is on). If it has not, you will need to resume the cycle
by closing the door and pressing START/RESUME.
If dishwasher is connected to a food waste disposer, be sure the knockout plug has been removed
from the disposer inlet.
Check for kinks in the drain hose.
Check for food obstructions in the drain or disposer.
Check your house fuse or circuit breaker.
HARD WATER
(WHITE RESIDUE ON
DISHWASHER INTERIOR OR
GLASSWARE)
NOTE: Extremely hard water mineral deposits can cause damage to your dishwasher and make it
difficult to achieve good cleaning. A water softener is strongly recommended if your hardness is
15 grains or more. If a water softener is not installed, the following steps may help:
Use a commercial cleaner designed for dishwashers once per month.
Always use a rinse aid.
Always use a high-quality, fresh detergent.
Use a detergent booster/water softener additive designed for dishwashers.
ODORS NOTE: If the dishwasher is not used daily, you can run a rinse cycle with the partial load daily until a
full load is ready to run, or use the Top Rack Only option (on some models) for partial loads.
Run a vinegar rinse through the dishwasher by putting 2 cups (500 mL) of white vinegar in an upright
glass measuring cup in the lower rack. Run a normal cycle with the Heat Dry option turned off. Do
not use detergent.
The dishwasher may not be draining properly, see “Water Remains In The Tub/Will Not Drain” in
“Troubleshooting.”
NOISY NOTES:
■ Surging sounds can occur periodically throughout the cycle while the dishwasher is draining.
■ Normal water valve hissing may be heard periodically.
■ A normal snap sound may be heard when the detergent dispenser opens during the cycle and
when the door is opened at the end of the cycle.
■ Improper installation will affect noise levels.
A thumping sound may be heard if items extend beyond the racks and interfere with the wash arms.
Readjust the dishware and resume the cycle.
FOOD SOILS REMAIN
ON DISHES
Be sure the dishwasher is loaded correctly. Improper loading can greatly decrease the washing
performance (see “Dishwasher Use”).
Select the proper cycle and option for the type of soils. The Heavy Duty cycle with the ProScrub® (on
some models) option can be used for tougher loads.
Be sure the incoming water temperature is at least 120°F (49°C).
Use the proper amount of fresh detergent. More detergent is needed for heavier-soiled loads and
hard water conditions.
Scrape food from dishes prior to loading (do not prerinse).
DISHES DIRTY/SUDS IN
DISHWASHER/CYCLE NOT
COMPLETE
If foam or suds are detected by the dishwasher sensing system, the dishwasher may not operate
properly or may not fill with water.
Suds can come from:
■ Using the incorrect type of detergent, such as dish detergent for hand washing dishes, laundry
detergent, or hand soap.
■ Not replacing the rinse aid dispenser cap after filling (or refilling) the rinse aid.
■ Using an excessive amount of dishwasher detergent.
Call for service.
If no water was present in the machine at any time during a heated wash cycle, the cycle will end and
the Clean LED will not come on. See “Will Not Fill” in “Troubleshooting.”
DID NOT SANITIZE If the sanitized light is blinking, the load is NOT sanitized. The cycle was interrupted in the final rinse,
or the temperature for your water heater is set too low. Set your water heater to 120°F (49°C).
14
Page 15

PROBLEM SOLUTION
DAMAGE TO DISHWARE Improper loading can cause dishes to become chipped or damaged. (See specific loading
instructions within this guide.)
BLINKING LIGHTS Blinking LED's will occur when the cycle is paused or when the cycle has been interrupted by
opening the door. In this case, the Start/Resume button LED, the Cycle Status Indicator LED(s), and
the countdown bars on the Cycle Status Display all blink together to indicate that attention is
needed. See Start or Resume a Cycle in the “Dishwasher Use” section.
Blinking LED's can also occur when certain errors have been detected. In this case, the Clean/
Complete LED will blink one time with a pause in between blinks.
Call for service.
CLOUDY OR SPOTTED
DISHWARE (AND HARD
WATER SOLUTION)
NOTES:
■ Liquid rinse aid is necessary for drying and to reduce spotting.
■ Use the correct amount of detergent.
Confirm that the cloudiness is removable by soaking the item in white vinegar for 5 minutes. If the
cloudiness disappears, it is due to hard water. Adjust the amount of detergent and rinse aid. (See
“Hard Water [White Residue On Dishwasher Interior Or Glassware] in “Troubleshooting.”) If it does
not come clear, it is due to etching (see below).
Be sure the incoming water temperature is set at 120°F (49ºC).
Try using the High Temp and Sani Rinse options.
To remove spotting, run a vinegar rinse through the dishwasher.
■ Wash and rinse the affected dishware and load into dishwasher. Remove all silverware and metal
items. Put 2 cups (500 mL) of white vinegar in a glass measuring cup in the lower rack. Run a
normal cycle with the Heat Dry option turned off. No detergent is needed.
ETCHING (PERMANENT
CLOUDINESS)
This is an erosion of the surface of the glassware and can be caused by a combination of: water that
is too hot, from using too much detergent with soft water or by pre-washing. Detergent needs food
soil to act upon. If etching has occurred, the glassware is permanently damaged. To avoid further
etching, adjust the detergent amount to match the water hardness, stop pre-washing, and use water
heating options only when incoming water temperature is below 120°F (49°C).
LEAKING WATER Be sure dishwasher has been installed properly and is level.
Suds can cause the dishwasher to overflow. Measure the detergent accurately and use only
detergents designed for use in a dishwasher. Less detergent is needed in soft water. Try another
brand of detergent if sudsing continues.
To avoid rinse aid leaking from the dispenser, be sure the lid is securely attached and avoid
overfilling.
TUB IS DISCOLORED NOTES:
■ High iron content in the water can discolor the tub.
■ Tomato-based foods can discolor the tub or dishware.
A citrus-based cleaner can be used to clean.
15
Page 16

KITCHENAID® DISHWASHER WARRANTY
For one year from the date of purchase, when this major appliance is operated and maintained according to instructions attached to or
furnished with the product, KitchenAid brand of Whirlpool Corporation or Whirlpool Canada LP (hereafter “KitchenAid”) will pay for factory
specified parts and repair labor to correct defects in materials or workmanship that existed when this major appliance was purchased.
Service must be provided by a KitchenAid designated service company. YOUR SOLE AND EXCLUSIVE REMEDY UNDER THIS LIMITED
WARRANTY SHALL BE PRODUCT REPAIR AS PROVIDED HEREIN. This limited warranty is valid only in the United States or Canada and
applies only when the major appliance is used in the country in which it was purchased. Proof of original purchase date is required to obtain
service under this limited warranty.
SECOND THROUGH FIFTH YEAR LIMITED WARRANTY ON CERTAIN COMPONENT PARTS
In the second through the fifth year from the date of purchase, when this major appliance is operated and maintained according to
instructions attached to or furnished with the product, KitchenAid will pay for factory specified parts for the following components to correct
defects in materials or workmanship that existed when this major appliance was purchased: nylon dish racks and electronic controls.
LIFETIME LIMITED WARRANTY ON STAINLESS STEEL TUB AND INNER DOOR LINER
For the lifetime of the product from the date of purchase, when this major appliance is installed, operated and maintained according to
instructions attached to or furnished with the product, KitchenAid will pay for factory specified parts and repair labor for the following
components to correct defects in materials or workmanship that existed when this major appliance was purchased: stainless steel tub and
inner door liner.
ITEMS EXCLUDED FROM WARRANTY
This limited warranty does not cover:
1. Replacement parts or repair labor if this major appliance is used for other than normal, single-family household use or when it is used in a
manner that is inconsistent to published user or operator instructions and/or installation instructions.
2. Service calls to correct the installation of your major appliance, to instruct you on how to use your major appliance, to replace or repair
house fuses, or to correct house wiring or plumbing.
3. Service calls to repair or replace appliance light bulbs, air filters or water filters. Consumable parts are excluded from warranty coverage.
4. Damage resulting from accident, alteration, misuse, abuse, fire, flood, acts of God, improper installation, installation not in accordance
with electrical or plumbing codes, or use of products not approved by KitchenAid.
5. Cosmetic damage, including scratches, dents, chips or other damage to the finish of your major appliance, unless such damage results
from defects in materials or workmanship and is reported to KitchenAid within 30 days from the date of purchase.
6. Any food or medicine loss due to refrigerator or freezer product failures.
7. Pickup and delivery. This major appliance is intended to be repaired in your home.
8. Repairs to parts or systems resulting from unauthorized modifications made to the appliance.
9. Expenses for travel and transportation for product service if your major appliance is located in a remote area where service by an
authorized KitchenAid servicer is not available.
10. The removal and reinstallation of your major appliance if it is installed in an inaccessible location or is not installed in accordance with
KitchenAid's published installation instructions.
11. Replacement parts or repair labor on major appliances with original model/serial numbers that have been removed, altered or cannot be
easily determined.
LIMITED WARRANTY
IMPLIED WARRANTIES, INCLUDING ANY IMPLIED WARRANTY OF MERCHANTABILITY OR IMPLIED WARRANTY OF FITNESS FOR A
PARTICULAR PURPOSE, ARE LIMITED TO ONE YEAR OR THE SHORTEST PERIOD ALLOWED BY LAW. Some states and provinces do not
allow limitations on the duration of implied warranties of merchantability or fitness, so this limitation may not apply to you. This warranty gives
you specific legal rights, and you also may have other rights that vary from state to state or province to province.
LIMITATION OF REMEDIES; EXCLUSION OF INCIDENTAL AND CONSEQUENTIAL DAMAGES
YOUR SOLE AND EXCLUSIVE REMEDY UNDER THIS LIMITED WARRANTY SHALL BE PRODUCT REPAIR AS PROVIDED HEREIN.
KITCHENAID SHALL NOT BE LIABLE FOR INCIDENTAL OR CONSEQUENTIAL DAMAGES. Some states and provinces do not allow the
exclusion or limitation of incidental or consequential damages, so these limitations and exclusion may not apply to you. This warranty gives
you specific legal rights, and you also may have other rights that vary from state to state or province to province.
If outside the 50 United States and Canada, contact your authorized KitchenAid dealer to determine if another warranty applies.
If you think you need repair service, first see the “Troubleshooting” section of the Use & Care Guide. If you are unable to resolve the problem
after checking “Troubleshooting,” additional help can be found by checking the “Assistance or Service” section or by calling KitchenAid. In
the U.S.A., call 1-800-422-1230. In Canada, call 1-800-807-6777. 2/10
DISCLAIMER OF IMPLIED WARRANTIES
16
Page 17

For additional product information or to view FAQs (Frequently Asked Questions), in U.S.A. visit: www.kitchenaid.com
In Canada visit: www.kitchenaid.ca
If you do not have access to the Internet and you need assistance using your product or you would like to schedule service, you may
contact KitchenAid at the number below.
Have your complete model number ready. You can find your model and serial number on the label located near the door on the right-hand
or left-hand side of the dishwasher interior.
For assistance or service in the U.S.A., call 1-800-422-1230. In Canada, call 1-800-807-6777.
If you need further assistance, you can write to KitchenAid with any questions or concerns at the address below:
In the U.S.A.:
KitchenAid Brand Home Appliances
Customer eXperience Center
553 Benson Road
Benton Harbor, MI 49022-2692
In Canada:
KitchenAid Brand Home Appliances
Customer eXperience Centre
200 – 6750 Century Avenue
Mississauga ON L5N 0B7
Please include a daytime phone number in your correspondence.
Please keep this User Instructions and model number information for future reference.
W10300928C
SP PN W10300596B
© 2012. All rights reserved. ® Registered Trademark/TM Trademark of KitchenAid, U.S.A., KitchenAid Canada licensee in Canada
Printed in U.S.A.
5/12
Page 18

Page 19

Page 20

Page 21

Page 22

Pour de plus amples renseignements sur les produits ou pour lire la FAQ (Foire aux questions), aux États-Unis, visitez :
www.kitchenaid.com
Au Canada, visitez : www.kitchenaid.ca
Si vous n’avez pas accès à Internet et que avez besoin d’aide pour l’utilisation de votre produit ou si vous voulez prendre rendez-vous
pour une visite de service, vous pouvez contacter KitchenAid au numéro ci-dessous.
Préparez le numéro de modèle complet. Vous trouverez les numéros de modèle et de série sur l’étiquette située près de la porte sur le
côté droit ou gauche de l'intérieur du lave-vaisselle.
Pour obtenir de l'aide ou un entretien/une réparation aux États-Unis, composer le 1-800-422-1230. Au Canada, composer le
1-800-807-6777.
Si vous avez besoin de plus d’assistance, vous pouvez écrire à KitchenAid en soumettant toute question ou problème à l’adresse cidessous :
Aux É.-U. :
KitchenAid Brand Home Appliances
Customer eXperience Center
553 Benson Road
Benton Harbor, MI 49022-2692
Au Canada :
KitchenAid Brand Home Appliances
Centre pour l'eXpérience de la clientèle
200 - 6750 Century Avenue
Mississauga, ON L5N 0B7
Veuillez indiquer dans votre correspondance un numéro de téléphone où l'on peut vous joindre dans la journée.
Veuillez conserver les Instructions d'utilisation et les renseignements sur le numéro de modèle pour référence ultérieure.
W10300928C
SP PN W10300596B
© 2012. Tous droits réservés. ® Marque déposée/TM Marque de commerce de KitchenAid, U.S.A., Emploi sous licence de KitchenAid Canada au Canada
Imprimé aux É.-U.
5/12
Page 23

GARANTIE DU LAVE-VAISSELLE KITCHENAID
®
Pendant un an à compter de la date d'achat, lorsque ce gros appareil ménager est utilisé et entretenu conformément aux instructions jointes
au produit ou fournies avec, la marque KitchenAid de Whirlpool Corporation ou Whirlpool Canada LP (ci-après désignées “KitchenAid”) paiera
pour les pièces spécifiées par l'usine et la main-d'œuvre pour corriger les vices de matériaux ou de fabrication qui existaient déjà lorsque ce
gros appareil ménager a été acheté. Le service doit être fourni par une compagnie de service désignée par KitchenAid. LE SEUL ET
EXCLUSIF RECOURS DU CLIENT DANS LE CADRE DE LA PRÉSENTE GARANTIE LIMITÉE CONSISTE EN LA RÉPARATION PRÉVUE PAR
LA PRÉSENTE. Cette garantie limitée est valide uniquement aux États-Unis ou au Canada et s’applique exclusivement lorsque le gros
appareil ménager est utilisé dans le pays où il a été acheté. Une preuve de la date d’achat d’origine est exigée pour obtenir un service dans le
cadre de la présente garantie limitée.
GARANTIE LIMITÉE DE LA DEUXIÈME À LA CINQUIÈME ANNÉE INCLUSIVEMENT SUR CERTAINS COMPOSANTS
GARANTIE LIMITÉE
De la deuxième à la cinquème année inclusivement à compter de la date d'achat, lorsque ce gros appareil ménager est utilisé et entretenu
conformément aux instructions jointes à ou fournies avec le produit, KitchenAid paiera pour les pièces de rechange spécifiées par l'usine
pour corriger les vices de matériaux ou de fabrication qui existaient déjà lorsque ce gros appareil ménager a été acheté pour les pièces
suivantes : panier à vaisselle en nylon et commandes électroniques.
GARANTIE LIMITÉE À VIE SUR LA CUVE EN ACIER INOXYDABLE ET LA PAROI INTERNE DE LA PORTE
Pendant toute la durée de vie de l'appareil à compter de sa date d'achat, lorsque ce gros appareil ménager est utilisé et entretenu
conformément aux instructions jointes à ou fournies avec le produit, KitchenAid paiera pour les pièces de rechange spécifiées par l'usine
pour corriger les vices de matériaux ou de fabrication qui existaient déjà lorsque ce gros appareil ménager a été acheté pour les pièces
suivantes : Cuve en acier inoxydable et paroi interne de la porte.
ÉLÉMENTS EXCLUS DE LA GARANTIE
La présente garantie limitée ne couvre pas :
1. Les pièces de rechange ou la main-d’œuvre lorsque ce gros appareil ménager est utilisé à des fins autres que l'usage domestique
unifamilial normal ou lorsque les instructions d’installation et/ou les instructions de l’opérateur ou de l’utilisateur fournies ne sont pas
respectées.
2. Les visites de service pour rectifier l'installation du gros appareil ménager, montrer à l'utilisateur comment utiliser le gros appareil
ménager, remplacer ou réparer des fusibles du domicile ou rectifier le câblage ou la plomberie du domicile.
3. Les visites de service pour réparer ou remplacer les ampoules électriques, les filtres à air ou les filtres à eau de l'appareil. Les pièces
consomptibles ne sont pas couvertes par la garantie.
4. Les dommages imputables à : accident, modification, usage impropre ou abusif, incendie, inondation, actes de Dieu, installation fautive
ou installation non conforme aux codes d’électricité ou de plomberie, ou l’utilisation de produits non approuvés par KitchenAid.
5. Les défauts d'apparence, notamment les éraflures, traces de choc, fissures ou tout autre dommage subi par le fini du gros appareil
ménager, à moins que ces dommages ne résultent de vices de matériaux ou de fabrication et ne soient signalés à KitchenAid dans les 30
jours suivant la date d'achat.
6. Toute perte d'aliments ou de médicaments due à une défaillance du réfrigérateur ou du congélateur.
7. Le ramassage et la livraison. Ce gros appareil ménager est conçu pour être réparé à domicile.
8. Les réparations aux pièces ou systèmes résultant d’une modification non autorisée faite à l’appareil.
9. Les frais de déplacement et de transport pour une intervention sur un produit si le gros appareil ménager est situé dans une région
éloignée où un service d’entretien autorisé KitchenAid n’est pas disponible.
10. La dépose et la réinstallation de votre gros appareil ménager si celui-ci est installé dans un endroit inaccessible ou n'est pas installé
conformément aux instructions d'installation fournies par KitchenAid.
11. Les pièces de rechange ou la main-d’œuvre pour les gros appareils ménagers dont les numéros de modèle/de série ont été enlevés,
modifiés ou ne peuvent pas être facilement identifiés.
LES GARANTIES IMPLICITES, Y COMPRIS LES GARANTIES APPLICABLES DE QUALITÉ MARCHANDE OU D'APTITUDE À UN USAGE
PARTICULIER, SONT LIMITÉES À UN AN OU À LA PLUS COURTE PÉRIODE AUTORISÉE PAR LA LOI. Certains États et provinces ne
permettent pas de limitation sur la durée de garanties implicites de qualité marchande ou d'aptitude à un usage particulier, de sorte que la
limitation ci-dessus peut ne pas être applicable dans votre cas. Cette garantie vous confère des droits juridiques spécifiques et vous pouvez
également jouir d’autres droits qui peuvent varier d’une juridiction à l'autre.
LIMITATION DES RECOURS; EXCLUSION DES DOMMAGES FORTUITS OU INDIRECTS
CLAUSE D'EXONÉRATION DE RESPONSABILITÉ AU TITRE DES GARANTIES IMPLICITES
LE SEUL ET EXCLUSIF RECOURS DU CLIENT DANS LE CADRE DE LA PRÉSENTE GARANTIE LIMITÉE CONSISTE EN LA RÉPARATION
PRÉVUE PAR LA PRÉSENTE. KITCHENAID N’ASSUME AUCUNE RESPONSABILITÉ POUR LES DOMMAGES FORTUITS OU INDIRECTS.
Certains États et certaines provinces ne permettent pas l’exclusion ou la limitation des dommages fortuits ou indirects de sorte que ces
limitations et exclusions peuvent ne pas être applicables dans votre cas. Cette garantie vous confère des droits juridiques spécifiques et vous
pouvez également jouir d’autres droits qui peuvent varier d’une juridiction à l'autre.
Si vous résidez à l'extérieur du Canada et des 50 États des États-Unis, contactez votre marchand KitchenAid autorisé pour déterminer si une
autre garantie s'applique.
Si vous avez besoin d’un service de réparation, voir d'abord la section “Dépannage” du Guide d'utilisation et d'entretien. Si vous êtes dans
l'incapacité de résoudre le problème après avoir vérifié la section “Dépannage", vous pourrez trouver de l’aide supplémentaire en vérifiant la
section “Assistance ou service” ou en appelant KitchenAid. Aux États-Unis, composer le 1-800-422-1230. Au Canada, composer le 1-800-
807-6777. 2/10
18
Page 24

PROBLÈME SOLUTION
VAISSELLE CONTENANT DES
TRACES OU DES TACHES (ET
SOLUTION POUR L'EAU
DURE)
REMARQUES :
■ Un agent de rinçage liquide est nécessaire pour le séchage et pour réduire les taches.
■ Utiliser la bonne quantité de détergent.
Vérifier que les traces peuvent s'enlever en trempant l'article dans du vinaigre blanc pendant
5 minutes. Si les traces disparaissent, ceci est dû à une eau dure. Ajuster la quantité de détergent et
d'agent de rinçage. (Voir “Eau dure [résidu blanc sur l'intérieur du labve-vaisselle ou sur les articles
en verre]” dans la section “Dépannage”.) Si les traces ne disparaissent pas, elles sont dues à des
attaques (voir ci-dessous).
Vérifier que la température d'eau entrante est réglée à 120 °F (49 ºC).
Essayer d'utiliser les options High Temp (température élevée) et Sani Rinse (rinçage par
assainissement).
Pour enlever les taches, effectuer un rinçage au vinaigre dans le lave-vaisselle.
■ Laver et rincer la vaisselle affectée et la charger dans le lave-vaisselle. Enlever tous les couverts
et les articles métalliques. Mettre 2 tasses (500 mL) de vinaigre blanc dans un verre à mesurer
dans le panier inférieur. Exécuter un programme normal après avoir désactivé l'option Heat Dry
(séchage avec chaleur). Aucun détergent n'est nécessaire.
ATTAQUES (TRACES
PERMANENTES)
Il y a une érosion de la surface de l'article en verre, qui peut être provoquée par un mélange : de l'eau
trop chaude, de l'utilisation de trop de détergent avec une eau douce ou par un prélavage. Le
détergent a besoin de saletés d'aliments pour agir. En cas d'attaque, l'article en verre est
définitivement abîmé. Pour éviter d'autres attaques, ajuster la quantité de détergent selon la dureté
de l'eau, arrêter le prélavage et utiliser des options de chauffage de l'eau uniquement lorsque la
température de l'eau entrante est inférieure à 120 °F (49 °C).
FUITES D'EAU Vérifier que le lave-vaisselle a été correctement installé et qu'il est d'aplomb.
La mousse peut faire déborder le lave-vaisselle. Mesurer le détergent précisément et utiliser
uniquement des détergents conçus pour lave-vaisselle. Moins de détergent est nécessaire dans de
l'eau douce. Essayer une autre marque de détergent si l'excès de mousse persiste.
Pour éviter les fuites d'agent de rinçage du distributeur, vérifier que le couvercle est bien fixé et éviter
de trop le remplir.
LA CUVE EST DÉCOLORÉE REMARQUES :
■ Une teneur en fer importante dans l'eau peut décolorer la cuve.
■ Les aliments à base de tomate peuvent décolorer la cuve ou la vaisselle.
Un nettoyant à base d'agrumes peut être utilisé pour le nettoyage.
17
Page 25

PROBLÈME SOLUTION
EAU DURE
(RÉSIDU BLANC SUR
L'INTÉRIEUR DU LAVEVAISSELLE OU SUR LA
VERRERIE)
REMARQUE : Des dépôts minéraux d'une eau très dure peuvent endommager le lave-vaisselle et
rendre un bon nettoyage difficile. Un adoucisseur d'eau est vivement recommandé si la dureté est de
15 grains ou plus. En l'absence d'un adoucisseur d'eau, les étapes suivantes peuvent aider :
Utiliser un produit de nettoyage commercial conçu pour les lave-vaisselle une fois par mois.
Toujours utiliser un agent de rinçage.
Toujours utiliser un détergent frais de grande qualité.
Utiliser un activateur de détergent/adoucisseur d'eau conçu pour les lave-vaisselle.
ODEURS REMARQUE : Si le lave-vaisselle n'est pas utilisé tous les jours, on peut exécuter un programme de
rinçage chaque jour lorsque le lave-vaisselle est partiellement rempli, jusqu'à ce que l'on ait une
charge complète à laver. On peut aussi utiliser l'option Top Rack Only (panier supérieur uniquement)
(sur certains modèles) orsque le lave-vaisselle est partiellement rempli.
Effectuer un rinçage au vinaigre au lave-vaisselle en mettant 2 tasses (500 mL) de vinaigre blanc
dans un verre à mesurer placé debout dans le panier inférieur. Exécuter un programme normal après
avoir désactivé l'option Heat Dry (séchage avec chaleur). Ne pas utiliser de détergent.
Le lave-vaisselle peut ne pas se vidanger correctement; voir “Il reste de l'eau dans la cuve/pas de
vidange” à la section “Dépannage”.
BRUYANT REMARQUES :
■ Des bruits de pompage peuvent se produire régulièrement pendant le programme alors que le
lave-vaisselle se vidange.
■ On peut entendre régulièrement un sifflement du robinet d'eau; ceci est normal.
■ On peut entendre un bruit d'enclenchement lorsque le distributeur de détergent s'ouvre pendant
le programme et lorsque la porte est ouverte à la fin du programme; ceci est normal.
■ Une installation incorrecte affectera les niveaux de bruit.
On peut entendre un bruit sourd si des articles dépassent des paniers et touchent les pales de
lavage. Réajuster la vaisselle et reprendre le programme.
IL RESTE DES SALETÉS
ALIMENTAIRES SUR LA
VAISSELLE
Vérifier que le lave-vaisselle est correctement chargé. Un chargement incorrect peut
considérablement réduire la performance de lavage (voir “Utilisation du lave-vaisselle”).
Sélectionner le programme et les options appropriés au type de saletés. Le programme Heavy Duty
(service intense) avec l'option ProScrub
®
(sur certains modèles) peut être utilisé pour les charges
plus difficiles à nettoyer.
Vérifier que la température d'eau entrante est d'au moins 120 °F (49 ºC).
Utiliser la bonne quantité de détergent frais. Un supplément de détergent est nécessaire pour les
charges très sales et en présence d'une eau dure.
Éliminer les aliments sur la vaisselle en la grattant avant de la charger (ne pas pré-rincer).
VAISSELLE SALE/
ACCUMULATION DE
MOUSSE DANS LE LAVEVAISSELLE/PROGRAMME
NON TERMINÉ
Si le système de détection du lave-vaisselle détecte la présence de mousse, il est possible que le
lave-vaisselle ne fonctionne pas correctement ou ne se remplisse pas d'eau.
La mousse peut provenir de :
■ L'emploi du mauvais type de détergent comme un produit à vaisselle pour nettoyage manuel, un
produit de lessive ou un savon pour les mains.
■ Le fait de ne pas avoir réinstallé le couvercle du distributeur d'agent de rinçage après l'avoir
rempli d'agent de rinçage (qu'il s'agisse d'un premier remplissage ou de remplissages
subséquents).
■ L'utilisation d'une quantité excessive de détergent pour lave-vaisselle.
Faire un appel de service.
S'il n'y a eu aucun remplissage pendant un programme de lavage avec chauffage, le programme
s'arrête et la LED Clean (propre) ne s'illumine pas. Voir “Pas de remplissage” dans la section
“Troubleshooting” (dépannage).
PAS D'ASSAINISSEMENT Si le témoin lumineux d'assainissement clignote, la charge n'est PAS assainie. Le programme a été
interrompu lors du rinçage final ou la température du dispositif de chauffage de l'eau est trop basse.
Régler le dispositif de chauffage de l'eau à 120 ºF (49 ºC).
DOMMAGES AU LAVEVAISSELLE
TÉMOINS LUMINEUX
CLIGNOTANTS
Un chargement incorrect peut écailler ou endommager la vaisselle. (Voir les instructions spécifiques
de chargement dans ce guide.)
Si le programme est suspendu ou s'il est interrompu par l'ouverture de la porte, la DEL clignote.
Dans ce cas, la DEL du bouton Start/Resume (mise en marche/reprise), la/les DEL de l'indicateur de
l'état d'avancement du programme et les barres du compte à rebours sur l'affichage de l'état
d'avancement d'un programme clignotent en même temps pour indiquer que l'attention de
l'utilisateur est requise. Voir Mettre en marche ou redémarrer un programme dans la section
"Utilisation du lave-vaisselle".
Les DEL peuvent également se mettre à clignoter si certaines erreurs sont détectées. Dans ce cas,
la DEL Clean/Complete (propre/terminé) clignote une fois avec une interruption entre chaque phase
de clignotement.
Faire un appel de service.
16
Page 26

Dépannage
Essayer d’abord les solutions suggérées ici ou visiter notre site Web et consulter la FAQ (Foire aux questions) pour tenter d’éviter le coût
d’une intervention de dépannage.
Aux États-Unis., www.kitchenaid.com Au Canada, www.kitchenaid.ca
PROBLÈME SOLUTION
LE LAVE-VAISSELLE NE
FONCTIONNE PAS
IL RESTE DU DÉTERGENT
DANS LE DISTRIBUTEUR OU
LA PASTILLE EST RESTÉE AU
FOND DE LA CUVE
LE PROGRAMME DURE
TROP LONGTEMPS
LE LAVE-VAISSELLE NE
SÈCHE PAS
PAS DE REMPLISSAGE Vérifier que le robinet d'alimentation en eau du lave-vaisselle est ouvert.
IL RESTE DE L'EAU DANS LA
CUVE/PAS DE VIDANGE
REMARQUE : Il est normal que le lave-vaisselle fasse des pauses répétées au cours d'un
programme.
Si le témoin lumineux Start/Resume (mise en marche/reprise) clignote, ouvrir la porte et appuyer sur
START/RESUME (mise en marche/reprise).
Vérifier que la porte est fermée et verrouillée.
Veiller à désactiver le mode de veille, soit en appuyant sur START/RESUME (mise en marche/reprise)
ou CANCEL (annulation), soit en ouvrant puis refermant la porte avant de sélectionner le programme/
l'option.
Vérifier que le fonctionnement du système de lavage à l'arrière du lave-vaisselle n'est pas entravé
par de grandes casseroles. Ajuster le chargement si nécessaire pour que la porte puisse se fermer et
se verrouiller.
Vérifier qu'un programme a été sélectionné. (Voir la section “Descriptions des programmes et
options”).
Vérifier que le lave-vaisselle est branché. Un disjoncteur ou un fusible peut s'être déclenché.
Si des témoins lumineux autres que le témoin Start/Resume (mise en marche/reprise) clignotent et
que l'appareil ne fonctionne pas, faire un appel de service.
Vérifier que des articles comme les plaques à biscuits, les planches à découper ou les grands
récipients, etc. n'empêchent pas le distributeur de détergent de s'ouvrir correctement.
Vérifier que le détergent est frais et ne contient pas de grumeaux.
Vérifier que le programme est terminé (le témoin Clean est allumé). Si le programme n'est pas
terminé, il faudra le faire reprendre en fermant la porte et en appuyant sur START/RESUME.
REMARQUES :
■ Pour utiliser moins d'eau et réduire la consommation d'énergie, il existe des programmes qui
fonctionnent en général jusqu'à 3 heures.
■ Un réglage du chauffage de l'eau à 120 °F (49 °C) est idéal, le lave-vaisselle retardera le
programme plus longtemps alors qu'il chauffera l'eau de refroidissement.
■ Certaines options prolongeront le programme. (Voir la section “Descriptions des programmes et
options”). L'option Heat Dry (séchage avec chaleur) ajoute ½ heure.
Essayer le programme 1 Hour Wash (lavage en 1 heure).
Faire couler l'eau chaude au niveau d'un robinet proche du lave-vaisselle avant de démarrer le
programme.
REMARQUE : Les articles en plastique ou à surface anti-adhésive sont difficiles à sécher car leur
surface est poreuse et a tendance à retenir les gouttelettes d'eau. Un séchage au torchon peut être
nécessaire.
L'utilisation d'un agent de rinçage avec l'option Heat Dry (séchage avec chaleur) est nécessaire pour
un séchage correct.
Un bon chargement des articles peut affecter le séchage. (Voir les instructions spécifiques de
chargement dans ce guide.)
Les verres et les tasses à fond concave retiennent l'eau. Cette eau peut éclabousser d'autres articles
lors du déchargement.
■ Décharger le panier inférieur en premier.
■ Placer ces articles sur le côté le plus incliné du panier pour obtenir de meilleurs résultats.
Vérifier l'absence d'obstruction du flotteur. (Voir “Pièces et caractéristiques”.)
Vérifier l'absence de mousse dans le lave-vaisselle. En cas de présence de mousse, le lave-vaisselle
peut ne pas fonctionner correctement ou ne pas se remplir d'eau. (Voir “Témoins lumineux
clignotants” dans “Dépannage”.)
Vérifier que le programme est terminé (le témoin Clean est allumé). Si le programme n'est pas
terminé, il faut le faire reprendre en fermant la porte et en appuyant sur START/RESUME.
Si le lave-vaisselle est relié à un broyeur de déchets, vérifier que le bouchon d'obturation a été retiré
de l'orifice du broyeur.
Vérifier l'absence de déformation sur le tuyau de vidange.
Vérifier l'absence d'obstructions par des aliments dans le système d'évacuation ou le broyeur.
Inspecter le fusible ou le disjoncteur du domicile.
15
Page 27

Nettoyage
Nettoyage de l’extérieur
Entretien du lave-vaisselle
Dans la plupart des cas, il suffit d'utiliser régulièrement un linge ou une éponge doux/
douce et un détergent doux pour que les surfaces extérieures du lave-vaisselle restent
propres et esthétiques. Si l’extérieur de votre lave-vaisselle est en acier inoxydable, un
nettoyant pour acier inoxydable est recommandé.
Nettoyage de l’intérieur
Dispositif de brise-siphon
Les composés minéraux présents dans l’eau dure peuvent provoquer l’accumulation d’un
film blanchâtre sur les surfaces intérieures, particulièrement juste au-dessous de la porte.
Ne pas nettoyer les surfaces internes du lave-vaisselle avant qu’elles aient refroidi. On
souhaitera peut-être porter des gants en caoutchouc. Ne pas utiliser un produit de
nettoyage autre que le détergent pour lave-vaisselle car cela pourrait provoquer un excès
de mousse.
Nettoyage des surfaces internes
Faire une pâte avec un détergent pour lave-vaisselle en poudre sur une éponge humide et
nettoyer.
OU
Utiliser un détergent liquide pour lave-vaisselle automatique, et nettoyer avec une éponge
humide.
OU
Voir la méthode de rinçage au vinaigre dans la section “Taches et films sur la vaisselle (et
solution avec eau dure)” à la section “Dépannage.”
REMARQUE : Effectuer un programme de lavage normal avec détergent pour lavevaisselle après avoir nettoyé l’intérieur.
Certains codes de plomberie provinciaux ou locaux exigent l’installation d’un dispositif de
brise-siphon entre un lave-vaisselle encastré et le système de vidange du domicile.
Inspecter le dispositif de brise-siphon lorsque votre lave-vaisselle ne se vidange pas bien.
Le dispositif de brise-siphon se trouve généralement sur le dessus de l’évier ou du
comptoir près du lave-vaisselle.
REMARQUE : Le dispositif de brise-siphon est un article de plomberie externe qui ne fait
pas partie de votre lave-vaisselle. La garantie fournie avec le lave-vaisselle ne couvre pas
les coûts de réparation directement associés au nettoyage ou à la réparation d’un
dispositif de brise-siphon externe.
Nettoyage du dispositif de brisesiphon
Remisage
Remisage pour l’été
Remisage pour l’hiver
14
Nettoyer le dispositif de brise-siphon périodiquement pour assurer une vidange adéquate
du lave-vaisselle. Pour la plupart des brise-siphons, il faut soulever le couvercle chromé.
Dévisser le couvercle en plastique. Vérifier ensuite qu'il n'y a pas accumulation de saletés.
Nettoyer au besoin.
Si le lave-vaisselle n'est pas utilisé pendant l'été, couper l'arrivée d'eau et l'alimentation
électrique du lave-vaisselle.
Éviter que le lave-vaisselle et l’habitation ne subissent de dommages causés par l’eau, et
plus précisément par le gel des canalisations. Si le lave-vaisselle est laissé dans une
résidence saisonnière ou risque d’être exposé à des températures proches du point de
congélation, faire hivériser le lave-vaisselle par un technicien de service agréé.
Page 28

Panier supérieur de luxe réglable à 2 positions
Il est possible d’élever ou d’abaisser le panier supérieur pour
pouvoir charger de grands articles dans le panier supérieur ou
inférieur. Les régleurs sont situés de chaque côté du panier
supérieur. Chaque régleur comporte 2 positions préréglées.
Pour soulever le panier,
soulever le panier jusqu’à ce qu’il soit en position haute et
d’aplomb.
Pour abaisser le
panier, appuyer sur les
deux régleurs du
panier et glisser le
panier à sa position
d'aplomb la plus
basse.
appuyer sur les deux régleurs du panier et
Pour enlever le panier
Pour accéder aux butées de glissières, tirer le panier supérieur vers
l'avant pour l'extraire à mi-distance de la cuve.
Pour ouvrir, rabattre la butée de glissière vers l'extérieur de la cuve.
Après avoir ouvert les deux butées de glissières, tirer la glissière
supérieure hors des glissières.
Butée de glissière fermée Butée de glissière ouverte
Tiges flexibles FLEXI-FOLD DOWN™
La rangée de tiges de chaque côté
du panier supérieur peut être réglée
pour faire de la place pour divers
articles de vaisselle.
Pour ajuster les tiges rabattables :
1. Saisir la pointe de la tige qui se
trouve dans le support de la tige.
2. Pousser doucement la tige à
l’extérieur du support de la tige.
3. Rabattre les tiges vers le centre
du panier.
REMARQUE : Le panier inférieur doit également comporter 1 ou 2
rangées de tiges flexibles situées à l'arrière du panier. Pour les
ajuster, suivre les mêmes instructions.
Panier supérieur amovible (pour glissières SatinGlide®)
Le panier supérieur amovible permet de laver des articles plus
grands tels que casseroles, rôtissoires et tôles à biscuits, dans le
panier inférieur.
IMPORTANT : Retirer la vaisselle avant de retirer le panier
supérieur du lave-vaisselle.
Dispositif SURE-HOLD®de retenue des tasses et des
verres à pied
Rabattre la tablette d’appoint du côté gauche ou droit du panier
supérieur pour y placer des tasses, verres à pied ou articles longs
supplémentaires tels que les ustensiles et les spatules.
Attaches SURE-HOLD® pour articles légers
Les attaches maintiennent en place les articles
légers en plastique tels que les tasses, couvercles
ou bols pendant le lavage.
Pour déplacer une attache :
1. Tirer l’attache vers le haut pour la séparer de la
tige.
2. Réinstaller l’attache sur une autre tige.
13
Page 29

Caractéristiques du lave-vaisselle
Votre lave-vaisselle KitchenAid peut comporter toutes les caractéristiques suivantes ou seulement certaines d'entre elles.
Zone de lavage ProScrub
®
La zone de lavage de l'option ProScrub® se situe à l'arrière du
panier inférieur.
REMARQUE : Sélectionner l'option de lavage ProScrub
®
pour
utiliser cette caractéristique. Vérifier que les articles ne touchent
pas le tube d'alimentation d'eau, les bras d'aspersion ou les jets
d'aspersion ProScrub
■ La dernière rangée de tiges au fond du panier inférieur doit être
inclinée à 60° lors de l'utilisation de l'option ProScrub
■ Charger les poêles, plats creux, etc., à l'arrière du panier
®
.
®
.
inférieur en orientant les surfaces sales face aux jets
d'aspersion ProScrub® et en faisant reposer les articles de
façon inclinée et sur la dernière rangée de tiges.
■ Une seule rangée d'articles à la fois peut être orientée face aux
jets d'aspersion ProScrub
emboîter les articles empêchera les jets ProScrub
®
. Empiler, faire se chevaucher ou
®
d'atteindre
toutes les surfaces.
Panier à couverts
Ultiliser les fentes des couvercles
pour séparer les articles et obtenir
une qualité de lavage optimale. Des
fentes spéciales (petits trous ronds)
ont été prévues pour les baguettes.
Varier les types de couverts pour les
maintenir séparés. Pour de meilleurs
résultats de lavage, charger les
couteaux vers le bas, les fourchettes
vers le haut et alterner la position des
cuillères.
Panier à ustensiles CULINARY CADDY
®
Utiliser le panier à ustensiles pour
retenir les ustensiles de cuisine
spéciaux (cuillères de service, spatules,
etc.) ou pour les couverts en trop.
Le panier se suspend dans le coin droit
du panier inférieur. Charger le panier
lorsqu'il est dans le panier inférieur ou le
retirer pour le charger sur un comptoir
ou sur une table.
REMARQUE : Faire pivoter les bras
d'aspersion pendant que le panier
inférieur est à l'intérieur du lave-vaisselle pour vérifier qu'aucun
élément dans le panier n'empêche la rotation des bras.
Panier supérieur manuel réglable à 2 positions
Il est possible d’élever ou d’abaisser le panier supérieur pour
pouvoir charger de grands articles dans le panier supérieur ou
inférieur. Les régleurs sont situés de chaque côté du panier
supérieur. Élever le panier supérieur pour pouvoir charger des
articles d’une hauteur maximale de 9" (22 cm) dans le panier
supérieur et de 13" (33 cm) dans le panier inférieur, ou abaisser le
panier supérieur pour pouvoir charger des articles d’une hauteur
maximale de 11" (28 cm) dans les paniers supérieur et inférieur.
IMPORTANT : Retirer la vaisselle avant de retirer le panier
supérieur du lave-vaisselle.
1. Pour élever le panier, le retirer et faire glisser les roulettes
inférieures dans les glissières comme indiqué à la section
“Panier supérieur amovible”.
2. Pour abaisser le panier, le retirer et faire glisser les roulettes
supérieures dans les glissières comme indiqué à la section
“Panier supérieur amovible”.
REMARQUE : Si vos
couverts ne conviennent
pas aux fentes prévues,
soulever les couvercles et
les placer dans le panier
orientés vers le bas.
12
Page 30

Section commentaires sur l'utilisation du lave-vaisselle
STATUT DES COMMANDES ET
PROGRAMMES
COMMANDE FONCTION COMMENTAIRES
Les indicateurs lumineux de
l'état d'avancement du
programme illustrent la
progression du programme
du lave-vaisselle. Ils sont
situés à l'avant du lavevaisselle sur les modèles
disposant des commandes à
l'avant, et sur le dessus de la
porte pour les modèles dont
les commandes sont
dissimulées.
L'indicateur lumineux avant
A
ou l'indicateur extérieur
unique (A) indique l'état
d'avancement du
programme du lave-vaisselle
selon un code de couleurs.
(Disponible sur les modèles
à commandes dissimulées
uniquement).
L'afficheur de l'état
d'avancement du
programme indique la
progression du programme
du lave-vaisselle ainsi que
d'autres informations.
(Disponible sur certains
modèles à la place des
indicateurs lumineux d'état
d'avancement du
programme)
L’indicateur Clean (propre) s’allume lorsqu'un programme est terminé.
Lorsque l'on sélectionne l’option Sani-Rinse (rinçage avec
assainissement), l’indicateur Sanitized (assainissement) s’allume dès que
le programme est terminé. Si le lave-vaisselle n’a pas bien assaini la
vaisselle, le témoin clignote à la fin du programme. Ceci peut se produire si
le programme a été interrompu ou si l'eau n'a pas pu être suffisamment
chauffée pour atteindre la température requise.
Les témoins lumineux Clean (nettoyage) and Sanitized (assaini) s'éteignent
lorsque l'on ouvre puis referme la porte ou que l'on appuie sans relâcher
sur CANCEL (annulation).
Lumière bleue: Lavage ou rinçage. Lumière rouge: Séchage. Lumière verte
: Terminé. Si le témoin lumineux avant Clean (propre) clignote, voir la
section “Dépannage”.
Les témoins lumineux indiquent à l'utilisateur s'il peut ajouter un plat après
le démarrage du programme. Ils informent également l'utilisateur de
l'action effectuée par le lave-vaisselle : lavage, rinçage, séchage,
programme terminé et/ou assainissement terminé. Ils indiquent à
l'utilisateur si les commandes sont verrouillées et / ou si l'option de mise
en marche différée est sélectionnée. Une série de barres entame un
compte à rebours du programme restant, de gauche à droite. Chaque
barre représente environ 24 minutes de durée de programme. Les barres
apparaissent aussi de gauche à droite pour effectuer le compte à rebours
de la caractéristique de mise en marche différée et le témoin de mise en
marche différée s'active.
Annulation d’un programme
1. Appuyer une fois sur le bouton Cancel/Drain (annulation/
vidange) et le maintenir enfoncé. Le témoin lumineux Cancel/
Drain (annulation/vidange) s'allume. Si le bouton Cancel/Drain
(annulations/vidange) se trouve sur le dessus de la porte,
ouvrir légèrement la porte pour arrêter le programme. Attendre
que l'action d'aspersion s'arrête avant d'ouvrir la porte
complètement. Appuyer une fois sur le bouton Cancel/Drain
(annulation/vidange) et le maintenir enfoncé.
2. Fermer la porte et le lave-vaisselle entame un programme de
vidange (s'il reste de l'eau au fond du lave-vaisselle). Laisser le
lave-vaisselle évacuer l'eau complètement. Le témoin Cancel/
Drain (annulation/vidange) s'éteint après 2 minutes.
Modification d'un programme après la mise en marche
du lave-vaisselle
1. On peut interrompre un programme et redémarrer le lave-
vaisselle depuis le début en suivant la procédure suivante.
2. Appuyer deux fois sur le bouton Cancel/Drain (annulation/
vidange) pour réinitialiser le module de commande. Si le
bouton Cancel/Drain (annulation/vidange) se trouve sur le
dessus de la porte, ouvrir légèrement la porte pour arrêter le
programme. Attendre que l'action d'aspersion s'arrête avant
d'ouvrir la porte complètement. Appuyer deux fois sur Cancel/
Drain (annulation/vidange) pour réinitialiser le module de
commande.
3. Choisir un nouveau programme et les options.
4. Appuyer sur START/RESUME (mise en marche/reprise).
Ajout d'un plat après la mise en marche du lavevaisselle
1. Vérifier que le témoin lumineux Add a Dish (ajouter un plat) est
bien allumé. (Disponible sur certains modèles. Sinon, passer à
l’étape 2).
2. Ouvrir légèrement la porte pour arrêter le programme. Attendre
que l’action d’aspersion s’arrête avant d’ouvrir complètement
la porte.
3. Vérifier que le couvercle du distributeur de détergent est
toujours fermé. S'il est ouvert, cela signifie que le programme
de lavage a déjà commencé et il n'est pas conseillé d'ajouter
un plat.
4. Si l'on n'a pas encore utilisé de détergent (couvercle du
distributeur de détergent fermé), on peut ajouter un plat.
5. Appuyer sur START/RESUME (mise en marche/reprise).
11
Page 31

SÉLECTION D'OPTIONS
OPTIONS PEUT ÊTRE
Diffère le fonctionnement
du lave-vaisselle ou le fait
démarrer pendant les
heures creuses. Choisir un
programme de lavage et
des options. Appuyer sur
4 Hour Delay (mise en
marche différée de
4 heures). Appuyer sur
START/RESUME (mise en
marche/reprise). Bien
fermer la porte.
REMARQUE : Chaque fois
que l'on ouvre la porte
(pour ajouter un plat, par
exemple), il est nécessaire
d'appuyer de nouveau sur
Start/Resume (mise en
marche/reprise) pour que
le compte à rebours
reprenne.
Verrouillage
des
commandes
Évite l'utilisation involontaire du lave-vaisselle entre 2 programmes des changements de programme et d'option durant
un programme.
Pour activer le verrouillage, appuyer pendant 3 secondes. Le témoin Control Lock s'allume durant un court instant pour
indiquer que l'option est activée, et tous les boutons sont désactivés. Lorsqu’on appuie sur un bouton alors que les
commandes du lave-vaisselle sont verrouillées, l’indicateur lumineux clignote 3. Il reste possible d'ouvrir/de fermer la
porte du lave-vaisselle lorsque les commandes sont verrouillées.
REMARQUE : Il faudra peut-être désactiver le mode de veille, soit en appuyant sur START/RESUME (mise en marche/
reprise) ou CANCEL (annulation), soit en ouvrant puis refermant la porte avant de pouvoir désactiver le verrouillage des
commandes.
Pour désactiver le verrouillage, appuyer pendant 3 secondes. L’indicateur lumineux s’éteint.
SÉLECTIONNÉ
AVEC
Disponible pour
tous les
programmes
DESCRIPTION DURÉE
SUPPLÉMENTAIRE DU
PROGRAMME
NORMAL MAX
Diffère le
démarrage d'un
programme jusqu'à
4heures.
240 240 0
CONSOMMATION
SUPPLÉMENTAIRE
D'EAU EN
GALLONS
(LITRES)
STATUT DES COMMANDES ET
PROGRAMMES
COMMANDE FONCTION COMMENTAIRES
Pour démarrer ou
poursuivre un
programme de
lavage
Pour revenir à tout
programme/option
initial au cours de la
sélection.
Pour annuler un
programme de
lavage après son
démarrage.
Pour activer ou
désactiver les
signaux sonores.
Si l'on ouvre la porte durant un programme ou si une panne de courant se produit, le
témoin lumineux Start/Resume (mise en marche/reprise) clignote. Le programme ne
reprend pas tant que la porte n'est pas fermée et que l'on n'a pas appuyé sur START/
RESUME (mise en marche/reprise).
REMARQUE : Si le bouton Start/Resume (mise en marche/reprise) se trouve sur le dessus
de la porte, bien fermer la porte dans les 3 secondes qui suivent l’appui sur la touche
START/RESUME (mise en marche/reprise). Si la porte n'est pas fermée dans les
3 secondes qui suivent, la DEL du bouton de mise en marche clignote, un signal sonore
retentit et le programme ne démarre pas.
Appuyer sans relâcher sur CANCEL/DRAIN (annulation/vidange) pour réinitialiser les
sélections de commande effectuées.
Voir les sections “Annuler un programme après le démarrage du lave-vaisselle” et
“Modifier un programme après le démarrage du lave-vaisselle”.
Appuyer sans relâcher sur le bouton Hi Temp Scrub (récurage à haute temp.) pendant
3 secondes pour activer ou désactiver les signaux sonores. Seuls les signaux sonores de
confirmation d'activation de boutons sont activables/désactivables. Les signaux sonores
importants, tels ceux indiquant l'interruption d'un programme, ne sont pas désactivables.
10
Page 32

SÉLECTION D'OPTIONS
OPTIONS PEUT ÊTRE
Nettoie les poêles,
casseroles, etc. présentant
un degré de saleté élevé
pour supprimer le
trempage et le récurage
des plats sales
comportant des résidus
ayant adhéré pendant la
cuisson.
Augmente la température
principale de lavage pour
améliorer le nettoyage des
charges comportant des
charges comportant des
résidus tenaces ayant
adhéré pendant la
cuisson.
Assainit la vaisselle et la
verrerie conformément à la
norme 184 de la National
Sanitation Foundation
(NSF)/ANSI pour lavevaisselle à usage
domestique. Les lavevaisselle à usage
domestique certifiés ne
sont pas destinés aux
établissements
alimentaires autorisés. À la
fin du programme, le
témoin Sani indique si
l'option Sani Rinse
(rinçage avec
assainissement) a
fonctionné correctement.
Si le témoin ne s'active
pas, le programme peut
avoir été interrompu.
Sèche la vaisselle à l'air
chaud. Cette option,
associée à un agent de
rinçage, offrira la meilleure
performance de séchage.
Les articles en plastique
sont moins susceptibles
de se déformer si on les
place dans le panier à
vaisselle supérieur.
Désactiver Heat Dry pour
un séchage à l’air
uniquement.
SÉLECTIONNÉ
AVEC
Heavy Duty
(service intense)
Normal Wash
(lavage normal)
Heavy Duty
(service intense)
Normal Wash
(lavage normal)
Heavy Duty
(service intense)
Normal Wash
(lavage normal)
Disponible pour
tous les
programmes, sauf
Rinse Only
(rinçage
uniquement)
DESCRIPTION DURÉE
SUPPLÉMENTAIRE DU
PROGRAMME
NORMAL MAX
Active les jets
ProScrub ® pour
assurer un pouvoir
nettoyant renforcé
pour les articles
placés à l'arrière du
panier inférieur.
Fait passer la
température du
lavage principal de
105°F (41°C) à
145°F (63°C) et
celle du rinçage
final de 130°F
(54°C) à 140°F
(60°C).
Fait passer la
température du
lavage principal de
105°F (41°C) à
145°F (63°C) et
celle du rinçage
final de 130°F
(54°C) à 140°F
(60°C).
Active l'élément de
chauffage à la fin
du programme de
lavage pour
accélérer les temps
de séchage.
L'option Heat Dry
est activée par
défaut avec tous
les programmes
sauf le lavage d'une
heure.
45 85 0 - 1,6
45 85 0 - 1,6
60 105 0 - 1,6
52 52 0
CONSOMMATION
SUPPLÉMENTAIRE
D'EAU EN
GALLONS
(LITRES)
(0 - 6)
(0 - 6)
(0 - 6)
9
Page 33

Description des programmes et options
Ces renseignements couvrent plusieurs modèles différents. Votre lave-vaisselle peut ne pas comporter tous les programmes et toutes les
options indiqués.
SÉLECTION DE
PROGRAMMES
PROGRAMMES NIVEAU DE
Utiliser ce programme pour les casseroles, les poêles
et la vaisselle ordinaire difficiles à nettoyer et très sales.
Utiliser ce programme pour des charges comportant
des quantités normales de résidus alimentaires.
L'étiquette de consommation d'énergie est basée sur
ce programme.
Utiliser ce programme pour les articles légèrement
sales ou pour la porcelaine et le cristal.
Pour des résultats rapides, le lavage en 1 heure nettoie
votre vaisselle en utilisant légèrement plus d'eau et
d'énergie. Sélectionner l'option Heat Dry (séchage
avec chaleur) ou ProDry
séchage (ajoute environ 27 à 35 minutes au
programme de lavage en 1 heure).
Utiliser ce programme pour rincer la vaisselle, les
verres et les couverts qui ne seront pas lavés
immédiatement.
Ne pas utiliser de détergent.
™
pour accélérer les temps de
SALETÉ
Léger à modéré 115 165 6,4 (24,3)
Élevé/Adhérant
aux surfaces
après cuisson
Léger 85 - 100 170 3,9 (14,7)
Moyen 105 165 4,6 (17,5)
Élevé 120 170 6,4 (24,3)
Léger 75 135 3,9 (14,7)
Moyen 80 145 5,5 (20,7)
Élevé 100 160 5,5 (20,7)
Tou s l es ni ve au x
de saleté
Tou s l es ni ve au x
de saleté
DURÉE DE LAVAGE* (MIN)
SANS OPTIONS
Normal** Max
120 170 6,4 (24,3)
60 62 6,4 (24,3)
10 12 1,7 (6,3)
CON-
SOMMA-
TION
D'EAU EN
GALLONS
(Litres)
Les durées de lavage dépendent de la température de l'eau, du degré de saleté, de la taille de la charge de vaisselle ainsi que des options
sélectionnées. Ajouter des options augmente la durée du programme.
*Ajouter des options augmente la durée du programme. Voir la section d'information sur les options.
**Durée de programme approximative obtenue avec de l'eau chaude à 120°F (49°C) fournie au lave-vaisselle. Si les durées sont plus
longues, cela signifie que l'eau d'arrivée est moins chaude.
8
Page 34

■ La quantité de détergent à utiliser dépend des éléments
suivants :
Degré de saleté de la vaisselle - les charges très sales
nécessitent plus de détergent.
Dureté de l'eau - si l'on n'utilise pas assez de détergent avec
une eau dure, la vaisselle ne sera pas propre. Si l'on utilise trop
de détergent avec une eau douce, la solution attaquera les
articles en verre.
Eau douce à moyenne (0 à 6 grains par gallon U.S.)
[eau venant d’adoucisseur d'eau général et eau du service
d'eau de la ville]
Eau moyenne à dure (7 à 12 grains par gallon U.S.)
[eau de puits et du service d’eau de la ville]
■ Selon la dureté de l'eau, remplir la section de lavage principal
du distributeur tel qu'illustré. Remplir la section de prélavage
jusqu'au niveau indiqué, si nécessaire.
REMARQUE : Les quantités
indiquées correspondent à
l'emploi d'un détergent en
poudre standard. Lors de
l'utilisation d'un autre type
Hard Water
Soft Water
Main Wash Pre-Wash
Hard Water
Soft Water
de détergent, procéder
conformément aux instructions indiquées sur l'emballage. Les
formats pré-mesurés conviennent parfaitement quels que soient la
dureté de l'eau et le niveau de saleté. Toujours placer les
détergents pré-mesurés dans le compartiment principal et fermer
le couvercle.
Verser l'agent de rinçage
■ Votre lave-vaisselle est conçu pour utiliser un agent de rinçage
pour un séchage satisfaisant. Sans agent de rinçage, la
vaisselle et l'intérieur du lave-vaisselle seront trop humides.
L'option de séchage avec chaleur ne fonctionnera pas de
manière optimale sans agent de rinçage.
■ Un agent de rinçage empêche l'eau de former des
gouttelettes qui peuvent laisser des taches ou des
coulées en séchant. Ils améliorent également le
séchage en permettant à l'eau de s'écouler de la
vaisselle après le rinçage final.
■ Un agent de rinçage aide à réduire l'excès d'humidité
sur les paniers à vaisselle et à l'intérieur du lavevaisselle.
■ Contrôler l'indicateur d'agent de rinçage. Ajouter l'agent de
rinçage lorsque l'indicateur arrive au niveau “Add” (ajouter).
■ Pour ajouter de l'agent de rinçage,
tourner le bouchon du distributeur au
niveau “Refill” (remplir) et le soulever.
Verser l'agent de rinçage dans
l'ouverture jusqu'à ce que l'indicateur
soit sur “Full” (plein). Remettre en place
le bouchon du distributeur et le tourner
Refill
fill
max
-
-
-
-
jusqu'à ce qu'il soit sur “Lock”
(verrouillage). S'assurer que le bouchon
est bien verrouillé.
¹⁄₄
tour pour
verrouiller
-
Lock
-
-
Full
Add
-
6
5
4
3
2
1
-
-
-
-
-
-
ÉTAPE 3
Sélectionner un programme (les programmes varient
selon les modèles)
Voir les tableaux “Descriptions des programmes et des options”
dans la section qui suit.
Les lave-vaisselle éconergiques fonctionnent plus longtemps pour
économiser de l’eau et de l’énergie, tout comme une vitesse de
conduite réduite permet d’économiser du carburant. La durée
normale d'un programme est d'environ 2 1/2 heures, mais ce
temps peut varier en fonction des sélections effectuées.
Sélectionner des options (les options varient selon le
modèle)
Voir les tableaux “Descriptions des programmes et des options”
dans la section qui suit.
On peut personnaliser les programmes en appuyant sur les options
désirées. Pour changer d’option, appuyer sur cette option à
nouveau pour la désactiver, ou sélectionner une option différente.
Toutes les options ne sont pas disponibles sur tous les
programmes. Si l'on sélectionne une option invalide pour un
programme donné, les témoins clignotent.
ÉTAPE 4
Démarrer ou reprendre un programme
■ Laisser couler l'eau du robinet le plus proche du lave-vaisselle
jusqu'à ce qu'elle soit chaude. Fermer le robinet.
■ Appuyer une fois sur START/RESUME (mise en marche/reprise)
pour afficher les sélections utilisées. Sélectionner le
programme de lavage et les options souhaités OU appuyer sur
START/RESUME (mise en marche/reprise) pour répéter le
même programme et les mêmes options que pour le
programme de lavage précédent.
IMPORTANT : Si l'on ouvre la porte (par exemple pour ajouter un
plat, même pendant le fonctionnement de l'option Delay Hours
[mise en marche différée de plusieurs heures]), faut appuyer
chaque fois sur le bouton Start/Resume (mise en marche/reprise).
■ Si le bouton Start/Resume (mise en marche/reprise) est situé
au-dessus de la porte : Bien fermer la porte dans un délai de
3 secondes après avoir appuyé sur START/RESUME (mise en
marche/reprise). Si la porte n'est pas fermée dans les
3 secondes qui suivent, la DEL du bouton de mise en marche
clignote, un signal sonore retentit et le programme ne démarre
pas.
REMARQUE : Pour la plupart des types
d'eau, le réglage de 2 effectué à l'usine
donnera de bons résultats. Si l'eau du
domicile est dure ou si l'on remarque la
présence d'anneaux ou de taches,
essayer un réglage plus élevé. Tourner
l'ajusteur à flèche à l'intérieur du
distributeur soit à la main, soit en
insérant un tournevis à lame plate au
centre de la flèche et en tournant.
-
6
5
-
4
-
fill
max
-
-
-
-
-
3
2
1
-
-
-
-
-
-
-
7
Page 35

Étapes rapides
C
Préparer et
1
charger le lavevaisselle.
Verser le
2
détergent pour le
nettoyage et
l’agent de
rinçage pour le
séchage.
Utilisation du lave-vaisselle
ÉTAPE 1
Préparation et chargement du lave-vaisselle
IMPORTANT : Enlever de la vaisselle les restes alimentaires, os,
cure-dents et autres articles durs. Enlever les étiquettes des
récipients avant de les laver.
Sélectionner un programme ou une option (les
programmes et options varient selon le modèle).
3
Mettre en marche le lave-vaisselle.
4
REMARQUE : Si le bouton Start/Resume
(mise en marche/reprise) se trouve sur le
dessus de la porte, bien fermer la porte
dans les 3 secondes qui suivent l’appui sur
la touche START/RESUME (mise en
marche/reprise).
■ Un chargement incorrect peut écailler ou endommager la
vaisselle. Pour le chargement des verres ou des tasses, mieux
vaut placer les articles entre les rangées de tiges plutôt qu'audessus, tel qu'illustré.
■ Pour le chargement des couverts, les articles
pointus doivent toujours être orientés vers le
bas. Mélanger les articles dans chaque
section du panier : en orienter certains vers le
haut et d’autres vers le bas afin qu'ils ne
s’imbriquent pas. Le jet d’eau ne peut
atteindre les articles imbriqués.
Panier supérieur Panier inférieur
■ S'assurer que rien n'empêche le(s) bras
d'aspersion de tourner librement. Il est
important que le jet d'eau atteigne toutes
les surfaces sales.
■ Vérifier qu'aucun article ne bloque le distributeur de détergent
lorsque la porte du lave-vaisselle est fermée.
■ Charger dans le panier les articles vers le bas en orientant la
surface sale vers l'intérieur, vers le bras d'aspersion, tel
qu’illustré. Ceci améliorera les résultats de nettoyage et de
séchage.
■ Éviter le chevauchement d'articles tels que bols ou assiettes
pouvant retenir les aliments.
■ Placer les articles de plastique, les petites assiettes et les
verres dans le panier supérieur. Ne laver au lave-vaisselle que
les articles de plastique identifiés comme “lavable au lavevaisselle”.
■ Pour éviter les bruits de choc et d'entrechoc durant le
fonctionnement : Charger la vaisselle de façon à ce que les
articles ne se touchent pas les uns les autres. S'assurer que les
articles légers sont bien retenus dans les paniers.
ÉTAPE 2
Verser le détergent
REMARQUE : Si on ne souhaite pas effectuer un programme de
lavage dans l'immédiat, exécuter le programme Rinse Only
(rinçage seulement) (sur certains modèles). Ne pas utiliser de
détergent.
■ Utiliser uniquement du détergent pour lave-vaisselle
automatique. Verser le détergent en poudre, liquide ou en
pastille juste avant de démarrer un programme.
■ Pour l'obtention de
meilleurs résultats de
lavage, utiliser un
détergent à lavevaisselle automatique
frais. Conserver le
récipient du détergent
bien fermé dans un
lieu sec et frais.
A
Hard Water
Soft Water
B
MAIN WASH
A. Loquet du couvercle
B. Section de lavage principal
C. Section de prélavage
Hard Water
Soft Water
PREWASH
6
Page 36

Démarrage / guide rapide (varie selon le modèle)
IMPORTANT : Ne pas obstruer le distributeur de
détergent.
De grands articles placés
dans le panier inférieur
pourraient entraver
l'ouverture du clapet du
distributeur. Des tôles à
biscuits ou planches à
découper qui seraient
chargées sur la gauche du
lave-vaisselle peuvent
facilement entraver
l'ouverture du distributeur. Si
l'on remarque du détergent
dans le distributeur ou au
fond de la cuve après la fin
d'un programme, cela signifie
que le distributeur était
bloqué.
Séchage - L'emploi d'un agent de rinçage est
essentiel.
Il faut utiliser un agent de
séchage (tel un agent de
rinçage) pour obtenir un bon
séchage (échantillon fourni).
Un agent de rinçage combiné
à l'option Heat Dry (séchage
avec chaleur) offrira une
performance de séchage
idéale et permettra d'éviter
une humidité excessive à
l'intérieur du lave-vaisselle.
USE RINSE AID FOR
BETTER DRYING
Lock
Refill
+
Full
Add
Programme Heavy Duty (service intense) pour
nettoyer la saleté tenace
Le programme Heavy Duty (service intense)
est recommandé pour les charges
comportant un degré de saleté élevé. Utiliser
ce programme pour les casseroles, les poêles
et la vaisselle ordinaire difficiles à nettoyer et
très sales. Il n'est pas nécessaire de prérincer la vaisselle; il suffit de la frotter et de la
charger dans le lave-vaisselle.
Chargement ProScrub® pour le nettoyage des
aliments ayant adhéré au plat durant la cuisson (sur
certains modèles)
Lorsque l'option
ProScrub® est
sélectionnée, elle
offre un lavage
concentré à l'arrière
du panier inférieur
pour les plats
difficiles à nettoyer.
Placer ces plats en
orientant leur surface
sale vers les orifices
d'aspersion
ProScrub
®
dans le
panier inférieur du
lave-vaisselle.
Appuyer sur START/RESUME (mise en marche/
reprise) chaque fois que
l'on ajoute un plat.
Lavage en 1 heure - Pour des résultats rapides.
Les lave-vaisselle éconergiques fonctionnent plus
longtemps pour économiser de l’eau et de
l’énergie, tout comme une vitesse de conduite
réduite permet d’économiser du carburant. Pour
des résultats rapides, le lavage en 1 heure nettoie
votre vaisselle en utilisant légèrement plus d'eau
et d'énergie. Sélectionner l'option Heat Dry
(séchage avec chaleur) pour accélérer les temps
de séchage (ajoute environ 35 minutes au
programme de lavage en 1 heure).
IMPORTANT : Si l'on ouvre la porte (par exemple
pour ajouter un plat, même pendant le
fonctionnement de l'option Delay Hours [mise en
marche différée de plusieurs heures]), il faut
appuyer chaque fois sur le bouton START/
RESUME (mise en marche/reprise).
Si le bouton START/RESUME (mise en marche/
reprise) est situé au-dessus de la porte : Bien
fermer la porte dans un délai de 3 secondes après
avoir appuyé sur START/RESUME (mise en
marche/reprise). Si la porte n'est pas fermée dans
les 3 secondes qui suivent, la DEL du bouton de
mise en marche clignote, un signal sonore retentit
et le programme ne démarre pas.
Dosage correct du détergent
Certains utilisateurs emploient trop de détergent dans leur lavevaisselle. Cela peut attaquer les plats. Voir “Ajout de détergent”
dans la section “Utilisation du lave-vaisselle” pour déterminer la
quantité de détergent nécessaire en fonction de la dureté de
l'eau.
5
Page 37

Lavage au niveau supérieur
Tube d'arrivée d'eau
Plaque signalétique des
numéros de modèle et de série
Ouverture d'arrivée d'eau
Pièces et caractéristiques
Les jets puissants ProScrub®
(sur certains modèles) dirigent l’eau
vers les plats, poêles ou casseroles
placés à l’arrière du lave-vaisselle pour
élimin la saleté tenace. Le broyeur à
aliments du système de lavage dispose
de quatre lames en acier inoxydable
pour broyer les résidus alimentaires,
qui sont éliminés lors de la vidange à la fin
de chaque programme.
Quatre bras de lavage en acier inoxydable
aspergent la charge à quatre reprises à
chaque rotation.
Bras d'aspersion inférieur
Élément chauffant
Distributeur d’agent de rinçage –
minimisation de la formation de taches
et optimisation du séchage.
Distributeur de détergent
Évents actifs
(sur certains modèles)
Régleurs du
panier supérieur de luxe
(sur certains modèles)
Tiges flexibles rabattables
(sur certains modèles)
Dispositif de protection
contre le débordement
Le broyeur à aliments du système de
lavage dispose de quatre lames en acier
inoxydable pour broyer les résidus
alimentaires, qui sont éliminés lors de la
vidange à la fin de chaque programme.
Tableau de commande
Tablettes d’appoint pour
tasses avec dispositif de
retenue des verres à pied
Bras d'aspersion supérieur
Tiges flexibles
rabattables
4
PANIER SUPÉRIEUR
PANIER INFÉRIEUR
Poignée du panier
Panier à couverts
Panier à ustensiles
Culinary Caddy
(sur certains modèles)
®
Page 38

INSTRUCTIONS DE MISE À LA TERRE
■
Pour un lave-vaisselle relié à la terre, branché avec un
cordon
Le lave-vaisselle doit être relié à la terre. En cas d'un
mauvais fonctionnement ou d'une panne, la mise à terre
réduira le risque d'un choc électrique en fournissant le moins
de résistance pour le courant électrique. Le lave-vaisselle est
équipé d'un cordon avec un conducteur pour relier les
appareils à la terre et d'une fiche de mise à la terre. La fiche
doit être branchée sur une prise appropriée, installée et reliée
à la terre conformément aux codes et règlements locaux.
:
AVERTISSEMENT : La connexion incorrecte du
conducteur pour relier les appareils à la terre peut causer le
risque de choc électrique. Vérifier avec un électricien
CONSERVEZ CES INSTRUCTIONS
Ne pas utiliser le lave-vaisselle jusqu’à ce qu’il soit complètement installé.
Ne pas appuyer sur la porte ouverte.
Le non-respect de ces instructions peut causer des blessures graves ou des coupures.
compétent ou un représentant de service si vous avez
des doutes si le lave-vaisselle est correctement relié à la
terre. Ne pas modifier la fiche fournie avec le lavevaisselle; si elle n'entre pas dans la prise, faire installer
une prise appropriée par un électricien compétent.
■
Pour un lave-vaisselle branché en permanence :
Le lave-vaisselle doit être branché à un système
d'installation électrique permanent en métal relié à la
terre, ou un conducteur pour relier les appareils à la terre
doit être relié avec les conducteurs du circuit et branché
à une borne pour relier les appareils à la terre ou au
cordon d'alimentation électrique avec le lave-vaisselle.
AVERTISSEMENT
Risque de basculement
Avertissements de la proposition 65 de l'État de Californie :
AVERTISSEMENT : Ce produit contient au moins un produit chimique connu par l’État de Californie pour être à l’origine de
cancers.
AVERTISSEMENT : Ce produit contient au moins un produit chimique connu par l’État de Californie pour être à l’origine de
malformations et autres déficiences de naissance.
3
Page 39

Sécurité du lave-vaisselle
Votre sécurité et celle des autres est très importante.
Nous donnons de nombreux messages de sécurité importants dans ce manuel et sur votre appareil ménager. Assurez-vous de
toujours lire tous les messages de sécurité et de vous y conformer.
Voici le symbole d’alerte de sécurité.
Ce symbole d’alerte de sécurité vous signale les dangers potentiels de décès et de blessures graves à vous
et à d’autres.
Tous les messages de sécurité suivront le symbole d’alerte de sécurité et le mot “DANGER” ou
“AVERTISSEMENT”. Ces mots signifient :
Risque possible de décès ou de blessure grave si vous ne
DANGER
AVERTISSEMENT
Tous les messages de sécurité vous diront quel est le danger potentiel et vous disent comment réduire le risque de blessure et
ce qui peut se produire en cas de non-respect des instructions.
IMPORTANTES INSTRUCTIONS DE SÉCURITÉ
AVERTISSEMENT
■ Lire la totalité des instructions avant d’utiliser le
lave-vaisselle.
■ N’utiliser le lave-vaisselle que pour laver la vaisselle.
■ Utiliser uniquement les détersifs ou agents de rinçage
recommandés pour lave-vaisselle et les garder hors de la
portée des enfants.
■ Lorsque vous chargez le lave-vaisselle :
1) Placer les objets coupants de façon qu’ils ne puissent
endommager le joint de la porte; et
2) Placer les couteaux le manche vers le haut de façon à ne
pas vous couper.
■ Ne pas laver d’articles en plastique à moins qu’ils ne soient
marqués “Peut aller au lave-vaisselle” ou l’équivalent. Si
l’article ne porte aucune indication, vérifier auprès du
fabricant.
■ Ne pas toucher l’élément chauffant pendant le
fonctionnement ou immédiatement après.
: Lors de l’utilisation du lave-vaisselle, suivre les précautions élémentaires dont les suivantes :
CONSERVEZ CES INSTRUCTIONS
suivez pas immédiatement les instructions.
Risque possible de décès ou de blessure grave si vous
ne suivez pas les instructions.
■ Ne pas faire fonctionner le lave-vaisselle si tous les
panneaux de l’enceinte ne sont pas en place.
■ Ne pas jouer avec les commandes.
■ Ne pas abuser, vous asseoir ni monter sur la porte,
le couvercle ou les paniers du lave-vaisselle.
■ Pour éviter tout risque d’accident, ne pas laisser les
enfants jouer dans ou sur le lave-vaisselle.
■ Sous certaines conditions, de l’hydrogène peut se former
dans un réseau d’eau chaude inutilisé depuis deux
semaines ou plus. L’HYDROGÈNE EST UN GAZ
EXPLOSIBLE. Si le système d’eau chaude n’a pas été
utilisé depuis un certain temps, laisser couler l’eau chaude
des robinets pendant quelques minutes avant de faire
fonctionner le lave-vaisselle. Cette mesure permettra à
l’hydrogène de s’évaporer. Ce gaz étant inflammable, ne
pas fumer ni utiliser de flamme nue pendant cette période.
■ Enlever la porte ou le couvercle du compartiment de lavage
lorsque vous remplacez ou mettez au rebut un vieux
lave-vaisselle.
2
Page 40

INSTRUCTIONS D’UTILISATION DU LAVE-VAISSELLE
Merci d’avoir choisi les appareils ménagers KitchenAid®.
Notre compagnie a recours aux plus hautes normes de qualité et nous attachons une grande importance à ce que l'acquisition d'un
produit KitchenAid
Pour votre commodité, nous vous fournissons un manuel d’instructions d’utilisation facile à utiliser. Ces instructions comprennent
une section “Dépannage” pour vous aider à surmonter tout problème que vous pourriez rencontrer.
Pour plus de renseignements, vous pouvez consulter la section Foire Aux Questions (FAQ) de notre site Web à
www.kitchenaid.com. Si vous avez besoin de plus d’assistance pour utiliser votre lave-vaisselle Kitchenaid, contactez-nous au
1-800-422-1230. Au Canada : visitez-notre site Web www.kitchenaid.com ou appelez le 1-800-807-6777.
Préparez vos numéros de modèle et de série complets. Vous trouverez les numéros de modèle et de série sur l’étiquette située près
de la porte sur le côté droit ou gauche de l'intérieur du lave-vaisselle.
Para obtener acceso a “Instrucciones para el usuario de la lavavajillas” en español, o para obtener información adicional acerca de
su producto, visite: www.kitchenaid.com
Tenga listo su número completo de modelo y de serie. Puede encontrar su número de modelo y de serie en la etiqueta ubicada
cerca de la puerta, al lado derecho o izquierdo del interior de la lavavajillas.
®
constitue pour vous une expérience positive.
Table des matières
SÉCURITÉ DU LAVE-VAISSELLE............................................. 2
PIÈCES ET CARACTÉRISTIQUES............................................ 4
DÉMARRAGE / GUIDE RAPIDE
(VARIE SELON LE MODÈLE) .................................................... 5
ÉTAPES RAPIDES...................................................................... 6
UTILISATION DU LAVE-VAISSELLE ........................................ 6
DESCRIPTION DES PROGRAMMES ET OPTIONS ................ 8
SECTION COMMENTAIRES SUR
L'UTILISATION DU LAVE-VAISSELLE ................................... 11
CARACTÉRISTIQUES DU LAVE-VAISSELLE........................ 12
ENTRETIEN DU LAVE-VAISSELLE......................................... 14
DÉPANNAGE ............................................................................ 15
GARANTIE................................................................................. 18
W10300928C
 Loading...