


KitchenAid KUDS24SEBL2, KUDS24SEAL2 Owner’s Manual

Model
KUDS24SE
9743103

Thank you for buying a KITCHENAID* appliance2
KitchanAid designs the best tools for the most important room in your house.To ensure that
you enjoy many years of trouble-free operation, we developed this Use and Care guide. It
contains valuable information concerning how to operate and maintain your new appliance
properly and safely. Please read it carefully.
Also, please complete and mail the enclosed Product Registration Card.
In the U.S.A.
Forassistanceor service
Callthe ConsumerAssistanceCentertollfree ................................................1-800-422-1230
Throughout Canada for assistance
Call the Consumer Assistance Centre toll free ................................................ 1-800-461-5681
8:30 a.m. - 6 p.m. (EST)
Throughout Canada for service ......................................................seepage 32
Ifyou need assistance or service, first see the =Troubleshooting" section of this book. After
checking =Troubleshooting",additional help can be found by checking the =Requesting
Assistance or Service" section, or by calling one of the telephone numbers above.
When calling, you will need to know your appliance's complete model number and serial
number,You can find this information on the model and serial number label (see diagram
on page 4).
Keep this book and the sales slip together in a safe place for future reference. You must
provide proof of purchase or installationdate for in-warranty service.
Model Number
Serial Number
Date Installed
Builder/Dealer Name
Address
Phone

_Your safety is important to us.
This guide contains safety symbols and
statements. Please pay special attention to
these symbols and follow any instructions
given. Here is a brief explanation of the use
of the symbol.
This symbol alerts you to
hazards such as fire,
electrical shock, or
other injuries.
IMPORTANT SAFETY INSTRUCTIONS
WARNING - When using the dish-
washer, follow basic precautions, including
the following:
• Read all instructions before using the
dishwasher.
• Use the dishwasher only for its intended
function.
• Use only detergents or rinse agents recom-
mended for use in the dishwasher, and keep
them out of the reach of children.
• When loading items to be washed:
- 1) Locate sharp items so that they are not
likely to damage the door seal; and
2) Load sharp knives with the handles up
to reduce the risk of cut-type injuries.
• Do not wash plastic items unless they are
marked "dishwasher safe" or the equivalent.
For plastic items not so marked, check the
manufacturer's recommendations.
• Do not touch the heating element during or
immediately after use.
• Do not operate the dishwasher unless all
enclosure panels are properly in place.
• Do not tamper with controls.
• Do not abuse, sit on, or stand on the door
or dish racks of the dishwasher.
• To reduce the risk of injury, do not allow
children to play in or on the dishwasher.
• Under certain conditions, hydrogen gas may
be produced in a hot water system that has
not been used for two weeks or more.
HYDROGEN GAS IS EXPLOSIVE. If the hot
water system has not been used for such a
period, before using the dishwasher turn on
all hot water faucets and let the water flow
from each for several minutes. This will
release any accumulated hydrogen gas.
As the gas isflammable, do not smoke
• Remove the door to the washing compart-
ment when removing an old dishwasher
from service or discarding it.
• For a grounded, cord connected dishwasher:.
GROUNDING INSTRUCTIONS
The dishwasher must be grounded. In
the event of a malfunction or breakdown,
grounding will reduce the risk of electrical
shock by providing a path of least resist-
ance for electric current. The dishwasher
is equipped with a cord having an
equipment-grounding conductor and a
grounding plug. The plug must be plugged
into an appropriate outlet that is installed
and grounded in accordance with all local
codes and ordinances.
WARNING - Improper connection of the
equipment-grounding conductor can result
in a risk of electrical shock. Check with a
qualified electrician or service representa-
tive if you are in doubt whether the
dishwasher is properly grounded. Do not
modify the plug provided with the dish-
washer; if it will not fit the outlet, have
a proper outlet installed by a qualified
electrician.
• For a permanently connected dishwasher:
GROUNDING INSTRUCTIONS
The dishwasher must be connected to a
grounded metal, permanent wiring system,
or an equipment-grounding conductor must
be run with the circuit conductors and
connected to the equipment-grounding
terminal or lead on the dishwasher.
I or use an open flame during this time.
- SAVE THESE INSTRUCTIONS -
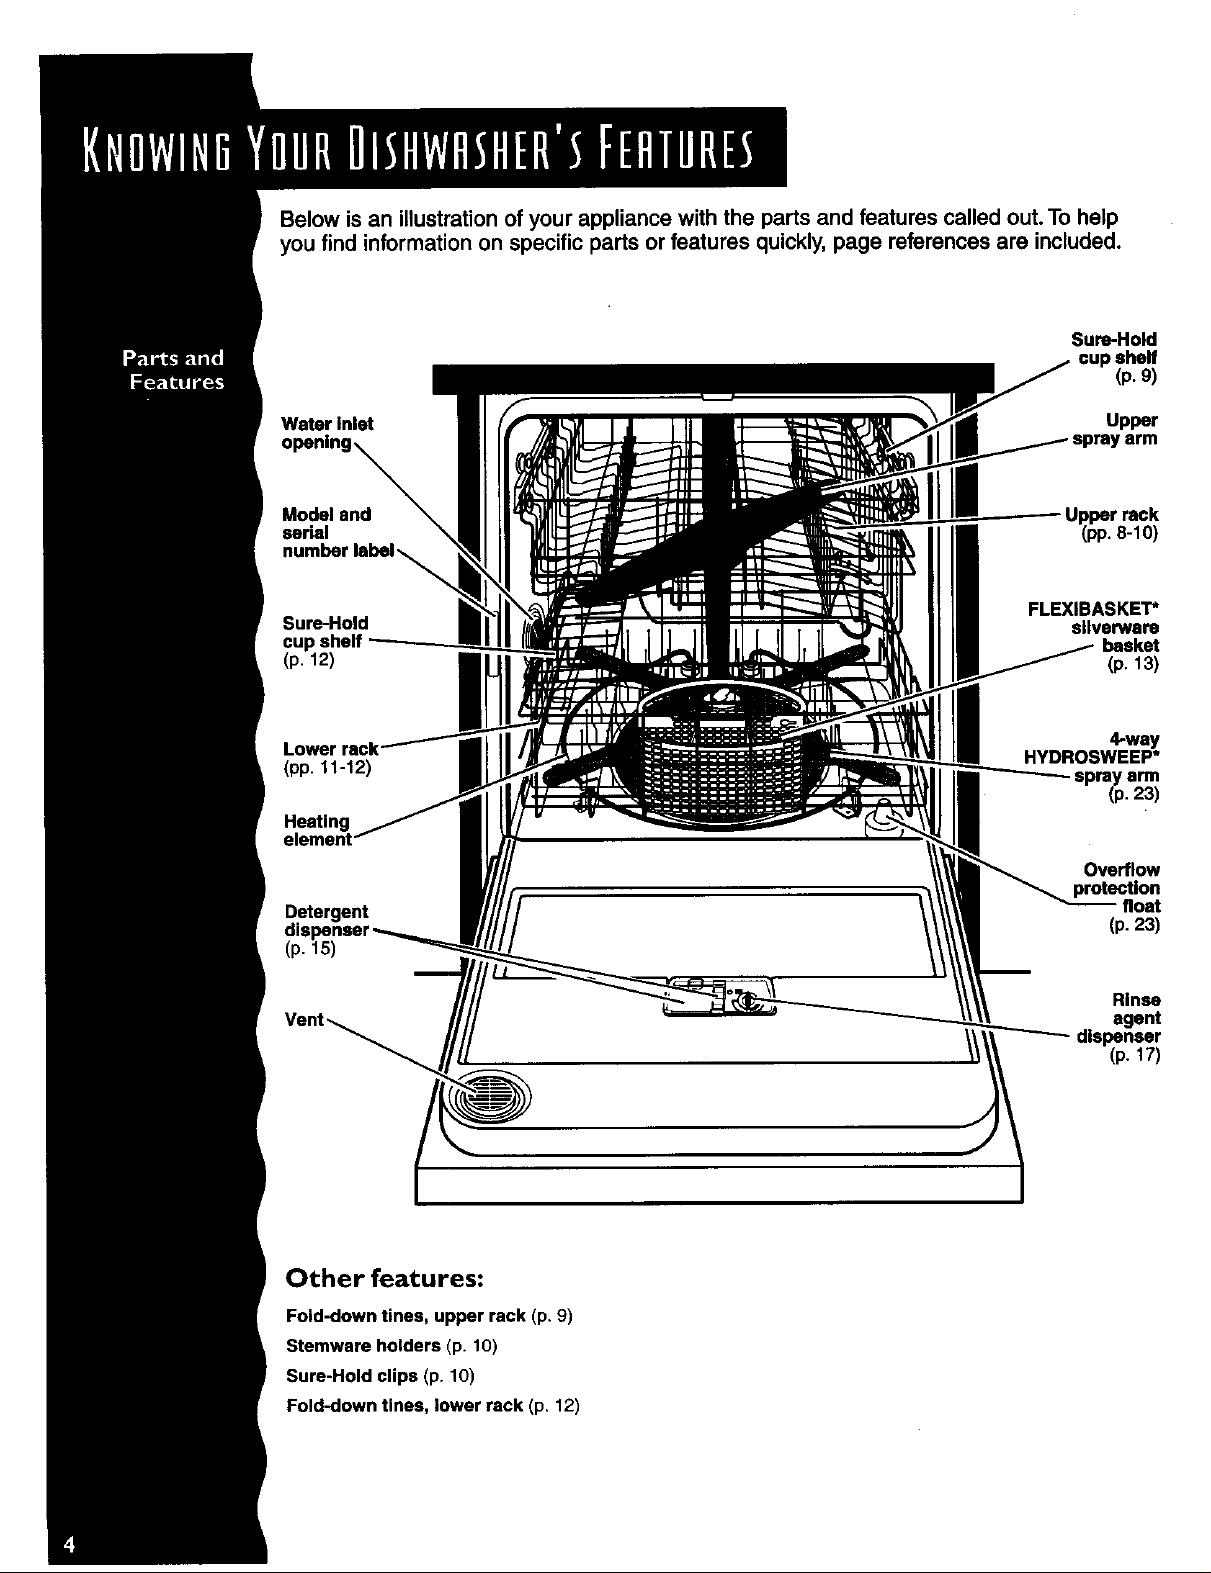
Below isan illustrationof your appliance with the parts and features called out.To help
you find information on specific parts or features quickly, page references are included.
Sure-Hold
cup shelf
(p. 9)
Water Inlet
Model and
serial
Sure-Hold
cup shelf
(p. 12)
(pp. 11-12)
Hsetlng
Vent_
Upper
'arm
Upper rack
(pp.8-10)
FLEXIBASKET*
silverware
basket
(p. 13)
4-way
HYDROSWEEP*
- spray arm
(p.23)
Overflow
protection
float
(p. 23)
Rinse
agent
dispenser
(p. 17)
Other features:
Fold-down tines, upper rack (p. 9)
Stemware holders (p. 10)
Sure-Hold clips (p. 10)
Fold-down tlnse, lower rack (p. 12)

_ontrol Panel
f
C_MON//OR"
W&TR HF.A11NO Cr.IILDLOCK RIN_ AiD_tPTY
WASH SELECTIONS
Cycle pads
OPTIONS
Option pads

Before using your dishwasher
Tip Over Hazard
Do not use dishwasher until
completely installed.
Do not push down on open door.
Doing so can result in serious injury
or cuts.
• Install where dishwasher is protected from
the elements. Protect against freezing to
avoid possible rupture of fill valve. Such
ruptures are not covered by the warranty.
See winter storage information on page 24.
• Install and level dishwasher on a floor that
will hold the weight, and in an area suitable
for its size and use.
• Remove all shipping plugs from hoses and
connectors (such as the cap on the drain
outlet) before installing. See Installation
Instructionsfor complete information.
Electrical Shock Hazard
Electrically ground dishwasher.
Connect ground wire to green ground
connector in terminal box.
Do not use an extension cord.
Failure to do so can result in death,
fire, or electrical shock.

_sing your new KITCHENAID* dishwasher is simple. Follow the steps below to
get
Started. For more information on specific steps and additional safety information, see
the page(s) next to the step you would like to know more about.
NOTE: Before using your dishwasher, remove all hang tags, temporary labels, and pack-
aging materials. Please also read the entire Use and Care Guide as itcontains important
operating and safety information.
How to use your dishwasher
1. Load the dishwasher. See pages 8-13. 5. Push door firmly when closing.
2. Spin the upper spray arm. It should tum
freely. Check the
lower spray arm
also to make sure
itturns freely.
3.Add detergent. See pages 15 and 16.
4. Add rinse agent if needed. See page 17.
L.,
6. Run hot water at sink nearest dishwasher
until water is hot. Turn
off water.See page 22.
7. Press the desired Wash Selection pad.
See the "Cycle
selection chart" on
page 18. Then press
the desired Option(s)
pad(s). See page 19
for "Option selections."
8. Press the Start pad. The cycle will begin (if
Delay Hours has not
been selected).
NOTE: The dishwasher
remembers the last
cycle and option(s) you
selected. You only have
to press the Start pad if
you want to use the same
cycle and option(s).

This section tells you how to properly load your dishwasher for the best washing and
rinsingresults.
Preparing to load the dishwasher
• Scrape leftover food, bones, toothpicks,
and other hard items from dishes. It isnot
necessary to rinse dishes before putting
them into the dishwasher.
• Load dishes so soiled surfaces face the
spray (down or inward). It is important for
the water spray to reach all soiled surfaces.
• Take care when loading heavy pots or pans
into the dishwasher. They can dent the
stainless steel interior of the door if they are
dropped or bumped.
Loading the upper rack
The upperrack is designed for cups,
glasses, and other small items.
• Load cups and glasses in the upper rack
only, in the rows between the prongs.
Placing them over the prongs can cause
them to chip or break.
• China, crystal, and other delicate items
must not touch each other during dish-
washer operation. Damage may occur.
• Place items so open ends face down for
best cleaning and draining.
• Load plastic items securely in the upper
rack only.Wash only plastic items marked
"dishwasher safe."
• Secure lightweight items so they don't
overturn during washing. Wedge light-
weight items against one another or
overlap them with heavier dishes. (See
page 10 on using the Sure-Hold clips.)
• Load bowls in the center section for best
stability.
• Racks with teal-colored tips can be ad-
justed for different loads.
• Make sure pot lidsand handles, pizza
pans, cookie sheets, etc., do not interfere
with the spray arm rotation.
• Run a Rinse Only cycle to keep dishes
moist if you do not plan to wash them soon.
Foods like eggs, rice, pasta, spinach, and
cooked cereals may be hard to remove if
they are left to dry.
Cup and glass load
Mixedload
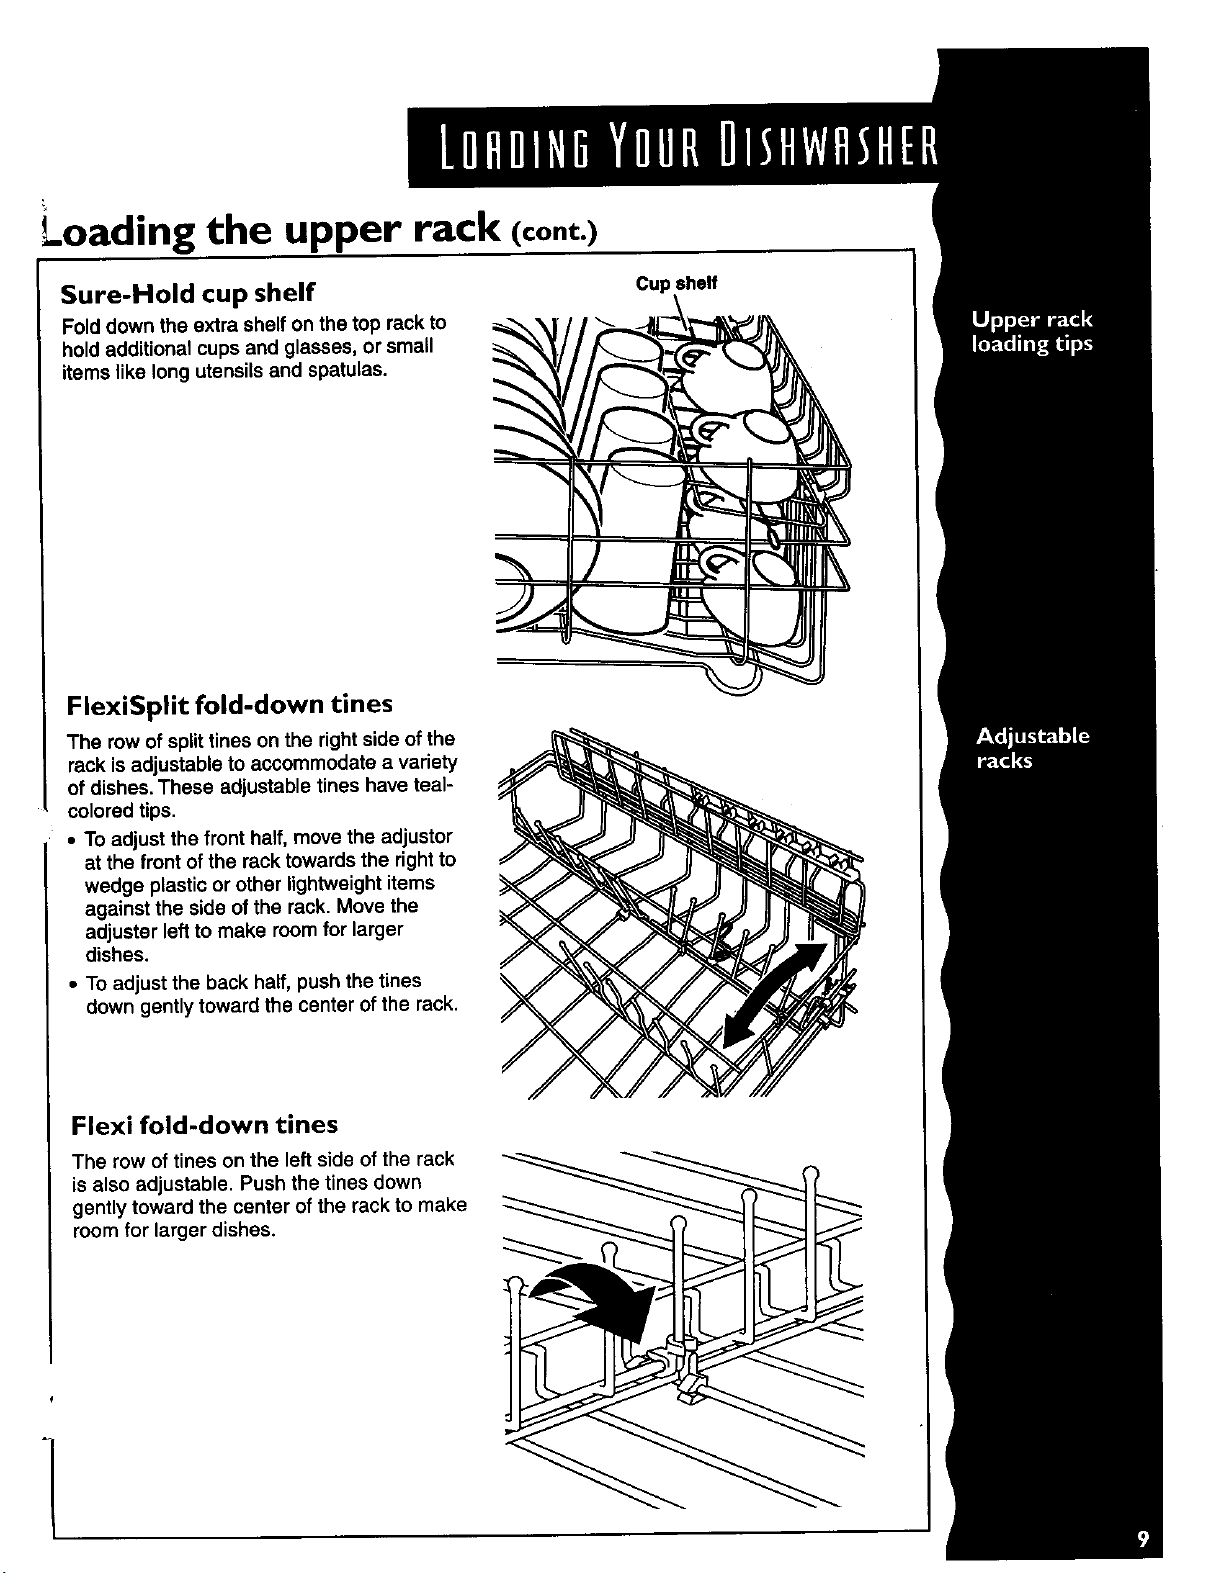
Loading the upper rack (cont.)
Sure-Hold cup shelf
Fold down the extra shelf on the top rack to
hold additional cups and glasses, or small
items like long utensils and spatulas.
FlexiSplit fold-down tines
The row of splittines on the right side of the
rack is adjustable to accommodate a variety
of dishes. These adjustable tines have teal-
colored tips.
• TOadjust the front half, move the adjustor
at the front of the rack towards the right to
wedge plastic or other lightweight items
against the side of the rack. Move the
adjuster leftto make room for larger
dishes.
• To adjust the back half, push the tines
down gently toward the center of the rack.
Cup shelf
Flexi fold-down tines
The row of tines on the left side of the rack
is also adjustable. Push the tines down
gently toward the center of the rack to make
room for larger dishes.

Loading the upper rack (cont.)
Stemware holders
Use the stemware holders (attached to the
cup shelf) to keep water goblets, wine
glasses, etc., in place and prevent damage
during washing.
Sure-Hold clips
The Sure-Hold clips hold lightweight plastic
items like cups, lids, or bowls in place during
washing. Move a clip anywhere in the rack
by pulling it up and off the tine and reposi-
tioning it in another tine.
Stemware holder
Sure-Hold clip
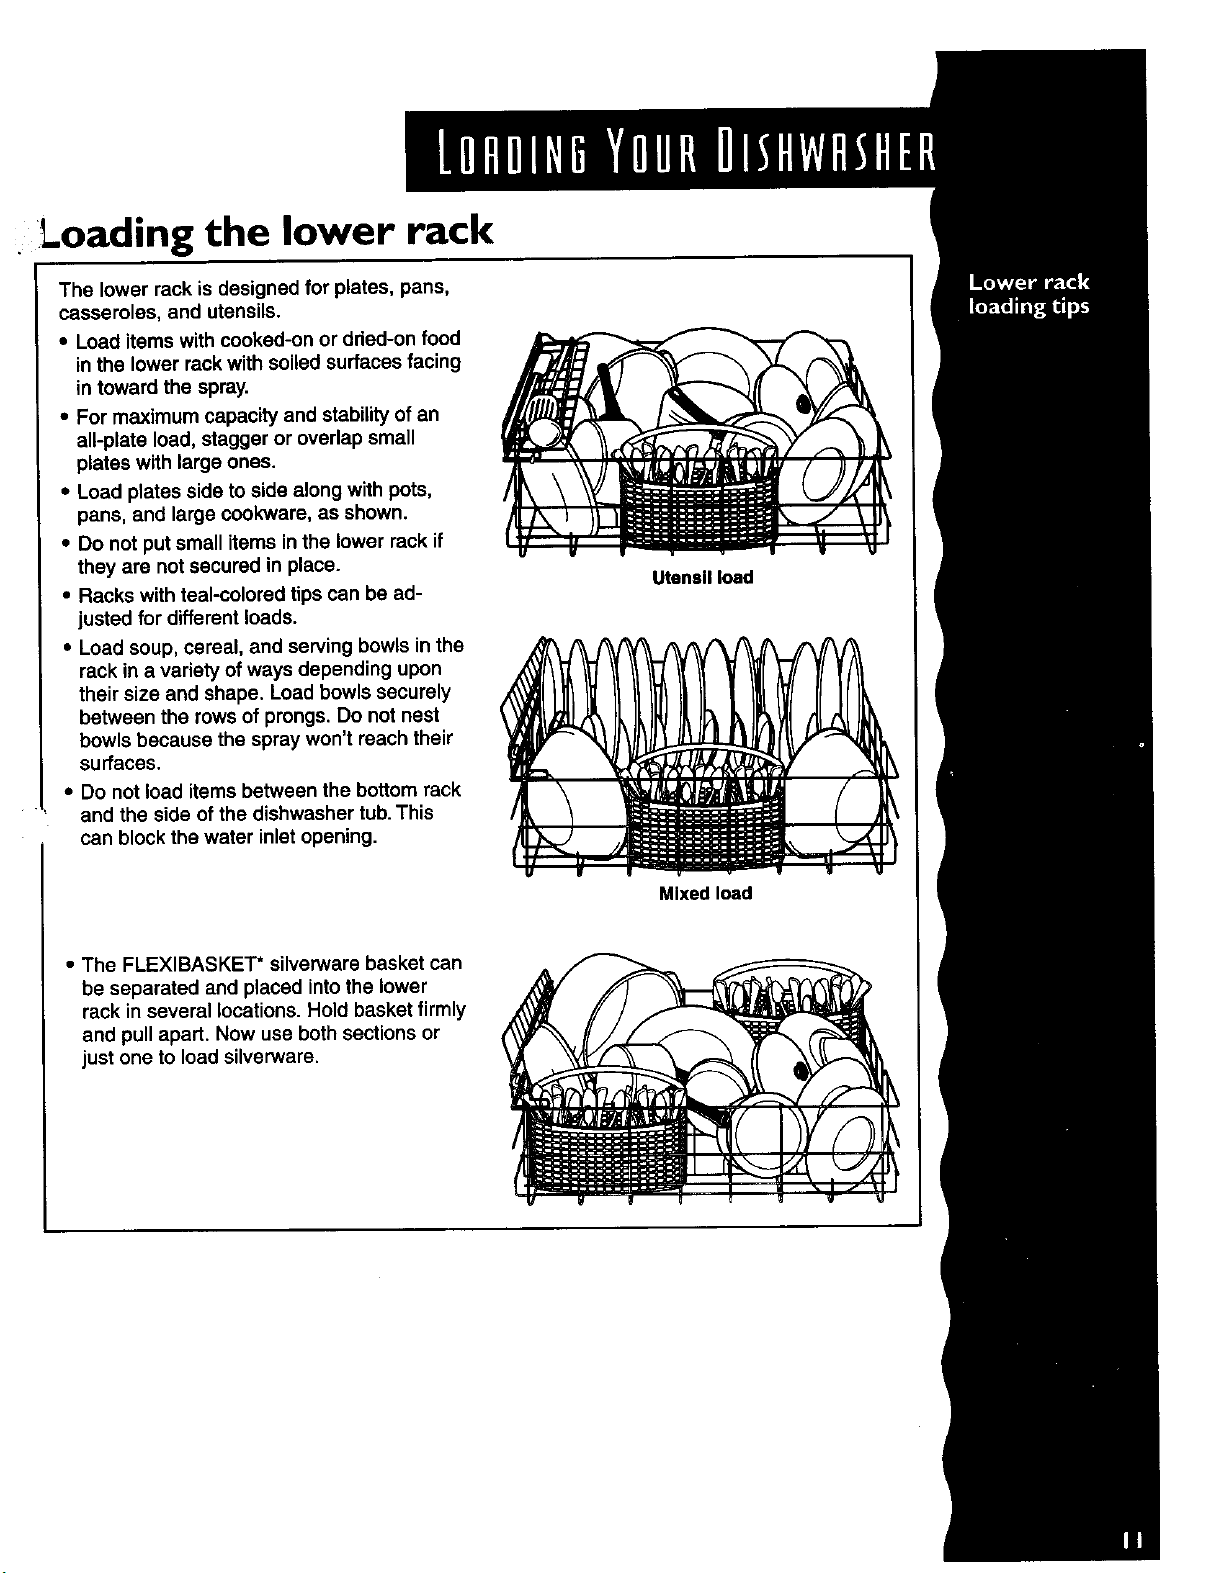
Loading the lower rack
The lower rack is designed for plates, pans,
casseroles, and utensils.
• Load items with cooked-on or ddod-on food
in the lower rack with soiled surfaces facing
in toward the spray.
• For maximum capacity and stability of an
all-plate load, stagger or overlap small
plates with large ones.
• Load plates side to side along with pots,
pans, and large cookware, as shown.
• Do not put small items inthe lower reck if
they are not secured in place.
• Racks with teal-colored tips can be ad-
justed for different loads.
• Load soup, cereal, and serving bowls in the
rack in a variety of ways depending upon
their size and shape. Load bowls securely
between the rows of prongs. Do not nest
bowls because the spray won't reach their
surfaces.
• Do not load items between the bottom rack
and the side of the dishwasher tub.This
can block the water inlet opening.
Utensil load
• The FLEXIBASKEi'* silverware basket can
be separated and placed into the lower
rack in several locations. Hold basket firmly
and pull apart. Now use both sections or
just one to load silverware.
Mixed load