

KitchenAid KUDS02FSPA3 Owner’s Manual

KitchenAid
DISHWASHER
For questions about features, operation/performance, parts, accessories or service, call: 1-800-422-1230 or visit our website at
www.kitchenaid.com
In Canada, for assistance, installation or service, call: 1-800-807-6777 or visit our website at www.KitchenAid.ca
LAVE-VAISSELLE
Au Canada, pour assistance, installation ou service, composez le 1-800-807-6777 ou visitez notre site web &www.KitchenAid.ca
......#iI191_!! I' ¢,._,_I Io,III._+'_''....... +;,; _ ;> _]_(!+ 11111!IIiII!!I"I!_,i
DISHWASHER SAFETY ................................... 2 SECURITE DU LAVE-VAISSELLE ................. 17
PARTS AND FEATURES ................................. 3 PIECES ET CARACTERISTIQUES ................ 18
START-UP ........................................................ 5 MISE EN MARCHE ......................................... 20
LOADING .......................................................... 6 CHARGEMENT ............................................... 21
CYCLES AND OPTIONS ................................ 13 PROGRAMMES ET OPTIONS ....................... 28
Save Water
no pre-rinsing
Economie d'eau
sans prdrinKage
Models/Modeles
KUDS02SR, KUDS02FR, KUDU02FR, KUDU02VSPA, KUDS02FSPA, KUDS021S, KUDS03FS
W10077956

DISHWASHER SAFETY
Your safety and the safety of others are very important.
We have provided many important safety messages in this manual and on your appliance. Always read and obey all safety
messages.
This is the safety alert symbol.
This symbol alerts you to potential hazards that can kill or hurt you and others.
All safety messages will follow the safety alert symbol and either the word "DANGER" or "WARNING."
These words mean:
You can be killed or seriously injured if you don't immediately
follow instructions.
You can be killed or seriously injured if you don't follow
instructions.
All safety messages will tell you what the potential hazard is, tell you how to reduce the chance of injury, and tell you what can
happen if the instructions are not followed.
Tip Over Hazard
Do not use dishwasher until completely installed.
Do not push down on open door.
Doing so can result in serious injury or cuts.
Electrical Shock Hazard
Electrically ground dishwasher.
Connect ground wire to green ground connector in
terminal box.
Do not use an extension cord.
Failure to follow these instructions can result in death,
fire, or electrical shock.
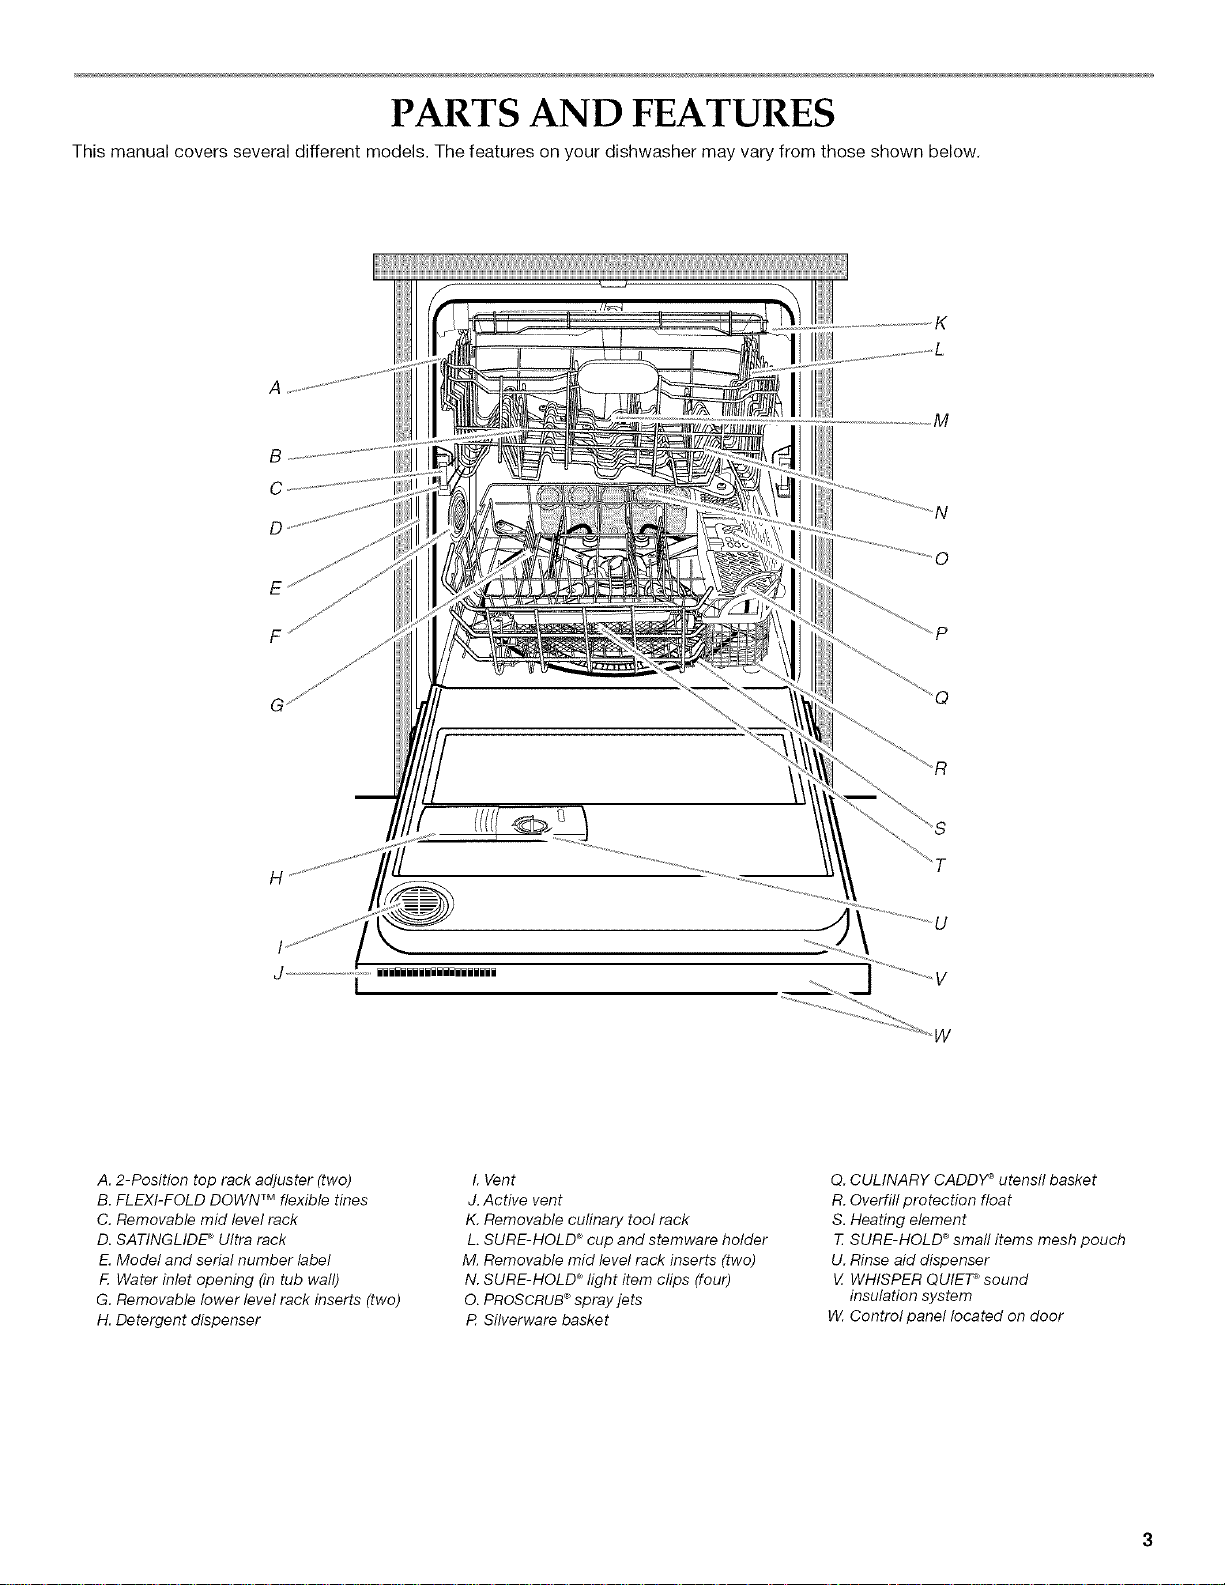
PARTS AND FEATURES
This manual covers several different models. The features on your dishwasher may vary from those shown below.
K
M
B
C
D
E
F
G
j,- iiiiiiiiiliiiiiiiiii
I
A. 2-Position top rack adjuster (two)
B. FLEXI-FOLD DOWN TM flexible tines
C. Removable mid level rack
D. SATINGLIDE '_Ultra rack
E. Model and serial number label
E Water inlet opening (in tub wall)
G. Removable lower level rack inserts (two)
H. Detergent dispenser
I. Vent
J. Active vent
K. Removable culinary tool rack
L. SURE-HOLD '_cup and stemware holder
M. Removable mid level rack inserts (two)
N. SURE-HOLD '_light item clips (four)
O. PROSCRUB®spray jets
P Silverware basket
Q. CULINARY CADDY ®utensil basket
R. Overfill protection float
S. Heating element
7_SURE-HOLD ®small items mesh pouch
U. Rinse aid dispenser
_ZWHISPER QUIET _sound
insulation system
14/.Control panel located on door
KUDS02SR
Heavy L ht/ Quick Rinse Hi Temp Sani Heat 4 Hour
Duty Normal C_ina Only ProSc ub Scrub Rinse Dry
• • • ® • • • • • •
......©ooooj ......OOO®G
KUDS02FR, KUDU02FR, KUDS03FS
Duty Normal C_ina Clean Up Only ProScrub Scrub Rinse Dry Delay
Q • O • • • • O Q Q O Control Lock
...... _k O O O O_ ...... O O " " "Clean"S........
KUDU02VSPA, KUDS02FSPA
Clean Up Delay
Lock
O San ized
Cancel
O Clean
"......'0"@_
00
Cancel
S eavy Light/ Quick Rinse Hi Temp Sani Heat 4 Hour START
Duty Normal China Clean Up Only ProScrub Scrub Rinse Dry Delay OControl Lock Resume
Q • • Q OCleao ®
................... OPTIONS
KUDS021S
Heavy Light/ Quick Hi Temp Sani
Dusty N .... China C ea=_nUp Ol_nly P ...... b Scrub Rinse
RinSer HeatDry D_ay
_._-,.oo o o O ooo'_.oo o o c_
4 Hour
Cancel 1 OClean
O ControlLock
PROGRESS
Cancel _
Washlng
San_t_zed

START-UP
Before using your dishwasher, remove all packaging materials. Read this entire Consumer Reference Guide, as well as the User
Instructions. You will find important safety information and useful operating tips.
For all models:
1. Rinse aid is essential for good drying. Be sure to fill the
dispenser before you use your new dishwasher. Each filling
will last about 1 to 3 months depending on your usage.
2=
Scrape large food soil and hard items (toothpicks or bones)
from dishes. You do not need to prerinse your dishes.
3.
Properly load the dishwasher. (See "Loading.") Load dishes
with space in between so water will reach the soiled surfaces.
Make sure nothing keeps the spray arm(s) from spinning
freely.
\
4.
Add detergent. Always use a high-quality brand detergent.
(See "Dishwasher Use" in the User Instructions.)
NOTE: If the dishwasher is not started within 30 seconds after
selecting the cycle and options, it will revert to the last cycle
and options completed.
IMPORTANT:
• When the cycle starts, you will see a rotating pattern of lights
in the display window indicating that the dishwasher is
operating. This pattern will continue for up to 6 minutes while
the multiple sensors check the incoming water temperature,
rinse aid usage and soil level on dishes and cookware. The
sensors then determine the ideal wash for your dish load.
After sensing is complete, the display will show the number of
minutes left in the cycle and the cycle countdown will begin.
• The cycle countdown pauses while the dishwasher heats the
water to a set temperature. (See "Cycle Selections.")
5. Run hot water at the sink nearest your dishwasher until the
water is hot. Turn off water.
6. Press the desired cycle and option selections on the control
panel. (See "Cycles and Options.")
For Model KUDS02SR:
7. Close the door firmly. Press START/RESUME on the front of
the dishwasher door. Or press START/RESUME to repeat the
same cycle and options as in the previous cycle.
For Models KUDS02FR, KUDU02FR, KUDU02VSPA,
KUDS02FSPA and KUDS03FS:
7. Press START/RESUME. Or press START/RESUME to repeat
the same cycle and options as in the previous cycle. The
selected cycle and option lights will glow.
8. Push door firmly closed within 3 seconds of pressing Start/
Resume.
NOTE: If the dishwasher is not started within 30 seconds after
selecting the cycle and options, it will revert to the last cycle
and options completed.
For model KUDS021S
7. Close the door firmly. Press START/RESUME. Or press
START/RESUME to repeat the same cycle and options as in
the previous cycle. The selected cycle and option lights will
glow.
NOTE: If the dishwasher is not started within 30 seconds after
selecting the cycle and options, it will revert to the last cycle
and options completed.

LOADING
The culinary tool rack is designed with 2 movable baskets to hold extra silverware, knives and cooking utensils.
Up position
Install the baskets in this up position when you have extra
silverware and flatware to wash.
Baskets installed in up position
Down position
Install the baskets in this down position when you have extra
silverware, knives, or utensils requiring more room to wash.
Removable culinary tool rack
The removable culinary tool rack allows you to wash larger items
in the mid level rack.
IMPORTANT: Remove baskets prior to removing culinary tool
rack from dishwasher.
To remove the rack
1. To access track stops, pull the rack forward until it stops.
2. Remove both baskets by lifting them out of the rack.
3. To open track stops, flip the track stop to the outside of the
track.
Track stop closed Track stop open
4=
After opening both track stops, slide front wheels up and out
of the slot in the track. Continue to pull rack forward in track
and slide the back wheels up and out of the track.
\
Baskets installed in down position
IMPORTANT: When using the culinary tool baskets in the down
position, the mid level rack must also be in the lowest position.
Remove the front basket in the down position, when you are using
the cup shelves or other tall items in the mid level rack for more
room.
Front basket removed while using cup shelves in mid level rack
Remove front rack wheel. Remove back rack wheel.
5. Close track stops.
6. Slide rack tracks back into dishwasher.
To replace the rack
1. Gently pull culinary tool rack tracks forward in dishwasher
until they stop.
2. To open track stops, flip the track stop to the outside of the
track.

3.
Place the back rack rollers on each side of the culinary tool
rack into the track slots and roll the rack back into the tracks.
\
4. Insert front rack rollers on each side of the rack into the track
slots and slide rack partly back into the dishwasher.
• Place items so open ends face down for cleaning and
draining.
• Load glasses and cups in mid level rack only. The lower level
rack is not designed for glasses and cups. Damage can occur.
• Place cups and glasses in the rows between tines. Placing
them over the tines can lead to breakage and water spots.
Cup and glass load
5. Close track stops on both sides of rack.
6. Install baskets in the desired position. (See "Culinary Tool
Rack.")
The mid level rack is designed for cups, glasses, and smaller
items. Many items, up to 9" (22 cm), fit in the mid level rack. (See
recommended loading patterns shown.)
NOTE: The features on your dishwasher rack may vary from those
in the drawings shown.
China, crystal, and other delicate items must not touch each
other during dishwasher operation. Damage may occur.
Load plastic items in the mid level rack only. Only plastic items
marked "dishwasher safe" are recommended.
Load plastic items so the force of the spray does not move
them during the cycle.
To avoid chipping, do not let stemware touch other items.
Small bowls, pans, and other utensils can be placed inthe
mid level rack. Load bowls in the center section for best
stability.
Removable mid level rack inserts
Your dishwasher is shipped with 2 removable mid level rack
inserts. (See illustration below.) The removable rack inserts allow
you to adjust the rack for the type of load you are washing. This is
useful when washing a variety of glassware and dishes.
................
10 place setting
12 place setting
A. Removable rack inserts
B. Insert holding clips
To remove inserts
1. Lift up on the insert wire located toward the center of the rack
to release the insert from the holding clips.
A. Lift removable insert wire to remove from holding clips.
B. Holding clips
2. Lift insert out of rack.
To install rack inserts
1. Place the insert end legs under the front or back rack wire as
shown below.
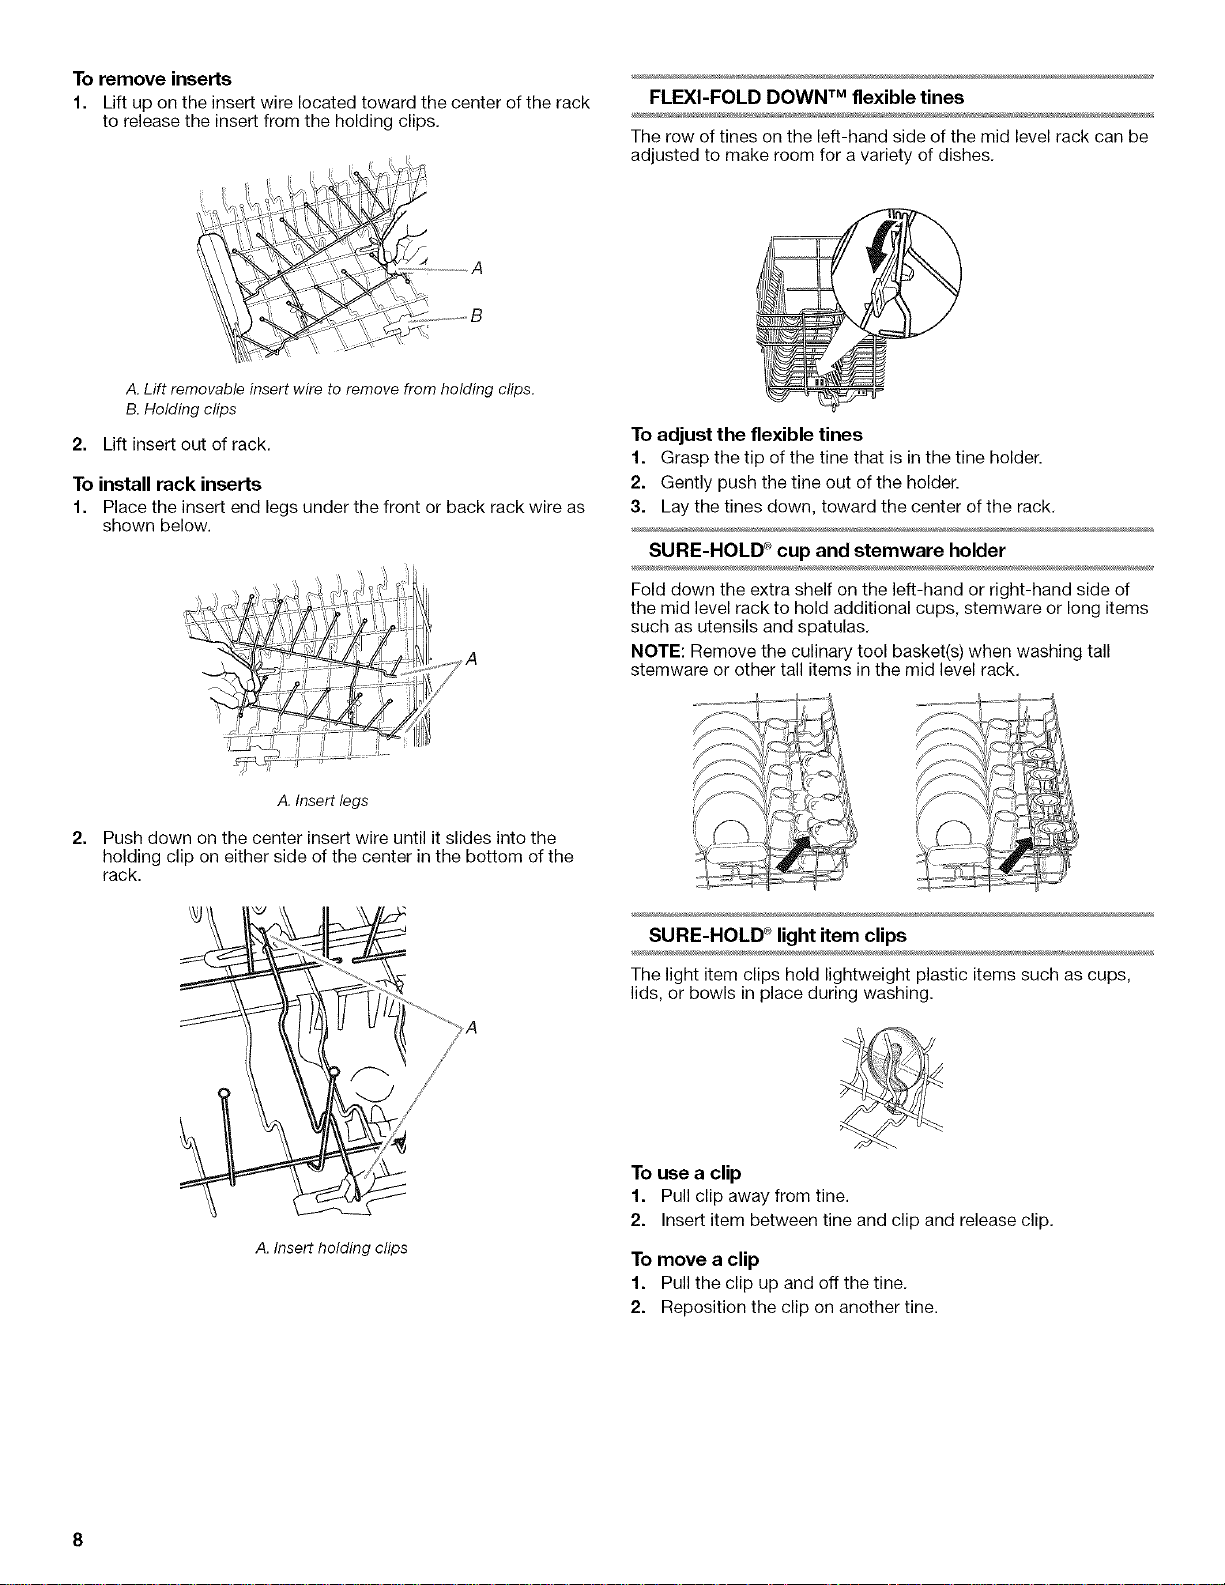
FLEXI-FOLD DOWN TM flexible tines
The row of tines on the left-hand side of the mid level rack can be
adjusted to make room for a variety of dishes.
To adjust the flexible tines
1. Grasp the tip of the tine that is in the tine holder.
2. Gently push the tine out of the holder.
3. Lay the tines down, toward the center of the rack.
SURE-HOLD _ cup and stemware holder
Fold down the extra shelf on the left-hand or right-hand side of
the mid level rack to hold additional cups, stemware or long items
such as utensils and spatulas.
NOTE: Remove the culinary tool basket(s) when washing tall
stemware or other tall items in the mid level rack.
A.Insert legs
2=
Push down on the center insert wire until it slides into the
holding clip on either side of the center in the bottom of the
rack.
,A
A. Insert holding clips
SURE-HOLD c_light item clips
The light item clips hold lightweight plastic items such as cups,
lids, or bowls in place during washing.
To use a clip
1. Pull clip away from tine.
2. Insert item between tine and clip and release clip.
To move a clip
1. Pull the clip up and off the tine.
2. Reposition the clip on another tine.
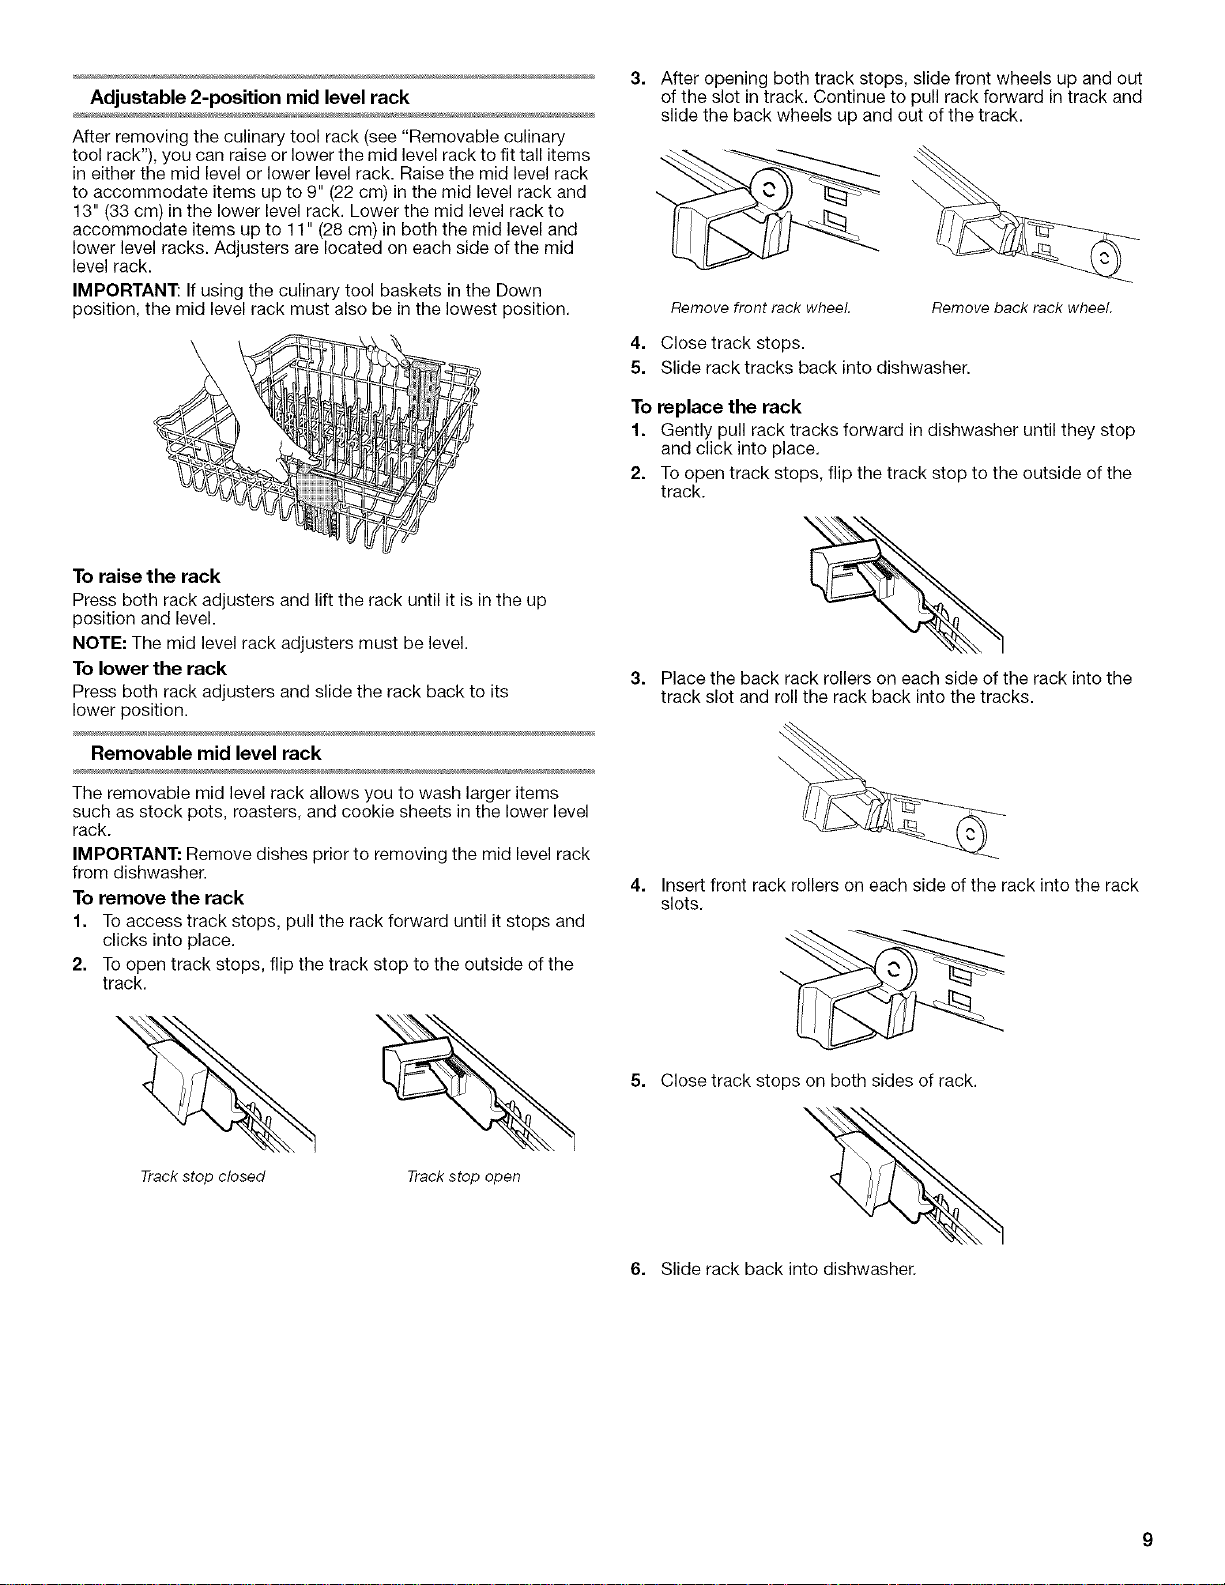
Adjustable 2-position mid level rack
After removing the culinary tool rack (see "Removable culinary
tool rack"), you can raise or lower the mid level rack to fit tall items
in either the mid level or lower level rack. Raise the mid level rack
to accommodate items up to 9" (22 cm) in the mid level rack and
13" (33 cm) in the lower level rack. Lower the mid level rack to
accommodate items up to 11" (28 cm) in both the mid level and
lower level racks. Adjusters are located on each side of the mid
level rack.
IMPORTANT: If using the culinary tool baskets in the Down
position, the mid level rack must also be in the lowest position.
To raise the rack
Press both rack adjusters and lift the rack until it is in the up
position and level.
NOTE: The mid level rack adjusters must be level.
To lower the rack
Press both rack adjusters and slide the rack back to its
lower position.
3. After opening both track stops, slide front wheels up and out
of the slot in track. Continue to pull rack forward in track and
slide the back wheels up and out of the track.
\
Remove front rack wheel. Remove back rack wheel.
4. Close track stops.
5. Slide rack tracks back into dishwasher.
To replace the rack
1. Gently pull rack tracks forward in dishwasher until they stop
and click into place.
2. To open track stops, flip the track stop to the outside of the
track.
3. Place the back rack rollers on each side of the rack into the
track slot and roll the rack back into the tracks.
Removable mid level rack
The removable mid level rack allows you to wash larger items
such as stock pots, roasters, and cookie sheets in the lower level
rack.
IMPORTANT: Remove dishes prior to removing the mid level rack
from dishwasher.
To remove the rack
1. To access track stops, pull the rack forward until it stops and
clicks into place.
2. To open track stops, flip the track stop to the outside of the
track.
Track stop closed Track stop open
\
4. Insert front rack rollers on each side of the rack into the rack
slots.
5. Close track stops on both sides of rack.
6. Slide rack back into dishwasher.

Thelowerlevelrackisdesignedforplates,pans,casseroles,and
utensils.Manyitems,upto13"(33cm)tall,fitinthelowerlevel
rack.(Seerecommendedloadingpatternsshown.)
NOTE:Thefeaturesonyourdishwasherrackmayvaryfromthose
inthedrawingsshown.
10 place setting
12 place setting
• Loadcookiesheets,cakepans,andotherlargeitemsatthe
sidesandback.Loadingsuchitemsinfrontcankeepthe
watersprayfromreachingthedetergentdispenser.
Mixedload
• Secure heavily soiled cookware face down in the rack.
• Make sure pot handles and other items do not stop rotation of
the spray arm(s). The spray arm(s) must move freely.
• Do not load items between the lower level rack and the side of
the dishwasher tub because they might block the water inlet
opening.
PROSORUB _ wash area
The PROSCRUB®wash area is located at the back of the lower
level rack.
NOTE: You must select the PROSCRUB®wash option to utilize this
wash feature. Do not face items toward the rear of the dishwasher
if you are not using this wash option.
• Do not load glasses, cups, or plastic items in the lower level
rack. Load small items in the lower level rack only if they are
secured in place.
• Load plates, soup bowls, etc., between tines.
• Overlap the edges of plates for large loads.
• Load soup, cereal, and serving bowls in the rack in avariety of
ways depending upon their size and shape. Load bowls
securely between the rows of tines. Do not nest bowls
because the spray will not reach all surfaces.
Utensil load
PROSCRUB_wash area view in lower level rack
(shown with rack pulled partially out of dishwasher)
Load pans, casserole dishes, etc. in the back of the lower
level rack with the soiled surfaces facing the PROSCRUB®
spray jets. Make sure items do not interfere with the water
feed tube or mid spray arm.
Tip items toward the rear of the dishwasher in the wider space
between the rows of tines in the double removable rack insert
to maximize coverage.
IMPORTANT: Only one row of items may face the
PROSCRUB®spray jets. Stacking, overlapping, or nesting
items will keep the PROSCRUB®spray jets from reaching all of
the surfaces.
/
10
tilt
PROSCRUB®wash area side view
 Loading...