

KitchenAid KUDM25SH, KUDI25CH User Manual
Models/Modèles KUDI25CH and KUDM25SH
9744037A

TABLE OF
TABLE DES
CONTENTS
DISHWASHER SAFETY .................................... ....... ...... .. 3
Before Using Your Dishwasher......................................... 4
PARTS AND FEATURES............................. ...... ....... ...... .. 5
Control Panels................................................................... 6
START-UP GUIDE............................................................... 7
Using Your New Dishwasher............................................ 7
LOADING YOUR DISHWASHER ....................................... 7
Loading Suggestions ........................................................ 7
Loading the Top Rack....................................................... 8
Loading the Bottom Rack................................................. 8
Loading the Silverware Basket......................................... 9
USING YOUR DISHWASHER............................................. 9
Detergent Dispenser ......................................................... 9
Rinse Aid Dispenser........................................................ 11
Dishwasher Efficiency Tips............................................. 11
Cycle Selection Chart ..................................................... 12
Canceling a Cycle ........................................................... 12
Changing a Cycle or Setting........................................... 13
Adding Items During a Cycle.......................................... 13
Option Selections............................................................ 13
Control Panel Lights........................................................ 14
Wash System.................................................................. 14
Drying System................................................................. 15
Overfill Protection Float................................................... 15
WASHING SPECIAL ITEMS ............................................. 15
CARING FOR YOUR DISHWASHER............................... 16
Cleaning Your Dishwasher.............................................. 16
Drain Air Gap................................................................... 17
Storing Your Dishwasher ................................................ 17
TROUBLESHOOTING....................................................... 18
ASSISTANCE OR SERVICE ............................................. 20
In the U.S.A. .................................................................... 20
In Canada........................................................................ 20
WARRANTY....................................................................... 21
MATIÈRES
LA SÉCURITÉ DU LAVE-VAISSELLE............................23
Avant d’utiliser le lave-vaisselle...................................... 24
PIÈCES ET CARACTÉRISTIQUES .................................. 25
Tableau de commande................................................... 26
GUIDE DE MISE EN MARCHE ........................................ 27
Utilisation de votre nouveau lave-vaisselle .................... 27
CHARGEMENT DU LAVE-VAISSELLE ........................... 28
Suggestions de chargement........................................... 28
Chargement du panier supérieur.................................... 28
Chargement du panier inférieur...................................... 29
Chargement du panier à couverts.................................. 30
UTILISATION DU LAVE-VAISSELLE............................... 30
Distributeur de détergent................................................ 30
Distributeur d’agent de rinçage ...................................... 32
Conseils d’efficacité pour le lave-vaisselle..................... 33
Tableau de sélection de programme.............................. 33
Annulation d’un programme........................................... 34
Changement d’un programme ou réglage..................... 34
Addition de vaisselle durant un programme .................. 35
Sélection d’options ......................................................... 35
Lampes du tableau de commande................................. 36
Système de lavage.......................................................... 36
Système de séchage ...................................................... 37
Dispositif de protection contre débordement................ 37
LAVAGE D’ARTICLES SPÉCIAUX................................... 37
ENTRETIEN DU LAVE-VAISSELLE ................................. 38
Nettoyage du lave-vaisselle............................................ 38
Dispositif anti-refoulement.............................................. 39
Remisage du lave-vaisselle ............................................ 39
DÉPANNAGE..................................................................... 40
ASSISTANCE OU SERVICE ............................................. 43
Aux États-Unis ................................................................ 43
Au Canada ...................................................................... 43
WARRANTY....................................................................... 44
2
DISHWASHER SAFETY
Your safety and the safety of others is very important.
We have provided many important safety messages in this manual and on your appliance. Always read and obey all
safety messages.
This is the safety alert symbol.
This symbol alerts you to hazards that can kill or hurt you and others.
All safety messages will be preceded by the safety alert symbol and the word “DANGER” or
“WARNING.” These words mean:
You will be killed or seriously injured if you don't
DANGER
WARNING
All safety messages will identify the hazard, tell you how to reduce the chance of injury, and tell you what can
happen if the instructions are not followed.
follow instructions.
can be killed or seriously injured if you don't
You
follow instructions.
IMPORTANT SAFETY INSTRUCTIONS
WARNING
■ Read all instructions before using the dishwasher.
■ Use the dishwasher only for its intended function.
■ Use only detergents or rinse agents recommended
for use in a dishwasher, and keep them out of the
reach of children.
■ When loading items to be washed:
1) Locate sharp items so that they are not likely to
damage the door seal; and
2) Load sharp knives with the handles up to reduce
the risk of cut-type injuries.
■ Do not wash plastic items unless they are marked
“dishwasher safe” or the equivalent. For plastic
items not so marked, check the manufacturer's
recommendations.
■ Do not touch the heating element during or
immediately after use.
: When using the dishwasher, follow bas ic precautions, including the following:
SAVE THESE INSTRUCTIONS
■ Do not operate the dishwasher unless all enclosure
panels are properly in place.
■ Do not tamper with controls.
■ Do not abuse, sit on, or stand on the door or dish
racks of the dishwasher.
■ To reduce the risk of injury, do not allow children to
play in or on the dishwasher.
■ Under certain conditions, hydrogen gas may be
produced in a hot water system that has not been
used for two weeks or more. HYDROGEN GAS IS
EXPLOSIVE. If the hot water system has not been
used for such a period, before using the dishwasher
turn on all hot water faucets and let the water flow
from each for several minutes. This will release any
accumulated hydrogen gas. As the gas is flammable,
do not smoke or use an open flame during this time.
■ Remove the door to the washing compartment when
removing an old dishwasher from service or
discarding it.
3
Before Using Y our
Dishwasher
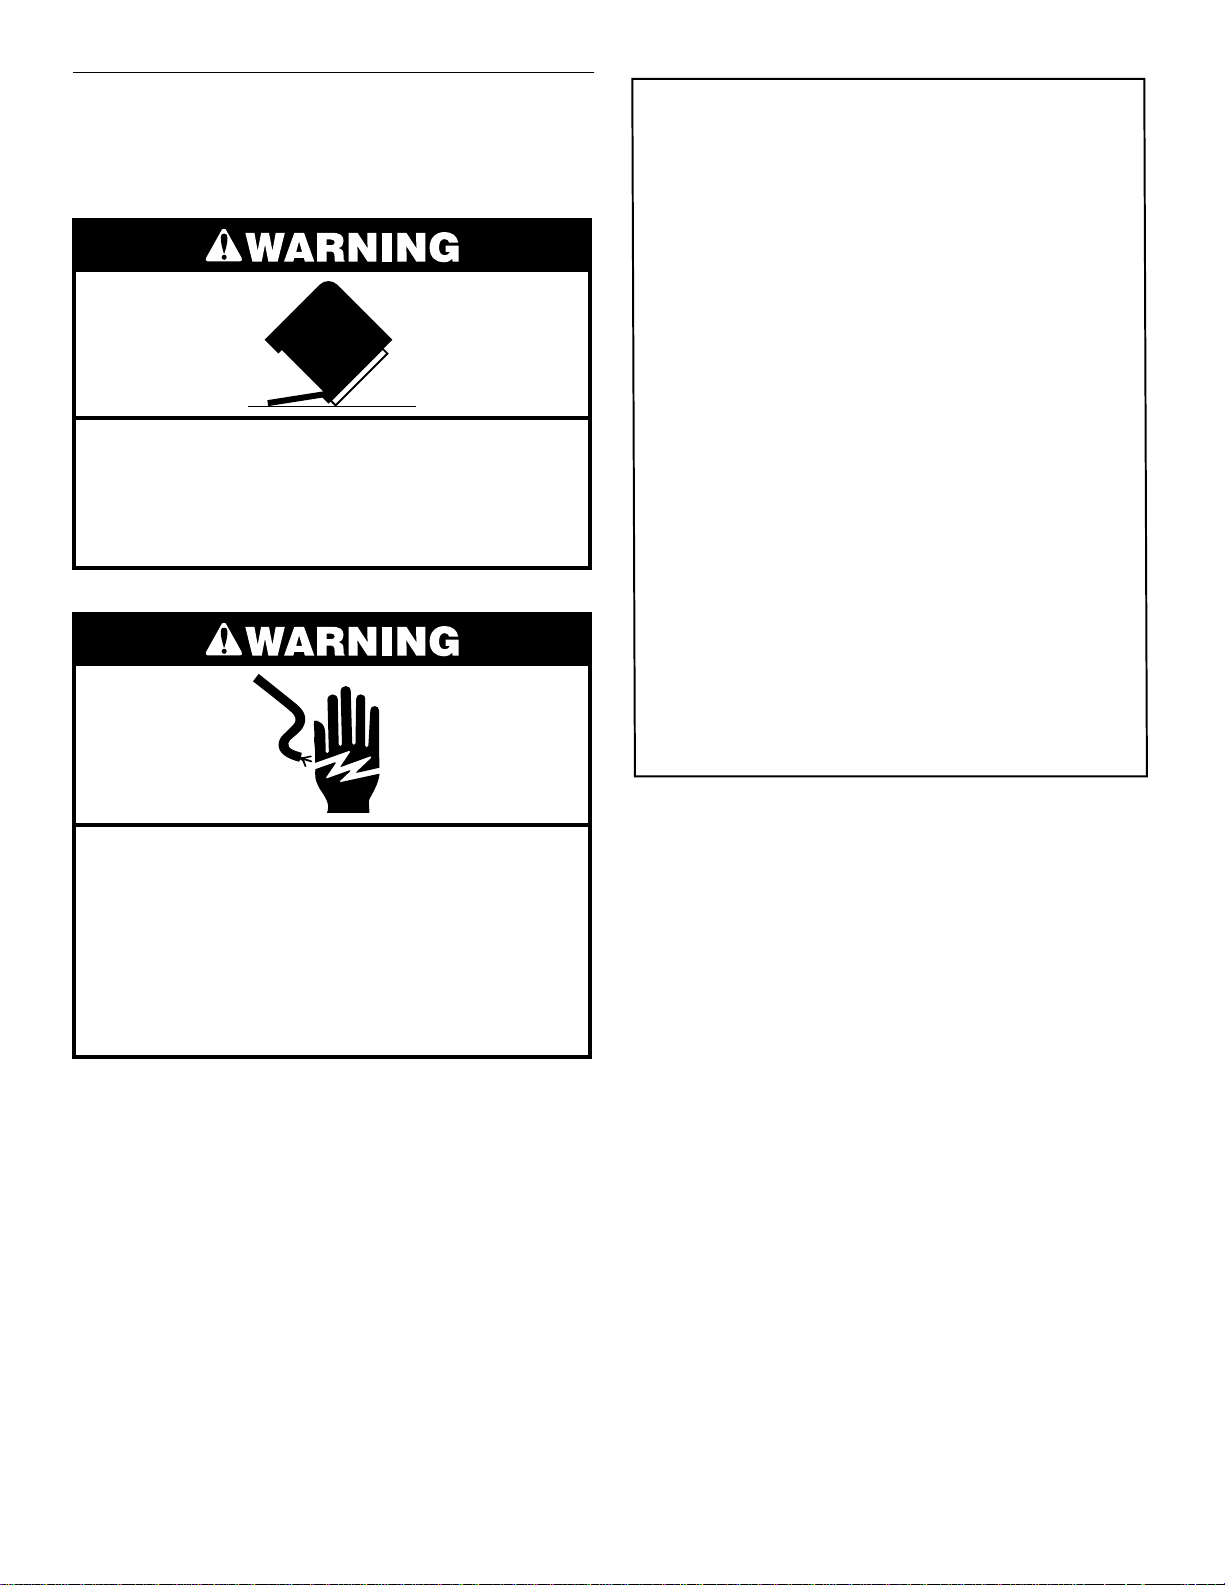
Tip Over Hazard
Do not use dishwasher until completely installed.
Do not push down on open door.
Doing so can result in serious injury or cuts.
GROUNDING INSTRUCTIONS
■
For a grounded, cord-connected dishwasher:
The dishwasher must be grounded. In the event
of a malfunction or breakdown, grounding will
reduce the risk of electric shock by providing a
path of least resistance for electric current. The
dishwasher is equipped with a cord having an
equipment-grounding conductor and a grounding
plug. The plug must be plugged into an appropriate outlet that is installed and grounded in
accordance with all local codes and ordinances.
WARNING: Improper connection of the
equipment-grounding conductor can result in a
risk of electric shock. Check with a qualified
electrician or service representative if you are in
doubt whether the dishwasher is properly
grounded. Do not modify the plug provided with
the dishwasher; if it will not fit the outlet, have a
proper outlet installed by a qualified electrician.
■
For a permanently connected dishwasher:
The dishwasher must be connected to a
grounded metal, permanent wiring system, or an
equipment-grounding conductor must be run
with the circuit conductors and connected to the
equipment-grounding terminal or lead on the
dishwasher.
Electrical Shock Hazard
Electrically ground dishwasher.
Connect ground wire to green ground connector
in terminal box.
Do not use an extension cord.
Failure to follow these instructions can result in
death, fire, or electrical shock.
■ Install where dishwasher is protected from the
elements. Protect against freezing to avoid possible
rupture of fill valve. Such ruptures are not covered by
the warranty. See “Storing Your Dishwasher” in the
“Caring for Your Dishwasher” section for winter stor age
information.
■ Install and level dishwasher on a floor that will hold the
weight, and in an area suitable for its size and use.
■ Remove all shipping plugs from hoses and connectors
(such as the cap on the drain outlet) before installing.
See Installation Instructions for complete information.
SAVE THESE INSTRUCTIONS
4

PARTS AND FEATURES
1. Upper spray
2. Water inlet opening
3. Model and serial number label
4. Bottom rack
5. Heating element
6. Detergent dispenser
7. Vent
8. Top rack
9. Top spray arm
10. Silverware basket
11. 4-WAY HYDRO SWEEP
spray arm
12. Overfill protection float
13. Rinse aid dispenser
TM
5
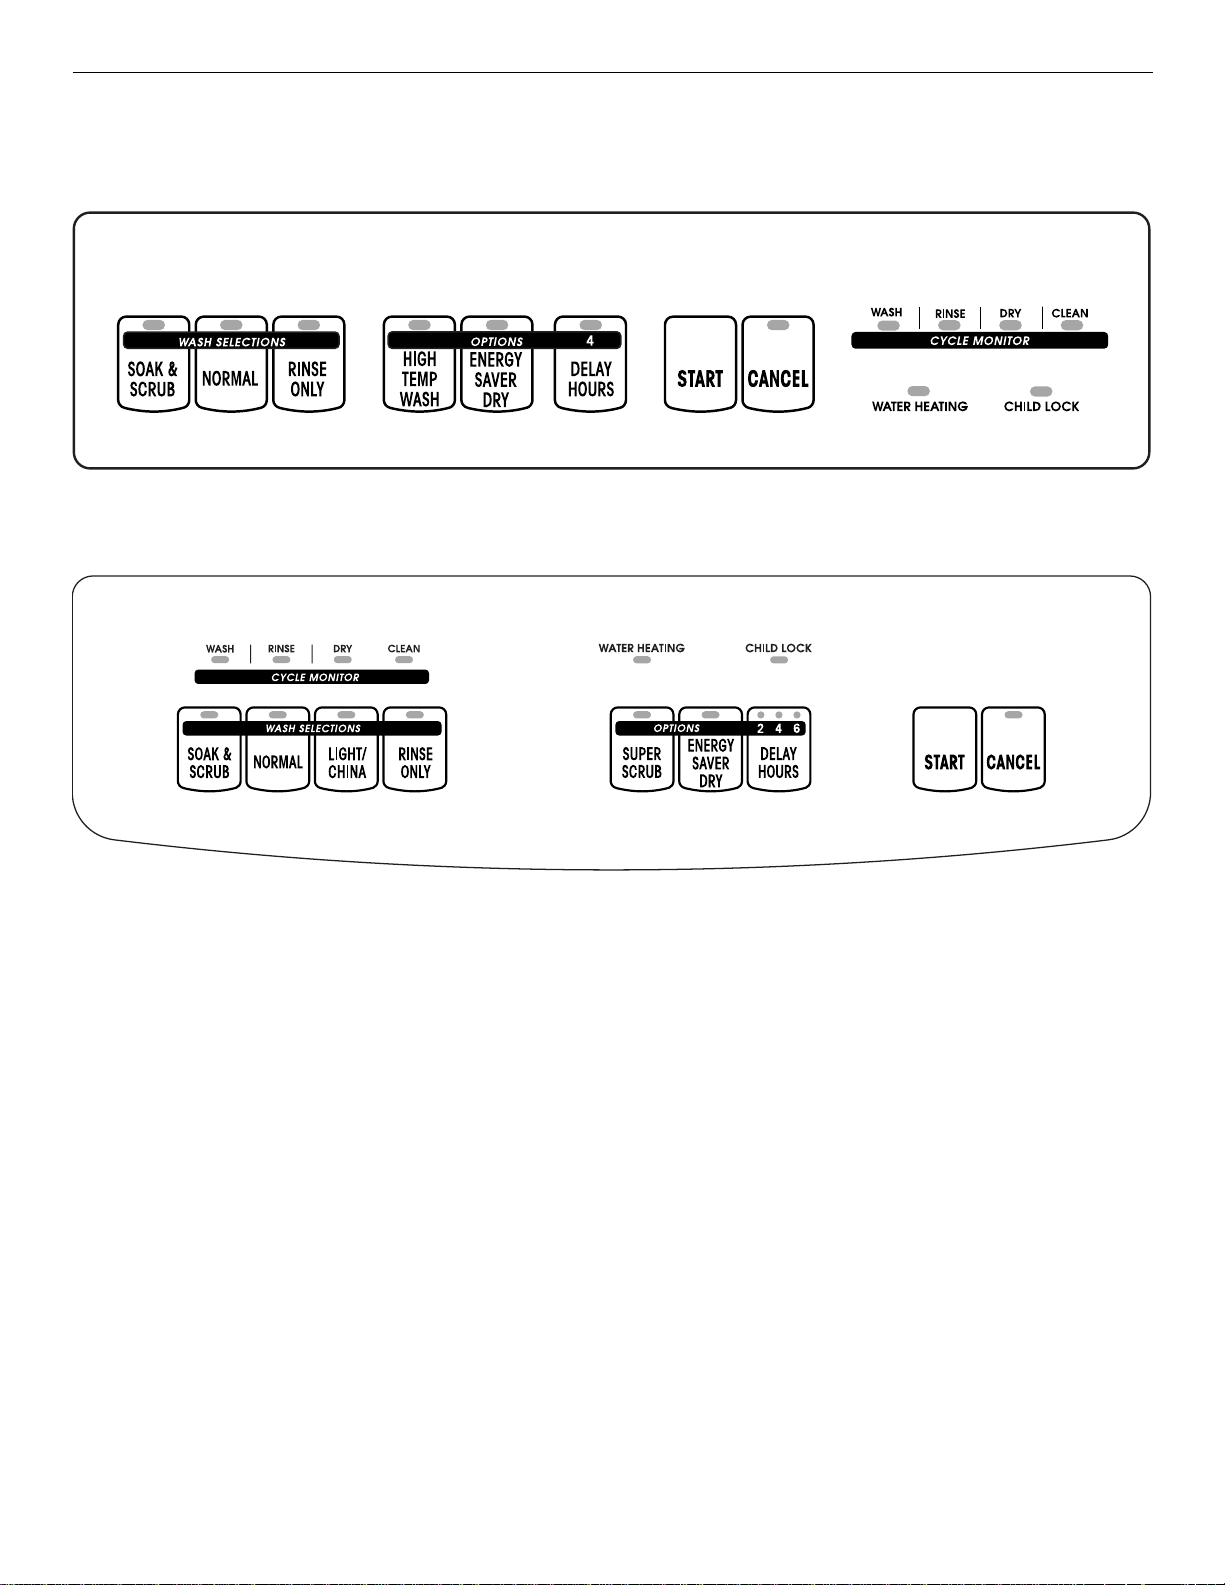
Model KUDI25CH
Model KUDM25SH
Control Panels
6
START-UP GUIDE
Before using your dishwasher, remove all hang tags,
temporary labels, and packaging materials. Read this
entire Use and Care Guide. You will find important safety
information and useful operating tips.
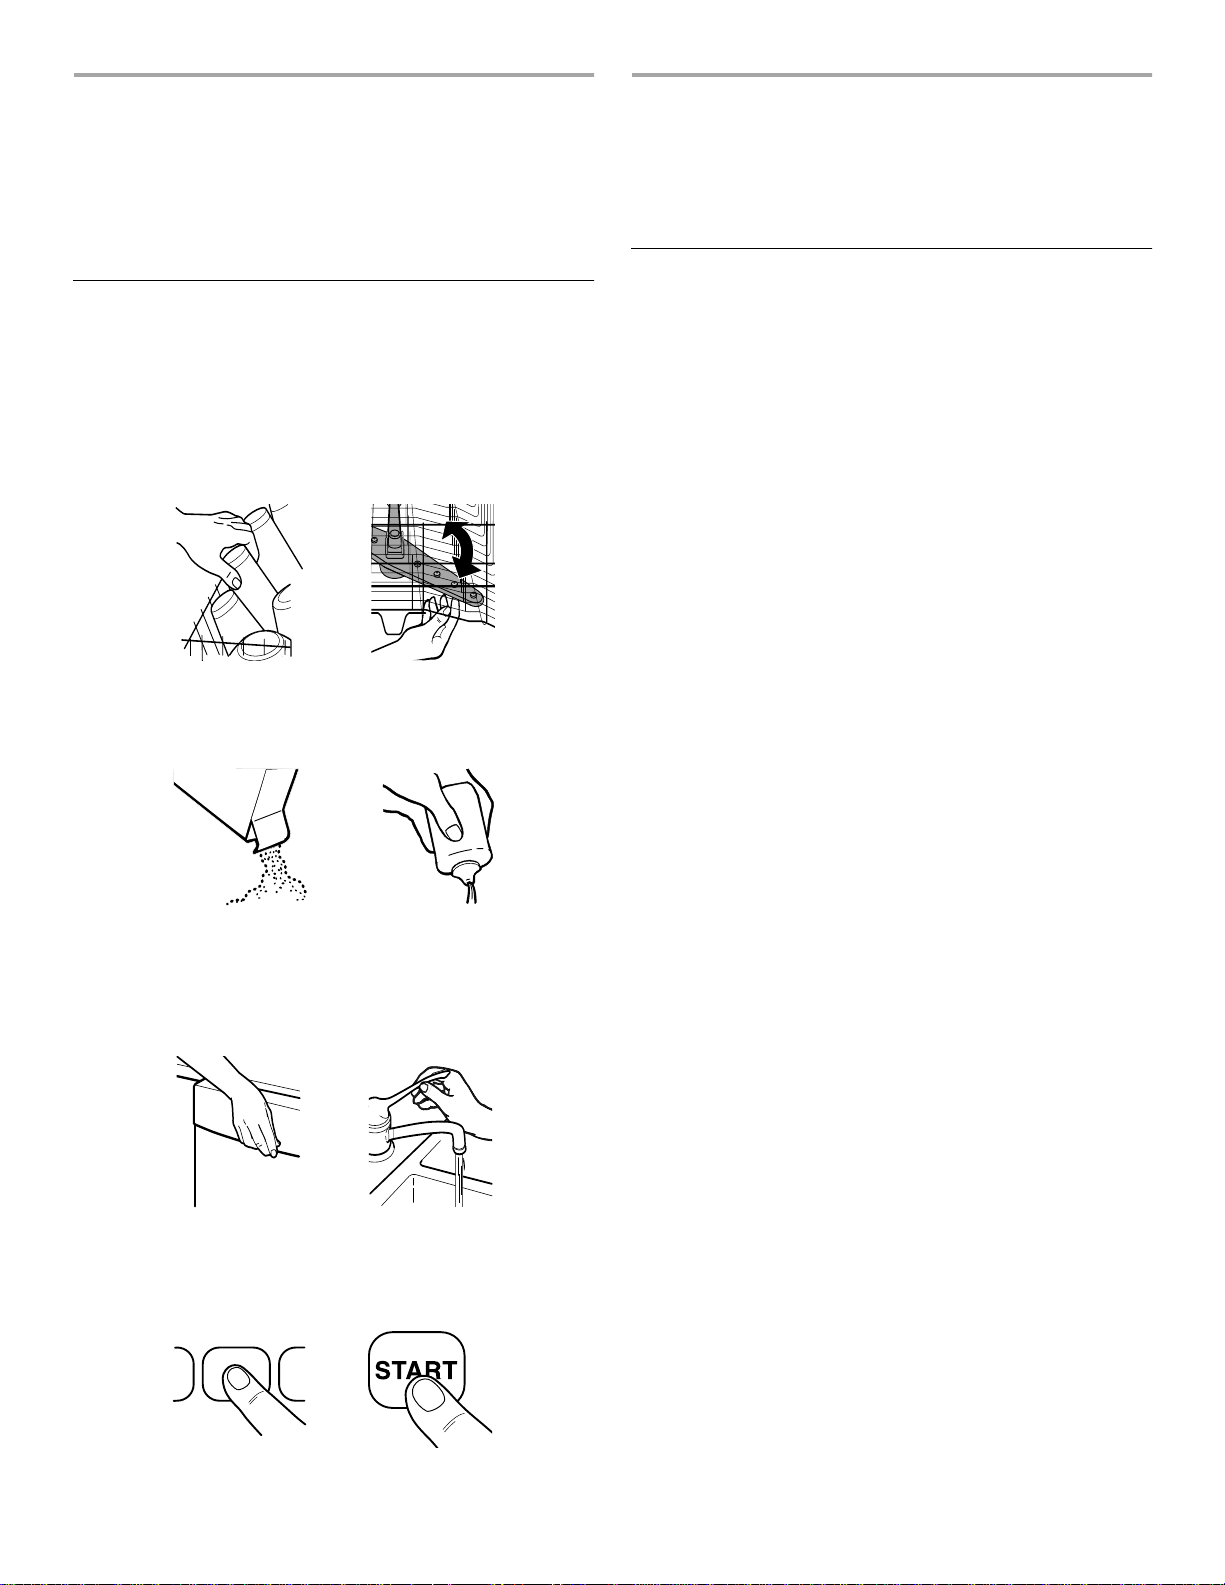
Using Y our New Dishwasher
1. Scrape large food soil and hard items (toothpicks o r
bones) from dishes.
2. Properly load the dishwasher. (See “Loading Your
Dishwasher.”) Make sure nothing prevents the spray
arm(s) from spinning freely.
LOADING YOUR
DISHWASHER
Loading Suggestions
■ Remove leftover food, bones, toothpicks and other
hard items from the dishes. It is not necessary to rinse
the dishes before putting them in the dishwasher. The
wash module removes food particles from the water.
The module contains a chopping device which will
reduce the size of food items.
NOTE: If hard items such as fruit seeds, nuts, and egg
shells enter the wash module, you might hear chopping,
grinding, crunching, or buzzing sounds. These sounds
are normal when hard items enter the module. Do not let
metallic items (such as pot handle screws) get into the
wash module. Damage can occur.
■ Load dishes so soil ed su rfaces fac e th e spray ( down o r
inward). It is important for the water spray to reach all
soiled surfaces.
3. Add detergent and check the rinse aid dispenser. Add
rinse aid if needed. (See “Using Your Dishwasher.”)
4. Push door firmly closed. The door latches
automatically. Run hot water at the sink nearest your
dishwasher until the water is hot. (See “Dishwasher
Efficiency Tips.”) Turn off water.
5. Press the desired cycle and option selections. (See
“Using Your Dishwasher.”) Press START.
■ Load dishes so they are not stacked or overlapping if
possible. For best drying, wate r must be able to drain
from all surfaces.
■ Load heavy pots and pans care fully. Heavy items can
dent the stainless steel interior of the door if they are
dropped or bumped.
■ Make sure pot lids and handles, pizza pans, cookie
sheets, etc., do not interfere with the spray arm
rotation.
■ Run a rinse cycle to keep dishes mois t if you do not
plan to wash them soon. Foods like eggs, rice, pasta,
spinach, and cooked cereals may be hard to remove if
they are left to dry over a period of time.
Quiet operating tips
To avoid thumping/clattering noises during operation:
■ Make sure lightweight load items are secured in the
racks.
■ Make sure pot lids and handles, pizza pans, cookie
sheets, etc., do not touch interior walls or interfere with
the rotation of the spray arm.
■ Load dishes so they do not touch one another.
NOTE: For built-in models, keep sink drain plugs
closed during dishwasher operation to prevent noise
transfer through drains.
7
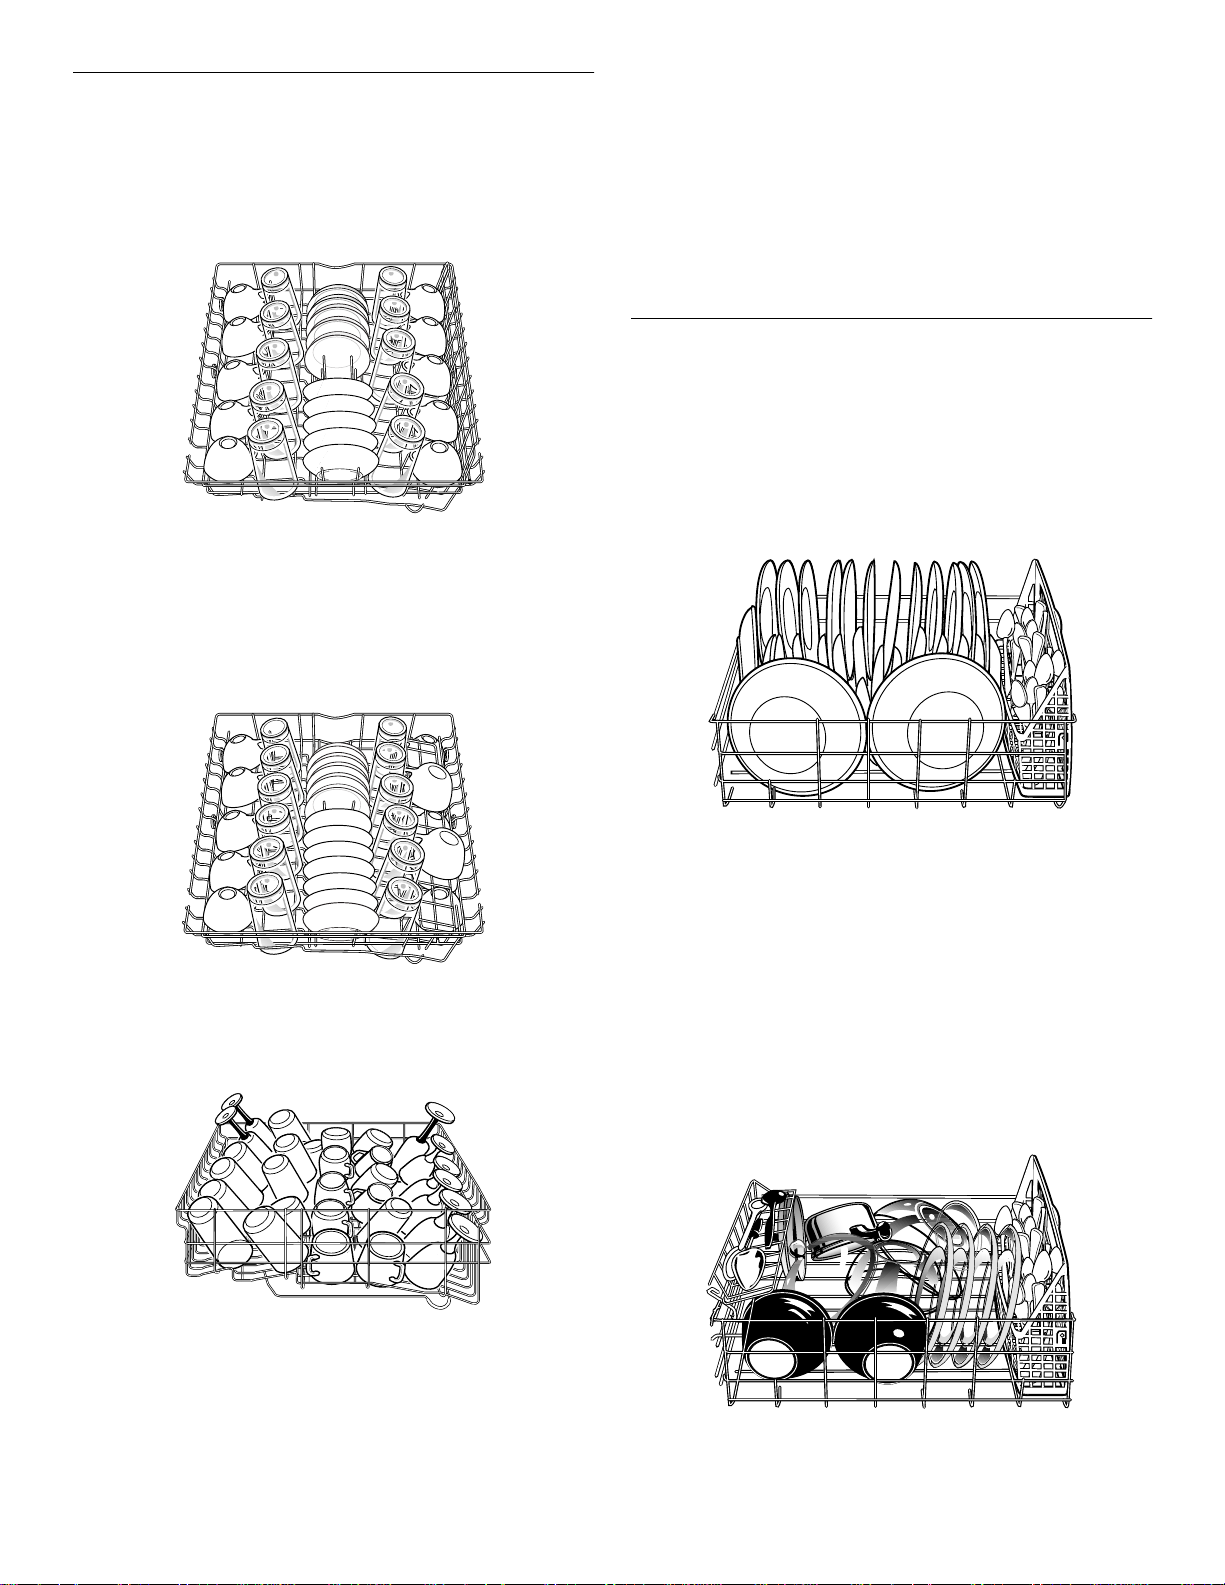
Loading the Top Rack
The top rack is designed for cups, glasses, and smaller
items. (See recommended loading patterns shown.)
NOTE: The features on your dishwasher rack may vary
from the drawings shown.
10 place setting load
■ Place items so open ends face down for cleaning and
draining.
■ Load glasses and cups in to p rack only. The bottom
rack is not designed for gla sses and cups. Da mage can
occur.
■ Load plastic items in the top rack only. Only plastic
items marked “dishwasher safe” are recommended.
■ Load plastic items so the force of the spray does not
move them during the cycle.
■ To avoid chipping, do not let stemware touch other
items.
■ Small bowls, pans, and other utensils can be placed in
the top rack. Load bowls in the center section for best
stability.
Loading the Bottom Rack
The bottom rack is designed for plates, pans, casseroles,
and utensils. Items with cooked-on or dried-on food
should be loaded with soi led su rf ace s fa cing i nwa rd to the
spray. (See recommended loading patterns shown.)
NOTE: The features on your dishwasher rack may vary
from the drawings shown.
12 place setting load
■ Place cups and glasses in the rows between prongs.
Placing them over the prongs can lead to breakage.
Cup and glass load
■ China, crystal, an d o ther de li cat e i tem s must n ot touch
each other during dishwash er operation. Damage may
occur.
Mixed load
■ Do not load glasses, cups, or plastic items in the
bottom rack. Load small items in the bottom rack only
if they are s ecured in place.
■ Load plates, soup bowls, etc., between prongs and
facing inward to the spray.
■ Overlap the edges of plates for large loads.
■ Load soup, cereal, and serving bowls in the rack in a
variety of ways depending upon their size and shape.
Load bowls securely between the rows of prongs. Do
not nest bowls becau se the spray will not reach all
surfaces
Utensil load
8
■ Load cookie sheets, cake pans, and other large items
at the sides and back. Loading such items in front can
keep the water spray from reaching the detergent
dispenser.
■ Secure heavily soiled cookware face down in the rack.
■ Make sure pot handles and other items do not stop
rotation of the spray arm(s). The spray arm(s) must
move freely.
USING YOUR
DISHWASHER
■ Do not load items be tween the bottom rack and the
side of the dishwasher tub. You can block the water
inlet opening.
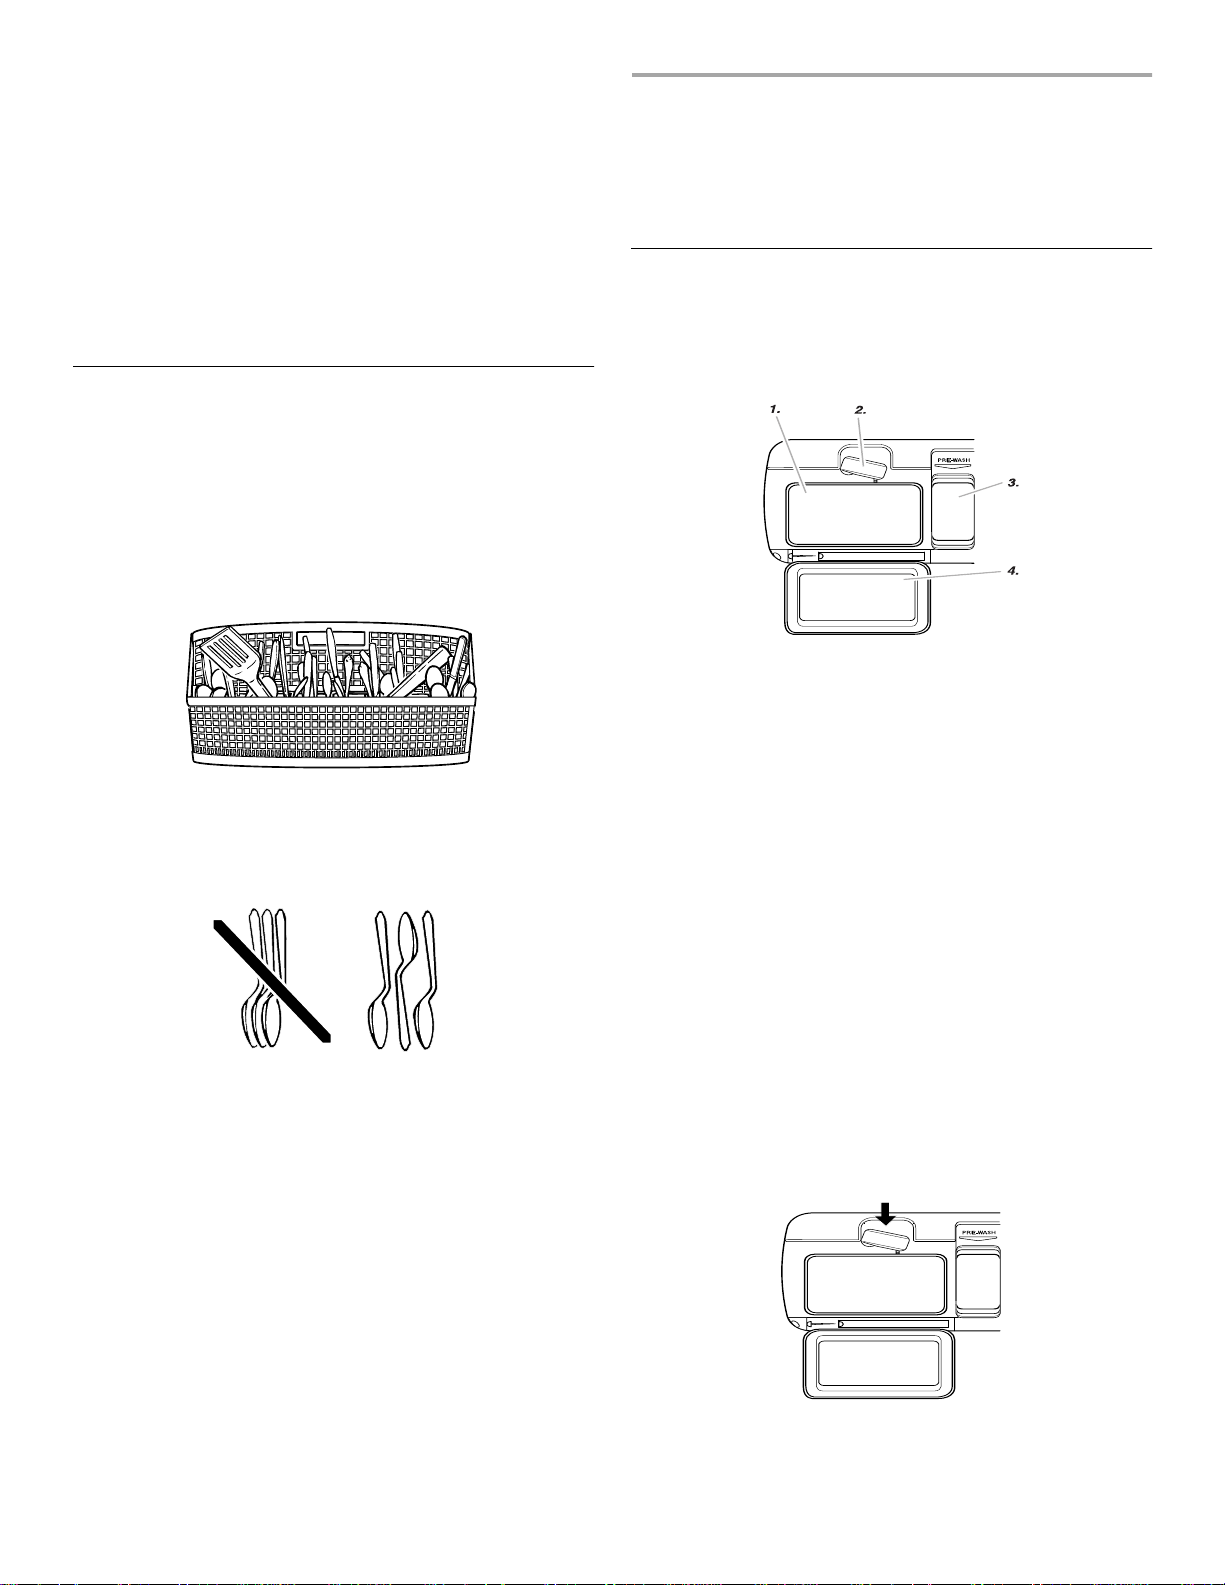
Loading the
Silverware Basket
Load the silverware basket while it is in the bottom rack or
take the basket out for loading on a counter or table.
NOTE: Unload or remove the basket before unloading the
racks to avoid spilling water drop lets on the silverware.
Mix items in each sect ion of th e ba sket wi th some point ing
up and some down to avoid nestin g. Spray ca nnot reach
nested items.
Detergent Dispenser
The deterg ent dispenser has 2 sections. The smaller PreWash section empties detergent into the dishwasher when
you close the door.
1. Main wash section
2.Cover latch
3. Pre-wash section
4. Cover
The larger Main Wash section automatically empties
detergent into the dishwasher during the wash. (See the
“Cycle Selection Chart.”)
■ Use automatic dishwashing detergent only. Other
detergents can produce excessive suds that c a n
overflow out of the dishwasher and reduce washing
performance.
IMPORTANT: Always load sharp items (knives, skewers,
forks, etc.) pointing down.
NOTES:
■ Do not load silver or silver-plated silverware with
stainless steel. These metals can be damaged by
contact with each other during washing.
■ Some foods (such as salt, vinegar, milk products, fruit
juices, etc.) can pit or corrode silverware. Run a rinse
cycle if you do not ha ve a ful l load to was h immedi ately.
■ Add detergent just before starting cycle.
■ Store tightly closed detergent in a cool, dry place.
Fresh automatic dishwasher detergent results in better
cleaning.
NOTE: Do not use detergent with a rinse cycle.
Filling the dispenser
1. If the dispenser cover is closed, open the cover by
rotating the cover latch.
2. Fill the Main Wash section with detergent. See “How
Much Detergent to Use.”
9

3. Close the Main Wash dispenser cover. Fill the PreWash section.
It is normal for the cover to open partially when dispensing
detergent.
NOTE: Use both sections for cycles with 2 washes. Use
only the covered section for cycles wit h 1 wash. See the
“Cycle Selection Chart” for more details.
How much deter gent to use
■ The amount of detergent to use depends on the
hardness of your water and the type of detergent. If you
use too little, dishes won’t be clean. If you use too
much in soft water, glassware will etch.
■ Water hardness can change over a p eriod of time. Fi nd
out your water’s hardness by asking your local water
department, water softener company, or county
extension agent.
■ You can order a water hardness test strip. In the U.S.A.,
call the Consumer Assistance Center at
1-800-422-1230 and ask for Part Number 4171690.
■ Different brands of dishwasher detergent have different
amounts of phosphorous for softening water. If you
have hard water and use a detergent with a
phosphorous content of less than 8.7%, you might
need to use more detergent, or use a detergent with a
phosphorous content higher than 8.7%.
Water Har dness Amount of Detergent
Soft to Medium
Hard Water
0 to 6 grains per
gallon
Medium to Hard
Water
7 to 12 grains per
gallon
Ve ry Hard Water
13 grains per
gallon and above
NOTE: It might be
necessary to use
the Soak & Scrub
cycle, or the
Normal cycle with
either a High Temp
wash (if available)
or Super Scrub
option (if available)
for best wash
performance with
very hard water.
For normally soiled loads:
■ Partially fill the Main Wash
section (2 tbs or 30 g)
■ Fill the Pre-Wash section
(2 tbs or 30 g)
NOTE: Add only 1 tb or 15 g of
detergent to the Pre-Wash
section if dis hes a r e pr e-ri nsed or
the water is very soft (0 to 2
grains per gallon).
For baked on soil loads:
■ Fill the Main Wash section
(2 tbs or 30 g)
■ Fill the Pre-Wash section
(2 tbs or 30 g)
For heavily soiled loads:
■ Fill the Main Wash section
(3 tbs or 45 g)
■ Fill the Pre-Wash section
(2 tbs or 30 g)
For normal and heavily soiled
loads:
■ Fill the Main Wash section
(3 tbs or 45 g)
■ Fill the Pre-Wash section
(2 tbs or 30 g)
For normally soiled loads:
■ Fill the Main Wash section
(3 tbs or 45 g)
■ Fill the Pre-Wash section
(2 tbs or 30 g)
■ Turn the rinse aid dispenser to
a higher setting. See “Rinse
Aid Dispenser” later in this
section.
For heavily soiled loads:
■ Fill the Main Wash section
(3 tbs or 45 g)
■ Fill the Pre-Wash section
(2 tbs or 30 g)
10
■ Turn the rinse aid dispenser to
a higher setting. See “Rinse
Aid Dispenser” later in this
section.
NOTE: Fill amounts shown are for standard powdered
detergent. Amounts may vary if you use liquid or
concentrated powdered detergent. Follow instructions on
the package when using liquid dishwasher detergent or
concentrated powdered detergent.
Rinse Aid Dispenser
Dishwasher Efficiency T ips
Rinse aids prevent water from forming droplets that can
dry as spots or streaks. They also improve drying by
allowing water to drain off of the dishes during the final
rinse by releasing a small amount of t he rinse aid into the
rinse water. Your dishwasher is designed to use a liquid
rinse aid. Do not use a solid or bar-type.
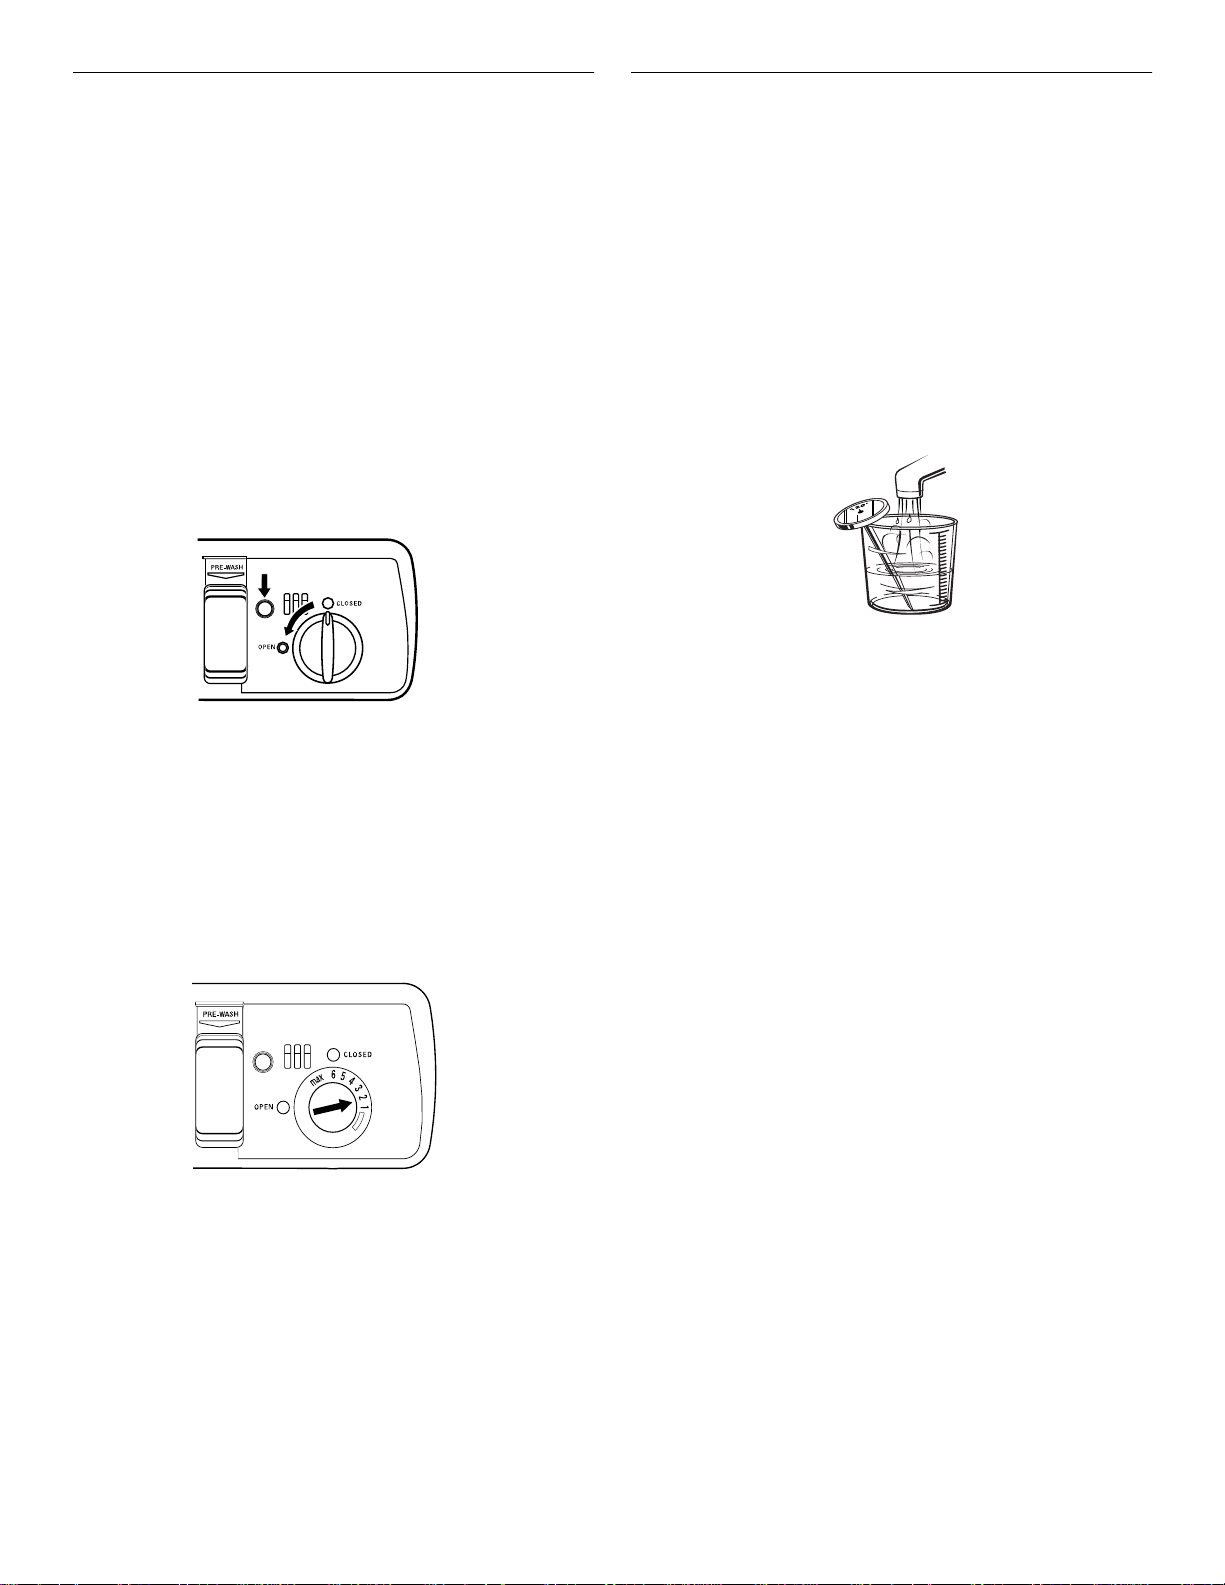
Filling the dispenser
The rinse aid dispenser holds 5.2 oz (153.7 mL) of rinse
aid. Under normal conditions, this will last for about three
months. You do not have to wait until the dispenser is
empty to refill it. Try to keep it full, but be careful not to
overfill it.
1. M a ke sure the dishwasher door is fully open .
2. Turn the dispenser knob to OPEN and lift it out.
3. Add rinse aid until the indicator window looks full.
4. Cl ean up any spilled rinse aid with a damp cloth.
5. Replace the dispenser knob and turn it to CLOSED.
Hot water dissolves and activates the dishwashing
detergent. Hot water also dissolves grease on dishes and
helps glasses dry spot-free. For best dis hwashing results,
water must be at least 120°F (49°C) as it enters the
dishwasher. Loads may not wash as well if the water
temperature is too low.
To chec k water temperature
1. Run hot water at the faucet closest to your dishwasher
for at least 1 minute.
2. Place a candy or meat thermometer in a glass
measuring cup.
3. Check the temperature on the thermometer as the
water is running into the cup.
4. I f the water temperature at the faucet is below 120°F
(49°C), have a qualified person raise the water heater’s
thermostat setting.
■ To save water and energy, do not rinse dishes before
putting them into the dishwasher.
Rinse aid setting
The amount of rinse aid released into the final wash can be
adjusted. The factory setting is at 2. For mos t water
conditions set the adjuster to 1 or 2. If there are rings or
calcium (hard water) spots on dishes, try a higher setting.
To adjust the setting
Remove the dispenser knob, then turn the adjuster inside
the dispenser to the desired setting.
■ Use a low energy, quick, or short cycle whenever
possible. These cycles use less hot water and energy
than the Normal cycle.
■ Use a delay feature (on some models) to run your
dishwasher during off-peak hours. Local utilities
recommend avoiding heavy usage of energy at certain
times of day.
■ During the summer, run your dishwasher at night to
reduce daytime heat buildup.
■ Use an air dry, or an energy-saving dry option
whenever possible. Allow longer drying times
(overnight) when using these option s. Use a rinse aid to
improve drying.
■ Use cycles or options that add extra heat to the wash
or rinse portion of the cycle only when needed.
■ Run your dishwasher with full loads. Run a rinse cycle
after meals until the dishwasher is full.
11
Cycle Selection Chart
Select the wash cycle and options desired. Or press
START to use the same cycle and options as the previous
cycle.
NOTE: If the last cycle you completed was a rinse cycle,
the dishwasher will run the last full wash cycle and options
that you selected when you press Start.
■ If the power is off or the door is open for an extended
period of time, the Start button memory will default to
the Normal cycle with heated drying.
■ If you do no t run t he dis hwash er daily, close the door t o
maintain memory.
A “●” shows what steps are in each cycle. Your model
may have some or all of the cycles shown.
Temperatures indicate where extra heat is added.
Water usage is shown in U.S. gallons/liters.
Cycle time includes dry time. An asterisk ( * ) by the cycle
time indicates the cycle time might be longer depending
on the temperature of the water entering the dishwasher.
The cooler the water, the longer the cycle time. If the water
is already hot enough, the cycle time will be as shown.
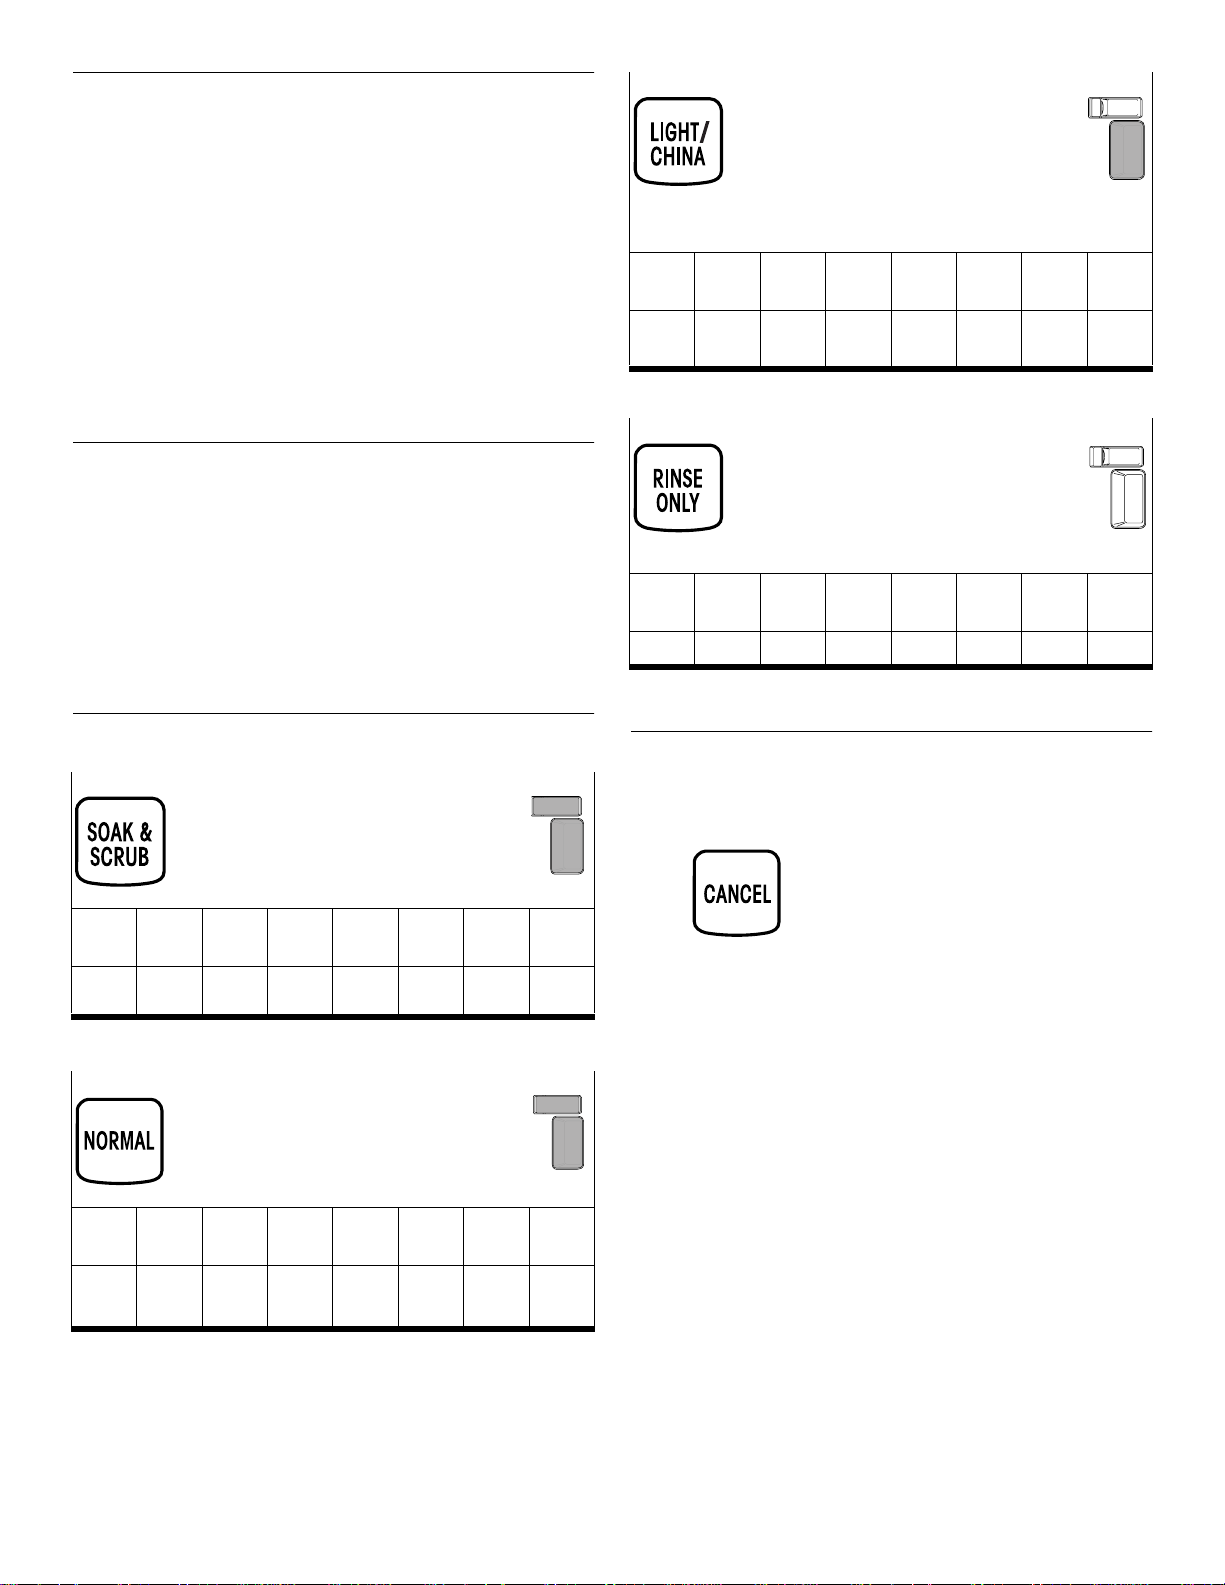
Use this cycle for c hina
and crystal. This cycle
uses a light wash and
gentle dr y. During the
heated dry, the heating
element cycles on and
Use
covered
detergent
dispenser
section.
off.
Pre-
Wash
Rinse Main
Wash
Rinse Final
●●●●●
●●
●●
Use this rinse cycle for
rinsing dish es, glasse s,
and silverware that will
not be washed right
away.
Heated
Rinse
●
●●
130°F
(54°C)
Dry Time
cycled
(min)
●●●●
Do not
use
detergent
with this
cycle.
Water
Usage
(gal/L)
64* 6.5/24.5
Pre-
Wash
†
A small amount of water is run through the pump to remove
Rinse Main
Wash
Rinse Final
Heated
Rinse
●
●
●●
Dry Time
(min)
10 2.2/8.2
soil particles between the main wash and final ri nse.
Water
Usage
(gal/L)
Use this cycle for hardto-clean, hea vily-soiled
pots, pans, casse ro les,
and regular tableware.
Wash
135°F
(57°C)
Pre-
●●●●
Rinse Main
Wash
●●●●
140°F
(60°C)
Rinse Final
Use this cycle for loads
with normal amounts of
food soil. (The energyusage label is based on
this cycle.)
Pre-
Wash
Rinse Main
●●●●●
Wash
Purge†Final
●●
●●
Heated
Rinse
●●●●●
●●
●●
●
●●
140°F
(60°C)
Heated
Rinse
●
●●
140°F
(60°C)
Use both
detergent
dispenser
sections.
Dry Time
●●●●
(min)
82* 8.6/32.7
Use both
detergent
dispenser
sections.
Dry Time
●●●●
(min)
75* 6.9/26.2
Water
Usage
(gal/L)
Water
Usage
(gal/L)
Canceling a Cycle
Anytime dur i n g a cy c le, press
CANCEL glows. The dishwasher pauses for 5 seconds and
starts a 2 minute drain (if needed). Let the dishwasher
drain completely. The light goes off when the dishwasher
finishes the drain.
To stop the drain
You can press Cancel again to stop the drain immediately.
Remember to drain the dishwasher before starting a new
cycle.
NOTE: A small amount of water remains in the dishwasher.
This is normal.
To c lear t he indicator s
Press Cancel before starting the dishwasher to clear all
options and cycles.
12

Changing a Cycle or Setting
During the first minute of a cycle
Press a new cycle and/or options.
After the first minute of a cycle
1. Press
CANCEL glows. The dishwasher pauses for 5 seconds
and starts a 2 minute drain (if needed). Let the
dishwasher drain completely.
2. Check the detergent dispensers. If the main wash cup
has opened and the detergent washed away, refill the
cups as needed.
3. Close the door.
4. Press a new cycle and/or options.
5. Press START.
Option Selections
You can customize your cycles by pressing an option. If
you change your mind, press the option again to turn the
option off. Select a different op tion if desired.
You can change an option anytime before the selected
option begins. For example, you can press an unheated
drying option any time before drying begins.
Press START to use the same cycle and options as the
previous wash cycle.
NOTE: If the last cycle you completed was a rinse cycle,
when you press Start, the dishwasher runs the last full
wash cycle and options.
SUPER SCRUBTM option
Select this high-temperature option for improved cleaning
of heavily soiled dishes. Selecting th is option adds heat
and wash time to the wash cycle. Heating the water helps
improve washing results.
Adding Items During a Cycle
You can add an item anytime before the main was h starts.
Open the door and check the detergent dispenser. If the
main wash section is still closed, you can add items.
To ad d items
1. Lift up the door latch to stop the cycle. Wait for the
spraying action to stop before opening the door.
2. Open the door. If the main wash detergent dispenser is
still closed, add the item.
3. Close the door firmly until it latches. The dishwasher
resumes the cycle after about a 5 second pause.
NOTE: Super Scrub is an option with Soak & Scrub and
Normal cycles.
High T emp Wash (on some models)
Select this option to heat the water to 140°F (60°C) in the
main wash cycle. Selecting this option adds heat and
wash time to the Normal cycle. Heating the water helps
improve washing results
NOTE: The Soak & Scrub cycle automatically uses this
option. High Temp Wash is an option with the Normal
cycle.
Energy Saver Dry
Select this option to dry dishes without heat and save
energy. Energy Saver Dry is useful when loads contain
plastic dinnerware that may be sensitive to high
temperatures.
The dishes take longer to dry and some spotting can
occur. For best drying, use a liquid rinse aid. Some items
(such as plastics) may need towel drying.
NOTE: Light/China (on some models) and Rinse Only
automatically use this option. Energy Saver Dry is an
option with all other cycles.
13

Delay Hours
Select this option to run your dishwasher at a later time or
during off-peak hours.
To delay the start
1. Close the door.
Child Lock
Use Child Lock to prevent your dishwasher from
accidentally being turned on. Use Child Lock, also, to
prevent accid ental cycle or option changes during a cycle.
2. Select a wash cycle and options.
3. If your dishwasher has a 2, 4, and 6 hour delay:
Press DELA Y HOURS 1 time for a 2-hour delay, 2 times
for a 4-hour delay, or 3 times for a 6-hour delay start.
If your dishwasher has a 4 hour delay:
Press Delay Hours 1 time.
The number glows above De lay Hours. Th e dishwasher
starts the cycle in the selected number of hours.
4. Press START.
NOTE: To cancel the delay, press DELAY HOURS until no
number is lit.
IMPORTANT:
■ Operate your dishwasher only when you are at home.
■ If your home is equipped with a water softener, do not
start the dishwasher during the regeneration of the
softener.
When CHILD LOCK is lit, all buttons are disabled.
NOTES:
■ The dishwasher door can be opened while the contr ols
are locked.
■ You can turn on the Lock while the dishwasher is
running.
To turn on the Child Lock
Press and hold
for 4 seconds. CHILD LOCK glows.
If you press any pad while your dishwasher is locked, the
light flashes 3 times.
To turn off the Child Lock
Press and hold ENERGY SAVER DRY for 4 seconds. The
light turns off.
Wash System
Control Panel Lights
Cycle Monitor
Follow the progress of your dishwasher cycles on the
Cycle Monitor. CLEAN glows when a cycle is finished. All
other lights turn off. The light turns off when you open the
door or press Cancel.
Water Heating
WATER HEATING glows, and the cycle progression
pauses, whenever water is h eated during a cycle.
Wash or rinse action continues as the water heats.
The five-level wash sy stem provides excellent cleaning
results. A triple filtration and soil collector system filters the
wash water and prevents food particles from redepositing
on the clean dishes.
■ The wash water continuously flows through the Ultra-
Fine filter, trapping food particles. A small amount of
water remains under the filter to keep the pump seal
moist.
■ Two water jets, located under the spray arm remove the
food particles from the Ultra-Fine filter.
■ A coarse strainer prevents bones, pits, and other large
objects from entering the pump system.
NOTE: Periodically check the coarse strainer and remove
any objects on the strainer.
14
 Loading...