

DISHWASHER
Consumer Reference Guide
For questions about features, operation/performance, parts accessories or service, call: 1-800-422-1230
In Canada, call for assistance 1-800-461-5681, for installation and service, call: 1-800-807-6777 or visit our website at...
www.kitchenaid.com or www.KitchenAid.ca
LAVE-VAISSELLE
Guide deréférence pour leconsommateur
Au Canada, pour assistance composez le 1-800-461-5681, pour installation ou service composez le 1-800-807-6777 ou visitez notre site web à...
www.KitchenAid.ca
Table of Contents / Table des matières
PARTS AND FEATURES ................................. 2
START-UP ........................................................4
LOADING .......................................................... 5
CYCLES AND OPTIONS.................................. 6
PIÈCES ET CARACTÉRISTIQUES ................11
MISE EN MARCHE .........................................13
CHARGEMENT ...............................................14
PROGRAMMES ET OPTIONS .......................16
Models/Modèles KUDI01IL, KUDI01DL, KUDI01FL, KUDC01TM, KUDK01IL, KUDL01IL
8531779A
PARTS AND FEATURES
O
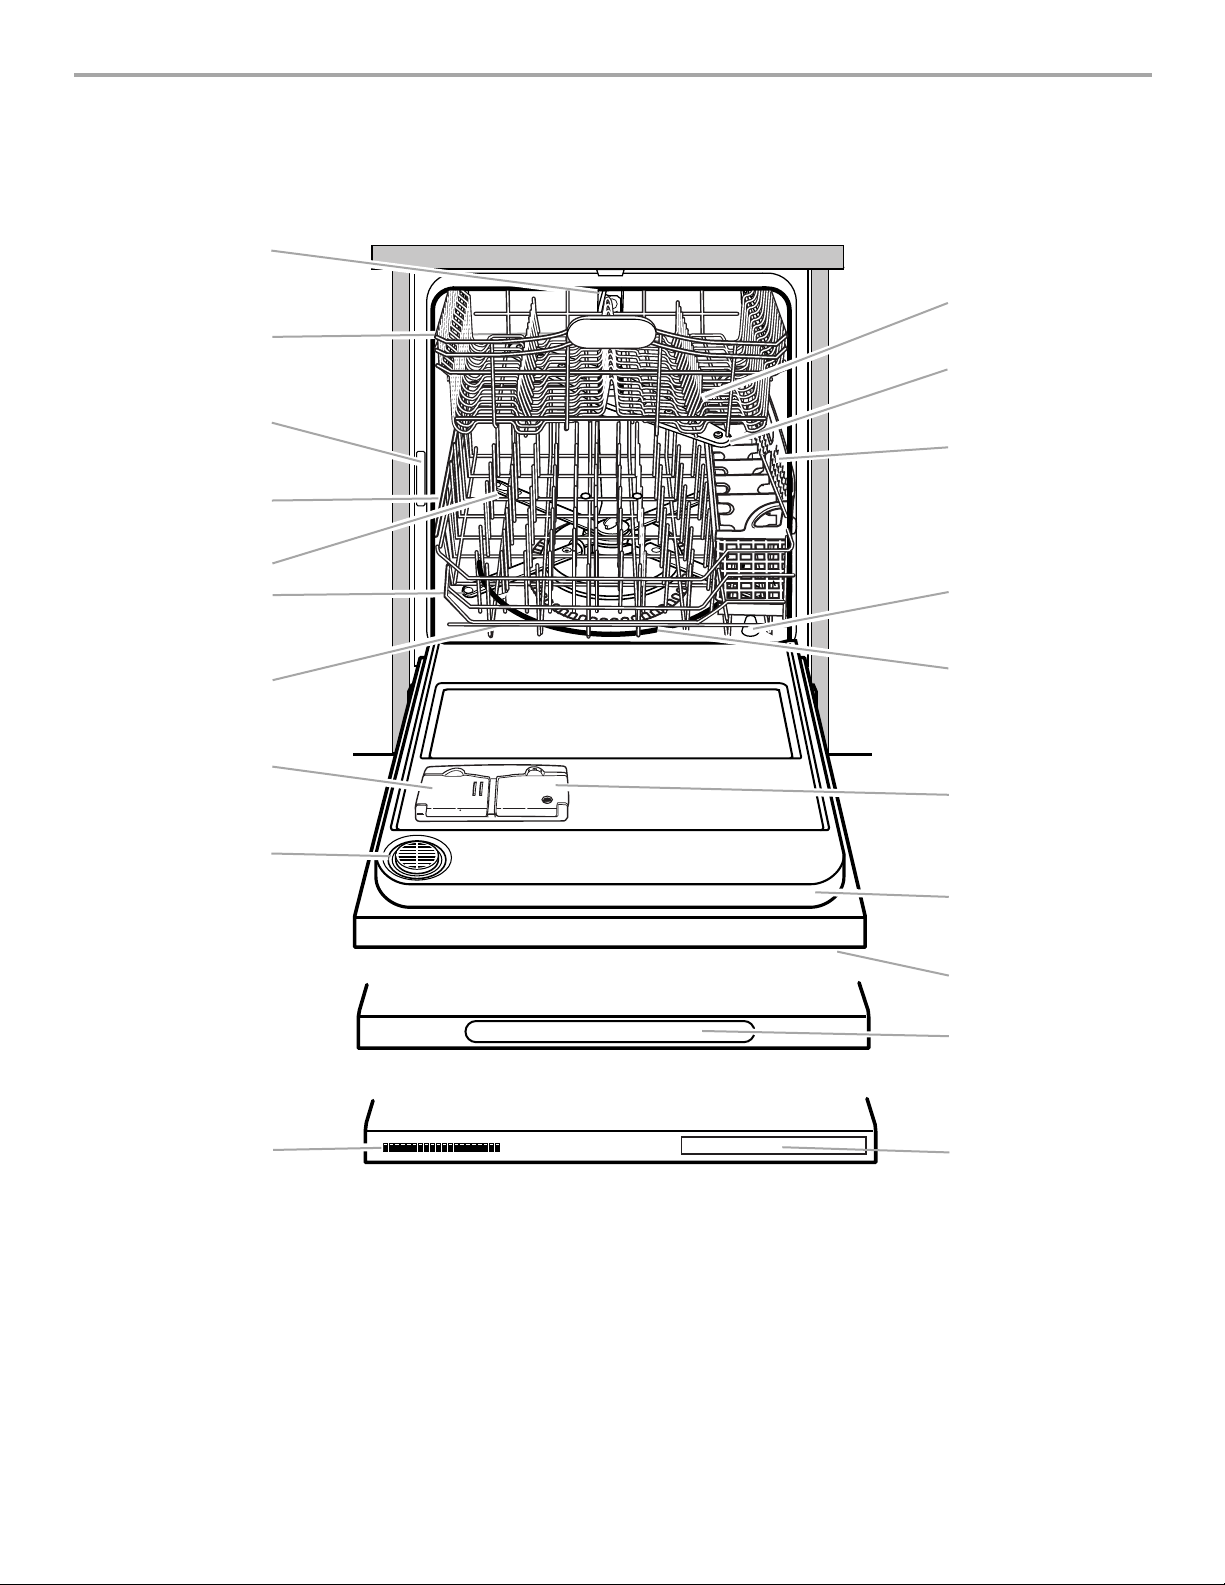
This manual covers several different models. The features on your dishwasher may vary from those shown below.
A
K
B
L
C
M
D
E
F
G
N
H
I
J
A. Upper spray
B. Top rack
C. Model and serial number label
D. Water inlet opening (in tub wall)
E. FLEXI-FOLD DOWN™ flexible tines
(on some models)
F. 4-way HYDRO SWEEP™
spray arm
G. Bottom rack
H. Detergent dispenser
I. Vent (on some models)
J. Active vent (Model KUDI01FL)
K. SURE-HOLD
(on some models)
L. Middle spray arm
M. Silverware basket
N. Overfill protection float
®
light item clips
P
Q
R
S
T
O. Heating element
P. Rinse aid dispenser
Q. WHISPER QUIET
insulation system
R. Control panel located on door front
(on some models)
S. Control panel (Model KUDI01DL)
T. Control panel (Model KUDI01FL)
®
sound
2
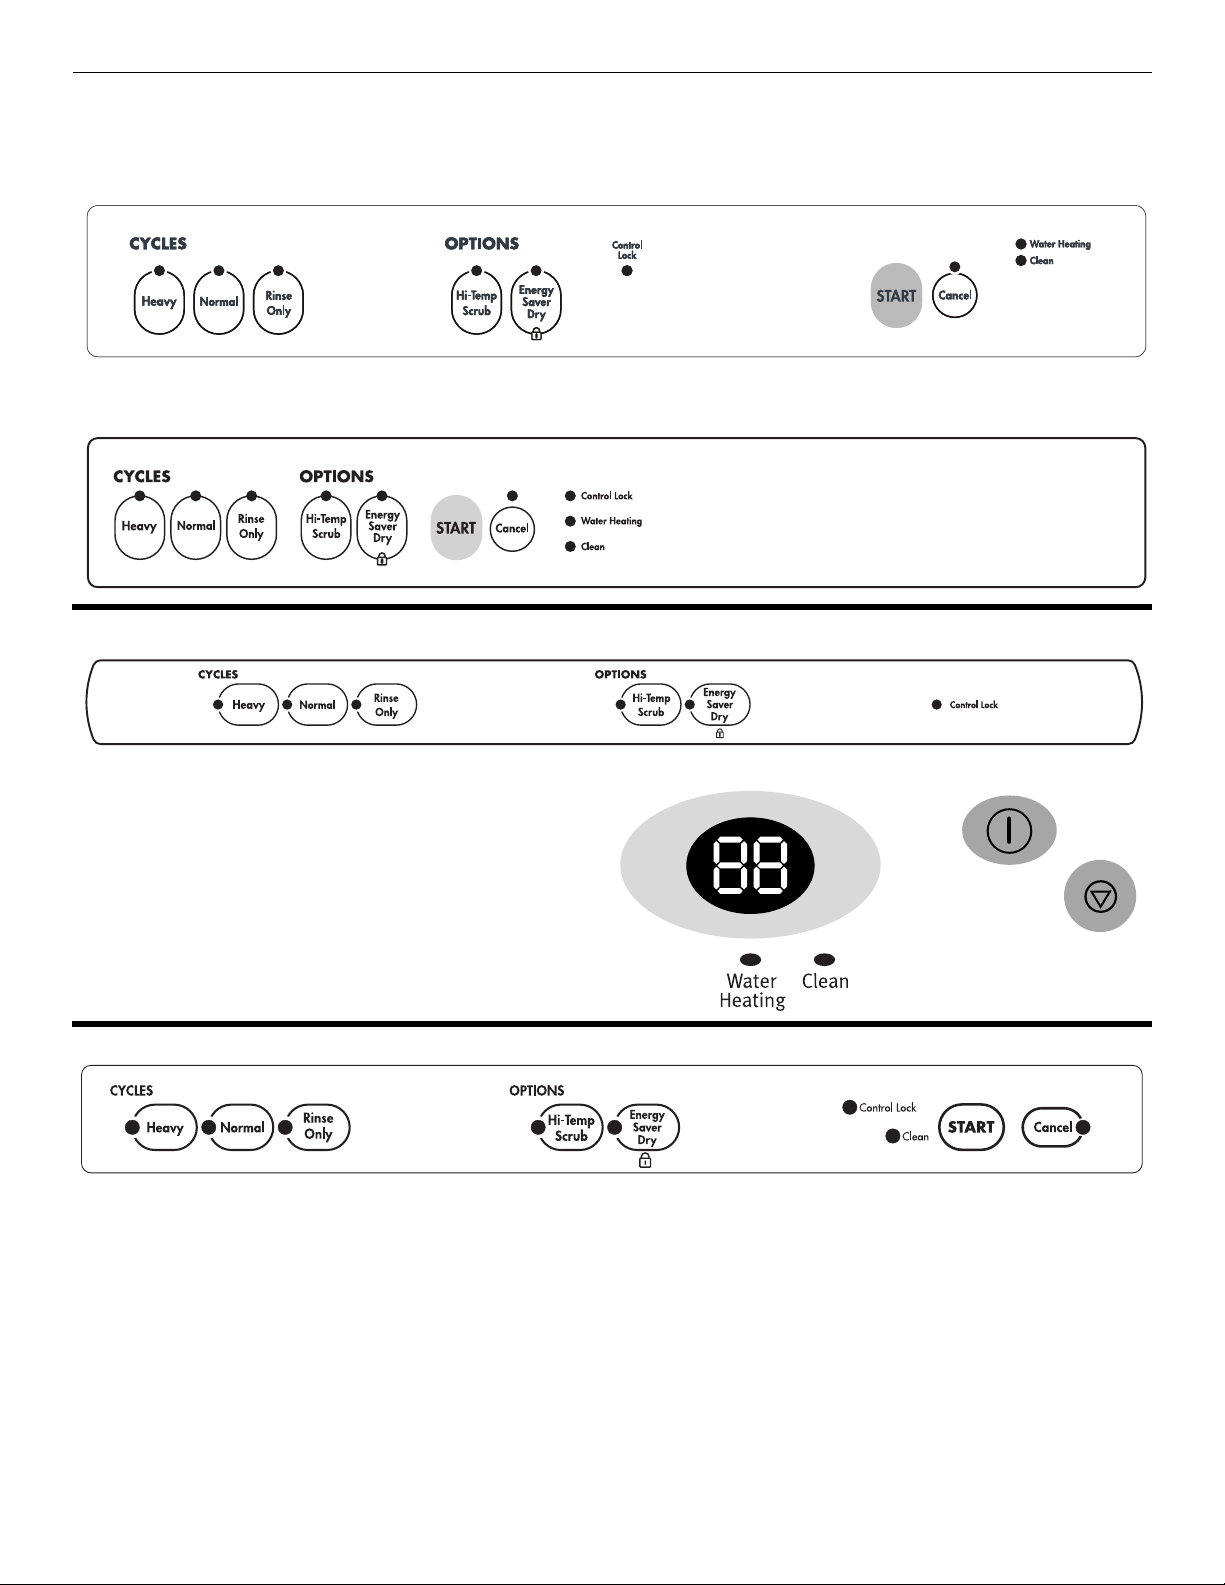
Control Panels
KUDI01IL, KUDK01IL, KUDL01IL, KUDC01TM
(For model KUDI01IL, your dishwasher may have one of the views shown.)
KUDI01IL
KUDI01DL
KUDI01FL
3
START-UP
Before using your dishwasher, remove all packaging materials. Read this entire Consumer Reference Guide, as well as the User
Instructions. You will find important safety information and useful operating tips.
Using Your Dishwasher
6. Press the desired cycle and option selections on the top, or
For all models:
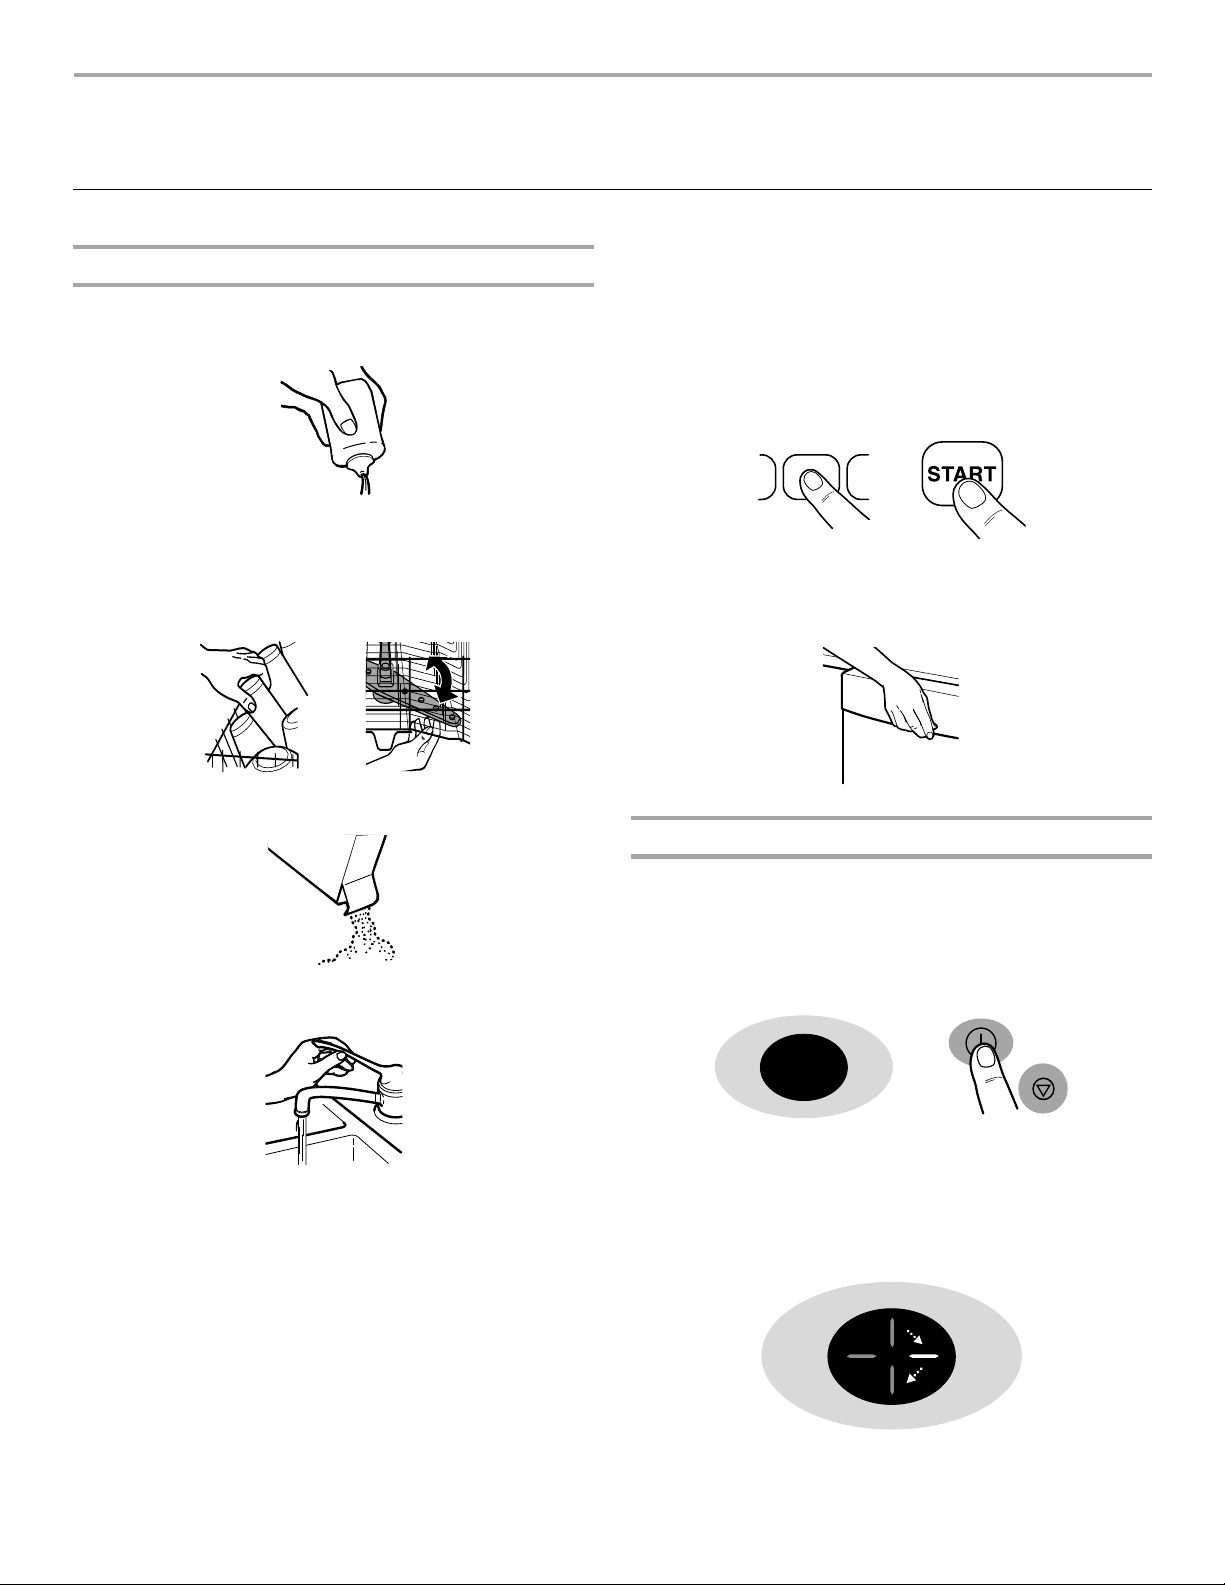
1. Rinse aid is essential for good drying. Be sure to fill the
dispenser before you use your new dishwasher. Each filling
will last about 1 to 3 months depending on your usage.
2. Scrape large food soil and hard items (toothpicks or bones)
from dishes. You do not need to prerinse your dishes.
3. Properly load the dishwasher. (See “Loading.”) Load dishes
with space in between so water will reach the soiled surfaces.
Make sure nothing prevents the spray arm(s) from spinning
freely.
front, of the dishwasher door. (See “Cycles and Options.”)
For all models except KUDI01DL: Press START. Or press
START to repeat the same cycle and options as the previous
cycle. The selected cycle and option lights will flash once.
NOTE: If the dishwasher is not started within 30 seconds after
selecting the cycle and options, it will revert to the last cycle
and options completed.
7. Push door firmly closed. The door latches automatically.
NOTE: The features on your dishwasher may vary from those
in the illustration below.
4. Add detergent. Always use a high-quality brand detergent.
(See “Dishwasher Use” in the User Instructions.)
5. Run hot water at the sink nearest your dishwasher until the
water is hot. Turn off water.
For Model KUDI01DL:
8. Press the Start pad on the front of the dishwasher door. Or
press the Start pad to repeat the same cycle and options as in
the previous cycle.
NOTE: If the dishwasher is not started within 30 seconds after
selecting the cycle and options, it will revert to the last cycle
and options completed.
IMPORTANT:
■ When the cycle starts, you will see a rotating pattern of lights
in the display window indicating that the unit is operating. This
pattern will continue for up to 6 minutes while the multiple
sensors check the incoming water temperature, rinse aid
usage and soil level on dishes and cookware.
■ The cycle countdown pauses and the water heating light
glows while the dishwasher heats the water to a set
temperature. (See “Cycle Selections.”)
4
LOADING
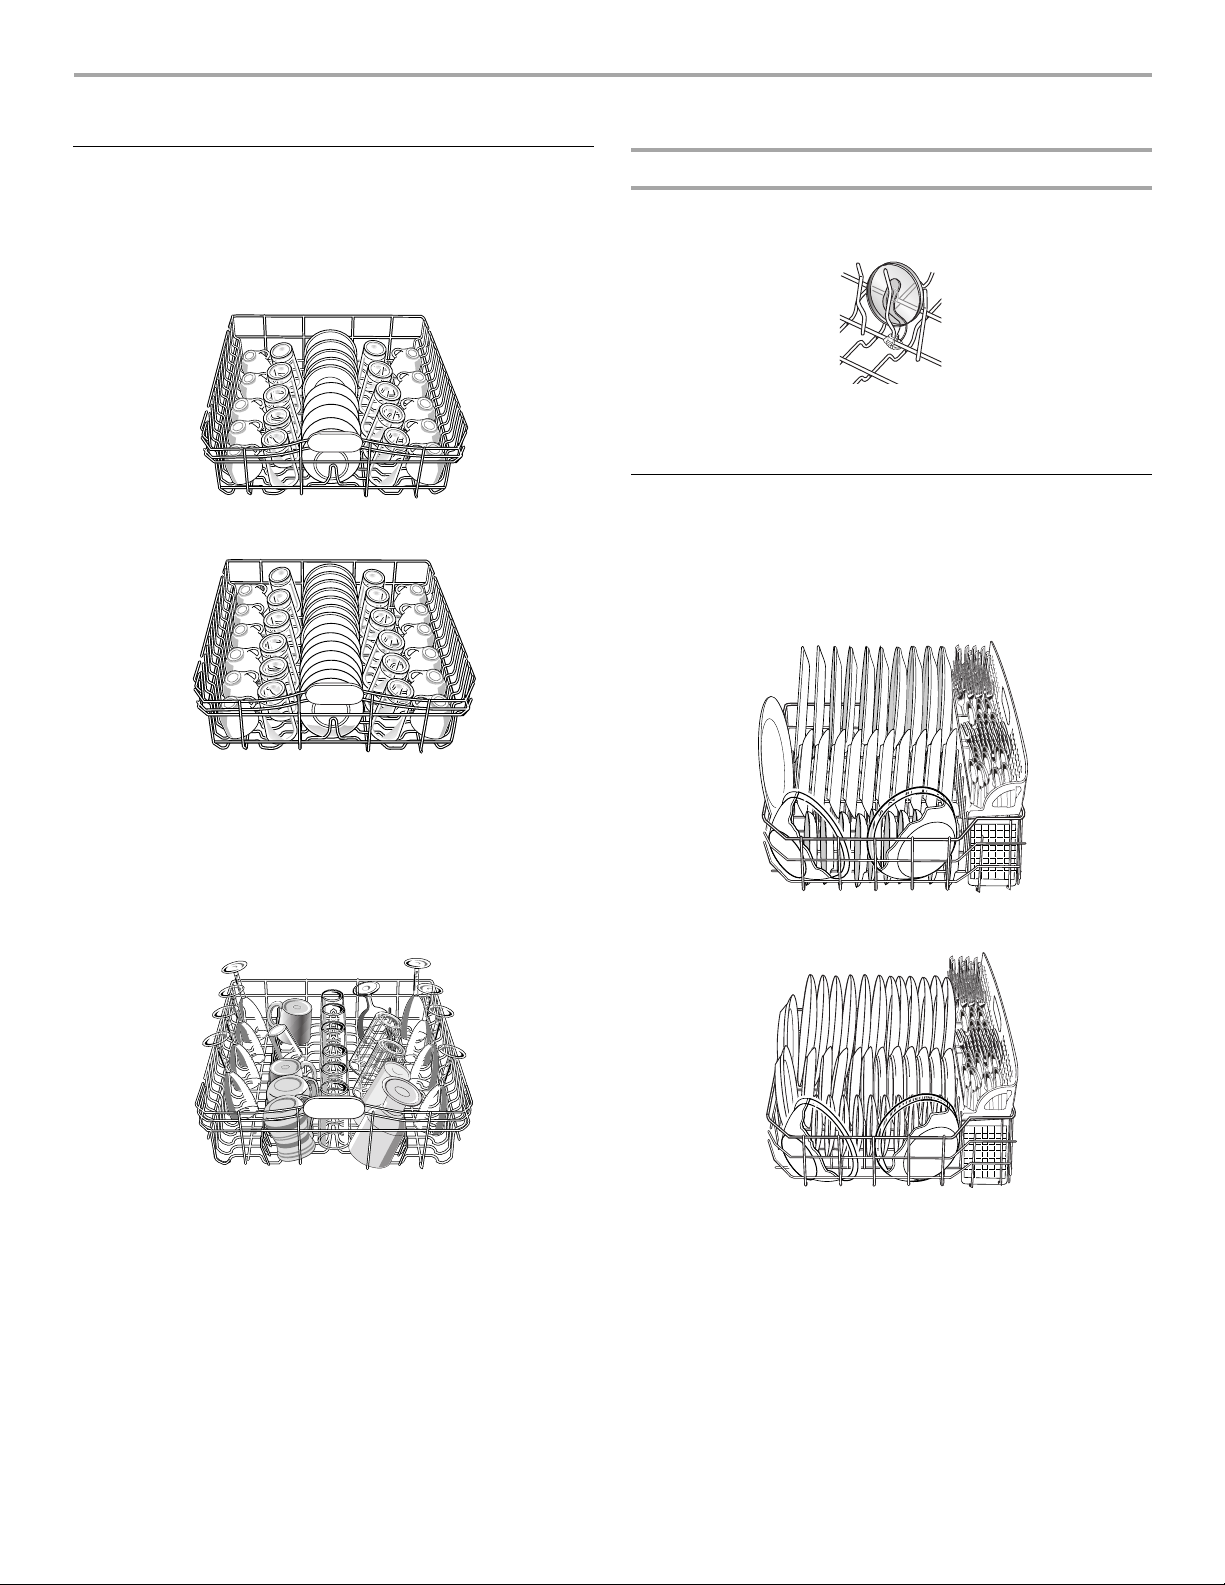
To p R a c k
The top rack is designed for cups, glasses, and smaller items.
Many items, up to 9" (22 cm), fit in the top rack. (See
recommended loading patterns shown.)
NOTE: The features on your dishwasher rack may vary from the
drawings shown.
10 place setting
SURE-HOLD® light item clips
The light item clips hold lightweight plastic items such as cups,
lids, or bowls in place during washing.
To move a clip
1. Pull the clip up and off the tine.
2. Reposition the clip on another tine.
BottomRack
The bottom rack is designed for plates, pans, casseroles, and
utensils. Many items, up to 13" (33 cm) tall, fit in the bottom rack.
(See recommended loading patterns shown.)
NOTE: The features on your dishwasher rack may vary from the
drawings shown.
12 place setting
■ Place items so open ends face down for cleaning and
draining.
■ Load glasses and cups in top rack only. The bottom rack is
not designed for glasses and cups. Damage can occur.
■ Place cups and glasses in the rows between tines. Placing
them over the tines can lead to breakage and water spots.
Cup and glass load
■ China, crystal, and other delicate items must not touch each
other during dishwasher operation. Damage may occur.
■ Load plastic items in the top rack only. Only plastic items
marked “dishwasher safe” are recommended.
■ Load plastic items so the force of the spray does not move
them during the cycle.
■ To avoid chipping, do not let stemware touch other items.
■ Small bowls, pans, and other utensils can be placed in the top
rack. Load bowls in the center section for best stability.
10 place setting
12 place setting
■ Do not load glasses, cups, or plastic items in the bottom rack.
Load small items in the bottom rack only if they are secured in
place.
■ Load plates, soup bowls, etc., between tines.
■ Overlap the edges of plates for large loads.
5
■ Load soup, cereal, and serving bowls in the rack in a variety of
ways depending upon their size and shape. Load bowls
securely between the rows of tines. Do not nest bowls
because the spray will not reach all surfaces.
Utensil load
■ Load cookie sheets, cake pans, and other large items at the
sides and back. Loading such items in front can keep the
water spray from reaching the detergent dispenser.
Mixed load
■ Secure heavily soiled cookware face down in the rack.
■ Make sure pot handles and other items do not stop rotation of
the spray arm(s). The spray arm(s) must move freely.
■ Do not load items between the bottom rack and the side of
the dishwasher tub because they might block the water inlet
opening.
FLEXI-FOLD DOWN™ flexible tines (on some models)
You can fold down one or both rows of tines at the back of the
bottom rack.
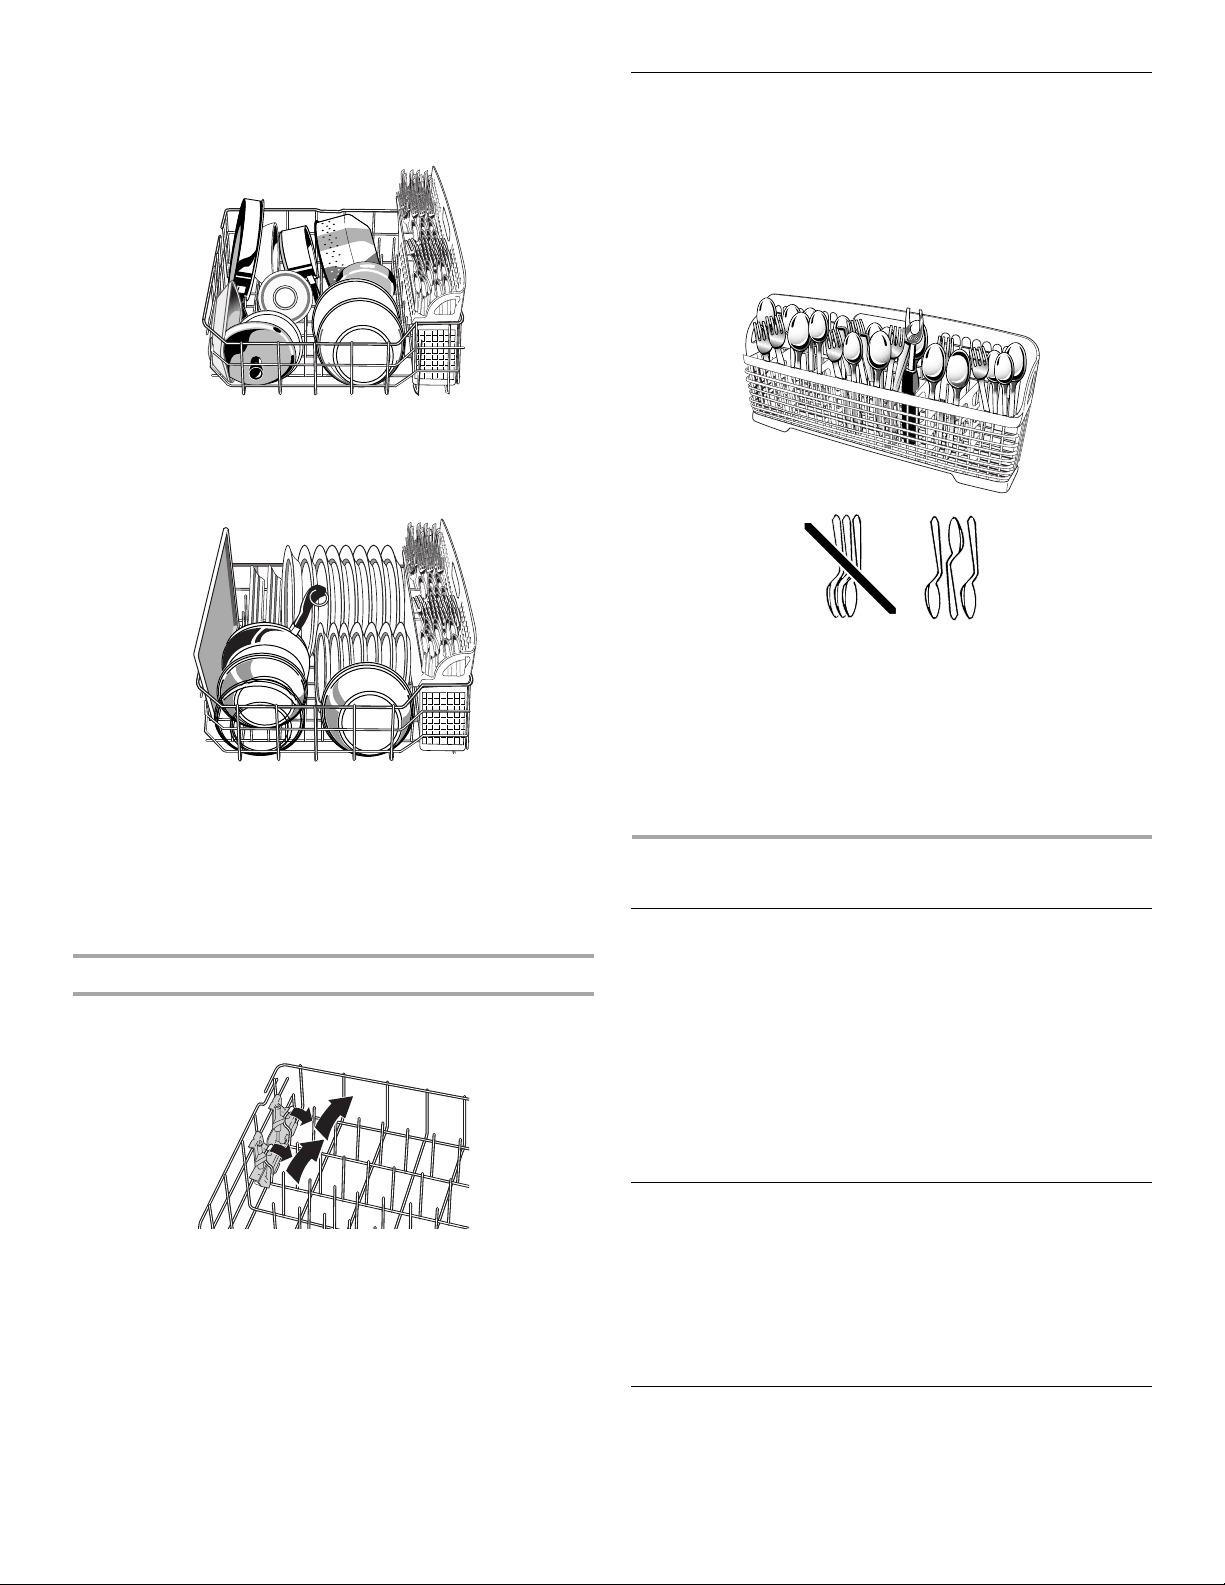
Silverware Basket
NOTE: The features on your silverware basket may vary from
those shown below.
Load the silverware basket while it is in the bottom rack or take
the basket out for loading on a counter or table.
NOTE: Unload or remove the basket before unloading the racks
to avoid spilling water droplets on the silverware. Mix items in
each section of the basket with some pointing up and some down
to avoid nesting. Spray cannot reach nested items.
IMPORTANT: Always load items (knives, skewers, etc.) pointing
down.
NOTES:
■ Do not load silver or silver-plated silverware with stainless
steel. These metals can be damaged by contact with each
other during washing.
■ Some foods (such as salt, vinegar, milk products, fruit juices,
etc.) can pit or corrode silverware. Run a rinse cycle if you do
not have a full load to wash immediately.
CYCLES AND OPTIONS
Cycle Selections
Select the wash cycle and options desired. Or press START to
repeat the same cycle and options as the previous cycle.
NOTE: If the last cycle you completed was a rinse cycle, the
dishwasher will run the last full wash cycle and options that you
selected when you press Start.
■ If the power is off or the door is open for an extended period
of time, the Start button memory will default to the Normal
cycle with heated drying.
■ If you do not run the dishwasher daily, close the door to
maintain memory.
1. Grasp the tip of the tine that is in the tine holder.
2. Gently pull the tine out of the tine holder.
3. Lay the row of tines down in the rack to make room for larger
dishes, bowls, pots, pans or roasters.
6
A “●” shows what steps are in each cycle.
Temperatures indicate where extra heat is added.
Water usage is shown in U.S. gallons/liters.
This model meets the ENERGY STAR
®
guidelines for energy
efficiency.
Cycle time includes dry time. An asterisk ( * ) by the cycle time
indicates the cycle time might be longer depending on the
temperature of the water entering the dishwasher.

Heavy
Rinse Only
Use this cycle for heavily-soiled pots, pans, casseroles, regular
tableware and harder than normal water conditions.
Use both detergent dispenser sections.
Pre-
Wash
130°F
(54°C)
Main
Wash
●
140°F
(60°C)
Rinse Rinse Final
●
●●
Heated
Rinse
140°F
(60°C)
Dry Mini-
mum
Time
(min)
● 89* 6.9/26
Water
Usage
(gal/L)
Heavy (Model KUDI01DL)
Use this cycle for heavily-soiled pots, pans, casseroles, regular
tableware and harder than normal water conditions.
Use both detergent dispenser sections.
Pre-
Wash
130°F
(54°C)
Main
Wash
●
145°F
(63°C)
Rinse Rinse Final
●
●●
Heated
Rinse
155°F
(68°C)
Dry Mini-
mum
Time
(min)
● 91* 6.9/26
Water
Usage
(gal/L)
Use this rinse cycle for rinsing dishes, glasses, and silverware
that will not be washed right away.
Do not use detergent with this cycle.
Pre-
Wash
†A small amount of water is run through the pump to remove soil
Rinse Main
Wash
Rinse Final
Heated
Rinse
● 10 1.8/7
Dry Time
(min)
Water
Usage
(gal/L)
particles between the main wash and final rinse.
*If the incoming water temperature is less than the recommended
temperature or food soils are heavy, the cycle will automatically
compensate by adding time, heat, and water as needed.
Canceling aCycle
For Model KUDI01IL
Anytime during a cycle, press CANCEL. Cancel glows. The
dishwasher starts a 2-minute drain (if needed). Let the dishwasher
drain completely. The light goes off when the dishwasher finishes
the drain.
To stop the drain
You can press CANCEL again to stop the drain immediately.
Remember to drain the dishwasher before starting a new cycle.
Normal
Use this cycle for loads with normal amounts of food soil. (The
energy-usage label is based on this cycle.) During the main
wash, the wash action will repeatedly pause for several
seconds.
Use both detergent dispenser sections.
Pre-
Wash
Main
Wash
●●
120°F
(49°C)
Purge† Rinse Final
●●
Heated
Rinse
140°F
(60°C)
Dry Mini-
● 72* 5.9/
mum
Time
(min)
Water
Usage
(gal/L)
22.3
To clear the indicators
Press CANCEL before starting the dishwasher to clear all options
and cycles.
For Model KUDI01DL
Anytime during a cycle, press the Cancel pad.
The display shows
Your dishwasher starts a 2-minute drain (if needed). Let the
dishwasher drain completely. The light turns off after
2minutes.
NOTE: If your dishwasher does not need draining, the light turns
off. Select a new cycle and options.
To stop the drain
You can press the Cancel pad again to stop the drain immediately.
Remember to drain the dishwasher before starting a new cycle.
To clear the indicators
Press the Cancel pad before starting the dishwasher to clear all
options and cycles.
7

For Model KUDI01FL
For Model KUDI01DL
1. Carefully open the door slightly to stop the cycle. Wait for the
spraying action to stop before opening the door to gain
access to the control panel.
2. Press CANCEL. Cancel glows.
3. Close the door. The dishwasher starts a 2-minute drain (if
needed). Let the dishwasher drain completely.
To stop the drain
You can press CANCEL again to stop the drain. Remember to
drain the dishwasher before starting a new cycle.
To clear the indicators
Press CANCEL before starting the dishwasher to clear all options
and cycles.
Changing a Cycle or Setting
For Model KUDI01IL
During the first minute of a cycle
Press a new cycle and/or options.
After the first minute of a cycle
1. Press CANCEL. Cancel glows. The dishwasher starts a
2-minute drain (if needed). Let the dishwasher drain
completely.
2. Check the detergent dispensers. If the main wash cup has
opened and the detergent washed away, refill the cups as
needed.
3. Close the door.
4. Press a new cycle and/or options.
5. Press START.
During the first minute of a cycle
1. Open the door.
2. Press a new cycle and/or options.
3. Check the detergent dispensers. They must be filled properly
for the new cycle.
4. Close the door. The dishwasher resumes the new cycle
and/or option after a 5-second pause.
After the first minute of a cycle
1. Press the Cancel pad.
The display shows
Your dishwasher starts a 2-minute drain (if needed). Let
the dishwasher drain completely. The light turns off after
2minutes.
NOTE: If your dishwasher does not need draining, the light
turns off.
2. Open the door.
3. Select a new cycle and/or options.
4. Check the detergent dispensers. They must be filled properly
for the new cycle.
5. Close the door.
6. Press the Start pad.
For Model KUDI01FL
During the first minute of a cycle
1. Open the door.
2. Press a new cycle and/or options.
3. Check the detergent dispensers. They must be filled properly
for the new cycle.
4. Close the door. The dishwasher resumes the new cycle
and/or option after a 5-second pause.
After the first minute of a cycle
1. Carefully open the door slightly to stop the cycle. Wait for the
spraying action to stop before opening the door to gain
access to the control panel.
2. Press CANCEL. Cancel glows.
3. Close the door. Your dishwasher starts a 2-minute drain (if
needed). Let the dishwasher drain completely.
4. Select a new cycle and/or options.
5. Press START.
6. Check the detergent dispensers. They must be filled properly
for the new cycle.
7. Close the door.
8

Adding ItemsDuring a Cycle
You can add an item anytime before the main wash starts. Open
the door and check the detergent dispenser. If the cover is still
closed, you can add items.
To add items
1. Lift up the door latch to stop the cycle. On model KUDI01FL,
carefully open the door slightly to stop the cycle. Wait for the
spraying action to stop before opening the door.
2. Open the door. If the detergent dispenser cover is still closed,
add the item.
3. Close the door firmly until it latches. The dishwasher resumes
the cycle after about a 5-second pause.
Option Selections
You can customize your cycles by pressing an option. If you
change your mind, press the option again to turn off the option.
Select a different option if desired.
You can change an option anytime before the selected option
begins. For example, you can press an unheated drying option
any time before drying begins.
Press START to repeat the same cycle and options as in the
previous wash cycle.
NOTE: If the last cycle you completed was a rinse cycle, when
you press Start, the dishwasher runs the last full wash cycle and
options.
Hi-Temp Scrub
Select this option to heat the water during parts of the cycle, and
add a rinse. Higher water temperatures and an extra rinse help
clean tough soils. Hi-Temp Scrub, with the Heavy cycle, heats the
water in the main wash and the prewash. Hi-Temp Scrub, with the
Normal cycle, raises the water temperature in the main wash.
This option adds heat, water, and wash time to a cycle.
NOTE: Hi-Temp Scrub is an option with the Heavy and Normal
cycles. Always use Hi-Temp Scrub if you have hard water.
Control Lock
Use Control Lock to prevent unintended use of your dishwasher.
You can also use the control lock feature to prevent unintended
cycle or option changes during a cycle.
When CONTROL LOCK is lit, all buttons are disabled.
NOTES:
■ The dishwasher door can be opened while the controls are
locked.
■ You can turn on the Lock while the dishwasher is running.
To turn on the Lock
Press and hold ENERGY SAVER™ Dry System control for
4 seconds. CONTROL LOCK glows.
If you press any pad while your dishwasher is locked, the light
flashes 3 times.
To turn off the Lock
Press and hold ENERGY SAVER™ Dry System control for
4 seconds. The light turns off.
Status Indicators
Water Heating
Water Heating glows, and the cycle progression pauses,
whenever water is heated during a cycle.
Wash or rinse action continues as the water heats.
Clean
Clean glows when a cycle is finished. The light turns off when you
open and close the door or press CANCEL
ENERGY SAVER™ Dry System
Select this option to dry dishes without heat. ENERGY SAVER™
Dry System is useful if you do dishes at night and unload in the
morning.
The dishes take longer to dry, and some spotting can occur. For
best drying, always use a liquid rinse aid. Some items (such as
plastics) may need towel drying.
NOTE: Rinse Only automatically uses this option. ENERGY
SAVER™ Dry System is an option with all other cycles.
9

Notes
10

PIÈCES ET CARACTÉRISTIQUES
O
Ce manuel couvre plusieurs modèles différents. Les caractéristiques de votre lave-vaisselle peuvent être différentes de celles illustrées
ci-dessous.
A
K
B
L
C
M
D
E
F
G
N
H
I
J
A. Aspersion supérieure
B. Panier supérieur
C. Plaque signalétique des numéros
de modèle et de série
D. Ouverture d’arrivée d’eau
(dans la paroi de la cuve)
E. Tiges flexibles
FLEXI-FOLD DOWN™
(sur certains modèles)
F. Bras d’aspersion
à 4 directions HYDRO SWEEP™
G. Panier inférieur
H. Distributeur de détergent
I. Évent (sur certains modèles)
J. Évent actif (Modèle KUDI01FL)
K. Attaches pour articles légers
SURE-HOLD
L. Bras d’aspersion central
M. Panier à couverts
N. Dispositif de protection
contre le débordement
®
(sur certains modèles)
P
Q
R
S
T
O. Élément de chauffage
P. Distributeur d’agent de rinçage
Q. Système d’insonorisation
WHISPER QUIET
R. Tableau de commande sur l’avant
de la porte (sur certains modèles)
S. Tableau de commande
(Modèle KUDI01DL)
T. Tableau de commande
(Modèle KUDI01FL])
®
11

Tableauxdecommande
KUDI01IL, KUDK01IL, KUDL01IL, KUDC01TM
(Pour le modèle KUDI01IL, votre lave-vaisselle peut avoir une des vues illustrées.)
KUDI01IL
KUDI01DL
KUDI01FL
12

MISE EN MARCHE
Avant d’utiliser le lave-vaisselle, enlever tous les matériaux d’emballage. Lire ce Guide de référence pour le consommateur au complet
ainsi que les instructions pour l’utilisateur. Vous y trouverez des renseignements de sécurité importants ainsi que des conseils
d’utilisation utiles.
Utilisation du lave-vaisselle
5. Laisser l’eau couler du robinet le plus près du lave-vaisselle
Pour tous les modèles :
1. L’agent de rinçage est essentiel pour un bon séchage. Veiller à
remplir le distributeur avant d’utiliser le nouveau lavevaisselle. Chaque remplissage durera de 1 à 3 mois selon
l’usage.
2. Ôter les particules alimentaires importantes et articles durs
(cure-dents ou os) de la vaisselle. Il n’est pas nécessaire de
prérincer la vaisselle.
3. Bien charger le lave-vaisselle. (Voir “Chargement”.) Espacer la
vaisselle pour que l’eau puisse atteindre les surfaces sales.
S’assurer que rien n’empêche le ou les bras d’aspersion de
tourner librement.
jusqu’à ce qu’elle soit chaude. Fermer le robinet.
6. Appuyer sur les boutons de programmes et d’options désirés
sur le dessus ou à l’avant de la porte du lave-vaisselle. (Voir
“Programmes et options”.)
Pour tous les modèles sauf KUDI01DL : Appuyer sur START
(mise en marche). Ou appuyer sur START (mise en marche)
pour répéter le même programme et les mêmes options que le
programme précédent. Le témoin lumineux du programme et
des options choisis clignotera une fois.
REMARQUE : Si le lave-vaisselle n’est pas mis en marche
dans les 30 secondes après la sélection du programme et des
options, ceux-ci retourneront au dernier programme et
dernières options complétés.
4. Ajouter le détergent. Toujours utiliser un détergent de bonne
qualité. (Voir “Utilisation du lave-vaisselle” dans les
Instructions pour l’utilisateur.)
7. Bien fermer la porte. Le verrou de la porte s’engage
automatiquement.
REMARQUE : Les caractéristiques sur le panier de votre lave-
vaisselle peuvent différer de l’illustration ci-dessous.
13

Pour le model KUDI01DL :
8. Appuyer sur la touche Start (mise en marche) à l’avant de la
porte du lave-vaisselle. Ou appuyer sur la touche Start (mise
en marche) pour répéter le même programme et les mêmes
options que le programme précédent.
REMARQUE : Si le lave-vaisselle n’est pas mis en marche
dans les 30 secondes après la sélection du programme et des
options, ceux-ci retourneront au dernier programme et
dernières options complétés.
IMPORTANT :
■ Quand le programme commence, vous verrez un motif rotatif
de lumières dans la fenêtre d’affichage, indiquant que
l’appareil est en marche. Ce motif continuera pendant une
période allant jusqu’à 6 minutes pendant que de multiples
détecteurs vérifient la température de l’eau qui pénètre dans
l’appareil, l’usage d’aide de rinçage et le niveau de saleté sur
la vaisselle et les ustensiles de cuisson.
Charge pour 12 couverts
■ Pour faciliter le nettoyage et le drainage, orienter la cavité
ouverte des articles vers le bas.
■ Charger les verres et les tasses dans le panier supérieur
seulement. Le panier inférieur n’est pas conçu pour les verres
et les tasses. Ils pourraient y subir des dommages.
■ Placer les tasses et verres dans les rangées entre les tiges.
Ces articles placés sur les tiges peuvent se casser et
comporter des taches d’eau.
■ Le compte à rebours du programme fait une pause et
l’indicateur de température d’eau s’allume pendant que le
lave-vaisselle chauffe l’eau à une température réglée. (Voir
“Sélection des programmes”.)
CHARGEMENT
Panier supérieur
Le panier supérieur est conçu pour le chargement des tasses,
verres et petits articles. De nombreux articles jusqu’à 9"
(22 cm) de hauteur conviennent dans le panier supérieur. (Voir les
modèles de chargement recommandés dans les illustrations.)
REMARQUE : Les caractéristiques sur le panier de votre lavevaisselle peuvent différer des illustrations.
Charge pour 10 couverts
Charge de tasses et verres
■ Veiller à ce qu’il n’y ait aucun contact entre les articles de
porcelaine, de cristal et autres articles délicats. Ils pourraient
subir des dommages.
■ Placer les articles de plastique dans le panier supérieur
seulement. Ne laver des articles de plastique au lave-vaisselle
que s’ils sont identifiés comme “lavable au lave-vaisselle.”
■ Placer les articles de plastique de façon à ce que la force du
jet d’eau ne les déplace pas durant le lavage.
■ Pour éviter l’écaillage, veiller à ce que les verres à pied ne
touchent pas les autres articles.
■ On peut placer dans le panier supérieur de petits bols ou
moules et autres petits ustensiles. Placer les bols dans la
section centrale pour une meilleure stabilité.
Attaches pour articles légers SURE-HOLD
®
Ces attaches maintiennent les articles légers en plastique tels que
les tasses, couvercles ou bols en place pendant le lavage.
Pour déplacer une attache
1. Tirer l’attache vers le haut pour la séparer de la tige.
2. Réinstaller l’attache sur une autre tige.
14

Panier inférieur
Le panier inférieur est conçu pour les assiettes, casseroles et
ustensiles. De nombreux articles jusqu’à 13" (33 cm) de hauteur
conviennent dans le panier inférieur. (Voir les modèles de
chargement recommandés dans les illustrations.)
REMARQUE : Les caractéristiques sur le panier de votre lavevaisselle peuvent différer des illustrations.
Charge pour 10 couverts
■ Charger les bols à soupe, à céréales et de service dans le
panier de diverses façons selon leur taille et forme. Charger
les bols solidement entre les rangées de tiges. Ne pas
imbriquer les bols car le jet d’eau n’atteindra pas toutes les
surfaces.
Charge d’ustensiles
■ Charger les plaques à biscuits, moules à gâteaux et autres
gros articles sur les côtés et à l’arrière. Le chargement de tels
articles à l’avant peut empêcher le jet d’eau d’atteindre le
distributeur de détergent.
Charge pour 12 couverts
■ Ne pas charger dans le panier inférieur des articles comme
verres, tasses ou articles de plastique. Ne charger de petits
articles dans le panier inférieur que s’ils sont bien fixés en
place.
■ Charger les assiettes, bols à soupe, etc. entre les tiges de
séparation.
■ Pour une charge importante, placer les bords des assiettes en
chevauchement.
Charge mixte
■ Immobiliser les ustensiles de cuisson très sales dans le panier,
cavité vers le bas.
■ Veiller à ce que les poignées des ustensiles et autres articles
n’entravent pas la rotation du ou des bras d’aspersion. Le ou
les bras d’aspersion doivent pouvoir tourner librement.
■ Ne pas charger d’articles entre le panier inférieur et la paroi
latérale de la cuve du lave-vaisselle. Cela risque de bloquer
l’arrivée d’eau.
Tiges flexibles FLEXI-FOLD DOWN™
(sur certains modèles)
Il est possible de rabattre une ou deux rangées de tiges à l’arrière
du panier inférieur
1. Saisir la pointe de la tige qui se trouve dans le support
de la tige.
2. Tirer doucement la tige hors du support de la tige.
3. Coucher la rangée de tiges dans le panier pour faire de la
place pour des plats plus gros, des bols, casseroles ou
rôtissoires.
.
15

Du panier àcouverts
REMARQUE : Les caractéristiques de votre panier à couverts
peuvent différer des illustrations ci-dessous.
Charger le panier à couverts alors qu’il est dans le panier inférieur
ou le retirer pour le charger sur un comptoir ou sur une table.
REMARQUE : Toujours décharger ou enlever le panier à couverts
avant de décharger le reste du lave-vaisselle afin d’éviter que des
gouttes d’eau tombent sur les couverts. Assortir les articles dans
chaque section du panier, certains vers le haut et d’autres vers le
bas afin que les articles ne s’imbriquent pas. Le jet d’eau ne peut
pas atteindre les articles imbriqués.
IMPORTANT : Toujours charger les articles acérés (couteaux,
brochettes, etc.) pointés vers le bas.
REMARQUES :
■ Ne pas charger d’ustensiles en argent ou plaqués argent avec
des articles en acier inoxydable. Ces métaux peuvent être
endommagés s’ils se touchent durant le lavage.
■ Certains aliments (tels que le sel, le vinaigre, les produits
laitiers, les jus de fruits, etc.) peuvent causer des piqûres ou
de la corrosion sur les couverts. Effectuer un programme de
rinçage si la charge n’est pas assez pleine pour un lavage
immédiat.
PROGRAMMES
ET OPTIONS
Sélectiondes programmes
Choisir le programme et les options de lavage désirés. Ou
appuyer sur START (mise en marche) pour répéter le même
programme et les mêmes options que dans le programme
précédent.
REMARQUE : Si le dernier programme achevé était un rinçage, le
lave-vaisselle exécutera le dernier programme de lavage complet
et les options que vous avez choisies quand vous appuyez sur
Start.
■ Si l’appareil est mis hors tension ou si la porte est ouverte
pendant une période prolongée, la mémoire du bouton Start
reviendra par défaut au programme Normal avec séchage à
chaud.
■ Lorsqu’on n’utilise pas le lave-vaisselle tous les jours,
refermer la porte pour conserver les données en mémoire.
Le “●” indique les étapes de chaque programme.
Les températures indiquent là où de la chaleur est ajoutée.
La consommation d’eau est indiquée en gallons américains/litres.
Ce modèle satisfait aux directives d’éconergie ENERGY STAR®.
La durée du programme inclut la durée de séchage. Un astérisque
( * ) à côté de la durée du programme indique que la durée du
programme peut être plus longue selon la température de l’eau
entrant dans le lave-vaisselle.
Heavy (lavage intense)
Utiliser ce programme pour les chaudrons, poêles, casseroles,
ustensiles ordinaires très sales et pour les conditions où l’eau
est plus dure que normalement.
Pré-
la-
vage
●
130°F
(54°C)
Utiliser les deux sections du distributeur
de détergent.
Lavage
principal
●
140°F
(60°C)
Rin-
çage
●●
Rin-
çage
Rin-
çage
final
chauf-
fé
140°F
(60°C)
Sécha
-ge
Durée
minimum
(min)
● 89* 6,9/26
Consom-
mation
d’eau
(gal/L)
16

Heavy (lavage intense) [Modèle KUDI01DL]
Utiliser ce programme pour les chaudrons, poêles, casseroles,
ustensiles ordinaires très sales et pour les conditions où l’eau
est plus dure que normalement.
Utiliser les deux sections du distributeur
de détergent.
Pré-
la-
vage
●
130°F
(54°C)
Lavage
principal
●
145°F
(63°C)
Rin-
çage
●●
Rin-
çage
Rin-
çage
final
chauf-
fé
155°F
(68°C)
cha
-ge
● 91* 6,9/26
Durée
minimum
(min)
Consom-
mation
d’eau
(gal/L)
Sé-
Normal
Utiliser ce programme pour des charges comportant des
quantités normales de débris alimentaires. (L’étiquette de
consommation d’énergie est basée sur ce programme.) Lors du
lavage principal, l’action de lavage fera des pauses répétées
pendant quelques secondes.
Utiliser les deux sections du distributeur
de détergent.
Pré-
la-
vage
Lavage
principal
Vi-
dange
†
Rin-
çage
Rin-
çage
final
chauf-
fé
Sécha
-ge
Durée
minimum
(min)
Consom-
mation
d’eau
(gal/L)
Annulation d’un programme
Pour le modèle KUDI01IL
En tout temps au cours d’un programme, appuyer sur CANCEL
(annulation). Cancel (annulation) s’allume. Le lave-vaisselle
commence une vidange de 2 minutes (au besoin). Laisser le lavevaisselle se vidanger complètement. La lumière s’éteint lorsque le
lave-vaisselle a complété la vidange.
Pour arrêter la vidange
On peut appuyer de nouveau sur CANCEL pour arrêter la vidange
immédiatement. Ne pas oublier de vidanger le lave-vaisselle avant
de commencer un nouveau programme.
Pour annuler les indicateurs
Appuyer sur CANCEL avant de mettre le lave-vaisselle en marche
pour annuler l’ensemble des options et programmes.
Pour le modèle KUDI01DL
À tout moment au cours d’un programme, appuyer sur la touche
Cancel (Annulation).
L’afficheur indique
●●
120°F
(49°C)
●●
140°F
(60°C)
● 72* 5,9/
22,3
Rinse Only (rinçage seulement)
Utiliser ce programme de rinçage pour rincer la vaisselle, les
verres et les couverts qui ne seront pas lavés immédiatement.
Ne pas utiliser de détergent avec ce
programme de rinçage.
Pré-
la-
vage
†Une petite quantité d’eau circule dans la pompe pour éliminer les
Rin-
çage
Lavage
principal
Rin-
çage
● 10 1,8/7
Rin-
çage
final
chauf-
fé
Sécha
-ge
Durée
(min)
mation
d’eau
(gal/L)
Consom-
saletés entre le lavage principal et le rinçage final.
*Si la température de l’eau à l’entrée est inférieure à la
température recommandée ou si la vaisselle est très sale, le
programme compensera automatiquement en ajoutant du
temps, de la chaleur et de l’eau si nécessaire.
Le lave-vaisselle commence une vidange de 2 minutes (si
nécessaire). Laisser le lave-vaisselle se vidanger
complètement. La lumière s’éteint après 2 minutes.
REMARQUE : Si votre lave-vaisselle n’a pas besoin d’être
vidangé, la lumière s’éteint. Choisir un nouveau programme et de
nouvelles options.
Pour arrêter la vidange
On peut appuyer de nouveau sur la touche Cancel pour faire
cesser la vidange immédiatement. Ne pas oublier de vidanger le
lave-vaisselle avant de commencer un nouveau programme.
Pour annuler les indicateurs
Appuyer sur la touche Cancel avant de mettre en marche le lavevaisselle pour annuler toutes les options et les programmes.
17

Pour le modèle KUDI01FL
1. Ouvrir délicatement et légèrement la porte pour arrêter le
programme. Attendre que l’aspersion s’arrête avant d’ouvrir la
porte pour avoir accès au tableau de commande.
2. Appuyer sur CANCEL (annulation). Cancel (annulation)
s’allume.
3. Fermer la porte. Le lave-vaisselle commence une vidange de
2 minutes (si nécessaire). Laisser le lave-vaisselle se vidanger
complètement.
Pour arrêter la vidange
On peut appuyer de nouveau sur CANCEL pour arrêter la vidange.
Ne pas oublier de vidanger le lave-vaisselle avant de commencer
un nouveau programme.
Pour annuler les indicateurs
Appuyer sur CANCEL avant de mettre le lave-vaisselle en marche
pour annuler l’ensemble des options et programmes.
Changement d’unprogramme
ou réglage
Pour le modèle KUDI01IL
Au cours de la première minute d’un programme
Appuyer sur une nouvelle touche de programme et/ou d’options.
Après la première minute d’un programme
1. Appuyer sur CANCEL (annulation). Cancel (annulation)
s’allume. Le lave-vaisselle commence une vidange de
2 minutes (si nécessaire). Laisser le lave-vaisselle se vidanger
complètement.
2. Examiner les distributeurs de détergent. Si la section pour le
lavage principal s’est ouverte et si le détergent a
complètement été éliminé, remplir de nouveau les sections au
besoin.
3. Fermer la porte.
4. Appuyer sur une nouvelle touche de programme et/ou
options.
5. Appuyer sur START (mise en marche).
Pour le modèle KUDI01DL
Au cours de la première minute d’un programme
1. Ouvrir la porte.
2. Appuyer sur une nouvelle touche de programme et/ou
options.
3. Vérifier les distributeurs de détergent. Ils doivent être bien
remplis pour le nouveau programme.
4. Fermer la porte. Le lave-vaisselle reprend le nouveau
programme et/ou l’option après une pause de 5 secondes.
Après la première minute d’un programme
1. Appuyer sur la touche Cancel (Annulation).
L’afficheur indique
Le lave-vaisselle commence une vidange de 2 minutes
(au besoin). Laisser le lave-vaisselle se vidanger
complètement. Le témoin s’éteint après 2 minutes.
REMARQUE : Si le lave-vaisselle n’a pas besoin d’être
vidangé, le témoin s’éteint.
2. Ouvrir la porte.
3. Appuyer sur une nouvelle touche de programme et/ou
options.
4. Vérifier les distributeurs de détergent. Ils doivent être bien
remplis pour le nouveau programme.
5. Fermer la porte.
6. Appuyer sur la touche Start (mise en marche).
Pour le modèle KUDI01FL
Au cours de la première minute d’un programme
1. Ouvrir la porte.
2. Appuyer sur une nouvelle touche de programme et/ou
options.
3. Vérifier les distributeurs de détergent. Ils doivent être bien
remplis pour le nouveau programme.
4. Fermer la porte. Le lave-vaisselle reprend le nouveau
programme et/ou l’option après une pause de 5 secondes.
Après la première minute d’un programme
1. Ouvrir délicatement et légèrement la porte pour arrêter le
programme. Attendre que l’aspersion s’arrête avant d’ouvrir la
porte pour avoir accès au tableau de commande.
2. Appuyer sur CANCEL (annulation). Cancel (annulation)
s’allume.
3. Fermer la porte. Le lave-vaisselle commence une vidange de
2 minutes (au besoin). Laisser le lave-vaisselle se vidanger
complètement.
4. Appuyer sur une nouvelle touche de programme et/ou
options.
5. Appuyer sur START (mise en marche).
6. Vérifier les distributeurs de détergent. Ils doivent être bien
remplis pour le nouveau programme.
7. Fermer la porte.
18

Addition de vaisselle
durant un programme
On peut ajouter un article n’importe quand avant le début du
lavage principal. Ouvrir la porte et vérifier le distributeur de
détergent. Si le distributeur de détergent est encore fermé, on
peut ajouter des articles.
Pour ajouter des articles
1. Soulever le loquet de la porte pour interrompre l’exécution du
programme. Sur le modèle KUDI01FL, ouvrir délicatement et
légèrement la porte pour arrêter le programme. Attendre
quelques instants jusqu’à l’arrêt des bras d’aspersion avant
d’ouvrir la porte.
2. Ouvrir la porte. Si le couvercle du distributeur de détergent est
encore fermé, ajouter l’article.
3. Pousser fermement sur la porte jusqu’à ce qu’elle
s’enclenche. Le lave-vaisselle se remet alors
automatiquement en marche après une pause d’environ
5secondes.
Sélection d’options
Vous pouvez personnaliser vos programmes en appuyant sur une
option. Si vous changez d’idée, appuyer de nouveau sur l’option
pour l’annuler. Choisir une option différente si désiré.
Vous pouvez changer une option à tout moment avant que
l’option choisie ne commence. Par exemple, vous pouvez
appuyer sur une option de séchage sans chaleur à tout moment
avant que le séchage ne commence.
Appuyer sur START (mise en marche) pour répéter le même
programme et les mêmes options que dans le programme de
lavage précédent.
REMARQUE : Si le dernier programme terminé était un
programme de rinçage, quand vous appuyez sur Start, le lavevaisselle exécute le dernier programme complet de lavage et les
options.
Système ENERGY SAVER™ Dry/séchage éconergique
Choisir cette option pour sécher la vaisselle sans chaleur. Le
système ENERGY SAVER™ Dry (séchage éconergique) est utile si
vous lavez la vaisselle la nuit et déchargez la machine le matin.
La vaisselle prend plus de temps à sécher et certaines taches
peuvent survenir. Pour le meilleur séchage, toujours utiliser un
agent de rinçage liquide. Certains articles (tels que les plastiques)
peuvent avoir besoin d’être essuyés avec un linge.
REMARQUE : Rinse Only (rinçage seulement) utilise
automatiquement cette option. ENERGY SAVER™ Dry (séchage
éconergique) est une option avec tous les autres programmes.
Control Lock/dispositif de verrouillage
Utiliser le dispositif de verrouillage pour éviter que le lave-vaisselle
ne soit mis en marche accidentellement. On peut également
l’utiliser pour éviter tout changement accidentel dans le choix du
programme ou des options pendant un programme.
Lorsque l’indicateur CONTROL LOCK (dispositif de verrouillage)
est allumé, tous les boutons sont désactivés.
REMARQUES :
■ On peut ouvrir la porte du lave-vaisselle lorsque les
commandes sont verrouillées.
■ On peut enclencher le dispositif de verrouillage des
commandes lorsque le lave-vaisselle est en marche.
Pour actionner la commande de verrouillage
Appuyer sur le bouton ENERGY SAVER™ Dry (séchage
éconergique) pendant 4 secondes. CONTROL LOCK (dispositif de
verrouillage) s’allume.
Si on appuie sur une touche pendant que le lave-vaisselle est
verrouillé, le témoin clignote 3 fois.
Pour éteindre la commande de verrouillage
Appuyer pendant 4 secondes sur le bouton ENERGY SAVER™
Dry (séchage éconergique). Le témoin s’éteint.
Hi-Temp Scrub/récurage à haute température
Choisir cette option pour chauffer l’eau durant des parties du
programme et ajouter un rinçage. Les températures d’eau plus
élevées et le rinçage supplémentaire aident à nettoyer les saletés
tenaces. L’option Hi-Temp Scrub (récurage à haute température),
associée au programme Heavy (lavage intense), chauffe l’eau au
cours du lavage principal et du prélavage. L’option Hi-Temp Scrub
(récurage à haute température), associée au programme Normal
augmente la température de l’eau au cours du lavage principal.
Cette option ajoute de la chaleur, de l’eau et du temps de lavage
au programme.
REMARQUE : Le récurage à haute température est une option
avec les programmes Heavy (lavage intense) et Normal. Toujours
utiliser le récurage à haute température si l’eau est dure.
Indicateurs d’étatd’avancement
du programme
Water Heating/chauffage de l’eau
Water Heating (chauffage de l’eau) s’allume et la progression du
programme fait une pause, chaque fois que l’eau est chauffée
durant un programme.
L’action de lavage ou de rinçage continue durant le chauffage
de l’eau.
Clean/propre
Clean (propre) s’allume quand un programme est terminé. La
lumière s’éteint quand vous ouvrez et fermez la porte ou appuyez
sur CANCEL (annulation).
19

8531779A
© 2004. All rights reserved.
Tous droits réservés.
® Registered Trademark/TM Trademark of KitchenAid, U.S.A., KitchenAid Canada licensee in Canada
® Marque déposée/TM Marque de commerce de KitchenAid, U.S.A., Emploi licencié par KitchenAid Canada au Canada
Printed in U.S.A.
Imprimé aux É.-U.
3/04
 Loading...