

KitchenAid KUDD03STWH10, KUDD03STWH2, KUDD03STSS10, KUDD03STPA10, KUDD03STPA2 Installation Guide
...
I_Jtchen_kJd _
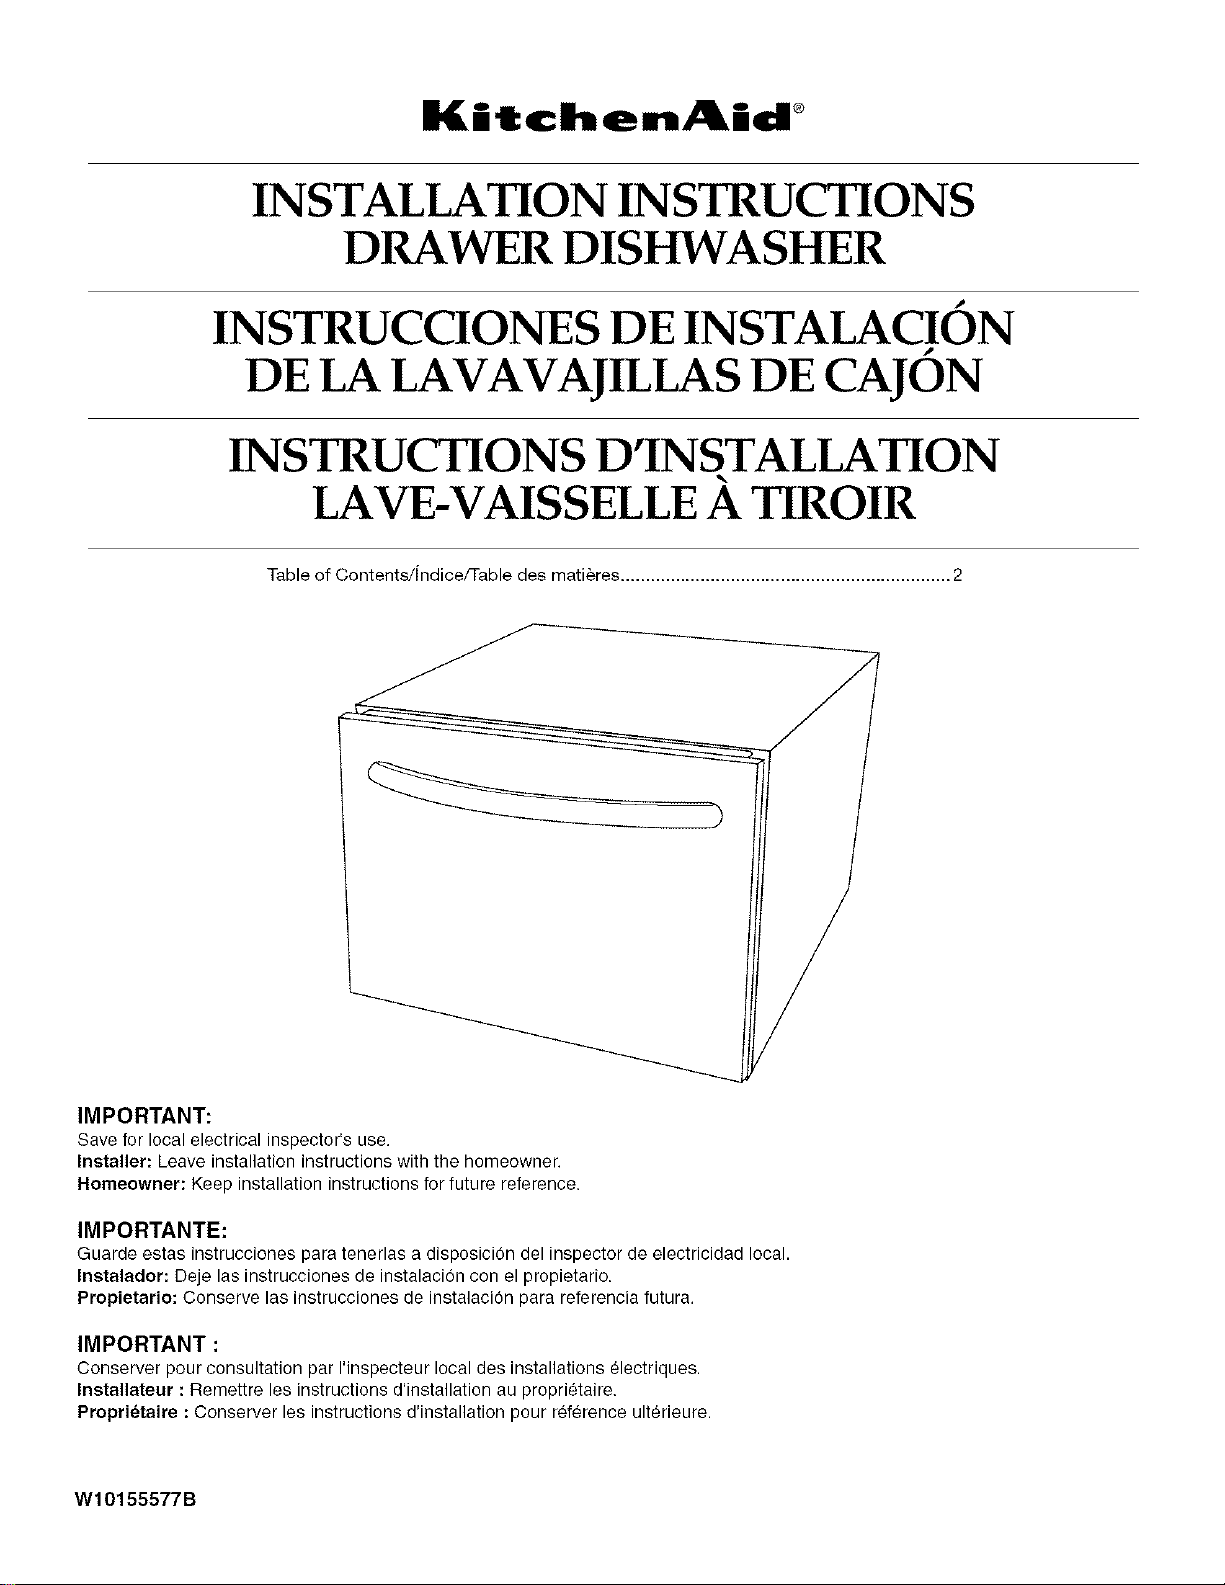
INSTALLATION INSTRUCTIONS
DRAWER DISHWASHER
INSTRUCCIONES DE INSTALACION
DE LA LAVAVAJILLAS DE CAJON
INSTRUCTIONS D'INSTALLATION
LAVE-VAISSELLE A TIROIR
Table of Contents/Indice/Table des mati_,res. ............................................................. 2
P
IMPORTANT:
Save for local electrical inspector's use.
Installer: Leave installation instructions with the homeowner.
Homeowner: Keep installation instructions for future reference.
IMPORTANTE:
Guarde estas instrucciones paratenerlas a disposici0n del inspector de electricidadlocal.
Instalador: Deje las instrucciones de instalacioncon elpropietario.
Propietario: Conserve las instrucciones de instalacion para referenciafutura.
IMPORTANT :
Conserver pour consultation parI'inspecteur local des installationselectriques.
Installateur : Remettre les instructions d'installation au proprietaire.
Propri_taire : Conserver les instructions d'installation pour reference ulterieure.
W10155577B
TABLE OF CONTENTS
DISHWASHER SAFETY ................................................................. 3
INSTALLATION REQUIREMENTS ................................................ 4
Tools and Parts ............................................................................ 4
Location Requirements ................................................................ 4
Electrical Requirements ............................................................... 5
Water Supply Requirements........................................................ B
Drain Requirements ..................................................................... B
INSTALLATION INSTRUCTIONS .................................................. 6
Unpack Dish Drawer .................................................................... B
Prepare Cabinet Opening ............................................................ 7
Prepare Dishwasher ..................................................................... 7
Route Electrical Wiring ................................................................. 8
iNDICE
SEGURIDAD DE LA LAVAVAJILLAS .......................................... 17
REQUISITES DE INSTALACION ................................................. 18
Piezas y herramientas ................................................................ 18
Requisites de ubicaeiCn ............................................................. 18
Requisites elCctricos.................................................................. 19
Requisitos del suministro de agua............................................. 20
Requisitos de desagQe .............................................................. 20
INSTRUCCIONES DE INSTALACION ......................................... 20
Desempaque el caj6n para platos ............................................. 20
Prepare la abertura en el armario .............................................. 21
Prepare la lavavajillas ................................................................. 21
Dirija el cableado electrico ......................................................... 22
Dirija la linea de suministro de agua y la manguera
de desagQe ................................................................................. 23
Route Water Supply Line and Drain Hose ................................... 9
Make Electrical Connection ....................................................... 10
Connect Water Supply Line and Drain Hoses ........................... 11
Install Drawer and Trim Pieces .................................................. 12
Level and Secure Dishwasher .................................................... 13
Complete Installation .................................................................. 14
OVERLAY PANEL INSTALLATION INSTRUCTIONS ................. 15
Custom Overlay Drawer Panel ................................................... 15
Preparing Custom Panel ............................................................ 15
Install Panel Fasteners ............................................................... 16
Mount the Overlay Panel ............................................................ 16
Conexi6n del suministro el6ctrico .............................................. 23
Conecte la IMea de suministro de agua y las mangueras
de desagQe ................................................................................. 25
Instale el caj6n y las piezas de adomo ...................................... 26
Nivele y asegure la lavavajillas ................................................... 27
Complete la instalaci6n .............................................................. 27
INSTRUCCIONES DE INSTALACION DE LOS
PANELES RECUBIERTOS ........................................................... 29
Panel del cajCn recubierto a la rnedida ...................................... 29
PreparaciCn del panel a la medida ............................................ 29
CCrno instalar los sujetadores del panel .................................... 30
Chmo montar el panel recubierto .............................................. 30
TABLE DES MATIERES
SleCURITIe DU LAVE-VAISSELLE ............................................... 31
EXIGENCES D'INSTALLATION ................................................... 32
Outillage et composants ............................................................ 32
Exigences d'ernplacement ......................................................... 32
SpCcifications electriques .......................................................... 33
SpCcifications de I'alimentation en eau ..................................... 34
Evacuation de I'eau de lavage - Crit_res a respecter ................ 34
INSTRUCTIONS D'INSTALLATION ............................................ 34
D6ballage du lave-vaisselle ........................................................ 34
Pr6paration de I'espace d'installation entre les placards .......... 35
Preparation du lave-vaisselle ..................................................... 35
Installation du c_.blage 61ectrique .............................................. 36
Installation du tuyau d'arrivee d'eau et du tuyau d'6vacuation.37
Raccordement du circuit 61ectrique ........................................... 38
Raccordement du tuyau d'arriv6e d'eau et
du tuyau d'6vacuation ................................................................ 39
Installation du tiroir et des comi@es de garniture ..................... 40
Etablissement de I'aplomb du lave-vaisselle; arrimage
de I'appareil ................................................................................ 41
Achever I'installation .................................................................. 42
INSTRUCTIONS D'INSTALLATION DU
PANNEAU DleCORATIF ............................................................... 43
Panneau decoratif de tiroir personnalis6 ................................... 43
Pr6paration du panneau personnalis6 ....................................... 43
Installation des dispositifs de fixation de panneau .................... 44
Montage du panneau d6eoratif .................................................. 44
2

DISHWASHER SAFETY
Your safety and the safety of others are very important.
We have provided many important safety messages in this manual and on your appliance. Always read and obey all safety
messages.
This is the safety alert symbol,
This symbol alerts you to potential hazards that can kill or hurt you and others,
All safety messages will follow the safety alert symbol and either the word "DANGER" or "WARNING,"
These words mean:
You can be killed or seriously injured if you don't immediately/
follow instructions,
You can be killed or seriously injured if you don't follow
instructions.
All safety messages will tell you what the potential hazard is, tell you how to reduce the chance of injury, and tell you what can
happen ifthe instructions are not followed.
IMPORTANT SAFETY INSTRUCTIONS
WARNING: When using the dishwasher, follow basic precautions including the following:
• Read all instructions before using the dishwasher.
• Use the dishwasher only for its intended function.
• Use only detergents or rinse agents recommended for use
in a dishwasher, and keep them out of the reach of children.
• When loading items to be washed:
1) Locate sharp items so that they are not likely to damage
the door seal; and
2) Load sharp knives with the handles up to reduce the risk
of cut-type injuries.
• Do not wash plastic items unless they are marked
"dishwasher safe" or the equivalent. For plastic items not so
marked, check the manufacturer's recommendations.
• Do not touch the heating element during or immediately
after use.
• Do not operate the dishwasher unless all enclosure panels
are properly in place.
SAVE THESE INSTRUCTIONS
You need to:
• Slowly open dishwasher drawer while someone grasps the
rear of the dishwasher. Remove shipping materials. Close
dishwasher drawer. Latch the dishwasher drawer shut.
• Observe all governing codes and ordinances.
Do not tamper with controls.
Do not abuse, sit on, or stand on the door, lid, or dish racks
of the dishwasher.
To reduce the risk of injury, do not allow children to play in
or on the dishwasher.
Under certain conditions, hydrogen gas may be produced in
a hot water system that has not been used for two weeks or
more. HYDROGEN GAS iS EXPLOSIVE. If the hot water
system has not been used for such a period before using
the dishwasher turn on all hot water faucets and let the
water flow from each for several minutes. This will release
any accumulated hydrogen gas. As the gas is flammable,
do not smoke or use an open flame during this time,
Remove the door or lid to the washing compartment
when removing an old dishwasher from service or
discarding it.
• Install this dishwasher as specified inthese instructions.
• Have everything you need to properly install dishwasher.
• Contact a qualified installer to ensure that dishwasher is
installed to meet all electrical and plumbing national and local
codes and ordinances.
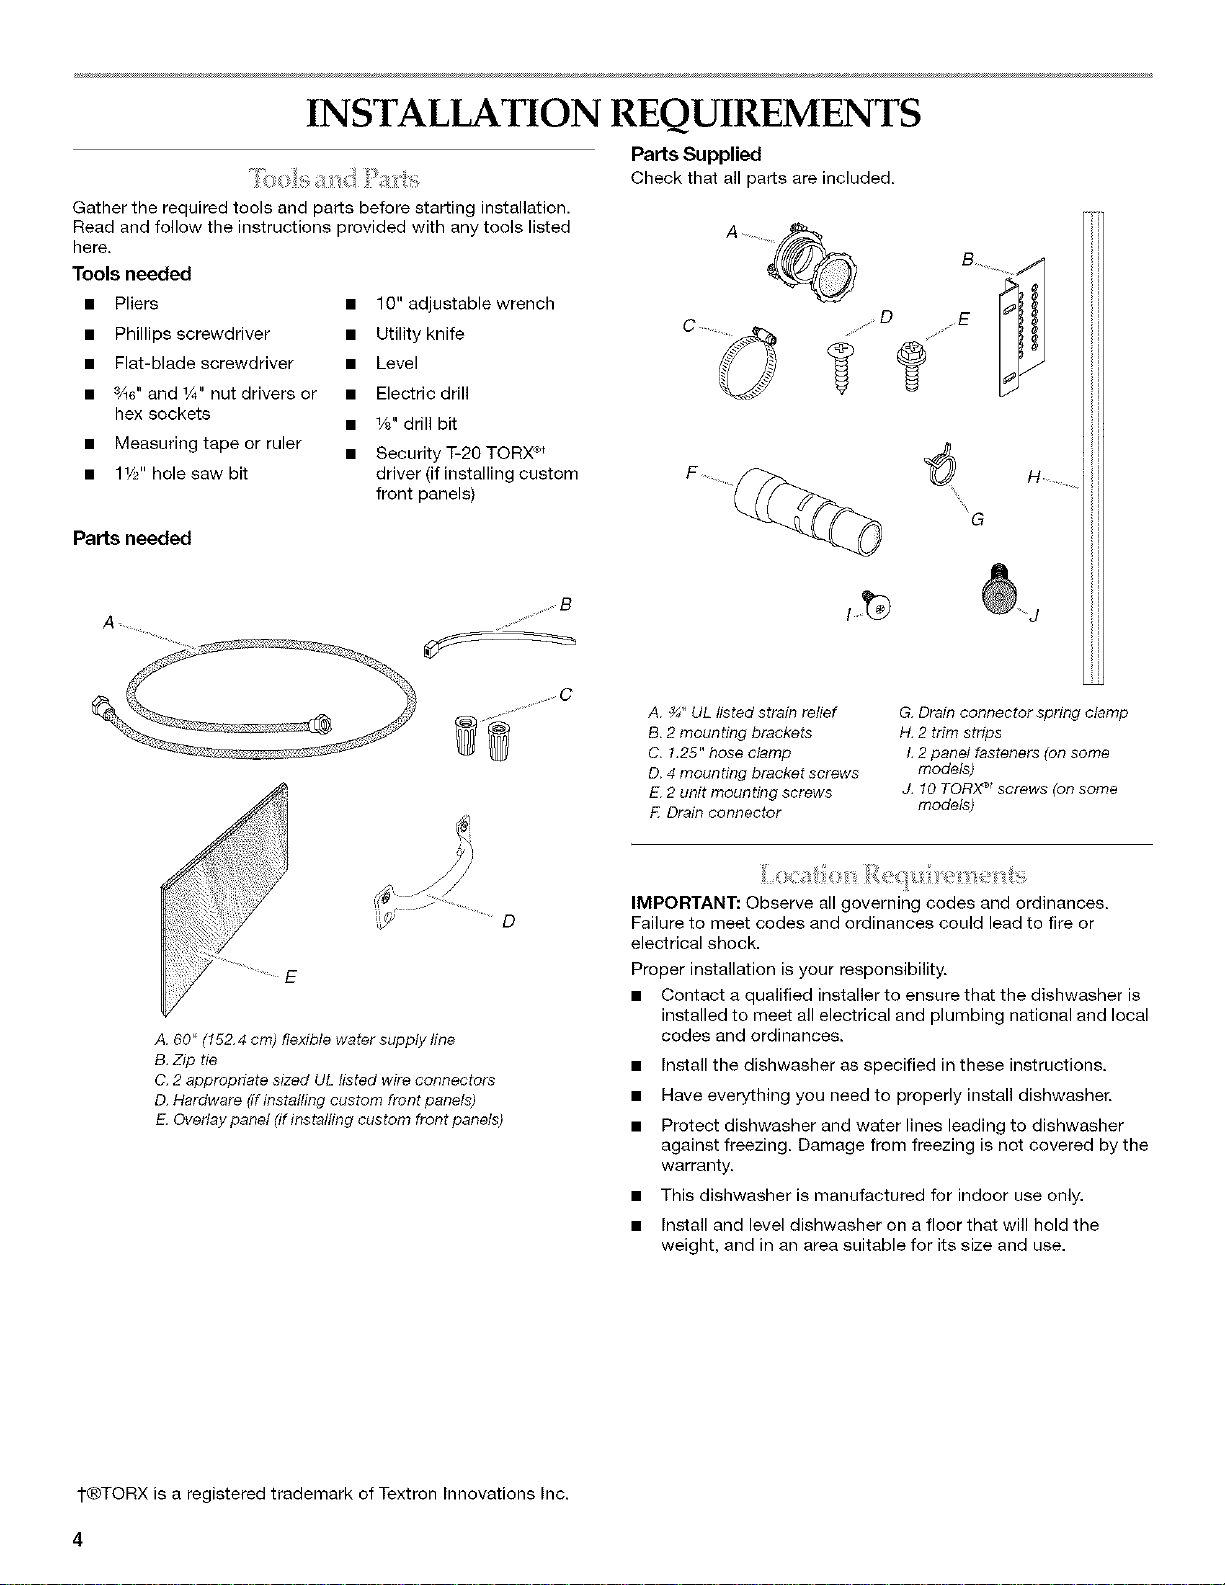
INSTALLATION REQUIREMENTS
Gather the required tools and parts before starting installation.
Read and follow the instructions provided with any tools listed
here.
Tools needed
• Pliers
• Phillips screwdriver
• Flat-blade screwdriver
• 3_6"and 1/_,,nut drivers or
hex sockets
• Measuring tape or ruler
• 11/2"hole saw bit
PaNs needed
• 10" adjustable wrench
• Utility knife
• Level
• Electric drill
• 1A,"drill bit
• Security T-20 TORX ®_
driver (if installing custom
front panels)
PaNs Supplied
Cheekth_ allpartsareineluded.
E
A. 60" (152.4 cm) flexible water supply fine
B. Zip tie
C. 2 appropriate sized UL listed wire connectors
D. Hardware (it installing custom front panels)
E. Overlay panel (if installing custom front panels)
.... O
A. _4"UL Iisted strain relief
B. 2 mounting brackets
C. 1.25" hose clamp
D. 4 mounting bracket screws
E. 2 unit mounting screws
tE Drain connecter
G. Drain connector spring clamp
H. 2 trim strips
L 2 panel fasteners (on some
models)
J. 10 TORX_1screws (on some
models)
IMPORTANT: Observe all governing codes and ordinances.
Failure to meet codes and ordinances could lead to fire or
electrical shock.
Proper installation is your responsibility.
• Contact a qualified installer to ensure that the dishwasher is
installed to meet all electrical and plumbing national and local
codes and ordinances.
• Install the dishwasher as specified in these instructions.
• Have everything you need to properly install dishwasher.
• Protect dishwasher and water lines leading to dishwasher
against freezing. Damage from freezing is not covered by the
warranty.
• This dishwasher is manufactured for indoor use only.
• Install and level dishwasher on a floor that will hold the
weight, and in an area suitable for its size and use.
1-®TORX is a registered trademark of Textron Innovations Inc.
4
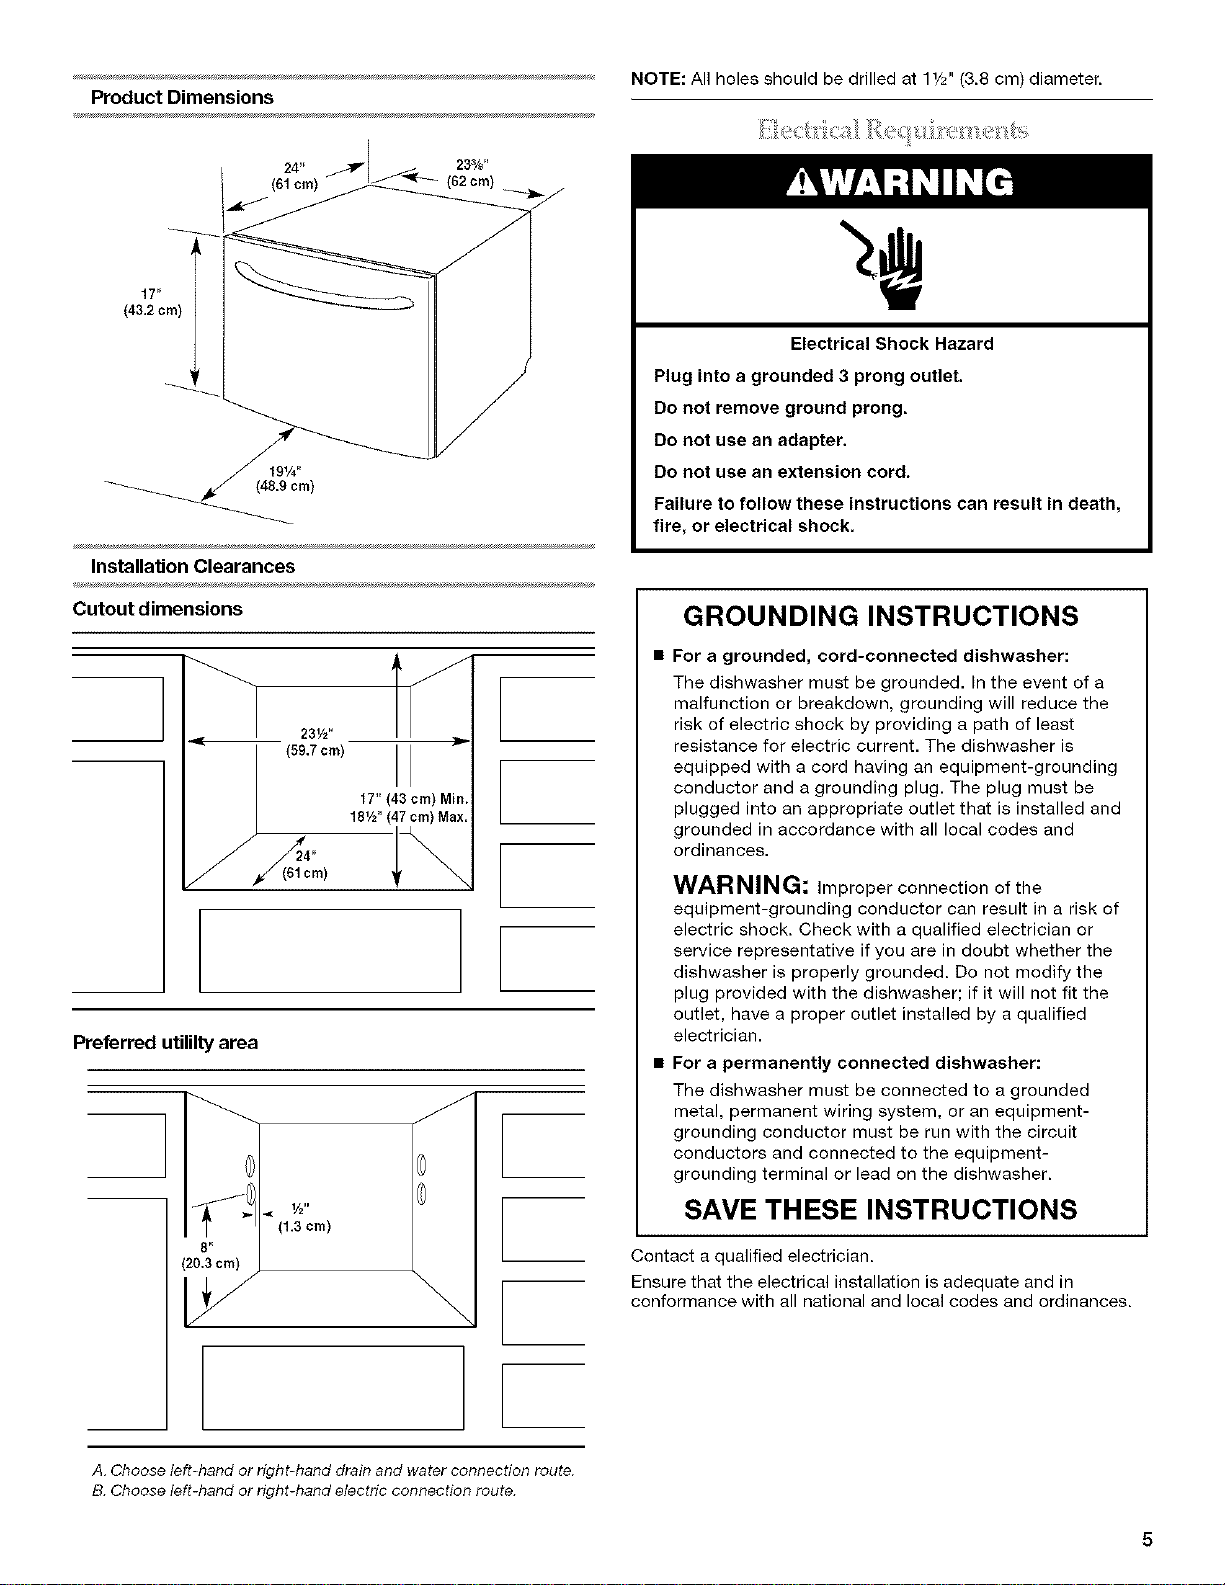
Product Dimensions
17"
(43.2cm)
Installation Clearances
24" _ _ 23%"
(61cm) (62cm)
NOTE: All holes should be drilled at 11/2"(3.8 cm) diameter.
Electrical Shock Hazard
Plug into a grounded 3 prong outlet.
Do not remove ground prong.
Do not use an adapter.
Do not use an extension cord,
Failure to follow these instructions can result in death,
fire, or electrical shock,
Cutout dimensions
Preferred utililtyarea
8"
(20,3 cm)
(59,7cm)II
_( 1,/2"
(1.3 cm)
23W'
18W'(47cm)Max.
m)
17" (43 cm) Min.
\
GROUNDING INSTRUCTIONS
• For a grounded, cord-connected dishwasher:
The dishwasher must be grounded. In the event of a
malfunction or breakdown, grounding will reduce the
risk of electric shock by providing a path of least
resistance for electric current. The dishwasher is
equipped with a cord having an equipment-grounding
conductor and a grounding plug. The plug must be
plugged into an appropriate outlet that is installed and
grounded in accordance with all local codes and
ordinances.
WARNING: Improper connection of the
equipment-grounding conductor san result in a risk of
electric shock. Check with a qualified electrician or
service representative if you are in doubt whether the
dishwasher is properly grounded. Do not modify the
plug provided with the dishwasher; if it will not fit the
outlet, have a proper outlet installed by a qualified
electrician.
• For a permanently connected dishwasher:
The dishwasher must be connected to a grounded
metal, permanent wiring system, or an equipment-
grounding conductor must be run with the circuit
conductors and connected to the equipment-
grounding terminal or lead on the dishwasher.
SAVE THESE INSTRUCTIONS
Contact a qualified electrician.
Ensure that the electrical installation is adequate and in
conformance with all national and local codes and ordinances.
A. Choose left-hand or right-hand drain and water connection route.
B. Choose left-hand or right-hand electric connection route.
You must have:
• 120-volt, 60 Hz, AC-only, 15 or 20 amp fused electrical
supply.
• Copper wire only.
We recommend:
• A time-delay fuse or circuit breaker.
• A separate circuit.
If direct wiring dishwasher:
• Use flexible, armored or nonmetallic sheathed, copper wire
with grounding wire that meets the wiring requirements for
your home and local codes and ordinances.
• Use strain relief method provided with house wiring junction
box or install a UL-listed/CSA-certified clamp connector to
the house wiring junction box. if using conduit, use a
UL-listed/CSA-certified conduit connector.
If connecting dishwasher with a power supply cord:
• Use Power Supply Cord Kit (Part Number 4317824) marked
for use with dishwashers. Kit contents include:
• Voltex, inc., UL listed 16 gauge 3 wire power supply cord
with 3 prong grounded plug.
• Neer C-5007/o. strain relief.
• 3 wire connectors.
• Part Number 302797 grommet.
Follow the kit instructions for installing the power supply
cord.
Power supply cord must plug into a mating three prong,
grounded outlet, located in the cabinet next to the
dishwasher opening. Outlet must meet all local codes and
ordinances.
IMPORTANT: if you plan to install a garbage disposer, an
additional separate 120-volt, 60 Hz, AC-only, 15 or 20 amp fused
electrical supply is required.
• A hot water line with 20-120 psi (138-862 kPa) water
pressure.
• 120°F (49°C) water temperature at dishwasher.
• Flexible stainless steel braided fill line (1/2"minimum plastic
tubing is not recommended).
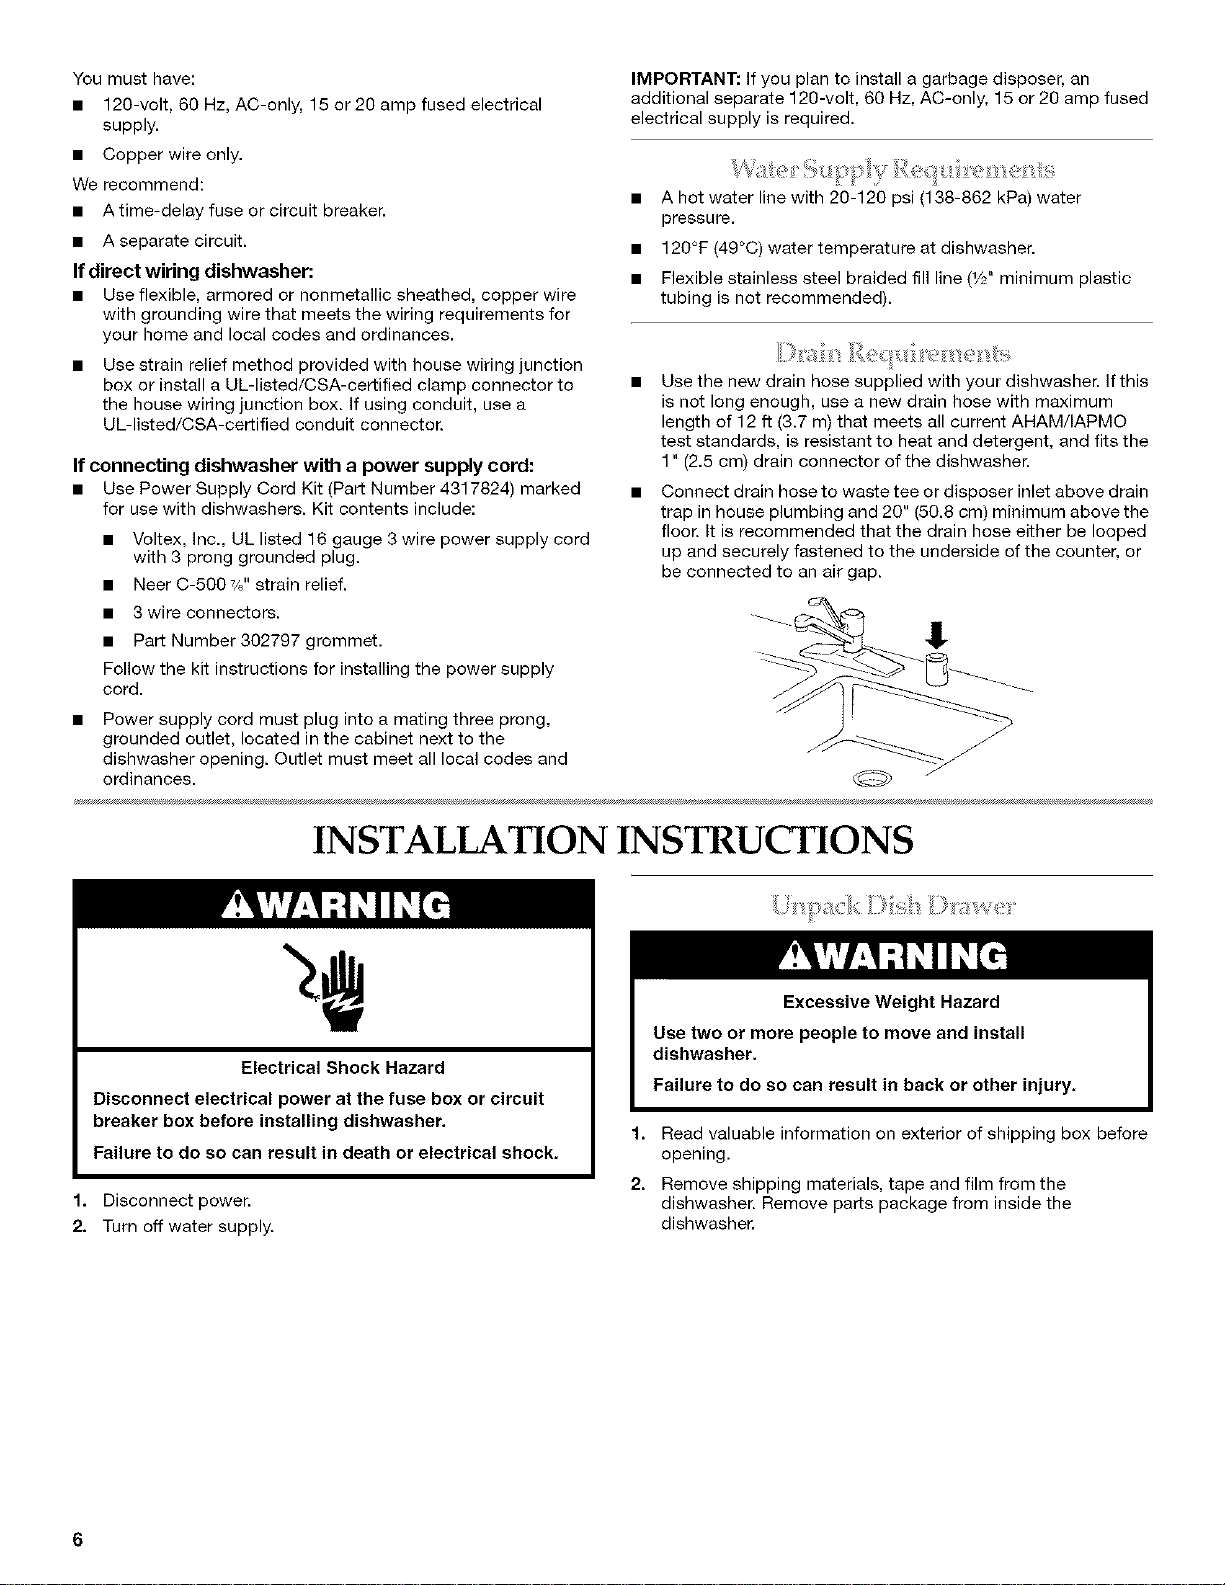
Use the new drain hose supplied with your dishwashen if this
is not long enough, use a new drain hose with maximum
length of 12 ft (3.7 m) that meets all current AHAM/IAPMO
test standards, is resistant to heat and detergent, and fits the
1" (2.5 cm) drain connector of the dishwashen
Connect drain hose to waste tee or disposer inlet above drain
trap in house plumbing and 20" (50.8 cm) minimum above the
floor. It is recommended that the drain hose either be looped
up and securely fastened to the underside of the counter, or
be connected to an air gap.
INSTALLATION INSTRUCTIONS
Electrical Shock Hazard
Disconnect electrical power at the fuse box or circuit
breaker box before installing dishwasher,
Failure to do so can result in death or electrical shock,
1. Disconnect power.
2. Turn off water supply.
1. Read valuable information on exterior of shipping box before
opening.
2. Remove shipping materials, tape and film from the
dishwasher. Remove parts package from inside the
dishwasher.
6
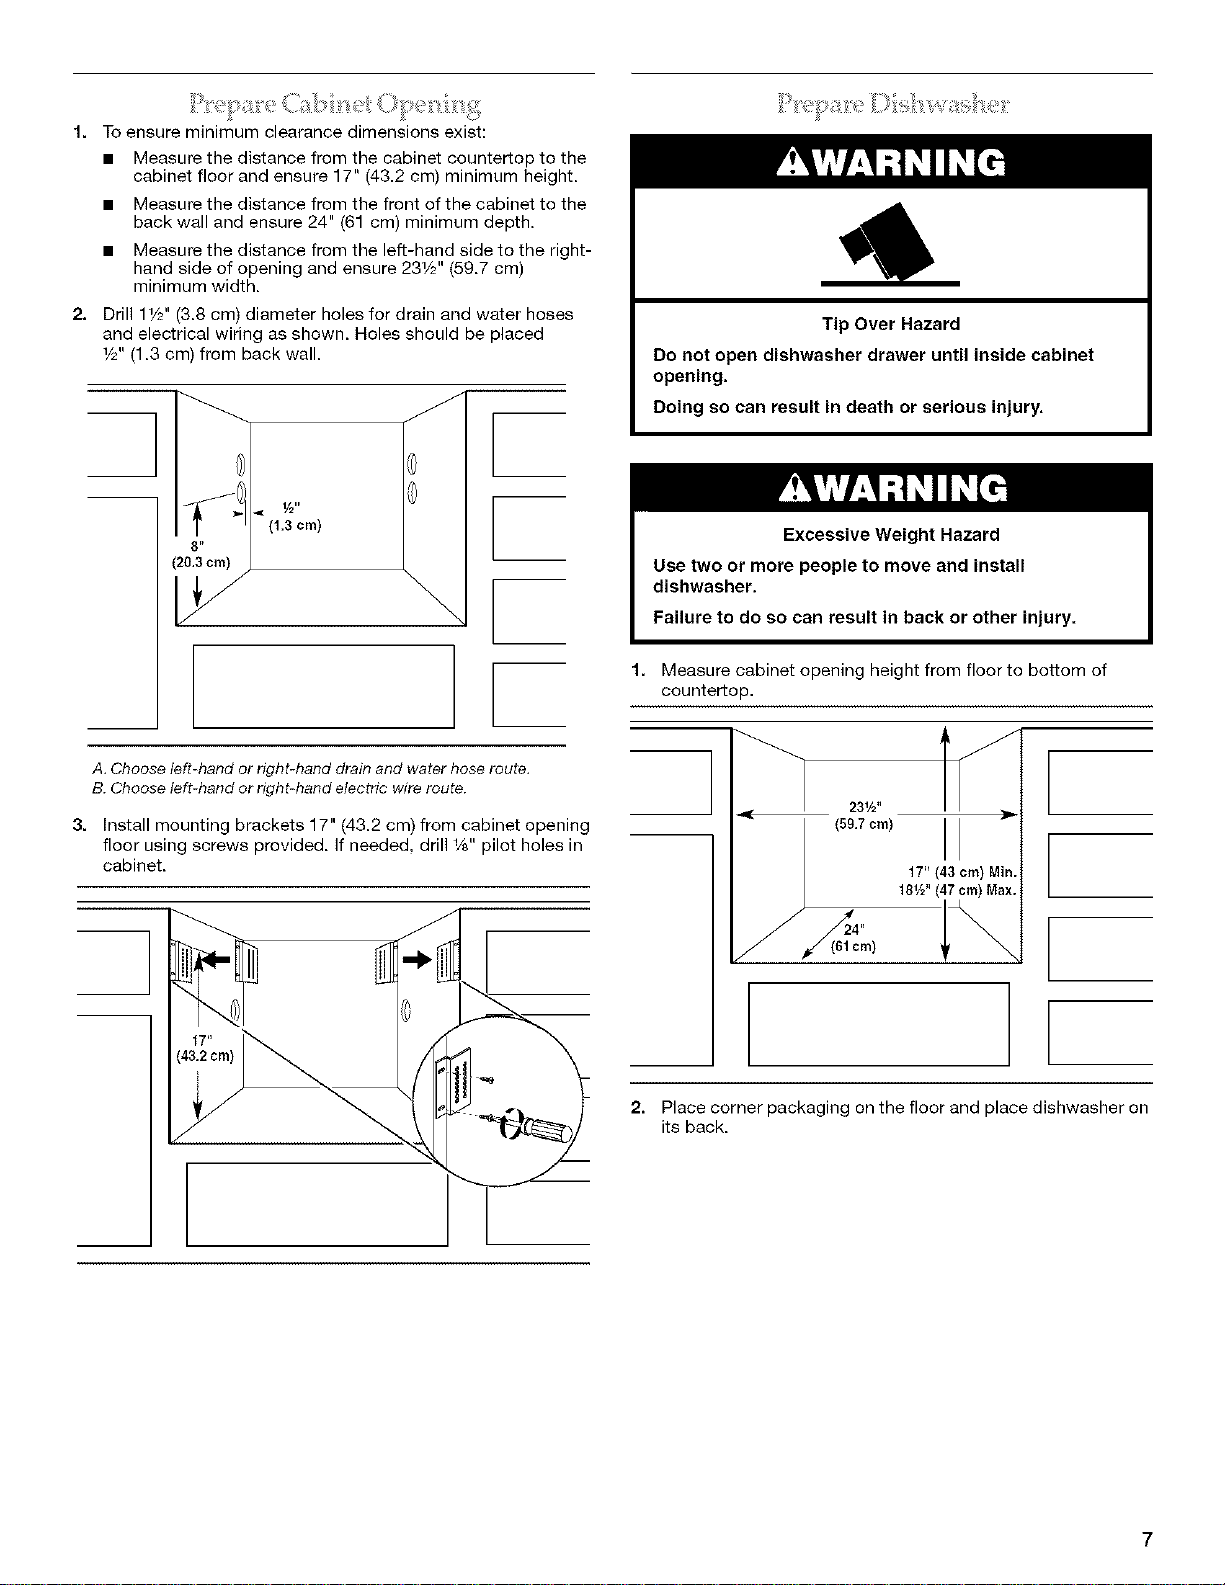
1. To ensure minimum clearance dimensions exist:
• Measure the distance from the cabinet countertop to the
cabinet floor and ensure 17" (43.2 cm) minimum height.
• Measure the distance from the front of the cabinet to the
back wall and ensure 24" (61 cm) minimum depth.
• Measure the distance from the left-hand side to the right-
hand side of opening and ensure 231/2'' (59.7 cm)
minimum width.
2. Drill 11/2"(3.8 cm) diameter holes for drain and water hoses
and electrical wiring as shown. Holes should be placed
1/2"(1.3 cm) from back wall.
Tip Over Hazard
Do not open dishwasher drawer until inside cabinet
opening.
Doing so can result in death or serious injury.
1. Measure cabinet opening height from floor to bottom of
countertop.
A. Choose left=hand or right-hand drain and water hose route.
B. Choose left-hand or right-hand electric wire route.
3. Install mounting brackets 17" (43.2 cm) from cabinet opening
floor using screws provided. If needed, drill %" pilot holes in
cabinet.
17"(43cm)Min
18W'(47cm)Max.
2. Place corner packaging on the floor and place dishwasher on
its back.
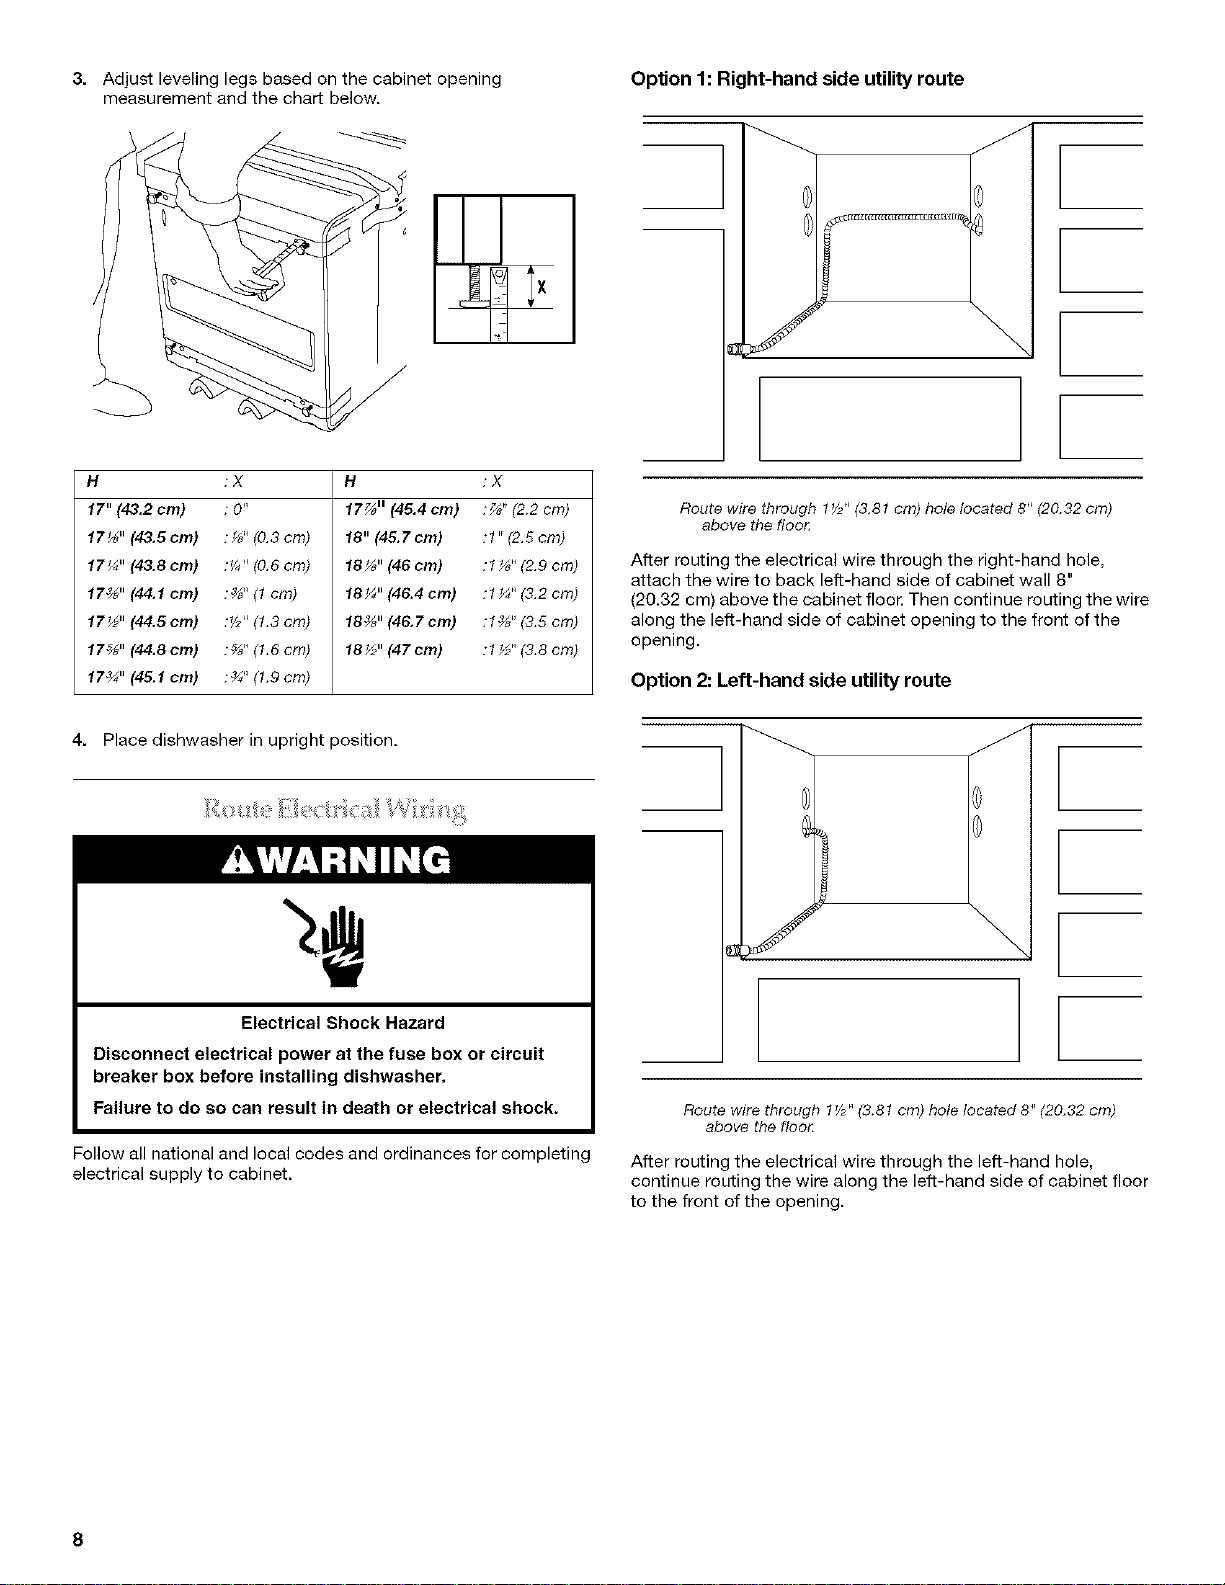
3. Adjustlevelinglegsbasedonthecabinetopening
measurementandthechartbelow.
Option 1:Right-hand side utility route
H :X
17"(43.2cm) :0"
171_" (43,5cm) :_" (0,3 cm)
17¼" (43.8 cm) Y4" (0,6 cm)
17_" (44,1 cm) :_" (1 cm)
17½" (44.5 cm) :_/2"(t.3 cm)
17_" (44.6 cm) :_" (1.6 cm)
173_'' (45,1 cm) :_" (1.9 cm)
H :X
17_" (45.4 cm) :_" (2.2 cm)
18" (45.7 cm) :I" (2.5 cm)
18_"(46cm) :1_"(2.9cm)
18¼" (46.4 cm) :I ¼" (3.2 cm)
187_" (46,7 cm) :17_" (3.5 cm)
18½"(47cm) :1½"(3.8cm)
4. Place dishwasher in upright position.
Electrical Shock Hazard
Disconnect electrical power at the fuse box or circuit
breaker box before installing dishwasher.
Failure to do so can result in death or electrical shock.
Follow all national and local codes and ordinances for completing
electrical supply to cabinet.
Route wire through I _/2"(3.81 cm) hole located 8" (20.32 cm)
above the floo_
After routing the electrical wire through the right-hand hole,
attach the wire to back left-hand side of cabinet wall 8"
(20.32 cm) above the cabinet floor. Then continue routing the wire
along the left-hand side of cabinet opening to the front of the
opening.
Option 2: Left-hand side utility route
Route wire through 1_/_"(3.81 cm) hole located 8" (20.32 cm)
above the floo_
After routing the electrical wire through the left-hand hole,
continue routing the wire along the left-hand side of cabinet floor
to the front of the opening.
8
_i(i !>'4111)) II'_ ;>!',i_[ I'
i
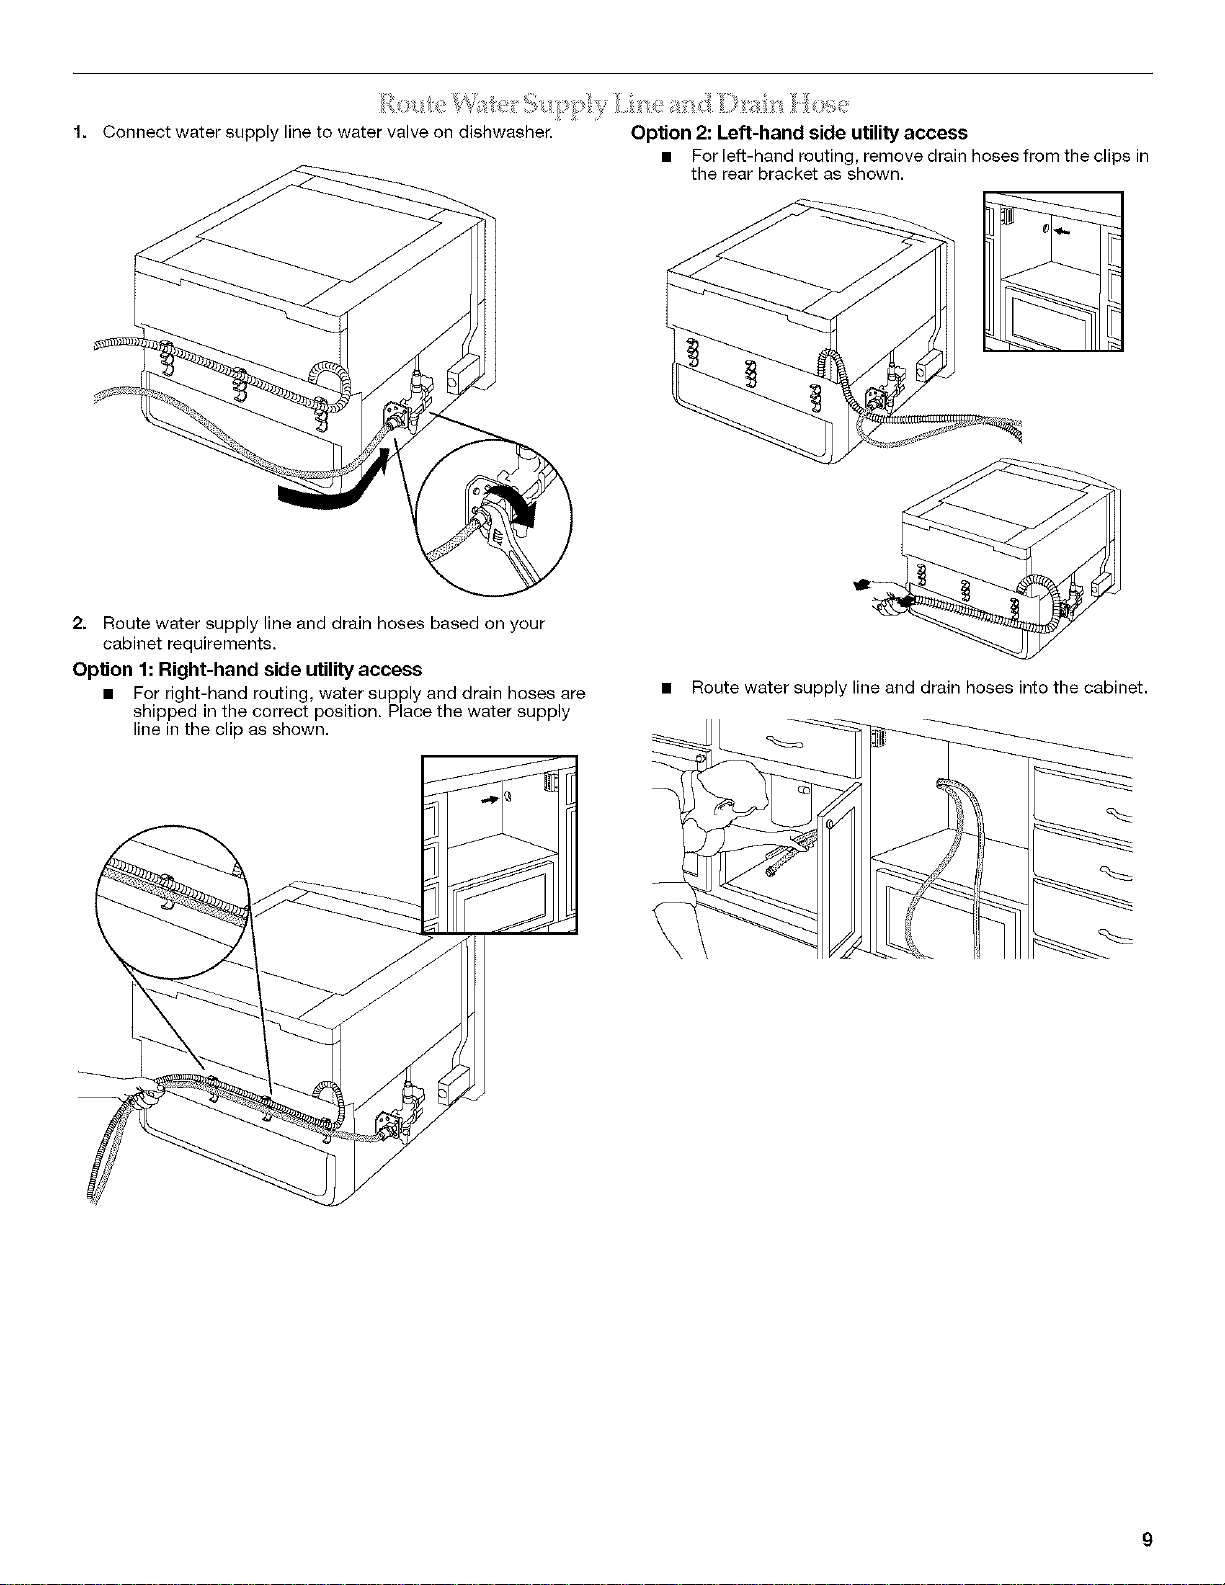
1. Connect water supply line to water valve on dishwasher. Option 2: Left-hand side utility access
• For left-hand routing, remove drain hoses from the clips in
the rear bracket as shown.
2. Route water supply line and drain hoses based on your
cabinet requirements.
Option 1: Right-hand side utility access
• For right-hand routing, water supply and drain hoses are
Route water supply line and drain hoses into the cabinet.
shipped in the correct position. Place the water supply
line in the clip as shown.
Electrical Shock Hazard
Disconnect electrical power at the fuse box or circuit
breaker box before installing dishwasher.
Failure to do so can result in death or electrical shock.
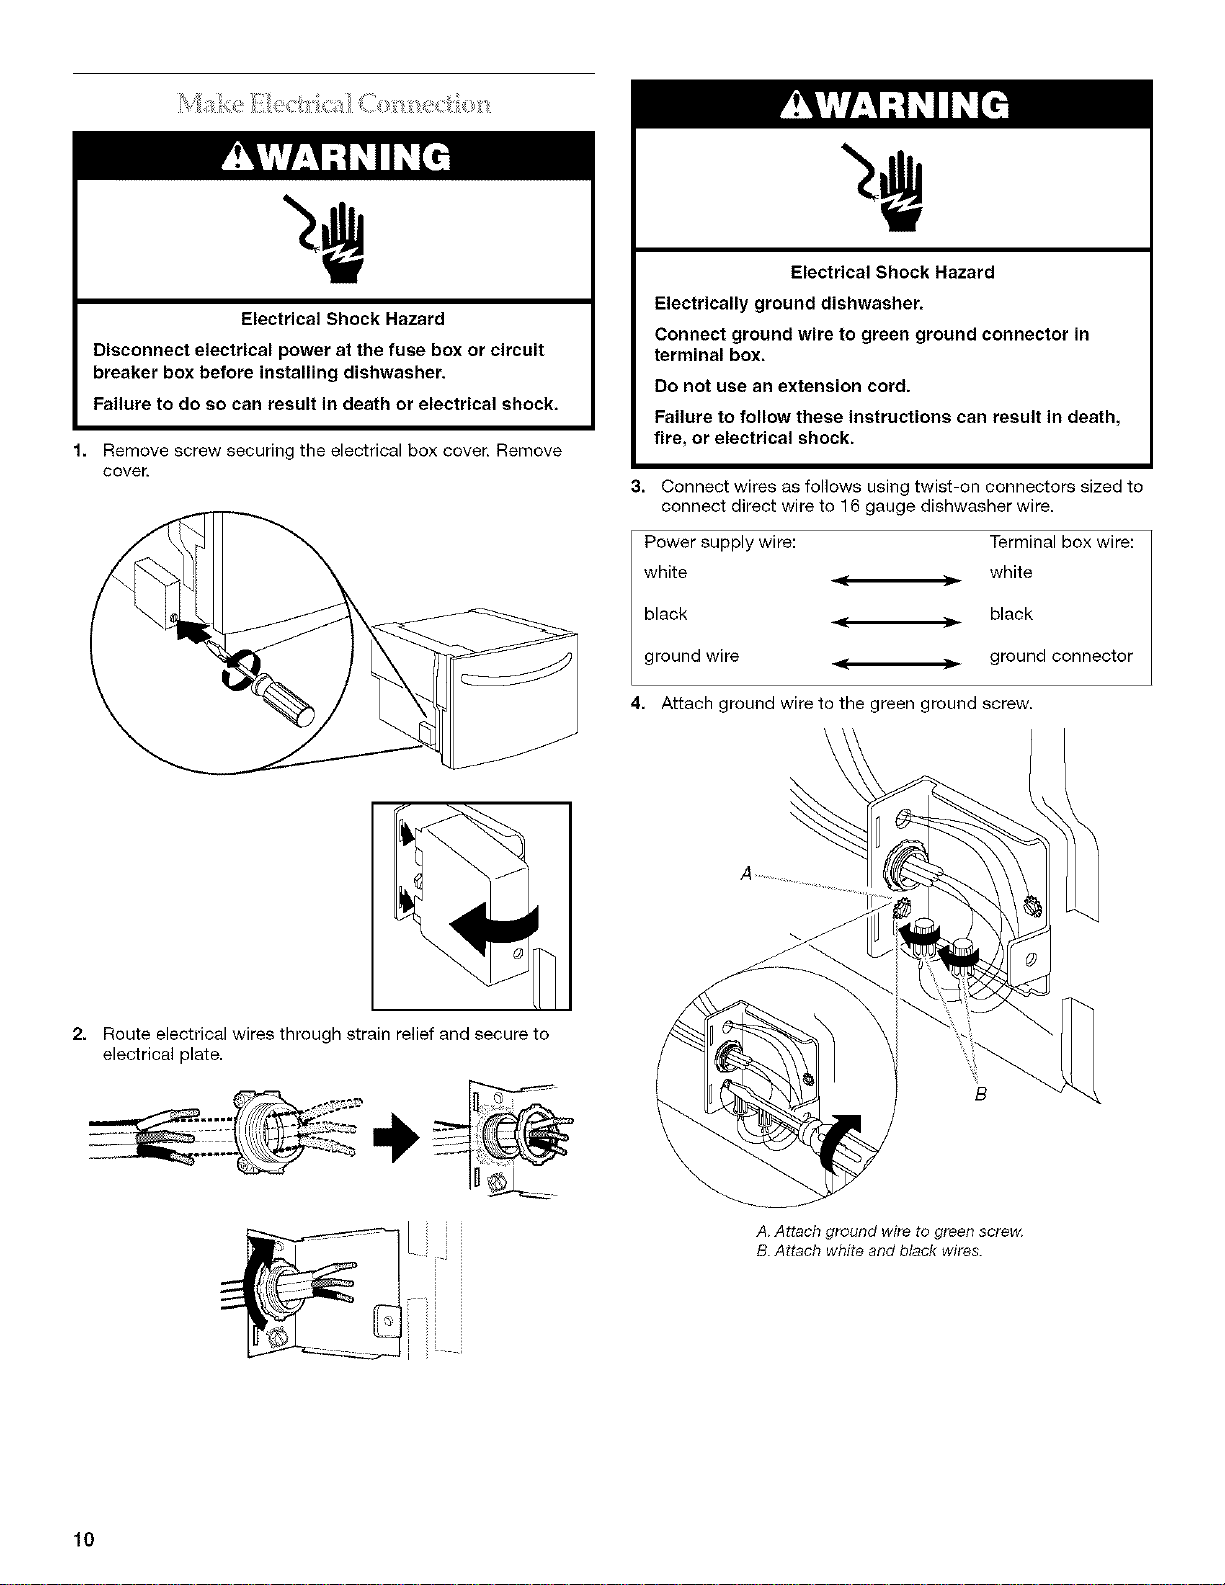
1.
Remove screw securing the electrical box cover. Remove
cover
Electrical Shock Hazard
Electrically ground dishwasher.
Connect ground wire to green ground connector in
terminal box.
Do not use an extension cord.
Failure to follow these instructions can result in death,
fire, or electrical shock.
3. Connect wires as follows using twist-on connectors sized to
connect direct wire to 16 gauge dishwasher wire.
Power supply wire: Terminal box wire:
white white
black black
ground wire : : ground connector
4. Attach ground wire to the green ground screw.
2.
Route electrical wires through strain relief and secure to
electrical plate.
10
A. Attach ground wire to green screw.
B.Attach white and black wires.

5. Reinstall electric box coverwith all wires contained insidethe 5. Connect the drain hoseusing one of the following options:
terminal box. Option 1: Waste disposer no drain air gap
A. For new construction, remove disposer plug.
B. Connect drain connector to waste dispose_
C. Tighten clamp.
1. Connect water supply line to the water valve under the sink.
A. Hot water supply
2. Slide clamps onto drain hoses (Figure A). Do net cut drain
hoses.
3. Push hose into drain connector until fully seated (Figure B).
Several "clicks" will be heard.
4. Slide clamp into position (figures C and D).
A B
Option 2: No waste disposer and drain air gap
C
A. Drain hose connector
B. Drain air gap
C. Waste
Option 3: Waste disposer and drain air gap
S .......
C D
/C
A. Drain hose connector
B. Drain air gap
C. Waste
11
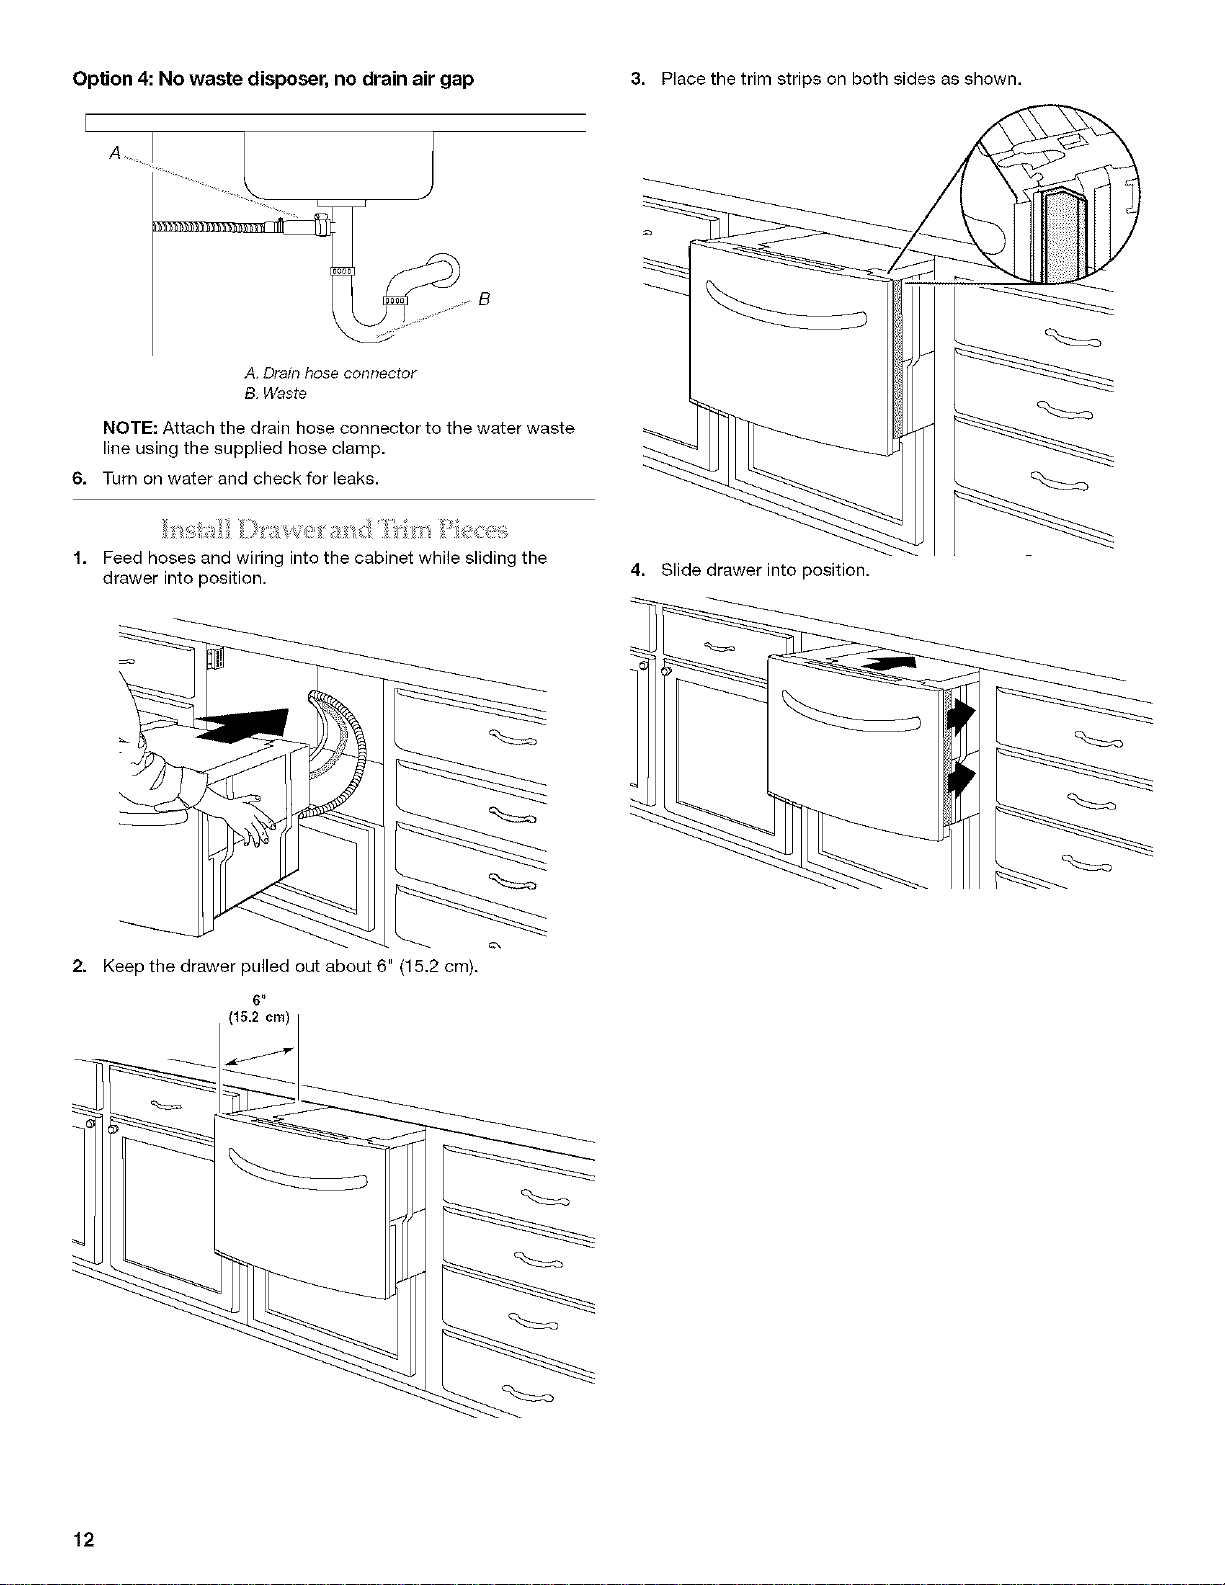
Option 4: No waste disposer, no drain air gap 3. Place the trim strips on both sides as shown.
A.Drain hose connector
B.Waste
NOTE: Attach the drain hose connector to the water waste
line using the supplied hose clamp.
6. Turn on water and check for leaks.
1.
Feed hoses and wiring into the cabinet while sliding the
drawer into position.
4. Slide drawer into position.
2. Keep the drawer pulled out about 6" (15.2 cm).
6 _F
12
5. Pull out the drawer and push in the clips on both sides.
\
r
1. Check whether cabinet is level from left to right. Check
whether cabinet is level from front to back by placing the level
in the slide rails.
2. Adjust the legs with a 3_6"socket wrench to level the
dishwasher.
6. Slide rails back 5" (12.7 cm).
7. Lift drawer up and out of the cabinet opening and place on a
chair with a covering. Slide rails back into the cabinet
opening.
3. Attach dishwasher frame to the cabinet mounting bracket
(installed earlier).
13
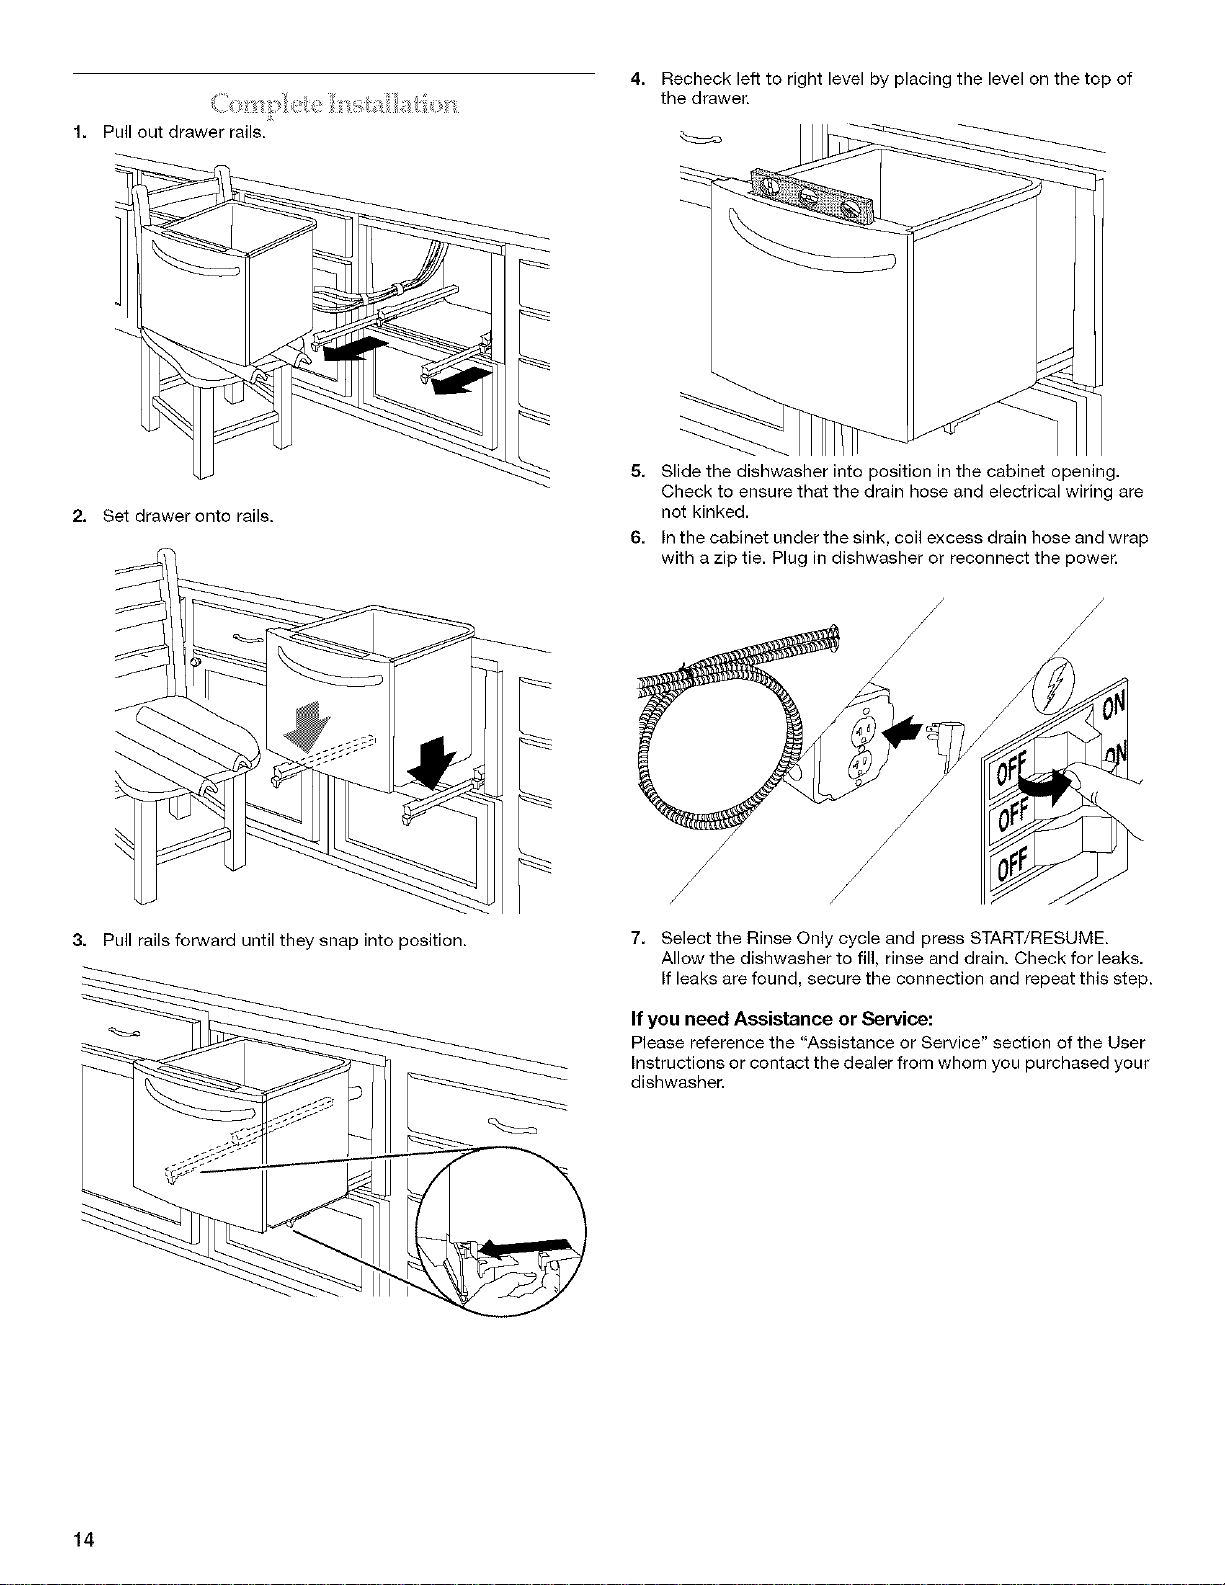
1. Pull out drawer rails.
2. Set draweronto rails.
4. Recheck left to right level by placing the level on the top of
the drawer.
5. Slide the dishwasher into position in the cabinet opening.
Check to ensure that the drain hose and electrical wiring are
not kinked.
6. In the cabinet under the sink, coil excess drain hose and wrap
with a zip tie. Plug in dishwasher or reconnect the power.
/
3. Pull rails forward until they snap into position.
7. Select the Rinse Only cycle and press START/RESUME.
Allow the dishwasher to fill, rinse and drain. Check for leaks.
If leaks are found, secure the connection and repeat this step.
If you need Assistance or Service:
Please reference the "Assistance or Service" section of the User
Instructions or contact the dealer from whom you purchased your
dishwasher.
14
 Loading...