

KitchenAid KUDH03DTSS3, KUDH03DTSS2, KUDH03DTSS0, KUDH03DTBL3, KUDH03DTBL2 Owner’s Manual
...
Thank you for Choosing KitchenAid ®Appliances.
We hold our company to the highest quality standards, and it is important to us that you have a positive experience owning a
KitchenAid ®product.
Foryour convenience, we have provided an easy to follow User Instruction Book. These instructions include a "Troubleshooting"
section to help you through any problems you may encounter.
For additional information, you can visit the Frequently Asked Questions (FAQs)section of our website at www.kitchenaid.com. If
you need further assistance using your KitchenAid dishwasher, please contact us at 1-800-422-1230. In Canada: visit
www.kitchenaid.ca or call 1-800-807-6777.
Have your complete model and serial number ready. You can find your model and serial number on the label located on the left-hand
side of the upper drawer.
Para obtener acceso a "lnstrucciones para el usuario de la lavavajillas" en espa_ol, o para obtener informaci6n adicional
acerca de su producto, visite: _w.kitchenaid.com.
Tenga listo su nOmerocompleto de modelo y de serie. Puede encontrar su nOmero de modelo y de serie en la etiqueta ubicada
cerca de la puerta, al lado derecho o izquierdo del interior de la lavavajillas.
Table of Contents
DISHWASHERSAFETY.............................................................1
QUICK STEPS.............................................................................3
DISHWASHERUSE ....................................................................3
CYCLE AND OPTION DESCRIPTIONS....................................5
DISHWASHERFEATURES........................................................7
DISHWASHERCARE .................................................................8
TROUBLESHOOTING................................................................8
WARRANTY..............................................................................10
Your safety and the safety of others are very important.
We have provided many important safety messages in this manualand on your appliance. Always read and obey all safety
messages.
This is the safety alert symbol.
This symbol alerts you to potential hazards that can kill or hurt you and others.
All safety messages will follow the safety alert symbol and either the word "DANGER" or "WARNING."
These words mean:
You can be killed or seriously injured if you don't immediately
follow instructions.
You can be killed or seriously injured if you don't follow
instructions.
All safety messages will tell you what the potential hazard is, tell you how to reduce the chance of injury, and tell you what can
happen if the instructions are not followed.
W10185043A

iMPORTANT SAFETY INSTRUCTIONS
WARNING: When using the dishwasher, follow basic precautions, including the following:
m Read all instructions before using the dishwasher, m Do not tamper with controls.
m Use the dishwasher only for its intended function.
m Use only detergents or rinse agents recommended for use in
a dishwasher, and keep them out of the reach of children.
m When loading items to be washed:
1) Locate sharp items so that they are not likely to damage
the door seal; and
2) Load sharp knives with the handles up to reduce the risk
of cut-type injuries.
m Do not wash plastic items unless they are marked
"dishwasher safe" or the equivalent. For plastic items not so
marked, check the manufacturer's recommendations.
m Do not touch the heating element during or immediately after
use.
m Do not operate the dishwasher unless all enclosure panels
are properly in place.
m Do not abuse, sit on, or stand on the door, lid, or dish racks
of the dishwasher.
m To reduce the risk of injury, do not allow children to play in
or on the dishwasher.
m Under certain conditions, hydrogen gas may be produced in
a hot water system that has not been used for two weeks or
more. HYDROGEN GAS IS EXPLOSIVE. If the hot water
system has not been used for such a period, before using
the dishwasher turn on all hot water faucets and let the
water flow from each for several minutes. This will release
any accumulated hydrogen gas. As the gas is flammable,
do not smoke or use an open flame during this time.
m Remove the door or lid to the washing compartment
when removing an old dishwasher from service or
discarding it.
SAVE THESE INSTRUCTIONS
GROUNDING INSTRUCTIONS
For a grounded, cord-connected dishwasher:
The dishwasher must be grounded. In the event of a
malfunction or breakdown, grounding will reduce the risk of
electric shock by providing a path of least resistance for
electric current. The dishwasher is equipped with a cord
having an equipment-grounding conductor and a grounding
plug. The plug must be plugged into an appropriate outlet
that is installed and grounded in accordance with all local
codes and ordinances.
WARNING: Improper connection of the equipment-
grounding conductor can result in a risk of electric shock.
SAVE THESE INSTRUCTIONS
Do not open dishwasher drawer until inside cabinet opening.
Doing so can resumt in death or serious injury.
Check with a qualified electrician or service representative
if you are in doubt whether the dishwasher is properly
grounded. Do not modify the plug provided with the
dishwasher; if it will not fit the outlet, have a proper outlet
installed by a qualified electrician.
m
For a permanently connected dishwasher:
The dishwasher must be connected to a grounded metal,
permanent wiring system, or an equipment-grounding
conductor must be run with the circuit conductors and
connected to the equipment-grounding terminal or lead on
the dishwasher.
Tip Over Hazard

(}_ c< Ste/ss
Prepare and load _
dishwasher. _Y
rinse aid for
for cleaning and ._....,
drying.
2 Add detergent , j/,' _ _
Prepare and Load the Dishwasher
IMPORTANT: Remove
leftover food, bones,
toothpicks and other
hard items from the
dishes. Remove labels
from containers before
washing.
Select a cycle and option.
I_..... c3 6CYCLESO c_
• OPTIONS OPTIONS
Heavy NorrnaJ Light/ Quick Rinse |
Duty Wash China Cleanup OrlJy ;
%......................._ _<.,...................../ %.....................,x/
Start dishwasher. @
[.se
When loading silverware, always place
sharp items pointing down and avoid
"nesting" as shown.
STEP 2
Make sure nothing keeps spray arm(s)
from spinning freely. It is important for
the water spray to reach all soiled
surfaces.
• Make sure that when the dishwasher drawer is closed no items
are blocking the detergent dispenser.
• Items should be loaded with soiled surfaces facing down and
inward to the spray as shown. This will improve cleaning and
drying results.
• Avoid overlapping items like bowls or plates that may trap food.
• Place plastics, small plates and glasses in the rack. Wash only
plastic items marked "dishwasher safe."
• To avoid thumping/clattering noises during operation: Load
dishes so they do not touch one another. Make sure lightweight
load items are secured in the racks.
Add Detergent
NOTE: If you do not plan to run a wash cycle soon, run a rinse
cycle. Do not use detergent.
• Use automatic dishwasher detergent only. Add powder or
liquid just before starting a cycle.
• Fresh automatic B
dishwasher detergent
results in better cleaning.
Store tightly closed
detergent container in a A
cool, dry place.
A. Pre-Wash section
B. Main Wash section
C. Cover latch
The amount of detergent to use depends on:
How much soil remains on the items - Heavily soiled loads
require more detergent.
The hardness of the water - If you use too little in hard water,
dishes won't be clean. If you use too much in soft water,
glassware will etch.
Soft to Medium Water (0-6 grains per U.S. gallon)
[typical water softener water and some city water]
Medium to Hard Water (7-12 grains per U.S. gallon)
[well water and some city water]
C
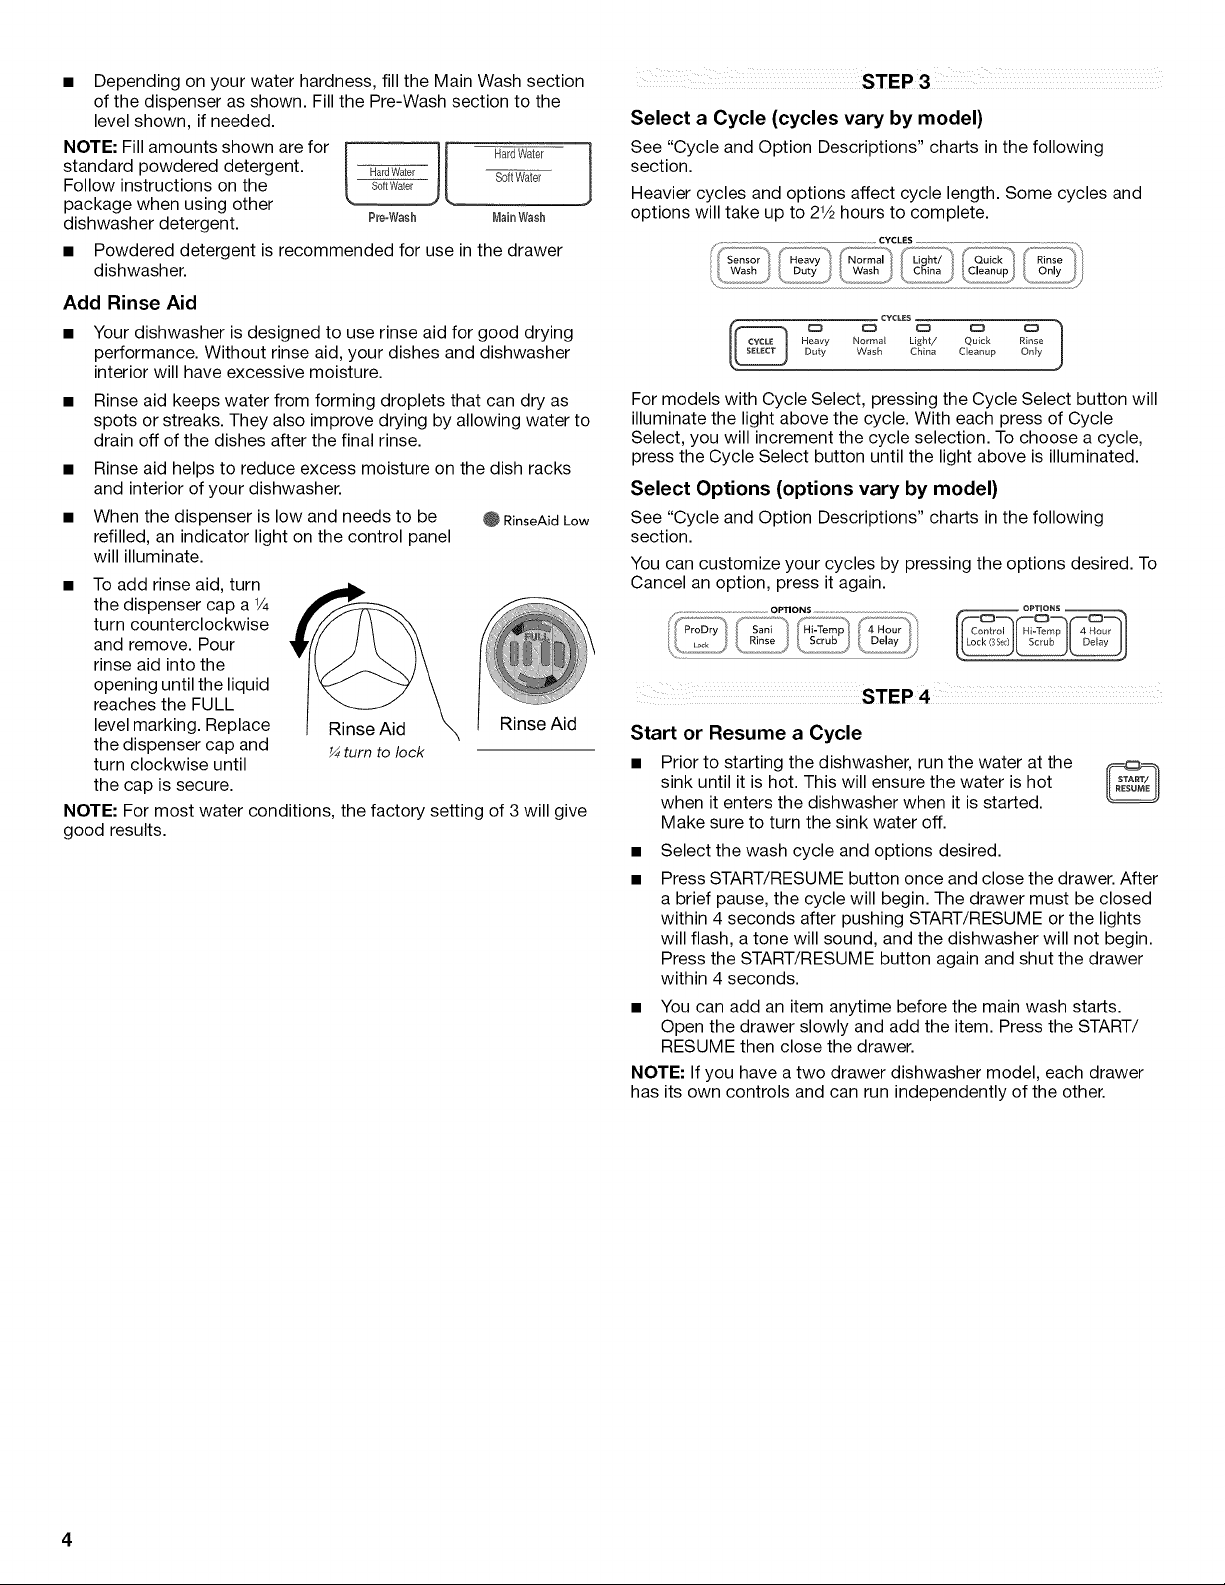
Dependingonyourwaterhardness,filltheMainWashsection
ofthedispenserasshown.FillthePre-Washsectiontothe
levelshown,ifneeded.
NOTE:Fillamountsshownarefor
standardpowdereddetergent.
Followinstructionsonthe
packagewhenusingother
dishwasherdetergent.
Powdered detergent is recommended for use in the drawer
dishwasher.
Add Rinse Aid
Your dishwasher is designed to use rinse aid for good drying
performance. Without rinse aid, your dishes and dishwasher
interior will have excessive moisture.
Rinse aid keeps water from forming droplets that can dry as
spots or streaks. They also improve drying by allowing water to
drain off of the dishes after the final rinse.
• Rinse aid helps to reduce excess moisture on the dish racks
and interior of your dishwasher.
• When the dispenser is low and needs to be @ RinseAidLow
refilled, an indicator light on the control panel
will illuminate.
To add rinse aid, turn
the dispenser cap a 1/4
turn counterclockwise
and remove. Pour
rinse aid into the
opening until the liquid
reaches the FULL
level marking. Replace
the dispenser cap and ¼ turn to lock
turn clockwise until
the cap is secure.
NOTE: For most water conditions, the factory setting of 3 will give
good results.
Pre-Wash MaUnWash
HardWater
Soft Water
Rinse Aid
STEP 3
Select a Cycle (cycles vary by model)
See "Cycle and Option Descriptions" charts inthe following
section.
Heavier cycles and options affect cycle length. Some cycles and
options will take up to 21/2hours to complete.
[ .oovy . , L,g..j....
[_DutyWashChina
For models with Cycle Select, pressing the Cycle Select button will
illuminate the light above the cycle. With each press of Cycle
Select, you will increment the cycle selection. To choose a cycle,
press the Cycle Select button until the light above is illuminated.
Quick Rinse
Cleanup Only
° ° 1
Select Options (options vary by model)
See "Cycle and Option Descriptions" charts inthe following
section.
You can customize your cycles by pressing the options desired. To
Cancel an option, press it again.
STEP 4
Start or Resume a Cycle
• Prior to starting the dishwasher, run the water at the
sink until it is hot. This will ensure the water is hot
when it enters the dishwasher when it is started.
Make sure to turn the sink water off.
Select the wash cycle and options desired.
Press START/RESUME button once and close the drawer. After
a brief pause, the cycle will begin. The drawer must be closed
within 4 seconds after pushing START/RESUME or the lights
will flash, a tone will sound, and the dishwasher will not begin.
Press the START/RESUME button again and shut the drawer
within 4 seconds.
• You can add an item anytime before the main wash starts.
Open the drawer slowly and add the item. Press the START/
RESUME then close the drawer.
NOTE: If you have a two drawer dishwasher model, each drawer
has its own controls and can run independently of the other.
f-_J'it_ '-__ 4 ........
,,, I)esc it: t:i
o _cvcL"s__d_--
Duty_a_n China Cleanup Only ,J
al Lifht/ Quick Rinse 1
__ CleanC_
RinseAidL0w_
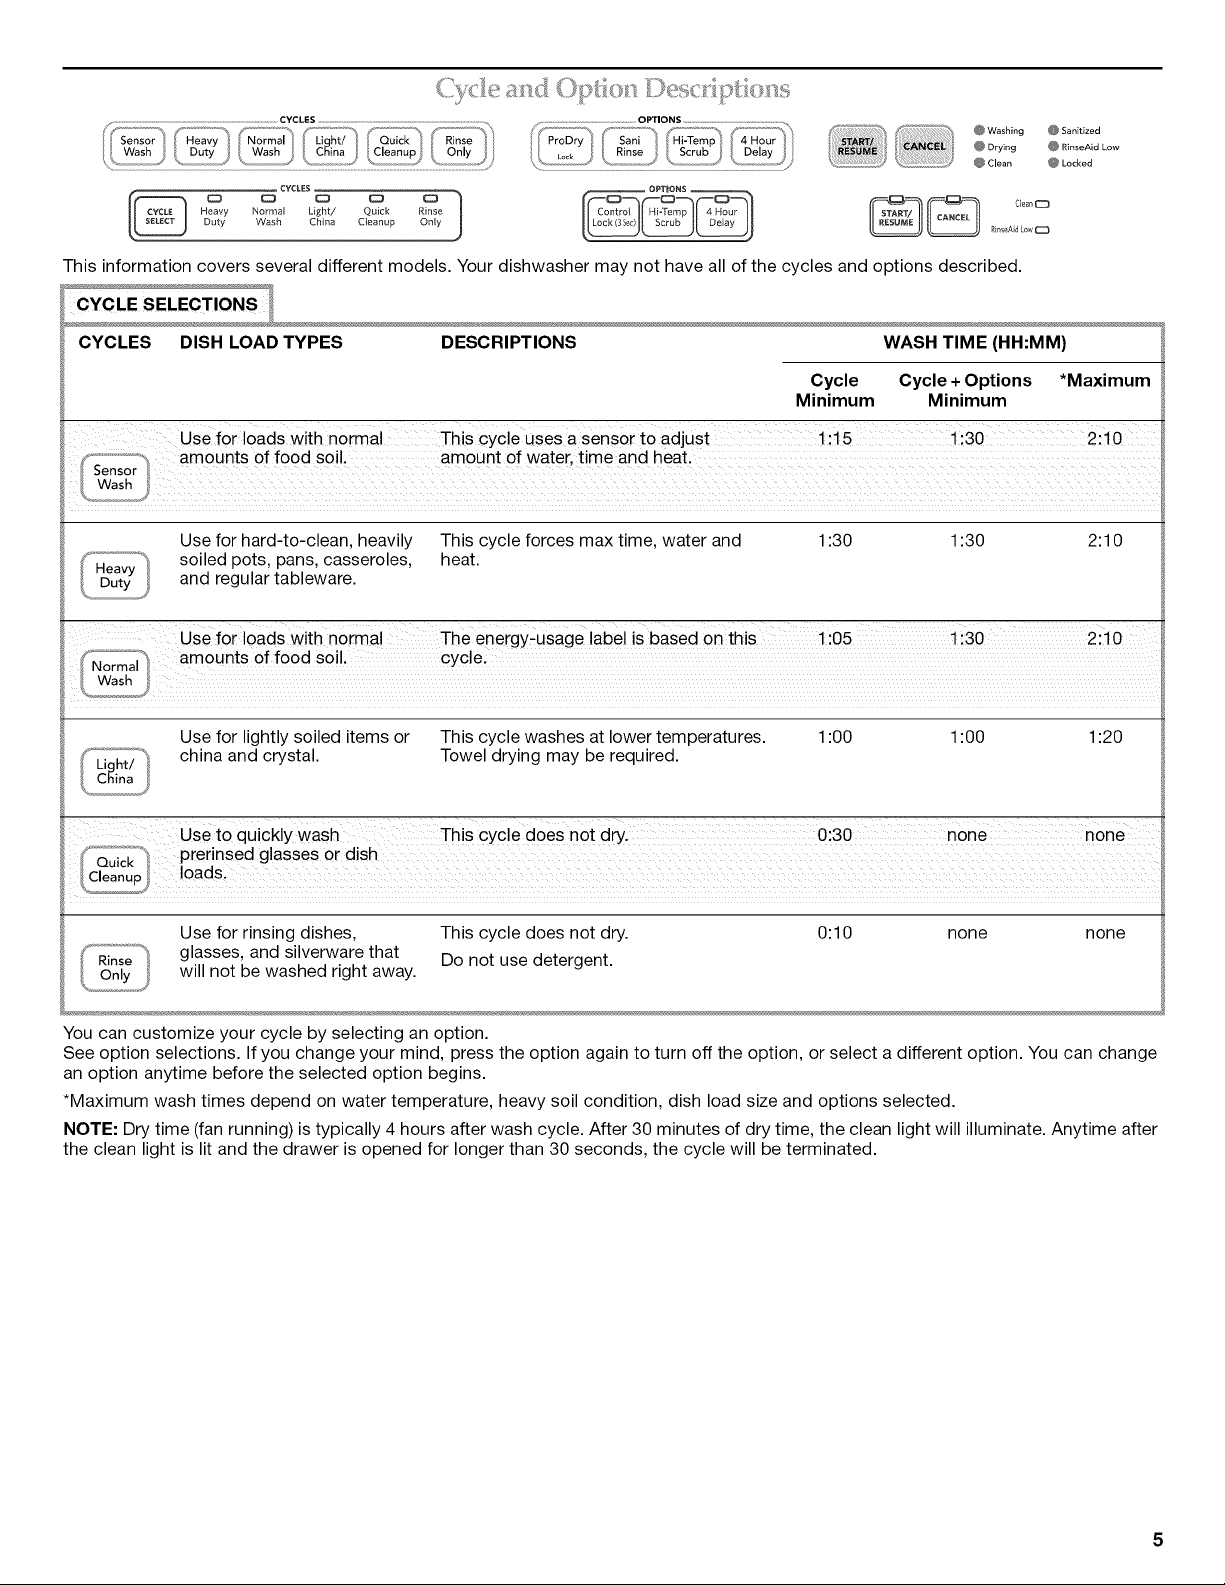
This information covers several different models. Your dishwasher may not have all of the cycles and options described.
CYCLES DISH LOAD TYPES DESCRIPTIONS
WASH TIME (HH:MM)
Cycle Cycle + Options *Maximum
Minimum Minimum
Use for loads with normal This cycle uses a sensor to adjust !:15 !:30 2:10
f-...............,% amounts of food soil. amount of water, t meand heaL
Sensor
I Wash
..............................J
Use for hard-to-clean, heavily This cycle forces max time, water and
1:30 1:30 2:10
soiled pots, pans, casseroles, heat.
and regular tableware.
Use for loads With normal The energY_usage labei is based on this 1:05 1:30 2:10
Use for lightly soiled items or This cycle washes at lower temperatures.
1:00 1:00 1:20
china and crystal. Towel drying may be required.
[°_17_,"' I prerinsed glasses or dish
UUICK
Cleanupj oacls,
use to quickly wash Th s cycle does not d_. 0:30 none none
Use for rinsing dishes,
glasses, and silverware that
will not be washed right away.
This cycle does not dry.
Do not use detergent.
0:10 none none
You can customize your cycle by selecting an option.
See option selections. If you change your mind, press the option again to turn off the option, or select a different option. You can change
an option anytime before the selected option begins.
*Maximum wash times depend on water temperature, heavy soil condition, dish load size and options selected.
NOTE: Dry time (fan running) is typically 4 hours after wash cycle. After 30 minutes of dry time, the clean light will illuminate. Anytime after
the clean light is lit and the drawer is opened for longer than 30 seconds, the cycle will be terminated.
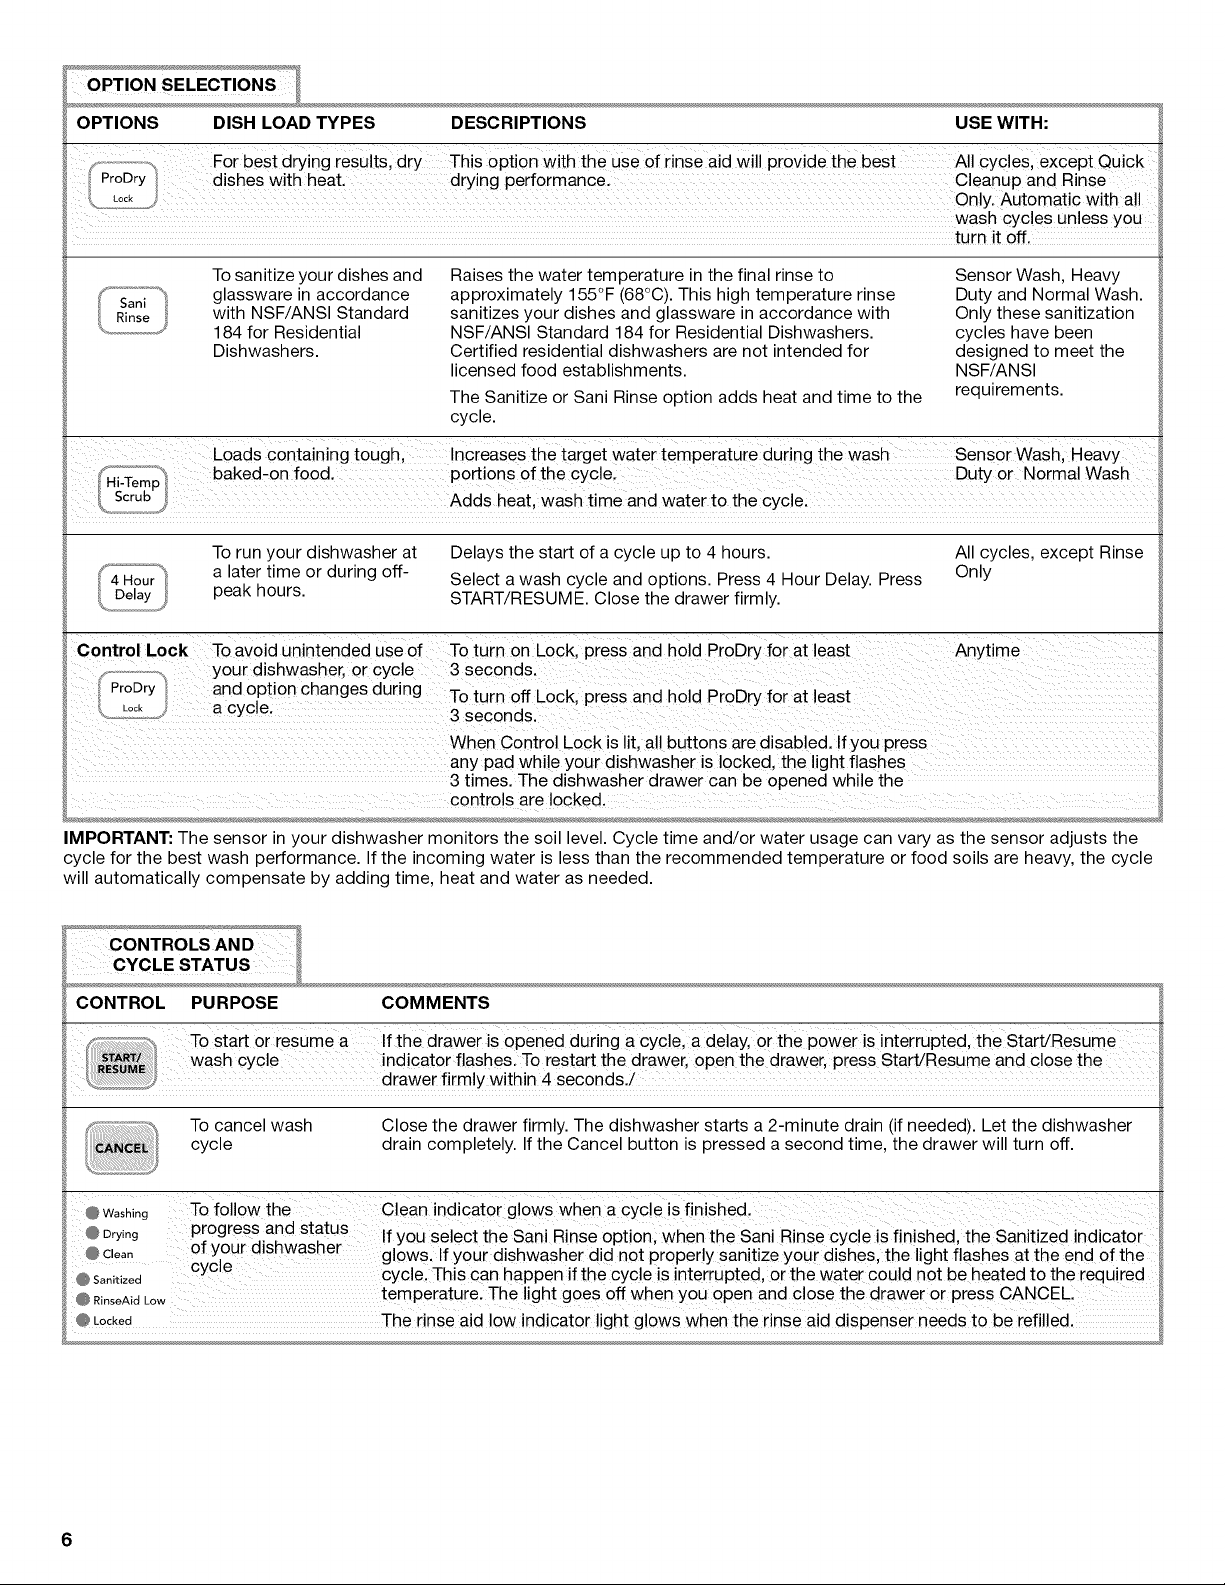
OPTIONS DISH LOAD TYPES DESCRIPTIONS USE WITH:
For best d_ing results dry This option With the use of rinSe aid Will piovide the best All CYcles except Quick
ProDry dishes with heat _ drying perf0rmance. Cleanup and Rins e
L_.,,..2_L...S Only. Automatic with a!l
wash Cyc!es unless you
turn it off.
Tosanitize your dishes and
glassware in accordance
with NSF/ANSI Standard
184 for Residential
Dishwashers.
Raises the water temperature in the final rinse to
approximately 155°F (68°C). This high temperature rinse
sanitizes your dishes and glassware in accordance with
NSF/ANSI Standard 184 for Residential Dishwashers.
Certified residential dishwashers are not intended for
licensed food establishments.
The Sanitize or Sani Rinse option adds heat and time to the
Sensor Wash, Heavy
Duty and Normal Wash.
Only these sanitization
cycles have been
designed to meet the
NSF/ANSI
requirements.
cycle.
Loads Containing tough' InCreases the target water temperature during the was h senSor Wash, HeaVY
To run your dishwasher at
a later time or during off-
peak hours.
Delays the start of a cycle up to 4 hours.
Select a wash cycle and options. Press 4 Hour Delay. Press
START/RESUME. Close the drawer firmly.
All cycles, except Rinse
Only
Control Lock To avoid unintended use of To turn on Lock, press and h0!d ProDry for at least Anytime
your dishwasher, ar cycle 3 seconds.
When Control Lock is lit, a!! buttons are disabled. Ifyou press
any pad while your dishwasher is locked, the light flashes
3 times. The dishwasher drawer can be opened while the
controls are locked.
IMPORTANT: The sensor in your dishwasher monitors the soil level. Cycle time and/or water usage can vary as the sensor adjusts the
cycle for the best wash performance. If the incoming water is less than the recommended temperature or food soils are heavy, the cycle
will automatically compensate by adding time, heat and water as needed.
CONTROL PURPOSE COMMENTS
_'_/ To start or resume a If the drawer is opened during a cycle, a delay, orthe power is interrupted, the start/Resume
Wash Cyc e nd cator f ashes To restart the drawer open the draWer piess start/ResUme and € 0se the
drawer firmly within 4 seconds.!
To cancel wash
cycle
Close the drawer firmly. The dishwasher starts a 2-minute drain (if needed). Let the dishwasher
drain completely. If the Cancel button is pressed a second time, the drawer will turn off.
@W_,hing TO follow the Clean indicator g!ows When a cYc!e is finished.
Dr,n progress and status
@ y9 '. ifv0U Select the sani Rinse option when the sani Rinse ovoid iS finished the sanitized indicator
_C!ean o1 your dishwasher glowsl If your diShWasher did'not proper!y sanitize your dishes the ligl_t flashes at the end of the
@sanitized cyc e cycle This ca n happen if the cycle is interrupted, or the water could not be heated to the required
IRinseAidLow temperature. The !ight goes off when you open and C!ose the drawer or press CANCEL:
_ Locked The rinse aid low indicator light glows when the rinse aid dispenser needs to be refilled.
Your KitchenAid dishwasher may have some or all of these features.
SURE-HOLD ® Small Items Mesh Pouch
This pouch hangs on the rack. Use it to hold small items that could
otherwise "fly" around inside the dishwasher during a cycle.
SURE-HOLD ®Cup and Stemware Holder
Fold down the extra shelf on the left-hand or right-hand side of the
rack to hold additional cups, stemware or long items such as
utensils and spatulas.
SURE-HOLD ® Light Item Clips
The light item clips hold lightweight plastic items
such as cups, lids, or bowls in place during
washing.
To move a clip:
1. Pull the clip up and off the tine.
2. Reposition the clip on another tine.
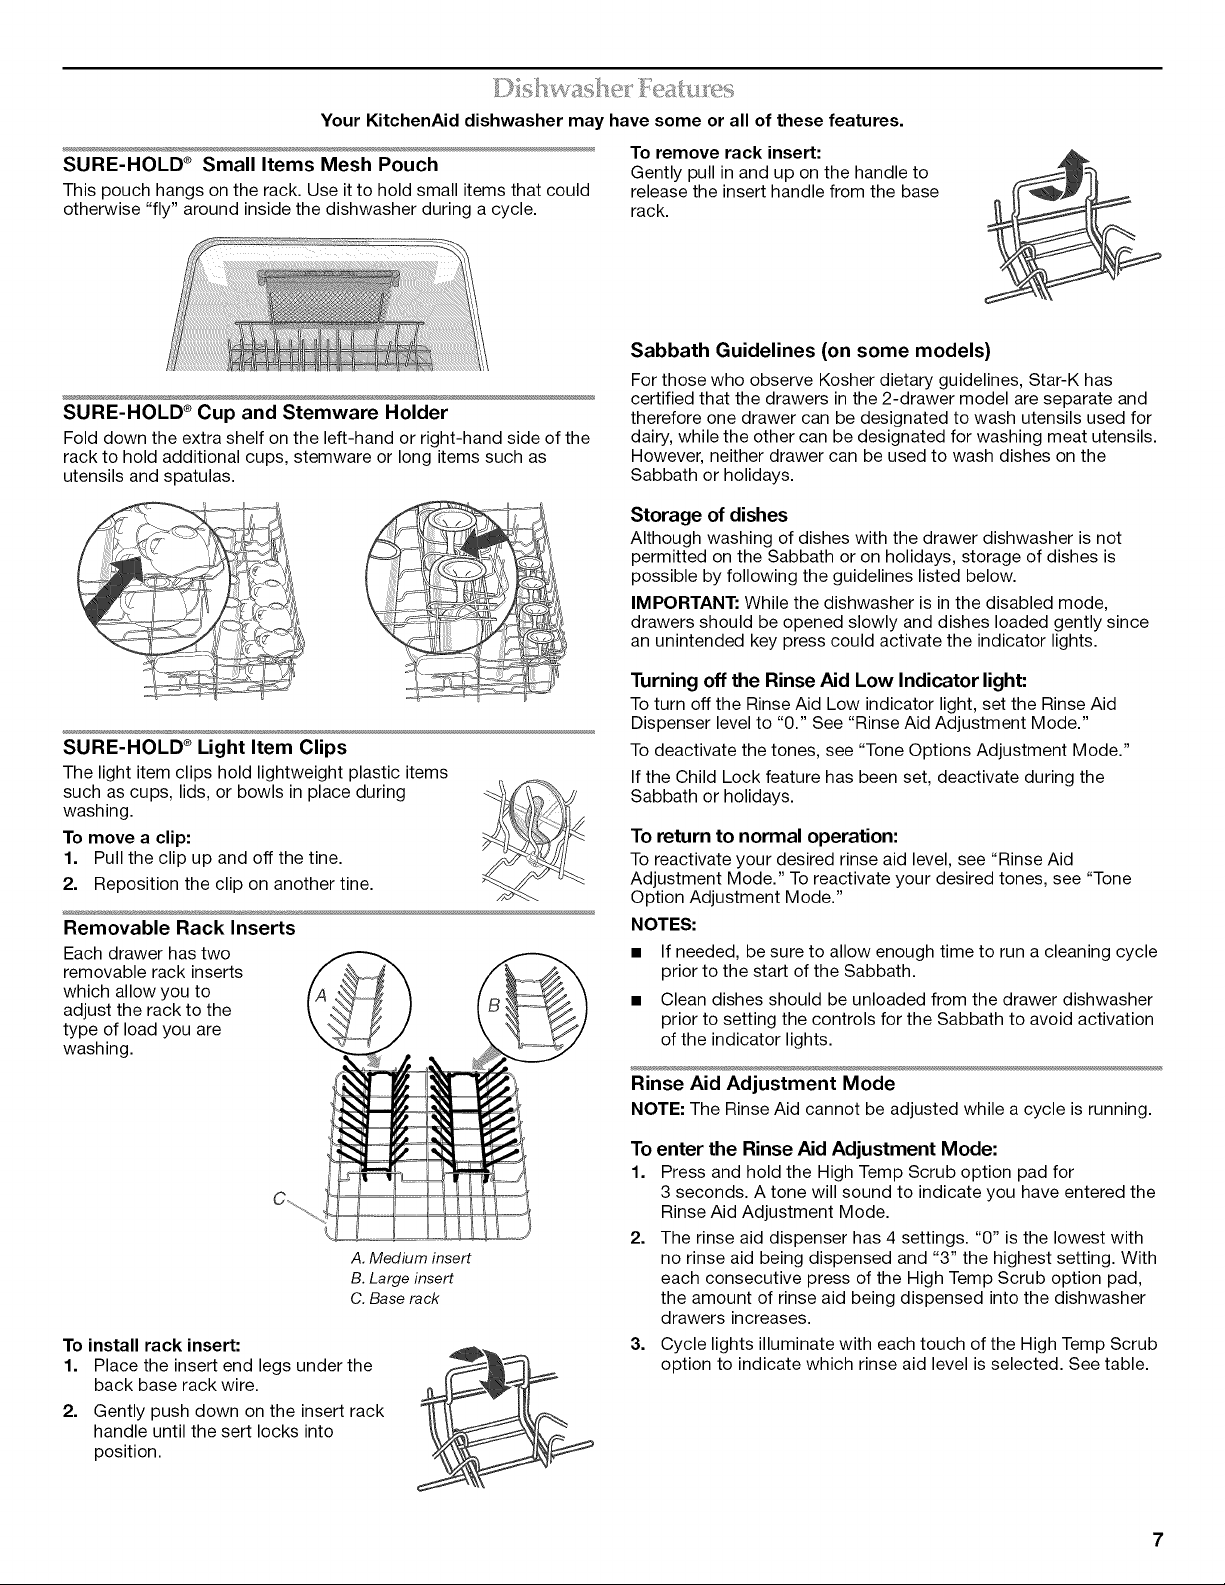
Removable Rack Inserts
Each drawer has two
removable rack inserts
which allow you to
adjust the rack to the
type of load you are
washing.
To remove rack insert:
Gently pull in and up on the handle to
release the insert handle from the base
rack.
Sabbath Guidelines (on some models)
For those who observe Kosher dietary guidelines, Star-K has
certified that the drawers in the 2-drawer model are separate and
therefore one drawer can be designated to wash utensils used for
dairy, while the other can be designated for washing meat utensils.
However, neither drawer can be used to wash dishes on the
Sabbath or holidays.
Storage of dishes
Although washing of dishes with the drawer dishwasher is not
permitted on the Sabbath or on holidays, storage of dishes is
possible by following the guidelines listed below.
IMPORTANT: While the dishwasher is in the disabled mode,
drawers should be opened slowly and dishes loaded gently since
an unintended key press could activate the indicator lights.
Turning off the Rinse Aid Low Indicator light:
To turn off the Rinse Aid Low indicator light, set the Rinse Aid
Dispenser level to "0." See "Rinse Aid Adjustment Mode."
To deactivate the tones, see "Tone Options Adjustment Mode."
If the Child Lock feature has been set, deactivate during the
Sabbath or holidays.
To return to normal operation:
To reactivate your desired rinse aid level, see "Rinse Aid
Adjustment Mode." To reactivate your desired tones, see "Tone
Option Adjustment Mode."
NOTES:
• If needed, be sure to allow enough time to run a cleaning cycle
prior to the start of the Sabbath.
• Clean dishes should be unloaded from the drawer dishwasher
prior to setting the controls for the Sabbath to avoid activation
of the indicator lights.
A. Medium insert
B. Large insert
C. Base rack
To install rack insert:
1. Place the insert end legs under the
back base rack wire.
2. Gently push down on the insert rack
handle until the sert locks into
position.
Rinse Aid Adjustment Mode
NOTE:The RinseAid cannot be adjusted while a cycle is running.
To enter the Rinse Aid Adjustment Mode:
1. Press and hold the High Temp Scrub option pad for
3 seconds. A tone will sound to indicate you have entered the
Rinse Aid Adjustment Mode.
2. The rinse aid dispenser has 4 settings. "0" is the lowest with
no rinse aid being dispensed and "3" the highest setting. With
each consecutive press of the High Temp Scrub option pad,
the amount of rinse aid being dispensed into the dishwasher
drawers increases.
3. Cycle lights illuminate with each touch of the High Temp Scrub
option to indicate which rinse aid level is selected. See table.
 Loading...