

Page 1

®
PRODUCT MODEL SERIES OVERALL DIMENSIONS
CABINET DIMENSIONS
KUDD01SS
Electrical: 120-volt, 60 Hz, AC-only, 15 or
20 amp fused electrical supply is required. A
time-delay fuse or circuit breaker and separate
circuit is recommended.
Water: A hot water line with 4.3-145 psi
(30-1000 kPa) water pressure. Water temperature
must be minimum 120°F (49°C) at dishwasher. An
easily accessible valve with ³⁄₈” compression
fitting must be installed in the hot water supply
line.
Because Whirlpool Corporation policy includes a continuous commitment to improve our
products, we reserve the right to change materials and specifications without notice.
Dimensions are for planning purposes only. For complete details, see Installation
Instructions packed with product. Specifications subject to change without notice.
Ref. 8573714
02-03-06
Single Drawer Dishwasher
23⁷⁄₁₆"
(59.5 cm)
22⁷⁄₁₆" *
(57 cm)
16³⁄₃₂"
side
attaching
tabs
20
¹⁵⁄₃₂"
(52 cm)
drawer open
4"
(10 cm)
moisture protection
tape
support surface must
be solid and level
Utility hole:
1
¹⁄₂" (3.8 cm) dia.
hole, either side –
immediately adjacent
to corner.
22⁷⁄₈" (58.0 cm)
3
¹³⁄₁₆
"
(9.7 cm)
19
⁷⁄₈
"
(50.5 cm)
2
⁵⁄₈
"
(6.7 cm)
23⁵⁄₈"* (60.0 cm)
16 ⁷⁄₃₂"
(41.2 cm)
These marks indicate the mounting tab screw locations.
Minimum thickness of cabinet/cavity sides – ⁵⁄₈" (1.6 cm)
* If custom wood panels are to be used, the product depth is specified
with an ¹¹⁄₁₆" (18 mm) door panel thickness.
NOTE: Product shown with front panels for dimension purposes.
Install the dishwasher in a cabinet cutout that is level, will hold weight
up to 104lbs. (47kg), and is in an area suitable for its size and use.
Page 2
KitchenAid
®
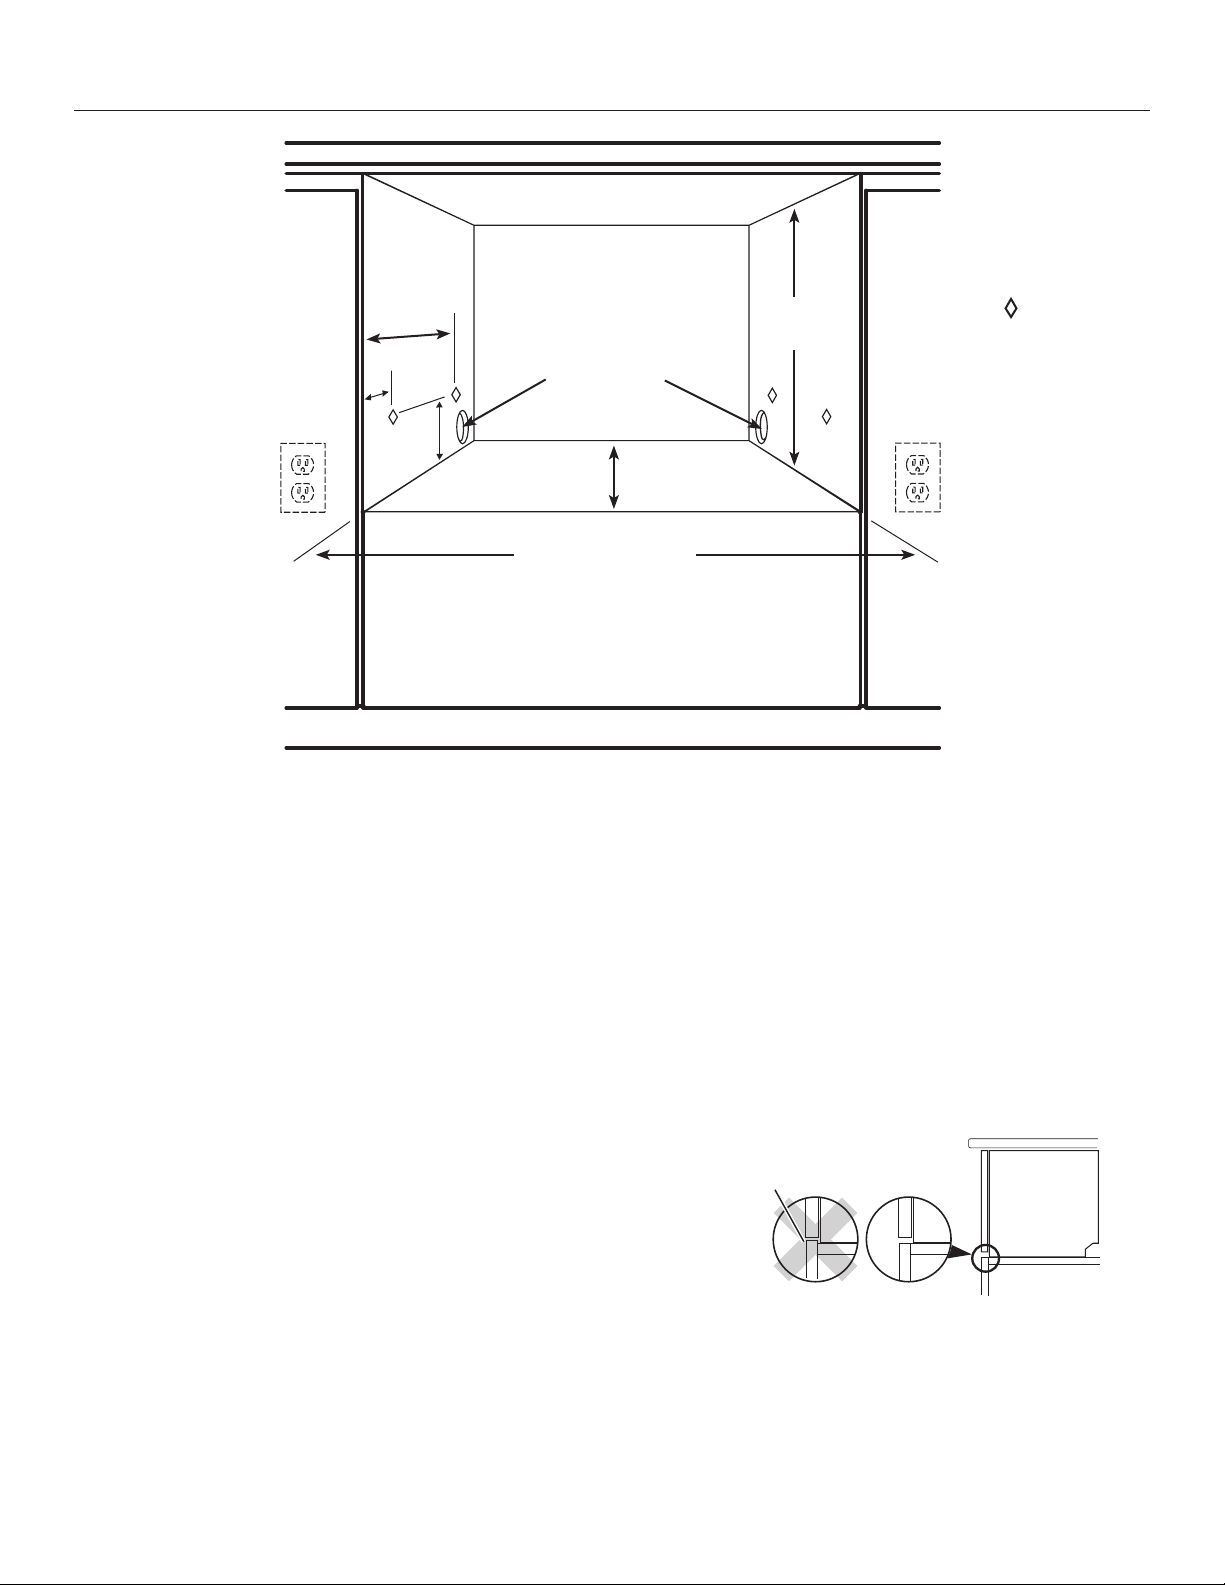
Single Drawer Dishwasher Custom Cabinet Requirements
19 7⁄8”
(50.5 cm)
3 13⁄16”
(9.7 cm)
2 5⁄8”
(6.7 cm)
Utility Hole:
1 1⁄2” (3.8 cm) dia.
either side immediately
adjacent to corner
23 5⁄8” (60.0 cm)
The minimum thickness of cabinet
cavity sides and bottom is
FIGURE 2
IMPORTANT: For best results, carefully read the following
instructions and recommendations before building the
custom cabinet.
• Build the custom cabinet to the size and specifications as
shown (See figure 2).
• The minimum thickness of cabinet/cavity sides is
5
⁄8” (1.6 cm).
• The supporting base of the cabinet must be solid, level,
and able to sustain weight up to 104 lbs. (47 kg).
• For best installation, the use of all four Side Attaching Tabs is
recommended. Wood spacers may need to be added to the
sides of the cabinet in order to properly secure the dishwasher
to the cabinet.
• A utility hole, that will be used to route power supply cord
and hoses, must be located as shown (See figure 2). The
utility hole can be located on either side depending on the
location of services. If the utility hole is not located as shown,
the hoses will prevent the dishwasher from being pushed
back all the way into the cavity. Make sure the edges of the
utility hole are smooth or covered to prevent damage to the
power cord and hoses. If the utility hole is through a metal
cabinet, the hole must be protected with an edge protector.
NOTE: Diamond
16 7⁄32”
(41.2 cm)
symbol indicates
Side Attaching Tab
screw locations.
22 7⁄8 ”
(58.0 cm)
5
⁄8” (1.6 cm)
• A 3-prong grounded outlet must be installed within
6” (15.2 cm) to 18” (45.7 cm) to either side of the utility hole
in the cabinet sidewall. The power outlet must be accessible
after installation.
• When installing a custom wood front door panel to the
dishwasher, the cabinet width of 23
increased to allow
3
⁄32” (2.5 mm) clearance between the
5
⁄8” (60.0 cm) must be
cabinet side and custom panel edge (See figure 2).
• For corner installation, there must be a
1
⁄2” (12.7 mm) space
between the adjacent cabinet doors (i.e. door knobs) and
open dishwasher drawer.
Adjacent cabinetry must not
extend above the cavity base.
DISHWASHER
• It is recommended that wood cabinetry surrounding
the dishwasher be sealed with an oil-based paint or
moisture-proof polyurethane to prevent possible
damage from humidity.
•
Refer to the Installation Instructions Single Drawer
Dishwasher included with the Drawer Dishwasher
to complete installation.
Page 3

KitchenAid
®
Single Drawer Dishwasher Custom Door Panel Requirements
MODEL: KUDD01SSPA
(Front Side)
(39.7 cm)
⁄8”
5
15
Custom Panel
FIGURE 1
MEDALLION CUTOUT DIMENSIONS
7
⁄32”
1
(30.8 mm)
CUSTOM
PANEL
Center of
9”
(22.9 cm)
Medallion
Location Area
23 7⁄16”
(59.5 cm)
9
⁄32” (32.6mm) MAX.
1
(12.7 cm)
1
(6.4 mm)
⁄4”
5
⁄16”
2
(5.9 cm)
5”
3) On the front side of the custom door panel, measure,
mark and cut a hole for the medallion to size as shown
(See figures 1 & 2).
NOTE: The medallion must be placed within the specified
medallion area. Do not locate outside of this specified area
(See figure 1)
.
4) Lay the custom door panel face down on a protective surface
to prevent damage or abrasions.
5) On the backside of the custom door panel, rout a
1
⁄4” (6.4 mm) radius around the medallion cutout previously
cut in step #3. The medallion end does not need to
be routed.
6) If custom door panel material is not suitable to withstand
damp conditions, seal with a moisture resistant material.
For painted panel, paint all rear edges to improve sealing.
Horizontal
Position Line
7
⁄16”
1
(36.5 mm)
CUSTOM
PANEL
(Back Side)
13
⁄64”
1
FIGURE 2
(30.6 mm)
13
⁄32”
2
(60.8 mm)
Medallion
End
IMPORTANT: It is recommended that the custom door panel
be made from suitable material to withstand damp conditions
or adequately sealed with a moisture-resistant material to
withstand moisture and humidity.
1) Cut the custom door panel to size as shown
(See figure 1). The custom panel may be wider than
the dishwasher in order to match the surrounding cabinets.
NOTE: The minimum custom panel thickness is
5
⁄8” (16mm). Panel thickness more than
can be accommodated but overall product depth will
11
⁄16” (18mm)
increase accordingly.
2) On the front side of the custom door panel, measure and mark
the location of the customer supplied handle. The location is
customer preference. Do not install handle at this time.
Vertical
Location Area
Center Line
FIGURE 3
7) On the backside of the custom door panel, measure and
mark the vertical center line and horizontal position line
(See figure 3).
Medallion
7
NOTE: The 1
⁄16” (36.5 mm) horizontal position line is
marked for later use in the installation process. Refer to the
Installation Instructions Single Drawer Dishwasher included
with the Drawer Dishwasher to align and attach the custom
door panel to the factory supplied metal plate.
8) Mount the customer supplied handle to the location
previously marked on the custom panel.
IMPORTANT: When mounting the customer supplied
handle, screws must fit flush to the panel and not extend
beyond the back surface.
9) Refer to the
Installation Instructions Single Drawer
Dishwasher included with the Drawer Dishwasher
to complete installation.
 Loading...