

Page 1
Undercounter Dishwasher
®
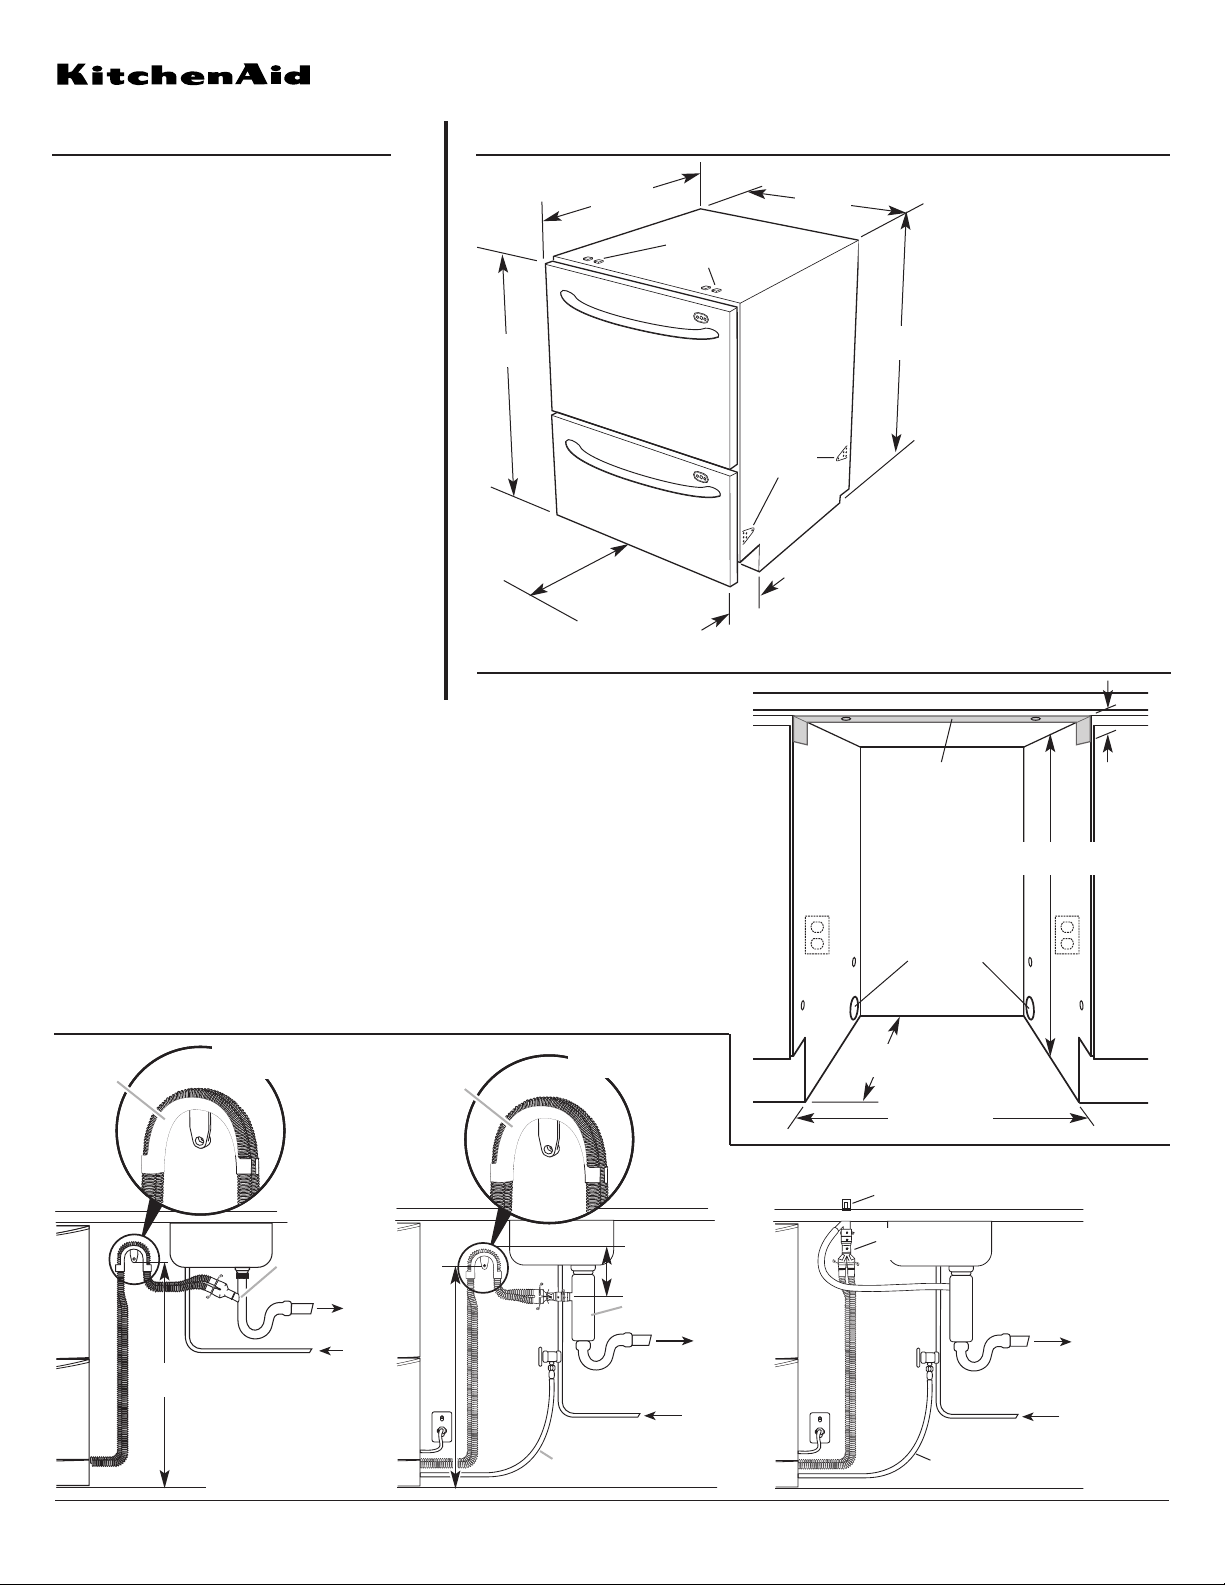
PRODUCT MODEL SERIES OVERALL DIMENSIONS
CABINET OPENING DIMENSIONS
DRAIN OPTIONS
KUDD01DPPA
Electrical: A 120-volt, 60 Hz, AC-only, 15-amp
fused electrical supply is required. (Circuit breaker
or time-delay fuse is recommended.) It is
recommended that a separate circuit serving only
this appliance be provided.
The 3 prong grounded outlet must be installed
within 6" (15.2 cm) to 18" (45.7 cm) of the cabinet
side wall.
If you plan to install a garbage disposer, an
additional separate 120-volt, 60 Hz, AC-only,
15- or 20-amp fused electrical supply is required.
Water: A hot water line with 4.3-145 psi
(30-1000 kPa) water pressure must be used.
Water temperature must be minimum 120°F
(49°C) at dishwasher. An easily accessible valve
with 3/8" compression fitting must be installed in
the hot water supply line.
Because Whirlpool Corporation policy includes a continuous commitment to improve our
products, we reserve the right to change materials and specifications without notice.
Dimensions are for planning purposes only. For complete details, see Installation
Instructions packed with product. Specifications subject to change without notice.
Ref. 8546448
12-2-04
23-7/16"
(59.5 cm)
22-7/16" *
(57 cm)
2"– 4-3/8" **
(5 cm – 11 cm)
32-3/16"- 34-1/2"
(81.8 cm - 87.8 cm)
side
attaching
tabs
raised tabs for
optional top
attaching brackets
30" ***
(76.2 cm)
20-15/32"
(52 cm)
drawer open
* If custom wood panels are to be used,
the product depth is specified with an
11/16" (18 mm) door panel thickness.
** Toe panel depth: Factory supplied,
2–4-3/8" (5 – 11 cm); Custom wood,
5" (12.7 cm) less the toe panel
thickness for integrated. Minimum
panel thickness using the supplied
screws is 3/8" (9 mm).
*** Door front height: Factory supplied –
30" (76.2 cm); Custom wood – 28-1/4"
(71.8 cm) minimum.
NOTE: Product shown with front panels
for dimension purposes.
4"
(10 cm)
moisture protection tape
Utility hole:
1-1/2" (3.8 cm) dia.
hole, either side –
immediately adjacent
to corner.
22-7/8"
(58.0 cm)
23-5/8"* (60.0 cm)
32-5/16"– 34-5/8"
(82.0 cm – 88.0 cm)
*IMPORTANT: Custom wood door panels, if
used, may be wider than the dishwasher to
match surrounding cabinets.The 23-5/8"
(60.0 cm) must be increased so that there is
a 1/4" (6.4 mm) clearance between the
cabinet side and panel edge.
For corner installation, there must be a 1/2"
(12.7 mm) space between the adjacent
cabinet doors (i.e. door knobs) and open
dishwasher drawer.
drain hose
support
water supply
waste
waste tee
27-1/2" – 32-1/4"
(70 cm – 82 cm)
waste
garbage
disposal
valve
water supply
8" (20.3 cm) min. bend
radius from valve
27-1/2" – 32-1/4"
(70 cm – 82 cm)
6" (15.2 cm)
minimum
drain hose
support
waste
valve
air break
drain hose
connector
water supply
8" (20.3 cm) min. bend
radius from valve
Sink drain waste
tee connection
Garbage disposal
connection
Air break connection
Page 2
KitchenAid
®
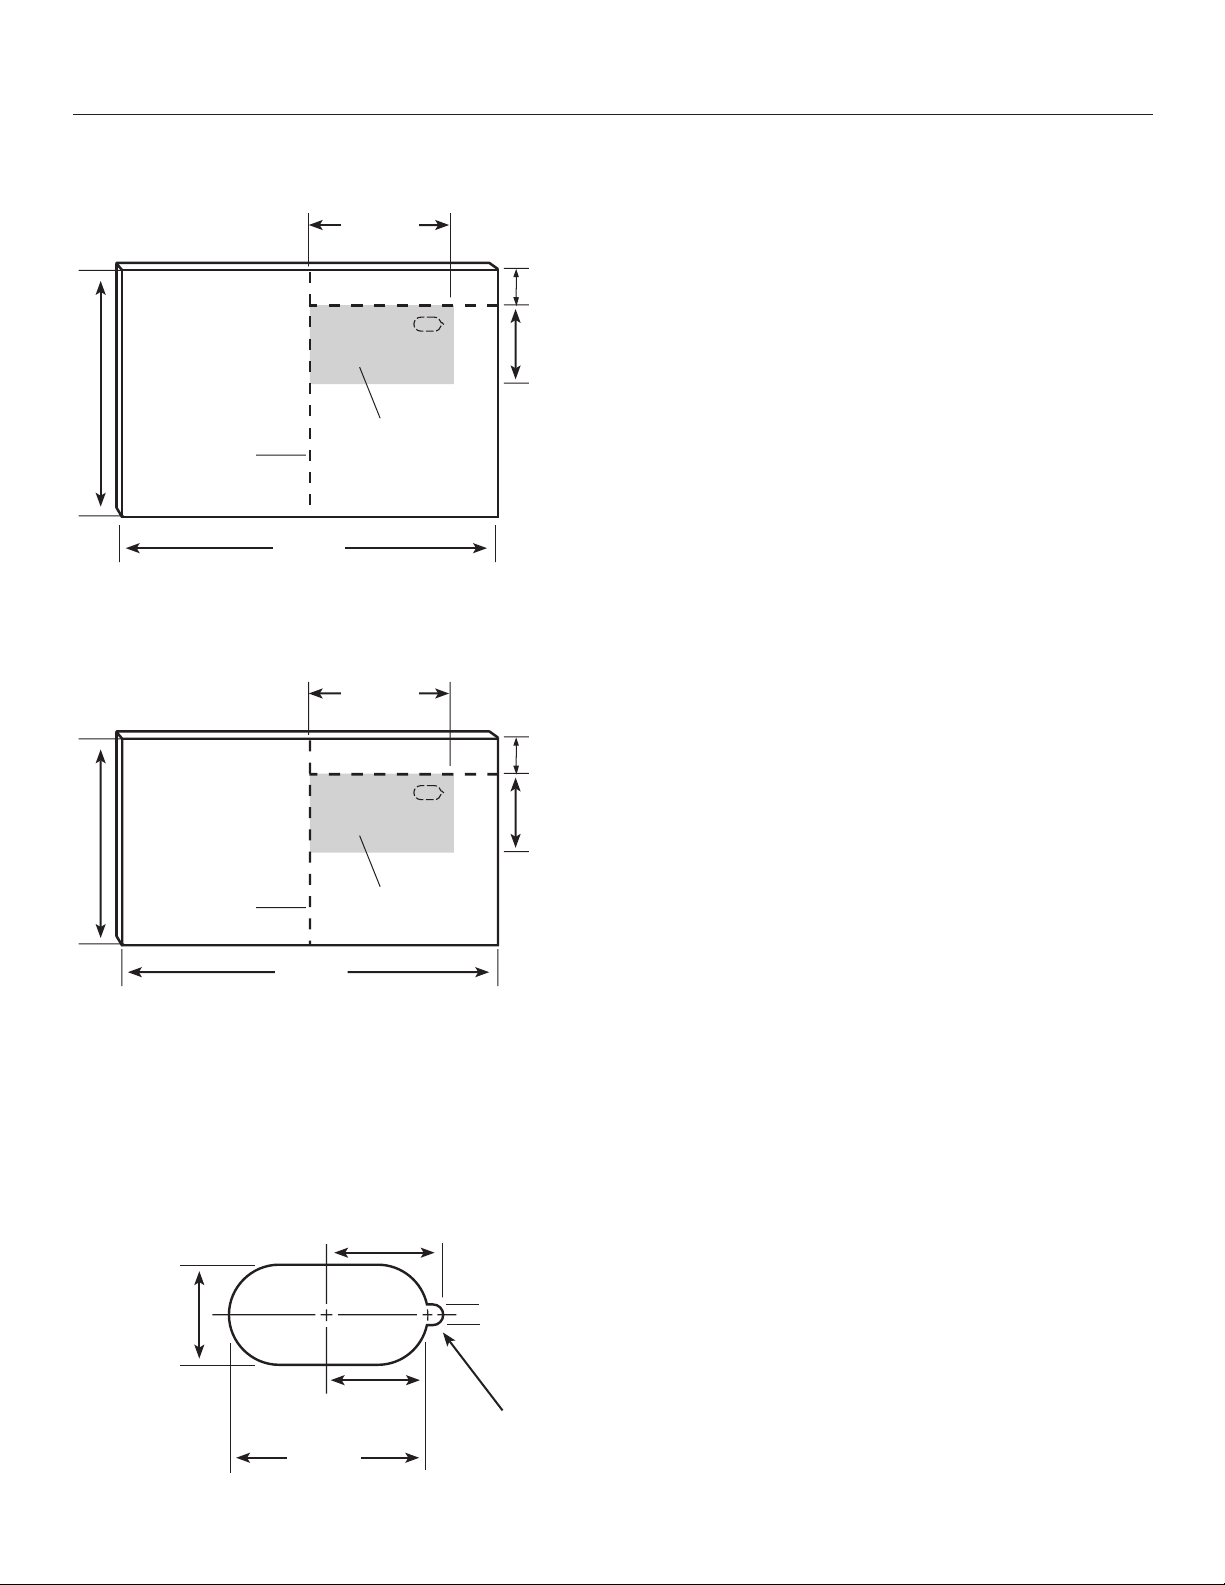
Double Drawer Dishwasher Custom Door Panel Requirements
MODEL: KUDD01DPPA
CUSTOM
PANEL FOR
TOP DRAWER
(Front Side)
(39.7 cm)
⁄8”
5
15
Center of
Custom Panel
FIGURE 1A
CUSTOM
PANEL FOR
BOTTOM
(35.6 cm)
14”
FIGURE 1B
DRAWER
(Front Side)
Center of
Custom Panel
23 7⁄16”
(59.5 cm)
7
⁄16”
23
(59.5 cm)
9”
(22.9 cm)
Medallion
Location Area
9”
(22.9 cm)
Medallion
Location Area
5
⁄16”
2
(5.9 cm)
5”
(12.7 cm)
1
⁄8”
2
(5.4 cm)
5”
(12.7 cm)
IMPORTANT: It is recommended that the top and
bottom custom door panels be made from suitable
material to withstand damp conditions or adequately
sealed with a moisture-resistant material to withstand
moisture and humidity.
1) Cut the top drawer custom door panel to size as shown
(See figure 1A). The custom panels may be wider
than the dishwasher in order to match the
surrounding cabinets.
NOTE: The minimum custom panel thickness is
5
⁄8” (16mm). Panel thickness more than 11⁄16” (18mm)
can be accommodated but overall product depth will
increase accordingly.
2) Cut the bottom drawer custom door panel to size as
shown (See figure 1B). The custom panels may be wider
than the dishwasher in order to match the
surrounding cabinets.
NOTE: The minimum custom panel thickness is
5
⁄8” (16mm). Panel thickness more than 11⁄16” (18mm)
can be accommodated but overall product depth will
increase accordingly.
3) On the front sides of both the top and bottom drawer
custom door panels, measure and mark the location of
the customer supplied handle. The location is customer
preference. Do not install handles at this time.
4) On the front side of the top drawer custom door panel,
measure, mark and cut a hole for the medallion to size as
shown (See figures 1A & 2).
NOTE: The medallion must be placed within the specified
medallion area. Do not locate outside of this specified area
(See figure 1A)
.
MEDALLION CUTOUT DIMENSIONS
1 7⁄32”
(30.8 mm)
FIGURE 2
FOR TOP AND BOTTOM DRAWER
CUSTOM PANELS
1 9⁄32” (32.6mm) MAX.
1
⁄4”
1 13⁄64”
(30.6 mm)
2 13⁄32”
(60.8 mm)
Medallion
End
(6.4 mm)
5) On the front side of the bottom drawer custom door
panel, measure, mark and cut a hole for the medallion to
size as shown (See figures 1B & 2).
NOTE: The medallion must be placed within the specified
medallion area. Do not locate outside of this specified area
(See figure 1B)
.
6) Lay the top and bottom drawer custom door panels face
down on a protective surface to prevent damage
or abrasions.
Page 3

KitchenAid
1 7⁄16”
(36.5 mm)
FIGURE 3A
1 3⁄16”
(30.2 mm)
FIGURE 3B
®
Double Drawer Dishwasher Custom Door Panel Requirements
MODELS: KUDD01DPPA
Horizontal
Position Line
Vertical
Center Line
Vertical
Center Line
CUSTOM
PANEL FOR
TOP DRAWER
(Back Side)
Medallion
Location Area
Horizontal
Position Line
CUSTOM
PANEL FOR
BOTTOM
DRAWER
(Back Side)
Medallion
Location Area
7) On the back side of the top drawer custom door panel,
8) On the back side of the bottom drawer custom door
9) If custom door panel material is not suitable to withstand
10) On the backside of the top drawer custom door panel,
NOTE: The 1 7⁄16” (36.5 mm) horizontal position line is
11) On the backside of the bottom drawer custom door
NOTE: The 1 3⁄16” (30.2 mm) horizontal position line is
1
rout a
⁄4” (6.4 mm) radius around the medallion cutout
previously cut in step #4. The medallion end does not
need to be routed.
panel, rout a
1
⁄4” (6.4 mm) radius around the medallion
cutout previously cut in step #5. The medallion end does
not need to be routed.
damp conditions, seal with a moisture resistant material.
For painted panels, paint all rear edges to improve sealing.
measure and mark the vertical center line and horizontal
position line (See figure 3A).
marked for later use in the installation process. Refer to
the Installation Instructions Drawer Dishwasher included
with the Drawer Dishwasher to align and attach the top
drawer custom door panel to the factory supplied
metal plate.
panel, measure and mark the vertical center line and
horizontal position line (See figure 3B)
marked for later use in the installation process. Refer to
the Installation Instructions Drawer Dishwasher included
with the Drawer Dishwasher to align and attach the
bottom drawer custom door panel to the factory supplied
metal plate.
.
12) Mount the customer supplied handles to the locations
previously marked on the top and bottom drawer
custom panels.
IMPORTANT: When mounting the customer supplied
handles, screws must fit flush to the panel and not extend
beyond the back surface.
13) Refer to the
Installation Instructions Drawer
Dishwasher included with the Drawer Dishwasher
to complete installation.
 Loading...