

Page 1

Model
KUDS24SE
KUDC24SE
Use & Care Guide
and
ARCHITECT
Undercounter
Dishwashers
A Note to You ...................2
Understanding
Dishwasher Safety .......... 3
*
Parts and Features..........4
Start Up Guide ................. 6
Loading Y our
Dishwasher ...................... 8
Washing Special
Items...............................14
Using the Dispensers ... 15
Operating Y our
Dishwasher .................... 19
Caring for Your
Dishwasher .................... 24
Solving Common
Dishwashing
Problems........................27
Troubleshooting............30
Requesting Assistance
or Service.......................32
Index...............................34
Warranty.........................35
9743110
In the U.S.A. for
assistance or service,
call the Consumer
Assistance Center:
1•800•422•1230
www.kitchenaid.com
In Canada for assistance
or service, see page 2.
Page 2

A Note to You
Thank you for buying a KITCHENAID* appliance!
KitchenAid designs the best tools for the most important room in your house. To ensure that
you enjoy many years of trouble-free operation, we developed this Use and Care Guide. It
contains valuable information concerning how to operate and maintain your new appliance
properly and safely. Please read it carefully.
Also, please complete and mail the enclosed Product Registration Card.
In the U.S.A.
For assistance or service
call the Consumer Assistance Center toll free................................................. 1-800-422-1230
Throughout Canada for assistance
Call the Consumer Assistance Centre toll free .................................................1-800-461-5681
8:30 a.m. – 6 p.m. (EST)
Throughout Canada for service ...................................................... see page 33
If you need assistance or service, first see the “Troubleshooting” section of this book. After
checking “Troubleshooting,” additional help can be found by checking the “Requesting
Assistance or Service” section, or by calling one of the telephone numbers above.
When calling, you will need to know your appliance’s complete model number and serial
number. You can find this information on the model and serial number label/plate (see diagram
in the “Parts and Features” section.)
Keep this book and the sales slip together in a safe place for future reference. You must
provide proof of purchase or installation date for in-warranty service.
Model Number______________________
Serial Number ______________________
Date Installed ______________________
Builder/Dealer Name ________________
Address ___________________________
Phone_____________________________
2
Page 3
Understanding Dishwasher Safety
Your safety and the safety of others is very important.
We have provided many important safety messages in this manual and on your
appliance. Always read and obey all safety messages.
This is the safety alert symbol.
This symbol alerts you to hazards that can kill or hurt you and others.
All safety messages will be preceded by the safety alert symbol and the
word “DANGER” or “WARNING.” These words mean:
You will be killed or seriously injured
wDANGER
wWARNING
All safety messages will identify the hazard, tell you how to reduce the chance of injury,
and tell you what can happen if the instructions are not followed.
IMPORTANT SAFETY INSTRUCTIONS
if you don’t follow instructions.
You can be killed or seriously injured
if you don’t follow instructions.
WARNING – When using the
dishwasher, follow basic precautions,
including the following:
• Read all instructions before using the
dishwasher.
• Use the dishwasher only for its
intended function.
• Use only detergents or rinse agents
recommended for use in a dishwasher
and keep them out of the reach of
children.
• When loading items to be washed:
1) Locate sharp items so that they
are not likely to damage the door
seal; and
2) Load sharp knives with the handles
up to reduce the risk of cut-type
injuries.
• Do not wash plastic items unless they
are marked “dishwasher safe” or the
equivalent. For plastic items not so
marked, check the manufacturer’s
recommendations.
• Do not touch the heating element
during or immediately after use.
• Do not operate the dishwasher unless
all enclosure panels are properly in
place.
• Do not tamper with controls.
• Do not abuse, sit on, or stand on the
door or dish racks of the dishwasher.
• To reduce the risk of injury, do not
allow children to play in or on the
dishwasher.
• Under certain conditions, hydrogen gas
may be produced in a hot water system
that has not been used for two weeks
or more. HYDROGEN GAS IS EXPLOSIVE. If the hot water system has not
been used for such a period, before
using the dishwasher turn on all hot
water faucets and let the water flow
from each for several minutes. This will
release any accumulated hydrogen gas.
As the gas is flammable, do not smoke
or use an open flame during this time.
• Remove the door to the washing
compartment when removing an old
dishwasher from service or discarding it.
– SAVE THESE INSTRUCTIONS –
3
Page 4

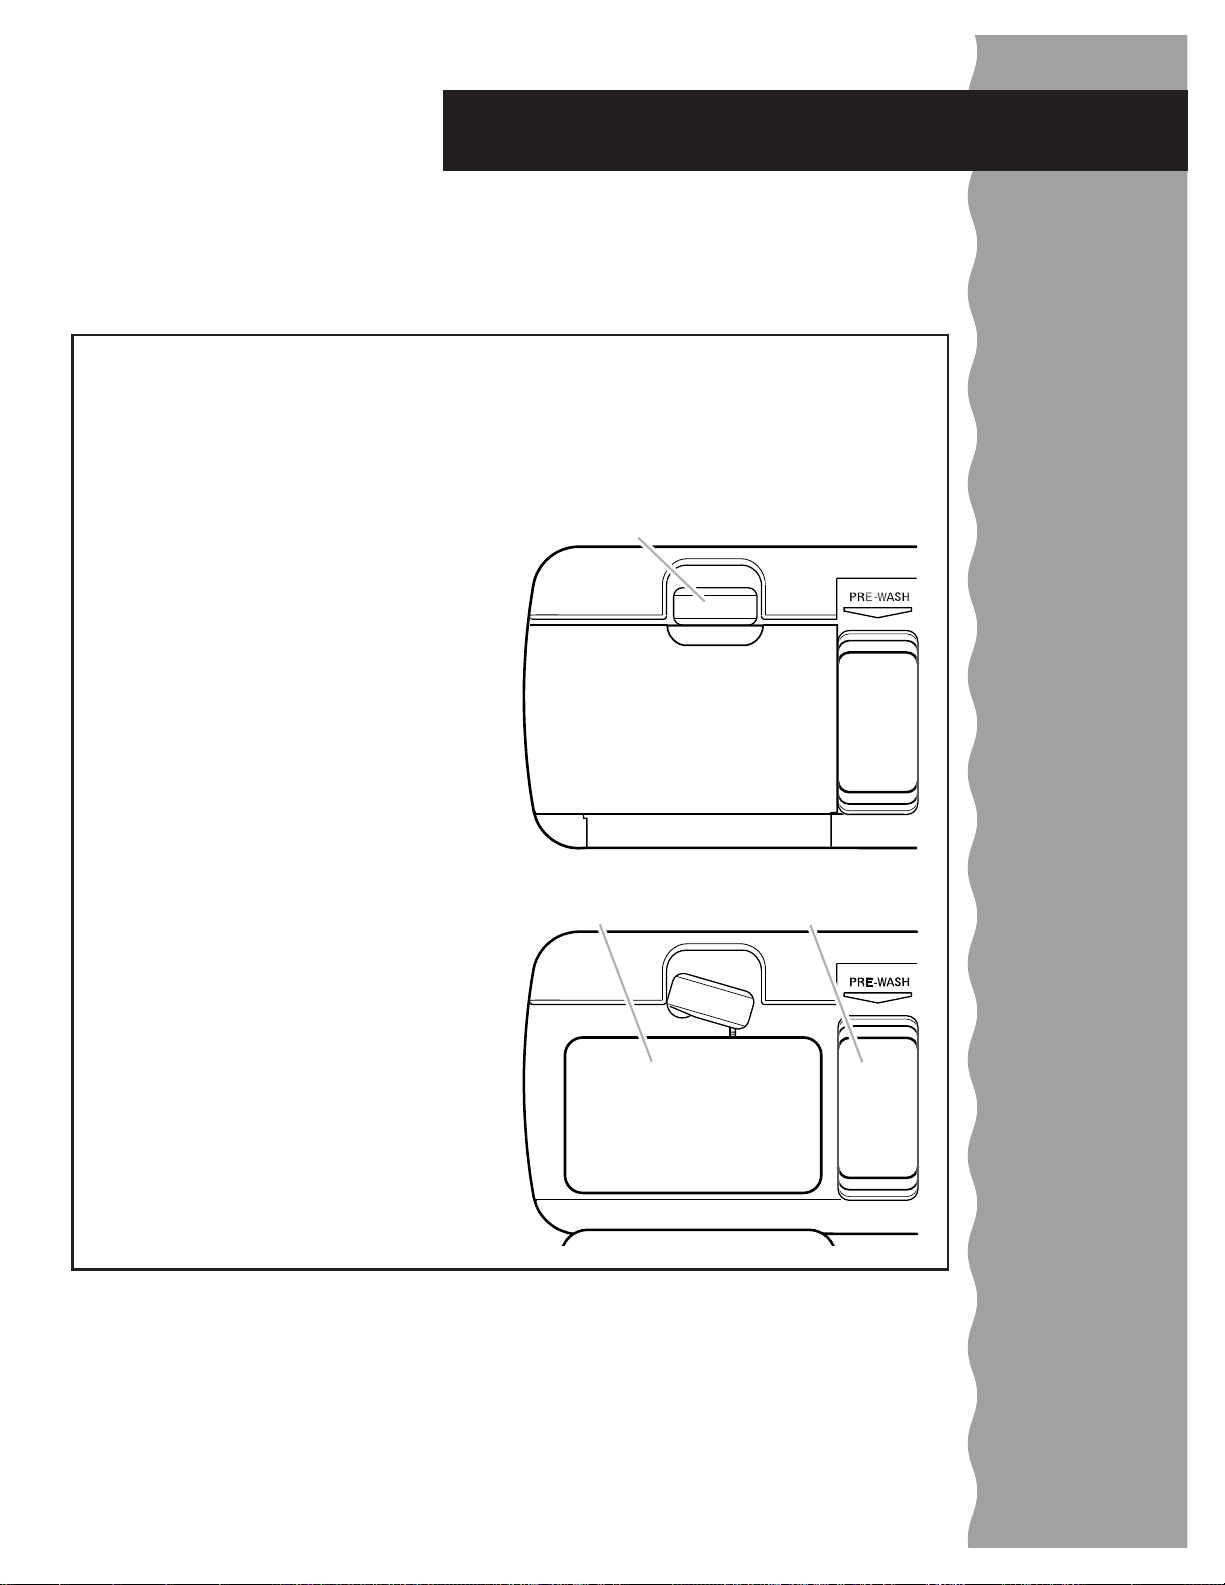
Parts and Features
Below is an illustration of your appliance with the parts and features called out. To help
you find information on specific parts or features quickly, page references are included.
Sure-Hold
cup shelf
(p. 9)
Water inlet
opening
Model and
serial
number label
(p. 2)
Sure-Hold
cup shelf
(p. 12)
Lower rack
(pp. 11-12)
Heating
element
Detergent
dispenser
(p. 15)
Vent
(p. 22)
Upper
spray arm
(p. 7)
Upper rack
(pp. 8-10)
FLEXI-BASKET*
silverware
basket
(p. 13)
4-way
HYDRO SWEEP*
spray arm
(p. 24)
Overflow
protection
float
(p. 24)
-
Rinse
agent
dispenser
(p. 18)
Other features:
Fold-down tines, upper rack (p. 9)
Stemware holders (p. 10)
Sure-Hold clips (p. 10)
Fold-down tines, lower rack (p. 12)
4
Page 5
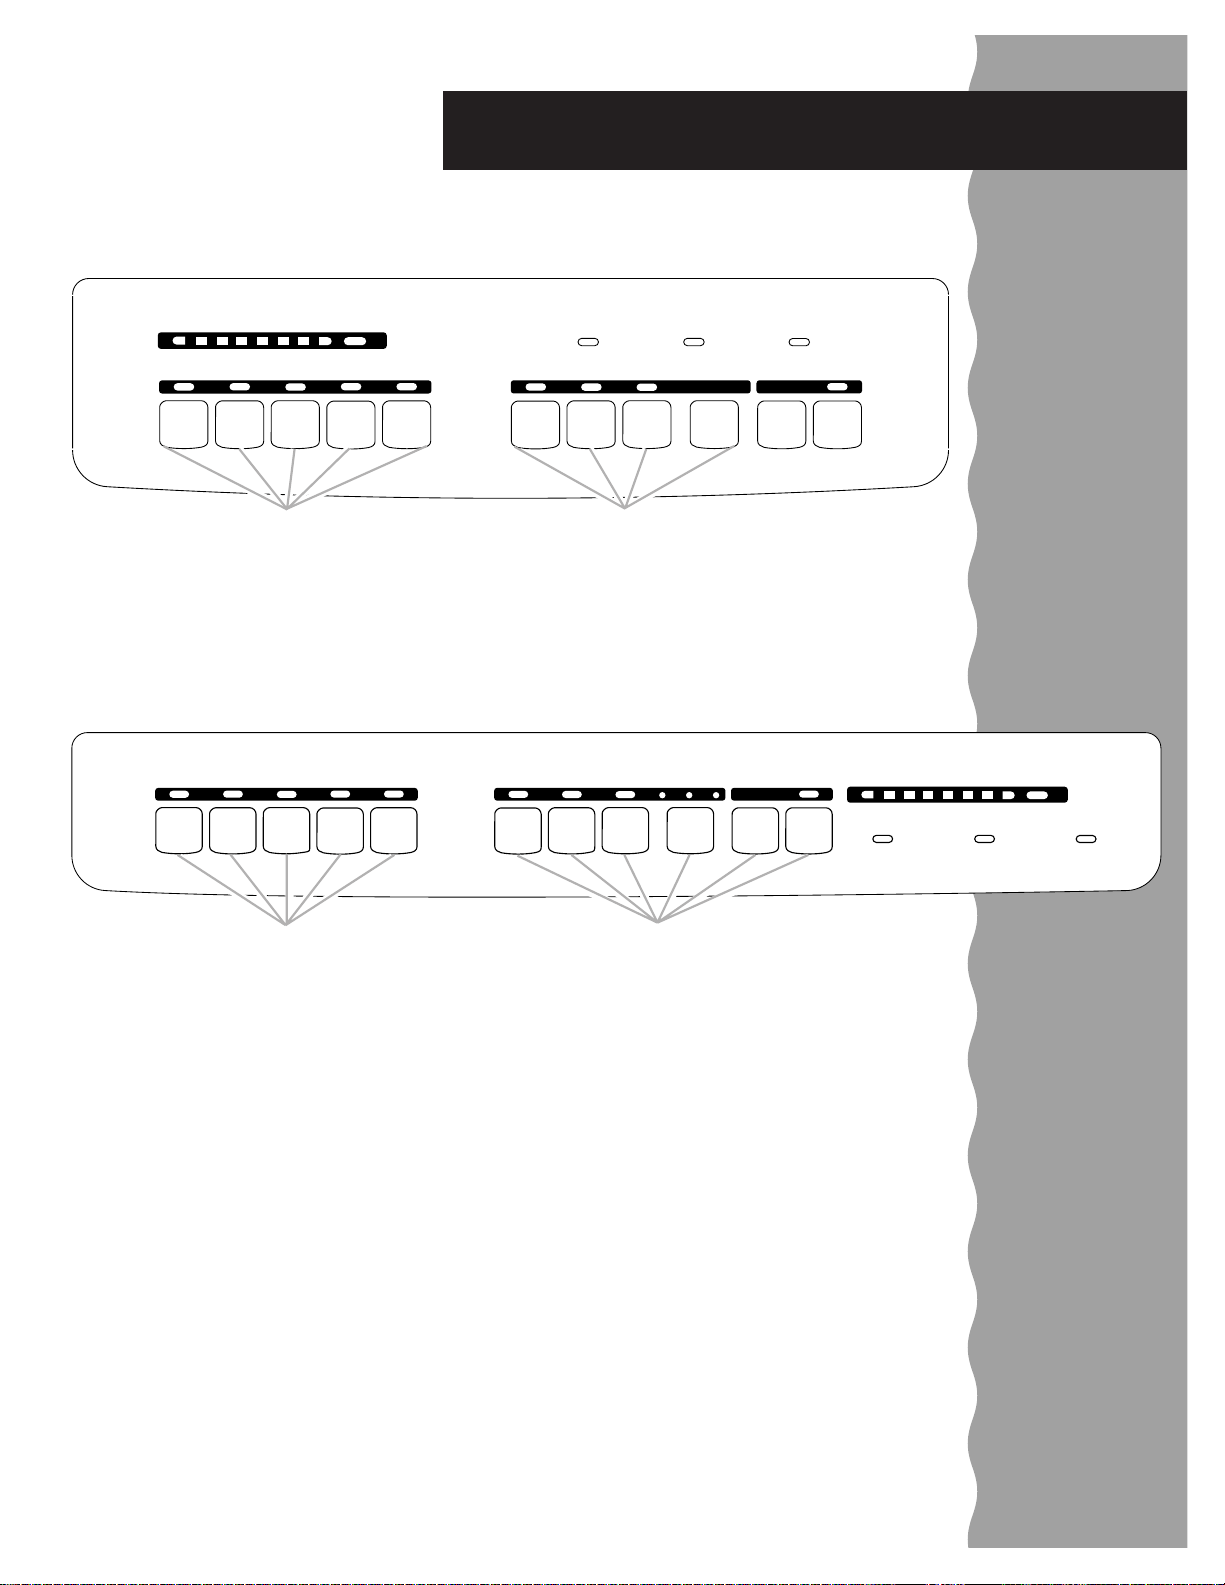
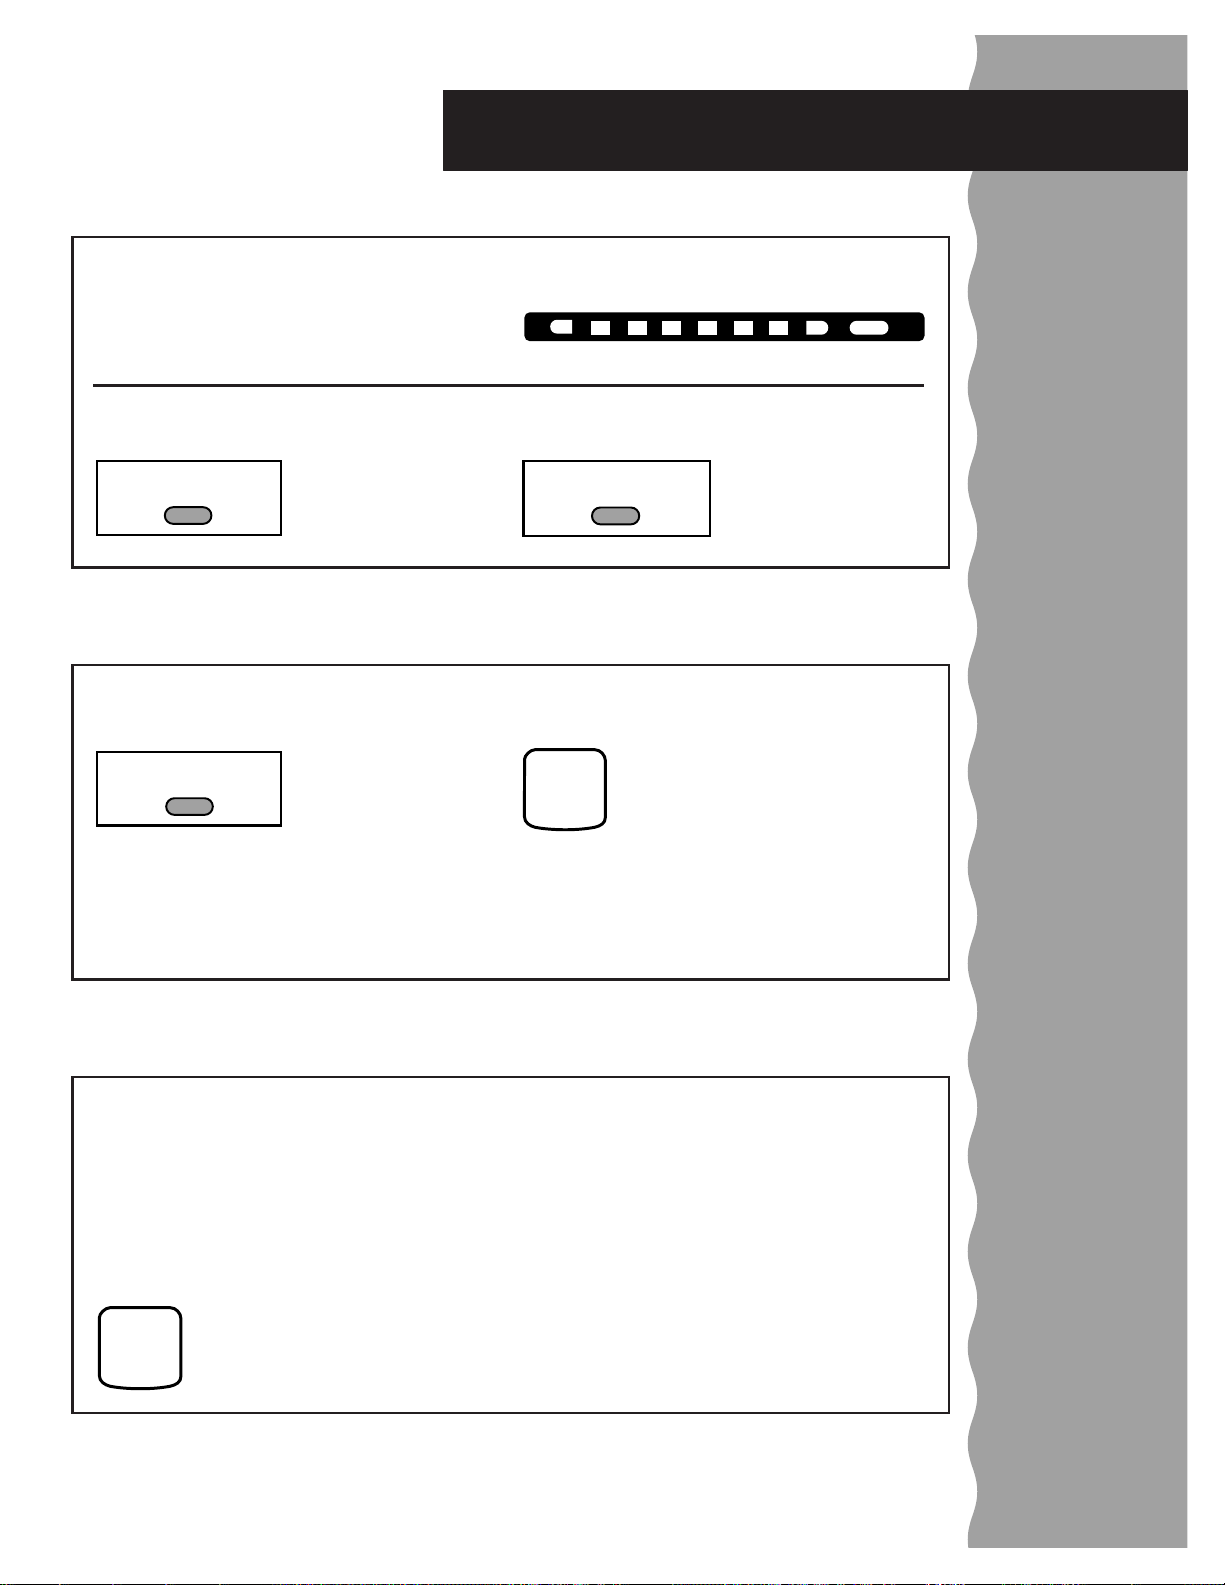
Control panels
KUDS24SE
CYCLE MONITOR
WASH RINSE
DRY
CLEAN
Parts and Features
WATER HEATING CHILD LOCK RINSE AID EMPTY
SOAK &
NORMAL
SCRUB
KUDC24SE
WASH SELECTIONS OPTIONS
SOAK &
NORMAL
SCRUB
WASH SELECTIONS OPTIONS
HIGH
SHORT
WASH
Cycle pads
(p. 19)
SHORT
WASH
Cycle pads
(p. 19)
LIGHT
CHINA
LIGHT
RINSE
CHINA
ONLY
RINSE
ONLY
TEMP.
WASH
HIGH
TEMP.
WASH
ENERGY
Option pads
ENERGY
SAVER
DRY
SAVER
DRY
(p. 20)
SANI
RINSE
Option pads
SANI
RINSE
(p. 20)
2
2
DELAY
HOURS
4
DELAY
HOURS
6
4
CANCEL
START
WASH RINSE
WATER HEATING
CYCLE MONITOR
DRY
CHILD LOCK RINSE AID EMPTY
CLEAN
6
CANCEL
START
5
Page 6

Start Up Guide
Before using your dishwasher
wWARNING
Tip Over Hazard
Do not use dishwasher until
completely installed.
Do not push down on open door.
Doing so can result in serious injury
or cuts.
• Install where dishwasher is protected
from the elements. Protect against
freezing to avoid possible rupture of fill
valve. Such ruptures are not covered by
the warranty. See “Storing your dishwasher” in the “Caring for Your Dishwasher” section for winter storage
information.
• Install and level dishwasher on a floor
that will hold the weight, and in an area
suitable for its size and use.
wWARNING
Electrical Shock Hazard
Electrically ground dishwasher.
Connect ground wire to green ground
connector in terminal box.
Do not use an extension cord.
Failure to follow these instructions
can result in death, fire, or
electrical shock.
• Remove all shipping plugs from hoses
and connectors (such as the cap on
the drain outlet) before installing. See
Installation Instructions for complete
information.
GROUNDING INSTRUCTIONS
• For a grounded, cord connected
dishwasher:
The dishwasher must be grounded. In
the event of a malfunction or breakdown,
grounding
shock by providing a path of least
resistance for electric current. The
dishwasher is equipped with a cord
having an equipment-grounding conductor and a grounding plug. The plug must
be plugged into an appropriate outlet that
is installed and grounded in accordance
with all local codes and ordinances.
will reduce the risk of
electric
WARNING – Improper connection of
the equipment-grounding conductor can
result in a risk of electric shock.
Check with a qualified electrician or
service representative if you are in
doubt whether the dishwasher is
properly grounded. Do not modify the
plug provided with the dishwasher; if it
will not fit the outlet, have a proper
outlet installed by a qualified electrician.
• For a permanently connected
dishwasher:
The dishwasher must be connected to a
grounded metal, permanent wiring
system, or an equipment-grounding
conductor must be run with the circuit
conductors and connected to the
equipment-grounding terminal or lead
on the dishwasher.
– SAVE THESE INSTRUCTIONS –
6
Page 7
Start Up Guide
Using your new KITCHENAID* dishwasher is simple. Follow the steps below to get
started. For more information on specific steps and additional safety information, see
the page(s) next to the step you would like to know more about.
NOTE: Before using your dishwasher, remove all hang tags, temporary labels, and packaging materials. Please also read the entire Use and Care Guide as it contains important
operating and safety information.
How to use your dishwasher
1. Load the dishwasher. See pages 8-13.
2. Spin the upper spray arm. It should turn
freely. Check the
lower spray arm
also to make sure
it turns freely.
3. Add detergent. See pages 15-17.
5. Push door firmly when closing.
6. Run hot water at sink nearest dishwasher
until water is hot. Turn
off water . See page 23.
7. Press the desired Wash Selection pad.
See the “Cycle
selection chart” on
page 19. Then press
the desired Option
pad(s). See page 20
for “Option selections.”
Fast and easy
start up
4. Add rinse agent if needed. See page 18.
8. Press the Start pad. The cycle will begin
(if Delay Hours has
not been selected).
NOTE: The dishwasher
remembers the last
START
option(s). However, if the last cycle you
completed was Rinse Only, the dishwasher
will run the Normal cycle if you press the
Start pad.
cycle and option(s) that
were completed. You
only have to press the
Start pad if you want to
use the same cycle and
7
Page 8
Loading Your Dishwasher
This section tells you how to properly load your dishwasher for the best washing and
rinsing results.
Preparing to load the dishwasher
Save time
and energy
Upper rack
loading tips
• Scrape leftover food, bones, toothpicks,
and other hard items from dishes. It is not
necessary to rinse dishes before putting
them into the dishwasher.
• Load dishes so soiled surfaces face the
spray (down or inward). It is important for
the water spray to reach all soiled surfaces.
• Take care when loading heavy pots or pans
into the dishwasher. They can dent the
stainless steel interior of the door if they are
dropped or bumped.
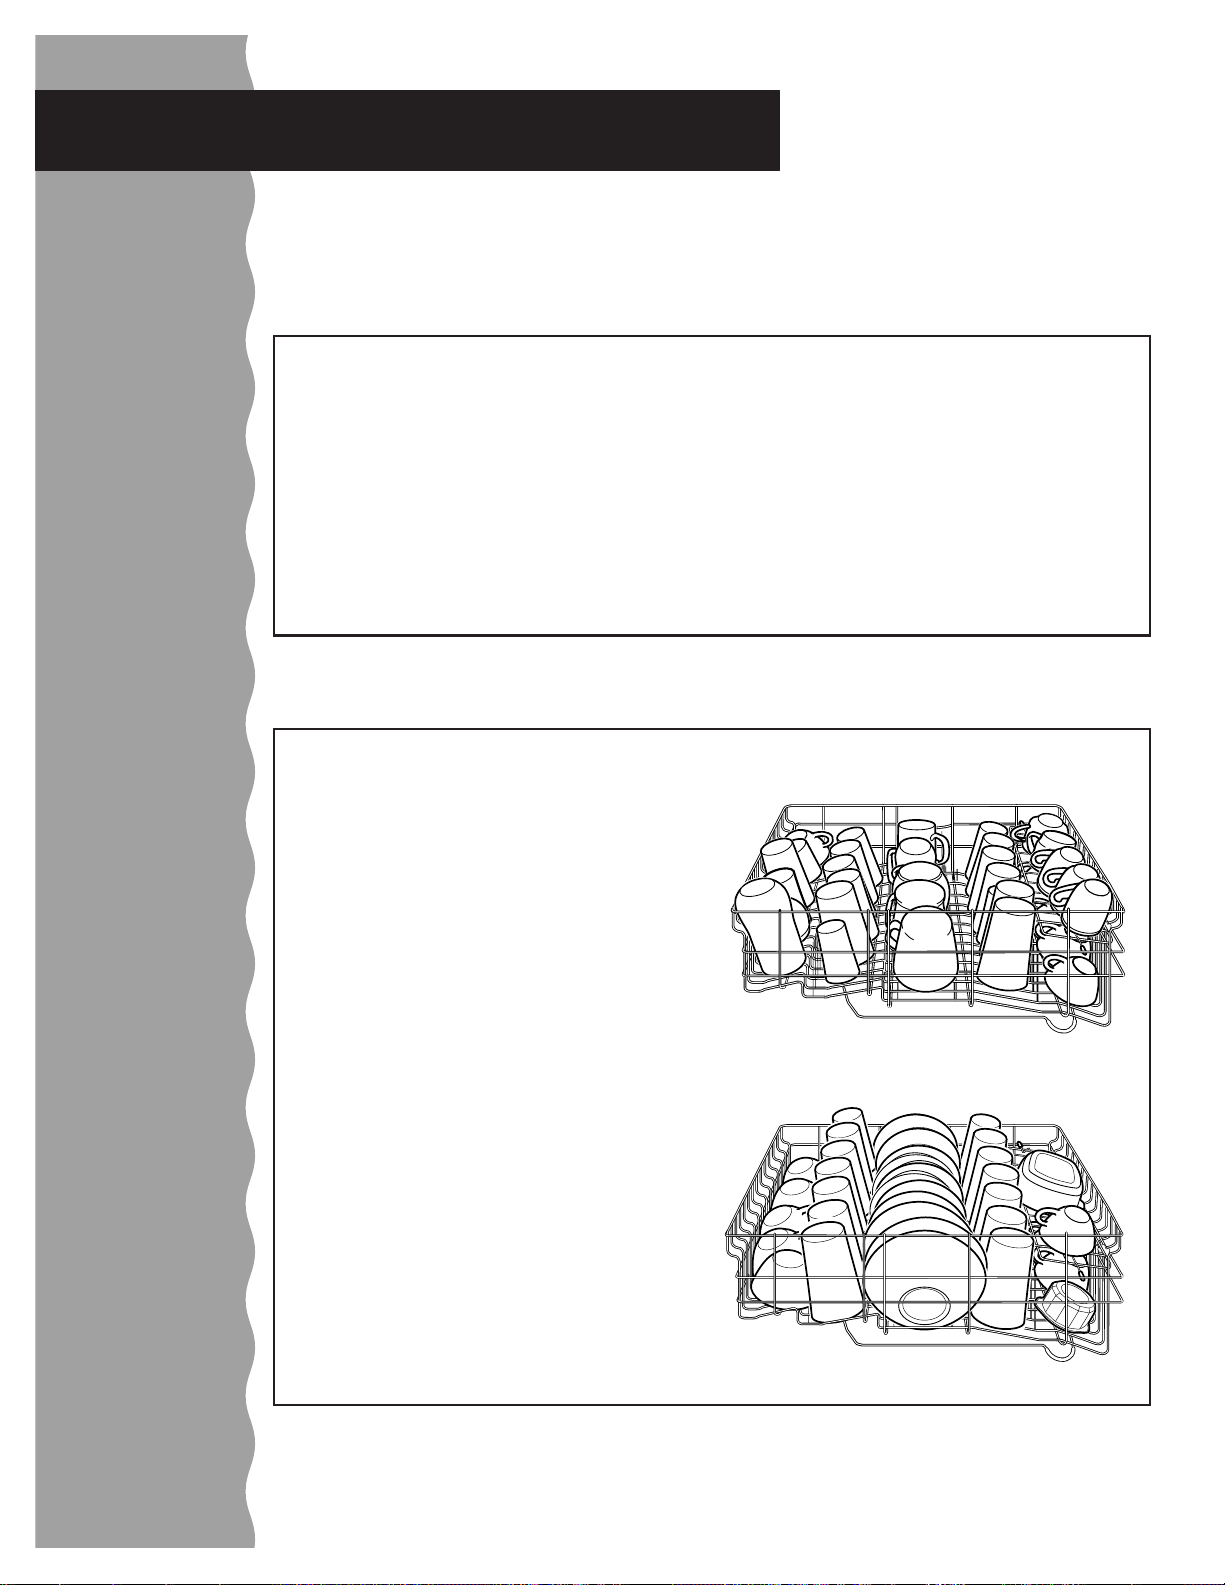
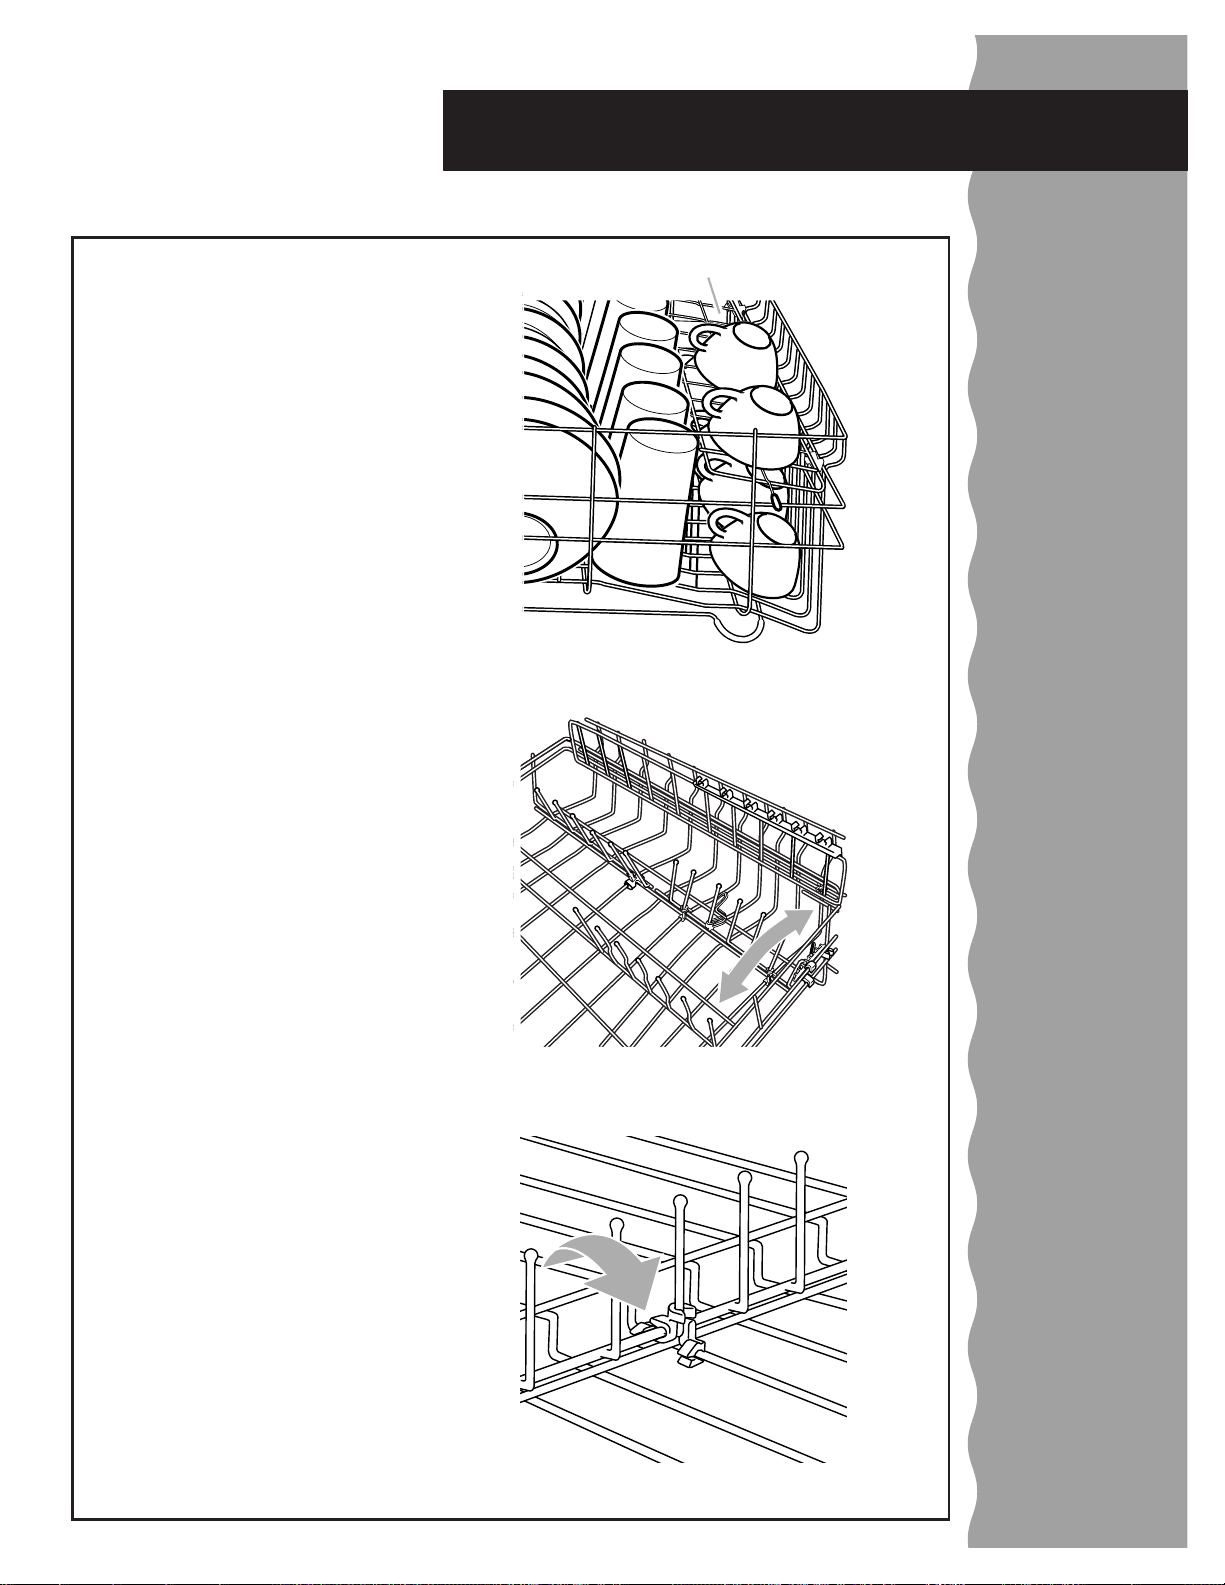
Loading the upper rack
The upper rack is designed for cups,
glasses, and other small items.
• Load cups and glasses in the upper rack
only, in the rows between the prongs.
Placing them over the prongs can cause
them to chip or break.
• China, crystal, and other delicate items
must not touch each other during dishwasher operation. Damage can occur.
• Place items so open ends face down for
best cleaning and draining.
• Load plastic items securely in the upper
rack only. Wash only plastic items marked
“dishwasher safe.”
• Secure lightweight items so they don’t
overturn during washing. Wedge lightweight items against one another or
overlap them with heavier dishes. (See
“Sure-Hold clips” later in this section.)
• Load bowls in the center section for
best stability.
• Racks with teal-colored tips can be
adjusted for different loads.
• Make sure pot lids and handles, pizza
pans, cookie sheets, etc., do not interfere
with the spray arm rotation.
• Run a Rinse Only cycle to keep dishes
moist if you do not plan to wash them soon.
Foods like eggs, rice, pasta, spinach, and
cooked cereals can be hard to remove if
they are left to dry.
Cup and glass load
Mixed load
8
Page 9
Loading Your Dishwasher
Loading the upper rack (cont.)
Sure-Hold cup shelf
Fold down the extra shelf on the top rack to
hold additional cups and glasses, or small
items like long utensils and spatulas.
FLEXI-SPLIT* fold down tines
The row of split tines on the right side of the
rack is adjustable to accommodate a variety
of dishes. These adjustable tines have tealcolored tips.
• To adjust the front half, move the adjustor
at the front of the rack towards the right to
wedge plastic or other lightweight items
against the side of the rack. Move the
adjuster left to make room for larger
dishes.
• To adjust the back half, push the tines
down gently toward the center of the rack.
Cup shelf
Upper rack
loading tips
Adjustable
racks
FLEXI-FOLD DOWN* tines
The row of tines on the left side of the rack
is also adjustable. Push the tines down
gently toward the center of the rack to make
room for larger dishes.
continued on next page
9
Page 10

Loading Your Dishwasher
Loading the upper rack (cont.)
Upper rack
loading tips
Stemware holders
Use the stemware holders (attached to the
cup shelf) to keep water goblets, wine
glasses, etc., in place and prevent damage
during washing.
Sure-Hold clips
The Sure-Hold clips hold lightweight plastic
items like cups, lids, or bowls in place during
washing. Move a clip anywhere in the rack
by pulling it up and off the tine and repositioning it on another tine.
Stemware holder
Sure-Hold clip
10
Page 11
Loading Your Dishwasher
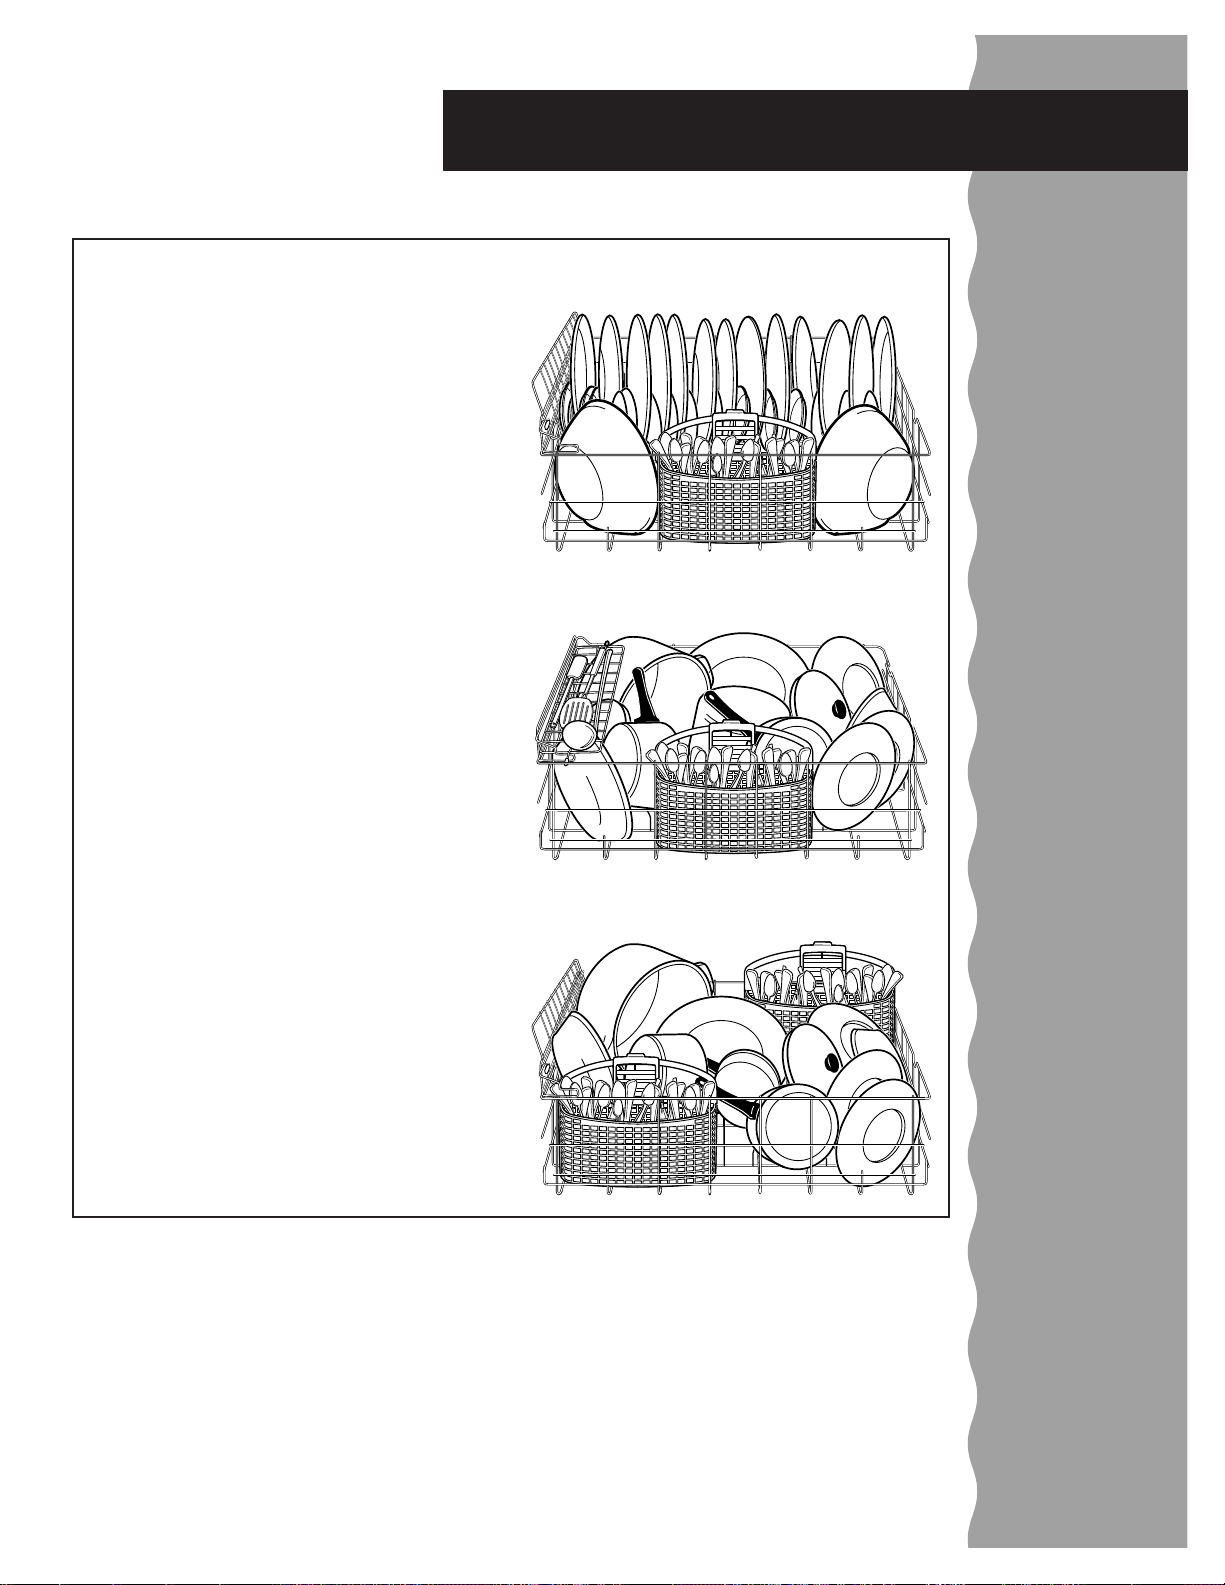
Loading the lower rack
The lower rack is designed for plates, pans,
casseroles, and utensils.
• Load items with cooked-on or dried-on food
in the lower rack with soiled surfaces facing
in toward the spray.
• For maximum capacity and stability of an
all-plate load, stagger or overlap small
plates with large ones.
• Load plates side to side along with pots,
pans, and large cookware, as shown.
• Do not put small items in the lower rack if
they are not secured in place.
• Racks with teal-colored tips can be
adjusted for different loads.
• Load soup, cereal, and serving bowls in the
rack in a variety of ways depending upon
their size and shape. Load bowls securely
between the rows of prongs. Do not nest
bowls because the spray won’t reach their
surfaces.
• Do not load items between the bottom rack
and the side of the dishwasher tub. This
can block the water inlet opening.
Lower rack
loading tips
Mixed load
• The FLEXI-BASKET* silverware basket can
be separated and placed into the lower
rack in several locations. Hold basket firmly
and pull apart. Now use both sections or
just one to load silverware.
Utensil load
continued on next page
11
Page 12
Small items
Large items
Loading Your Dishwasher
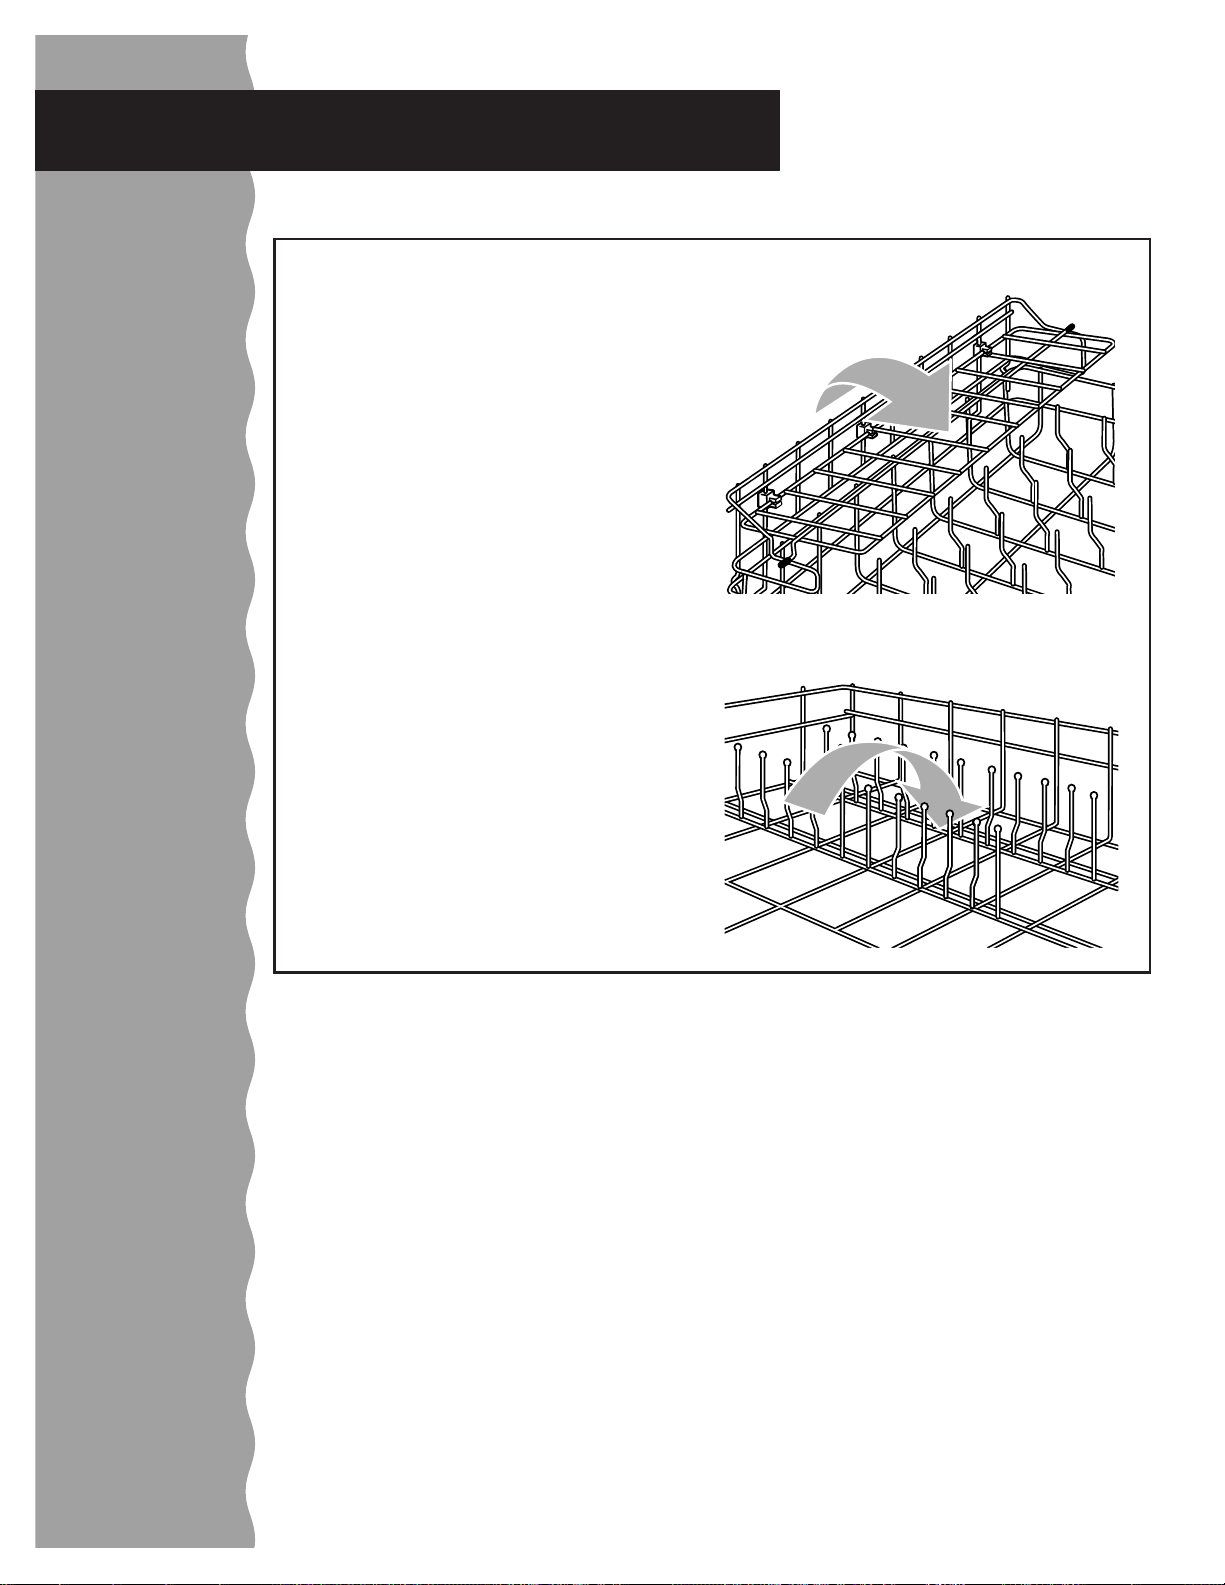
Loading the lower rack (cont.)
Sure-Hold cup shelf
Fold down the extra shelf on the left side of
the lower rack to hold small items such as
cups or utensils.
FLEXI-FOLD DOWN* tines
Fold down one or both of the back rows of
tines to hold large bowls, pots, pans,
roasters, etc. Push down gently towards the
back of the rack to fold down the tines.
12
Page 13
Loading Your Dishwasher
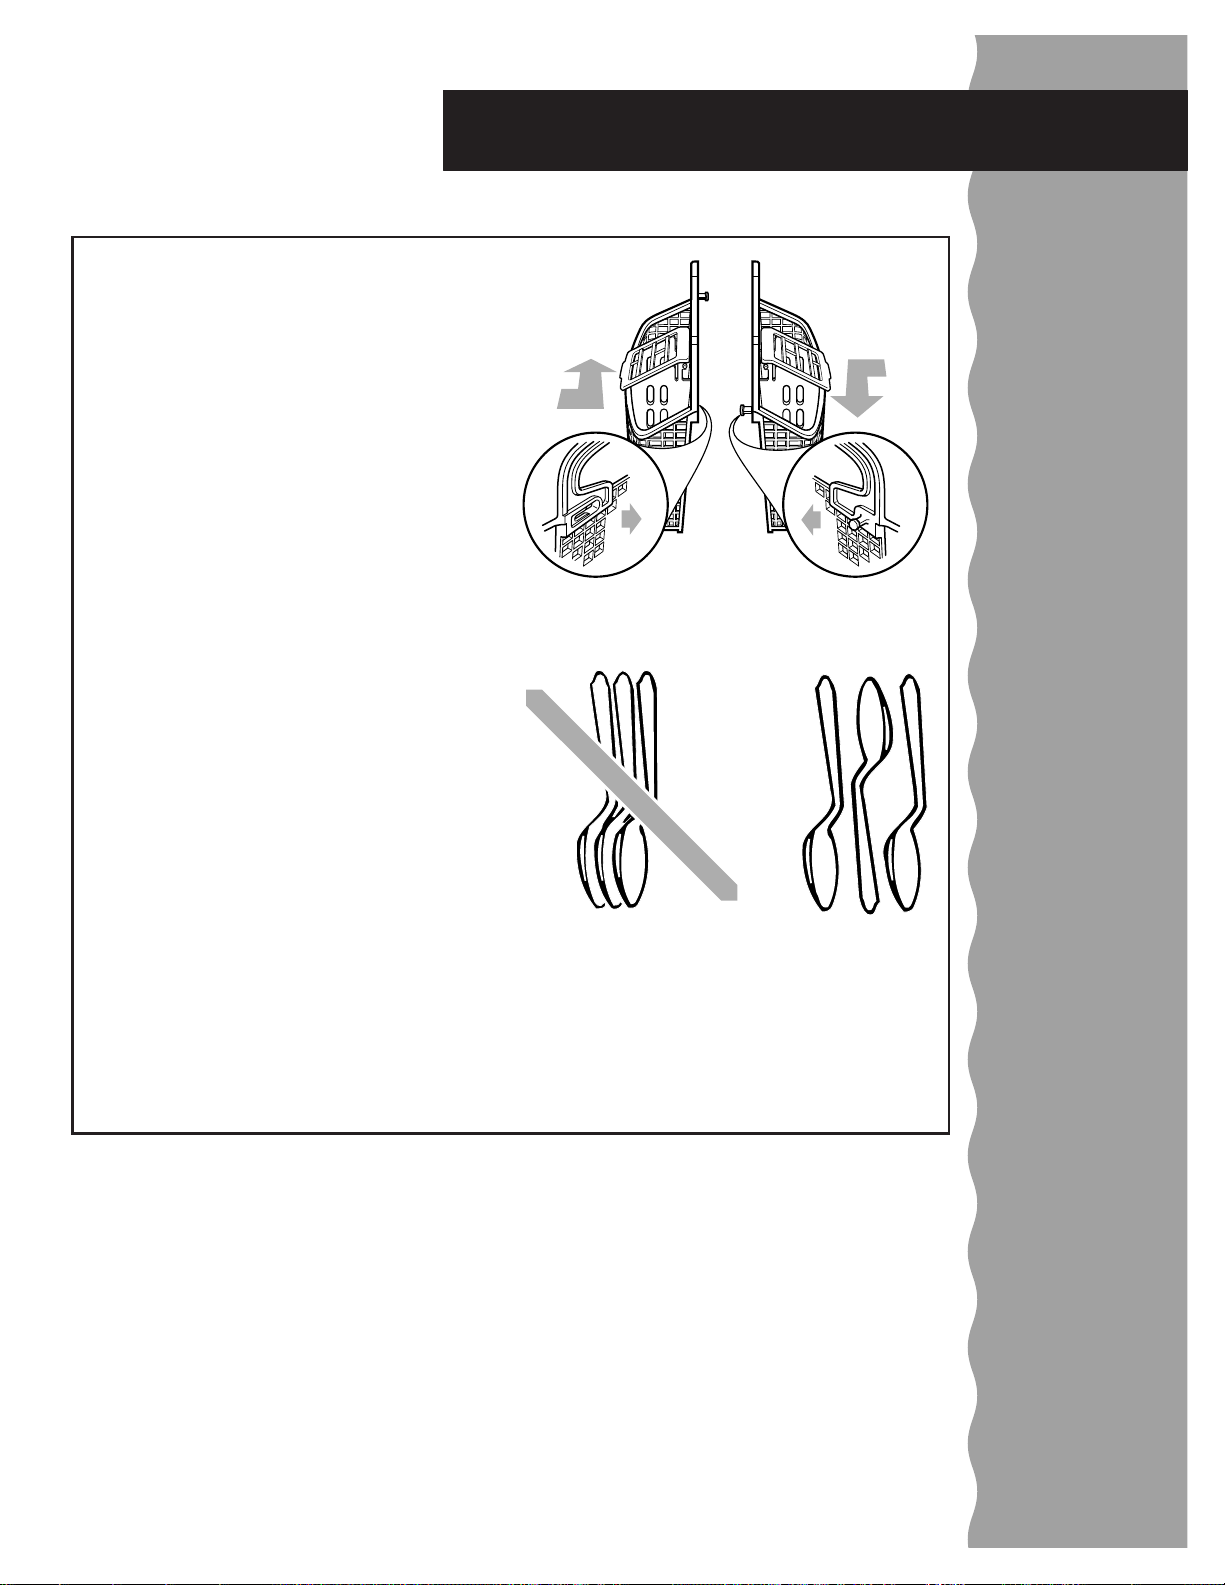
Loading the FLEXI-BASKET* silverware basket
• The FLEXI-BASKET silverware basket can
be separated and placed into the lower
rack in several locations. Hold basket firmly
and pull apart. Now use both sections or
just one to load silverware.
• Load the silverware basket while it is in
the lower rack or take the basket out for
loading on a counter or table.
• Mix items in each section of the basket –
some pointing up and some down.
IMPORTANT: Always load sharp items
(knives, skewers, forks, etc.) pointing down.
• Place small items like baby bottle caps, jar
lids, corn cob holders, etc., in the middle
section with the hinged cover. Close the
cover over the section to hold small items
in place.
• Load forks and spoons so they don’t
nest together. Water spray cannot reach
nested items.
• The silverware basket can also be removed
for easy unloading. Unload or remove the
basket before unloading the upper rack
to avoid spilling water droplets on the
silverware.
Removable
silverware
basket
NOTES:
• Don’t load silver or silver-plated silverware
with stainless steel. These metals can be
damaged by contact with one another
during washing.
• Some foods (such as salt, vinegar, milk
products, fruit juices, etc.) can pit or corrode
silverware if left on for long periods of time.
Use the Rinse Only cycle when silverware
is not washed immediately after use.
13
Page 14

Washing Special Items
If you have any doubts about washing a particular item, check with the manufacturer to
see if it is dishwasher safe.
Check with
manufacturer
MATERIAL
Aluminum
Disposable
Aluminum
Bottles and
Cans
Cast Iron
China/
Stoneware
Crystal
Gold
DISHWASHER SAFE?
Yes
No
No
No
Yes
Yes
No
EXCEPTIONS/SPECIAL INFORMATION
High water temperature and detergents may
affect finish of anodized aluminum. All aluminum
will darken when washed in the dishwasher. This
does not affect pan performance.
Do not wash throwaway aluminum pans in the
dishwasher. These might shift during washing and
transfer black marks to dishes and other items.
Wash bottles and cans by hand. Labels attached
with glue can loosen in your dishwasher, clog
spray arms or the pump, and will reduce washing
performance.
Seasoning will be removed and iron will rust.
Always check manufacturer’s recommendations
before washing. Antique, hand-painted, or overthe-glaze patterns may fade. Gold leaf can
discolor or fade.
Always check manufacturer’s recommendations
before washing. Some types of leaded crystal can
etch with repeated washings.
Gold-colored flatware will discolor.
Glass
Hollow-
Handle
Knives
Pewter, Brass,
and Bronze
Plastics
Disposable
Plastics
Stainless
Steel
Sterling Silver
or Silver Plate
Tin
Wooden Ware
Yes
No
No
Yes
No
Yes
Yes
No
No
Milk glass will yellow with repeated washings.
Handles of some knives are attached to the blade
with adhesives which may loosen if washed in the
dishwasher.
High water temperatures and detergent can
discolor or pit finish.
Always check manufacturer’s recommendations
before washing. Plastics vary in their capacity to
withstand high water temperatures and detergents.
Load plastics in top rack only.
Cannot withstand high water temperatures and
detergents.
Run a Rinse Only cycle if not washing immediately .
Prolonged contact with food containing salt, vinegar ,
milk products, or fruit juice could damage finish.
Run a Rinse Only cycle if not washing immediately. Prolonged contact with food containing salt,
acid, or sulfide (eggs, mayonnaise, and seafood)
can damage finish.
Can rust.
Wash by hand. Always check manufacturer’s
recommendations before washing. Untreated
wood can warp, crack, or lose its finish.
14
Page 15
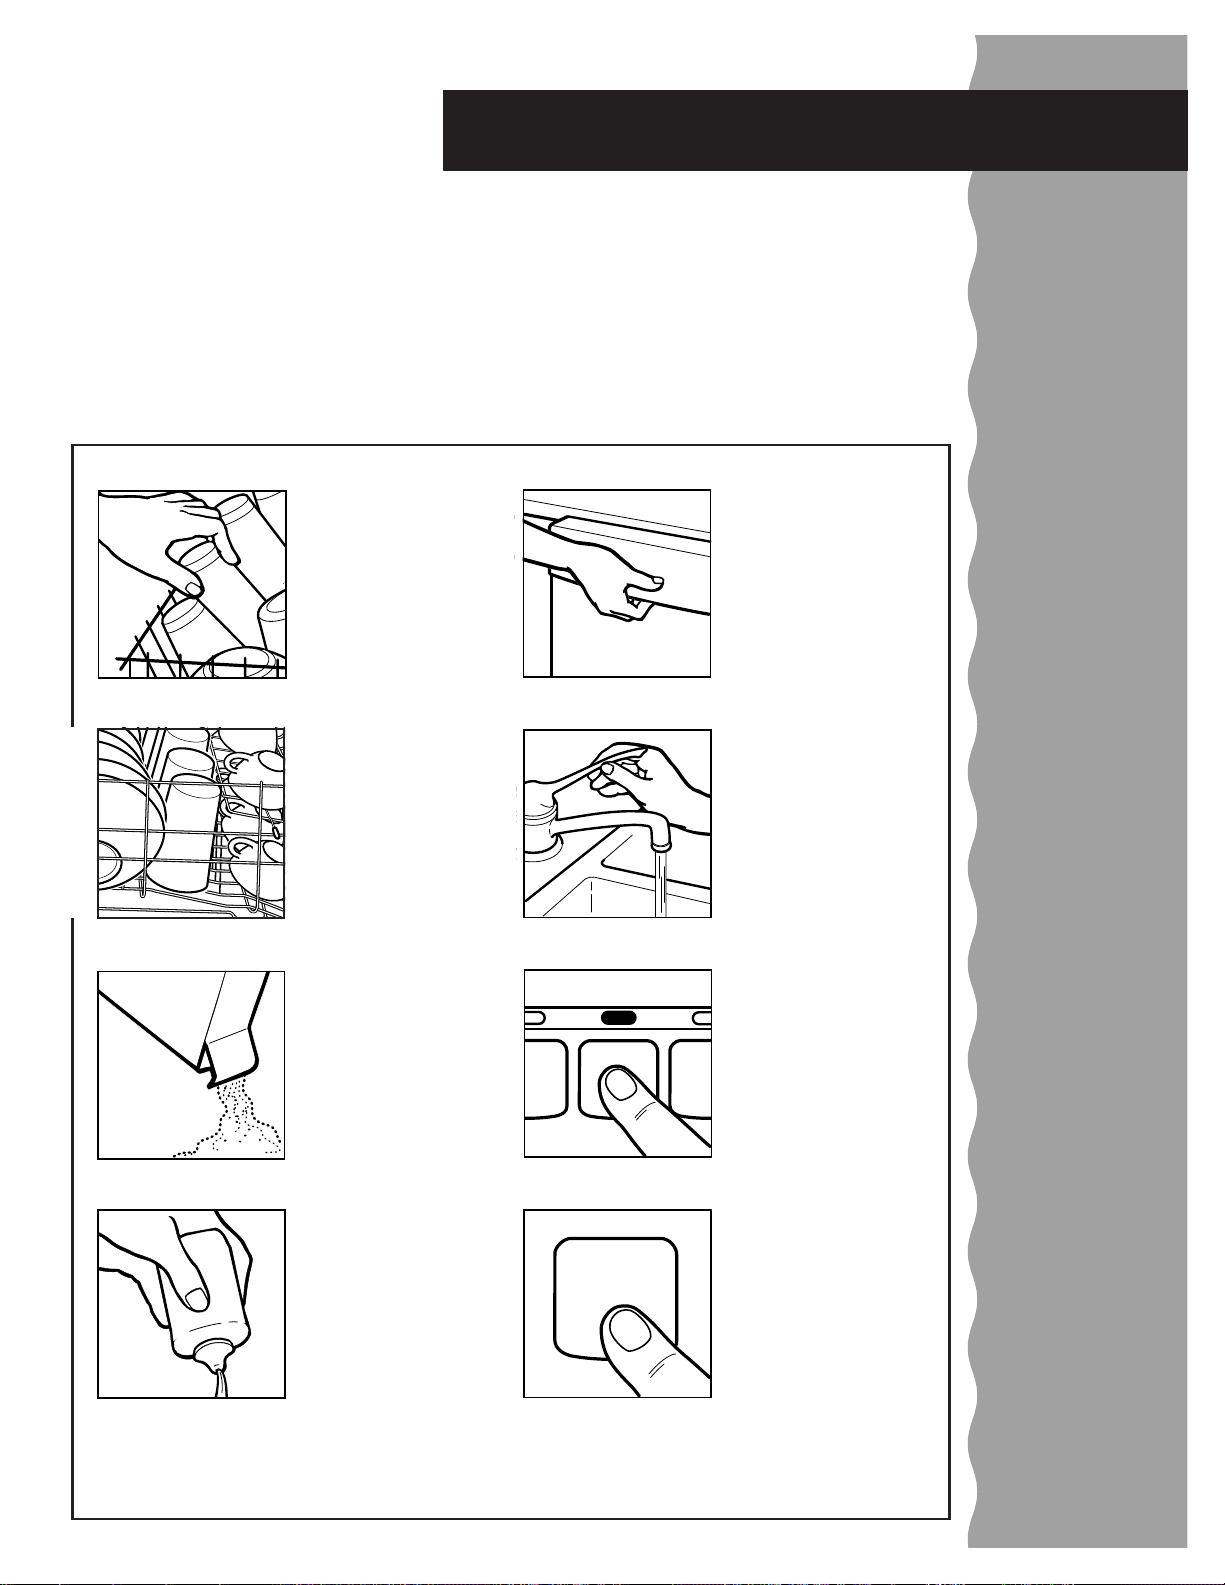
Using the Dispensers
MAIN-WASH
For best washing results, it is important to use the correct amount of detergent and a rinse
agent. Read this section for information on using both properly.
The detergent dispenser
The detergent dispenser has two sections.
The smaller Pre-Wash section empties
detergent into the dishwasher when you
close the door. The larger Main Wash
section empties detergent into the dishwasher during the wash cycle.
1. If the dispenser cover is closed, open the
cover by rotating the blue button.
Rotate blue
button to open
2. Fill the Main Wash section with detergent.
The amount of detergent needed depends
on the amount of food soil on the dishes
and water hardness. See the detergent
usage chart later in this section.
3. Close the dispenser cover and fill the
Pre-Wash section.
NOTE: Do not use detergent with the Rinse
Only cycle.
Main Wash section
Pre-Wash section
15
Page 16

Using the Dispensers
Using the detergent dispenser
Details about
detergent
What type of detergent to use
• Use automatic dishwasher detergent only.
NOTE: Never use soap, hand-dishwashing
detergent, or laundry detergent. These
products will produce excessive suds which
could cause flooding and reduce washing
performance.
• Follow manufacturer’s instructions when
using powdered, liquid, or gel dishwasher
detergents. Concentrated (Ultra) powdered
detergents usually call for lower usage than
do standard powdered detergents.
• Add detergent to the dispenser just before
starting the dishwasher.
• Keep detergent container tightly closed in a
cool, dry place, out of the reach of children.
After opening, a box of detergent should
stay fresh for about one month. Detergent
exposed to moisture over a period of time
might become caked and ineffective.
How much detergent to use
WATER HARDNESS
Soft to Medium Hard
Water
0 to 6 grains per gallon
AMOUNT OF DETERGENT
For normal loads:
• Partially fill the Main Wash section (2 tablespoons or
30 grams)
• Fill the Pre-Wash section (2 tablespoons or 30 grams)
NOTE: Add only 1 tablespoon or 15 grams of detergent to the Pre-Wash section if dishes are prerinsed
or water is very soft.
For heavily soiled loads:
• Fill the Main Wash section (3 tablespoons or 45 grams)
• Fill the Pre-Wash section (2 tablespoons or 30 grams)
16
Medium to Hard Water
7 to 12 grains per gallon
Very Hard Water
13 grains and above
For normal and heavily soiled loads:
• Fill the Main Wash section (3 tablespoons or 45 grams)
• Fill the Pre-Wash section (2 tablespoons or 30 grams)
For normal loads:
• Fill the Main Wash section (3 tablespoons or 45 grams)
• Fill the Pre-Wash section (2 tablespoons or 30 grams)
• Turn the rinse agent dispenser to a higher setting. See
“Using the rinse agent dispenser” later in this section.
NOTE: Under abnormal water hardness conditions
(13 grains and above), it may be necessary to use the
Short Wash cycle for best wash performance.
Page 17
Using the Dispensers
How much detergent to use (cont.)
WATER HARDNESS
Very Hard Water
13 grains and above (cont.)
Different brands of dishwasher detergent
have different amounts of phosphorus for
softening water. If you have hard water and
use a detergent with a phosphorous content
of less than 8.7%, you may need to use
more detergent, or use a detergent with a
phosphorous content higher than 8.7%.
• Excessive amounts of detergent combined
with soft water may cause etching of
glassware.
AMOUNT OF DETERGENT
For heavily soiled loads:
• Fill the Main Wash section (3 tablespoons or 45 grams)
• Fill the Pre-Wash section (2 tablespoons or 30 grams)
• Turn the rinse agent dispenser to a higher setting. See
“Using the rinse agent dispenser” later in this section.
NOTE: Under abnormal water hardness conditions
(13 grains and above), it may be necessary to use the
Soak & Scrub cycle for best wash performance.
NOTE: Water hardness may change over a
period of time. Contact your local water utility
or area water softening company to determine
your water hardness, or order water hardness
test strip (Part Number 4171690) through the
Consumer Assistance Center.
17
Page 18
Using the Dispensers
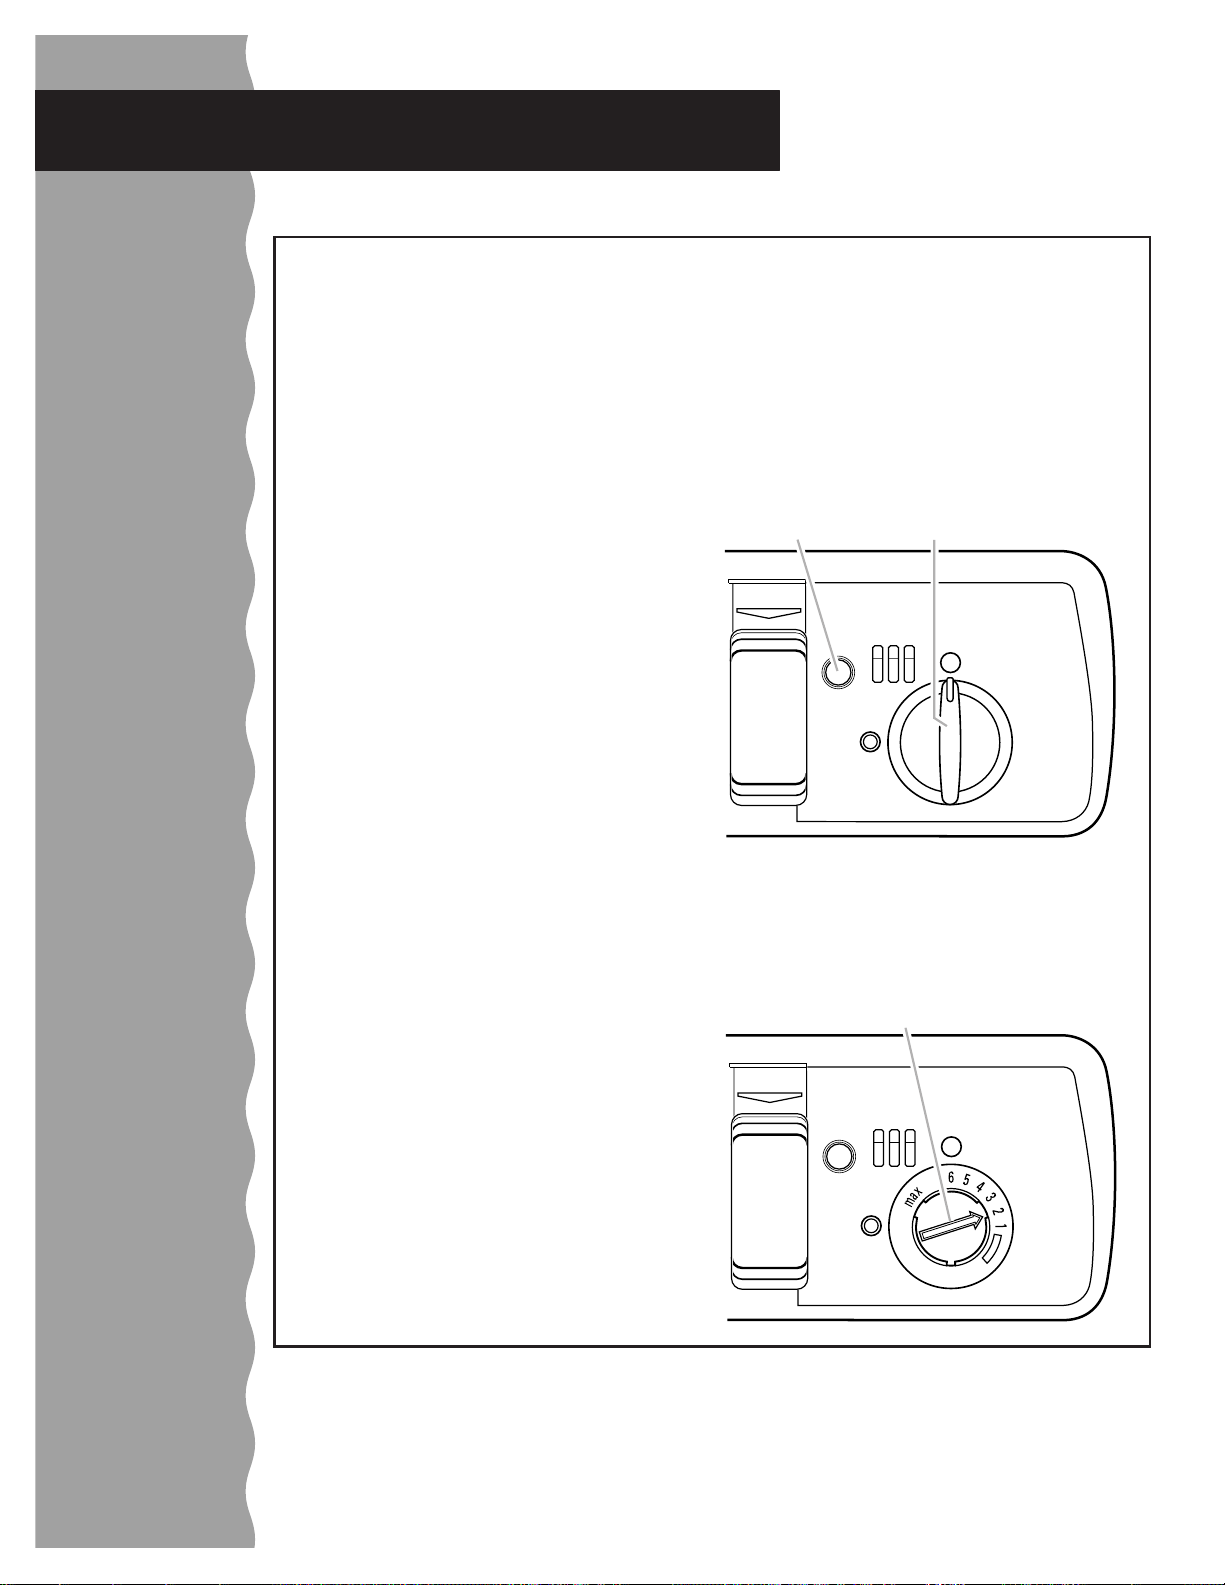
Using the rinse agent dispenser
Use rinse
agent for
better drying
A rinse agent prevents water from forming
droplets that can dry as spots or streaks. It
also improves drying by allowing water to
drain off the dishes during the final rinse by
releasing a small amount of the rinse agent
into the rinse water. Your dishwasher is
designed to use a liquid rinse agent. Do not
use a solid or bar-type rinse agent.
Filling the dispenser
The rinse agent dispenser holds 5.2 fluid
ounces (153.7 mL) of rinse agent. Under
normal conditions, this will last for about
three months. You do not have to wait until
the dispenser is empty to refill it. Try to
keep it full, but be careful not to overfill it.
1. Make sure the dishwasher door is
fully open.
2. Turn the dispenser knob to Open and lift
it out.
3. Add rinse agent until the indicator window
looks full. If you overfill, the excess rinse
agent may overflow the dispenser and
cause oversudsing during the wash cycle.
4. Clean up any spilled rinse agent with a
damp cloth.
5. Replace the dispenser knob and turn it
to Closed.
Indicator
window
H
S
-PRE
A
W
OPE
N
Dispenser
knob
CLOSED
Adjustable rinse
agent dispenser
18
Rinse agent setting
The amount of rinse agent released into the
final wash can be adjusted. The factory
setting is at 2. For most water conditions set
the adjuster to 1 or 2. If there are rings or
calcium (hard water) spots on dishes, try a
higher setting (4, 5, or 6).
To adjust setting
Remove the dispenser knob, then turn
the adjuster inside the dispenser to the
desired setting.
Adjuster
H
S
-PRE
A
W
CLOSED
OPE
N
Page 19

Operating Your Dishwasher
This section tells you how to operate the dishwasher. Operating your dishwasher properly
enables you to obtain the best possible results.
Cycle selection chart
The dishwasher will wash and dry dishes according to the selections you make on the control
panel. The dishwasher remembers the last cycle and option(s) that were completed. You only have
to press the Start pad if you want to use the same cycle and option(s). However, if the last cycle
you completed was Rinse Only, the dishwasher will run the Normal cycle if you press the Start pad.
A “3” shows what steps are in each cycle.
CYCLE
SOAK &
SCRUB
NORMAL
SHORT
WASH
††
Purge RinseRinse
Dry
Pre-Wash
Rinse
Main
Wash
333 33388
Use this cycle for hard-to-clean, heavily soiled loads, and harder than normal
water conditions.
3333375
Use this cycle for loads with moderate amounts of food soil. (The energy usage
label is based on this cycle.)
333 33 69
Use this cycle for lightly soiled loads, or harder than normal water conditions.
Time
(minutes)
†
†
†
Water
Usage
(gallons/liters)
11.0/41
7.0/26
8.8/33
Heavily soiled
dishes
Lightly soiled
dishes
LIGHT
333 33 65
†
8.8/33
CHINA
Use this cycle for china, crystal, and other delicate items.
RINSE
3 7.5 2.2/8
ONLY
Use this cycle for rinsing dishes, glasses, and silverware that will not be
washed right away.
• Do not use detergent with the Rinse Only cycle.
†
Expect longer cycle times if water entering the dishwasher is not hot enough.
††
A small amount of water is run through the pump to remove soil particles between the main
wash and final rinse.
Delicate items
When washing
later
19
Page 20
Operating Your dishwasher
DELAY
HOURS
Canceling a cycle
Cancel
anytime
Customize
your cycles
You can cancel a cycle anytime during
the cycle.
1. Press the Cancel pad once, then wait.
The Cancel light will glow . There
CANCEL
is a 5-second pause between
the time Cancel is pressed and
draining begins.
Option selections
Press a pad to select an option. If you
change your mind, press the pad again to
turn the option off. To select a different
option, press another pad.
High Temp. Wash
Select this option, and water will heat during
HIGH
TEMP.
WASH
Soak & Scrub cycle, and in the final rinse of
the Normal, Short Wash, and Light China
cycles.
Energy Saver Dry
Use this option to air dry dishes without heat.
ENERGY
SAVER
DRY
plastic items in the load, etc.) you might find
some water left on plastics, dishes, and
silverware.
the main wash for better cleaning
of heavily soiled dishes. Water
heating is automatic in the wash
portions and final rinse of the
For best results, keep the rinse
agent dispenser filled. Under
certain conditions (hard water,
empty rinse agent dispenser,
2. Let the dishwasher drain completely.
SANI RINSE* Option
The SANI RINSE option raises the water
temperature in the final rinse to
SANI
RINSE
the incoming temperature of your water, cycle
times might be longer when you select SANI
RINSE.
NOTE: The SANI RINSE cycle raises the
temperature of the final rinse to approximately
155°F (68°C), and maintains that temperature
for at least 16 minutes. This high temperature
rinse sanitizes your dishes and glassware in
accordance with the NFS International requirements (#95/480/2480).
approximately 155°F (68°C). SANI
RINSE is an option with all cycles
except Rinse Only. Depending on
Delay Hours
The Delay Hours light glows when the dish-
washer has been set for a delayed
start. The delay light will turn off
when the cycle starts. See“Setting
a delay start” later in this section.
20
Page 21
Control panel lights
Operating Your Dishwasher
The Cycle Monitor allows you to see what
portion of a cycle your dishwasher is in. The
Clean light glows when a cycle has finished.
All other lights will turn off. The Clean light
will turn off when you open the door.
Water Heating Light
The Water Heating light glows while water in
the dishwasher is
WATER HEATING
heating. Wash or rinse
action continues while
the water heats.
Using child lock
Child Lock Light
Use Child Lock to prevent your dishwasher
from being turned on
CHILD LOCK
Child Lock is on, and the dishwasher will
not start.
NOTE: You will still be able to open the
dishwasher door.
accidentally. No wash
selections or options
can be selected when
CYCLE MONITOR
WASH
RINSE
DRY CLEAN
Rinse Aid Empty
Fill the rinse agent dispenser when Rinse
Aid Empty is lit to
RINSE AID EMPTY
improve drying and
prevent spots or
streaks.
To turn Child Lock on
Press Energy Saver Dry for 5 seconds. The
ENERGY
SAVER
DRY
is pressed during this time.
Child Lock light will glow for 30
seconds. All other lights will be off.
The Child Lock light will turn back
on for 30 seconds if any pad
To turn Child Lock off
Press Energy Saver Dry again for 5 seconds.
The Child Lock light will turn off.
Safeguard
against
accidental
start up
Changing a setting
During the first 2 minutes of
a cycle
Press new Wash Selection and Option pads.
After the first 2 minutes of
a cycle
1. Press the Cancel pad to drain any water
and to reset the control.
CANCEL
2. Open the door and check the detergent
dispenser to be sure it is properly filled for
the new cycle.
3. Close the door.
4. Press new Wash Selection and Option
pads, then press the Start pad.
NOTE: If the dishwasher will not start, make
sure Delay Hours has not been selected.
Select the
wrong cycle?
21
Page 22
Operating Your Dishwasher
Adding dishes during a cycle
When washing
dishes later
You can add an item to the dishwasher
during the first 10 minutes of the cycle.
1. Unlatch the door to stop the cycle. Wait a
few seconds for the spray action to stop
before opening the door.
Setting a delay start
To run your dishwasher at a later time, or
during off-peak hours, you can delay the
start of a cycle for 2, 4, or 6 hours.
To delay the start, follow these steps:
ENERGY
NORMAL
SAVER
DRY
Example for delayed Normal cycle with
Energy Saver Dry
1. Press a Wash Selection pad for the
desired cycle. See “Cycle selection chart”
earlier in this section for cycle descriptions.
2. Press a pad to select an option. If you
change your mind, press the pad again
to turn the option off. To select a different
option, just press another pad. See
“Option selections” earlier in this section.
DELAY
HOURS
START
2. Open the door and add the dishes.
3. Close the door.
4. The dishwasher will start automatically
after a 5-second pause when you close
the door.
3. Press the Delay Hours pad once for a
2-hour delay start, twice for 4 hours,
or three times for 6 hours.
The number above the Delay Hours pad
will glow and the dishwasher will start the
cycle in the amount of hours you have
selected.
4. Press the Start pad to begin the delay cycle.
NOTE: To turn Delay Hours off, press the pad
until no number is lit above the pad.
IMPORTANT:
• Operate your dishwasher only when you are
at home.
• If your home is equipped with a water soft-
ener, make sure the dishwasher is not timed
to start during regeneration of the softener.
22
Drying system
During drying, vapor escapes through the
vent at the upper left corner of the door.
This is normal. The vapor is the result of
moisture in the dishwasher being removed
during drying.
IMPORTANT: The vapor is hot. Do not touch
the vent during drying.
Page 23
Quiet operating tips
Operating Your Dishwasher
To avoid thumping and clattering noises
during operation:
• Make sure lightweight load items are
secured in the rack.
• Make sure pot lids and handles, pizza
pans, cookie sheets, etc., do not touch
the dishwasher sides or interfere with the
spray arm rotation.
• Where possible, load items so they do not
touch one another.
NOTE: Keep sink drain plugs inserted during
dishwasher operation to prevent noise transfer through drains.
Normal operating sounds
Some normal sounds you might hear while
the dishwasher is running:
• The fill valve opening or closing and the
sound of water entering the dishwasher.
• Food soil being ground up in the food
disposer.
• Water being pumped out during drain
portion of a cycle.
• Detergent cup opening.
• Pump motor starting.
• Wash/rinse action of water spray. To
minimize noise of water circulating on
dishes, see the “Loading Your Dishwasher”
section.
Energy saving tips
Set your home water heater to provide a
minimum of 120°F (49°C) incoming water to
the dishwasher.
To check water temperature:
1. Run hot water at the faucet closest to your
dishwasher. Set a cup under the faucet,
and place a candy or meat thermometer
in it.
2. Run hot water for at least one minute into
the cup, allowing the water to
overflow. Check the temperature. If the water temperature
is below 120°F (49°C), have
a qualified person raise the
thermostat setting on your water heater.
• Run the dishwasher only with a full load.
• Use only the cycle and options that you need.
• Run the dishwasher during off-peak hours
if your utility company offers reduced rates
on electricity during specific times of day.
• Run the dishwasher at night during the
summer to reduce daytime heat buildup
in your home.
• Do not rinse dishes before loading.
• Use the Energy Saver Dry option.
23
Page 24
Caring for Your Dishwasher
Your new dishwasher is designed to give you many years of dependable service. However, there are a few things you are expected to do in order to maintain your dishwasher
properly. This section tells you how to clean and care for your dishwasher.
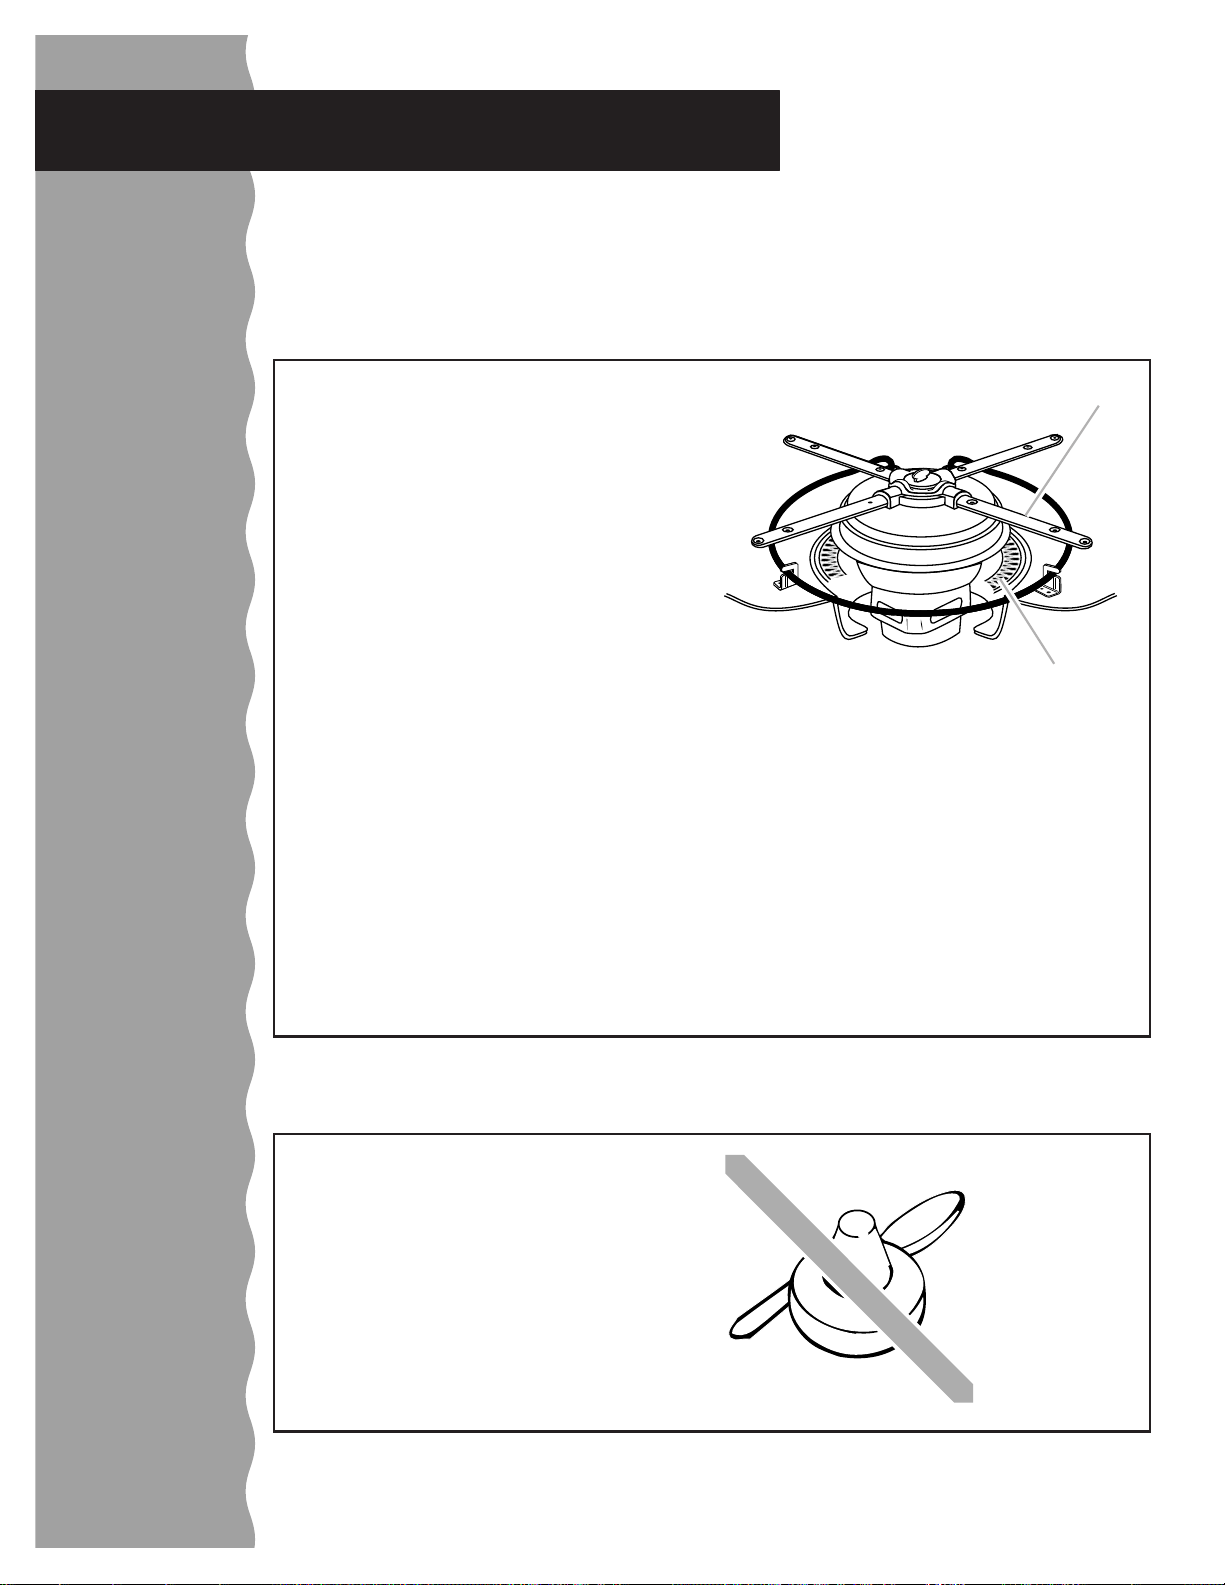
HYDRO SWEEP* Wash System
Water filtered
for cleaner
dishes
The HYDRO SWEEP Wash System in your
dishwasher provides excellent cleaning
results. The wash water is continuously
filtered by a triple filtration and soil collector
system to prevent food particles from
redepositing on clean dishes.
The filter
The filter continuously filters the wash water
and traps the food particles that have been
removed from the dishes. A small amount of
water will always remain under the filter to
keep the pump seal moist.
The water jets
The food particles are removed from
the Ultra-Fine filter by 2 water jets that
are located underneath the 4-way
HYDRO SWEEP spray arm.
The coarse strainer
A coarse strainer will prevent bones, pits,
and other large objects from entering the
pump system. You should periodically check
the strainer for such items that may have
mistakenly entered the dishwasher.
4-way HYDRO SWEEP
spray arm
Coarse strainer
(not removable)
24
Overflow protection float
The overflow protection float in the front right
corner of the dishwasher tank prevents the
dishwasher from overflowing. The float must
be in place for the dishwasher to operate.
Check under the float for objects that may
prevent the float from moving up or down.
Check under
overflow
protection float
Page 25

Caring for Your Dishwasher
Storing your dishwasher
Moving or winterizing your
dishwasher
Protect your dishwasher and home against
water damage due to freezing water lines. If
your dishwasher is left in a seasonal dwelling
or could be exposed to near freezing temperatures, have a qualified person do the
following:
1. Disconnect power or unplug dishwasher.
2. Turn off water supply to the dishwasher.
3. Remove the 4 screws on the lower access
panel and remove the lower access panel.
4. Place a shallow pan under the water supply
valve. Then, use a wrench to disconnect
the water inlet from the water supply valve.
Separate the water inlet from the water
supply valve and drain water into the pan.
5. Remove the spring clamp from the water
outlet and separate from the water supply
valve; drain water into pan.
6. Reconnect both water inlet and water
outlet to the water supply valve.
7. Empty the pan and reposition it under the
water pump.
8. Remove the clamp and disconnect the
drain hose from the water pump; drain
water into pan.
9. Reconnect drain hose to the water pump,
being sure to position the clamp over the
connection.
10. Replace the lower access panel.
Water outlet
Water lines
can freeze
Disconnecting
water valves
Spring clamps
NOTE: If your dishwasher is connected to a
garbage disposal, do not run water into the
sink after winterizing. This could cause water
to refill the drain hose on your dishwasher.
Reconnecting your dishwasher
after storage
1. Remove the 4 screws on the lower access
panel and remove lower access panel.
2. Turn on the water supply to dishwasher.
3. Reconnect power or plug in dishwasher.
4. Run dishwasher through a complete cycle
and check for leaks.
5. Replace lower access panel.
Water supply
valve
Water
inlet
Water
pump
Drain
hose
Storing for the summer
Protect your dishwasher during the summer
months by turning off the water supply and
power supply to the dishwasher.
25
Page 26

Caring for Your Dishwasher
Cleaning your dishwasher
Prevent water
backup
Cleaning the interior
If mineral deposits from hard water accumulate on the interior of your dishwasher, clean
with a damp cloth or follow the instructions
indicated in “Removing spots and film” in the
“Solving Common Dishwashing Problems”
section.
• Do not clean the dishwasher interior until it
has cooled.
• Do not use any type of cleanser that may
cause foaming or sudsing. Use cleansers
made for stainless steel products.
The drain air gap
Check the drain air gap
anytime your dishwasher
isn’t draining well.
Some state or local plumbing codes require
the addition of a drain air gap between a builtin dishwasher and the home drain system.
This device protects your dishwasher against
water backing up into it when a drain clogs.
The drain air gap is usually located on top of
the sink or countertop near the dishwasher.
To order drain air gap (Part Number 300096),
contact your local dealer. You can also call
1-800-422-1230 in the U.S.A., or see the
“A Note to You” section.
• Run the dishwasher through a Normal cycle
with detergent after you are finished cleaning
the interior.
Cleaning the exterior
Wipe the control panel, front, and sides with
a damp cloth, then dry. Never use detergents
or abrasive cleansers which may damage
the finish.
Drain air gap
26
NOTE: The drain air gap is an external
plumbing device that is not part of your
dishwasher. The warranty provided with
your dishwasher does not cover service
costs directly associated with the cleaning
or repair of the external drain air gap.
To clean the drain air gap:
Clean the drain air gap periodically to ensure
proper drainage of your dishwasher. Follow
the drain air gap cleaning instructions
provided by the manufacturer. With most
types, you lift off the chrome cover, unscrew
the plastic cap, and then check for any
buildup of soil. Clean, if necessary.
Page 27

Solving Common Dishwashing Problems
This section explains how you can handle minor performance problems. Check this list
before calling for service. If you can’t solve your dishwasher’s problem, review the
“Troubleshooting” charts on pages 30-31 before calling for service information.
Dishes are not cleaned completely
PROBLEM
Food soil
left on
dishes
CAUSE
Slowdown of spray arm
due to high suds
Improper loading
Insufficient fill due to
low water pressure
Use of incorrect, too
little, or ineffective
detergent
Detergent cakes in
dispenser
SOLUTION
Use only recommended dishwasher detergents,
not soap or laundry detergents. Do not overfill
the rinse agent dispenser and wipe up any
spills before running a cycle.
Follow the loading instructions on pages 8-13.
Your home water pressure should be 20 to
120 psi (138 to 828 kPa) for a proper dishwasher fill. You may need a booster pump on
the water supply if the pressure is too low.
Use recommended dishwasher detergents
and specified amounts only (see pages 16 and
17 for amounts), but never use less than 1 tbs
(15 mL). For effective cleaning, use only fresh
detergent and store it tightly closed in a cool,
dry place.
Add detergent just before starting the dishwasher. Use fresh detergent and remove any
caked detergent before filling the dispenser.
When using Delay Wash, make sure the dispenser is dry before adding detergent.
Get the
cleanest
dishes
possible
Spotting and
filming
Water temperature
too low
Hard water or high
mineral content in
water
Water temperature is
too low
Use of incorrect
detergents
Incorrect amount of
detergent
Set your water heater to ensure that the water
entering the dishwasher is at least 120°F
(49°C). See page 23 for recommended procedure under “Energy saving tips.”
Use rinse agent to help eliminate spotting and
filming. See “Using the rinse agent dispenser”
on page 18. To remove hard water film, see
“Removing spots and film” on page 29.
Set your water heater to ensure that the water
entering the dishwasher is at least 120°F (49°C).
See page 23 for recommended procedure under
“Energy saving tips.”
Use only recommended dishwasher detergents.
Heavy soil or hard water usually require the
use of extra detergent. See pages 16 and 17
for recommended detergent amounts.
continued on next page
27
Page 28

Solving Common Dishwashing Problems
Dishes are not cleaned completely (cont.)
PROBLEM
Spotting and
filming (cont.)
Silica film
or etching
(silica film is
a white milky
looking
deposit;
etching is a
cloudy film)
CAUSE
Use of ineffective
detergents
Insufficient fill due to low
water pressure
Rinse agent not used
A water chemical
reaction with certain
types of glassware –
usually caused by some
combination of soft or
softened water, alkaline
washing solutions,
insufficient rinsing,
excessive detergent,
and overloading the
dishwasher.
SOLUTION
For effective cleaning, use fresh dishwasher
detergent and store it tightly closed in a cool,
dry place. Throw away any lumpy detergent.
Your home water pressure should be 20 to
120 psi (138 to 828 kPa) for a proper dishwasher
fill. You may need a booster pump on the water
supply if the pressure is too low.
Fill the rinse agent dispenser. See the instructions on page 18.
You may have to hand wash these items to
eliminate this problem completely. Silica film
and etching are permanent marks and cannot
be removed. To slow down the reaction, you
can try using as little detergent as possible and
a liquid rinse agent. Also, underload the dishwasher to allow thorough rinsing, and use the
Energy Saver Dry option.
White spots
on cookware
with nonstick finish
Seasoning removed by
dishwasher detergents
Reseason your cookware after a dishwasher
washing. See cookware manufacturer’s instructions, or coat pan with cooking oil and wipe
clean with a paper towel.
Dishes do not dry completely
PROBLEM
Dishes are
not dry
CAUSE
Water temperature is
too low
Water does not drain off
of dishes
Rinse agent not used
SOLUTION
Set your water heater to ensure that the water
entering the dishwasher is at least 120°F
(49°C). See page 23 for recommended
procedure under “Energy saving tips.”
Do not overload the dishwasher so that the
water can drain off the dishes adequately, and
use a liquid rinse agent to help speed drying.
See pages 8-13 for proper loading instructions.
Do not use the Energy Saver Dry option.
Fill the rinse agent dispenser. See page 18 for
instructions.
28
Plastics
Energy Saver Dry
option used
Some plastics might need to be towel dried.
Do not use the Energy Saver Dry option on the
next load of dishes.
Page 29

Solving Common Dishwashing Problems
Dishes are damaged during cycle
PROBLEM
Chipping of
dishes
Black or gray
marks on
dishes
CAUSE
Improper loading
Aluminum items
touching dishes
SOLUTION
Load dishes and glasses so they are stable
and do not strike together while washing.
Moving the racks in and out smoothly will also
minimize chipping.
NOTE: Hand wash some types of china and
glassware, such as antiques and feather-edged
crystal.
Load aluminum pieces so that they will not rub
against dishes during washing. Do not wash
throw-away aluminum items in the dishwasher.
You can remove aluminum markings by using
a mild abrasive cleanser.
Removing spots and film
Keep the rinse agent dispenser filled with a
liquid rinse agent. A rinse agent prevents
water from forming droplets and drying as
spots or streaks.
To remove spots and film on dishes and
glasses, or hard water film/lime buildup on
the interior of the dishwasher, you may use
white vinegar with the following procedure:
1. Load clean dishes and glasses in the
dishwasher in regular manner. Do not load
silverware or other metals in the dishwasher .
2. Put 2 cups (473 mL) of household vinegar
in a glass or dishwasher-safe measuring
cup, and stand it upright in the bottom rack.
3. Close the door.
4. Select the Normal cycle and Energy Saver
NOTE: This procedure is intended for occa-
sional use only. Vinegar is an acid and
excessive use may damage your dishwasher.
Dry option, then press Start. Do not use
detergent. Allow the dishwasher to complete the entire cycle.
29
Page 30

Troubleshooting
Before calling for service …
If your appliance fails to operate, review the following list and the “Solving Common
Dishwashing Problems” section on pages 27-29 before calling your dealer. This could
save you the cost of a service call.
Dishwasher is not operating properly
Having
problems?
PROBLEM
Dishwasher does
not run or stops
during a cycle
Dishwasher will
not fill
Dishwasher
seems to run
too long
Water remains
in dishwasher
Detergent
remains in
covered
detergent cup
CHECK THE FOLLOWING
Is the door tightly closed?
Has the cycle been set correctly? See page 7.
Is Child Lock on? See page 21.
Has a household fuse or circuit breaker blown or tripped?
Is the water supply turned on?
If the motor has stopped because of an overload, it will automatically
reset itself within a few minutes. If the motor does not start, call for service.
Is the overflow protection float stuck in “up” position? It should move up
and down freely. Press down to release. See page 24.
Is the incoming water temperature low? The dishwasher will run longer
while water automatically heats or if the High Temp. Wash option has
been selected. Set your water heater to ensure that the water entering
the dishwasher is at least 120°F (49°C).
Wait for the cycle to finish. A small amount of water remaining is
normal. Check the drain air gap (if installed). If it is clogged, follow the
manufacturer’s cleaning instructions. See page 26.
Use fresh detergent and store it tightly closed in a cool, dry place.
Throw away any lumpy detergent.
Wait for the cycle to complete itself.
Overflow protection float should move up and down freely. Press
down to release. See page 24.
30
White residue
appears on front
of access panel
Odor in the
dishwasher
Some detergents foam a lot and can build up on the access panel.
Try using less detergent or a different brand to reduce foaming and
eliminate buildup.
Run a Rinse Only cycle at least once or twice a day until a full load is
accumulated.
Page 31

Noises
Troubleshooting
PROBLEM
Grinding, grat-
ing, crunching,
or buzzing
sounds
CHECK THE FOLLOWING
Has a hard object entered the pump? The sound should stop when the
object is ground up. If it does not stop after the next cycle, call for service. See page 23 for “Normal operating sounds.”
Vapor appears
PROBLEM
Vapor from door
CHECK THE FOLLOWING
This is normal when dishwasher is in the drying portion of a cycle. See
“Drying system” on page 22.
31
Page 32

Requesting Assistance or Service
Before calling for assistance or service, please check the “Troubleshooting” section.
It may save you the cost of a service call. If you still need help, follow these instructions.
If you need assistance or service
in the U.S.A. …
Help is at your
fingertips
Call the KitchenAid Consumer Assistance
Center toll free:
1-800-422-1230.
When calling:
Please know the purchase
date, and the complete model
and serial number of your appliance (see the
“A Note to You” section). This information will
help us to better respond to your request.
Our consultants provide assistance with:
• Features and specifications on our full line
of appliances.
• Installation information.
• Use and maintenance procedures.
• Accessory and repair parts sales.
• Specialized customer assistance (Spanish
speaking, hearing impaired, limited vision, etc.).
• Referrals to local dealers, service
companies, and repair parts distributors.
KitchenAid service technicians are trained
to fulfill the product warranty and provide
after-warranty service, anywhere in the
United States.
To locate the authorized KitchenAid
service company in your area, you can also
look in your telephone directory Yellow Pages.
If you need replacement parts …
If you need to order replacement parts, we
recommend that you only use factory
authorized parts. These parts will fit right
and work right, because they are made with
the same precision used to build every new
KITCHENAID* appliance. To locate factory
authorized replacement parts in your area,
call our Consumer Assistance Center
telephone number or your nearest authorized
service center.
32
For further assistance …
If you need further assistance, you can write to
KitchenAid with any questions or concerns at:
KitchenAid Brand Home Appliances
Consumer Assistance Center
c/o Correspondence Dept.
2000 North M-63
Benton Harbor, MI 49022
Please include a daytime phone number in
your correspondence.
Page 33

Requesting Assistance or Service
If you need assistance or service in Canada …
For assistance throughout Canada,
call the KitchenAid Canada
Consumer Assistance
Centre toll free,
8:30 a.m. – 6. p.m. (EST):
1-800-461-5681.
When calling:
Please know the purchase date, and the
complete model and serial number of your
appliance (see the “A Note to You” section).
This information will help us to better
respond to your request.
Our consultants provide assistance with:
• Features and specifications on our full line
of appliances.
• Referrals to local dealers.
KitchenAid service technicians are
trained to fulfill the product warranty and
provide after-warranty service, anywhere
in Canada. For service in Canada, call
one of the following numbers listed
below.
KitchenAid Canada Appliance Service – Consumer Services
Direct service branches:
BRITISH COLUMBIA 1-800-665-6788
ALBERTA 1-800-661-6291
ONTARIO Ottawa area 1-800-267-3456
(except 807 area code) Outside the Ottawa area 1-800-807-6777
MANITOBA, SASKATCHEWAN 1-800-665-1683
and 807 area code in ONTARIO
QUEBEC Montreal (except South Shore) 1-800-361-3032
ATLANTIC PROVINCES 1-800-565-1598
South Shore Montreal 1-800-361-0950
Quebec City 1-800-463-1523
Sherbrooke 1-800-567-6966
If you need replacement parts …
If you need to order replacement parts,
we recommend that you only use factory
authorized parts. These parts will fit right
and work right, because they are made with
the same precision used to build every new
KITCHENAID* appliance. To locate factory
authorized replacement parts in your area,
call your nearest authorized service centre.
For further assistance …
If you need further assistance, you can write
to KitchenAid Canada with any questions or
concerns at:
Consumer Relations Centre
KitchenAid Canada
1901 Minnesota Court
Mississauga, Ontario L5N 3A7
Please include a daytime phone number in
your correspondence.
33
Page 34

Index
This index is alphabetical. Look for the word or phrase you are interested in, then look for
the page number.
TOPIC PAGE
ASSISTANCE
In Canada ...................................................33
In U.S.A....................................................... 32
CHILD LOCK.................................................. 21
CLEANING
Exterior........................................................ 26
Interior.........................................................26
COMMON DISHWASHING PROBLEMS
Solving ...................................................27-29
CONTROL PANEL LIGHTS........................... 21
CYCLE
Canceling ....................................................20
Selection chart ............................................ 19
DELAY START............................................... 22
DETERGENT
How much.............................................16, 17
What type....................................................16
DISHWASHER OPERATION
Adding dishes during cycle ......................... 22
Canceling cycle...........................................20
Changing setting .........................................21
Setting a delay start .................................... 22
Starting.......................................................... 6
DISPENSER
Detergent .................................................... 15
Rinse Agent ................................................ 18
DRAIN AIR GAP ............................................ 26
DRYING SYSTEM ......................................... 22
ENERGY
Saving......................................................... 23
FEATURES/PARTS .........................................4
FILM/SPOTS
Removing....................................................29
LOADING
Lower rack .................................................. 11
Preparing to load ..........................................8
Silverware basket........................................ 13
Upper rack .................................................... 8
LOWER RACK .........................................11, 12
TOPIC PAGE
MAINTENANCE
Cleaning......................................................26
Drain air gap ............................................... 26
HYDRO SWEEP* wash system..................24
Overflow protection float ............................. 24
Storing......................................................... 25
NOISES
Normal operating sounds............................23
Quiet operating tips.....................................23
OPERATING .............................................19-23
OPTIONS
Selecting ..................................................... 20
OVERFLOW PROTECTION ..........................24
PARTS/FEATURES .........................................4
RESPONSIBILITIES
Owner ........................................................... 2
RINSE AGENT
Using...........................................................18
SAFETY ...........................................................3
SERVICE
In Canada ...................................................33
In U.S.A....................................................... 32
SILVERWARE BASKET ................................ 13
SPECIAL ITEMS
Washing tips ............................................... 14
SPOTS/FILM
Removing....................................................29
START UP GUIDE ...........................................6
STORING.......................................................25
TROUBLESHOOTING ...................................30
UPPER RACK
Loading ....................................................8-10
VAPOR........................................................... 22
WARRANTY................................................... 35
WATER
Checking temperature................................. 23
34
Page 35

Dishwasher Warranty
LENGTH OF
WARRANTY:
ONE YEAR FULL
WARRANTY
FROM DATE OF
INSTALLATION
SECOND –
THROUGH FIFTH –
YEAR LIMITED
WARRANTY
FROM DATE OF
INSTALLATION
LIFETIME FULL
WARRANTY
FROM DATE OF
INSTALLATION
KITCHENAID
WILL PAY FOR:
Replacement parts and repair
labor to correct defects in
materials or workmanship.
Service must be provided by
an authorized KitchenAid
servicing outlet.
Replacement parts for the
upper or lower dish rack if the
rack rusts due to defective
materials or workmanship.
Replacement parts for the
one-third horsepower motor if
defective in materials or
workmanship.
Replacement parts for the
electronic controls if defective
in materials or workmanship.
Replacement parts for the
heating element if defective in
materials or workmanship.
Replacement parts and repair
labor for the stainless steel tub
or inner door if the tub or inner
door develops water leak
caused by rust through as a
result of defective materials or
workmanship.
KITCHENAID
WILL NOT PAY FOR:
A. Service calls to:
1. Correct the installation of the
dishwasher.
2. Instruct you how to use the
dishwasher.
3. Replace house fuses or correct
house wiring.
4. Correct house plumbing.
B. Repairs when dishwasher is used in
other than normal home use. Normal
home use includes semi-commercial
establishments, such as in-home day
care centers, bed and breakfast inns,
and home-based extended care
facilities. Check local ordinances to
ensure use of this unit is appropriate.
C. Damage resulting from accident,
alteration, misuse, abuse, fire, floods,
acts of God, improper installation, or
installation not in accordance with
local electrical and plumbing codes.
D. Any labor costs during the limited
warranty.
E. Replacement parts or repair labor
costs for units operated outside the
United States or Canada.
F. Pickup and delivery. This product is
designed to be repaired in the home.
G.Repairs to parts or systems resulting
from unauthorized modifications
made to the appliance.
H. In Canada, travel or transportation
expenses for customers who reside
in remote areas.
3/98
KITCHENAID AND KITCHENAID CANADA DO NOT ASSUME ANY RESPONSIBILITY FOR
INCIDENTAL OR CONSEQUENTIAL DAMAGES. Some states or provinces do not allow the
exclusion or limitation of incidental or consequential damages, so this exclusion or limitation may
not apply to you. This warranty gives you specific legal rights and you may also have other rights
which may vary from state to state or province to province.
Outside the United States or Canada, a different warranty may apply. For details, please
contact your authorized KitchenAid dealer.
If you need assistance or service, first see the “Troubleshooting” section of this book. After
checking “Troubleshooting,” additional help can be found by checking the “Requesting Assistance
or Service” section. In the U.S.A., call our Consumer Assistance Center at 1-800-422-1230. In
Canada, call KitchenAid Canada at one of the telephone numbers listed in the “Requesting
Assistance or Service” section.
KitchenAid
Benton Harbor, MI 49022-2692 U.S.A.
35
Page 36

Notes
36
9743110
© 1998 KitchenAid Printed in U.S.A.
Registered Trademark/Trademark of KitchenAid U.S.A.,
*
KitchenAid Canada licensee in Canada
3/98
Page 37

Modèle
KUDS24SE
KUDC24SE
Guide d’utilisation et d’entretien
and
ARCHITECT
Lave-vaisselle
encastrés
Note à l’utilisateur ........... 2
La sécurité du
lave-vaisselle ................... 3
*
Composants et
caractéristiques............... 4
Guide de mise
en service......................... 6
Chargement du
lave-vaisselle ................... 9
Lavage d’articles
spéciaux......................... 16
Utilisation des
distributeurs .................. 18
Utilisation du
lave-vaisselle ................. 22
Entretien du
lave-vaisselle ................. 29
Solutions des problèmes
communs du
lave-vaisselle ................. 33
Diagnostic...................... 37
Demande d’assistance
ou de service ................. 39
Index............................... 42
9743110
Garantie..........................43
Aux É.-U. pour obtenir
assistance ou service,
contacter le Centre
d’assistance à la clientèle :
1•800•422•1230
Au Canada, pour obtenir
assistance ou service,
voir page 2.
Page 38

Note à l’utilisateur
Nous vous remercions de votre achat d’un appareil ménager
KITCHENAID*!
KitchenAid conçoit les meilleurs outils pour la pièce la plus importante dans votre maison.
Nous avons préparé ce Guide d’utilisation et d’entretien pour que votre appareil puisse vous
fournir de nombreuses années de service sans problème. Il contient des renseignements
importants concernant l’utilisation et l’entretien convenables et en sécurité de votre nouvel
appareil. Veuillez le lire attentivement.
Veuillez également remplir et nous retourner la carte ci-jointe d’enregistrement du produit.
Aux É.-U.
Pour assistance ou service
contacter le Centre d’assistance à la clientèle, sans frais ................................1-800-422-1230
Au Canada pour assistance
Contacter le Centre d’assistance à la clientèle, sans frais ...............................1-800-461-5681
8 h 30 à 18 h (EST)
Dans tout le Canada pour les
interventions de service
Si vous avez besoin d’assistance ou de service, consulter d’abord la section “Diagnostic”
dans cette brochure. Après avoir consulté la section “Diagnostic”, on peut également obtenir
de l’aide à la section “Demande d’assistance ou de service” ou en téléphonant à l’un des
numéros mentionnés ci-dessus.
Lors de votre appel, vous devrez communiquer le numéro de série et le numéro de modèle
complet de l’appareil. Vous pouvez trouver cette information sur la plaque signalétique (voir le
schéma à la section “Composants et caractéristiques).
Conserver cette brochure et la facture d’achat ensemble en lieu sûr pour consultation ultérieure. Pour obtenir le service sous garantie, vous devez fournir une preuve d’achat ou la
date d’installation.
................................................................. voir à la page 40
Numéro de modèle __________________
Numéro de série ____________________
Date d’installation___________________
Constructeur/Concessionnaire________
Adresse ___________________________
Téléphone _________________________
2
Page 39

La sécurité du lave-vaisselle
Votre sécurité et celle des autres est très importante.
Nous donnons de nombreux messages de sécurité importants dans ce manuel et
sur votre appareil ménager. Assurez-vous de toujours lire tous les messages de sécurité
et de vous y conformer.
Voici le symbole d’alerte de sécurité.
Ce symbole d’alerte de sécurité vous signale les dangers susceptibles de
causer le décès et des blessures graves.
Tous les messages de sécurité seront précédés du symbole d’alerte de
sécurité et du mot “DANGER” ou “AVERTISSEMENT”. Ces mots signifient :
Risque certain de décès ou de
wDANGER
w
AVERTISSEMENT
Tous les messages de sécurité identifient le danger et vous disent comment réduire
le risque de blessure et ce qui peut se produire en cas de non-respect des instructions.
blessure grave si vous ne suivez
pas les instructions.
Risque possible de décès ou de
blessure grave si vous ne suivez
pas les instructions.
IMPORTANTES INSTRUCTIONS DE SÉCURITÉ
AVERTISSEMENT – Pendant
l’usage du lave-vaisselle, suivre les
précautions fondamentales, y compris
les suivantes :
• Lire toutes les instructions avant
d’utiliser le lave-vaisselle.
• N’utiliser le lave-vaisselle que pour laver
la vaisselle.
• Utiliser les détergents ou agents de
rinçage recommandés pour lavevaisselle et les garder hors de la portée
des enfants.
• Lorsque vous chargez le lave-vaisselle :
1) Placer les objets coupants de façon
qu’ils ne puissent endommager le
joint de la porte; et
2) Placer les couteaux le manche vers
le haut de façon à ne pas vous couper.
– CONSERVER CES INSTRUCTIONS –
• Ne pas laver d’articles en plastique à
moins qu’ils ne soient marqués “peut aller
au lave-vaisselle” ou l’équivalent. Si
l’article ne porte aucune indication,
vérifier auprès du fabricant.
• Ne pas toucher l’élément chauffant
pendant le fonctionnement ou
immédiatement après.
• Ne pas faire fonctionner le lave-vaisselle
si tous les panneaux de l’enceinte ne
sont pas en place.
• Ne pas jouer avec les commandes.
• Ne pas abuser, vous asseoir ou monter
sur la porte ou les paniers du lavevaisselle.
• Pour éviter tout risque d’accident, ne pas
laisser les enfants jouer dans ou sur le
lave-vaisselle.
3
Page 40

Composants et caractéristiques
On présente ci-dessous une illustration du lave-vaisselle identifiant les divers composants
et fonctions. On indique également les pages où on peut trouver rapidement une information plus détaillée sur des fonctions ou composants spécifiques.
Arrivée d’eau
Étagère à
tasses
Sure-Hold
(p. 10)
Plaque
signalétique
(numéro de
modèle et
numéro de
série)
(p. 2)
Étagère
rabattable
Sure-Hold
(p. 14)
Panier inférieur
(p. 13 à 14)
Élément
chauffant
Distributeur
de détergent
(p. 18)
Évent
(p. 27)
d’aspersion
Panier à couverts
FLEXI-BASKET*
d’aspersion
à 4 branches
HYDRO SWEEP*
débordement
-
Distributeur
Bras
supérieure
(p. 7)
Panier
supérieur
(p. 9 à 12)
(p. 14 à 15)
Bras
(p. 29)
Flotteur de
protection
contre le
(p. 29)
d’agent
de rinçage
(p. 21)
Autres caractéristiques :
Tiges de séparation rabattables,
panier supérieur (p. 11)
Supports pour verres à pied (p. 12)
Agrafes Sure-Hold (p. 12)
Tiges de séparation rabattables,
panier inférieur (p. 14)
4
Page 41

Composants et caractéristiques
Tableau de commandes
KUDS24SE
CYCLE MONITOR
WASH RINSE
DRY
CLEAN
WATER HEATING CHILD LOCK RINSE AID EMPTY
SOAK &
NORMAL
SCRUB
Touches des programmes
TREMPAGE
ET
RÉCURAGE
NORMAL
LAVAGE
COURT
Touches des programmes
(p. 22 et 23)
KUDC24SE
WASH SELECTIONS OPTIONS
HIGH
SHORT
WASH
LIGHT
CHINA
RINSE
ONLY
TEMP.
WASH
ENERGY
SAVER
DRY
SANI
RINSE
Touches des options
LAVAGE
À HAUTE
TEMP.
(p. 23 et 24)
SÉCHAGE
ÉCONO-
MIQUE
(p. 22 et 23)
PORCE-
LAINE
RINÇAGE
Touches des options
(p. 23 et 24)
2
DELAY
HOURS
RINÇAGE
"SANI"
4
6
START
HEURES
DIFFÉRÉES
CANCEL
MISE
EN
MARCHE
ANNU-
LATION
WASH SELECTIONS OPTIONS
SOAK &
SCRUB
NORMAL
SHORT
WASH
LIGHT
CHINA
Touches des programmes
(p. 22 et 23)
RINSE
ONLY
HIGH
ENERGY
SAVER
DRY
SANI
RINSE
TEMP.
WASH
Touches des options
(p. 23 et 24)
2
4
DELAY
HOURS
6
CANCEL
START
WATER HEATING
CYCLE MONITOR
WASH RINSE
CLEAN
DRY
CHILD LOCK RINSE AID EMPTY
5
Page 42

Guide de mise en service
Avant d’utiliser le lave-vaisselle
wAVERTISSEMENT
Risque de basculement
Ne pas utiliser le lave-vaisselle
jusqu’à ce qu’il soit complètement
installé.
Ne pas appuyer sur la porte ouverte.
Le non-respect de ces instructions
peut causer des blessures graves ou
des coupures.
• Installer le lave-vaisselle dans un endroit à
l’abri des intempéries. Protéger l’appareil
contre le gel pour éviter une rupture
possible du robinet de remplissage. De
telles ruptures ne sont pas couvertes par la
garantie. Voir “Remisage du lave-vaisselle”
à la section “Entretien du lave-vaisselle”
pour la préparation du remisage en hiver.
• Installer et niveler le lave-vaisselle sur un
plancher qui pourra en supporter le poids,
et dans un espace convenable pour ses
dimensions et son utilisation.
wAVERTISSEMENT
Risque de choc électrique
Relier le lave-vaisselle à la terre d’une
méthode électrique.
Brancher le fil relié à la terre au
connecteur vert relié à la terre dans
la boîte de la borne.
Ne pas utiliser un câble de rallonge.
Le non-respect de ces instructions
peut causer un décès, un incendie
ou un choc électrique.
• Enlever tous les bouchons d’expédition
des tuyaux et des raccords (tel que le
capuchon sur l’ouverture de vidange)
avant l’installation. Voir les instructions
d’installation pour des renseignements
complets.
INSTRUCTIONS DE MISE À LA TERRE
• Pour un lave-vaisselle relié à la terre,
branché avec un cordon :
Le lave-vaisselle doit être relié à la terre. En
cas d’un mauvais fonctionnement ou d’une
panne, la mise à la terre réduira le risque
d’un choc électrique en fournissant le moins
de résistance pour le courant électrique. Le
lave-vaisselle est équipé d’un cordon avec
un conducteur pour relier les appareils à la
terre et une fiche de branchement reliée à
la terre. La fiche doit être branchée à une
prise appropriée installée et reliée à la terre
conformément aux codes et ordonnances
locales.
AVERTISSEMENT – La connexion
incorrecte du conducteur pour relier les
appareils peut causer le risque de choc
électrique. Vérifier avec un électricien
6
– CONSERVER CES INSTRUCTIONS –
compétent ou un représentant de service si
vous avez des doutes si le lave-vaisselle
est correctement relié à la terre. Ne pas
modifier la fiche fournie avec le lavevaisselle; si elle n’entre pas dans la prise,
installer une prise appropriée à l’aide d’un
électricien compétent.
• Pour un lave-vaisselle branché en permanence :
Le lave-vaisselle doit être branché à un
système d’installation électrique permanent
en métal relié à la terre, ou un conducteur
pour relier les appareils doit être relié avec
les conducteurs du circuit et branché à une
borne pour relier
les appareils à la terre ou au cordon
d’alimentation électrique avec le lavevaisselle.
Page 43

Guide de mise en service
L’utilisation du nouveau lave-vaisselle KITCHENAID* est simple. Suivre les étapes
ci-dessous pour la mise en marche. Pour plus de renseignements spécifiques sur des
étapes et des renseignements additionnels, voir la(les) page(s) décrivant l’étape que vous
désirez connaître davantage.
REMARQUE : Avant d’utiliser le lave-vaisselle, enlever tous les documents imprimés, les
étiquettes temporaires et matériaux d’emballage. Veuillez lire aussi le guide d’utilisation et
d’entretien entièrement puisqu’il contient des renseignements sur le fonctionnement et la
sécurité.
Utilisation du lave-vaisselle
1. Charger le lave-vaisselle. Voir pages
9 à 15.
2. Faire tourner le bras d’aspersion supérieur.
Il devrait tourner
librement. Vérifier le
bras d’aspersion
inférieur aussi pour
vous assurer qu’il
tourne librement.
3. Ajouter le détergent. Voir pages 18 à 20.
4. Ajouter l’agent de rinçage si nécessaire.
Voir page 21.
suite à la page suivante
Préparation et
mise en marche
faciles
7
Page 44

Guide de mise en service
Utilisation du lave-vaisselle
5. Pousser fermement la porte lors de la
fermeture.
6. Faire couler l’eau chaude à l’évier le plus
près du lave-vaisselle
jusqu’à ce que l’eau
soit chaude. Fermer le
robinet d’eau. Voir
page 28.
7. Appuyer sur la touche désirée de sélection
de lavage. Voir “Tableau de sélection des
programmes” aux
page 22. Ensuite
appuyer sur la ou les
touches d’option
désirée. Voir pages 23
à 24 pour la “Sélection
des options”.
8. Appuyer sur la touche de mise en marche
(Start). Le programme
commencera (si un
fonctionnement différé
n’a pas été sélectionné).
START
ont été exécutés. Il vous suffit d’appuyer
sur la touche de mise en marche (Start)
si vous désirez utiliser le même programme
et les mêmes options. Toutefois, si le
dernier programme que vous avez choisi
est celui de Rinse Only (rinçage seulement)
le lave-vaisselle exécutera le programme
Normal si vous appuyez sur la touche de
mise en marche.
REMARQUE : Le
lave-vaisselle se
souvient du dernier
programme et des
dernières options qui
8
Page 45

Chargement du lave-vaisselle
On décrit dans cette section la méthode convenable de chargement du lave-vaisselle pour
l’obtention des meilleurs résultats de lavage et de rinçage.
Préparation avant le chargement du
lave-vaisselle
• Gratter et enlever les résidus alimentaires,
os, cure-dents et autres articles durs sur la
vaisselle. Il n’est pas nécessaire de rincer
la vaisselle avant de la placer dans le lavevaisselle.
• Charger la vaisselle de telle manière que la
surface souillée soit orientée vers la source
d’aspersion (vers le bas ou l’intérieur). Il est
important que les jets d’eau atteignent
toutes les surfaces souillées.
• Procéder prudemment lors du chargement
des ustensiles de cuisine lourds dans le
lave-vaisselle. Ils peuvent laisser des
traces sur la surface intérieure d’acier
inoxydable de la porte, à l’occasion d’une
chute ou d’un choc.
• Veiller à ce que les couvercles et poignées
des ustensiles, tôles à pizza, tôle à
biscuits, etc. n’entravent pas la rotation
des bras d’aspersion.
• Exécuter un programme de “Rinçage
Seulement” pour que la vaisselle reste
humide si on ne prévoit pas d’effectuer le
lavage immédiatement. Il peut être difficile
d’éliminer les résidus de produits alimentaires
comme oeufs, riz, pâtes, épinards et céréales
cuites si on les laisse sécher.
Chargement du panier supérieur
Le panier supérieur est conçu pour le
chargement des tasses, verres et autres
petits articles.
• Charger les tasses et verres dans le panier
supérieur seulement, dans les rangées
entre les tiges. Si on les place en
chevauchement sur les tiges, ces articles
peuvent s’écailler ou se briser.
• Les articles de porcelaine, cristal et autres
matières délicates ne doivent pas se
toucher au cours du lavage. Ils pourraient
subir des dommages.
• Placer les articles de telle manière que
l’extrémité ouverte soit orientée vers le bas,
pour obtenir le meilleur résultat de nettoyage et drainage.
• Charger correctement les articles de plastique dans le panier supérieur seulement.
Laver au lave-vaisselle seulement des
articles de plastique identifiés comme
“lavables au lave-vaisselle”.
Charge de tasses et verres
Gain de temps
et d’énergie
Conseils pour
le chargement
du panier
supérieur
suite à la page suivante
9
Page 46

Chargement du lave-vaisselle
Chargement du panier supérieur (suite)
• Immobiliser les articles légers pour qu’ils
ne se retournent pas au cours du lavage.
Coincer les articles légers les uns contre
les autres ou recouvrir ceux-ci d’articles
plus lourds. (Voir la page suivante pour
l’utilisation des agrafes Sure-Hold.)
• Pour obtenir la meilleure stabilité, charger
les bols dans la section centrale.
• Les paniers avec les bouts de couleur
sarcelle peuvent être réglés pour les
charges différentes.
Charge mixte
Conseils pour
le chargement
du panier
supérieur
Étagère à tasses Sure-Hold
Rabattre l’étagère sur le panier supérieur
pour y placer des tasses et verres
additionnels, ou de petits articles comme
les spatules et les ustensiles longs.
Étagère à tasses
10
Page 47

Chargement du lave-vaisselle
Chargement du panier supérieur (suite)
Tiges de séparation
rabattables FLEXI-SPLIT*
fold down
La rangée de tiges de séparation sur le côté
droit du panier est réglable, ce qui permet de
placer une variété de plats. Ces tiges
réglables ont des bouts de couleur sarcelle.
• Pour ajuster la moitié avant, déplacer vers
la droite le dispositif d’ajustement à l’avant
du panier pour coincer des articles de
plastique ou autres articles légers contre le
côté du panier. Déplacer le dispositif
d’ajustement vers la gauche pour obtenir
l’espace nécessaire pour des plats de plus
grande taille.
• Pour ajuster la moitié arrière, pousser
doucement les tiges vers le bas, vers le
centre du panier.
Paniers
réglables
Tiges de séparation
rabattables FLEXI-FOLD
DOWN*
La rangée de tiges de séparation sur le côté
gauche du panier est également réglable.
Pousser doucement les tiges vers le bas,
vers le centre du panier, pour qu’il y ait plus
de place pour les plats de grande taille.
11
Page 48

Chargement du lave-vaisselle
Conseils pour
le chargement
du panier
supérieur
Chargement du panier supérieur (suite)
Attaches pour verres à pied
Utiliser les attaches pour verres à pied
(fixés à l’étagère à tasses) pour soutenir les
verres à vin et à eau, etc., et empêcher
qu’ils soient endommagés au cours du
lavage.
Attaches pour verres à pied
Agrafes Sure-Hold
Les agrafes Sure Hold ont pour fonction de
maintenir en place au cours du lavage les
articles de plastique légers comme tasses,
couvercles ou bols. On peut placer une
agrafe partout dans le panier; il suffit de la
soulever pour la séparer de la tige, et de la
repositionner à un autre endroit.
Agrafe Sure-Hold
12
Page 49

Chargement du lave-vaisselle
Chargement du panier inférieur
Le panier inférieur est conçu pour les
assiettes, poêlons, casseroles et ustensiles.
• Charger dans le panier inférieur les articles
comportant des résidus alimentaires cuits
ou séchés, en veillant à orienter les surfaces
souillées vers les sources d’aspersion.
• Pour maximiser la capacité et la stabilité
d’une charge de vaisselle seulement,
placer des petites et grandes assiettes en
décalage ou chevauchement.
• Charger les assiettes côte à côte avec les
ustensiles de cuisine et les ustensiles de
plus grande taille, comm à l’illustration.
• Les paniers avec les bouts de couleur
sarcelle peuvent être réglés pour les
charges différentes.
• Charger les bols à soupe, bols à céréales et
bols de service dans le panier de diverses
manières, selon leur taille et leur forme.
Essayer d’immobiliser les bols entre les
rangées de tiges. Ne pas imbriquer les bols
les uns dans les autres, car les jets d’eau ne
pourraient atteindre leur surface souillée.
• Ne pas placer de petits articles dans le
panier inférieur s’ils ne sont pas
immobilisés en place.
• Ne pas charger les articles entre le panier
inférieur et la paroi latérale de la cuve du
lave-vaisselle. Ceci pourrait obstruer
l’arrivée d’eau.
• Le panier à couverts FLEXI-BASKET* peut
être séparé et placé dans le panier inférieur
à plusieurs endroits. Tenir le panier fermement et le séparer. Maintenant utiliser les
deux sections ou seulement l’une d’elles
pour charger les couverts.
Charge mixte
Charge d’ustensiles
suite à la page suivante
13
Page 50

Chargement du lave-vaisselle
Chargement du panier inférieur (suite)
Étagère rabattable Sure-Hold
Petits
articles
Gros
articles
Rabattre l’étagère sur le côté gauche du
panier inférieur pour y placer de petits
articles, comme des tasses ou ustensiles.
Tiges de séparation
rabattables FLEXI-FOLD
DOWN*
Rabattre les tiges d’une ou deux rangées
arrière pour pouvoir placer des bols ou
ustensiles de grande taille, etc. Pousser
doucement les tiges à rabattre vers l'arrière
du panier.
Conseils pour
le chargement
du panier à
couverts
14
Chargement du panier à couverts
FLEXI-BASKET*
• La panier à couverts FLEXI-BASKET peut
être séparé et placé dans le panier inférieur
à plusieurs endroits. Tenir le panier
fermement et le séparer. Maintenant
utiliser les deux sections ou seulement
l’une d’elles pour charger les couverts.
• Charger le panier à couverts alors qu’il est
placé dans le panier inférieur, ou retirer le
panier et le placer sur une table ou un
comptoir pour le remplir.
Page 51

Chargement du lave-vaisselle
Chargement du panier à couverts
FLEXI-BASKET
• Dans chaque section du panier, orienter
certains articles vers le haut et certains
articles vers le bas.
IMPORTANT : On doit toujours orienter
vers le bas la pointe des articles acérés
(couteaux, brochettes, fourchettes, etc.).
• Placer les articles de petite taille comme
les tétines de biberon, couvercles de pot,
porte-épis de maïs, etc., dans la section
médiane qui comporte un couvercle.
Fermer le couvercle sur la section pour que
les petits articles ne puissent en sortir.
• Charger les fourchettes et cuillères de telle
manière qu’elles ne puissent s’imbriquer
les unes dans les autres; les jets d’eau ne
pourraient atteindre leur surface.
• On peut également retirer le panier à
couverts pour faciliter le déchargement.
Vider ou enlever le panier avant de
décharger le panier supérieur, pour éviter
la chute de gouttes d’eau sur les couverts.
REMARQUES :
• Ne pas mélanger des articles d’argenterie
avec des articles d’acier inoxydable. Ces
métaux peuvent subir des dommages s’ils
entrent en contact entre eux au cours
du lavage.
• Certains aliments (comme sel, vinaigre,
produits laitiers, jus de fruit, etc.) peuvent
provoquer une corrosion ou des piqûres sur
les couverts si on les laisse en contact
pendant une période prolongée. Utiliser le
programme “Rinçage Seulement” si les
couverts ne sont pas lavés immédiatement
après l’usage.
*
(suite)
Panier
amovible
15
Page 52

Vérifier avec
le fabricant
Lavage d’articles spéciaux
En cas de doute au sujet de la méthode de lavage d’un article particulier, consulter le
fabricant pour déterminer si l’article est lavable au lave-vaisselle.
LA VABLE AU
MA TIÈRE
Acier
inoxydable
LAVE-VAISSELLE?
Oui
EXCEPTIONS/RENSEIGNEMENTS SPÉCIAUX
Exécuter un programme “Rinçage Seulement”
si les articles ne sont pas lavés immédiatement.
Le contact prolongé avec des produits alimentaires contenant sel, vinaigre, produits laitiers ou
jus de fruit peut endommager la finition.
Aluminium
Aluminium
jetable
Argent fin
ou placage
d’argent
Articles en bois
Bouteilles et
bocaux
Oui
Non
Oui
Non
Non
Les détergents et l’eau à une température
élevée peuvent affecter la finition de l’aluminium
anodisé. Toute surface d’aluminium prendra une
teinte plus foncée après le lavage au lavevaisselle. Ceci n’affecte pas la performance de
l’ustensile.
Ne pas laver au lave-vaisselle les assiettes
jetables d’aluminium; elles peuvent se déplacer
au lavage et laisser des marques noires sur
d’autres assiettes et articles.
Exécuter un programme “Rinçage Seulement” si
les articles ne sont pas lavés immédiatement.
Le contact prolongé des aliments contenant sel,
acide ou sulfure (oeufs, mayonnaise et fruits de
mer) peut endommager la finition.
Laver manuellement. Consulter toujours les
recommandations du fabricant avant le lavage.
Le bois non traité peut gauchir, se fissurer, ou
perdre sa finition.
Laver manuellement les bouteilles et bocaux.
Les étiquettes fixées avec de la colle se détacheraient au cours du lavage et pourraient
obstruer la pompe ou les trous des bras
d’aspersion, ce qui réduirait la performance
de lavage.
16
Couteaux à
manche creux
Cristal
Étain, laiton
et bronze
Fer blanc
Fonte
Or
Non
Oui
Non
Non
Non
Non
Les manches de certains couteaux sont fixés à
la lame au moyen d’un adhésif qui peut s’amollir
lors d’un lavage au lave-vaisselle.
Consulter toujours les recommandations du
fabricant avant le lavage. Des lavages répétés
peuvent susciter une attaque de certains types
de cristal au plomb.
Le détergent et l’eau à température élevée
peuvent décolorer ou attaquer la finition.
Possibilité de rouille.
La patine serait éliminée et la fonte rouillerait.
Les dorures se décolorent.
Page 53

MATIÈRE
Plastique
jetable
Plastique
LAVABLE AU
LAVE-VAISSELLE?
Non
Oui
Lavage d’articles spéciaux
EXCEPTIONS/RENSEIGNEMENTS SPÉCIAUX
Ces articles ne peuvent résister aux températures élevées et aux détergents.
Consulter toujours les recommandations du
fabricant avant le lavage. La résistance des
matières plastiques à l’eau à température
élevée et aux détergents est variable. Charger
les articles de plastique dans le panier supérieur
seulement.
Porcelaine/
faïence
Verre
Oui
Oui
Consulter toujours les recommandations du
fabricant avant le lavage. Les finitions antiques
ou de peinture manuelle et autres décorations
par-dessus le glaçage peuvent pâlir. Les
dorures peuvent se décolorer ou pâlir.
Des lavages répétitifs font jaunir les verres
opaques.
17
Page 54

Utilisation des distributeurs
Pour l’obtention des meilleurs résultats, il est important d’utiliser la quantité correcte de
détergent et d’agent de rinçage. Lire cette section pour utiliser correctement les deux
distributeurs.
Le distributeur de détergent
Le distributeur de détergent comporte deux
sections. La section plus petite – prélavage –
vide le détergent dans le lave-vaisselle lors
de la fermeture de la porte. La section plus
grande – lavage principal – vide le détergent
dans le lave-vaisselle au cours du programme de lavage.
1. Si le couvercle du distributeur est fermé,
ouvrir le couvercle en tournant le bouton
bleu.
Faire tourner le bouton
bleu pour ouvrir
18
2. Remplir de détergent la section “Lavage
Principal”. La quantité de détergent
nécessaire dépend de la quantité de
résidus alimentaires sur la vaisselle et
de la dureté de l’eau. Voir le tableau de
dosage du détergent plus loin dans cette
section.
3. Fermer le couvercle du distributeur et
remplir la section “Prélavage”.
REMARQUE : Ne pas utiliser de détergent
pour le programme “Rinçage Seulement”.
Section “Lavage
Principal”
MAIN-WASH
Section
“Prélavage”
Page 55

Utilisation des distributeurs
Utilisation du distributeur de détergent
Type de détergent à utiliser
• Utiliser uniquement un détergent pour lavevaisselle automatique.
REMARQUE : Ne jamais utiliser de savon,
détergent pour lavage manuel de la
vaisselle ou détergent pour lavage du linge.
Ces produits génèrent une quantité excessive de mousse qui peut provoquer une
inondation et réduire le rendement
de lavage.
• Respecter les instructions du fabricant lors
de l’utilisation d’un détergent pour lavevaisselle sous forme de poudre, liquide ou
gel. Un détergent en poudre concentré
(Ultra) implique habituellement l’emploi
d’une plus petite quantité que pour un
détergent en poudre standard.
• Verser le détergent dans le distributeur juste
avant la mise en marche du lave-vaisselle.
• Veiller à conserver le paquet de détergent
bien fermé en un lieu frais et sec, hors
d’atteinte des enfants. Après l’ouverture, le
détergent d’un paquet peut rester utilisable
pendant environ un mois. Le détergent
exposé à l’humidité pendant une période
prolongée peut s’agglomérer et devenir
inefficace.
Quantité de détergent à utiliser
DURETÉ DE L’EAU
Eau douce ou
moyennement dure
0 à 6 grains par gallon
QUANTITÉ DE DÉTERGENT
Pour une charge normale :
• Remplir partiellement la section “Lavage Principal”
(30 grammes ou 2 c. à soupe)
• Remplir la section “Prélavage” (30 grammes ou 2 c.
à soupe)
REMARQUE : Ajouter seulement 15 grammes ou 1 c.
à soupe de détergent dans la section “Prélavage” si la
vaisselle a déjà été prérincée ou si l’eau est très douce.
Pour une charge de vaisselle très souillée :
• Remplir la section “Lavage Principal” (45 grammes ou
3 c. à soupe)
• Remplir la section “Prélavage” (30 grammes ou
2 c. à soupe)
Les détails sur
le détergent
Eau de dureté
moyenne à élevée
7 à 12 grains par gallon
Pour une charge normale et très souillée :
• Remplir la section “Lavage Principal” (45 grammes ou
3 c. à soupe)
• Remplir la section “Prélavage” (30 grammes ou
2 c. à soupe)
suite à la page suivante
19
Page 56

Utilisation des distributeurs
Quantité de détergent à utiliser (suite)
DURETÉ DE L’EAU
Eau très dure
13 grains et au-dessus
QUANTITÉ DE DÉTERGENT
Pour une charge normale :
• Remplir la section “Lavage principal” (45 grammes ou
3 c. à soupe)
• Remplir la section “Prélavage” (30 grammes ou
2 c. à soupe)
• Tourner le distributeur d’agent de rinçage à un réglage
plus élevé. Voir “Utilisation du distributeur d’agent de
rinçage” plus loin dans cette section.
REMARQUE : Dans des conditions de dureté anormales
de l’eau (13 grains et plus), il peut être nécessaire
d’utiliser le programme “Short Wash” pour le meilleur
rendement de lavage.
Pour une charge de vaisselle très souillée :
• Remplir la section “Lavage principal” (45 grammes ou
3 c. à soupe)
• Remplir la section “Prélavage” (30 grammes ou
2 c. à soupe)
• Tourner le distributeur d’agent de rinçage à un réglage
plus élevé. Voir “Utilisation du distributeur d’agent de
rinçage” plus loin dans cette section.
REMARQUE : Dans des conditions de dureté anormales
de l’eau (13 grains et plus), il peut être nécessaire
d’utiliser le programme “Soak & Scrub” pour le meilleur
rendement de lavage.
20
Les détergents à lave-vaisselle des diverses
marques peuvent contenir diverses quantités
de phosphore pour l’adoucissement de l’eau.
Si en présence d’eau dure on utilise un
détergent à teneur en phosphore inférieure
à 8,7 %, il peut être nécessaire d’utiliser une
plus grande quantité de détergent, ou de
choisir un détergent dont la teneur en
phosphore est supérieure à 8,7 %.
• La combinaison d’une quantité excessive
de détergent et d’une eau douce peut
provoquer une attaque de la verrerie.
REMARQUE : La dureté de l’eau peut
changer avec le temps. Pour déterminer la
dureté de l’eau disponible, contacter le
service local d’eau ou une compagnie locale
de traitement/adoucissement de l’eau, ou
commander la bande pour tester la dureté
de l’eau (numéro de pièce 4171690) au
Centre d’assistance aux consommateurs.
Page 57

-PRE
A
S
H
W
CLOSED
OPE
N
-PRE
A
S
H
W
CLOSED
OPE
N
Utilisation des distributeurs
Utilisation du distributeur d’agent de rinçage
Un agent de rinçage empêche l’eau de
former des gouttelettes qui peuvent sécher
en laissant des taches ou traces sur les
surfaces. Il améliore également le séchage
en permettant à l’eau de s’écouler de la
vaisselle au cours du rinçage final lorsqu’une
petite quantité d’agent de rinçage est libérée
dans l’eau de rinçage. Ce lave-vaisselle est
conçu pour l’utilisation d’un agent de rinçage
liquide. Ne pas utiliser un agent de rinçage
solide ou en barre.
Remplissage du distributeur
Le distributeur d’agent de rinçage peut
contenir 153,7 mL (5,2 oz) d’agent de
rinçage. Dans les conditions normales, cette
quantité suffit pour trois mois d’utilisation
environ. Il n’est pas nécessaire d’attendre
que le distributeur soit vide pour le remplir
de nouveau. Essayer de maintenir le
distributeur plein, mais veiller à ne pas
le remplir excessivement.
1. Vérifier que la porte du lave-vaisselle est
complètement ouverte.
2. Faire tourner le bouton du distributeur
jusqu’à la position d’ouverture et soulever
pour l’enlever.
3. Verser l’agent de rinçage jusqu’à ce que la
lucarne de repérage indique que le distributeur est plein. En cas de remplissage
excessif, l’agent de rinçage peut déborder
et provoquer un moussage excessif au
cours du programme de lavage.
4. Enlever tout agent de rinçage renversé
avec un chiffon humide.
5. Réinstaller le bouton du distributeur et le
placer à la position de fermeture.
Lucarne de
repérage
Utiliser un
agent de
rinçage pour
un meilleur
séchage
Bouton du
distributeur
Réglage du dosage d’agent
de rinçage
La quantité d’agent de rinçage libérée dans
l’eau du rinçage final est réglable. Le réglage
de l’usine correspond à l’indice 2. On peut
généralement régler le dispositif à 1 ou 2. Si
on observe des traces ou dépôts de calcium
sur la vaisselle, essayer un réglage plus
élevé (4, 5 ou 6).
Réglage du dosage
Ôter le bouton du distributeur, puis faire
tourner le dispositif de réglage à l’intérieur
du distributeur jusqu’à la position de
réglage désirée.
Dispositif de réglage
Distributeur
réglable
d’agent de
rinçage
21
Page 58

Utilisation du lave-vaisselle
On décrit dans cette section les méthodes d’utilisation du lave-vaisselle. L ’utilisation correcte
du lave-vaisselle permet l’obtention des meilleurs résultats de lavage.
Tableau de sélection des programmes
Le lave-vaisselle exécutera le lavage et le séchage conformément aux sélections effectuées au
tableau de commande. Le lave-vaisselle se souvient du dernier programme et des dernières
options qui ont été exécutées. Il vous suffit d’appuyer sur la touche de mise en marche (Start)
si vous désirez utiliser le même programme et les mêmes options. Toutefois, si le dernier
programme que vous avez complété était Rinçage seulement, le lave-vaisselle exécutera un
programme normal si vous appuyez sur la touche de mise en marche.
Une marque “3” indique les étapes exécutées au cours de chaque programme.
Vaisselle
très sale
Vaisselle
légèrement
sale
PROGRAMME
SOAK &
SCRUB
TREMPAGE
ET
RÉCURAGE
NORMAL
SHORT
WASH
LAVAGE
COURT
Lavage
princi-
Rinçage
Prélavage
3
Utiliser ce programme pour les charges de vaisselle très souillée, difficile à
nettoyer, et pour des conditions d’eau plus dure que normale.
Rinçage
3
3
Utiliser ce programme pour les charges de vaisselle modérément souillée de
résidus alimentaires. (L’indice de consommation d’énergie est déterminé à
partir de ce programme.)
3
Utiliser ce programme pour les charges de vaisselle légèrement souillée, ou pour
les conditions d’eau plus dure que normale.
pal
33
3333
33 3 3
††
Purge
Rinçage
3
Séchage
3
Durée
(minutes)
88
69
†
†
†
Consommation
d'eau
(litres/gallons)
41/11,0
26/7,075
33/8,8
22
Articles
délicats
LIGHT
CHINA
PORCE-
LAINE
†
Prévoir une durée totale plus longue si l’eau introduite dans le lave-vaisselle n’est pas
assez chaude.
††
Une petite quantité d’eau s’écoule par la pompe pour enlever les particules de saletés entre
le lavage principal et le rinçage final.
3
Utiliser ce programme pour le lavage de porcelaine, cristal et autres articles
délicats.
3
3
33
†
33/8,865
Page 59

Utilisation du lave-vaisselle
Tableau de sélection des programmes (suite)
RINSE
ONLY
3
8/2,27,5
Lavage différé
de la vaisselle
RINÇAGE
†
Prévoir une durée totale plus longue si l’eau introduite dans le lave-vaisselle n’est pas
assez chaude.
††
Une petite quantité d’eau s’écoule par la pompe pour enlever les particules de saletés entre
le lavage principal et le rinçage final.
Utiliser ce programme pour le rinçage de vaisselle, verres et couverts qui ne
sont pas immédiatement soumis à un lavage complet.
• Ne pas utiliser de détergent pour le programme “Rinçage Seulement”.
Annulation d’un programme
On peut annuler un programme à tout
moment au cours de son exécution.
1. Appuyer sur la touche à annuler une fois,
et puis attendez. Il y a une pause
CANCEL
de cinq secondes entre la pression
sur la touche Cancel et le début de
la vidange.
ANNU-
LATION
2. Laisser le lave-vaisselle se vider
complètement.
Annuler d’un
moment à
l’autre
Sélection des options
Appuyer sur une touche pour sélectionner
une option. Si on change d’idée, il suffit
d’appuyer de nouveau sur la touche pour
désactiver l’option. Pour sélectionner une
option différente, appuyer sur une autre
touche.
Lavage à haute température
Utiliser cette option et l’eau se chauffera
HIGH
TEMP.
WASH
LAVAGE
À HAUTE
TEMP.
“Lavage Court”, et “Porcelaine”.
pendant le lavage principal pour
le meilleur nettoyage de la
vaisselle très sale. Le chauffage
de l’eau est automatique pour les
phases de lavage et de rinçage
final du programme “Trempage et
Récurage” et pour le rinçage final
des programmes “Normal”,
Séchage Économique
Utiliser cette option pour le séchage à l’air
ENERGY
SAVER
DRY
SÉCHAGE
ÉCONO-
MIQUE
charge, etc.), l’eau peut laisser des traces
sur les articles de plastique, la vaisselle et
les couverts.
de la vaisselle, sans application
de chaleur. Pour obtenir le
meilleur résultat, veiller à ce que
le distributeur d’agent de rinçage
soit rempli. Dans certaines
conditions (eau dure, distributeur
d’agent de rinçage vide, présence
d’articles de plastique dans la
suite à la page suivante
Arranger vos
programmes
sur commande
23
Page 60

Utilisation du lave-vaisselle
DRY CLEAN
RINSE
WASH
CYCLE MONITOR
Sélection des options (suite)
Arranger vos
programmes
sur commande
Rinçage SANI RINSE*
(Sanitaire)
L’option de “SANI RINSE” augmente la
température de l’eau pendant la
SANI
RINSE
RINÇAGE
"SANI"
programme peut être plus longue lorsqu’on
sélectionne SANI RINSE.
REMARQUE : Le programme SANI RINSE
augmente la température du rinçage final à
environ 68°C (155°F), et maintient cette
température pendant au moins 16 minutes.
Cette température élevée assainit votre
vaisselle et verrerie conformément aux
exigences internationales NSF (N° 95/480/
05/2480).
phase de rincage final à environ
68°C (155°F). L’option SANI
RINSE est utilisable avec tous les
programmes sauf le programme
“Rinçage”. Selon la température
de l’eau introduite dans le lavevaisselle, la durée d’exécution du
Attente
La lumière Delay Hours (Heures Différées)
s’illumine lorsque le lave-vaisselle
DELAY
HOURS
HEURES
DIFFÉRÉES
a été réglé pour une mise en
marche différée. La lumière de
temps différé s’éteindra lorsque le
programme commence. Voir
“Programmation pour un lavage
différé” plus loin dans cette
section.
Lumières du panneau de commandes
Le moniteur des programmes vous permet
de voir quelle portion d’un programme
fonctionne dans le lave-vaisselle. La lumière
Clean (Propre) s’illumine lorsqu’un programme est terminé. Toutes les autres
lumières s’éteindront. La lumière Clean
s’éteindra lorsque vous ouvrez la porte.
Lumière de chauffage de l’eau
La lumière de chauffage de l’eau s’illumine
pendant que l’eau
WATER HEATING
continue pendant que l’eau chauffe.
chauffe dans le lavevaisselle. L’action de
lavage ou de rinçage
Agent de rinçage épuisé
Remplir le distributeur d’agent de rinçage
lorsque Rinse Aid
RINSE AID EMPTY
empêcher les taches ou traces.
Empty s’allume,
pour améliorer le
séchage et
24
Page 61

Utilisation du lave-vaisselle
Utilisation du système de verrouillage pour enfants
Témoin du verrouillage
pour enfants
Utiliser le système de verrouillage pour
enfants pour
CHILD LOCK
Lorsque la fonction de verrouillage pour
enfants est activée, il est impossible de
sélectionner un programme de lavage ou
des options, et le lave-vaisselle ne peut se
mettre en marche.
REMARQUE : Il demeure possible d’ouvrir
la porte du lave-vaisselle.
empêcher la mise en
marche accidentelle
du lave-vaisselle.
Activation du verrouillage
pour enfants
Appuyer sur la touche “Séchage
ENERGY
SAVER
DRY
SÉCHAGE
ÉCONO-
MIQUE
appuyée pendant ce temps.
Économique” pendant 5 secondes.
Le témoin lumineux de
verrouillage pour enfants sera
illuminé pendant 30 secondes.
Tous les autres témoins lumineux
seront éteints. Le témoin lumineux
de verrouillage pour enfants
s’allumera de nouveau pendant 30
secondes si aucune touche n’est
Désactivation du verrouillage
pour enfants
Appuyer de nouveau sur la touche “Séchage
Économique” pendant 5 secondes. Le
témoin “Verrouillage pour enfants” s’éteint.
Sécurité contre
la mise en
marche
accidentelle
Modifications des réglages
Au cours des 2 premières
minutes d’un programme
Appuyer sur de nouvelles touches de
sélection de programme et d’options.
Après les 2 premières
minutes d’un programme
1. Appuyer sur la touche d’annulation Cancel
pour commander la vidange de
l’eau et réactiver les commandes.
CANCEL
ANNU-
LATION
2. Ouvrir la porte et vérifier que le distributeur
de détergent est convenablement rempli
pour le nouveau programme.
3. Fermer la porte.
4. Appuyer sur de nouvelles touches de
sélection de programme et d’options,
puis appuyer sur la touche de mise en
marche Start.
REMARQUE : Si le lave-vaisselle ne se met
pas en marche, vérifier que la fonction de
lavage différé n’a pas été sélectionnée.
Sélectionner
le programme
incorrect?
25
Page 62

Utilisation du lave-vaisselle
Addition de vaisselle pendant l’exécution
d’un programme
En faisant
la vaisselle
plus tard
Il est possible d’ajouter un article dans le
lave-vaisselle au cours des 10 premières
minutes d’un programme.
1. Déverrouiller la porte pour interrompre
l’exécution du programme. Attendre l’arrêt
des bras d’aspersion avant d’ouvrir
la porte.
2. Ouvrir la porte et ajouter les articles.
3. Fermer la porte.
4. Le lave-vaisselle se remet en marche
automatiquement après une pause de
5 secondes lors de la fermeture de la porte.
Programmation pour un lavage différé
Pour faire fonctionner votre lave-vaisselle en
dehors des heures de pointe, vous pouvez
différer la mise en marche d’un programme
pour 2, 4, ou 6 heures, selon le modèle que
vous avez. Pour différer la mise en marche,
suivre ces étapes :
ENERGY
NORMAL
SAVER
DRY
Exemple pour programme de lavage
“Normal” différé, avec séchage économique
1. Sélectionner avec la touche appropriée le
programme de lavage désiré. Voir “Tableau
de sélection de programme” aux pages
précédentes dans cette section pour les
descriptions de programmes.
2. Sélectionner une option avec la touche
appropriée. Si on change d’idée, appuyer
de nouveau sur la touche pour désactiver
l’option. Pour sélectionner une option
différente, appuyer sur une autre touche.
Voir “Sélection d’options” aux pages
précédentes dans cette section.
DELAY
HOURS
START
3. Appuyer sur la touche des heures différées
une fois pour un temps différé de 2 heures,
deux fois pour 4 heures, ou trois fois pour
6 heures.
LE CHIFFRE au-dessus de la touche
Delay Hours s’illuminera et le lave-vaisselle
commencera le programme au bout du
nombre d’heures que vous avez choisi.
4. Appuyer sur la touche ST ART pour commencer le programme différé.
REMARQUE : Pour faire cesser le
programme d'heures différées, appuyer sur
la touche jusqu’à ce qu’aucun numéro ne
soit illuminé au-dessus de la touche.
IMPORTANT :
• Utilisez votre lave-vaisselle seulement
quand vous êtes chez vous.
• Si la résidence est équipée d’un adoucisseur
d’eau, vérifier que le lave-vaisselle n’est pas
programmé pour la mise en marche au
cours de la regénération de l’adoucisseur.
26
Page 63

Utilisation du lave-vaisselle
Système de séchage
Au cours du séchage, de la vapeur
s’échappe par l’évent dans l’angle supérieur
gauche de la porte. Ceci est normal. Cette
vapeur provient de l’humidité qui s’échappe
du lave-vaisselle au cours du séchage.
IMPORTANT : La vapeur est chaude. Ne
pas toucher l’évent au cours du séchage.
Conseils pour le fonctionnement silencieux
Pour éviter que l’appareil émette des bruits
de choc et cliquetis au cours du fonctionnement :
• Veiller à ce que les articles légers soient
immobilisés dans le panier.
• Veiller à ce que les couvercles et poignées
d’ustensiles, tôles à pizza, tôles à biscuits,
etc. ne touchent pas les parois du lavevaisselle et n’entravent pas la rotation des
bras d’aspersion.
• Lorsque c’est possible, charger les articles
de telle manière qu’ils ne se touchent pas
entre eux.
REMARQUE : Laisser la bonde de l’évier en
place pendant le fonctionnement du lavevaisselle pour éviter la transmission du son
par les canalisations d’égout.
Sons normaux émis au cours du
fonctionnement
On peut normalement entendre certains
sons émis lors du fonctionnement du
lave-vaisselle :
• Bruit d’ouverture ou de fermeture de la
valve de remplissage, et son de l’eau
pénétrant dans le lave-vaisselle.
• Broyage de résidus alimentaires dans
le broyeur.
• Pompage de l’eau lors des vidanges au
cours d’un programme.
• Ouverture du réceptacle à détergent.
• Bruit de mise en marche du moteur de
la pompe.
• Action de lavage/rinçage des bras
d’aspersion. Pour minimiser le bruit de l’eau
circulant sur la vaisselle, voir la section
“Chargement du lave-vaisselle”.
27
Page 64

Utilisation du lave-vaisselle
Conseils pour l’économie d’énergie
Régler le chauffe-eau de la résidence pour
qu’il alimente le lave-vaisselle en eau à une
température d’au moins 49°C (120°F).
Contrôle de la température
de l’eau :
1. Laisser l’eau chaude couler par le robinet
le plus proche du lave-vaisselle. Placer
sous le robinet une tasse avec un
thermomètre à viande ou à confiserie.
2. Laisser l’eau chaude couler pendant au
moins une minute dans la tasse,
en la laissant déborder. Lire la
température. Si la température
de l’eau est inférieure à 49°C
(120°F), demander à une
personne compétente de régler le thermostat du chauffe-eau.
• Faire fonctionner le lave-vaisselle seulement
avec une charge complète.
• Utiliser uniquement le programme et les
options nécessaires.
• Faire fonctionner le lave-vaisselle hors des
périodes de pointe de consommation, si la
compagnie de distribution propose des tarifs
réduits pendant certaines périodes de la
journée.
• Faire fonctionner l’appareil la nuit au cours
de l’été pour éviter l’introduction de chaleur
dans la maison au cours de la journée.
• Ne pas rincer la vaisselle avant le
chargement.
• Utiliser l’option de “Séchage Économique”.
28
Page 65

Entretien du lave-vaisselle
Ce lave-vaisselle a été conçu pour qu’il fournisse de nombreuses années de service
fiable. Cependant, pour que l’appareil continue à fonctionner correctement, il convient
d’exécuter certaines opérations d’entretien décrites dans cette section.
Système de lavage HYDRO SWEEP*
Le système de lavage HYDRO SWEEP
dont est doté ce lave-vaisselle produit
d’excellents résultats de lavage. L’eau de
lavage est constamment filtrée par un
système de triple filtration et rétention des
débris qui empêchet les particules de
produits alimentaires de se redéposer sur la
vaisselle propre.
Le filtre
Le filtre assure en permanence la filtration
de l’eau de lavage et retient les particules
alimentaires qui ont été détachées de la
vaisselle. Il reste toujours une petite quantité
d’eau sous le filtre, qui entretient l’humidité
du joint de la pompe.
Les jets d’eau
Les particules alimentaires sont enlevés du
filtre ultra-fin par 2 jets d’eau qui sont situés
sous la rampe d’aspersion à 4 branches
HYDRO SWEEP.
La crépine à débris
La crépine à gros débris retient des objets
de grande taille comme os, noyaux et autres
gros objets, et les empêche de pénétrer
dans le système de pompage. On doit
périodiquement inspecter la crépine pour en
enlever les articles qui ont pu être introduits
accidentellement dans le lave-vaisselle.
Rampe d’aspersion à 4
branches HYDRO SWEEP
Crépine
(N’est pas amovible)
L’eau est filtrée
pour la vaisselle
plus propre
Flotteur de protection contre le débordement
Le flotteur de protection contre le
débordement, dans l’angle avant droit de la
cuve du lave-vaisselle, empêche un
remplissage excessif du lave-vaisselle. Pour
que le lave-vaisselle puisse fonctionner, il
faut que ce flotteur soit en place. Inspecter
et rechercher sous le flotteur les objets qui
pourraient l’empêcher de se déplacer
verticalement.
Rechercher des
objets étrangers
sous le flotteur
de protection
29
Page 66

Entretien du lave-vaisselle
Les tuyaux
d’eau peuvent
geler
Déconnexion
des valves
d’eau
Remisage du lave-vaisselle
Déménagement ou
hivérisation du lave-vaisselle
Protéger le lave-vaisselle et l’habitation
contre les dommages par l’eau, attribuables
au gel des conduits d’eau. Si le lave-vaisselle est laissé dans une résidence
saisonnière ou risque d’être exposé à des
températures près du degré de congélation,
faire exécuter les opérations suivantes par
une personne qualifiée :
1. Déconnecter la source de courant
électrique ou débrancher le lave-vaisselle.
2. Fermer l’approvisionnement d’eau au
lave-vaisselle.
3. Enlever les 4 vis du panneau d’accès
inférieur et retirer ce panneau.
4. Placer un récipient de faible profondeur
sous la valve d’arrivée d’eau. Puis, utiliser
une clé à molette pour déconnecter
l’arrivée d’eau de la valve d’arrivée d’eau.
Séparer l’arrivée d’eau de la valve
d’arrivée d’eau et vidanger l’eau dans le
récipient.
5. Ôter la bride à ressort du conduit de
sortie d’eau et le séparer de la valve
d’arrivée d’eau; vidanger l’eau dans le
récipient.
6. Reconnecter les conduits d’arrivée d’eau
et de sortie d’eau à la valve d’arrivée
d’eau.
7. Vider le récipient et le replacer sous la
pompe à eau.
8. Ôter la bride et déconnecter le tuyau de
vidange de la pompe à eau; vidanger
l’eau dans le récipient.
9. Reconnecter le tuyau de vidange à la
pompe à eau, et s’assurer de placer la
bride sur la connexion.
10. Replacer le panneau d’accès inférieur.
REMARQUE : Si le lave-vaisselle est relié à
un broyeur, ne pas faire couler l’eau dans
l’évier après l’hivérisation. Le tuyau de
vidange du lave-vaisselle risquerait de se
remplir d’eau de nouveau.
Sortie d’eau
Valve
d’arrivée
d’eau
Brides à ressort
Arrivée d’eau
Pompe à eau
Tuyau de
vidange
30
Remisage pour l’été
Protéger le lave-vaisselle au cours des mois
d’été en fermant l’approvisionnement d’eau
et déconnecter le lave-vaisselle de
l’alimentation électrique.
Page 67

Entretien du lave-vaisselle
Remisage du lave-vaisselle (suite)
Remise en service du lavevaisselle après le remisage
1. Enlever les 4 vis du panneau d’accès
inférieur et retirer ce panneau.
2. Ouvrir l’approvisionnement d’eau au
lave-vaisselle.
3. Reconnecter la source de courant électrique
ou brancher le lave-vaisselle.
4. Laisser le lave-vaisselle exécuter un
programme complet et vérifier s’il y a
des fuites.
5. Replacer le panneau d’accès inférieur.
Nettoyage du lave-vaisselle
Nettoyage des surfaces
intérieures
Si des dépôts minéraux provenant de l’eau
dure s’accumulent à l’intérieur du lavevaisselle, nettoyer avec un linge humide ou
suivre les instructions indiquées dans
“Enlèvement des taches et du film” dans la
section “Solutions aux problèmes communs
de lavage de vaisselle”.
• Ne pas nettoyer les surfaces intérieurs
du lave-vaisselle avant qu’il ait refroidi.
• Ne pas utiliser un produit de nettoyage
susceptible de générer de la mousse.
Utiliser les produits de nettoyage conçus
pour les produits d’acier inoxydable.
• Faire exécuter au lave-vaisselle un programme de lavage “Normal” avec du
détergent après avoir terminé le nettoyage
des surfaces internes.
Nettoyage des surfaces
extérieures
Essuyer avec un linge humide le tableau de
commande et les surfaces frontales et
latérales; laisser ensuite sécher. Ne jamais
utiliser un détergent ou produit de nettoyage
abrasif susceptible d’endommager la finition.
31
Page 68

Entretien du lave-vaisselle
Empêcher le
refoulement
d’eau
Le brise-siphon
Inspecter le brise-siphon
chaque fois que le lave-vaisselle ne se vide pas bien.
Dans certaines juridictions, le code local des
installations de plomberie exige l’installation
d’un brise-siphon entre un lave-vaisselle
encastré et la canalisation d’égout de la
résidence. Ce dispositif protège le lavevaisselle contre un reflux d’eau advenant
l’obstruction d’une canalisation d’égout.
Le brise-siphon est généralement situé sur
l’évier ou le comptoir près du lave-vaisselle.
Pour commander le composant brise-siphon
(pce n° 300096), contacter le concessionnaire local. On peut également téléphoner au
1-800-422-1230 aux É.-U., ou voir la section
“Note à l’utilisateur”.
REMARQUE : Le brise-siphon est un
composant de plomberie externe qui n’est
pas incorporé au lave-vaisselle. La garantie
accordée pour le lave-vaisselle ne couvre
pas les frais d’entretien imputables au
nettoyage ou à la réparation du brisesiphon externe.
Brise-siphon
Nettoyage du brise-siphon :
Nettoyer périodiquement le composant brisesiphon pour garantir la vidange correcte du
lave-vaisselle. Exécuter les instructions de
nettoyage fournies par le fabricant du
composant. Pour la plupart des types, on
doit enlever le couvercle chromé, dévisser
le capuchon de plastique, puis rechercher
toute accumulation de souillures. Nettoyer
si c’est nécessaire.
32
Page 69

Solutions des problèmes communs du lave-vaisselle
On décrit dans cette section comment résoudre certains problèmes mineurs qui peuvent
affecter la performance de l’appareil. Consulter ce tableau avant de contacter un
dépanneur. S’il n’est pas possible de résoudre le problème, consulter également le tableau de “Diagnostic” aux pages 37 et 38 avant de contacter un service de dépannage.
Lavage incomplet de la vaisselle
PROBLÈME
Résidus
de produits
alimentaires
sur les plats
CAUSE
Ralentissement de
la rotation des bras
d’aspersion du fait d’un
moussage excessif
Chargement incorrect
Remplissage insuffisant
du fait d’une pression
d’eau insuffisante
Utilisation d’un
détergent inefficace,
incorrect ou en quantité
insuffisante
SOLUTION
Utiliser uniquement les détergents recommandés pour les lave-vaisselle, et pas de savon
ni de détergent destiné au lavage du linge.
Ne pas trop remplir le distributeur d’agent de
rinçage; récupérer par essuyage tout produit
renversé avant d’exécuter un programme.
Exécuter les instructions de chargement
présentées aux pages 9 à 15.
La pression du circuit de distribution devrait
être de 138 à 828 kPa (20 à 120 lb/po2) pour
que le lave-vaisselle se remplisse correctement. Si la pression est insuffisante, il peut
être nécessaire d’installer une pompe de
surpression dans la canalisation.
Utiliser uniquement les détergents recommandés pour le lave-vaisselle et seulement
les quantités spécifiées (voir les quantités aux
pages 19 et 20), mais ne jamais utiliser une
quantité inférieure à une cuillerée à soupe ou
15 mL. Pour qu’il soit efficace, il faut que le
détergent soit frais. Entreposer toujours le
détergent en un lieu frais et sec dans un
conteneur bien fermé.
Pour une
vaisselle la plus
propre possible
Agglomération du
détergent dans le
distributeur
Température de l’eau
insuffisante
Ajouter le détergent juste avant la mise en
marche du lave-vaisselle. Utiliser un détergent frais et enlever tout détergent aggloméré
avant de remplir le distributeur. Lors de
l’utilisation de la fonction de lavage différé,
vérifier que le distributeur est sec avant
d’ajouter le détergent.
Si nécessaire, régler le chauffe-eau pour une
température plus élevée, pour que le lavevaisselle soit alimenté par de l’eau à au moins
49°C (120°F). Voir à la page 28 la méthode
recommandée à la rubrique “Conseils pour
l’économie d’énergie”.
suite à la page suivante
33
Page 70

Solutions des problèmes communs du lave-vaisselle
PROBLÈME
Taches
et films
résiduels
sur la
vaisselle
CAUSE
Eau dure ou concentration élevée de
minéraux dans l’eau
Température de l’eau
insuffisante
Emploi d’un détergent
incorrect
Quantité incorrecte
de détergent
Utilisation d’un détergent inefficace
SOLUTION
Utiliser un agent de rinçage pour faciliter
l’élimination des taches et films. Voir utilisation
du distributeur d’agent de rinçage à la page 15.
Pour éliminer un film imputable à la dureté de
l’eau, voir “Élimination des taches et films” à la
page 36.
Si nécessaire, régler le chauffe-eau pour une
température plus élevée, pour que le lavevaisselle soit alimenté par de l’eau à au
moins 49°C (120°F). Voir à la page 28 la
méthode recommandée à la rubrique
“Conseils pour l’économie d’énergie”.
Utiliser uniquement les détergents
recommandés pour le lave-vaisselle.
Une vaisselle très sale ou de l’eau dure
nécessitent l’emploi d’une plus grande
quantité de détergent. Voir pages 19 et 20 pour
les quantités de détergent recommandées.
Pour qu’il soit efficace, il faut que le détergent
soit frais. Entreposer toujours le détergent en
un lieu frais et sec dans un conteneur bien
fermé. Jeter tout détergent aggloméré.
Film de silice
ou attaque (le
film de silice
est un dépôt
blanc laiteux;
l’attaque forme
un film trouble)
Taches
blanches
sur les
ustensiles
de cuisine
à revêtement
anti-adhésion
Remplissage insuffisant
du fait d’une pression
d’eau insuffisante
Carence d’agent de
rinçage
Réaction chimique de
l’eau avec certains
types de verre habituellement imputable à certaines
combinaisons d’eau
douce ou adoucie,
solutions de lavage
alcalines, rinçage
insuffisant, quantité
excessive de détergent
et remplissage excessif
du lave-vaisselle.
Patine éliminée par
le détergent lors
du lavage
La pression du circuit de distribution devrait
être 138 à 828 kPa (20 à 120 lb/po2) pour que
le lave-vaisselle se remplisse correctement.
Si la pression est insuffisante, il peut être
nécessaire d’installer une pompe de
surpression dans la canalisation.
Remplir le distributeur d’agent de rinçage.
Voir les instructions à la page 21.
Il peut être nécessaire de laver manuellement
ces articles pour éliminer complètement le
problème. Le film de silice et l’attaque sont
des défauts permanents qu’on ne peut éliminer.
Pour ralentir ce processus, utiliser la quantité
minimale de détergent et d’agent de rinçage
liquide. Réduire également la charge du lavevaisselle pour permettre un rinçage approfondi,
et utiliser l’option de “Séchage Économique”.
Restaurer la patine sur les ustensiles après le
lavage au lave-vaisselle. Voir les instructions
du fabricant de l’ustensile ou enduire l’ustensile
d’huile de cuisine et essuyer avec un essuietout de papier.
34
Page 71

Solutions des problèmes communs du lave-vaisselle
Séchage incomplet de la vaisselle
PROBLÈME
Séchage
incomplet de
la vaisselle
CAUSE
Température
insuffisante de l’eau
Écoulement
insuffisant de l’eau
sur la vaisselle
Carence d’agent
de rinçage
Articles de plastique
Emploi de l’option de
“Séchage Économique”
SOLUTION
Si nécessaire, régler le chauffe-eau pour une
température plus élevée, pour que le lavevaisselle soit alimenté par de l’eau à au
moins 49°C (120°F). Voir à la page 28 la
méthode recommandée à la rubrique
“Conseils pour l’économie d’énergie”.
Ne pas trop charger le lave-vaisselle afin
que l’eau puisse s’en écouler correctement,
et utiliser un agent de rinçage liquide pour
faciliter le séchage. Voir les instructions de
chargement correct aux pages 9 à 14. Ne
pas utiliser l’option de séchage économique.
Remplir le distributeur d’agent de rinçage.
Voir les instructions à la page 21.
Certains articles de plastique peuvent
nécessiter un séchage manuel avec un
torchon.
Ne pas utiliser l’option de “Séchage
Économique” pour la charge de vaisselle
suivante.
Détérioration de la vaisselle au cours
du lavage
PROBLÈME
Écaillage sur
la vaisselle
Taches
noires ou
grises sur
la vaisselle
CAUSE
Chargement
incorrect
Contact avec des
articles d’aluminium
SOLUTION
Charger la vaisselle et les verres de telle
manière qu’ils soient stables et qu’ils ne se
heurtent pas mutuellement sous l’effet du
lavage. Manoeuvrer doucement les paniers
sur leurs glissières pour minimiser les chocs.
REMARQUE : Laver manuellement certains
types de porcelaine et verrerie, comme les
articles antiques et de cristal mince.
Charger les articles d’aluminium de telle
manière qu’ils ne puissent pas se frotter
contre d’autres articles au cours du lavage.
Ne pas laver au lave-vaisselle des articles
jetables en aluminium. Pour éliminer les
marques d’aluminium, utiliser un produit de
nettoyage moyennement abrasif.
35
Page 72

Solutions des problèmes communs du lave-vaisselle
Élimination des taches et films
Veiller à ce que le distributeur d’agent de
rinçage soit toujours rempli d’agent de
rinçage liquide. Un agent de rinçage empêche
l’eau de former des gouttelettes qui sécheraient en laissant des taches ou marques.
Pour éliminer les taches et films sur la
vaisselle et les verres, ou un film qui s’est
formé sous l’effet de l’eau dure sur la
surface interne du lave-vaisselle, on peut
utiliser du vinaigre blanc selon la méthode
suivante :
1. Charger la vaisselle et les verres dans le
lave-vaisselle de la manière habituelle.
Ne pas charger des couverts ou autres
articles métalliques dans le lave-vaisselle.
2. Verser 473 mL (2 tasses) de vinaigre
ménager dans un verre, ou dans une tasse
à mesurer lavable au lave-vaisselle, qui
sera placé verticalement dans le panier
inférieur.
3. Fermer la porte.
4. Sélectionner le programme de lavage
“Normal” et l’option de “Séchage
Économique”, puis appuyer sur la touche
de mise en marche Start. Ne pas utiliser
de détergent. Laisser le lave-vaisselle
exécuter complètement le programme.
REMARQUE : On ne doit exécuter cette
opération qu’occasionnellement. Le vinaigre
est un acide; son utilisation excessive peut
faire subir des dommages au lave-vaisselle.
36
Page 73

Diagnostic
Avant de contacter le service de dépannage ...
Si le lave-vaisselle ne fonctionne pas correctement, étudier le tableau suivant ainsi que la
section “Solutions des problèmes communs du lave-vaisselle” aux pages 33 à 36 avant
de contacter le concessionnaire. Cela pourra vous économiser le coût de la visite d’un
dépanneur.
Le lave-vaisselle ne fonctionne pas
correctement
PROBLÈME
Le lave-vaisselle
ne fonctionne pas
ou s’arrête au
cours d’un
programme
Le lave-vaisselle
ne se remplit pas
Le lave-vaisselle
semble fonctionner trop longtemps
Résidus d’eau
dans le lavevaisselle
CONTRÔLER CE QUI SUIT
Porte bien fermée?
Programme approprié sélectionné? Voir page 8.
Verrouillage pour enfants actif? Voir page 25.
Fusible grillé ou disjoncteur ouvert?
Arrivée d’eau ouverte?
Arrêt du moteur du fait d’une charge excessive? Dans ce cas, l’appareil
se remet en marche automatiquement après quelques minutes. Si le
moteur ne se remet pas en marche, contacter le dépanneur.
Flotteur de protection contre débordement bloqué à la position la plus
élevée? Il faut que le flotteur puisse se déplacer librement verticalement. Appuyer dessus pour le libérer. Voir page 29.
Température de l’eau d’alimentation insuffisante? La période de
fonctionnement du lave-vaisselle est plus longue lorsqu’il faut qu’il
chauffe l’eau ou si on a sélectionné l’option de lavage à haute
température. Régler le thermostat du chauffe-eau pour que le
lave-vaisselle soit alimenté par de l’eau à au moins 49°C (120°F).
Attendre la fin du programme. Il est normal qu’il reste un petit résidu
d’eau. Examiner le brise-siphon s’il y en a un; il est peut-être obstrué.
Dans ce cas, exécuter les instructions de nettoyage du fabricant. Voir
page 32.
Avez-vous des
problèmes?
Résidus de
détergent dans la
section couverte
du distributeur
Résidu blanc
apparent sur
le panneau
d’accès frontal
Odeur perceptible
dans le lavevaisselle
Utiliser un détergent frais, remiser le détergent en un lieu frais et sec
dans un récipient bien fermé. Jeter tout détergent aggloméré.
Attendre la fin du programme.
Il faut que le flotteur puisse se déplacer librement verticalement.
Appuyer dessus pour le libérer. Voir page 29.
Certains détergents liquides produisent un moussage excessif et
une accumulation sur le panneau d’accès. Essayer un autre type
de détergent ou une marque différente pour réduire le moussage
et éliminer l’accumulation.
Exécuter le programme de “Rinçage Seulement” au moins une fois
ou deux par jour jusqu’à l’accumulation d’une charge complète.
suite à la page suivante
37
Page 74

Bruits
Diagnostic
PROBLÈME
Sons de
broyage,
râpage ou
bourdonnement
CONTRÔLER CE QUI SUIT
Présence d’un objet dur dans la pompe? L’émission du son devrait
cesser après le broyage de l’objet. Si le son ne disparaît pas après le
programme suivant, contacter le dépanneur. Voir à la page 27 “Sons
normaux émis aux cours du fonctionnement”.
Formation de vapeur
PROBLÈME
Émission de
vapeur par
la porte
CONTRÔLER CE QUI SUIT
Ceci est normal au cours de la phase de séchage d’un programme du
lave-vaisselle. Voir “Système de séchage”, page 27.
38
Page 75

Demande d’assistance ou de service
Avant de faire un appel pour assistance ou service, consulter la section “Diagnostic”.
Ceci pourra peut-être vous épargner le coût de la visite d’un dépanneur. Si une aide
demeure nécessaire, procéder conformément aux instructions ci-dessous.
Demande d’assistance ou de service
aux É.-U. ...
Contacter sans frais le Centre
d’assistance à la clientèle
de KitchenAid au :
1-800-422-1230.
Lors du contact :
Veuillez communiquer la date
d’achat ainsi que le numéro de série et le
numéro de modèle complet de l’appareil
(voir la section “Note à l’utilisateur”). Cette
information nous aidera à mieux satisfaire
vos besoins.
Nos consultants vous renseigneront sur
les sujets suivants :
• Caractéristiques et spécifications sur toute
notre gamme d’appareils ménagers.
• Information pour l’installation.
• Procédures d’utilisation et d’entretien.
• Vente de pièces de rechange et accessoires.
• Assistance spécialisée à la clientèle (langue
espagnole, malentendants, malvoyants, etc.).
• Concessionnaires locaux, entreprises de
service et distributeurs de pièces
de rechange.
Les techniciens de service KitchenAid
ont reçu la formation qui leur permet
d’effectuer les travaux de réparation sous
garantie et le service après-vente sur les
produits partout aux É.-U.
Vous pouvez également consulter l’annuaire
téléphonique Pages jaunes pour identifier une
entreprise de service agréée KitchenAid dans
votre région.
Pour acheter des pièces de rechange ...
Si vous avez besoin de commander des
pièces de rechange, nous recommandons
l’emploi uniquement de pièces autorisées
par l’usine. Ces pièces seront facilement
installées et fonctionneront bien parce
qu’elles sont fabriquées avec la même
précision mise en oeuvre dans la fabrication
de chaque appareil ménager KITCHENAID*
neuf. Pour obtenir des pièces de rechange
autorisées par l’usine, contacter le Centre
de service agréé le plus proche.
L’assistance est
sur le bout
du doigt
Pour obtenir une assistance plus étendue ...
Si vous avez besoin d’une assistance plus
étendue, vous pouvez écrire à KitchenAid
pour nous communiquer vos questions ou
préoccupations, à l’adresse suivante :
KitchenAid Brand Home Appliances
Consumer Assistance Center
c/o Correspondence Dept.
2000 North M-63
Benton Harbor, MI 49022
Dans votre correspondance, veuillez indiquer un numéro de téléphone où on peut
vous contacter dans la journée.
39
Page 76

Demande d’assistance ou de service
Demande d’assistance ou de service au
Canada ...
Pour obtenir de l’aide dans tout le
Canada, contacter sans frais
le Centre d’assistance à la
clientèle de KitchenAid
Canada, 8 h 30 – 18 h (HNE) :
1-800-461-5681.
Lors du contact :
Veuillez communiquer la date d’achat ainsi
que le numéro de série et le numéro de
modèle complet de l’appareil (voir la section
“Note à l’utilisateur”). Cette information nous
aidera à mieux satisfaire vos besoins.
Nos consultants vous renseigneront sur
les sujets suivants :
• Caractéristiques et spécifications sur toute
notre gamme d’appareils ménagers.
• Concessionnaires locaux.
Les techniciens de service KitchenAid
ont reçu la formation qui leur permet d’effectuer les travaux de réparation sous garantie
et le service après-vente sur les produits
partout au Canada. Pour service au Canada,
téléphoner à une des numéros suivantes
inscrit ci-dessous.
Service d’appareils ménagers KitchenAid Canada –
Service aux consommateurs
Succursales de service direct :
COLOMBIE-BRITANNIQUE 1-800-665-6788
ALBERTA 1-800-661-6291
ONTARIO Région d’Ottawa 1-800-267-3456
(à l’exception du code régional 807) En dehors de la région d’Ottawa 1-800-807-6777
MANITOBA, SASKATCHEWAN 1-800-665-1683
et code régional 807 en ONTARIO
QUÉBEC Montréal (à l’exception de la rive sud) 1-800-361-3032
PROVINCES DE L’ATLANTIQUE 1-800-565-1598
Rive Sud Montréal 1-800-361-0950
Québec 1-800-463-1523
Sherbrooke 1-800-567-6966
40
Page 77

Demande d’assistance ou de service
Pour acheter des pièces de rechange ...
Si vous avez besoin de commander des
pièces de rechange, nous recommandons
l’emploi uniquement de pièces autorisées
par l’usine. Ces pièces seront facilement
installées et fonctionneront bien parce
qu’elles sont fabriquées avec la même
précision mise en oeuvre dans la fabrication
de chaque appareil ménager KITCHENAID*
neuf. Pour obtenir des pièces de rechange
autorisées par l’usine, contacter le Centre
de service agréé le plus proche.
Pour obtenir une assistance plus étendue ...
Si vous avez besoin d’une assistance plus
étendue, vous pouvez écrire à KitchenAid
Canada pour nous communiquer vos
questions ou préoccupations,
à l’adresse suivante :
Service des relations avec la clientèle
KitchenAid Canada
1901 Minnesota Court
Mississauga, Ontario L5N 3A7
Dans votre correspondance, veuillez
indiquer un numéro de téléphone où on
peut vous contacter dans la journée.
41
Page 78

Index
Cet index est alphabétique. Rechercher le mot ou la phrase désirée pour identifier la page
où on l’y trouve.
SUJET PAGE
AGENT DE RINÇAGE
Utilisation .................................................... 21
ARTICLES SPÉCIAUX
Conseils pour le lavage............................... 16
ASSISTANCE
Au Canada ..................................................40
Aux É.-U. ....................................................39
BRISE-SIPHON ............................................. 32
BRUITS
Conseils pour le fonctionnement
silencieux .................................................... 27
S’ons normaux émis ................................... 27
CARACTÉRISTIQUES/COMPOSANTS ..........4
CHARGEMENT
Panier à couverts........................................14
Panier inférieur ...........................................13
Panier supérieur ...........................................9
Préparation du chargement .......................... 9
COMPOSANTS/CARACTÉRISTIQUES ..........4
DÉTERGENT
Quantité ................................................19, 20
Type............................................................ 19
DIAGNOSTIC................................................. 37
DISTRIBUTEUR
Agent de rinçage.........................................21
Détergent .................................................... 18
EAU
Contrôle de la température ......................... 28
ÉNERGIE
Économie ....................................................28
ENTRETIEN
Brise-siphon ................................................32
Flotteur – protection contre débordement..... 29
Nettoyage.................................................... 31
Remisage....................................................30
Système de lavage HYDRO SWEEP* ........29
SUJET PAGE
Mise en service .............................................6
Modification des réglages ........................... 25
Programmation pour un
lavage différé .............................................. 26
GARANTIE..................................................... 43
GUIDE DE MISE EN SERVICE .......................6
LUMIÈRES DU PANNEAU
DE COMMANDES ......................................... 24
MISE EN MARCHE DIFFÉRÉE .....................26
NETTOYAGE
Extérieur...................................................... 31
Intérieur.......................................................31
OPTIONS
Sélection ..................................................... 23
PANIER À COUVERTS ................................. 14
PANIER INFÉRIEUR ..................................... 13
PANIER SUPÉRIEUR
Chargement .................................................. 9
PROBLÈMES COMMUNS DU
LAVE-VAISSELLE
Solutions ............................................. 33 à 36
PROGRAMME
Annulation ...................................................23
Tableau de sélection...................................22
PROTECTION CONTRE DÉBORDEMENT ...29
REMISAGE .................................................... 30
RESPONSABILITÉS
Propriétaire ................................................... 2
SÉCURITÉ .......................................................3
SERVICE
Au Canada ............................................40, 41
Aux É.-U. ....................................................39
SYSTÈME DE SÉCHAGE ............................. 27
42
FILM/TACHES
Élimination .................................................. 36
FONCTIONNEMENT DU LAVE-VAISSELLE
Addition d’articles au cours d’un
programme.................................................. 26
Annulation d’un programme........................23
TACHES/FILM
Élimination .................................................. 36
VAPEUR ........................................................ 27
VERROUILLAGE POUR ENFANTS ..............25
Page 79

Garantie du lave-vaisselle
DURÉE DE LA
GARANTIE :
GARANTIE
COMPLÈTE
D’UNE ANNÉE
À PARTIR DE
LA DATE
D’INSTALLATION
GARANTIE
LIMITÉE DE
LA SECONDE À
LA CINQUIÈME
ANNÉE
À PARTIR DE
LA DATE
D’INSTALLATION
GARANTIE
COMPLÈTE
DEPUIS LA DATE
D’INSTALLATION
KITCHENAID PAIERA
POUR :
Pièces de rechange et frais
de main-d’oeuvre pour
l’élimination des vices de
matériau ou de fabrication.
Les travaux doivent être
exécutés par le personnel
d’un établissement de service
agréé KitchenAid.
Pièces de rechange pour le
panier supérieur ou inférieur, si
le panier rouille en cas de vice
de matériau ou de fabrication.
Pièces de rechange pour le
moteur d’un tiers HP en cas
de vice de matériau ou de
fabrication.
Pièces de rechange pour les
pièces de commande
électronique en cas de vice
de matériau ou de fabrication.
Pièces de rechange pour
l’élément chauffant en cas de
vice de matériau ou de
fabrication.
Pièces de rechange et frais
de main-d’oeuvre pour la
doublure de porte interne ou
la cuve d’acier inoxydable en
cas d’apparition de fuite
d’eau par suite de rouille
imputable à un vice de
matériau ou de fabrication.
KITCHENAID NE PAIERA PAS
POUR :
A. Visite de dépannage pour :
1. Correction de l’installation du
lave-vaisselle.
2. Explications du fonctionnement
du lave-vaisselle.
3. Remplacement des fusibles ou
correction du câblage de la maison.
4. Correction du circuit de conduit
de plomberie de la maison.
B. L’utilisation normale à domicile inclut
les établissements non commerciaux,
tels que les garderies à domicile, les
établissements de chambre d’hôte et
les installations de soins de longue
durée à domicile. Consulter les
règlements locaux pour vous assurer
que l’utilisation de cet appareil convient.
C. Dommage résultant d’accident,
altération, mauvais usage, abus,
incendie, inondation, actes naturels,
installation inappropriée ou installation
non conforme aux codes locaux
d’électricité et de plomberie.
D. Tout frais de main-d’oeuvre pendant
la période de garantie limitée.
E. Pièces de rechange ou frais de main-
d’oeuvre pour un appareil utilisé hors
des États-Unis.
F. Frais de transport de l’appareil. Ce
produit est conçu pour qu’il soit
réparable sur place.
G. Réparations aux pièces ou systèmes
résultant de modifications non
autorisées exécutées à l’appareil.
H. Au Canada, les frais de déplacement
ou de transport pour les clients
habitant dans des régions éloignées.
3/98
KITCHENAID ET KITCHENAID CANADA DÉCLINE TOUTE RESPONSABILITÉ AU TITRE DE
DOMMAGES SECONDAIRES OU INDIRECTS. Certaines provinces n’admettent pas l’exclusion
ou la limitation de dommages secondaires ou indirects. Par conséquent, cette exclusion ou
limitation peut ne pas vous être applicable. Cette garantie vous confère des droits juridiques
spécifiques; vous pouvez également jouir d’autres droits qui peuvent varier d’une province à
l’autre ou d’un État à un autre.
Hors des États-Unis ou du Canada, une garantie différente peut être applicable. Pour les
détails, contacter le concessionnaire agréé KitchenAid.
En cas de besoin d’assistance ou d’une intervention de service, consulter d’abord la section
“Diagnostic” de cette brochure. Après avoir consulté la section “Diagnostic”, on peut également
trouver de l’aide dans la section “Demande d’assistance ou de service”. Aux É.-U., contacter le
centre d’assistance à la clientèle au 1-800-422-1230. Au Canada, téléphoner à KitchenAid
Canada en composant l’un des numéros de téléphone indiqués dans la section “Demande
d’assistance ou de service”.
KitchenAid
Benton Harbor, MI U.S.A.
43
Page 80

Notes
44
9743110
© 1998 KitchenAid
Marque déposée de KitchenAid U.S.A.,
*
Emploi licencié par KitchenAid Canada
Imprimé aux États-Unis
3/98
 Loading...