

KitchenAid KUDS40FVPA3, KUDS50FVPA0, KUDS50SVWH3, KUDS50SVWH2, KUDS50SVWH0 Owner’s Manual
...
Thank you for Choosing KitchenAid ®Appliances.
We hold our company to the highest quality standards and it is important to us that you have a positive experience owning a
KitchenAid ®product.
Foryour convenience, we have provided an easy to follow User Instruction Book. These instructions include a "Troubleshooting"
section to help you through any problems you may encounter.
For additional information, you can visit the Frequently Asked Questions (FAQs) section of our website at www.kitchenaid.com. If
you need further assistance using your KitchenAid dishwasher, please contact us at 1-800-422-1230. In Canada: visit
www.kitchenaid.ca or call 1-800-807-6777.
Have your complete model and serial number ready. You can find your model and serial number on the label located near the door
on the right-hand or left-hand side of the dishwasher interior.
Para obtener acceso a "lnstrucciones para el usuario de lalavavajillas" en espa_ol, o para obtener informaci6n adicional acerca de
su producto, visite: www.kitchenaid.com
Tenga listo su nOmerocompleto de modelo y de serie. Puede encontrar su nOmero de modelo y de serie en la etiqueta ubicada
cerca de la puerta, al lado derecho o izquierdo del interior de la lavavajillas.
Table of Contents
DISHWASHERSAFETY.............................................................1
QUICK STEPS.............................................................................3
DISHWASHERUSE ....................................................................3
CYCLE AND OPTION DESCRIPTIONS....................................4
DISHWASHERFEATURES........................................................6
DISHWASHERCARE .................................................................7
TROUBLESHOOTING................................................................8
WARRANTY..............................................................................10
Your safety and the safety of others are very important.
We have provided many important safety messages in this manualand on your appliance. Always read and obey all safety
messages.
This is the safety alert symbol.
This symbol alerts you to potential hazards that can kill or hurt you and others.
All safety messages will follow the safety alert symbol and either the word "DANGER" or "WARNING."
These words mean:
You can be killed or seriously injured if you don't immediately
follow instructions.
You can be killed or seriously injured if you don't follow
instructions.
All safety messages will tell you what the potential hazard is, tell you how to reduce the chance of injury, and tell you what can
happen if the instructions are not followed.
W10205937A
iMPORTANT SAFETY iNSTRUCTiONS
WARNING: When using the dishwasher, follow basic precautions, including the following:
[] Read all instructions before using the dishwasher. [] Do not tamper with controls.
[] Use the dishwasher only for its intended function.
[] Use only detergents or rinse agents recommended for use in
a dishwasher, and keep them out of the reach of children.
[] When loading items to be washed:
1) Locate sharp items so that they are not likely to damage
the door seal; and
2) Load sharp knives with the handles up to reduce the risk
of cut-type injuries.
[] Do not wash plastic items unless they are marked
"dishwasher safe" or the equivalent. For plastic items not so
marked, check the manufacturer's recommendations.
[] Do not touch the heating element during or immediately after
use.
[] Do not operate the dishwasher unless all enclosure panels
are properly in place.
[] Do not abuse, sit on, or stand on the door, lid, or dish racks
of the dishwasher.
[] To reduce the risk of injury, do not allow children to play in
or on the dishwasher.
[] Under certain conditions, hydrogen gas may be produced in
a hot water system that has not been used for two weeks or
more. HYDROGEN GAS IS EXPLOSIVE. If the hot water
system has not been used for such a period, before using
the dishwasher turn on all hot water faucets and let the
water flow from each for several minutes. This will release
any accumulated hydrogen gas. As the gas is flammable,
do not smoke or use an open flame during this time.
[] Remove the door or lid to the washing compartment
when removing an old dishwasher from service or
discarding it.
SAVE THESE iNSTRUCTiONS
GROUNDING iNSTRUCTiONS
For a grounded, cord-connected dishwasher:
The dishwasher must be grounded. In the event of a
malfunction or breakdown, grounding will reduce the risk of
electric shock by providing a path of least resistance for
electric current. The dishwasher is equipped with a cord
having an equipment-grounding conductor and a grounding
plug. The plug must be plugged into an appropriate outlet
that is installed and grounded in accordance with all local
codes and ordinances.
WARNING: Improper connection of the equipment-
grounding conductor can result in a risk of electric shock.
SAVE THESE iNSTRUCTiONS
Do not use dishwasher until completely installed.
Do not push down on open door.
Doing so can result in serious injury or cuts.
Check with a qualified electrician or service representative
if you are in doubt whether the dishwasher is properly
grounded. Do not modify the plug provided with the
dishwasher; if it will not fit the outlet, have a proper outlet
installed by a qualified electrician.
[]
For a permanently connected dishwasher:
The dishwasher must be connected to a grounded metal,
permanent wiring system, or an equipment-grounding
conductor must be run with the circuit conductors and
connected to the equipment-grounding terminal or lead on
the dishwasher.
Tip Over Hazard
(])_ c < Ste/c_s
dishwasher. _
,_ Prepare and load _{ Select
_ Start dishwasher.
rinse aid for
for cleaning and ._.,
drying.
2 Add detergent , .'j/.'
NOTE: If the START/RESUME button is
located on the top of door, push door firmly
closed within 3 seconds of pressing
START/RES UME.
a cycle and option.
STEP 2
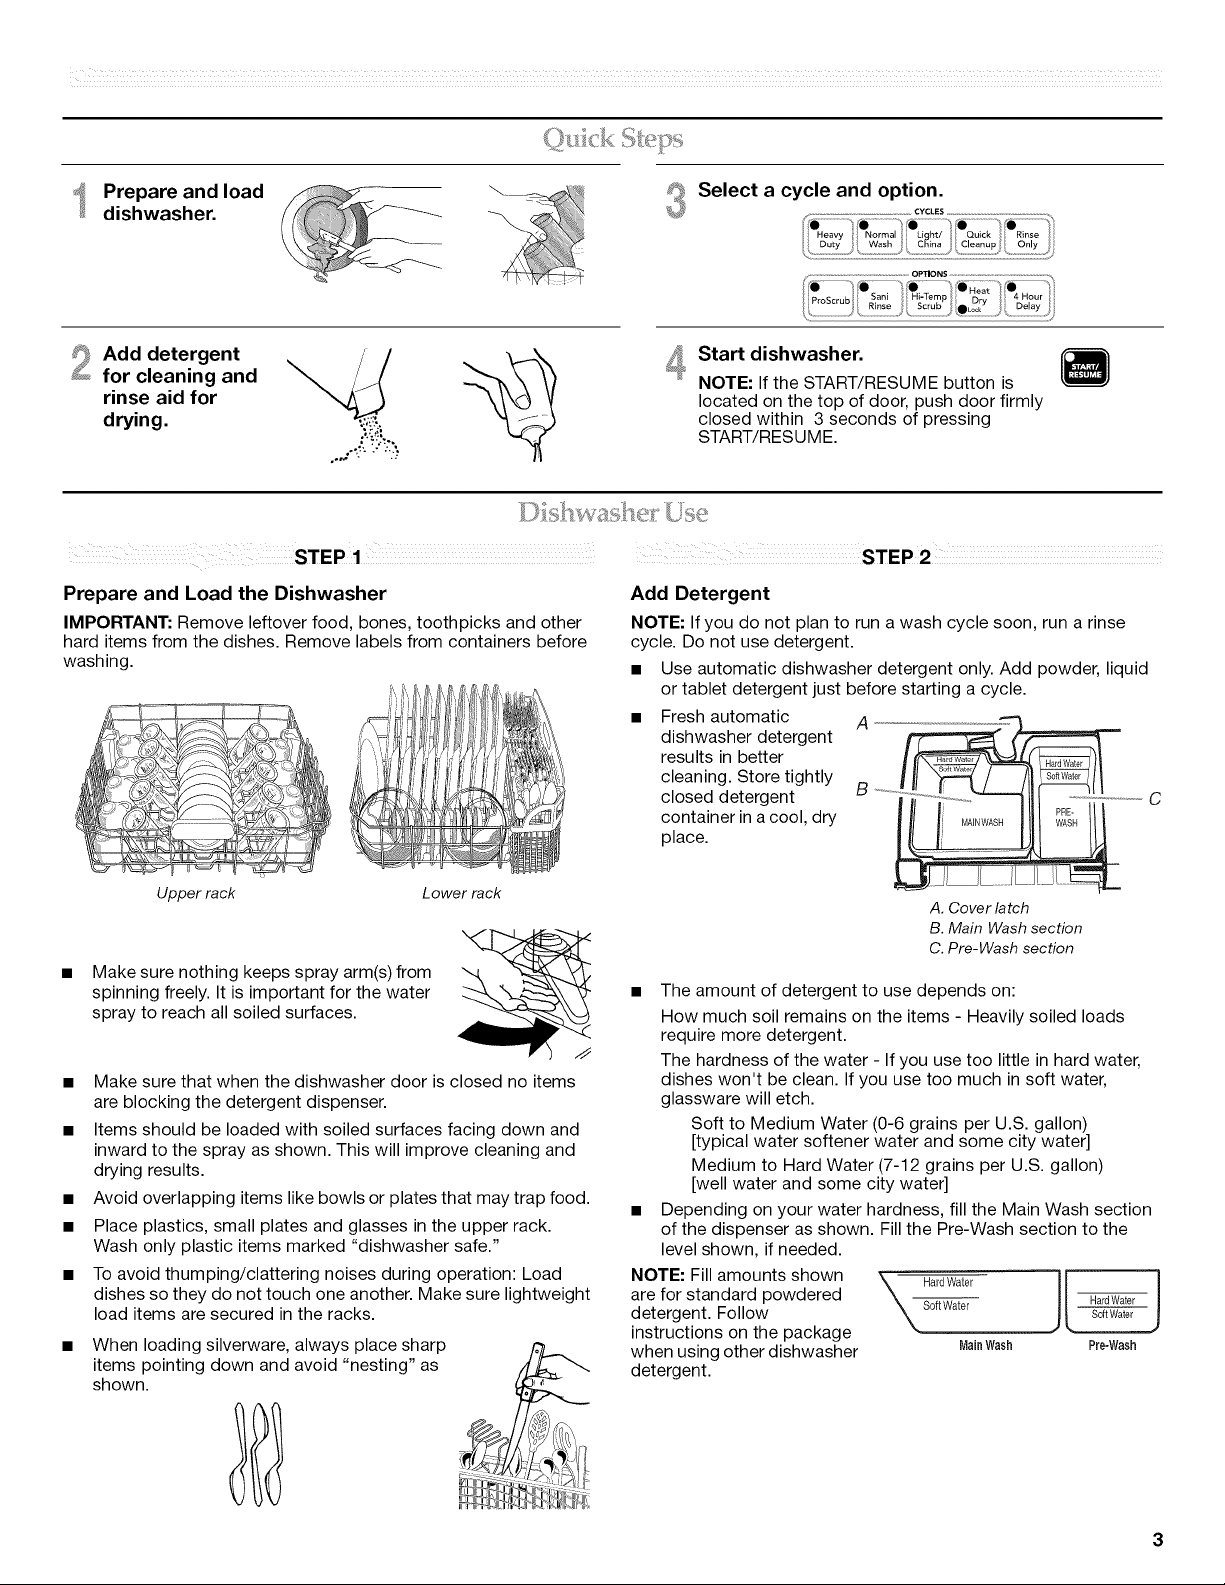
Prepare and Load the Dishwasher
IMPORTANT: Remove leftover food, bones, toothpicks and other
hard items from the dishes. Remove labels from containers before
washing.
i',/_',l_/4/',
Upper rack Lower rack
Make sure nothing keeps spray arm(s) from
spinning freely. It is important for the water
spray to reach all soiled surfaces.
• Make sure that when the dishwasher door is closed no items
are blocking the detergent dispenser.
• Items should be loaded with soiled surfaces facing down and
inward to the spray as shown. This will improve cleaning and
drying results.
• Avoid overlapping items like bowls or plates that may trap food.
• Place plastics, small plates and glasses in the upper rack.
Wash only plastic items marked "dishwasher safe."
• To avoid thumping/clattering noises during operation: Load
dishes so they do not touch one another. Make sure lightweight
load items are secured in the racks.
When loading silverware, always place sharp
items pointing down and avoid "nesting" as
shown.
Add Detergent
NOTE: If you do not plan to run a wash cycle soon, run a rinse
cycle. Do not use detergent.
• Use automatic dishwasher detergent only. Add powder, liquid
or tablet detergent just before starting a cycle.
• Fresh automatic A
dishwasher detergent
results in better
cleaning. Store tightly
closed detergent B
container in acool, dry
place.
A. Cover latch
B. Main Wash section
C. Pre- Wash section
• The amount of detergent to use depends on:
How much soil remains on the items - Heavily soiled loads
require more detergent.
The hardness of the water - If you use too little in hard water,
dishes won't be clean. If you use too much in soft water,
glassware will etch.
Soft to Medium Water (0-6 grains per U.S. gallon)
[typical water softener water and some city water]
Medium to Hard Water (7-12 grains per U.S. gallon)
[well water and some city water]
• Depending on your water hardness, fill the Main Wash section
of the dispenser as shown. Fillthe Pre-Wash section to the
level shown, if needed.
NOTE: Fill amounts shown
are for standard powdered
detergent. Follow
instructions on the package
when using other dishwasher
X HardWater 1
MainWash
HardWater
SoftWater
Pre-Wash
detergent.

Add Rinse Aid
Your dishwasher is designed to use rinse aid for good drying
performance• Without rinse aid your dishes and dishwasher
interior will have excessive moisture• The heat dry option will
not perform as well without rinse aid.
Rinse aid keeps water from forming droplets that can
dry as spots or streaks• They also improve drying by
allowing water to drain off of the dishes after the final
rinse•
Rinse aid helps to reduce excess moisture on the dish
racks and interior of your dishwasher•
Check the rinse aid indicator• Add rinse aid when indicator
drops to "Add" level•
To add rinse aid, turn the dispenser cap
to "Refill" and lift off. Pour rinse aid into
the opening until the indicator level is at
"Full•" Replace the dispenser cap and
turn to "Lock•" Make sure cap is fully
locked•
NOTE: For most water conditions, the
factory setting of 2 will give good
results• If you have hard water or notice
rings or spots, try a higher setting• Turn
the arrow adjuster inside the dispenser
by either using your fingers or inserting
a flat-blade screwdriver into the center
of the arrow and turning•
Refill
turn to lock
Lock
Full
Add
Select a Cycle (cycles vary by model)
See "Cycle and Option Descriptions" charts inthe following
section•
Heavier cycles and options affect cycle length• Some cycles and
options will take up to 31/2hours to complete•
Select Options (options vary by model)
See "Cycle and Option Descriptions" charts inthe following
section•
You can customize your cycles by pressing the options desired•
STEP 4
Start or Resume a Cycle
Run hot water at the sink nearest your dishwasher until the
water is hot. Turn off water•
Push door firmly closed• The door latches
automatically• Select the wash cycle and options
desired OR press START/RESUME to repeat the same
cycle and options as in the previous wash cycle•
You can add an item anytime before the main wash starts•
Open the door slowly and add the item. Close the door firmly•
Press START/RESUME.
Note: Ifthe START/RESUME button is located on top of door,
push door firmly closed within 3 seconds of pressing START/
RESUME•
This information covers several different models• Your dishwasher may not have all the cycles and options described•
CYCLES DISH LOAD TYPES DESCRIPTIONS WASH TIME (HH:MM)
Cycle Cycle + Options *Maximum
Minimum Minimum
"0 _ _", Use for hard,t0_c!ean; heavily During the wash;the wash action i ;39 2i 09 3:30
Heavy sol ed pots, pans, cassero es, repeated y pause for severa seconds
Duty
k and regula[ tableware.
Use for loads with normal The energy-usage label is based on this 1:11 1:41 3:30
amounts of food soil. cycle. During the wash, the wash action
will repeatedly pause for several seconds.
_"_*......................'/ use for ighty So ed items or During the Wash the Wash aCtion W 1 17 1 47 2
Light/ china and Crystal. ................... repeatedly pause for several seconds. ............................................................................
*** .j
Use to quickly wash
This cycle does not dry.
0:30 none none
prerinsed glasses or dish
loads•
use for rinsing dishes, This cYcle does not d_: 0:i0 none none
glasses, and silverware that DO ot u deter ent
• . n se g .
wl not bewashed nght away. ....................................
0 Washing
Drying
Clean
Sanitized
You can customize your cycle by selecting an option•
See option selections• If you change your mind, press the option again to turn off the option, or select a different option• You can change
an option anytime before the selected option begins•
*Maximum wash times depend on water temperature, heavy soil condition, dish load size and options selected•
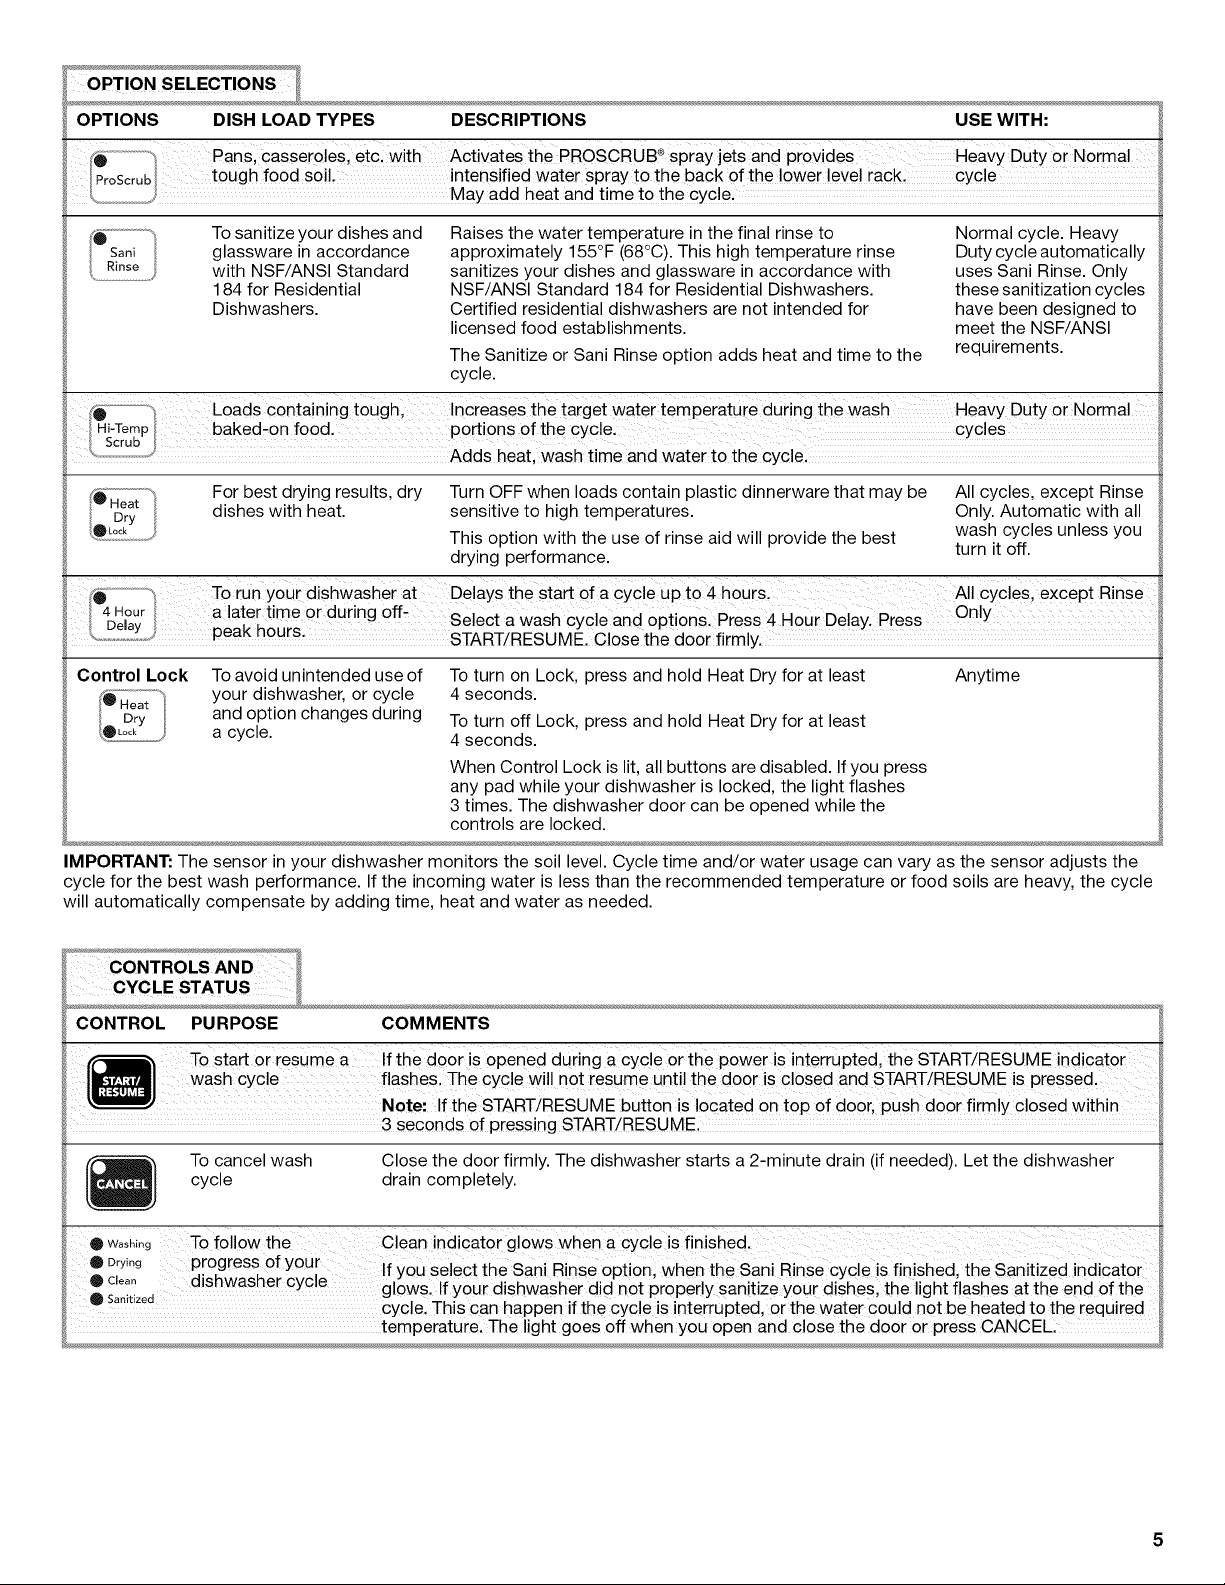
OPTIONS DISH LOAD TYPES DESCRIPTIONS USE WITH:
_0 ............................ Casseroles etcl with Activates the PROSCRUB® spray jets and provides Heavy Duty or N0rmal
ProScrub tough food s0iL intensified water spray to the back 0f the !ower !evel rack, Cycle
.............. May add heat and t me to the cyc e,
To sanitize your dishes and
glassware in accordance
with NSF/ANSI Standard
184 for Residential
Dishwashers.
Raises the water temperature in the final rinse to
approximately 155°F (68°C). This high temperature rinse
sanitizes your dishes and glassware in accordance with
NSF/ANSI Standard 184 for Residential Dishwashers.
Certified residential dishwashers are not intended for
licensed food establishments.
The Sanitize or Sani Rinse option adds heat and time to the
Normal cycle. Heavy
Duty cycle automatically
uses Sani Rinse. Only
these sanitization cycles
have been designed to
meet the NSF/ANSI
requirements.
cycle.
...................... Loads c°nta n ng tough ncreases the target water temperature dur ng the Wash HeaVY Duty or Norma
"_i-Ternp baked-on food. portions of the cyclel cycles
Scrub
"_-,................................_'_ Adds heat, wash t me and water to the cyc e,
For best drying results, dry Turn OFF when loads contain plastic dinnerware that may be All cycles, except Rinse
dishes with heat. sensitive to high temperatures. Only. Automatic with all
This option with the use of rinse aid will provide the best
wash cycles unless you
drying performance, turn it off.
To run your dishwasher at Delays the start of a cycle up to 4 hours. All cycles, except Rinse
4Hour aater t'me or dur'ng off On y
Deay _1_1. rh_, I._. ...... select a Wash CYcle and 0ptionsl Press 4 Hour Delayl Press ..............................
,2 iJ_d,_ ,,_u_o T_ r "r
: STAR )'RESUME. Close the doo fl rely.
Control Lock To avoid unintended use of To turn on Lock, press and hold Heat Dry for at least Anytime
your dishwasher, or cycle 4 seconds.
and option changes during
a cycle.
To turn off Lock, press and hold Heat Dry for at least
4 seconds.
When Control Lock is lit, all buttons are disabled. Ifyou press
any pad while your dishwasher is locked, the light flashes
3 times. The dishwasher door can be opened while the
controls are locked.
IMPORTANT: The sensor in your dishwasher monitors the soil level. Cycle time and/or water usage can vary as the sensor adjusts the
cycle for the best wash performance. If the incoming water is less than the recommended temperature or food soils are heavy, the cycle
will automatically compensate by adding time, heat and water as needed.
CONTROL PURPOSE COMMENTS
Tostart or [esume a !f the door is opened during a cycle or the power is interrupted, the START/RESUME indicator
wash cycle flashes, The cycle wi!! not resum e until the door is closed and START/RESUME is pressed.
Note" If the START/RESUME button is located on top 0f door, push door firmly closed within
3 seconds of pressing START/RESUME,
To cancel wash
cycle
Close the door firmly. The dishwasher starts a 2-minute drain (if needed). Let the dishwasher
drain completely.
_ ®w.s,,ng To follow the Clean indicator glows When a Cycle is finished.
et Drying p.ro.gress of your If you select the Sani Rinse option; When the sani Rinse cYcle is f nished, the Sanitized ind cator
Clean dlsnwasner cycle
- a.... glows If your dishwasher did not properly sanitize your dishes, the light flashes at the end of the
S "t" ed ' , , , ,
cycle, This can happen if the cycle is interrupted, or the water could not be heated to the requ!red
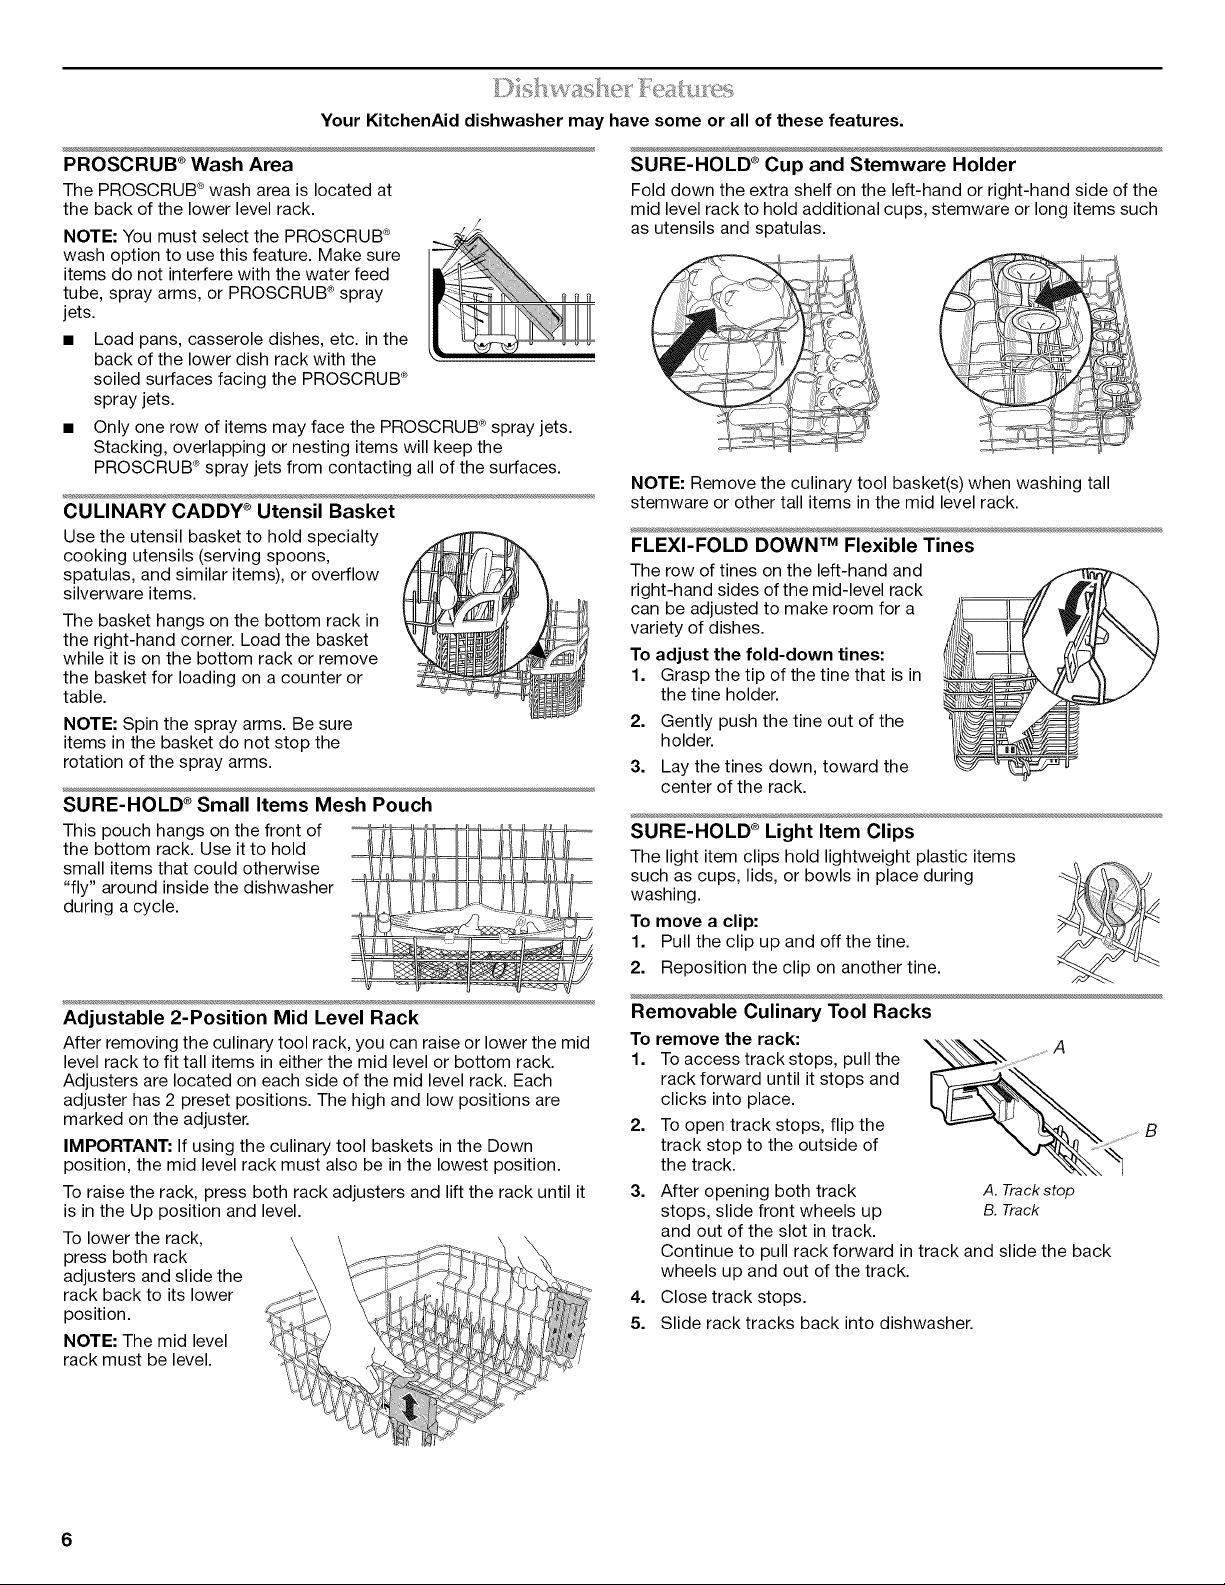
Your KitchenAid dishwasher may have some or all of these features.
PROSCRUB ®Wash Area
The PROSCRUB ®wash area is located at
the back of the lower level rack.
NOTE: You must select the PROSCRUB ®
wash option to use this feature. Make sure
items do not interfere with the water feed
tube, spray arms, or PROSCRUB ®spray
jets.
• Load pans, casserole dishes, etc. in the
back of the lower dish rack with the
soiled surfaces facing the PROSCRUB ®
spray jets.
• Only one row of items may face the PROSCRUB ®spray jets.
Stacking, overlapping or nesting items will keep the
PROSCRUB ®spray jets from contacting all of the surfaces.
CULINARY CADDY ®Utensil Basket
Use the utensil basket to hold specialty
cooking utensils (serving spoons,
spatulas, and similar items), or overflow
silverware items.
The basket hangs on the bottom rack in
the right-hand corner. Load the basket
while it is on the bottom rack or remove
the basket for loading on a counter or
table.
NOTE: Spin the spray arms. Be sure
items in the basket do not stop the
rotation of the spray arms.
SURE-HOLD ®Small Items Mesh Pouch
This pouch hangs on the front of
the bottom rack. Use it to hold
small items that could otherwise
"fly" around inside the dishwasher
during a cycle.
SURE-HOLD ®Cup and Stemware Holder
Fold down the extra shelf on the left-hand or right-hand side of the
mid level rack to hold additional cups, stemware or long items such
as utensils and spatulas.
NOTE: Remove the culinary tool basket(s) when washing tall
stemware or other tall items in the mid level rack.
FLEXI-FOLD DOWN TM Flexible Tines
The row of tines on the left-hand and
right-hand sides of the mid-level rack
can be adjusted to make room for a
variety of dishes.
To adjust the fold-down tines:
1. Grasp the tip of the tine that is in
the tine holder.
2. Gently push the tine out of the
holder.
3. Lay the tines down, toward the
center of the rack.
SURE-HOLD ®Light Item Clips
The light item clips hold lightweight plastic items
such as cups, lids, or bowls in place during --_%_'_1
washing.
To move a clip:
1. Pull the clip up and off the tine.
i
2. Reposition the clip on another tine.
Adjustable 2-Position Mid Level Rack
After removing the culinary tool rack, you can raise or lower the mid
level rack to fit tall items in either the mid level or bottom rack.
Adjusters are located on each side of the mid level rack. Each
adjuster has 2 preset positions. The high and low positions are
marked on the adjuster.
IMPORTANT: If using the culinary tool baskets in the Down
position, the mid level rack must also be in the lowest position.
To raise the rack, press both rack adjusters and lift the rack until it
is in the Up position and level.
To lower the rack,
press both rack
adjusters and slide the
rack back to its lower
position.
NOTE: The mid level
rack must be level.
j '
Removable Culinary Tool Racks
To remove the rack: A
1. To access track stops, pull the
rack forward until it stops and
clicks into place.
2. To open track stops, flip the B
track stop to the outside of
the track.
3. After opening both track A.Trackstop
stops, slide front wheels up B.Track
and out of the slot in track.
Continue to pull rack forward in track and slide the back
wheels up and out of the track.
4.
Close track stops.
5.
Slide rack tracks back into dishwasher.
 Loading...