

Page 1

COMPACTOR USER
INSTRUCTIONS
THANK YOU for purchasing this high-quality product. If you should experience a problem not covered in TROUBLESHOOTING,
please visit our website at www.kitchenaid.com or call us at 1-800-422-1230.
You will need your model and serial number located on the right-hand side, behind the compactor drawer.
TABLE OF CONTENTS
COMPACTOR SAFETY ..................................................................2
INSTALLATION REQUIREMENTS .................................................3
INSTALLATION INSTRUCTIONS ...................................................4
COMPACTOR USE .........................................................................7
COMPACTOR CARE ......................................................................9
TROUBLESHOOTING ..................................................................12
WARRANTY ..................................................................................14
W11034514A
Page 2
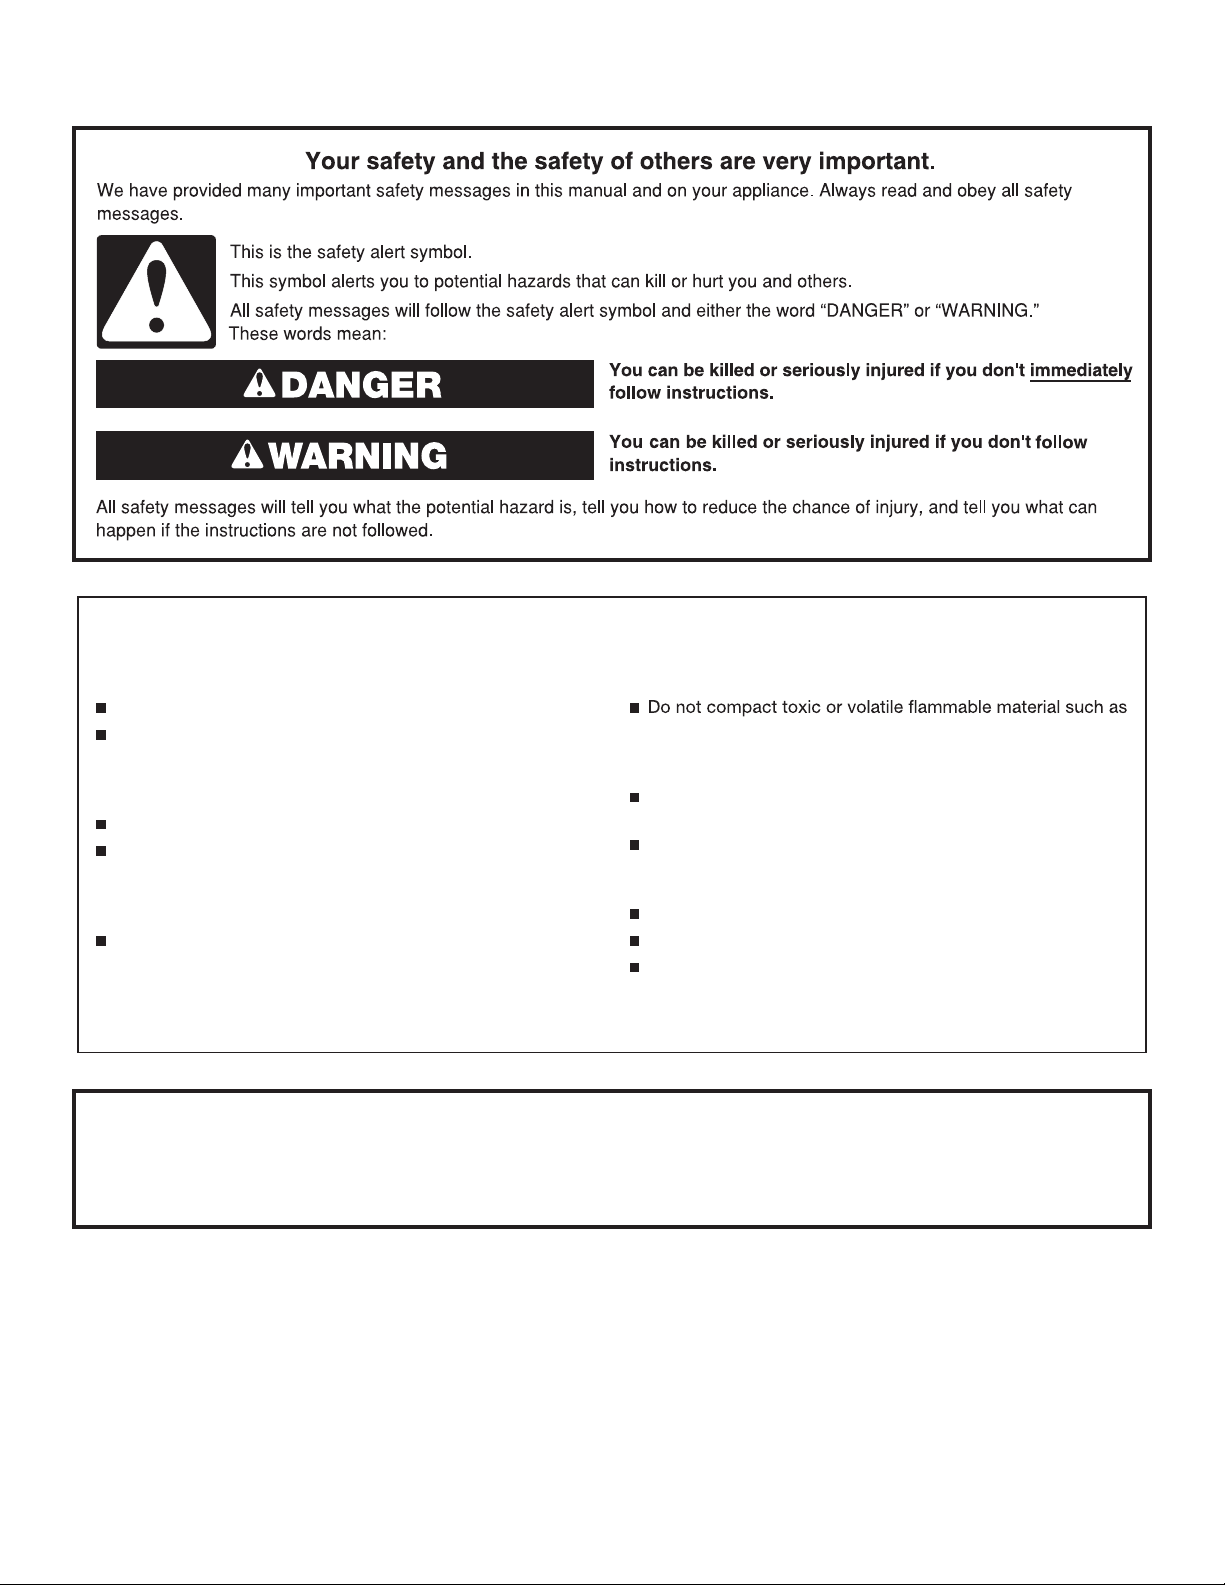
COMPACTOR SAFETY
IMPORTANT SAFETY INSTRUCTIONS
WARNING: When using an electrical appliance, basic precautions should always be followed, including the following:
Read all instructions before using the compactor.
Close supervision is necessary when used by or near
children. Do not allow to be used as a toy, or to run
unattended at any time. Lock Key Switch when not in use
and store key out of reach of children.
Do not touch moving parts.
Do not operate with a damaged cord set, plug, motor, or
after damage in any manner. Have the compactor
examined, repaired or adjusted by an authorized
serviceperson.
Use only for intended use as described in this manual. Do
not use other than manufacturer's recommended
attachments.
oily rags and insect sprays. Do not compact lighted
cigarettes, cigars, or other hot or burning items. Do not
overload the compactor.
Do not take apart the compactor. Incorrect reassembly can
cause electric shock when subsequently used.
Handle a loaded trash bag with care. Sharp objects can
pierce the bag and cause injury. Do not overload trash bag
with heavy material such as glass.
This compactor is intended for household use only.
Unplug the compactor before servicing.
Do not modify the plug attached to the compactor; use only
with a grounded receptacle.
SAVE THESE INSTRUCTIONS
State of California Proposition 65 Warnings:
WARNING: This product contains one or more chemicals known to the State of California to cause cancer.
WARNING: This product contains one or more chemicals known to the State of California to cause birth defects or other
reproductive harm.
2
Page 3
INSTALLATION REQUIREMENTS
(61.0 cm)
(86.7 cm)
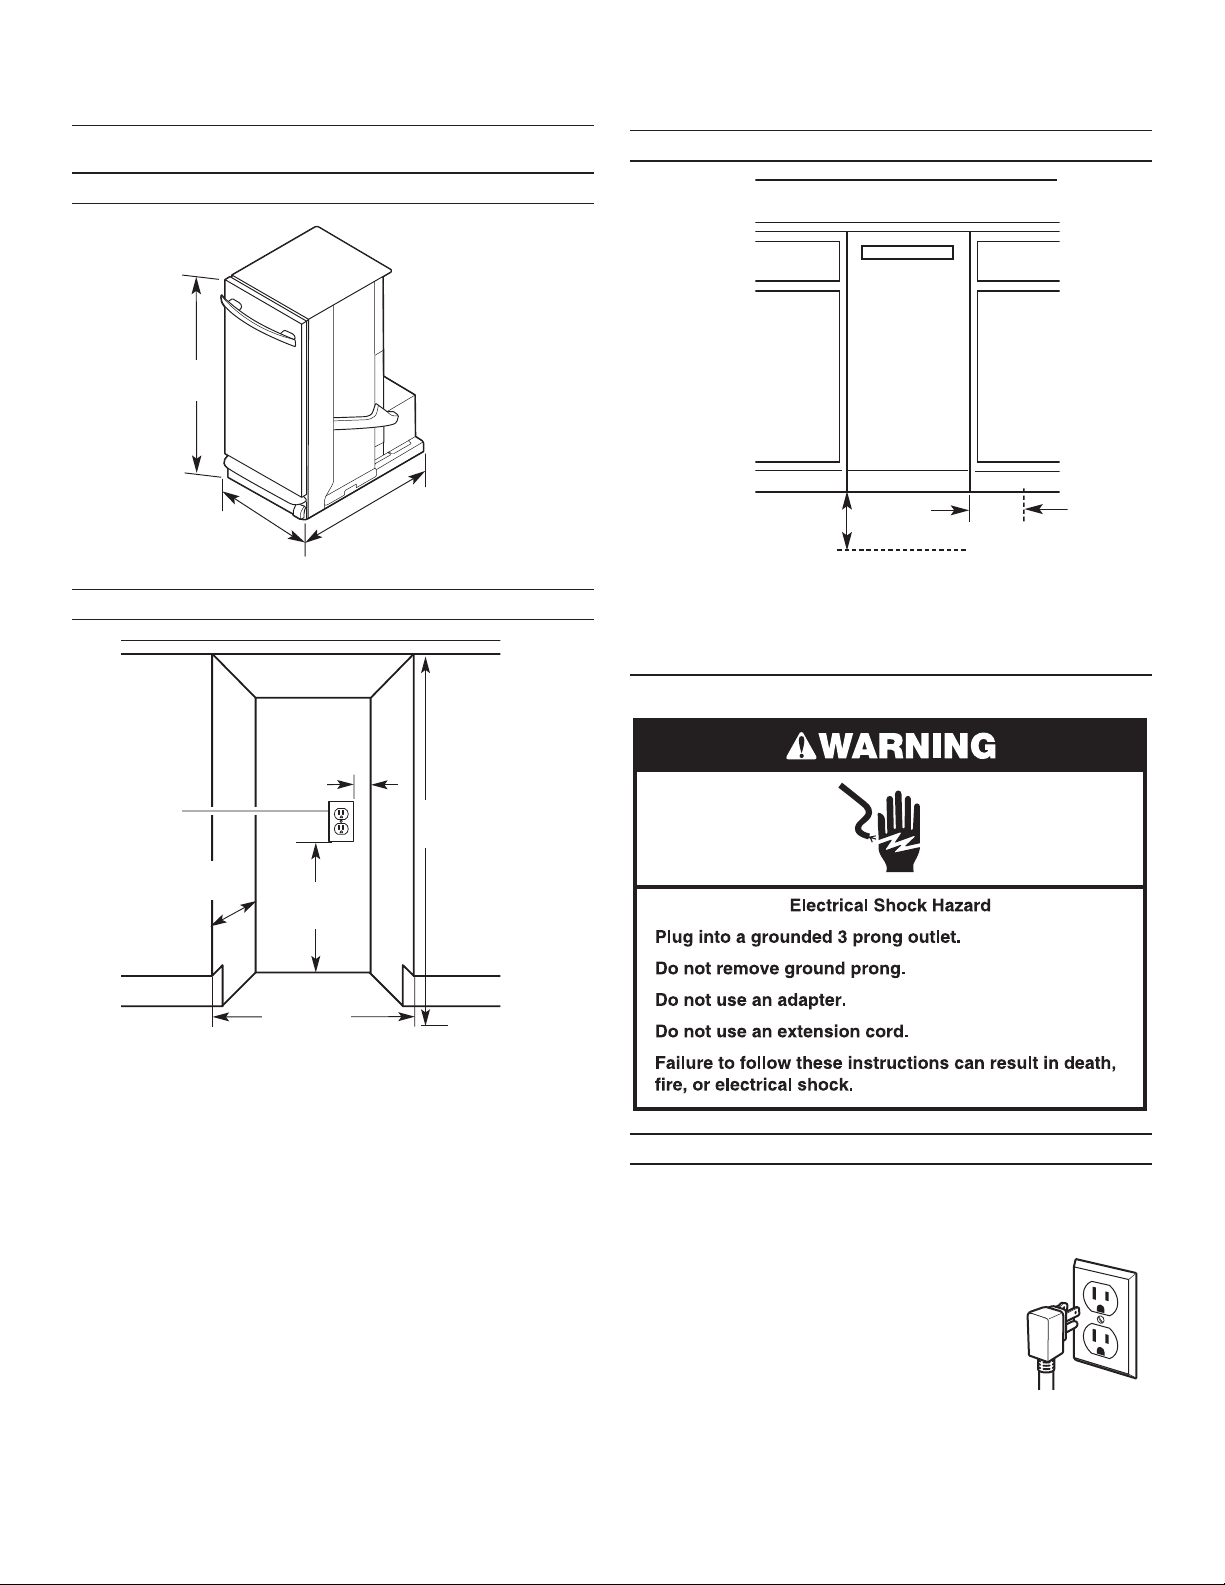
Location Requirement
Product Dimensions
341/8"
15"
(38.1 cm)
Cutout Dimensions
24"
Clearance Dimensions
B
A. Leave 6" (15.2 cm) of clearance space to the right side of the
compactor in order to remove the compactor bags.
B. Leave 23" (58.4 cm) of clearance in front of the compactor in
order to fully open or remove the compactor drawer.
A
Electrical Requirements
3" min.
(7.6 cm)
A
24" min.
(61.0 cm)
A. Grounded electrical outlet must be a minimum of 3" (7.6 cm)
away from surrounding cabinets or nearby walls as shown.
It can be placed either to the left or the right side of the
compactor.
18" min.
(45.7 cm)
151/4" min.
(38.7 cm)
341/4" min.
(87.0 cm)
Recommended Grounding Method
This compactor is for use on a single phase, 115 volt, 60 Hz, AC
only, 15 or 20 amp fused and properly grounded circuit and is
equipped with a grounding plug as shown. It is recommended
that a separate circuit serving only this appliance be provided.
This compactor must be grounded while in
use to reduce the risk of electric shock. The
compactor is equipped with a three-conductor
cord and 3 prong grounding-type plug to t the
proper grounding-type receptacle. The green
(or green and yellow) conductor in the cord is
the grounding wire. Do not connect the green
(or green and yellow) wire to a live terminal.
Do not modify the plug attached to the
compactor; use with a grounded receptacle.
3
Page 4
INSTALLATION INSTRUCTIONS
Tools
Installer: Leave User Instructions with the homeowner.
Homeowner: Keep User Instructions for future reference
and for local electrical inspector’s use if required.
Tools needed:
Gather the required tools and parts before starting installation.
■ Level
■ Tape measure
■ Pliers
■ Scissors
■ Phillips No. 2 screwdriver
■ Flat-head screwdriver
■ 5/16" box-end wrench
■ Utility knife
Unpacking
WARNING
Excessive Weight Hazard
Use two or more people to move and install compactor.
Failure to do so can result in back or other injury.
Begin in the room where the compactor will be located.
1. Remove compactor from shipping carton. Follow the
instructions on the shipping carton.
2. Remove all packaging materials such as tape and shipping
pads.
3. Use a mild detergent and warm water to remove waxy
residue caused by shipping material.
4. Dry thoroughly with a soft cloth. For more information, see
the “Cleaning” section.
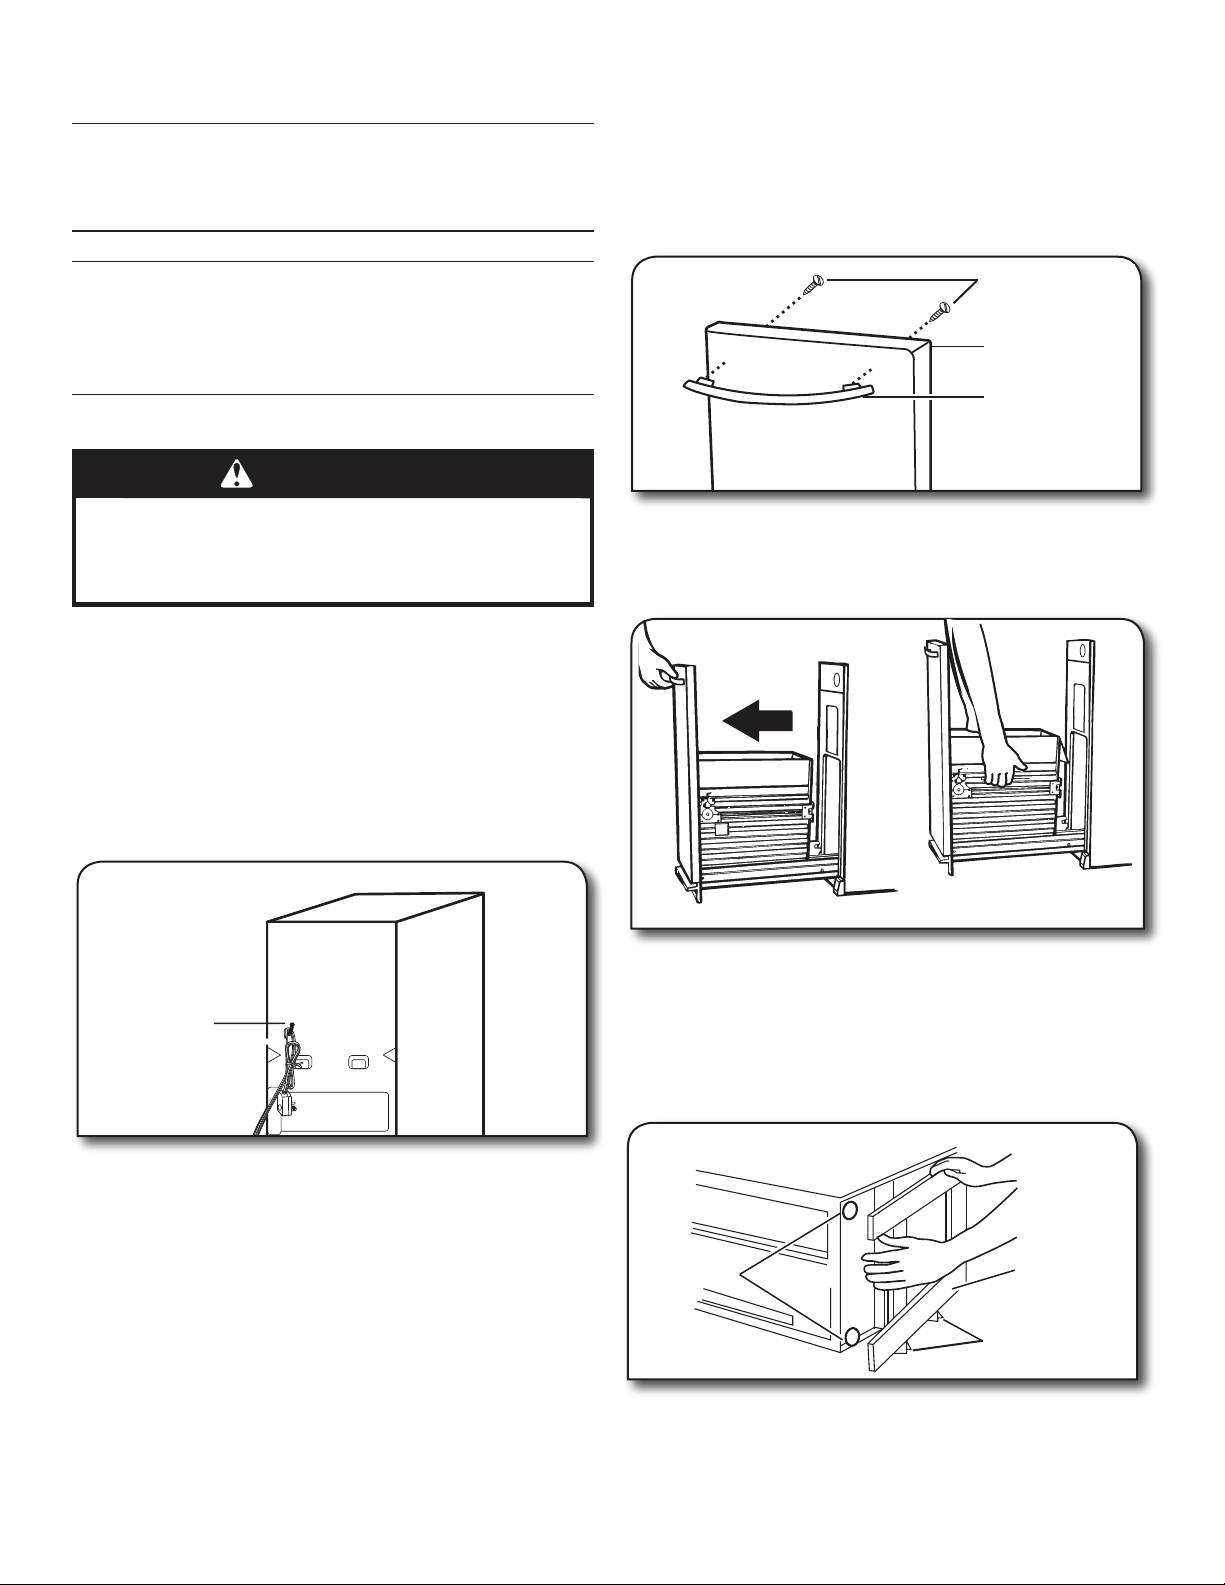
5. Be sure the power cord is attached to the cord clip on the
rear of the compactor.
To install handle:
■ Insert screws into the holes from the inside of the drawer.
■ Place handle on the front of the drawer and align handle
screw holes with screw ends.
■ Tighten screws snugly.
Two screws inserted
into holes from
inside of drawer
Top of drawer
Handle installed
on drawer front
9. Grasp the front of the drawer and tilt it backwards slightly
while pulling forward to clear the drawer stops.
10. Grasp the drawer handle or sides of drawer and lift drawer
out of compactor.
Power cord clip
6. Place two of the four corner posts from the packaging on the
oor near the compactor.
7. Press the foot pedal to open the compactor drawer and
remove any shipping materials or other items from the
drawer.
NOTE: Do not remove the compactor bag.
8. If the compactor has a full front panel, install the handle. The
handle is located inside the drawer.
4
11. Place the drawer on the two corner posts.
12. Place the other two corner posts on the oor to the side of
the compactor.
13. Grasp the sides of the compactor cabinet and place
compactor on its side on top of the corner posts.
14. Remove the shipping base from the bottom of the
compactor.
Leveling legs
Shipping base
Corner posts
NOTE: Before returning the compactor to the upright position,
adjust the height of the compactor as necessary using the
following “Height Adjustment” instructions.
Page 5

Height Adjustment (optional)
1. Measure the height of your cabinet opening. The top of the
compactor mounting screw head should be at least 1/8"
(3 mm) from the top of the cabinet opening.
The rear wheels are preset for a cabinet height of 341/4"
(87 cm). See Position “1” in the following picture.
To adjust for cabinet opening heights greater than 341/4"
(87 cm):
■ Loosen self-tapping screw just enough to clear stud from
hole in Position “1”.
■ Move the rear wheel and stud to Position “2” or “3” as
needed for your cabinet opening measurement:
Position “2”: 347/16" to 3411/16" (87.5 to 88.1 cm)
Position “3”: 3413/16" to 35" (88.4 to 88.9 cm)
NOTE: To level the compactor in position “3”, you may
need to add shims under the front leveling legs. The
shims should be approximately 1/4" (6 mm) thick.
■ Tighten screw.
Cabinet
Undercounter Installation
Proper installation is your responsibility. Make sure you have
everything necessary for correct installation. It is the personal
responsibility and obligation of the customer to contact a
qualied installer to assure that electrical installation meets all
national and local codes and ordinances.
IMPORTANT:
■ To avoid damaging oor covering, slide compactor onto
cardboard or hardboard before moving compactor across
oor.
■ Do not allow the rear frame of the compactor to touch the
oor covering when lifting or moving compactor.
1. Move the compactor close to its nal location.
2. Remove cord clip from the back of the compactor. Plug into
a grounded 3 prong outlet.
3. Determine if you want the compactor cabinet frame or
drawer front ush with the kitchen cabinet face.
4. Rotate the two top retaining brackets 180°.
The screws are supplied in position “2”. If desired, adjust the
brackets to position “1” or “3” as described below:
■ If the compactor frame is to be ush with the cabinet
front, place retaining bracket screws through “1”.
■ If the compactor drawer front is to be ush with the
cabinet front, place retaining bracket screws through “3”.
■ If the compactor is to be midway between “1” and “3”,
leave the retaining bracket screws through “2”.
Position 1
Wheel bracket
assembly
1
2
3
Self-tapping screw (pivot)
Locating stud
2. Stand the compactor upright. If you are changing the rear
wheel height, move the corner posts to the opposite side
and lay the compactor on its other side. Adjust the other rear
wheel.
3. Use pliers to lower the front leveling legs away from the
compactor cabinet. Adjust the leveling legs to agree with the
position of the rear wheels.
Rear Wheel position:
“1”: 3/16" (4 mm) from bottom plate
“2”: 9/16" (14 mm) from bottom plate
“3”: 3/4" (19 mm) from bottom plate
3/16
" (4 mm) at
default position 1
Leveling leg
Countertop
Retaining bracket
3
2
1
5. Slowly lift the front slightly and roll compactor into the
cabinet opening.
6. Adjust the leveling legs until the compactor is level and
stable. Place a level inside the bottom of the cabinet as
shown. Check the compactor leveling side to side and back
to back.
Bottom plate
4. Stand the compactor upright. Dispose of/recycle all
packaging materials.
7. Using the two #8-18 x 1/2" (13 mm) screws (provided), fasten
the retaining brackets to the countertop with the mounting
screws.
5
Page 6
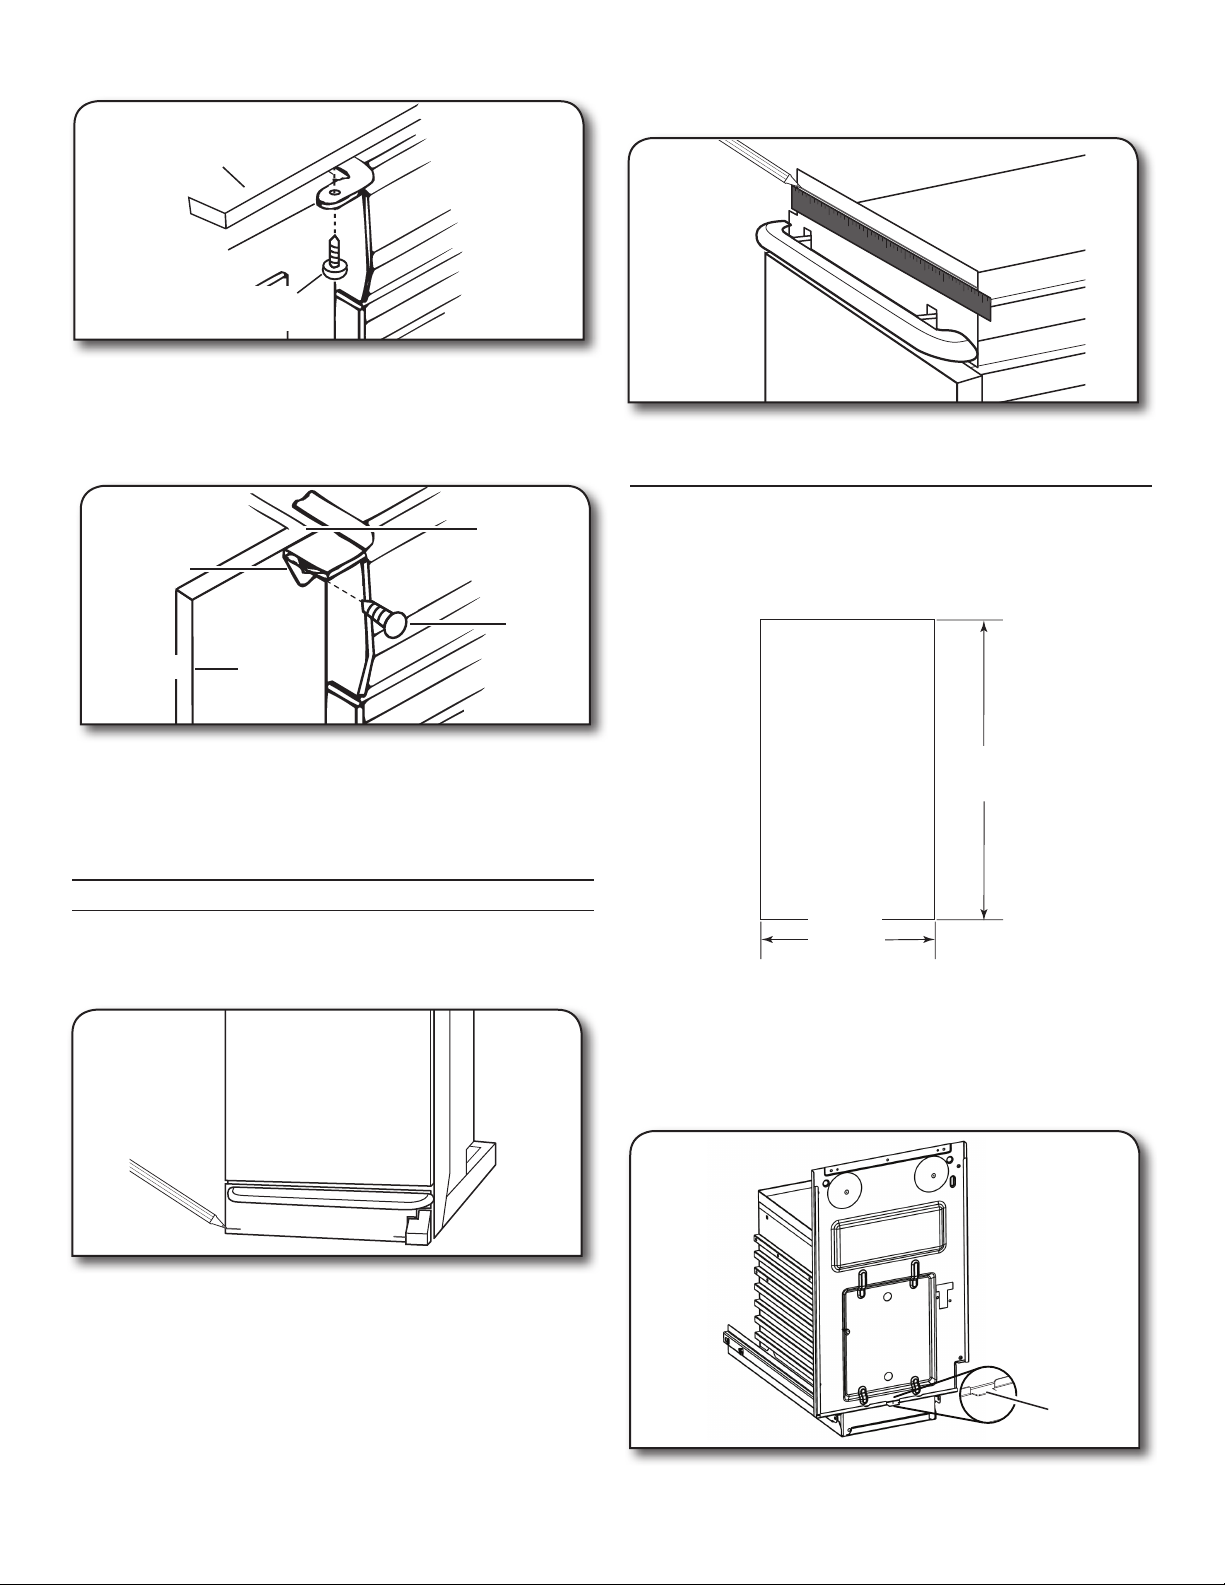
Countertop Mounting
Countertop
Retaining
bracket
Mounting screw
(provided)
NOTE: If the retaining brackets cannot be attached to the
underside of countertop, see the “Cabinet-face Mounting”
section.
Cabinet-face Mounting
(use if countertop mounting is not possible)
3. Use a ruler and a pencil or chalk to draw a line between the
marks on each side of toe guard. Use scissors or a utility
knife to cut toe guard along line.
4. Replace drawer. If toe guard still rubs oor covering, repeat
steps 1-3.
Retaining
bracket
Mounting clip
(provided)
Screw
(provided)
Cabinet face
8. Grasp sides of compactor drawer and place the wheels of
the drawer into the tracks. Lift at the handle so drawer will go
over drawer stops. Close the drawer. Make sure the drawer
opens and closes freely.
If the toe guard rubs against oor, see the “Adjusting the Toe
Guard” section for further instructions.
Adjusting the Toe Guard
If the toe guard rubs the oor covering, the toe guard clearance
may be changed as follows:
1. Mark on each side of the toe guard the amount of toe guard
that rubs the oor covering.
Installing a Custom Panel
Dimensions
Use these dimensions to create a custom panel. The panel
should be a minimum of 1/2" (1.3 cm) thick.
293/8" max
(74.6 cm)
15" max
(38.1 cm)
Installation
1. Align the bottom of the custom panel with the bottom of the
exterior drawer front and rest the panel on the rest tab.
NOTE: The bottom of the custom panel should not extend below
the bottom rest tab which is located at the lower center of the
exterior drawer front.
2. Remove the drawer from the compactor. (See steps 9 and 10
in the “Unpacking” section.)
6
Rest tab
Page 7

Secure the custom panel to the exterior drawer front by
WARNING
using four #8 x 1" wood screws from the inside drawer front.
There are seven holes available for use.
2. Attach a 15" x 1/2" (38.1 cm x 13 mm) quarter-round ller
along the top inside edge of the drawer front using glue or
screws.
Custom panel
WARNING
Four #8 x 1"
15" x 1/2
quarter round
Drawer front
Four #8 x 1"
wood screws
placement:
seven holes
are available
"
for use
wood screws
placement:
seven holes
are available
for use
COMPACTOR USE
How Your Compactor Works
The compacting ram is the part of the compactor which
compresses the trash.
IMPORTANT: The compacting ram stops 7" (18 cm) from the
bottom of the drawer. You will not see compacting of trash until
the drawer is more than 1/2 full.
You may hear a noise when glass breaks. Strong glass bottles
may not break. The trash in a full compactor bag will be about
1/4 the size of its original bulk.
Cut Hazard
Do not push items down into compactor with hands
or feet.
Doing so can result in cuts.
NOTE: You will not see compacting of trash the rst few times
you load the compactor. The compactor drawer should be at
least 1/2 full before the compactor can begin compressing the
load.
1. Open the drawer. Lift and pull the handle or press the foot
pedal to open the drawer.
NOTE: Pressing the foot pedal opens the drawer only 3" to
6" (7.6 cm to 15.2 cm), dependent upon the load.
Cut Hazard
Cover glass items when compacting to better contain
fragments.
Failure to do so can result in cuts.
2. Place trash in compactor.
■ Wrap or cover wet or messy trash.
■ Do not compact items that may develop offensive odors
such as raw meat, sh, grapefruit rinds, disposable
diapers, or personal hygiene items.
■ Load bulky trash in the center of the drawer.
■ Load bottles and cans on their sides in the center of the
drawer. Do not load bottles in an upright position.
3. Close the drawer.
7
Page 8
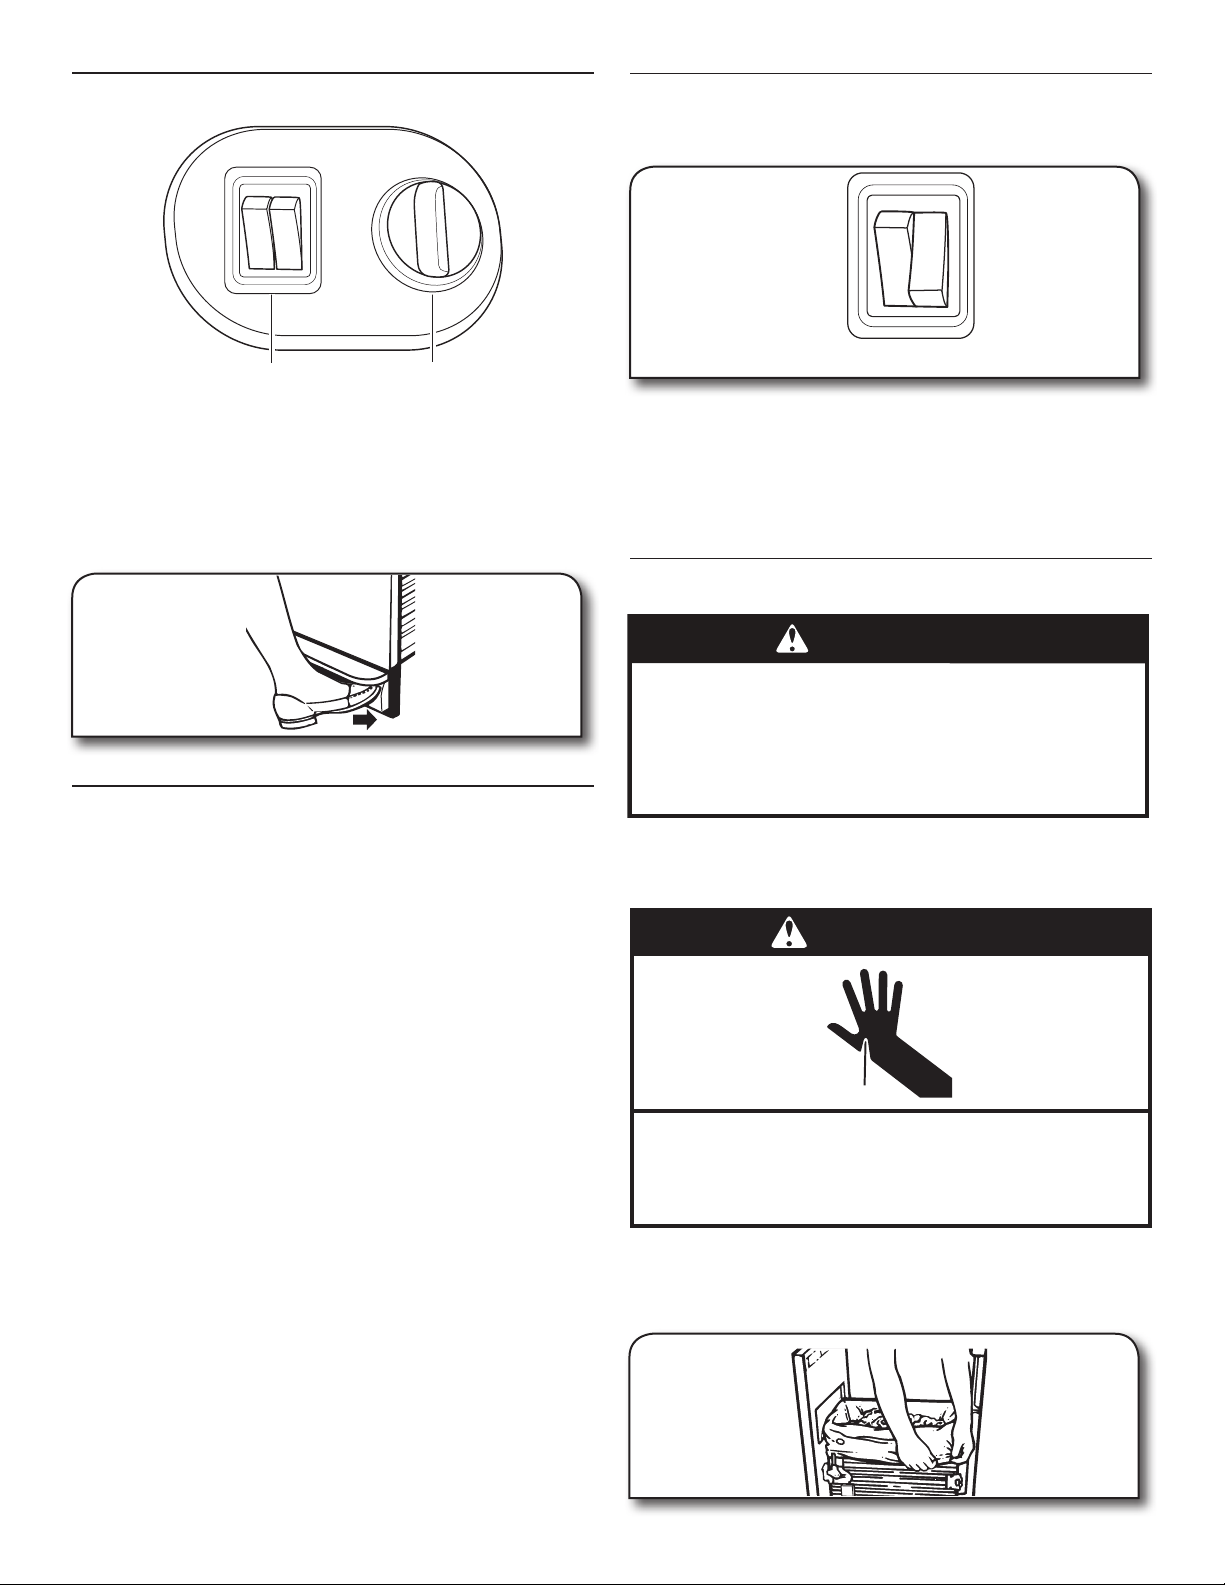
Starting Your Compactor
Key-knob
ON
OFF
ON ON
OFF
OFF
AIR
SOLID
FILTER
PACK
Control switches
1. Open drawer. Load trash.
2. Turn the Key-knob to the ON position.
3. Set Solid PackTM cycle switch to OFF.
4. Close drawer.
NOTE: The Key-knob is removable. Remove the Key-knob to
disallow children to operate the compactor. Press the footactuated Start button in with your toe to start the compacting
cycle.
Using Solid PackTM (Locked) Cycle
The Solid PackTM (locked) cycle extends the use of the bag by
putting constant pressure on the trash to keep it from springing
back. Regular use of a Solid PackTM cycle can increase bag
capacity up to 25 percent.
During the Solid PackTM cycle, the ram will stay in the down
position for extra compacting. The drawer is locked and cannot
be opened when the ram is down.
IMPORTANT: During the Solid PackTM cycle, the drawer remains
locked until you press the foot-actuated Start button to raise the
ram.
For best results, use the Solid PackTM cycle for at least 30
minutes at a time.
1. Lift and pull the handle or press the foot pedal to open the
compactor drawer.
2. Set compactor Solid PackTM cycle switch to ON.
3. Close drawer.
4. Press the foot-actuated Start button in with your toe to start
the compacting cycle.
5. Press the foot-actuated Start button to raise the ram and
allow the drawer to be opened.
Using the Air Filter
1. Set the Air Filter switch to ON. The fan creates air movement
in the compactor for odor removal.
ON
ON
OFF
OFF
SOLID
PACK
AIR
FILTER
NOTES:
■ The Air Filter only works when the Key-knob is in the On
position.
■ If you hear noise while the compactor is not in use, it
might be the fan has been left on.
2. Set the Air Filter switch to OFF to turn off the fan.
Removing a Filled Bag
WARNING
Excessive Weight Hazard
Two people may be required to remove and transport
compacted bag.
Unlock latch to assist in the removal of the bag.
Failure to do so can result in back or other injury.
When the trash is compacted to the top of the drawer, remove
the bag. If the bag is too heavy, compact less trash before
emptying it in the future.
WARNING
Cut Hazard
Do not push items down into compactor with hands
or feet.
Doing so can result in cuts.
1. Lift and pull the handle or press the foot pedal to open the
drawer.
2. Remove top of bag from bag retainer buttons. Pull up all four
bag cuffs. Close bag with a twist tie.
8
Page 9
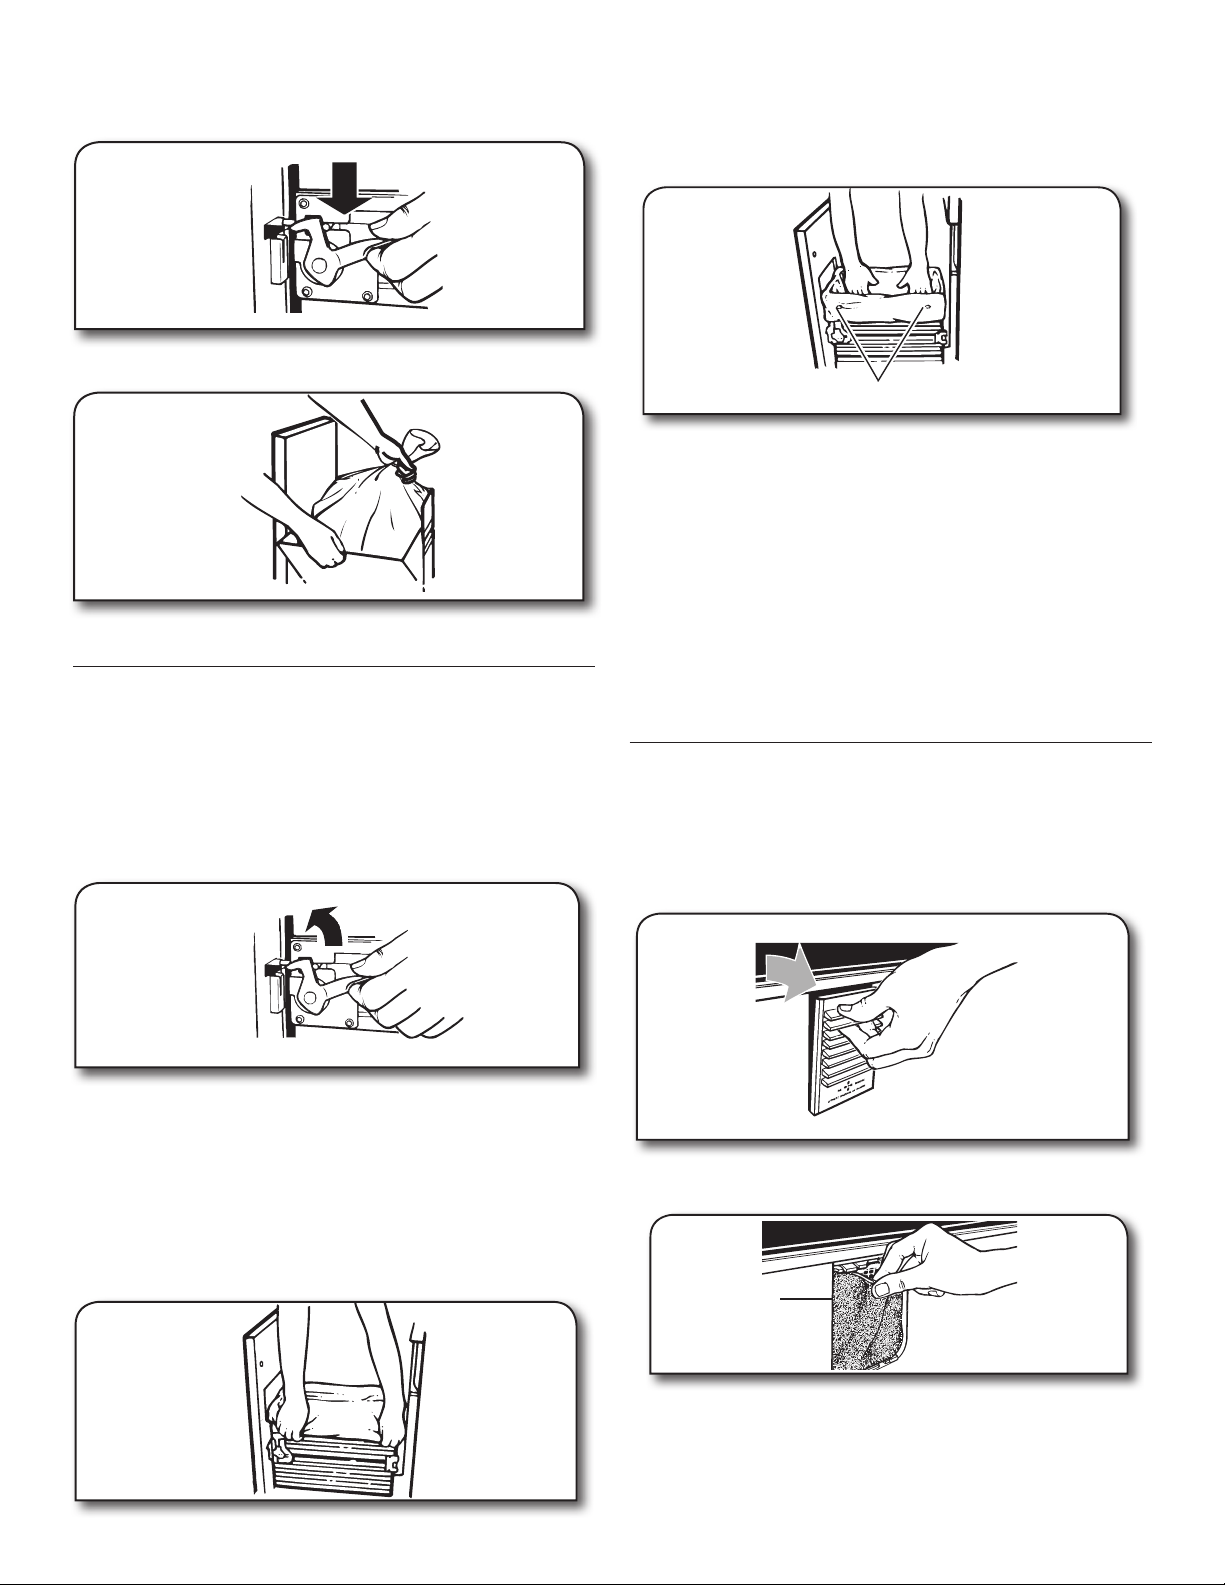
3. Release drawer side latch. Tilt drawer to the right. This
Pre-punched holes and bag buttons
Filter
releases pressure on the bag making it easier to remove the
bag.
4. Lift out bag.
5. Latch the drawer if it was unlatched.
Installing a New Bag
Do not use any kind of bag other than those designed
specically for use in your compactor. Order replacement
compactor bags through your local dealer or by calling the
toll-free number on the cover or in the “Assistance or Service”
section.
IMPORTANT:
Before installing a new bag, be sure:
■ The drawer latch is securely locked.
2. Lock bag in place by pulling the four pre-punched holes over
the bag retainer buttons. Holes will expand over the buttons
without damaging the bag.
3. Press inside of bag against the drawer bottom, sides and
corners for a smooth t.
NOTE: The ram can and will tear improperly installed bags.
COMPACTOR CARE
Your new compactor is designed to give you many years of
dependable service. However, there are a few things you are
expected to do in order to properly maintain your compactor.
This section will tell you how to clean and care for your
compactor.
Before changing the air lter, open the drawer and turn the
Key-knob to the OFF position and remove it.
NOTE: Any services other than those outlined in this section
should be performed by an authorized service representative.
Cleaning
Changing the Air Filter
It is recommended that you use the charcoal air lter located
under the lter cover.
To order the correct replacement charcoal lters, call the toll-free
number listed on the cover or in the “Accessories” section.
1. Insert ngertips in the air lter cover and pull until the side
tabs release. Lift the cover to release the bottom tabs.
■ The drawer is clean and free of debris.
NOTE: An unlatched drawer can cause the drawer monitor
switch to stay open. This will make the ram return and the
compactor will continue to run. Attempt to push the drawer
inwards to stop the compactor. The continuous running of the
compactor can also be attributed to debris in the drawer area. If
it is difcult to open or close the drawer this may be due to either
the drawer latch not being locked or debris in the drawer area.
1. Place folded bag into the drawer. Open bag and pull top
edges over the drawer top.
2. Remove the air lter by pulling the top edge of the lter. The
lter should pull out easily. Throw away the used lter.
3. To replace air lter, push the replacement lter into place.
4. Insert the bottom tabs of the air lter cover and push in until
the side tabs snap into place.
9
Page 10
Cleaning
WARNING
Cut Hazard
Wear gloves when cleaning inside the drawer or
cabinet, or the ram.
Failure to do so can result in cuts.
Before cleaning the compactor, open the drawer and turn the
Key-Knob to the OFF position and remove it.
Cleaning Inside the Drawer
1. Pull drawer out until it stops.
2. Remove the bag. See the “Removing a Filled Bag” section.
3. Optional: Remove the drawer side. Hold the drawer latch
open and tilt the side of the drawer out until the latch clears
the drawer front.
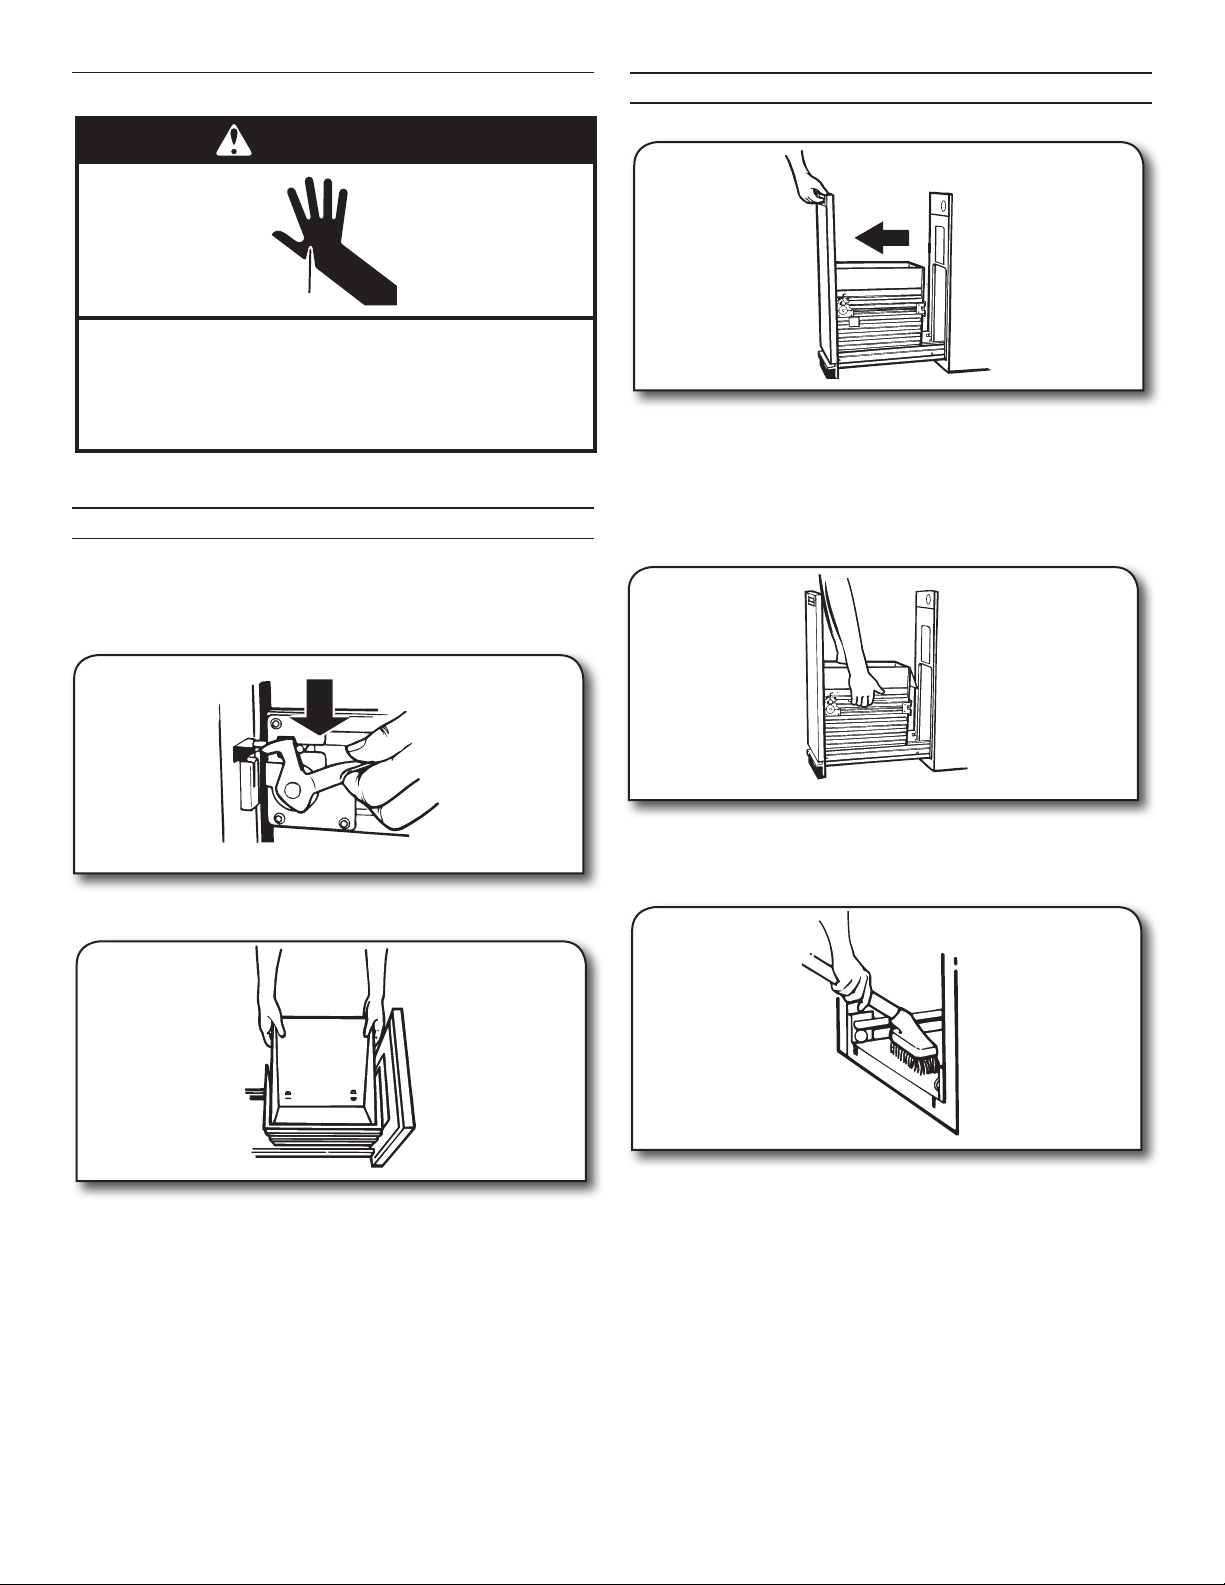
Cleaning Inside the Cabinet
1. Pull the drawer out until it stops.
NOTE: Look to see how the drawer rollers move in the tracks
and disengage. It will be easier to replace the drawer after
you have nished cleaning.
2. Lift the front of the drawer to clear the stops.
3. Grasp the handle or drawer on the sides and pull it out the
rest of the way. Set the drawer down gently.
Remove the drawer side by lifting it out of the drawer.
4. Wash the interior of the drawer with a clean sponge or soft
cloth and a mild detergent in warm water. Rinse and dry
thoroughly with a soft cloth.
5. If the drawer side was removed, slide it back into the tilted
position.
6. Press the drawer latch down while pushing the drawer side
to the upright position.
7. Latch the drawer side.
8. Close the drawer.
Vacuum the inside of the cabinet. Liquid spills or wet trash
should be cleaned up by hand, or by using a vacuum designed
to pick up liquids.
4. Wash the inside of the cabinet with a clean sponge or soft
cloth and a mild detergent in warm water. Rinse and dry
thoroughly with a soft cloth.
5. To replace the drawer, grasp it by the sides and insert the
rollers onto the tracks.
6. Lift the front of the drawer and push it in fully past the stops.
10
Page 11

Cleaning Exterior Surfaces
1. Wash exterior surfaces (including stainless steel) with a clean
sponge or soft cloth and a mild detergent in warm water. Do
not use abrasive or harsh cleaners. Rinse and dry thoroughly
with a soft cloth.
2. Wipe up spills immediately. Some foods can damage the
nish if left on the compactor surface.
Cleaning the Ram
1. Wipe glass particles off of the ram cover with a cloth or
paper towels. Throw the towel away.
2. Remove foods with a clean sponge or soft cloth and a mild
detergent in warm water. Rinse and dry thoroughly with a
soft cloth.
Cleaning Before a Vacation
If you will be away for more than a couple of days, remove
the compactor bag. Remove the Key-knob and store it out of
children’s reach.
Accessories
To order, contact your local authorized dealer. In the U.S.A. visit
our webpage www.kitchenaid.com or call 1-800-422-1230.
In Canada, visit our webpage www.kitchenaid.ca. or call:
1-800-807-6777.
Replacement bags
15-pack - Part Number W10165295RP
60-pack - Part Number W10165294RB
180-pack - Part Number W10165295BU
Charcoal air lter
Part Number 4151750
Bag Carrier
Part Number 776989
Panels and Handles:
Panels
Part Number W10714558 (Stainless Steel)
Part Number W10714559 (White)
Part Number W10714560 (Black)
Handles:
Part Number W10483828 (Stainless Steel Handle)
11
Page 12

TROUBLESHOOTING
Try the solutions suggested here rst in order to avoid the cost of an unnecessary service call.
PROBLEM SOLUTION
COMPACTOR WILL NOT
OPERATE
TRASH IS NOT
COMPACTING
DRAWER WILL NOT OPEN The Solid PackTM Cycle may be engaged. The drawer will remain locked until you reset by pressing
Check that the power supply cord is plugged into a grounded 3 prong outlet.
Check the type of wall plug the compactor is plugged into. It is possible the compactor power
cord is plugged into an outlet controlled by a wall switch. This can occur when the wall switch was
meant for a garbage disposal outlet.
A household fuse may have blown, or a circuit breaker tripped. Replace the fuse or reset the circuit
breaker. If the problem continues, call an electrician.
Make sure the drawer is completely closed. Open the drawer to ensure the latch is locked. Close
the drawer rmly and start the compactor.
Check that the Key-knob is set to ON. See the “Starting Your Compactor” section.
Press the foot-actuated start button. See the “Starting Your Compactor” section.
Drawer must be more than half full before trash is compacted. The ram stops 7" (17.8 cm) from the
bottom of the drawer.
the foot-actuated Start button. Turn the Solid PackTM Cycle off by pushing the Solid PackTM switch
to OFF.
Push on the drawer front in an attempt to raise the ram. Be sure the latch is locked.
Press the foot-actuated Start button. See the “Starting Your Compactor” section.
12
Page 13

PROBLEM SOLUTION
THERE IS NOT ENOUGH
COMPACTION OR FORCE
BOTTLES DO NOT BREAK Factors that affect bottle breakage: Bottles will not break every time. The thickness of the bottle’s
COMPACTOR WILL NOT
TURN OFF
DRAWER IS HITTING THE
CABINET
COMPACTOR MOVING
DURING OPERATION
DRAWER IS WOBBLY OR
LOOSE
COMPACTOR IS NOISY The noise could be normal operation: The compactor is driven by a steel chain and steel sprockets.
Compacting works best when the Solid PackTM cycle is used. Keep trash compressed for a
minimum of 30 minutes.
glass and the content of the trash load below it may keep the bottle from breaking.
Push on the drawer front to attempt to engage the drawer monitor switch. Open drawer and be
sure the latch is locked.
The foot actuated Start switch may not be engaged or the lever that pushes the Start switch in may
be bent. Push on the lever to stop the compactor. If needed, bend the lever back into position.
Debris in the drawer area will cause the door to disengage from the drawer monitor switch causing
the compactor to keep running. This can also keep the compactor from starting.
The cabinet opening should be 151/4" (38.7 cm) minimum with at least an 1/8" (3.2 mm) clearance
on either side.
Make sure the compactor is centered in the cabinet opening.
Make sure the latch is locked. An unlatched drawer will cause the front door to be wobbly and
offset from center.
Check for debris on the drawer tracks or under the drawer. Debris may cause the drawer to lean to
one side or not sit properly on the tracks.
The compactor may be set too high or not level. The compactor can be raised or lowered with front
leveling.
Ensure the drawer is located on the tracks. If it is not, remove the drawer and reinstall.
Check that the retaining brackets are installed to the cabinet. See the “Countertop Mounting” or
“Cabinet-front Mounting” sections.
NOTE: By design, it is normal for the drawer to move slightly side to side.
An unlatched door will wobble more than normal. Check that the door latch is in the locked
position.
The screws on the drawer front (door) may be loose. With a Phillips screwdriver, check to ensure
the screws holding the door to the drawer are secure.
The fan will make a humming noise when on. Set the air lter switch to OFF to turn the fan off.
13
Page 14

ATTACH YOUR RECEIPT HERE. PROOF OF PURCHASE IS REQUIRED
TOOBTAIN WARRANTY SERVICE.
KITCHENAID®
COMPACTOR
LIMITED WARRANTY
Please have the following information available when you call the
CustomereXperience Center:
■ Name, address and telephone number
■ Model number and serial number
■ A clear, detailed description of the problem
■ Proof of purchase including dealer or retailer name and address
IF YOU NEED SERVICE:
1. Before contacting us to arrange service, please determine whether your product requires repair. Some questions can be addressed
withoutservice. Please take a few minutes to review the Troubleshooting or Problem Solver section of the Use and Care Guide, or visithttp://
kitchenaid.custhelp.com.
2. All warranty service is provided exclusively by our authorized KitchenAid Service Providers. In the U.S. and Canada, direct all requests for
warranty service to:
KitchenAid Customer eXperience Center
In the U.S.A., call 1-800-422-1230. In Canada, call 1-800-807-6777.
If outside the 50 United States or Canada, contact your authorized KitchenAid dealer to determine whether another warranty applies.
ONE YEAR LIMITED WARRANTY
WHAT IS COVERED WHAT IS NOT COVERED
ONE YEAR LIMITED WARRANTY
For one year from the date of purchase,
when this major appliance is operated and
maintained according to instructions attached
to or furnished with the product, KitchenAid
or KitchenAid Canada (hereafter “KitchenAid”)
will pay for factory specied parts and
repair labor to correct defects in materials or
workmanship. Service must be provided by a
KitchenAid designated service company.
30 DAY LIMITED WARRANTY ON THE
CHARCOAL FILTER AND AIR FRESHENER
For thirty days from the date of purchase,
when the compactor is installed, operated
and maintained according to instructions
attached to or furnished with the product,
KitchenAid will provide a replacement lter
or air freshener if the original lter or air
freshener fails due to defects in materials or
workmanship.
YOUR SOLE AND EXCLUSIVE REMEDY
UNDER THIS LIMITED WARRANTY SHALL
BE PRODUCT REPAIR AS PROVIDED
HEREIN. Service must be provided by a
KitchenAid designated service company. This
limited warranty is valid only in the United
States or Canada and applies only when
the major appliance is used in the country in
which it was purchased. This limited warranty
is effective from the date of original consumer
purchase. Proof of original purchase date is
required to obtain service under this limited
warranty.
1. Commercial, non-residential, multiple-family use, or use inconsistent with published user,
operator or installation instructions.
2. In-home instruction on how to use your product.
3. Service to correct improper product maintenance or installation, installation not in accordance
with electrical or plumbing codes or correction of household electrical or plumbing (i.e. house
wiring, fuses or water inlet hoses).
4. Consumable parts (i.e. light bulbs, batteries, air or water lters, preservation solutions, etc.).
5. Defects or damage caused by the use of non-genuine KitchenAid parts or accessories.
6. Damage from accident, misuse, abuse, re, oods, acts of God or use with products not
approved by KitchenAid.
7. Repairs to parts or systems to correct product damage or defects caused by unauthorized
service, alteration or modication of theappliance.
8. Cosmetic damage including scratches, dents, chips, and other damage to the appliance nishes
unless such damage results from defects in materials and workmanship and is reported to
KitchenAid within 30 days.
9. Discoloration, rust or oxidation of surfaces resulting from caustic or corrosive environments
including but not limited to high salt concentrations, high moisture or humidity or exposure to
chemicals.
10. Pick-up or delivery. This product is intended for in-home repair.
11. Travel or transportation expenses for service in remote locations where an authorized KitchenAid
servicer is not available.
12. Removal or reinstallation of inaccessible appliances or built-in xtures (i.e. trim, decorative
panels, ooring, cabinetry, islands, countertops, drywall, etc.) that interfere with servicing,
removal or replacement of the product.
13. Service or parts for appliances with original model/serial numbers removed, altered or not easily
determined.
The cost of repair or replacement under these excluded circumstances shall be borne by the
customer.
DISCLAIMER OF IMPLIED WARRANTIES
IMPLIED WARRANTIES, INCLUDING ANY IMPLIED WARRANTY OF MERCHANTABILITY OR IMPLIED WARRANTY OF FITNESS FOR A
PARTICULAR PURPOSE, ARE LIMITED TO ONE YEAR OR THE SHORTEST PERIOD ALLOWED BY LAW. Some states and provinces do not allow
limitations on the duration of implied warranties of merchantability or tness, so this limitation may not apply to you. This warranty gives you specic
legal rights, and you also may have other rights that vary from state to state or province to province.
DISCLAIMER OF REPRESENTATIONS OUTSIDE OF WARRANTY
KitchenAid makes no representations about the quality, durability, or need for service or repair of this major appliance other than
the representations contained in this warranty. If you want a longer or more comprehensive warranty than the limited warranty
that comes with this major appliance, you should ask KitchenAid or your retailer about buying an extended warranty.
LIMITATION OF REMEDIES; EXCLUSION OF INCIDENTAL AND CONSEQUENTIAL DAMAGES
YOUR SOLE AND EXCLUSIVE REMEDY UNDER THIS LIMITED WARRANTY SHALL BE PRODUCT REPAIR AS PROVIDED HEREIN. KITCHENAID
SHALL NOT BE LIABLE FOR INCIDENTAL OR CONSEQUENTIAL DAMAGES. Some states and provinces do not allow the exclusion or limitation
of incidental or consequential damages, so these limitations and exclusions may not apply to you. This warranty gives you specic legal rights, and
you also may have other rights that vary from state to state or province to province.
11/14
14
Page 15

NOTES
15
Page 16

INSTRUCTIONS
D’UTILISATION
DUCOMPACTEUR
Nous vous REMERCIONS d’avoir acheté ce produit de haute qualité. Si vous rencontrez un problème non couvert dans la section
DÉPANNAGE, veuillez visiter notre site Web à l’adresse www.kitchenaid.com ou appelez-nous au 1800422-1230 pour de plus
amples renseignements.
Il vous faudra les numéros de modèle et de série qui se trouvent derrière le tiroir du compacteur, côté droit.
TABLE DES MATIÈRES
SÉCURITÉ DU COMPACTEUR ...................................................17
EXIGENCES D’INSTALLATION ...................................................18
INSTRUCTIONS D’INSTALLATION ............................................. 19
UTILISATION DU COMPACTEUR ............................................... 22
ENTRETIEN DU COMPACTEUR .................................................24
DÉPANNAGE .................................................................................27
GARANTIE .....................................................................................29
W11034514A
Page 17

SÉCURITÉ DU COMPACTEUR
Risque possible de décès ou de blessure grave si vous ne
suivez pas immédiatement les instructions.
Risque possible de décès ou de blessure grave si vous
ne suivez pas les instructions.
Tous les messages de sécurité vous diront quel est le danger potentiel et vous disent comment réduire le risque de blessure et
ce qui peut se produire en cas de non-respect des instructions.
Votre sécurité et celle des autres est très importante.
Nous donnons de nombreux messages de sécurité importants dans ce manuel et sur votre appareil ménager. Assurez-vous de
toujours lire tous les messages de sécurité et de vous y conformer.
AVERTISSEMENT
DANGER
Voici le symbole d’alerte de sécurité.
Ce symbole d’alerte de sécurité vous signale les dangers potentiels de décès et de blessures graves à vous
et à d’autres.
Tous les messages de sécurité suivront le symbole d’alerte de sécurité et le mot “DANGER” ou
“AVERTISSEMENT”. Ces mots signifient :
IMPORTANTES INSTRUCTIONS DE SÉCURITÉ
AVERTISSEMENT : Lors de l'utilisation d'appareils électroménagers, il convient d'observer certaines précautions
élémentaires dont les suivantes :
■ Lire toutes les instructions avant d’utiliser le compacteur.
■ Une surveillance étroite est nécessaire, lorsque l’appareil
est employé par ou près d’enfants. Ne pas permettre
d’utiliser l’appareil comme un jouet, ou le faire fonctionner
sans surveillance. Verrouiller l'interrupteur à clé lorsque
l’appareil n’est pas utilisé et garder la clé hors d’atteinte
des enfants.
Ne pas toucher les pièces mobiles.
■
■ Ne pas faire fonctionner le compacteur si le cordon
d'alimentation, la fiche de branchement, le moteur sont
endommagés ou après tout dommage quelconque. Faire
examiner, réparer ou ajuster le compacteur par un
technicien autorisé.
Utiliser uniquement pour l’usage auquel il est destiné, tel
■
que décrit dans ce manuel. Ne pas utiliser des accessoires
autres que ceux qui sont recommandés par le fabricant.
■ Ne pas utiliser cet appareil pour compacter des produits
toxiques ou fluides inflammables tels que chiffons imbibés
d’huile et vaporisateurs insecticides. Ne pas soumettre au
compacteur les articles comme cigarettes ou cigares
allumés, ou autres objets en combustion ou chauds. Ne pas
surcharger le compacteur.
■ Ne pas démonter le compacteur. Un remontage incorrect
peut être à l’origine d’un choc électrique, lors de l’utilisation
subséquente.
■ Manipuler avec soin un sac rempli de déchets. Des objets
pointus peuvent percer le sac et causer des blessures. Ne
pas surcharger le sac de déchets avec des matériaux
pesants tels que le verre.
■ Ce compacteur est destiné à l'usage domestique
uniquement.
■ Débrancher le compacteur avant toute intervention sur
l'appareil.
■ Ne pas modifier la fiche jointe au compacteur et utiliser
seulement avec une prise reliée à la terre.
Avertissements de la Proposition65 de l’État de la Californie:
AVERTISSEMENT: Ce produit contient au moins un produit chimique connu par l’État de la Californie pour être à l’origine de cancers.
AVERTISSEMENT: Ce produit contient au moins un produit chimique connu par l’État de la Californie pour être à l’origine de
malformations et autres déficiences de naissance.
CONSERVEZ CES INSTRUCTIONS
17
Page 18

EXIGENCES D’INSTALLATION
(61,0 cm)
(86,7 cm)
Risque de choc électrique
Brancher sur une prise de courant à 3 alvéoles, reliée
à la terre.
Ne pas enlever la prise de liaison à la terre.
Ne pas utiliser d’adaptateur.
Ne pas utiliser de rallonge.
Le non-respect de ces instructions peut causer un
décès, un incendie ou un choc électrique.
AVERTISSEMENT
Exigences d’emplacement
Dimensions du produit
341/8"
15"
(38,1 cm)
Dimensions de l’ouverture à découper
24"
Dimensions d’espacement
B
A. Laisser 6" (15,2 cm) d’espace à droite du compacteur pour
enlever les sacs du compacteur.
B. Laisser 23" (58,4 cm) d’espace devant le compacteur pour
ouvrir complètement ou retirer le tiroir du compacteur.
A
Spécifications électriques
3" min.
(7,6 cm)
A
24" min.
(61,0 cm)
A. La prise de courant mise à la terre doit se situer à au moins
3" (7,6 cm) des armoires ou murs adjacents, tel qu’illustré.
Laprise peut être installée soit sur le côté gauche ou sur
lecôté droit du compacteur.
18" min.
(45,7 cm)
151/4" min.
(38,7 cm)
18
341/4" min.
(87,0 cm)
Méthode de liaison à la terre recommandée
Le compacteur est alimenté par un circuit de 115 V CA
monophasé, 60 Hz, 15 ou 20 A; le circuit doit être protégé par un
fusible et convenablement relié à la terre et doit être équipé d’une
che de liaison à la terre tel qu’illustré. Il est recommandé de
raccorder l’appareil sur un circuit distinct exclusif à cet appareil.
Ce compacteur doit être relié à la terre
lorsqu’il est utilisé pour réduire le risque de
choc électrique. Le compacteur est équipé
d’un cordon à trois conducteurs et d’une
che à 3broches de type relié à la terre, pour
convenir à la prise de courant appropriée reliée
à la terre. Le conducteur vert (ou vert et jaune)
dans le cordon est le l de liaison à la terre.
Nepas connecter le l vert (ou vert et jaune)
à une borne active. Ne pas modier la che
jointe au compacteur; utiliser avec une prise
reliée à la terre.
Page 19

INSTRUCTIONS D’INSTALLATION
Outils
Installateur: remettre les instructions d’utilisation au propriétaire.
Propriétaire: conserver les instructions d’utilisation pour
référence ultérieure et à l’usage de l’inspecteur des installations
électriques local, si nécessaire.
Outils nécessaires :
Rassembler les outils et pièces nécessaires avant d’entreprendre
l’installation.
■ Niveau
■ Ruban à mesurer
■ Pince
■ Ciseaux
■ Tournevis Phillips n°2
■ Tournevis à tête plate
■ Clé polygonale de 5/16”
■ Couteau utilitaire
Déballage
AVERTISSEMENT
Risque de poids excessif
Il faut l’aide d’au moins deux personnes pour déplacer
et installer le compacteur.
Le non-respect de cette instruction peut entraîner une
blessure au dos ou d’autres blessures.
Commencer dans la pièce où le compacteur sera installé.
1. Retirer le compacteur du carton d’emballage. Suivre les
instructions indiquées sur le carton d’expédition.
2. Retirer tous les matériaux d’emballage de protection tels que
ruban adhésif et cales d’expédition.
3. Utiliser une solution d’eau tiède et de détergent pour éliminer
tout résidu de cire laissé par les matériaux d’emballage.
4. Sécher soigneusement avec un chiffon doux. Pour obtenir
plus de renseignements, voir la section “Nettoyage”.
5. S’assurer que le cordon d’alimentation est attaché à la bride
du cordon à l’arrière du compacteur.
Installation de la poignée:
■ Insérer les vis dans les trous depuis l’intérieur du tiroir.
■ Placer la poignée sur la façade du tiroir; aligner les trous de
la poignée avec les extrémités des vis.
■ Bien serrer les vis.
Deuxvis insérées dans
les trous, depuis
l’intérieur du tiroir
Haut du tiroir
Poignée installée sur
l’avant du tiroir
9. Saisir l’avant du tiroir et l’incliner légèrement vers l’arrière
tout en tirant vers l’avant pour dégager les butées du tiroir.
10. Saisir la poignée du tiroir ou les côtés du tiroir et soulever le
tiroir pour le sortir du compacteur.
Attache du
cordon
d’alimentation
6. Mettre deux des quatre cornières de protection de
l’emballage sur le sol près du compacteur.
7. Appuyer sur la pédale pour ouvrir le tiroir du compacteur
etretirer tout matériau d’expédition ou autre article du tiroir.
REMARQUE: Ne pas enlever le sac du compacteur.
8. Si le panneau avant du compacteur est complet, installer la
poignée. La poignée est située à l’intérieur du tiroir.
11. Mettre le tiroir sur les deux cornières de protection.
12. Mettre les deux autres cornières de protection sur le sol
àcôté du compacteur.
13. Saisir les côtés de la caisse du compacteur et placer le
compacteur sur le côté sur les cornières de protection.
14. Retirer la base d’expédition du bas du compacteur.
Pieds de réglage
de l’aplomb.
Base
d’expédition
Cornière
REMARQUE: Remettre le compacteur en position verticale
et régler la hauteur du compacteur au besoin en suivant les
instructions “Réglage de la hauteur”.
19
Page 20

Réglage de la hauteur
(selon les besoins)
1. Mesurer la hauteur de l’ouverture d’encastrement.
Lesommet de la tête de la vis de montage du compacteur
devrait être à au moins 1/8" (3 mm) du sommet de
l’ouverture d’encastrement.
Les roues arrière sont préréglées pour une armoire d’une
hauteur de 341/4" (87 cm). Voir position“1” de l’illustration
suivante.
Pour ajuster pour hauteur d’ouverture d’encastrement
supérieure à 341/4" (87 cm):
■ Desserrer la vis, juste assez pour pouvoir extraire le
piston du trou de positionnement“1”.
■ Déplacer la roue arrière et le tenon à la position“2” ou “3”
au besoin, pour la mesure d’ouverture d’encastrement:
Position“2”: 347/16" à 3411/16" (87,5 à 88,1 cm)
Position“3”: 3413/16" à 35" (88,4 à 88,9 cm)
REMARQUE: Pour mettre le compacteur d’aplomb en
position “3”, vous devez peut-être ajouter des cales sous
les pieds de nivellement. La hauteur des cales doit être
environ 1/4" (6 mm).
■ Serrer la vis.
Armoire
Position 1
Bride
porte-roue
1
2
3
Goujon de
positionnement
Installation sous un comptoir
C’est à l’utilisateur qu’incombe la responsabilité de réaliser une
installation correcte. S’assurer d’avoir tout le nécessaire pour
une installation correcte. C’est la responsabilité et l’obligation
personnelle du client de contacter un installateur qualié pour
s’assurer que l’installation électrique réponde aux codes et
règlements nationaux et locaux.
IMPORTANT:
■ Pour éviter d’endommager le revêtement de sol, glisser le
compacteur sur du carton ou des panneaux durs avant de
déplacer le compacteur sur le plancher.
■ Ne pas laisser le châssis arrière du compacteur toucher
le revêtement de sol lorsqu’on soulève ou déplace le
compacteur.
1. Déplacer le compacteur près de son emplacement nal.
2. Retirer la bride du cordon à l’arrière du compacteur.
Brancher sur une prise de courant à 3 alvéoles, reliée
àlaterre.
3. Déterminer si le cadre du compacteur ou le devant du tiroir doit
être en afeurement avec le devant de l’armoire de cuisine.
4. Faire pivoter les deux brides de retenue supérieures de 180°.
Les vis sont fournies en position “2”. Au besoin, régler les brides
sur la position “1” ou “3” comme décrit ci-dessous:
■ Si le cadre du compacteur doit être en afeurement avec
l’avant de l’armoire, placer les vis de retenue de la bride
dans les trous“1” des brides.
■ Si le devant de la bride du tiroir du compacteur doit être
en afeurement avec l’avant de l’armoire, placer les vis
de retenue de la bride dans les trous“3” des brides.
■ Si le compacteur doit être installé à une position
intermédiaire entre “1” et “3”, placer les vis de retenue
dela bride dans les trous “2” des brides.
Comptoir
Bride de retenue
Vis autotaraudante (pivot)
2. Placer le compacteur à la verticale. Si la hauteur de la roue
arrière doit être réglée, déplacer les cornières de protection
au côté opposé et placer le compacteur sur son autre côté.
Régler l’autre roue arrière.
3. Utiliser la pince pour abaisser les pieds de nivellement
avant hors de la caisse du compacteur. Régler les pieds de
nivellement pour correspondre avec la position des roues
arrière.
Position de la roue arrière:
“1”: 3/16" (4 mm) à partir du dessous du compacteur
“2”: 9/16" (14 mm) à partir du dessous du compacteur
“3”: 3/4" (19 mm) à partir du dessous du compacteur
3/16" (4 mm) par
défaut position 1
Pied de nivellement
Plaque inférieure
3
2
1
5. Soulever lentement et légèrement le devant et faire rouler
lecompacteur dans l’ouverture d’encastrement.
6. Ajuster les pieds de nivellement jusqu’à ce que le compacteur
soit de niveau et stable. Placer un niveau à l’intérieur au bas
de la caisse, comme indiqué. Contrôlerl’aplomb transversal
et dans le sens avant/arrière du compacteur.
4. Placer le compacteur à la verticale. Éliminer/recycler tous les
matériaux d’emballage.
20
7. À l’aide des deux vis n°8 – 18 x 1/2" (13mm), xer les brides
de retenue en dessous du comptoir avec les vis de montage.
Page 21

Installation au comptoir
Comptoir
Bride de
retenue
Vis de montage
(fournie)
REMARQUE: Si les brides de retenue ne peuvent pas être xées
sous le comptoir, voir la section “Montage à l’avant de l’armoire”.
Montage à l’avant de l’armoire
(à utiliser si le montage au comptoir n’est pas possible)
Bride de
montage
(fournie)
Façade de
l’armoire
Bride de
retenue
Vis
(fournie)
3. À l’aide d’une règle et d’un crayon ou d’une craie, tracer
une ligne entre les marques tracées de chaque côté du
garde-pieds. À l’aide de ciseaux ou d’un couteau tout usage,
découper le garde-pieds le long de la ligne.
4. Réinstaller le tiroir. Si le garde-pieds frotte toujours sur le
revêtement de sol, répéter les étapes1 à 3.
Installation d’un panneau personnalisé
Dimensions
Utiliser ces dimensions pour créer un panneau personnalisé.
Lepanneau doit avoir une épaisseur minimale de 1/2" (1,3mm).
8. Saisir les côtés du tiroir du compacteur et placer les roues du
tiroir dans les glissières. Soulever le tiroir par la poignée pour
faire passer l’avant du tiroir au-dessus des butées. Fermer le
tiroir. Vérier que le tiroir s’ouvre et se referme librement.
Si le garde-pieds frotte contre le plancher, consulter les
autres instructions à la section “Réglage du garde-pieds”.
Réglage du garde-pieds
Si le garde-pieds frotte contre le revêtement de sol, on peut en
modier la hauteur comme suit:
1. Marquer de chaque côté du garde-pieds la largeur du
matériau qui cause le frottement sur le revêtement de sol.
2. Retirer le tiroir du compacteur. (Voir les étapes 9 et10 à la
section “Déballage du compacteur”.)
293/8" max
(74,6 cm)
15" max
(38,1 cm)
Installation
1. Aligner le bas du panneau personnalisé au bas avant extérieur
du tiroir et appuyer le panneau sur la languette d’appui.
REMARQUE: Le bas du panneau personnalisé ne devrait pas
aller plus bas que le bas de la languette d’appui qui est située
auniveau le plus bas au centre et à l’avant du tiroir extérieur.
Languette
d’appui
21
Page 22

Fixer le panneau personnalisé à l’avant du tiroir extérieur au
moyen de quatre vis à bois nº8 x 1". Visser de l’intérieur du
tiroir. Il y a sept trous pour les vis.
2. Fixer un joint d’un quart-de-rond de 15" x 1/2" (38,1 cm x
13mm) le long du sommet du tiroir à l’avant en utilisant de
lacolle ou des vis.
Panneau
personnalisé
Quatre
placements
Quart de rond
de 15" x 1/2"
Façade
du tiroir
Quatre
placements
pour vis de
bois nº8 x 1":
sept trous sont
disponibles
pour utilisation
pour vis de
bois nº8 x 1":
sept trous sont
disponibles
pour utilisation
AVERTISSEMENT
Risque de coupure
Ne pas utiliser les mains ou les pieds pour compacter
les articles dans le compacteur.
Le non-respect de cette instruction peut occasionner
des coupures.
REMARQUE: Les premiers déchets chargés ne seront pas
comprimés les premières fois que vous chargez le compacteur.
Le tiroir du compacteur devrait être au moins à 1/2 rempli avant
que le compacteur de déchets puisse commencer à compresser
la charge.
1. Ouvrir le tiroir. Soulever et tirer la poignée ou appuyer sur la
pédale pour ouvrir le tiroir.
UTILISATION DU
COMPACTEUR
Fonctionnement du compacteur
La presse du compacteur fait partie du compacteur qui
compresse les déchets.
IMPORTANT: Le vérin du compacteur s’arrête à 7" (18mm)
dubas du tiroir. Les déchets ne seront pas compactés avant
quele tiroir ne soit à 1/2 plein.
Un bruit se fait entendre lorsque de la verrerie se brise.
Lesbouteilles en verre robuste peuvent ne pas se briser.
Lesdéchets dans un sac de compacteur plein feront environ
le1/4 du volume original.
REMARQUE: Appuyer sur la pédale ouvre le tiroir de 3" à 6"
(7,6 cm à 15,2 cm) seulement, selon la charge.
AVERTISSEMENT
Risque de coupure
Couvrir les articles en verre lors de la compression
pour mieux contenir les fragments.
Le non-respect de cette instruction peut causer des
coupures.
2. Mettre les déchets dans le compacteur.
22
■ Envelopper ou recouvrir les déchets humides ou salissants.
■ Ne pas mettre dans le compacteur des matières
susceptibles de dégager de mauvaises odeurs, telles
que viande crue, poisson, pelures de pamplemousse,
couches jetables ou articles d’hygiène personnelle.
■ Charger les déchets volumineux au centre du tiroir.
■ Charger les bouteilles et canettes sur le côté au centre
du tiroir. Ne pas placer les bouteilles dans une position
verticale.
3. Fermer le tiroir.
Page 23

Mise en marche du compacteur
Bouton clé
ON
OFF
ON ON
OFF
OFF
FILTRE
COMPRESSION
SOLIDE
À AIR
Utiliser le filtre à air
1. Régler l’interrupteur du ltre à air sur ON (marche).
Leventilateur crée un mouvement d’air dans le compacteur
pour éliminer les odeurs.
ON
ON
OFF
OFF
Interrupteurs
1. Ouvrir le tiroir. Placer les déchets à l’intérieur.
2. Tourner le bouton clé à la position ON (marche).
3. Régler l’interrupteur Solid PackTM (compression solide) à OFF
(arrêt).
4. Fermer le tiroir.
REMARQUE: Le bouton clé est amovible. Retirer le bouton clé
pour empêcher les enfants de faire fonctionner le compacteur.
Appuyer sur le bouton start (mise en marche) avec le pied pour
démarrer le programme de compactage.
Utilisation du programme de
compression solide (verrouillé)
Le programme de compression solide (verrouillé) prolonge la
durée d’utilisation du sac en exerçant une pression constante
sur les déchets pour les empêcher de se décompresser.
L’utilisation régulière d’un programme de compression solide
peut augmenter la capacité d’un sac de 25 pour cent.
Durant le programme de compression solide, le vérin de
compression reste en position abaissée pour un compactage
supplémentaire. Le tiroir est verrouillé et ne peut être ouvert
quand le vérin est abaissé.
IMPORTANT: Au cours du programme de compression solide,
letiroir reste verrouillé jusqu’à ce que l’on appuie sur le bouton
start (mise en marche) avec le pied permettant de monter le vérin.
Pour les meilleurs résultats, utiliser le programme de compression
solide pendant des périodes d’au moins 30 minutes.
1. Soulever et tirer la poignée ou appuyer sur la pédale pour
ouvrir le tiroir du compacteur.
2. Régler l’interrupteur du programme Solid PackTM
(compresson solide) du compacteur sur ON (marche).
3. Fermer le tiroir.
4. Appuyer sur le bouton start (mise en marche) avec le pied
pour démarrer le programme de compactage.
5. Appuyer sur le bouton start (mise en marche) avec le pied
pour relever le vérin et permettre l’ouverture du tiroir.
COMPRESSION
SOLIDE
FILTRE
À AIR
REMARQUES:
■ Le ltre à air fonctionne seulement lorsque le bouton clé
est en position ON (marche).
■ Du bruit peut provenir du compacteur même s’il n’est
pas utilisé si le ventilateur n’a pas été fermé.
2. Régler l’interrupteur Air Filter (ltre à air) sur OFF (arrêt) pour
éteindre le ventilateur.
Retirer un sac plein
AVERTISSEMENT
Risque de poids excessif
Il faudra peut-être deux personnes pour retirer et
transporter le sac de déchets compactés.
Déverrouiller le loquet pour aider au retrait du sac.
Le non-respect de cette instruction peut entraîner une
blessure au dos ou d’autres blessures.
Lorsque les déchets sont compactés jusqu’au-dessus du tiroir,
retirer le sac. Si le sac est trop lourd, compacter moins de
déchets avant de vider le sac à l’avenir.
AVERTISSEMENT
Risque de coupure
Ne pas utiliser les mains ou les pieds pour compacter
les articles dans le compacteur.
Le non-respect de cette instruction peut occasionner
des coupures.
1. Soulever et tirer la poignée ou appuyer sur la pédale pour
ouvrir le tiroir.
2. Dégager le haut du sac des boutons de retenue du sac.
Relever les quatre revers du sac. Fermer le sac avec une
attache torsadée.
23
Page 24

3. Ouvrir le loquet sur le côté du tiroir. Incliner le tiroir sur la
Trous prépercés et boutons de retenue du sac
Filtre
droite. Cette opération libère la pression, ce qui rend le sac
plus facile à enlever.
4. Retirer le sac en le soulevant.
5. Verrouiller le tiroir s’il était déverrouillé.
Installation d’un nouveau sac
Ne pas utiliser d’autres sacs que ceux qui sont spéciquement
conçus pour être utilisés dans votre compacteur.
Commanderdes sacs de rechange pour compacteur chez votre
marchand local ou en composant le numéro sans frais indiqué
sur la couverture ou à la section “Assistance ou service”.
IMPORTANT:
Avant d’installer un nouveau sac, s’assurer que:
■ Le loquet du tiroir est bien verrouillé.
2. Immobiliser le sac en engageant les quatre trous prépercés
sur les boutons de retenue du sac. Les trous s’agrandiront
sur les boutons sans endommager le sac.
3. Presser l’intérieur du sac contre le fond, les côtés et les
coins du tiroir, pour qu’il s’adapte bien.
REMARQUE: La presse déchirera un sac mal installé.
ENTRETIEN DU
COMPACTEUR
Votre nouveau compacteur est conçu pour vous donner
de nombreuses années de service. Toutefois, vous avez
quelques mesures à prendre pour entretenir correctement votre
compacteur. Cette section vous expliquera comment nettoyer et
prendre soin de votre compacteur.
Avant de changer le ltre à air, ouvrir le tiroir et tourner le bouton
clé à la position OFF (arrêt) et le retirer.
REMARQUE: Les entretiens autres que ceux décrits dans cette
section doivent être exécutés par un représentant de service
autorisé.
Remplacement du filtre à air
On recommande d’utiliser le ltre à air au charbon situé sous le
couvercle du ltre.
Pour commander le bon ltre au charbon de remplacement,
composer le numéro sans frais indiqué sur la couverture ou dans
la section “Accessoires”.
1. Insérer le bout des doigts dans le couvercle du ltre et tirer
jusqu’à ce que les languettes sur le côté soient dégagées.
Soulever le couvercle pour libérer les languettes du bas.
■ Le tiroir est propre et exempt de débris.
REMARQUE: Un tiroir non verrouillé peut faire en sorte que le
commutateur du tiroir reste ouvert. La presse reviendra ainsi à sa
position et le compacteur continuera de fonctionner. Essayerde
pousser le tiroir vers l’intérieur pour arrêter le compacteur.
Lecompacteur peut aussi continuer à fonctionner si des
débris sont présents dans la zone du tiroir. Un tiroir difcile
àmanœuvrer peut être causé par un loquet non verrouillé ou
parlaprésence de débris dans la zone du tiroir.
1. Placer le sac plié dans le tiroir. Ouvrir le sac et replier les
bords supérieurs du sac sur le bord du tiroir.
24
2. Retirer le ltre à air en tirant sur la partie supérieure du ltre.
Le ltre devrait être facile à enlever. Jeter le ltre usagé.
3. Pour placer le ltre à air de remplacement, insérez-le en place.
4. Insérer les languettes du bas du couvercle de ltre à air
jusqu’à ce que les languettes de côté s’enclenchent.
Page 25

Nettoyage
AVERTISSEMENT
Risque de coupure
Porter des gants lors du nettoyage de l’intérieur du
tiroir ou de l’armoire, ou de la presse.
Le non-respect de cette instruction peut causer des
coupures.
Avant de nettoyer le compacteur, ouvrir le tiroir et tourner le
bouton clé à la position OFF (arrêt) et l’enlever.
Nettoyage de l’intérieur du tiroir
1. Tirer le tiroir vers l’extérieur jusqu’à la butée.
2. Enlever le sac. Voir la section “Enlever un sac rempli”.
3. Facultatif: Retirer le côté du tiroir. Maintenir le loquet ouvert
et incliner le côté du tiroir jusqu’à ce que le loquet dépasse
le devant du tiroir.
Nettoyage de l’intérieur de la caisse
1. Retirer le tiroir vers l’extérieur jusqu’à la butée.
REMARQUE: Remarquer comment les roulettes du tiroir
se déplacent dans les glissières, les désengager. Il sera
plus facile de replacer le tiroir lorsque vous aurez terminé
lenettoyage.
2. Soulever le devant du tiroir pour franchir les butées.
3. Saisir la poignée ou les côtés du tiroir et le tirer jusqu’à ce
qu’il sorte complètement. Le déposer délicatement.
Retirer le côté du tiroir en le soulevant du tiroir.
4. Laver l’intérieur du tiroir avec une éponge propre ou un linge
doux et un détergent doux dans de l’eau tiède. Rincer et
sécher à fond avec un linge doux.
5. Si le côté du tiroir a été enlevé, le remettre en position inclinée.
6. Abaisser le loquet du tiroir tout en soulevant le côté du tiroir
à la position verticale.
7. Verrouiller le côté du tiroir.
8. Fermer le tiroir.
Passer l’aspirateur à l’intérieur de la caisse. Les liquides renversés
ou les déchets humides doivent être nettoyés à la main ou au
moyen d’un aspirateur conçu pour aspirer les liquides.
4. Laver l’intérieur de la caisse avec une éponge propre ou
un linge doux et un détergent doux dans de l’eau tiède.
Rinceret sécher à fond avec un linge doux.
5. Pour replacer le tiroir, le saisir par les côtés et insérer les
roulettes sur les glissières.
6. Soulever l’avant du tiroir et le pousser complètement au-delà
des butées.
25
Page 26

Nettoyage des surfaces extérieures
1. Laver les surfaces extérieures (y compris l’acier inoxydable)
avec une éponge propre ou un linge doux et un détergent
doux dans de l’eau tiède. Ne pas utiliser de nettoyants
abrasifs ou puissants. Rincer et sécher à fond avec un
lingedoux.
2. Essuyer les renversements immédiatement. Certainsaliments
peuvent endommager le ni s’ils sont laissés à la surface du
compacteur.
Nettoyage de la presse
1. Enlever les particules de verre en essuyant le dessus de la
presse avec un linge ou un essuie-tout. Jeter l’essuie-tout.
Accessoires
Pour commander, prendre contact avec le revendeur agréé local.
Aux É.-U., consulter notre page Web à l’adresse
www.kitchenaid.com ou nous contacter au 1800422-1230.
Au Canada, consulter notre page Web www.kitchenaid.ca.
Oucomposer le:
1800807-6777.
Sacs de rechange
Paquet de 15 – pièce nº W10165295RP
Paquet de 60 – pièce nº W10165294RB
Paquet de 180 – pièce nº W10165295BU
Filtre à air au charbon pièce nº 4151750
Porte-sacs
pièce nº 776989
Panneaux et poignées :
Paneaux
pièce nº W10714558 (acier inoxydable)
pièce nº W10714559 (blanc)
pièce nº W10714560 (noir)
Poignées:
pièce nº W10483828 (poignée en acier inoxydable)
2. Enlever les aliments avec une éponge propre ou un linge
doux et un détergent doux dans de l’eau tiède. Rincer et
sécher à fond avec un linge doux.
Nettoyage avant les vacances
En cas d’absence pendant plus de quelques jours, enlever le sac
du compacteur. Enlever le bouton clé et le garder hors de portée
des enfants.
26
Page 27

DÉPANNAGE
AVERTISSEMENT
Risque de choc électrique
Brancher sur une prise de courant à 3 alvéoles, reliée
à la terre.
Ne pas enlever la prise de liaison à la terre.
Ne pas utiliser d’adaptateur.
Ne pas utiliser de rallonge.
Le non-respect de ces instructions peut causer un
décès, un incendie ou un choc électrique.
Essayer d’abord les solutions suggérées ici an d’éviter le coût d’une intervention de dépannage inutile.
PROBLÈME SOLUTION
LE COMPACTEUR NE
FONCTIONNE PAS
LES DÉCHETS NE SE
COMPACTENT PAS
LE TIROIR NE S’OUVRE PAS Le programme de compression solide peut être activé. Le tiroir reste verrouillé jusqu’à ce que le
Vérier que le cordon d’alimentation est correctement branché sur une prise reliée à la terre.
Vérier le type de prise murale sur laquelle le compacteur est branché. Il est possible que le cordon
d’alimentation du compacteur soit branché dans une prise commandée par un interrupteur mural.
Cela peut se produire lorsque l’interrupteur mural était destiné à une prise pour broyeur de déchets.
Un fusible est grillé ou un disjoncteur s’est déclenché. Remplacer le fusible ou réenclencher le
disjoncteur. Si le problème persiste, appeler un électricien.
S’assurer que le tiroir est complètement fermé. Ouvrir le tiroir et vérier que le loquet est verrouillé.
Bien fermer le tiroir et mettre le compacteur en marche.
S’assurer que le bouton clé est réglé à ON (marche). Voir la section “Mise en marche du compacteur”.
Appuyer sur le bouton de mise en marche à pédale. Voir la section “Mise en marche du compacteur”.
Le tiroir doit être plus qu’à moitié rempli avant que les déchets soient compactés. Le vérin s’arrête
à 7" (17,8 cm) du bas du tiroir.
bouton de mise en marche à pédale soit appuyé. Arrêter le programme de compression solide en
appuyant sur l’interrupteur Solide Pack (compression solide) pour le mettre en position OFF (arrêt).
Pousser sur le devant du tiroir pour essayer de soulever la presse. Vérier que le loquet est verrouillé.
Appuyer sur le bouton de mise en marche à pédale. Voir la section “Mise en marche du compacteur”.
27
Page 28

PROBLÈME SOLUTION
LA COMPRESSION OU
LA FORCE N’EST PAS
SUFFISANTE
LES BOUTEILLES NE SE
BRISENT PAS
LE COMPACTEUR NE
S’ÉTEINT PAS
LE TIROIR BUTE SUR
L’ARMOIRE
LE COMPACTEUR SE
DÉPLACE PENDANT
LEFONCTIONNEMENT
LE TIROIR EST BRANLANT
OU DESSERRÉ
LE COMPACTEUR EST
BRUYANT
Le compactage est plus efcace lors de l’utilisation du programme de compression solide.
Maintenir les déchets compressés pour une période minimum de 30minutes.
Raisons possibles: Les bouteilles ne se brisent pas chaque fois. L’épaisseur du verre de
labouteille et le contenu de la charge de déchets peuvent empêcher le bris des bouteilles.
Pousser sur l’avant du tiroir pour essayer d’engager le commutateur du tiroir. Ouvrir le tiroir et
vérier que le loquet est verrouillé.
Le bouton de mise en marche à pédale peut ne pas être enclenché ou le levier qui pousse
l’interrupteur de démarrage peut être plié. Appuyer sur le levier pour arrêter le compacteur.
Aubesoin, replier le levier à sa position.
Des débris dans la zone de tiroir peuvent être la cause du déclenchement de la porte du
commutateur du tiroir entraînant le fonctionnement continu du compresseur. Cela peut également
empêcher le démarrage du compacteur.
L’ouverture d’encastrement doit être d’au moins 151/4" (38,7 cm) avec un dégagement d’au moins
1/8" (3,2 mm) sur chaque côté.
Toujours s’assurer que le compacteur est centré dans l’ouverture d’encastrement.
Vérier que le loquet est verrouillé. Un tiroir déverrouillé sera branlant et décalé par rapport au centre.
Vérier qu’il n’y a pas de débris sur les glissières du tiroir ou sous le tiroir. Les débris peuvent faire
pencher le tiroir d’un côté ou ne pas se loger correctement sur les glissières.
Le compacteur peut être réglé trop haut ou pas de niveau. Le compacteur peut être relevé ou
abaissé avec réglage des pieds de nivellement avant.
S’assurer que le tiroir est situé sur les glissières. Sinon, retirer le tiroir et le réinstaller.
Vérier que les brides de retenue sont xées à l’armoire. Consulter les sections “Installation au
comptoir” ou “Installation à l’avant de l’armoire”.
REMARQUE: Selon le modèle, il est normal que le tiroir bouge légèrement d’un côté à l’autre.
Un tiroir déverrouillé sera plus branlant que la normale. Vérier que le loquet du tiroir est en position
verrouillé.
Les vis sur le devant du tiroir (porte) peuvent être desserrées. À l’aide d’un tournevis à tête
cruciforme, vérier que les vis qui maintiennent la porte du tiroir sont bien xées.
Il peut s’agir du bruit de fonctionnement normal: Le compacteur est entraîné par une chaîne et des
pignons en acier.
Le ventilateur produit un bourdonnement lorsqu’il fonctionne. Mettre l’interrupteur du ltre à air à
OFF (arrêt) pour éteindre le ventilateur.
28
Page 29

ATTACHEZ ICI VOTRE REÇU DE VENTE. UNE PREUVE D’ACHAT EST
OBLIGATOIRE POUR OBTENIR L’APPLICATION DE LA GARANTIE.
GARANTIE LIMITÉE
DU COMPACTEUR
KITCHENAID
®
Lorsque vous appelez le centre d’eXpérience de la clientèle, veuillez garder à
disposition les renseignements suivants :
■ Nom, adresse et numéro de téléphone
■ Numéros de modèle et de série
■ Une description claire et détaillée du problème rencontré
■ Une preuve d’achat incluant le nom et l’adresse du marchand ou
dudétaillant
SI VOUS AVEZ BESOIN DE SERVICE:
1. Avant de nous contacter pour obtenir un dépannage, veuillez déterminer si des réparations sont nécessaires pour votre produit. Certains
problèmes peuvent être résolus sans intervention de dépannage. Veuillez prendre quelques minutes pour consulter la section Dépannage du
Guide d’utilisation et d’entretien ou visitez le site http://kitchenaid.custhelp.com.
2. Tout service sous garantie doit être effectué exclusivement par nos fournisseurs de dépannage autorisés KitchenAid. Aux É.-U. et au Canada,
dirigez toutes vos demandes de service sous garantie au:
KitchenAid Customer eXperience Center
Aux États-Unis, composez le 1800422-1230. Au Canada, composez le 1-800-807-6777.
Si vous résidez à l’extérieur du Canada et des 50 États des États-Unis, contactez votre marchand KitchenAid autorisé pour déterminer si une autre
garantie s’applique.
GARANTIE LIMITÉE DE UN AN
CE QUI EST COUVERT CE QUI N’EST PAS COUVERT
GARANTIE LIMITÉE DE UN AN
Pendant un an à compter de la date d’achat,
lorsque ce gros appareil ménager est utilisé et
entretenu conformément aux instructions jointes
à ou fournies avec le produit, KitchenAid ou
KitchenAid Canada (ci-après “KitchenAid”) paiera
pour les pièces spéciées par l’usine et la maind’œuvre pour corriger les vices de matériaux ou
de fabrication. Le service doit être fourni par une
compagnie de service désignée par KitchenAid.
GARANTIE LIMITÉE DE 30 JOURS SUR LE
FILTRE AU CHARBON ET L’ASSAINISSEUR
D’AIR
Durante treinta días desde la fecha de compra,
siempre y cuando el compactador se haya
instalado, operado y dado un mantenimiento
deconformidad con las instrucciones adjuntas o
provistas con el mismo, KitchenAid reemplazará el
ltro de agua o el desodorante ambiental si el ltro
o desodorante ambiental original fallara defectos
en los materiales o en la mano de obra.
VOTRE SEUL ET EXCLUSIF RECOURS DANS LE
CADRE DE LA PRÉSENTE GARANTIE LIMITÉE
CONSISTE EN LA RÉPARATION PRÉVUE
CI-DESSUS. Le service doit être fourni par une
compagnie de service désignée par KitchenAid.
Cette garantie limitée est valide uniquement
aux États-Unis ou au Canada et s’applique
exclusivement lorsque le gros appareil ménager
est utilisé dans le pays où il a été acheté. La
présente garantie limitée est valable à compter de
la date d’achat initial par leconsommateur. Une
preuve de la date d’achat initial est exigée pour
obtenir un dépannage dans le cadre de la présente
garantie limitée.
1. Usage commercial, non résidentiel ou par plusieurs familles, ou non-respect des
instructions de l’utilisateur, de l’opérateur ou des instructions d’installation.
2. Visite d’instruction à domicile pour montrer à l’utilisateur comment utiliser l’appareil.
3. Visites de service pour rectier une installation ou un entretien fautifs du produit, une
installation non conforme aux codes d’électricité ou de plomberie, ou la rectication de
l’installation électrique ou de la plomberie du domicile (p. ex., câblage électrique, fusibles ou
tuyaux d’arrivée d’eau du domicile).
4. Pièces consomptibles (p. ex. : ampoules, batteries, ltres à air ou à eau, solutions de
conservation, etc.).
5. Défauts ou dommage résultant de l’utilisation de pièces ou accessoires qui ne sont pas
d’origineKitchenAid.
6. Dommages causés par: accident, mésusage, abus, incendie, inondations, catastrophe
naturelle ou l’utilisation de produits non approuvés par KitchenAid.
7. Réparations aux pièces ou systèmes dans le but de rectier un dommage ou des défauts
résultant d’une réparation, d’une altération ou d’une modication non autorisée de l’appareil.
8. Défauts d’apparence, notamment les éraures, traces de choc, ssures ou tout autre
dommage subi par le ni de l’appareil ménager, à moins que ces dommages ne résultent
devices de matériaux ou de fabrication et ne soient signalés à KitchenAid dans les 30 jours.
9. Décoloration, rouille ou oxydation des surfaces résultant d’environnements caustiques
ou corrosifs incluant des concentrations élevées de sel, un haut degré d’humidité ou une
exposition à des produits chimiques (exemples non exhaustifs).
10. Enlèvement ou livraison. Ce produit est conçu uniquement pour être réparé à l’intérieur du
domicile.
11. Frais de déplacement et de transport pour le dépannage/la réparation dans une région
éloignée où une compagnie de service KitchenAid autorisée n’est pas disponible.
12. Retrait ou réinstallation d’appareils inaccessibles ou de dispositifs préinstallés (ex :
garnitures, panneaux décoratifs, plancher, meubles, îlots de cuisine, plans de travail,
panneaux de gypse, etc.) qui entravent le dépannage, le retrait ou le remplacement
duproduit.
13. Service et pièces pour des appareils dont les numéros de série et de modèle originaux ont
été enlevés, modiés ou ne peuvent pas être facilement identiés.
Le coût d’une réparation ou d’un remplacement dans le cadre de ces circonstances
exclues est à la charge du client.
CLAUSE D’EXONÉRATION DE RESPONSABILITÉ AU TITRE DES GARANTIES IMPLICITES
LES GARANTIES IMPLICITES, Y COMPRIS LES GARANTIES APPLICABLES DE QUALITÉ MARCHANDE OU D’APTITUDE À UN USAGE
PARTICULIER, SONT LIMITÉES À UN AN OU À LA PLUS COURTE PÉRIODE AUTORISÉE PAR LA LOI. Certains États et certaines provinces
ne permettent pas de limitation sur la durée des garanties implicites de qualité marchande ou d’aptitude à un usage particulier, de sorte que la
limitation ci-dessus peut ne pas être applicable dans votre cas. Cette garantie vous confère des droits juridiques spéciques et vous pouvez
également jouir d’autres droits qui peuvent varier d’une juridiction à l’autre.
EXONÉRATION DE RESPONSABILITÉ DANS LES DOMAINES NON COUVERTS PAR LA GARANTIE
KitchenAid décline toute responsabilité au titre de la qualité, de la durabilité ou en cas de dépannage ou de réparation
nécessaire sur ce gros appareil ménager autre que les responsabilités énoncées dans la présente garantie. Si vous souhaitez
une garantie plus étendue ou plus complète que la garantie limitée fournie avec ce gros appareil ménager, adressez-vous à
KitchenAid ou à votre détaillant pour obtenir les modalités d’achat d’une garantie étendue.
LIMITATION DES RECOURS ; EXCLUSION DES DOMMAGES FORTUITS OU INDIRECTS
VOTRE SEUL ET EXCLUSIF RECOURS DANS LE CADRE DE LA PRÉSENTE GARANTIE LIMITÉE CONSISTE EN LA RÉPARATION PRÉVUE
CI-DESSUS. KITCHENAID N’ASSUME AUCUNE RESPONSABILITÉ POUR LES DOMMAGES FORTUITS OU INDIRECTS. Certains États et
certaines provinces ne permettent pas l’exclusion ou la limitation des dommages fortuits ou indirects de sorte que ces limitations et exclusions
peuvent ne pas être applicables dans votre cas. Cette garantie vous confère des droits juridiques spéciques et vous pouvez également jouir
d’autres droits qui peuvent varier d’une juridiction à l’autre.
11/14
29
Page 30

REMARQUES
30
Page 31

W11034514A
®
/™ ©2018 KitchenAid. All rights reserved.
KitchenAid. Tous droits réservés.
03/18
 Loading...