

KitchenAid KSSS36QDX05 Owner’s Manual

'_se and Care Guide
Table of Contents
(complete) ..................... 2
A Note to You ................. 2
Refrigerator Safety ........ 3
Parts and Features ........ 4
Using Your
Refrigerator .................... 5
Caring for Your
Refrigerator .................. 19
Food Storage Guide .... 21
Troubleshooting .......... 23
Requesting Assistance
or Service ..................... 24
Warranty ....................... 26
2004846
KITCHENAID*36" TO48" NO-FROST
BUILT-INREFRIGERATORS
- ble of Contents
Page
A Note to You ............................................................ 2
Refrigerator Safety .................................................... 3
Parts and Features .................................................... 4
Using Your Refrigerator ........................................... 5
Removing the upper ventilation panel .................. 5
Using the power on/off switch (power
interrupter switch) ................................................. 5
Using the EXTENDFRESH*
Temperature Management System ...................... 6
Setting the FRESHCHILL* meat locker
temperature control .............................................. 7
Adjusting the utility compartment .......................... 7
Adjusting the door bins ......................................... 8
Adjusting the SPILLCLEAN* glass
refrigerator shelves ............................................... 8
Removing the FRESHCHILL* meat locker ........... 9
Removing the humidity-controlled
CLEARVUE* crispers ......................................... 10
Page
Adjusting the freezer shelves ............................. 11
Removing the pull-out freezer baskets ............... 11
Using the automatic ice maker ........................... 12
Removing the ice maker storage bin .................. 13
Using the cold water and ice dispensers ............ 14
Removing the base grille .................................... 16
Removing the defrost pan .................................. 16
- Changing the light bulbs ..................................... 17
Understanding the sounds you may hear ........... 18
Saving energy ..................................................... 18
Caring for Your Refrigerator .................................. 19
Food Storage Guide ................................................ 21
Troubleshooting ...................................................... 23
Requesting Assistance or Service ........................ 24
Warranty ................................................................... 26
Note to You
Thankyou for buying a KITCHENAID* appliance!
KitchenAid designs the best tools for the most important room in your house. To ensure that you enjoy
many years of trouble-free operation, we developed this Use and Care Guide. It contains valuable
information concerning how to operate and maintain your new appliance properly and safely. Please
read it carefully.
Also, please complete and mail the enclosed Product Registration Card.
Please record your model's information.
Whenever you call to request service on your appli- Model Number
ance, you need to know your complete model number Serial Number
and serial number. You can find this information on the
model and serial number label (see diagram on page 4 Purchase Date
for location of label). Dealer Name
Please also record the purchase date of your
appliance and your dealer's name, address, and DealerAddress
telephone number. Dealer Phone
Keep this book and the sales slip together in a safe place for future reference.
2
__ frigerator Safety
Your safety and the safety of others is very important.
We have provided many important safety messages in this manual and on your appliance. Always read and
obey all safety messages.
This symbol alerts you to hazards that can kill or hurt you and others.
All safety messages will be preceded by the safety alert symbol and the word "DANGER" or
This is the safety alert symbol.
"WARNING." These words mean:
You will be killed or seriously injured if you don't
follow instructions.
You can be killed or seriously injured if you don't
follow instructions.
All safety messages will identify the hazard, tell you how to reduce the chance of injury, and tell you what can
happen if the instructions are not followed.
IMPORTANTSAFETYINSTRUCTIONS
WARNING - To reduce the risk of fire, electric shock, or injury when using your refrigerator, follow these
basic precautions:
• Plug into grounded 3 prong outlet.
• Do not remove ground prong.
• Do not use an adapter.
• Do not use an extension cord.
• Disconnect power before servicing.
• Remove doors from your old refrigerator.
• Use nonflammable cleaner only.
• Keep flammable materials and vapors, such as
gasoline, away from refrigerator.
• Use two or more people to move or install refrigerator.
• Unplug refrigerator before installing ice maker.
• Use a sturdy glass when dispensing ice or water
(on some models).
- SAVETHESEINSTRUCTIONS-
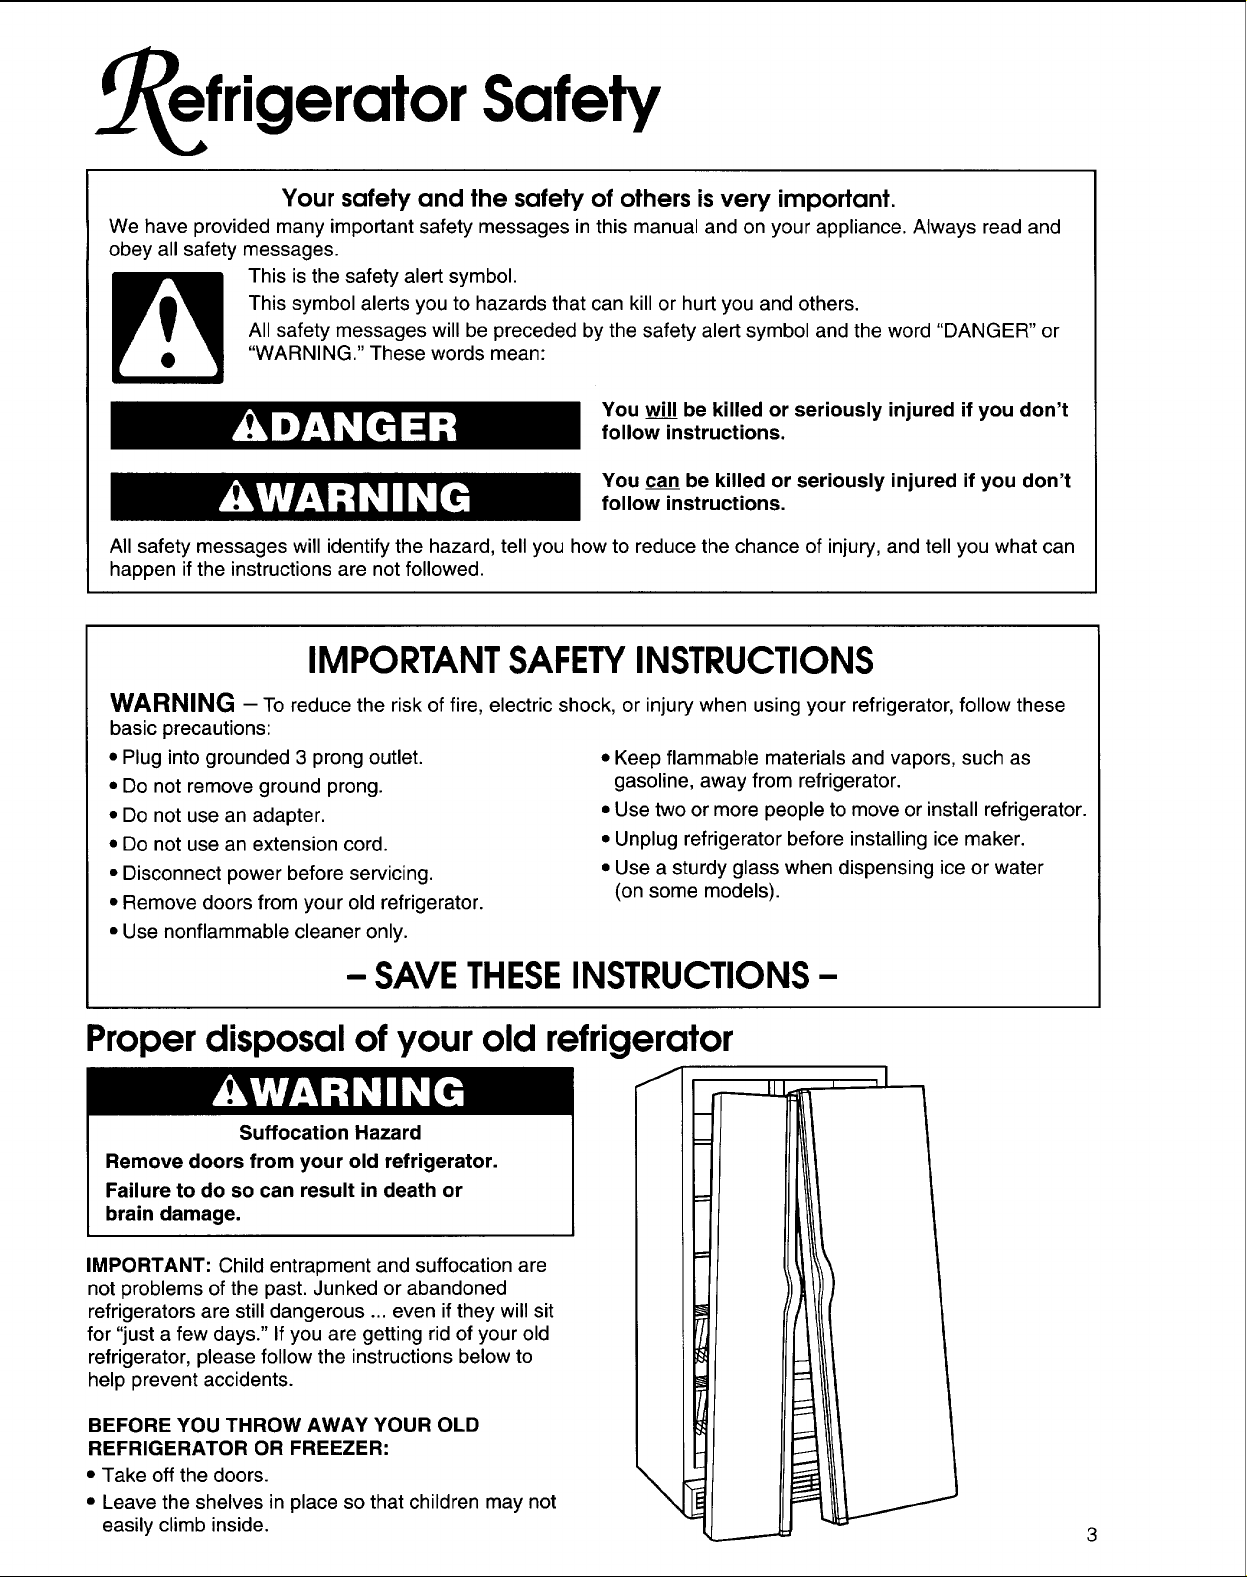
Proper disposal of your old refrigerator
Suffocation Hazard
Remove doors from your old refrigerator.
Failure to do so can result in death or
brain damage.
IMPORTANT: Child entrapment and suffocation are
not problems of the past. Junked or abandoned
refrigerators are still dangerous ... even if they will sit
for "just a few days." If you are getting rid of your old
refrigerator, please follow the instructions below to
help prevent accidents.
BEFORE YOU THROW AWAY YOUR OLD
REFRIGERATOR OR FREEZER:
• Take offthe doors.
• Leave the shelves in place so that children may not
easily climb inside.
3
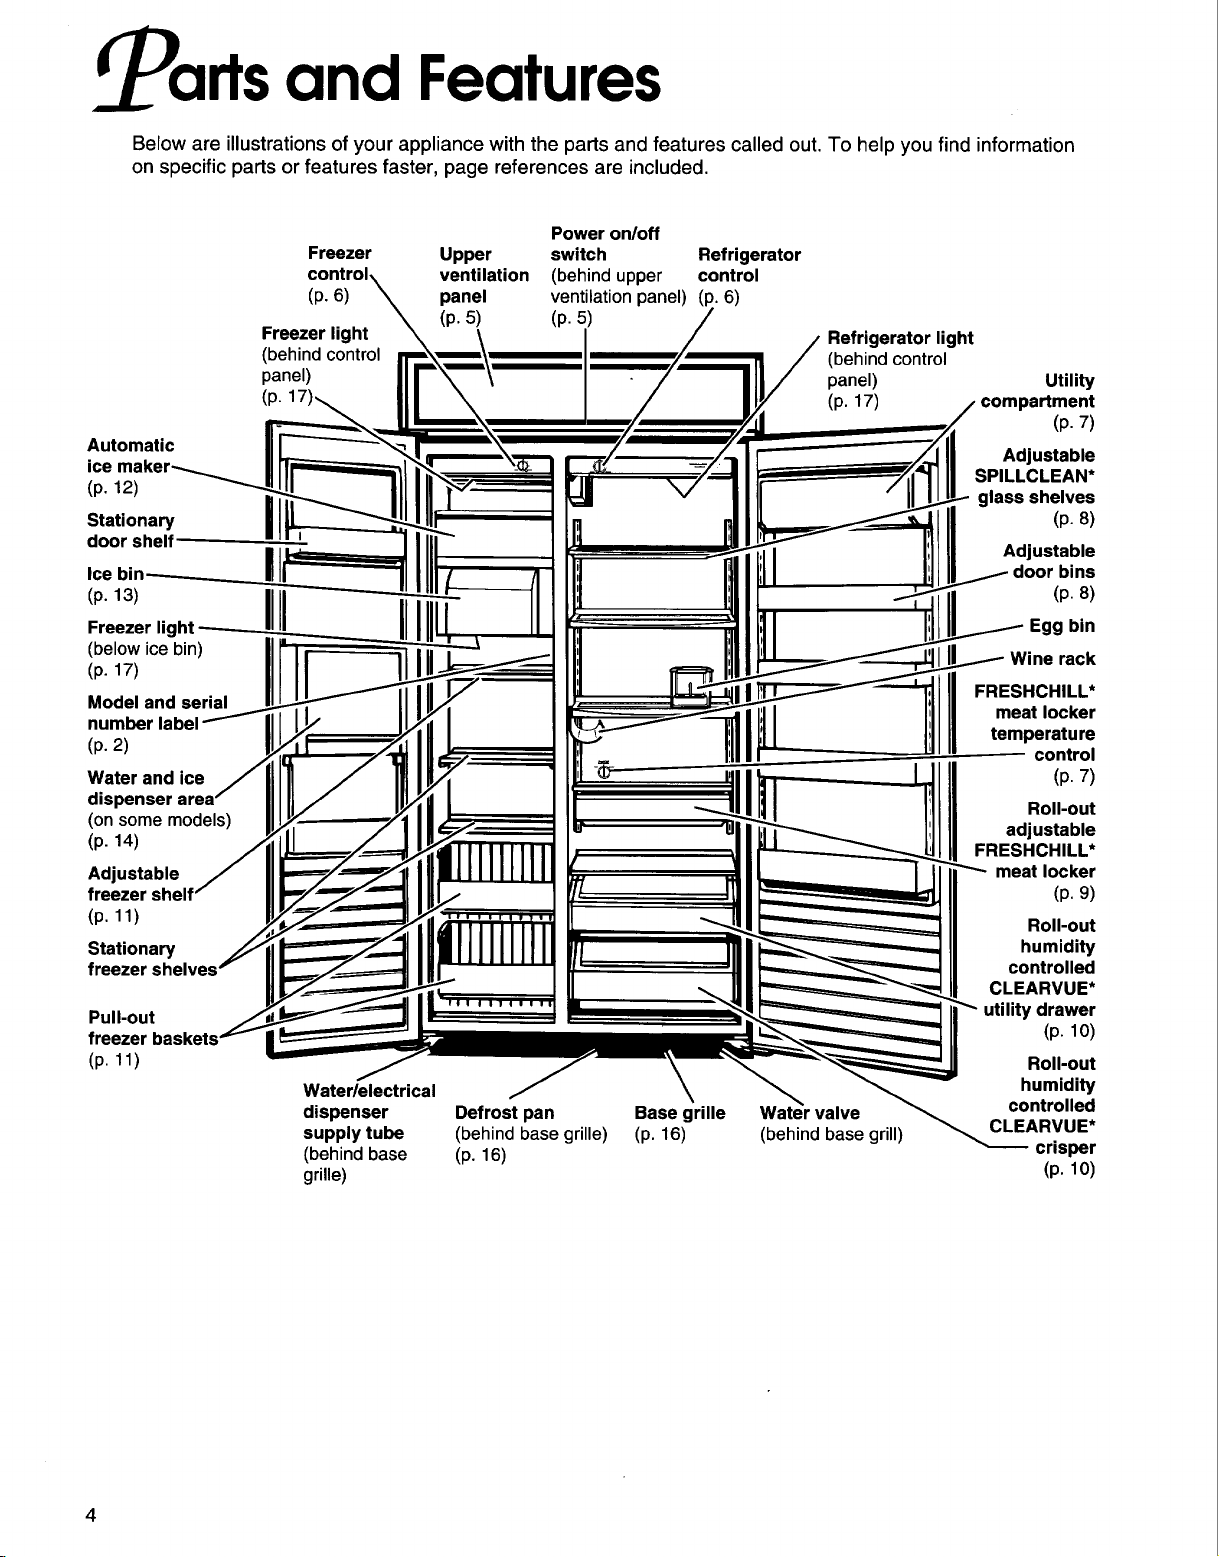
arts and Features
Below are illustrations of your appliance with the parts and features called out. To help you find information
on specific parts or features faster, page references are included.
Power on/off
Freezer Upper switch Refrigerator
ventilation (behind upper control
(p. 6) panel ventilation panel) (p. 6)
Freezer light
(behind control
panel)
(p.
Automatic
ice
(p. 12)
Stationary
door shelf
Ice
(p. 13)
(below ice bin)
(p. 17)
Model and serial
number
(p. 2)
Water and ice
dispenser
(on some models)
(p. 14)
Adjustable
freezer she
(p. 11)
Stationary
freezer
Pull-out
(p 11)
Water/electrical
dispenser Defrost pan Base grille
supply tube (behind base grille) (p. 16)
(behind base (p. 16)
grille)
(p. 5) (p. 5)
Refrigerator light
(behind control
panel)
(p. 17)
----------- control
valve
(behind base grill)
Utility
compartment
(p. 7)
Adjustable
SPILLCLEAN*
glass shelves
(p. 8)
Adjustable
bins
(p. 8)
Egg bin
rack
FRESHCHILL*
meat locker
temperature
(p. 7)
Roll-out
adjustable
FRESHCHILL*
meat locker
(p. 9)
Roll-out
humidity
controlled
CLEARVUE*
utility drawer
(p. 10)
Roll-out
humidity
controlled
CLEARVUE*
crisper
(p. 10)
C/.. sing Your Refrigerator
To obtain the best possible results from your refrigerator, it is important that you operate it properly. This
section tells you how to set the temperature controls, remove and adjust some of the features in your
refrigerator, and how to save energy.
Electrical Shock Hazard
Plug into a grounded 3 prong outlet.
Do not remove ground prong.
Do not use an adapter.
Do not use an extension cord.
Failure to follow these instructions can result
in death, fire, or electrical shock.
Keep flammable materials and vapors, such as
gasoline, away from refrigerator.
Failure to do so can result in death, explosion,
or fire.
Explosion Hazard
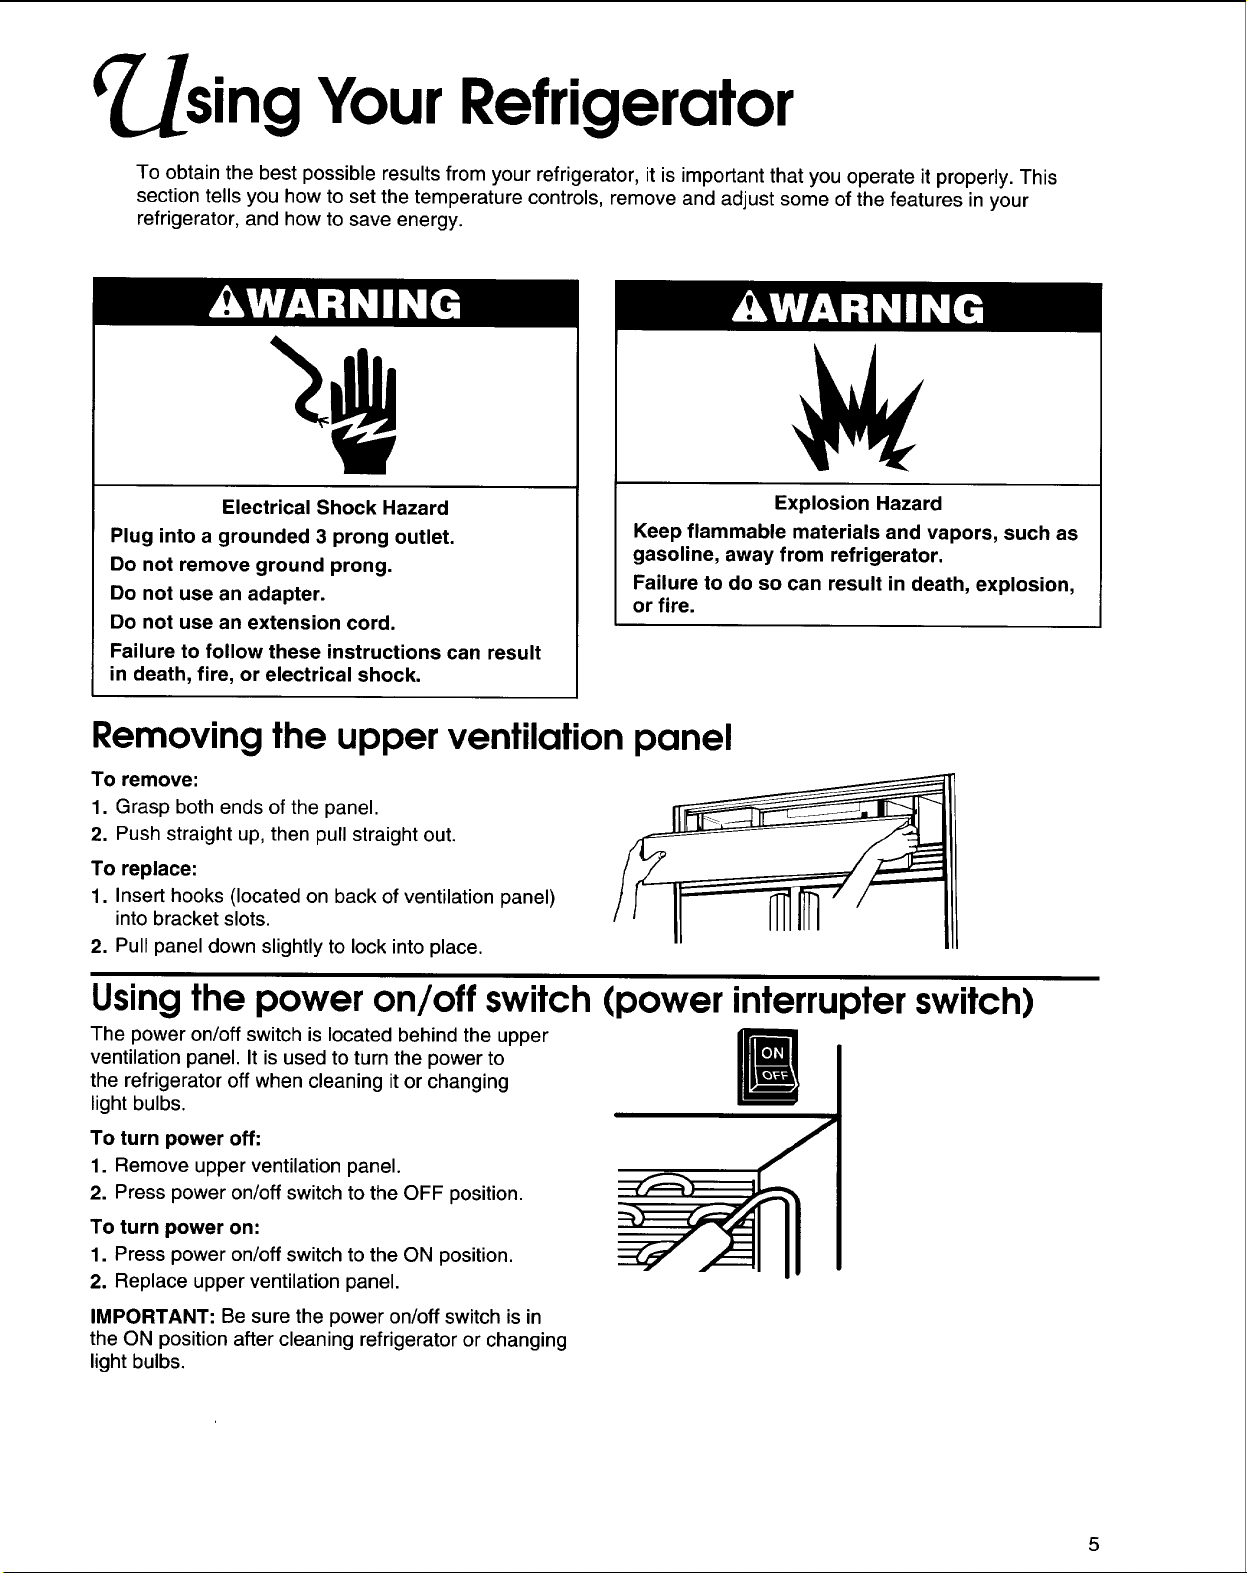
Removing the upper ventilation panel
To remove:
1. Grasp both ends of the panel.
2. Push straight up, then pull straight out.
To replace:
1. Insert hooks (located on back of ventilation panel)
into bracket slots.
2. Pull panel down slightly to lock into place.
Usingthe power on/off switch (power interrupter switch)
The power on/off switch is located behind the upper
ventilation panel. It is used to turn the power to
the refrigerator off when cleaning it or changing
light bulbs.
To turn power off:
1. Remove upper ventilation panel.
2. Press power on/off switch to the OFF position.
To turn power on:
1. Press power on/off switch to the ON position.
2. Replace upper ventilation panel.
IMPORTANT: Be sure the power on/off switch is in
the ON position after cleaning refrigerator or changing
light bulbs.
sing Your Refrigerator
Usingthe EXTENDFRESH*Temperature
Management System
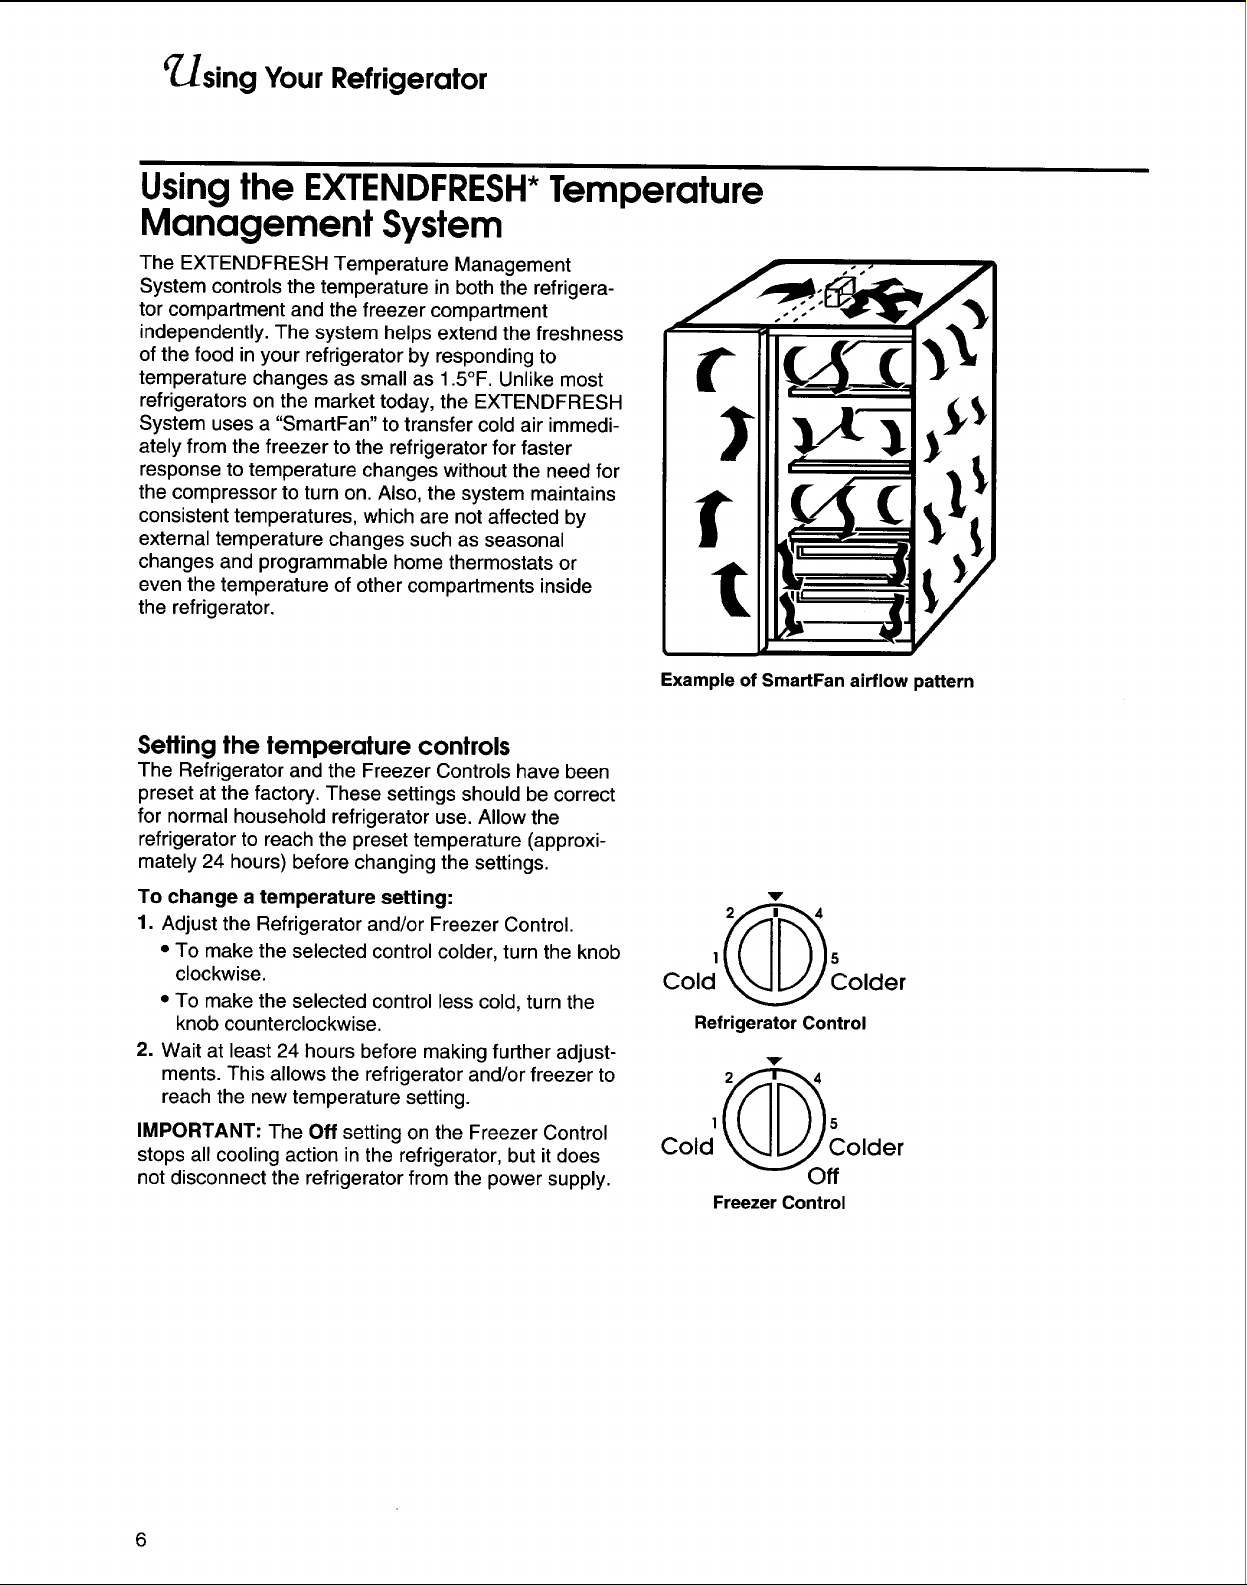
The EXTENDFRESH Temperature Management
System controls the temperature in both the refrigera-
tor compartment and the freezer compartment
independently. The system helps extend the freshness
of the food in your refrigerator by responding to
temperature changes as small as 1.5°F. Unlike most
refrigerators on the market today, the EXTENDFRESH
System uses a "SmartFan" to transfer cold air immedi-
ately from the freezer to the refrigerator for faster
response to temperature changes without the need for
the compressor to turn on. Also, the system maintains
consistent temperatures, which are not affected by
external temperature changes such as seasonal
changes and programmable home thermostats or
even the temperature of other compartments inside
the refrigerator.
Setting the temperature controls
The Refrigerator and the Freezer Controls have been
preset at the factory. These settings should be correct
for normal household refrigerator use. Allow the
refrigerator to reach the preset temperature (approxi-
mately 24 hours) before changing the settings.
To change a temperature setting:
1. Adjust the Refrigerator and/or Freezer Control.
• To make the selected control colder, turn the knob
clockwise.
• To make the selected control less cold, turn the
knob counterclockwise.
2. Wait at least 24 hours before making further adjust-
ments. This allows the refrigerator and/or freezer to
reach the new temperature setting.
IMPORTANT: The Off setting on the Freezer Control
stops all cooling action in the refrigerator, but it does
not disconnect the refrigerator from the power supply.
Example of SmartFan airflow pattern
Cold ___ _:older
Refrigerator Control
V
1
Cold
Colder
Freezer Control

_sing Your Refrigerator
Setting the FRESHCHILL*meat locker temperature control
The FRESHCHILL Meat Locker Temperature Control
allows you to adjust the storage temperature of the
FRESHCHILL meat locker.
Cold air flows into the meat locker through an air
duct between the freezer and the refrigerator. Setting
the control allows more or less cold air through the air
duct. Set the control to "cold" to close the air duct. See
page 9 for more information on the FRESHCHILL
meat locker.
IMPORTANT: Occasionally, a food item may freeze in
the FRESHCHILL meat locker, utility drawer, or
crisper. When this occurs, turn the FRESHCHILL Meat
Locker Temperature Control toward cold.
Also, if the water dispenser stops working, it may be
due to freezing of the water line leading to the dis-
penser. If this happens, turn the FRESHCHILL Meat
Locker Temperature Control toward cold.
Cold (_Colder
Adjusting the utility compartment
(models KSSS36Q, KSSS36M, KSSS42Q, KSSS42M, KSSP36Q, KSSP36M, KSSP42Q, and
KSSP42M)
FreshChill
Meat Locker
v
The utility compartment can be placed in any position
on the refrigerator door.
To remove:
1. Grasp both ends of compartment.
2. Lift compartment up and pull out.
To replace:
1. Insert compartment hooks into ladder slots on both
sides of refrigerator door.
2. Push compartment down to lock into place.
7

' r_sing Your Refrigerator
Adjusting the door bins
Door bins hold two-liter bottles and can be placed in
any position on the refrigerator door.
To remove:
1. Grasp door bin.
2. Liftdoor bin up and pull out.
To replace:
1. Insert door bin hooks into ladder slots on both sides
of refrigerator door.
2. Push door bin down to lock into place.
Adjusting the SPILLCLEAN*glass refrigerator shelves
Adjust the shelves to match the way you use
your refrigerator.
To remove shelves:
1. Tilt shelf up at front.
2. Lift shelf up at back.
3. Pull shelf straight out.
IMPORTANT: Glass shelves are heavy. Handle
with care.
To replace shelves:
1. Guide the rear hooks of shelf into slots in the
shelf supports.
2. Tilt shelf up at front until hooks drop into slots.
Lower front of shelf to level position.
3. Check the stability of the shelf to be sure hooks
have been inserted properly.
Removing the FRESHCHILL*meat locker
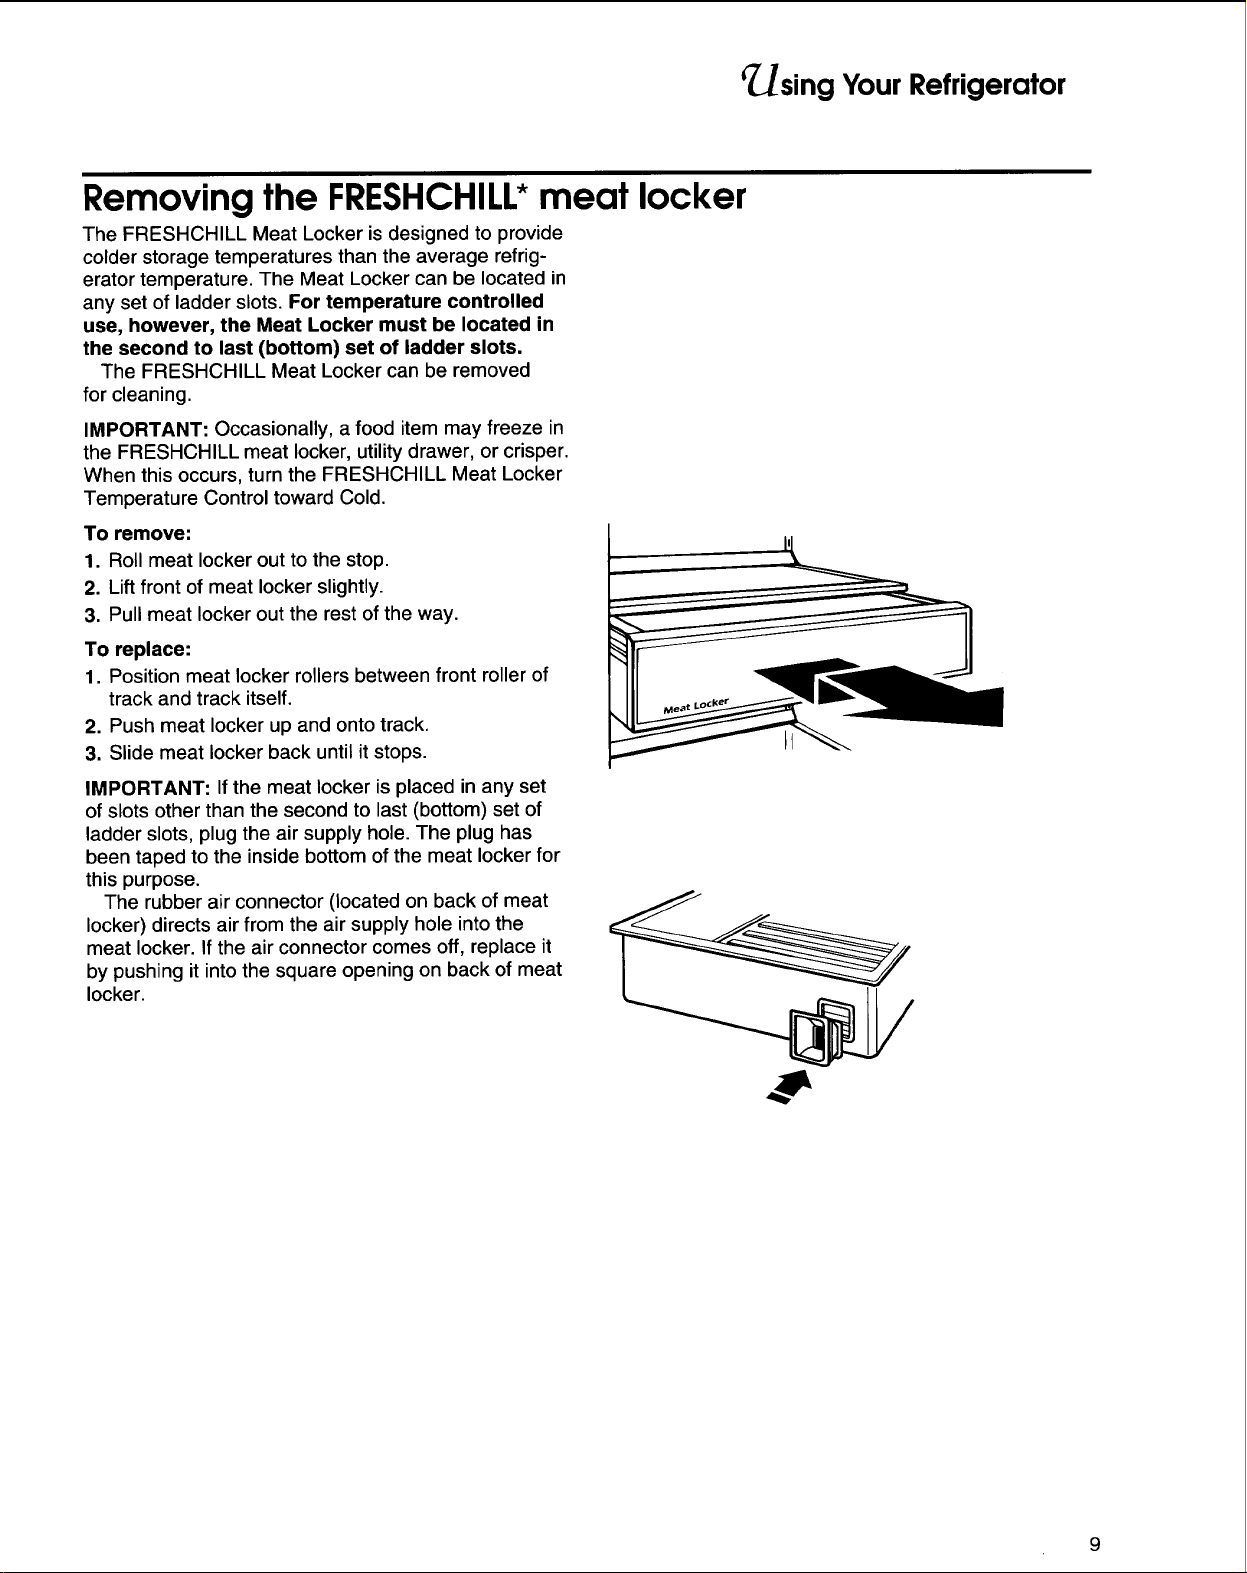
The FRESHCHILL Meat Locker is designed to provide
colder storage temperatures than the average refrig-
erator temperature. The Meat Locker can be located in
any set of ladder slots. For temperature controlled
use, however, the Meat Locker must be located in
the second to last (bottom) set of ladder slots.
The FRESHCHILL Meat Locker can be removed
for cleaning.
IMPORTANT: Occasionally, a food item may freeze in
the FRESHCHILL meat locker, utility drawer, or crisper.
When this occurs, turn the FRESHCHILL Meat Locker
Temperature Control toward Cold.
To remove:
1. Roll meat locker out to the stop.
2. Lift front of meat locker slightly.
3. Pull meat locker out the rest of the way.
To replace:
1. Position meat locker rollers between front roller of
track and track itself.
2. Push meat locker up and onto track.
3. Slide meat locker back until it stops.
IMPORTANT: If the meat locker is placed in any set
of slots other than the second to last (bottom) set of
ladder slots, plug the air supply hole. The plug has
been taped to the inside bottom of the meat locker for
this purpose.
The rubber air connector (located on back of meat
locker) directs air from the air supply hole into the
meat locker. If the air connector comes off, replace it
by pushing it into the square opening on back of meat
locker.
CUsing Your Refrigerator
9

¢ sing Your Refrigerator
Removing the humidity-controlled CLEARVUE*crispers
The humidity controls on the drawers give you the
ability to change the amount of moisture in the utility
drawer and/or crisper according to what food you store
in it. The humidity-controlled utility drawer and the
crisper are interchangeable. The CLEARVUE section
allows you to see into the drawer/crisper without
opening it.
IMPORTANT: Occasionally, a food item may freeze
in the FRESHCHILL* meat locker, utility drawer, or
crisper. When this occurs, turn the FRESHCHILL
Meat Locker Temperature Control toward cold.
To adjust the humidity control:
• Move the lever to the right for higher humidity and
best storage of fresh, leafy vegetables.
• Move the lever to the left for lower humidity and best
storage of fruits and vegetables with skins.
See "Food Storage Guide" on page 21 for more
information on storing foods properly.
To remove utility drawer/crisper:
1. Roll drawer out to the stop.
2. Lift front of drawer and pull out the rest of the way.
3. Replace in reverse order.
To remove glass covers:
1. Lift right side of glass cover to free retainer and left
side of cover.
2. Carefully remove glass cover.
To replace glass cover:
1. PLace retainer on right side of glass cover.
2. Insert left side of glass cover into groove on left side
of drawer.
3. Lower cover so that the retainer pins are in the
guide holes on right side of drawer.
To remove CLEARVUE section:
1. Remove glass cover.
2. Slide CLEARVUE section down track, away from
the retainer.
3. Replace in reverse order.
10
t
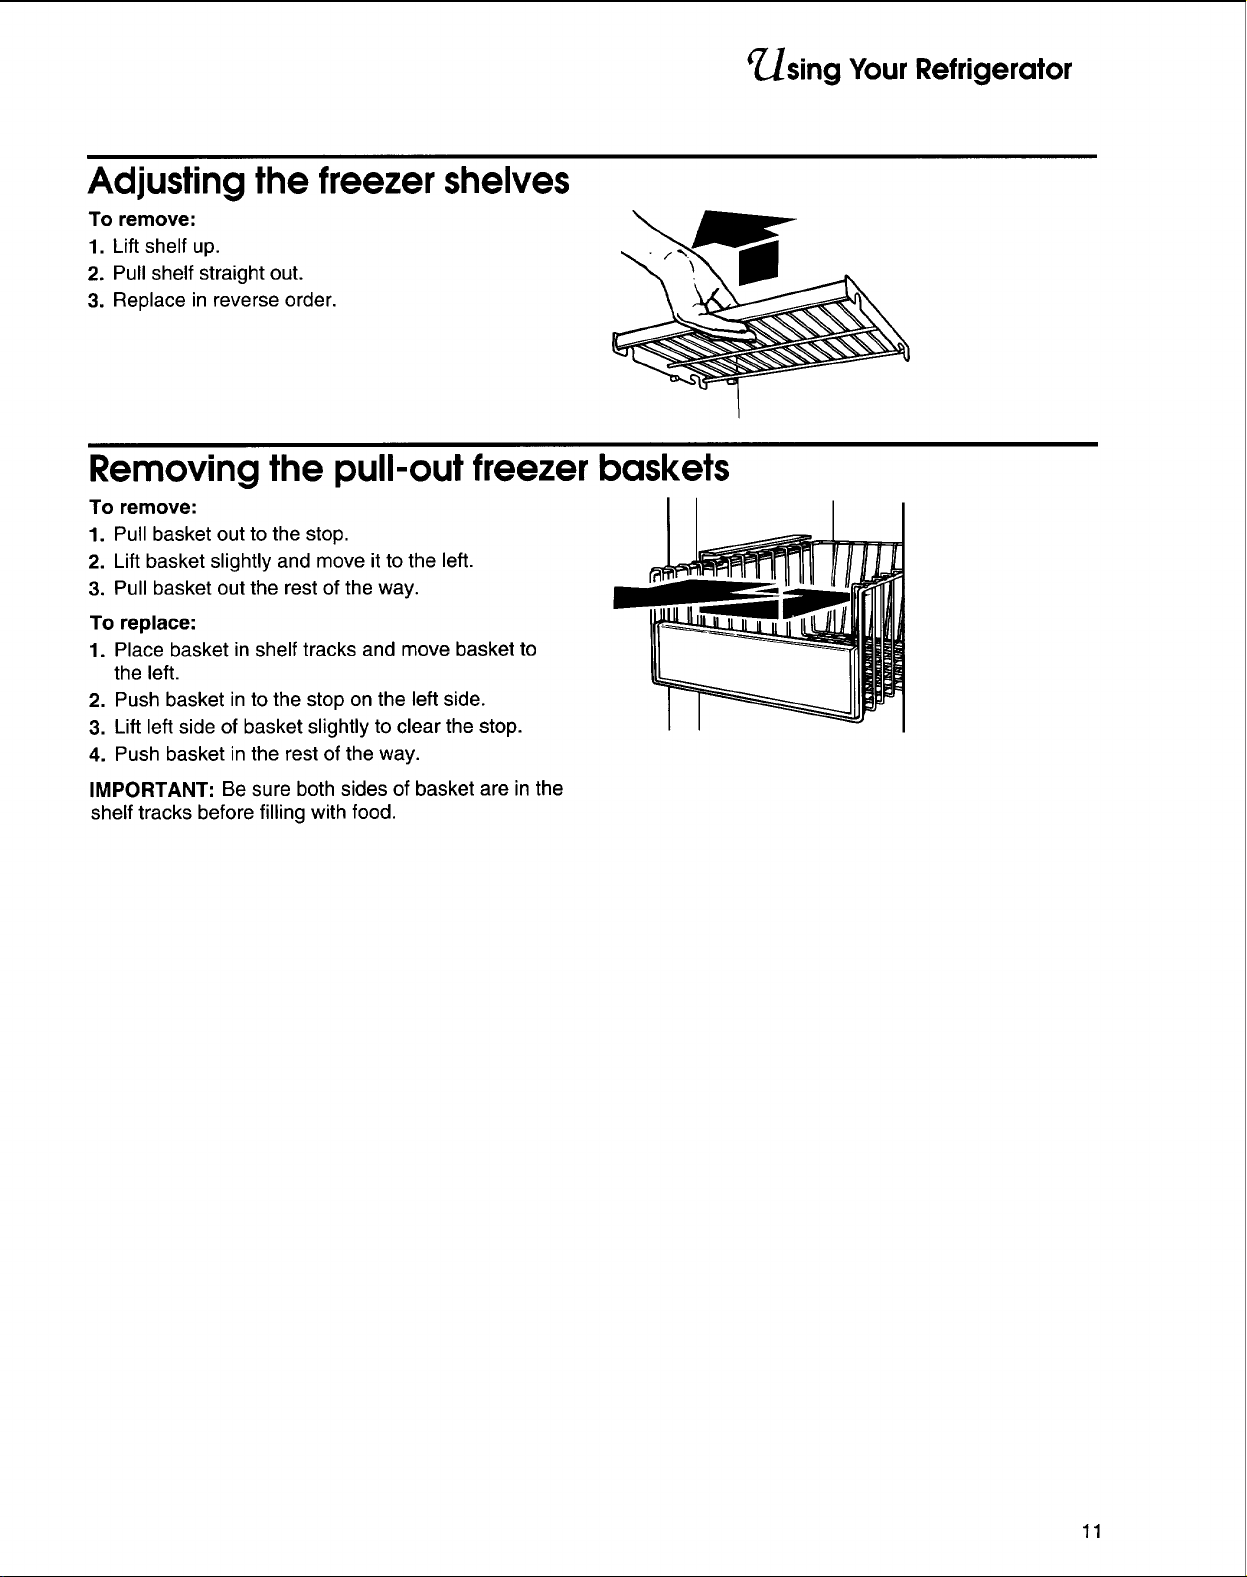
Adjusting the freezer shelves
To remove:
1. Lift shelf up.
2. Pull shelf straight out.
3. Replace in reverse order.
Removing the pull-out freezer baskets
To remove:
1. Pull basket out to the stop,
2. Lift basket slightly and move it to the left.
3. Pull basket out the rest of the way.
To replace:
1. Place basket inshelf tracks and move basket to
the left.
2, Push basket in to the stop on the left side.
3, Lift left side of basket slightlyto clear the stop.
4. Push basket in the rest of the way.
IMPORTANT: Be sure both sides of basket are in the
shelf tracks before filling with food.
¢Using Your Refrigerator
11

r/.Jsing Your Refrigerator
Using the automatic ice maker
IMPORTANT: The ice maker is shipped from the
factory with the signal arm in the OFF position (up). It is
recommended that the ice maker be left in the OFF
position for the first 24 hours after your refrigerator is
turned on. This will allow the freezer compartment and
the ice maker to reach the proper temperature before
making ice.
To start ice maker:
• For dispenser models only: Pull the ice maker
covering panel out from the bottom and slide itto
the rear.
• Push the ice maker signal arm down to the ON
position.
To stop ice maker:
• Lift the ice maker signal arm until you feel it click into
the OFF position.
IMPORTANT: The ice maker signal arm must be in
the ON position (down) to produce ice. Also, the first
few batches of ice from the ice maker may have an
off-taste. This is from the new plumbing and parts.
Please throw this ice away and allow the ice maker to
make a new supply.
_OFF
Solving common ice maker problems
PROBLEM POSSIBLE CAUSE/SOLUTION
Ice crescents attached • This is normal. They break apart easily. Shake bin occasionally to keep
at corners cubes separated.
Ice maker will not • ON/OFF lever is in the OFF (up) position. Lower lever to the ON (down) position.
operate or ice is not = Freezer is not cold enough. Adjust temperature controls and wait 24 hours.
made fast enough (See "Setting the temperature controls"on page 6.)
Off-taste or odor in ice • New plumbing connections can cause discolored or off-flavored ice. Discard
the firstfew batches of ice.
• Cubes are stored too long. Throw them away and make a new supply.
• Food is not wrapped properly. See page 22.
• Freezer and ice bin need to be cleaned. See page 19.
• Water may contain minerals (such as sulfur). A filter may be required to
remove them.
12
Removing the ice maker storage bin
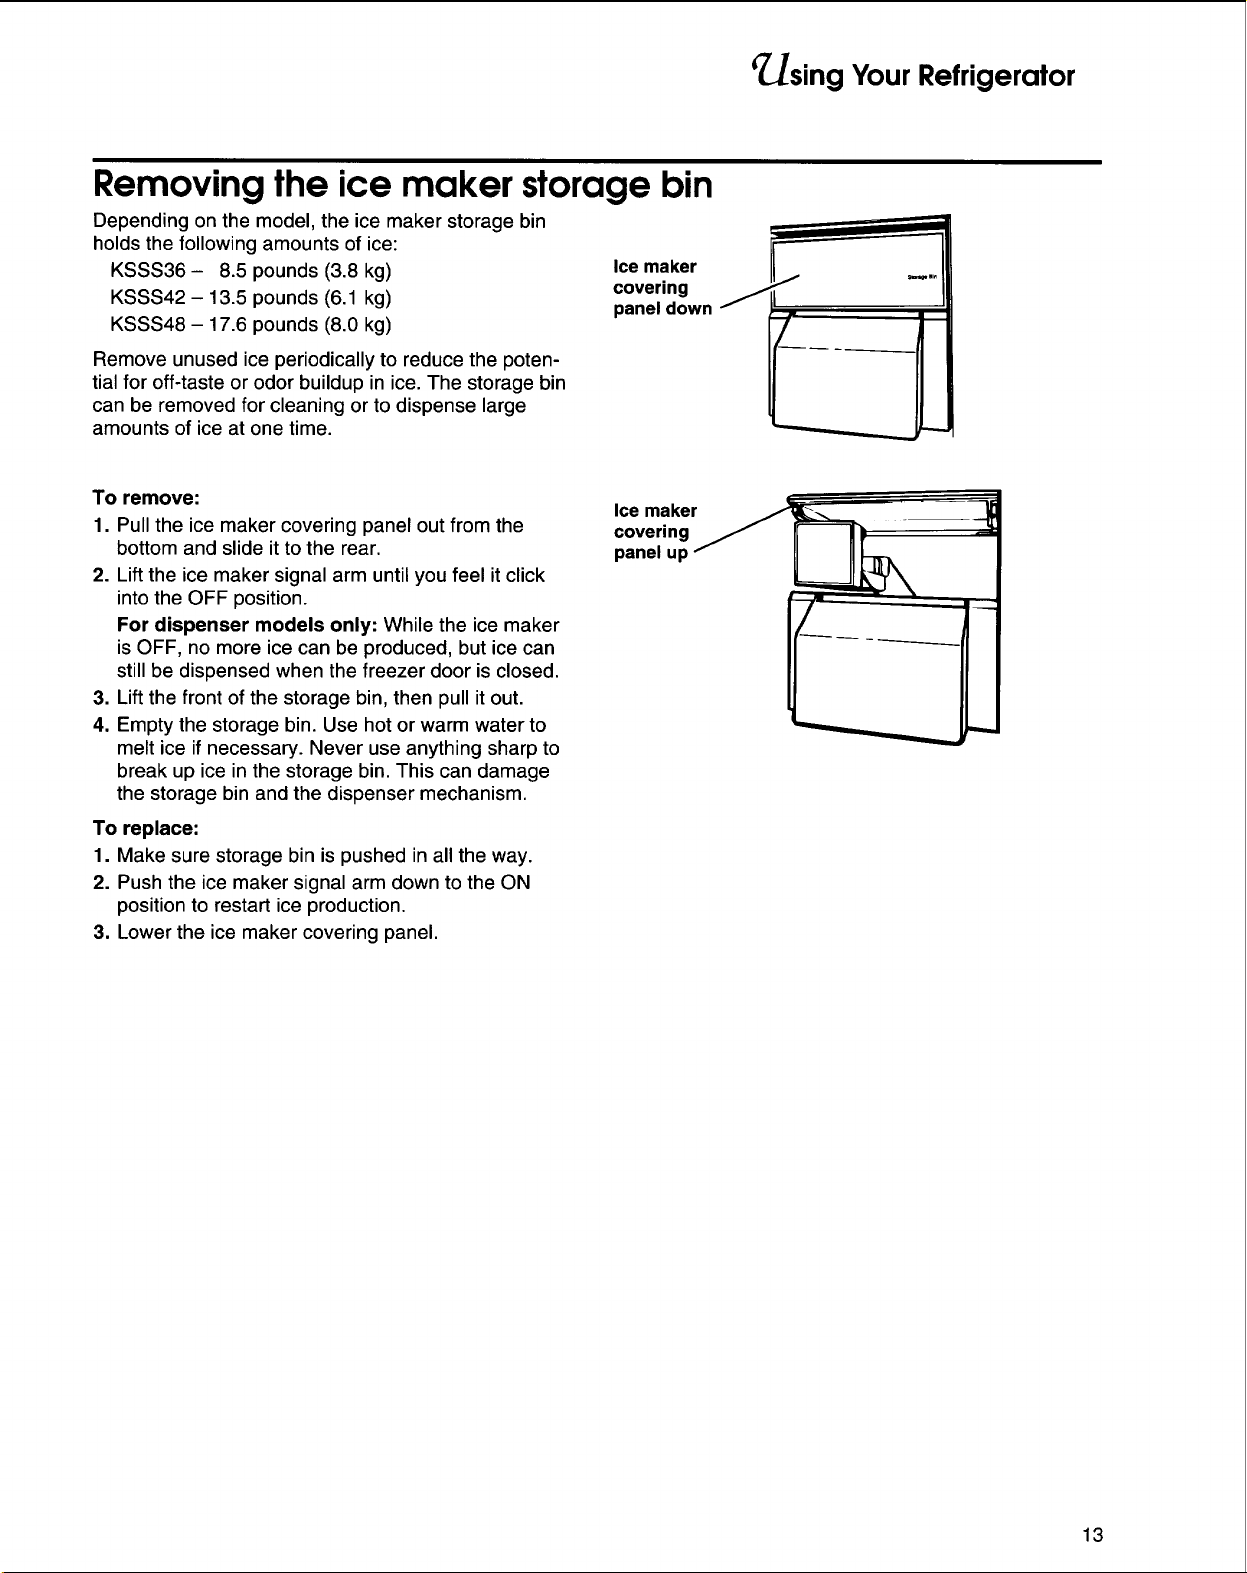
Depending on the model, the ice maker storage bin
holds the following amounts of ice:
KSSS36- 8.5 pounds (3.8 kg)
KSSS42- 13.5 pounds (6.1 kg)
KSSS48 - 17.6 pounds (8.0 kg)
Remove unused ice periodically to reduce the poten-
tial for off-taste or odor buildup in ice. The storage bin
can be removed for cleaning or to dispense large
amounts of ice at one time.
Ice maker
covering
panel down
sing Your Refrigerator
To remove:
1. Pull the ice maker covering panel out from the
bottom and slide it to the rear.
2. Lift the ice maker signal arm until you feel it click
into the OFF position.
For dispenser models only: While the ice maker
is OFF, no more ice can be produced, but ice can
stillbe dispensed when the freezer door is closed,
3. Lift the front of the storage bin, then pull it out.
4. Empty the storage bin. Use hot or warm water to
melt ice if necessary. Never use anything sharp to
break up ice in the storage bin. This can damage
the storage bin and the dispenser mechanism.
To replace:
1. Make sure storage bin is pushed in all the way.
2. Push the ice maker signal arm down to the ON
position to restart ice production.
3. Lower the ice maker covering panel.
Ice maker
covering
panel up
13
' sing Your Refrigerator
Using the cold water and ice dispensers
(models KSSS36Q, KSSS42Q, KSSS48Q, KSSP36Q, KSSP42Q, and KSSP48Q)
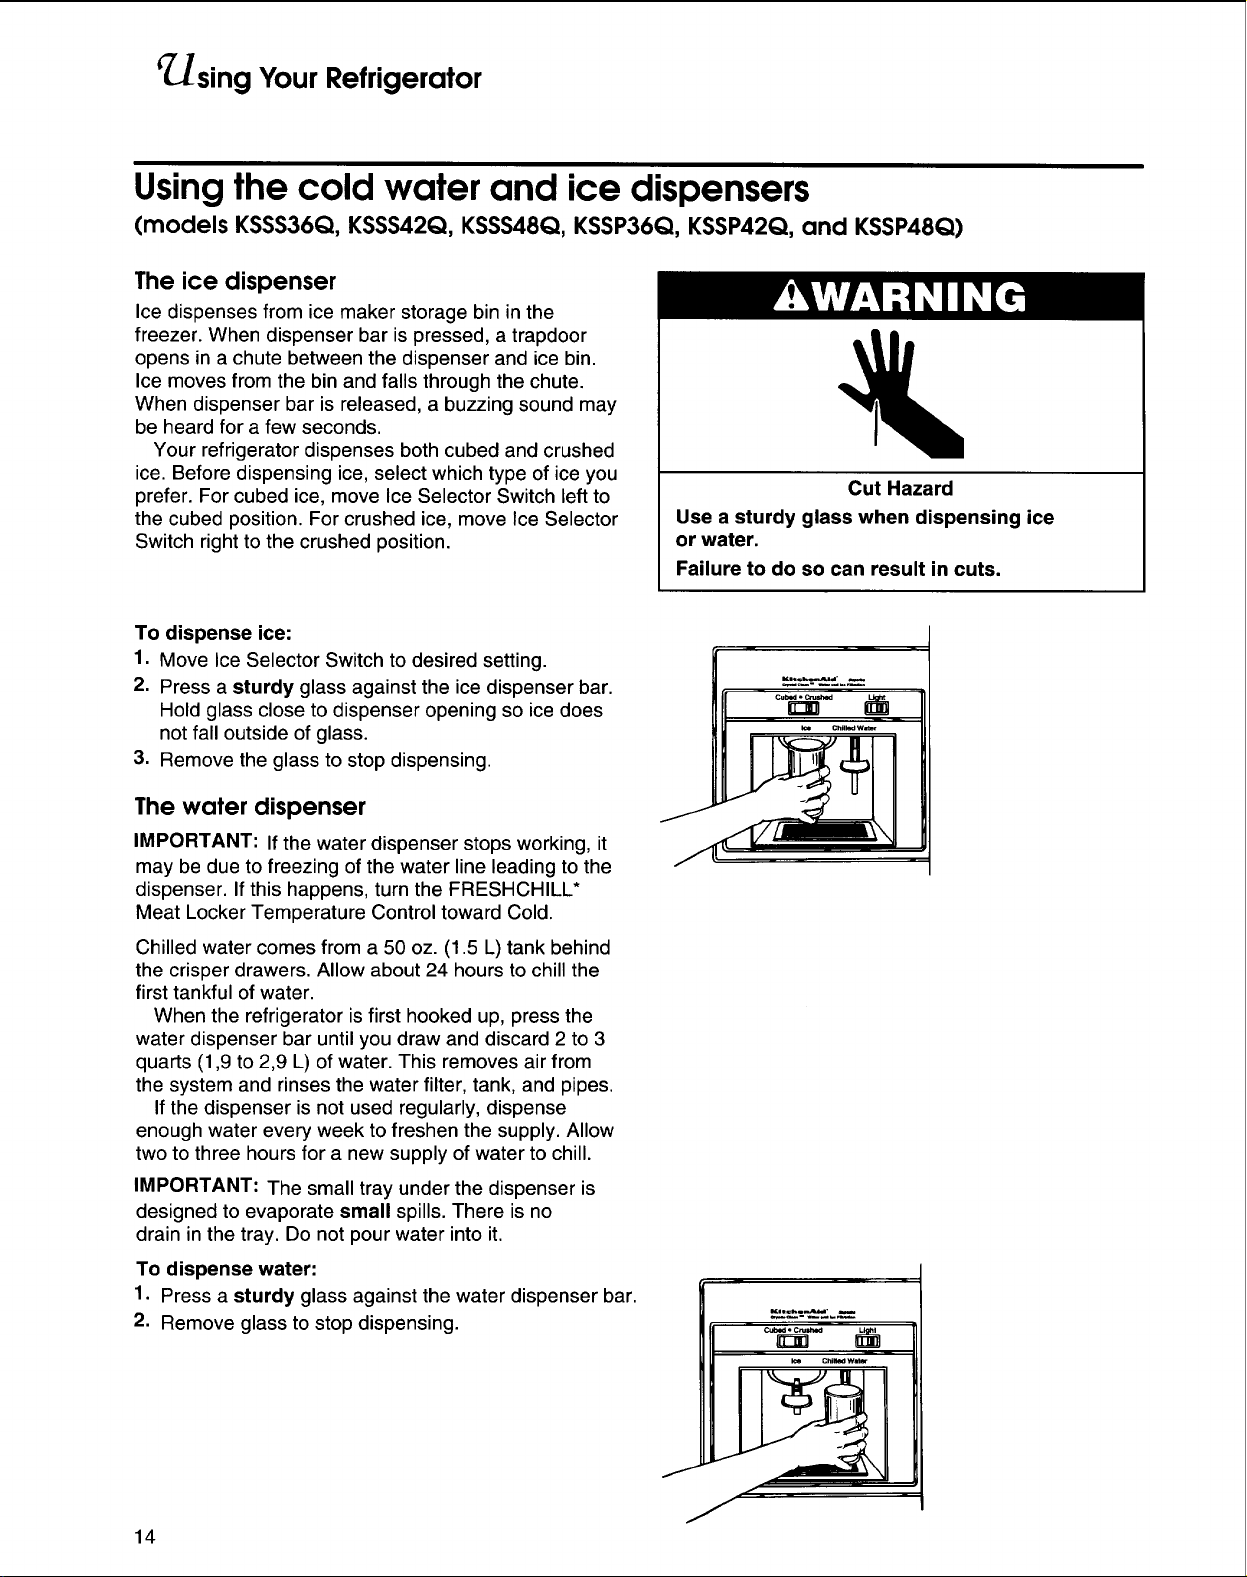
The ice dispenser
Ice dispenses from ice maker storage bin in the
freezer. When dispenser bar is pressed, a trapdoor
opens in a chute between the dispenser and ice bin.
Ice moves from the bin and falls through the chute.
When dispenser bar is released, a buzzing sound may
be heard for a few seconds.
Your refrigerator dispenses both cubed and crushed
ice. Before dispensing ice, select which type of ice you
prefer. For cubed ice, move Ice Selector Switch left to
the cubed position. For crushed ice, move Ice Selector
Switch right to the crushed position.
To dispense ice:
1. Move Ice Selector Switch to desired setting.
2. Press a sturdy glass against the ice dispenser bar.
Hold glass close to dispenser opening so ice does
not fall outside of glass.
3. Remove the glass to stop dispensing.
Use a sturdy glass when dispensing ice
or water.
Failure to do so can result in cuts.
°oTz__'-
Cut Hazard
_c " mK
i _
The water dispenser
IMPORTANT: If the water dispenser stops working, it
may be due to freezing of the water line leading to the
dispenser. If this happens, turn the FRESHCHILL*
Meat Locker Temperature Control toward Cold.
Chilled water comes from a 50 oz. (1.5 L) tank behind
the crisper drawers. Allow about 24 hours to chill the
first tankful of water.
When the refrigerator is first hooked up, press the
water dispenser bar until you draw and discard 2 to 3
quarts (1,9 to 2,9 L) of water. This removes air from
the system and rinses the water filter, tank, and pipes.
If the dispenser is not used regularly, dispense
enough water every week to freshen the supply. Allow
two to three hours for a new supply of water to chill.
IMPORTANT: The small tray under the dispenser is
designed to evaporate small spills. There is no
drain in the tray. Do not pour water into it.
To dispense water:
1. Press a sturdy glass against the water dispenser bar.
2. Remove glass to stop dispensing.
k:e Chill_] W=dmr
14
f
sing Your Refrigerator
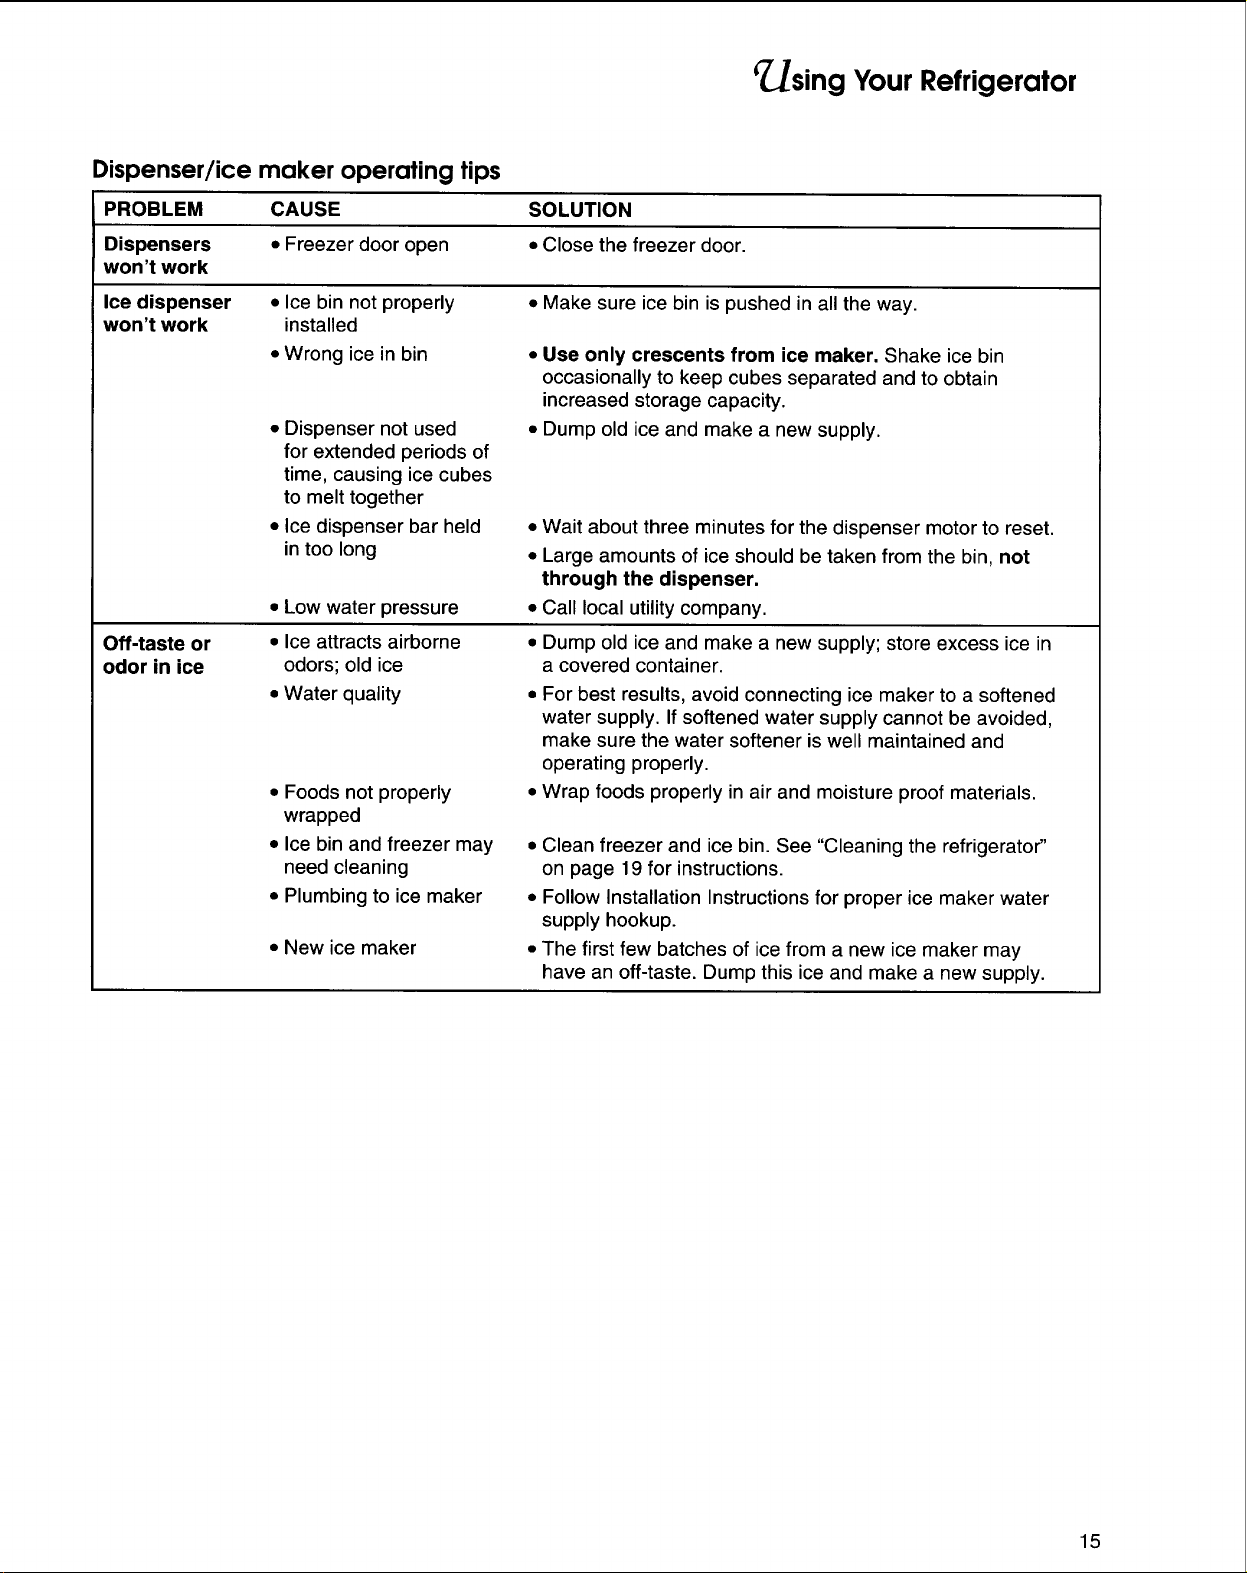
Dispenser/ice maker operating tips
PROBLEM CAUSE SOLUTION
Dispensers • Freezer door open • Close the freezer door.
won't work
Ice dispenser • Ice bin not properly • Make sure ice bin is pushed in all the way.
won't work installed
Off-taste or
odor in ice
• Wrong ice in bin •
• Dispenser not used
for extended periods of
time, causing ice cubes
to melt together
• Ice dispenser bar held
in too long
• Low water pressure
• Ice attracts airborne
odors; old ice
• Water quality
• Foods not properly
wrapped
• Ice bin and freezer may
need cleaning
• Plumbing to ice maker
• New ice maker
Use only crescents from ice maker. Shake ice bin
occasionally to keep cubes separated and to obtain
increased storage capacity.
Dump old ice and make a new supply.
• Wait about three minutes for the dispenser motor to reset.
• Large amounts of ice should be taken from the bin, not
through the dispenser.
• Call local utility company.
• Dump old ice and make a new supply; store excess ice in
a covered container.
• For best results, avoid connecting ice maker to a softened
water supply. If softened water supply cannot be avoided,
make sure the water softener is well maintained and
operating properly.
• Wrap foods properly in air and moisture proof materials.
• Clean freezer and ice bin. See "Cleaning the refrigerator"
on page 19 for instructions.
• Follow Installation Instructions for proper ice maker water
supply hookup.
• The first few batches of ice from a new ice maker may
have an off-taste. Dump this ice and make a new supply.
15

r_sing Your Refrigerator
Removing the base grille
To remove:
1. Remove one screw at each end of the base grille.
2. Remove base grille.
3. Replace in reverse order.
Removing the defrost pan
The defrost pan is located behind the base grille,
toward the left side of the refrigerator.
To remove:
1. Press power on/off switch to the OFF position. (See
page 5 for instructions.)
2. Remove base grille.
3. Find retaining clip (A) under refrigerator.
4. Push up on the clip and, at the same time, slide the
pan forward and out.
5. Clean the pan. (See page 19 for instructions.)
To replace:
1. Position the edge ofthe defrost pan approximately
7 inches (17.8 cm) from the left side of the
refrigerator.
2. Lift defrost pan intoside guides and push back until
you hear the "click" or "snap" of the retaining clip
moving into place.
3. Replace the base grille.
4. Press power on/off switch to the ON position.
\
\
\
\
Defrost pan Retaining
clip (A)
16
 Loading...