

KitchenAid KSMSCA INSTALLATION INSTRUCTIONS AND OPERATION MANUAL
KSMSCA
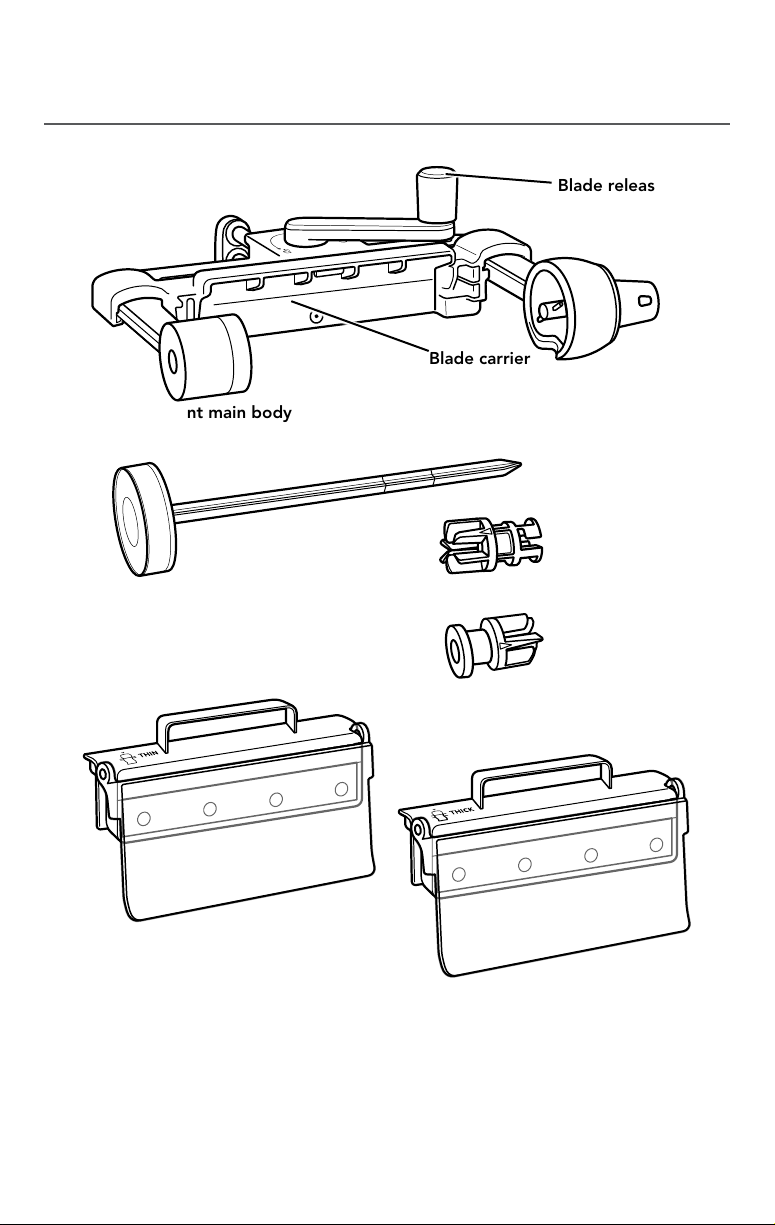
PARTS AND FEATURES
PARTS AND ACCESSORIES
Attachment main body
Food skewer
Blade release lever
Blade carrier
Food holder
Thin blade
Zucchini/Cucumber adapter (Gray)
Thick blade

VEGETABLE SHEET CUTTER SAFETY
IMPORTANT SAFEGUARDS
When using electrical appliances, basic safety precautions should always
be followed, including the following:
1. Read all instructions.
2. To protect against risk of electrical shock, do not put Stand Mixer in water
or other liquid.
3. Be sure to turn the Stand Mixer off (and detach the Vegetable Sheet Cutter
attachment from Stand Mixer) after each use of the Vegetable Sheet Cutter
attachment and before cleaning. Make sure the motor stops completely
before disassembling.
4. Keep hands, utensils, or other objects away from the Vegetable Sheet Cutter
attachment, skewer, or moving parts while it is in operation to reduce the risk of
severe injury to persons or damage to the Vegetable Sheet Cutter attachment.
5. Never feed by hand. Always use the provided skewer, food holder, and
zucchini/cucumber adapter.
6. If food becomes lodged in any blade or the skewer, turn the motor off and
disassemble the Vegetable Sheet Cutter attachment to remove the
remaining food.
7. Avoid contacting moving parts.
8. The use of attachments not recommended or sold by KitchenAid may cause
re, electric shock, or injury.
9. Do not use outdoors.
10. Close supervision is necessary when any appliance is used by or near children.
11. Do not use the appliance if the driver mechanism or rotating parts are damaged.
Return appliance to the nearest Authorized Service Center for examination,
repair, or electrical or mechanical adjustment.
12. Do not let the Stand Mixer cord hang over the edge of table or counter.
13. Blades are sharp. Handle carefully when inserting or removing blades.
14. Do not remove food until Stand Mixer is off and skewer stops.
15. To avoid damaging the gear assembly, do not immerse the Vegetable Sheet
Cutter attachment main body in water or other liquids.
ENGLISH
SAVE THESE INSTRUCTIONS
This product is designed for household use only.
VEGETABLE SHEET CUTTER SAFETY | 3
USING THE VEGETABLE SHEET
CUTTER ATTACHMENT
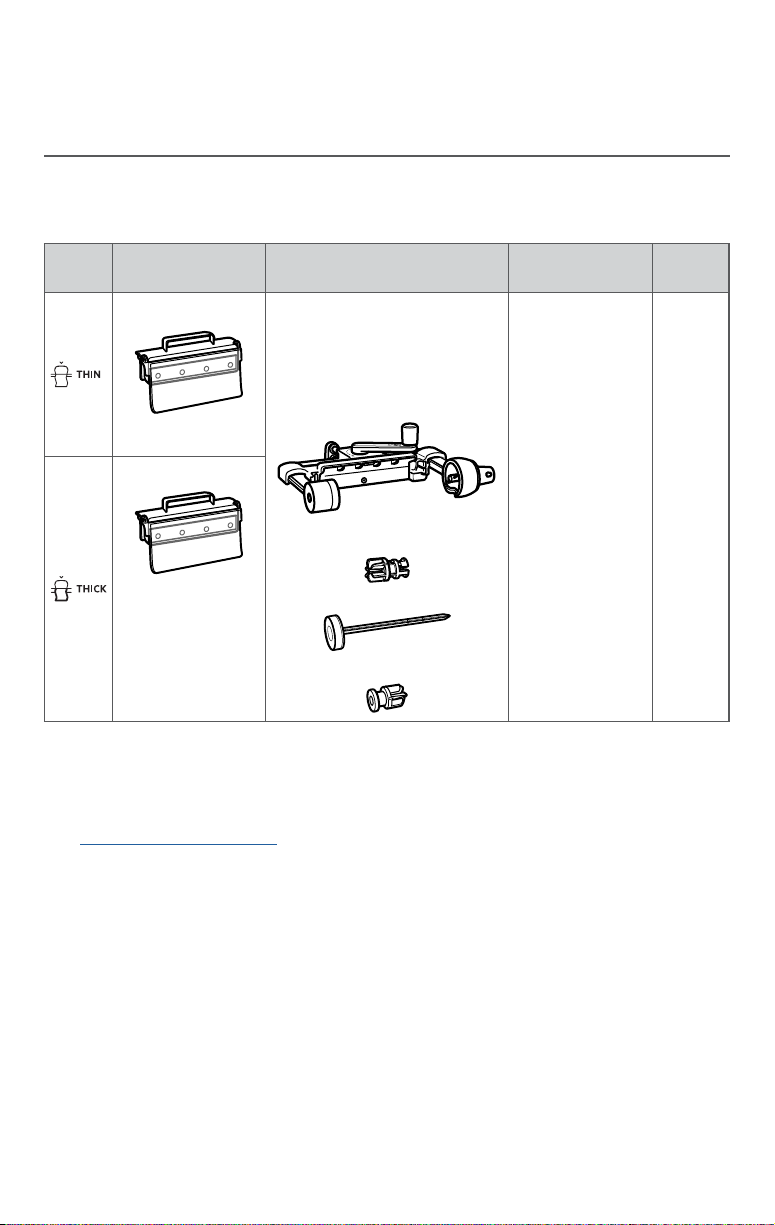
VEGETABLE SHEET CUTTER ATTACHMENT BLADE CHART
Choose a blade based on your preference. Both blades work well for many types of
recipes — e.g., baked entrees, wraps, sushi. Experiment with both blades to identify the
thickness that you prefer.
ICON
*Approximate sheet thickness will be 1.3 mm.
**Approximate sheet thickness will be 1.8 mm.
***Zucchini/cucumber adapter should only be used with soft foods.
FOR INSTRUCTIONAL VIDEOS, RECIPES AND OTHER INFORMATION ON USING THE
VEGETABLE SHEET CUTTER ATTACHMENT
Visit kitchenaid.com/quickstart for additional instructions with videos, inspiring recipes,
and tips on how to use your Vegetable Sheet Cutter attachment.
USE THESE
PARTS
Thin blade* Attachment main body,
Thick blade**
WITH THESE PARTS
food holder,
food skewer,
and
zucchini/cucumber
adapter***
SUGGESTED
FOODS
ZUCCHINI
POTATO
APPLE
SWEET POTATO
CUCUMBER
SPEED
Stir
Speed
to
Speed
2
4 | USING THE VEGETABLE SHEET CUTTER ATTACHMENT
USING THE VEGETABLE SHEET
CUTTER ATTACHMENT
FRUIT & VEGETABLE PREP CHART
NOTE: For best results, food should be 1.5-3.5"(3.8-8.9 cm) in diameter.
FOOD
Zucchini Firm and thick
Cucumber Firm and thick
Apple Firm and thick Leave ends on
Potato Round and symmetrical
Sweet
Potato
TYPE
RECOMMENDED
Round and symmetrical
HOW TO PREP SKEWER
Cut off ends
(Max length 4.5"/11.4 cm )
Cut off ends
(Max length 4.5"/11.4 cm )
Cut off ends to be square
(Max length 5.5"/14 cm)
Cut off ends to be square
(Max length 5.5"/14 cm)
Insert all the
way in
Insert all the
way in
Insert to first
mark
Insert to first
mark
Insert to first
mark
USE
ADAPTER
Yes
Yes
No
No
No
NOTE: For hard or tougher foods, such as jicama or yucca root, remove the skin
before processing.
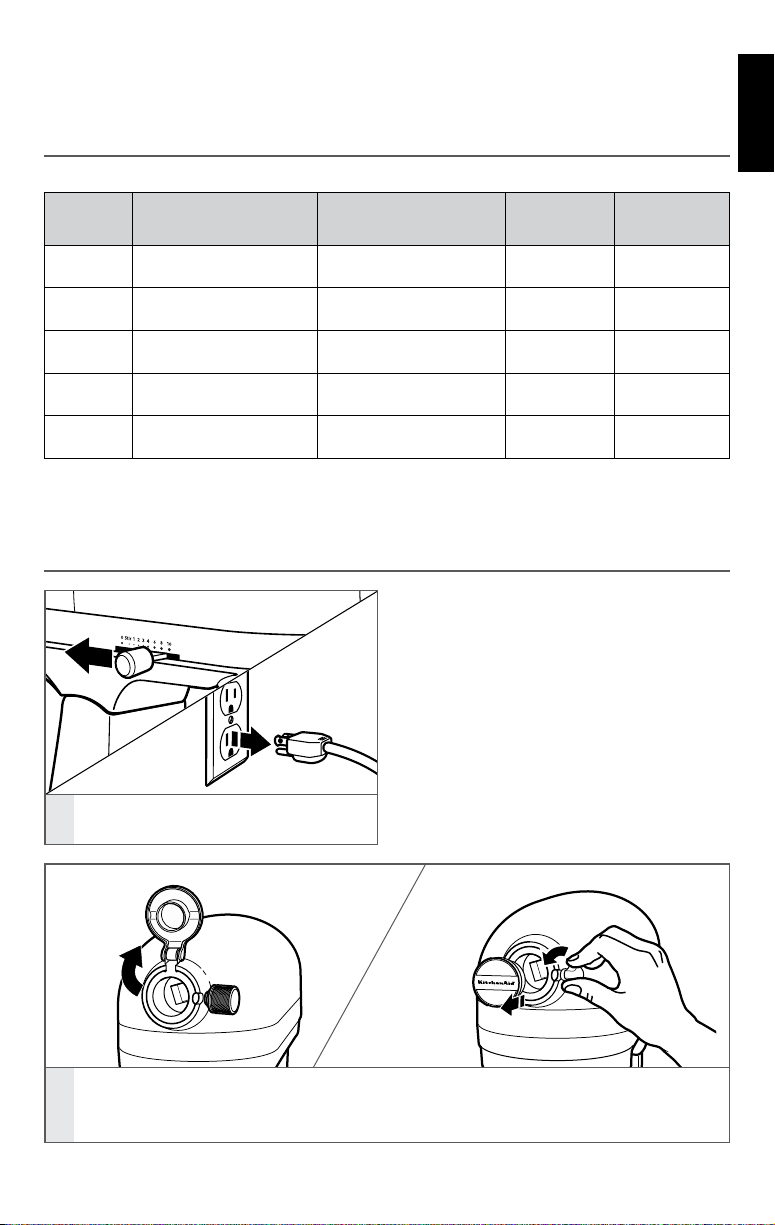
ATTACHING THE VEGETABLE SHEET CUTTER ATTACHMENT
TO THE STAND MIXER
ENGLISH
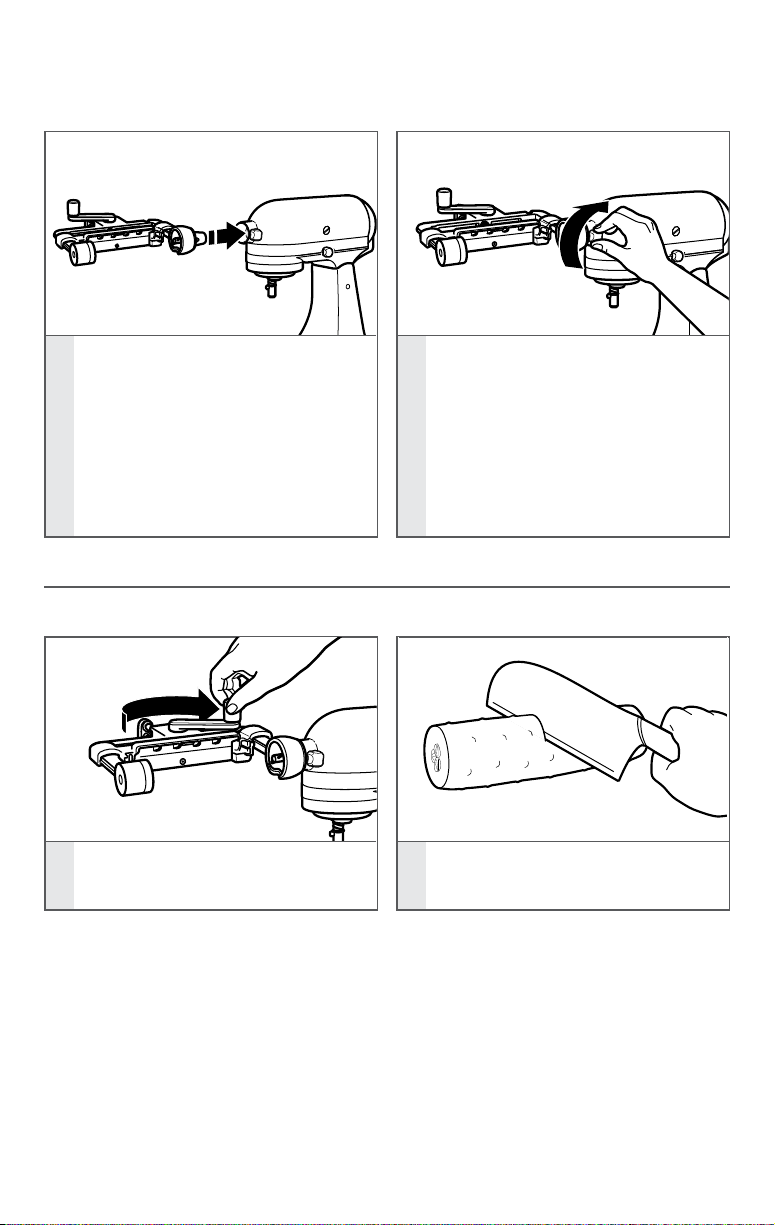
Turn the Stand Mixer off and unplug.
1
For Stand Mixers with a hinged power hub cover: Flip up to open.
2
For Stand Mixers with a removable power hub cover: Turn the attachment knob
counterclockwise to remove power hub cover.
USING THE VEGETABLE SHEET CUTTER ATTACHMENT | 5
USING THE VEGETABLE SHEET
CUTTER ATTACHMENT
Insert the Vegetable Sheet Cutter
attachment into the power hub,
making certain that the power shaft
fits into the square hub.
Rotate the Vegetable Sheet Cutter
3
attachment back and forth if
necessary. The pin on the shaft
housing will slip fully into the notch
on the hub rim when it is in the
proper position.
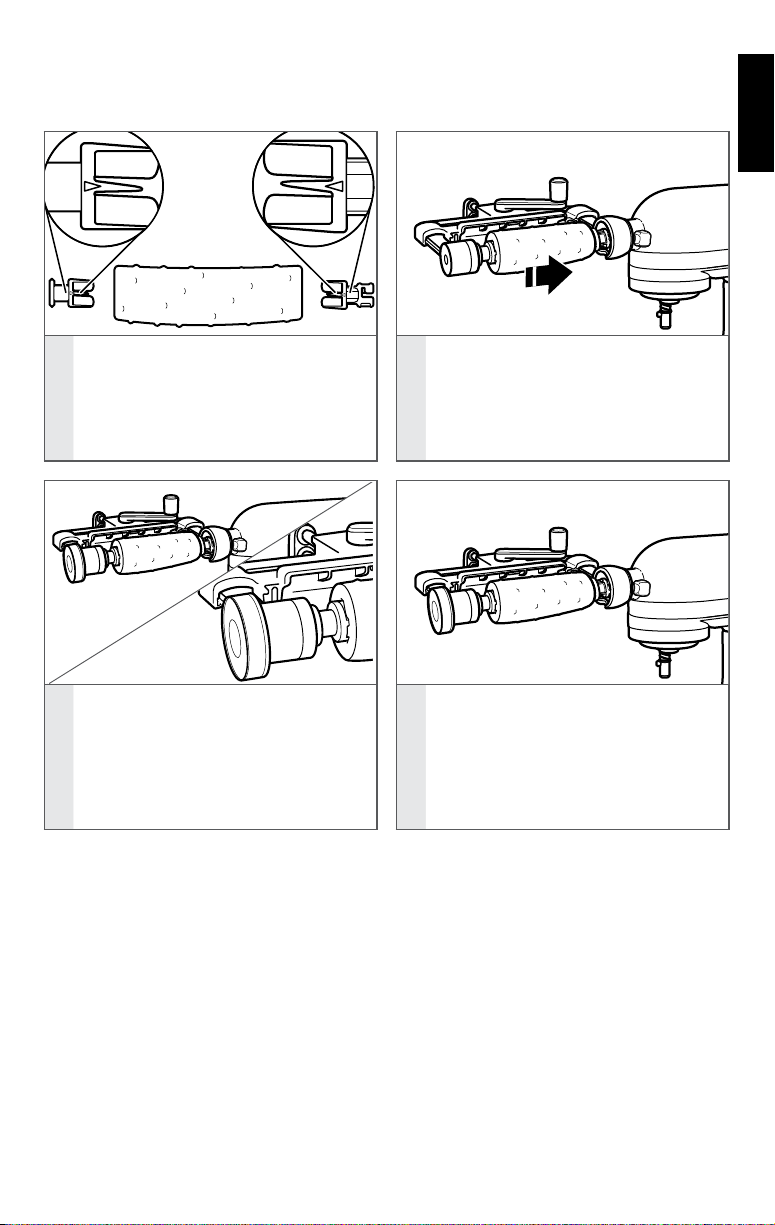
PREPARING TO PROCESS CUCUMBERS/ZUCCHINI
NOTE: Please refer to the “Fruit & Vegetable Prep”chart before processing.
Tighten the attachment knob
until the Vegetable Sheet Cutter
4
attachment is completely secured
to the Stand Mixer.
Rotate lever clockwise to the
1
locked position.
6 | USING THE VEGETABLE SHEET CUTTER ATTACHMENT
Cut cucumber or zucchini to a
maximum length of 4.5"
2
(11.4 cm).
TIP: The first mark on the food skewer
is 4.5"(11.4 cm) from the round
skewer base.
USING THE VEGETABLE SHEET
CUTTER ATTACHMENT
Insert the food holder into one end,
then the zucchini/cucumber adapter
into the other, using the markings to
3
align both holder and adapter. Make
sure the food holder and adapter are
centered.
Place the food and food holder
onto the main body and twist
4
clockwise to lock into place.
ENGLISH
Insert the food skewer into the
skewer support on the attachment,
making sure it goes all the way
through the vegetable. Make sure
5
there is no gap between the skewer
knob and the skewer support on the
main body.
USING THE VEGETABLE SHEET CUTTER ATTACHMENT | 7
Once this is complete, begin on
Step 1 of the “Processing Fruits &
6
Vegetables” section.
USING THE VEGETABLE SHEET
CUTTER ATTACHMENT
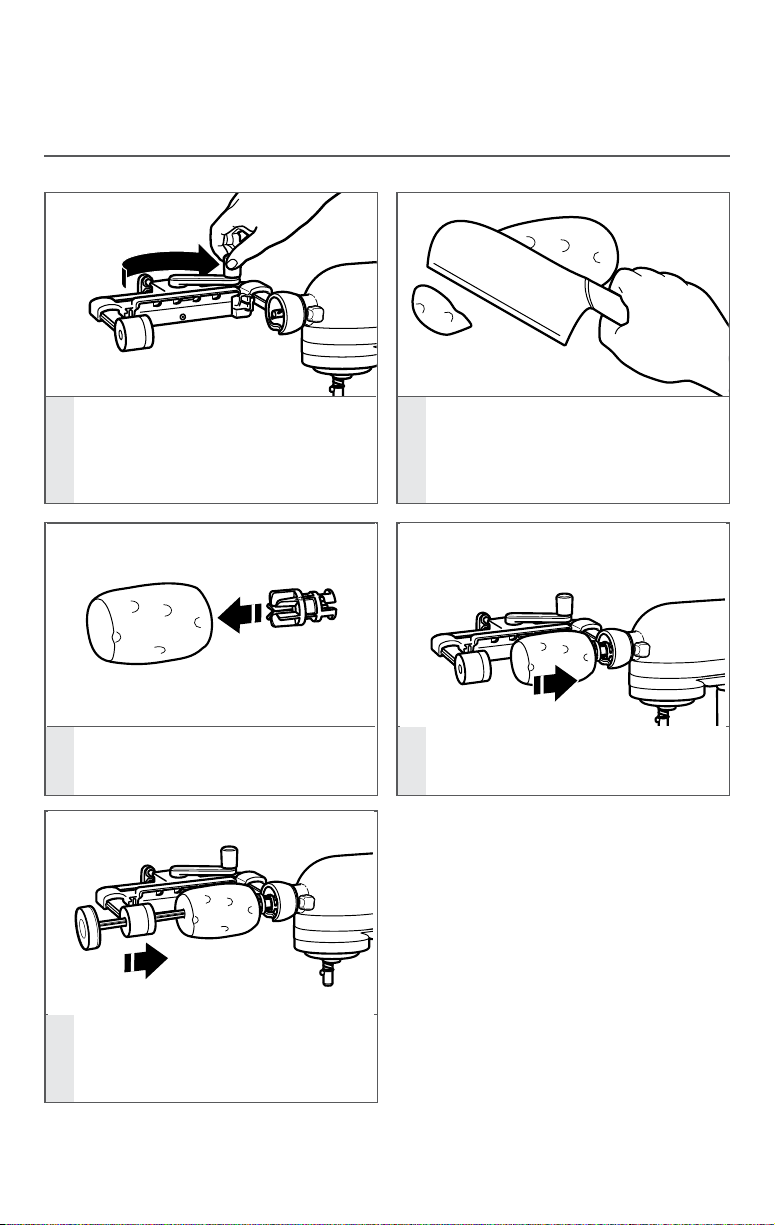
PREPARING TO PROCESS OTHER VEGETABLES/FRUITS
Cut the food to fit within the
Rotate lever clockwise to the
1
locked position.
attachment main body.
Maximum food size is approximately
2
3.5" (8.9 cm) diameter and 5.5"
(14 cm) long.
Insert the food holder all the way
3
into the center of the food.
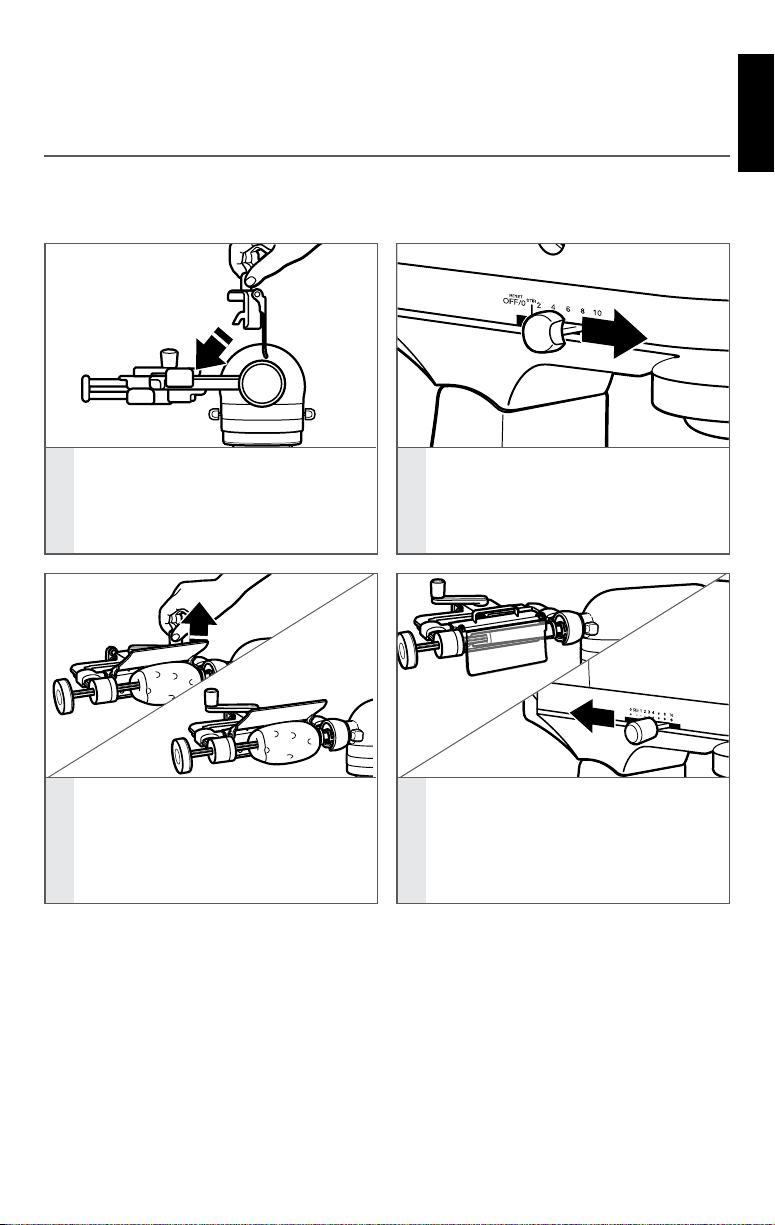
Insert the food skewer into the
skewer support on the attachment
5
main body, making sure that it is
centered on the food.
8 | USING THE VEGETABLE SHEET CUTTER ATTACHMENT
Place the food and food holder
onto the main body and twist
4
clockwise to lock into place.
NOTE: The food skewer may not need
to be fully inserted. For hard foods, insert
approximately 2"(5 cm), or to the first
mark on the food skewer.
USING THE VEGETABLE SHEET
CUTTER ATTACHMENT
PROCESSING FRUITS & VEGETABLES
NOTE: When using the Vegetable Sheet Cutter attachment, do not wear ties, scarves,
loose clothing, long necklaces, or anything that could become entagled in the
attachment; gather long hair with a clasp.
Insert the desired blade into the
blade carrier at a 45 degree angle
to allow proper alignment with the
1
attachment main body. Allow the
blade cover to rest on the food.
Turn the Stand Mixer on to Stir speed.
For best results, start the Stand Mixer
2
before releasing the blade into
the food.
ENGLISH
Pull toward Stand Mixer and lift up
on the blade release lever to unlock
the blade carrier and rotate the blade
3
carrier slowly until it comes into
contact with the food before
letting go.
NOTE: As the attachment cuts the
vegetable into sheets, it can either be
one continuous sheet or several sheets.
This is normal.
USING THE VEGETABLE SHEET CUTTER ATTACHMENT | 9
Once the food stops processing, turn
4
off the Stand Mixer.
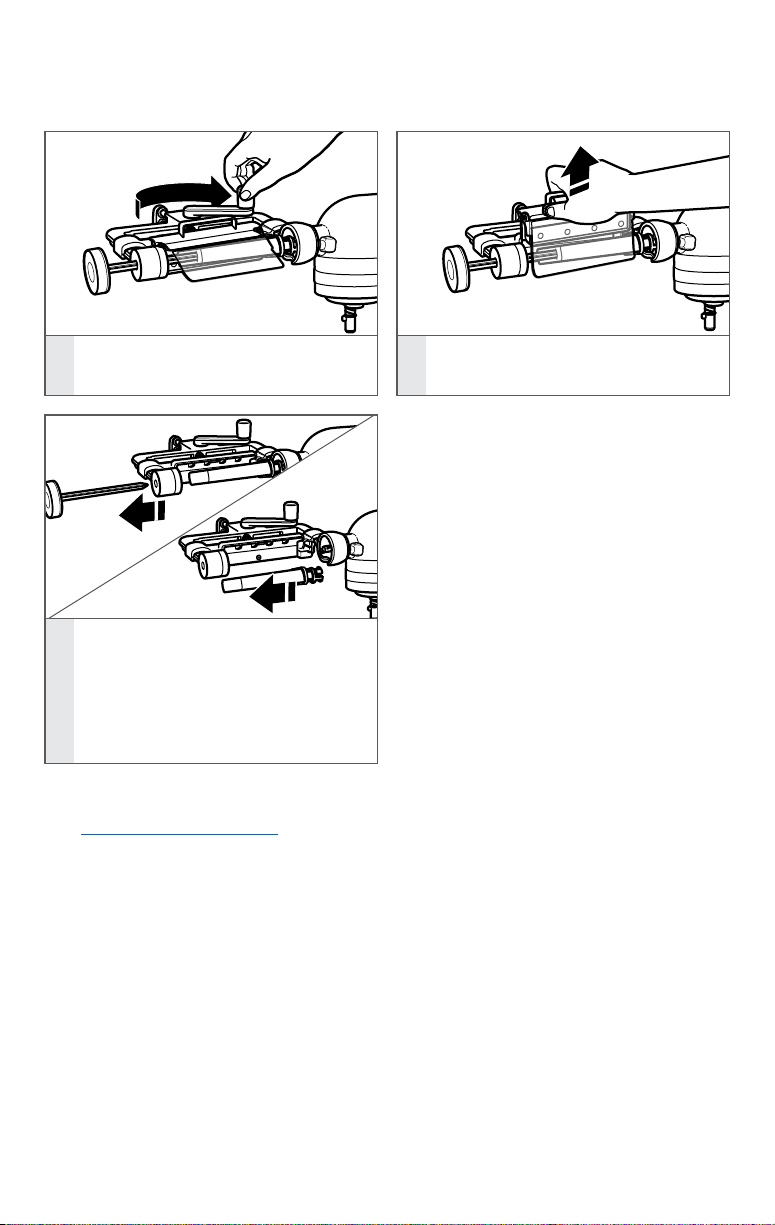
USING THE VEGETABLE SHEET
CUTTER ATTACHMENT
Rotate lever clockwise to the
5
locked position.
Remove the food skewer, then
remove the food and adapter (if
necessary). To prevent breakage,
do not twist the skewer during food
7
removal. If food is difficult to remove
from food holder or skewer, slice into
the core lengthwise to help remove it.
FOR INSTRUCTIONAL VIDEOS, RECIPES AND OTHER INFORMATION ON USING THE
VEGETABLE SHEET CUTTER ATTACHMENT
Visit kitchenaid.com/quickstart for additional instructions with videos, inspiring recipes,
and tips on how to use your Vegetable Sheet Cutter attachment.
Remove the blade.
6
10 | USING THE VEGETABLE SHEET CUTTER ATTACHMENT
CARE AND CLEANING
CLEANING THE VEGETABLE SHEET CUTTER ATTACHMENT
AND ACCESSORIES
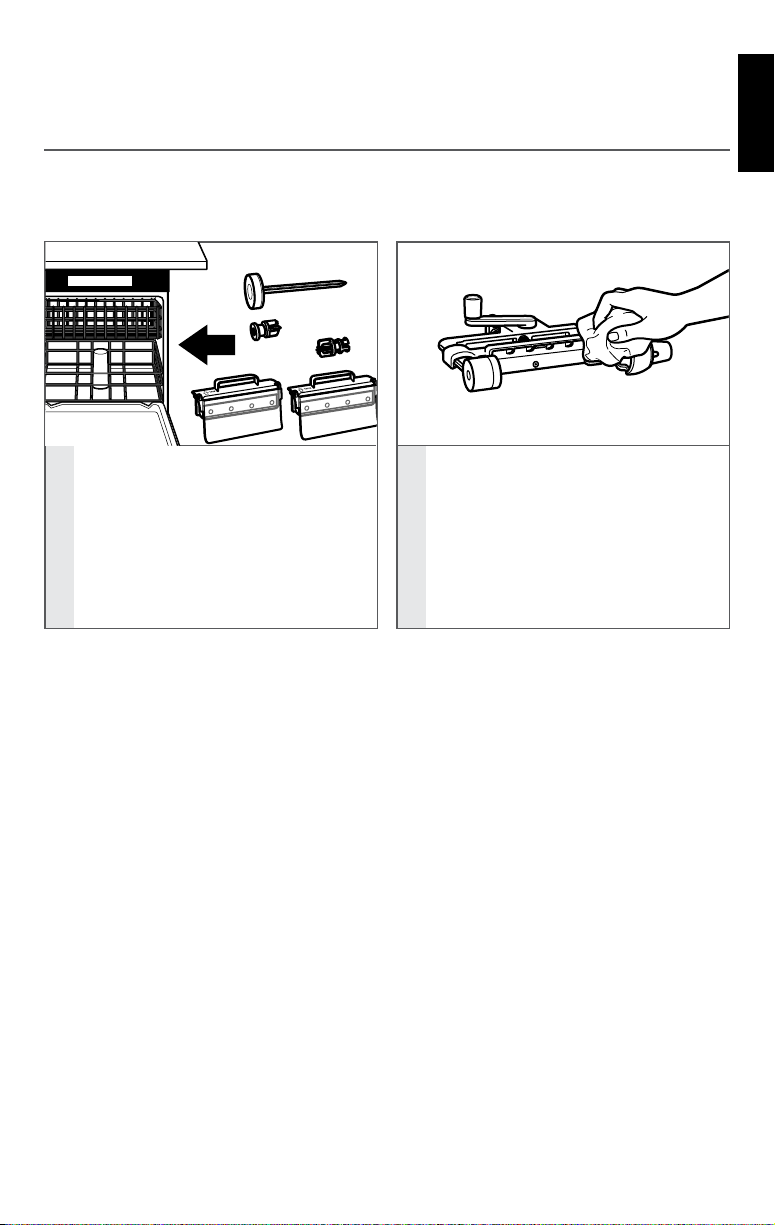
IMPORTANT: To avoid damaging the finish, never wash or immerse the main body of
the Vegetable Sheet Cutter attachment in water or place in the dishwasher. The
removable blades and accessories are dishwasher safe.
Clean the main body of the
After using the Vegetable Sheet
Cutter attachment, remove all
blades and accessories. Wash the
1
blades and accessory pieces in the
dishwasher, top rack only.
Vegetable Sheet Cutter attachment
by hand only. Wash with a soft,
damp cloth. Be sure to rinse the
skewer support located in the
2
main body. Dry thoroughly with a
soft, dry cloth. Do not wash in the
dishwasher. Do not immerse
in water.
ENGLISH
NOTE: For easier cleaning, rinse blades and other accessories immediately after
each use. If food is stuck in the blades, use a knife to remove the pieces.
TROUBLESHOOTING
If your Stand Mixer should malfunction
or fail to operate while using the
Vegetable Sheet Cutter attachment,
please check the following:
- Did you follow the preparation
suggestions in the “Vegetable Sheet
Cutter attachment blade chart”?
- Did you choose a blade recommended
for the type of food you are processing?
- Is the Stand Mixer plugged in? Refer to
the “Instructions” manual that came
with your Stand Mixer to nd
possible solutions.
- Is the fuse in the circuit to the Stand
Mixer in working order? Refer to the
“Instructions” manual that came
with your Stand Mixer to nd
possible solutions.
If the problem is not due to one of the
above items, see the “Arranging for
service” section in the Warranty.
Do not return the Vegetable Sheet Cutter
attachment or the Stand Mixer to the
retailer, as retailers do not provide service.
TROUBLESHOOTING | 11
WARRANTY
KITCHENAID® VEGETABLE SHEET CUTTER ATTACHMENT
WARRANTY FOR THE 50 UNITED STATES, THE DISTRICT
OF COLUMBIA, PUERTO RICO, AND CANADA
This warranty extends to the purchaser and any succeeding owner of the Vegetable
Sheet Cutter attachment operated in the 50 United States, the District of Columbia,
Puerto Rico, and Canada.
Length of Warranty: One Year Full Warranty from date of purchase.
KitchenAid Will Pay Hassle-Free Replacement of your Vegetable
for Your Choice of: Sheet Cutter attachment. See the next page for details
on how to arrange for service, or call the Customer
eXperience Center toll-free at 1-800-541-6390.
OR
The replacement parts and repair labor costs to
KitchenAid Will A. Repairs when your Vegetable Sheet Cutter
Not Pay for: attachment is used in other than normal single
family home use.
B. Damage resulting from accident, alteration,
misuse, or abuse.
C. Any shipping or handling costs to deliver
your Vegetable Sheet Cutter attachment
to an Authorized Service Center.
D. Replacement parts or repair labor costs for
Vegetable Sheet Cutter attachments
operated outside the 50 United States, District
of Columbia, Puerto Rico, and Canada.
DISCLAIMER OF IMPLIED WARRANTIES; LIMITATION OF REMEDIES
IMPLIED WARRANTIES, INCLUDING TO THE EXTENT APPLICABLE WARRANTIES
OF MERCHANTABILITY OR FITNESS FOR A PARTICULAR PURPOSE, ARE
EXCLUDED TO THE EXTENT LEGALLY PERMISSIBLE. ANY IMPLIED WARRANTIES
THAT MAY BE IMPOSED BY LAW ARE LIMITED TO ONE YEAR, OR THE
SHORTEST PERIOD ALLOWED BY LAW. SOME STATES AND PROVINCES DO
NOT ALLOW LIMITATIONS OR EXCLUSIONS ON HOW LONG AN IMPLIED
WARRANTY OF MERCHANTABILITY OR FITNESS LASTS, SO THE ABOVE
LIMITATIONS OR EXCLUSIONS MAY NOT APPLY TO YOU.
IF THIS PRODUCT FAILS TO WORK AS WARRANTED, CUSTOMER’S SOLE AND
EXCLUSIVE REMEDY SHALL BE REPAIR OR REPLACEMENT ACCORDING TO THE
TERMS OF THIS LIMITED WARRANTY. KITCHENAID AND KITCHENAID CANADA
DO NOT ASSUME ANY RESPONSIBILITY FOR INCIDENTAL OR CONSEQUENTIAL
DAMAGES. This warranty gives you specic legal rights and you may also have
other rights which vary from state to state or province to province.
correct defects in materials and workmanship.
Service must be provided by an Authorized
KitchenAid Service Center.
12 | WARRANTY
 Loading...