

KitchenAid KSMFGA Quick Start Guide

GET
GRINDING
ALLEZ-Y,
¡A MOLER!
HACHEZ!
ALLEZ-Y, HACHEZ!
GET GRINDING!
¡A MOLER!
DISCOVER MORE
AT KITCHENAID.COM/QUICKSTART
For exciting recipes, demo videos, product registration,
and more — our quick start page has what you need
to help you get the most from your new product.
KitchenAid.com | KitchenAid.ca | USA: 1.800.541.6390 | Canada: 1.800.807.6777
W11339701A KSMFGA
04/2019
W11339701B.indd 1-3 02/04/2019 14:10:40
®/™ ©2019 KitchenAid. All rights reserved. KITCHENAID and the design
of the stand mixer are trademarks in the U.S. and elsewhere.
VISITEZ KITCHENAID.COM/QUICKSTART
W11339701A KSMFGA
04/2019
DÉCOUVREZ PLUS
Pour plus d’idées sur l’utilisation, de nouvelles recettes, voir des
vidéos de démonstration, l’enregistrement du produit, et plus –
notre page de démarrage rapide comprend tout ce dont vous
avez besoin pour vous aider à profiter de votre nouveau produit.
ASSISTANCESUPPORT
®/™ ©2019 KitchenAid. Tous droits réservés. KITCHENAID et la forme du batteur
sur socle sont des marques de commerce aux É.-U. et dans d’autres pays.
ENREGISTRERREGISTER RECETTESRECIPES
EN KITCHENAID.COM/QUICKSTART
demostraciones, registro de productos, etc., nuestra página
ayudarle a sacar el máximo provecho de su nuevo producto.
KitchenAid.com | KitchenAid.ca | USA: 1.800.541.6390 | Canada: 1.800.807.6777KitchenAid.com | KitchenAid.ca | USA: 1.800.541.6390 | Canada: 1.800.807.6777
W11339701A KSMFGA
04/2019
DESCUBRA MÁS
Para más usos, recetas interesantes, videos con
de guía rápida para comenzar tiene lo necesario para
VIDEOSGUÍAS
®/™ ©2019 KitchenAid. Todos los derechos reservados. KITCHENAID y el
diseño de la batidora con base son marcas registradas en EE.UU.
SOPORTE
TÉCNICO
REGISTRORECETASVIDEOSVIDEOS GUIDESGUIDES
PARA COMENZAR
GUÍA RÁPIDA PARA COMENZAR
¡En unos pocos pasos sencillos, usted estará encaminada para disfrutar algo delicioso!
Para ver instrucciones completos y videos, visite www.kitchenaid.com/quickstart en internet.
1
2
PREMIERS PAS
GUIDE DE DÉMARRAGE RAPIDE
En quelques étapes rapides, vous vous apprêterez à savourer quelque chose de délicieux! Rendez-
vous sur www.kitchenaid.com/quickstart pour obtenir des instructions complètes et voir des vidéos.
1
2
GET STARTED
QUICK START GUIDE
In a few easy steps, you’ll be on your way to enjoying something delicious!
For complete instructions and videos, go online to www.kitchenaid.com/quickstart.
1
2
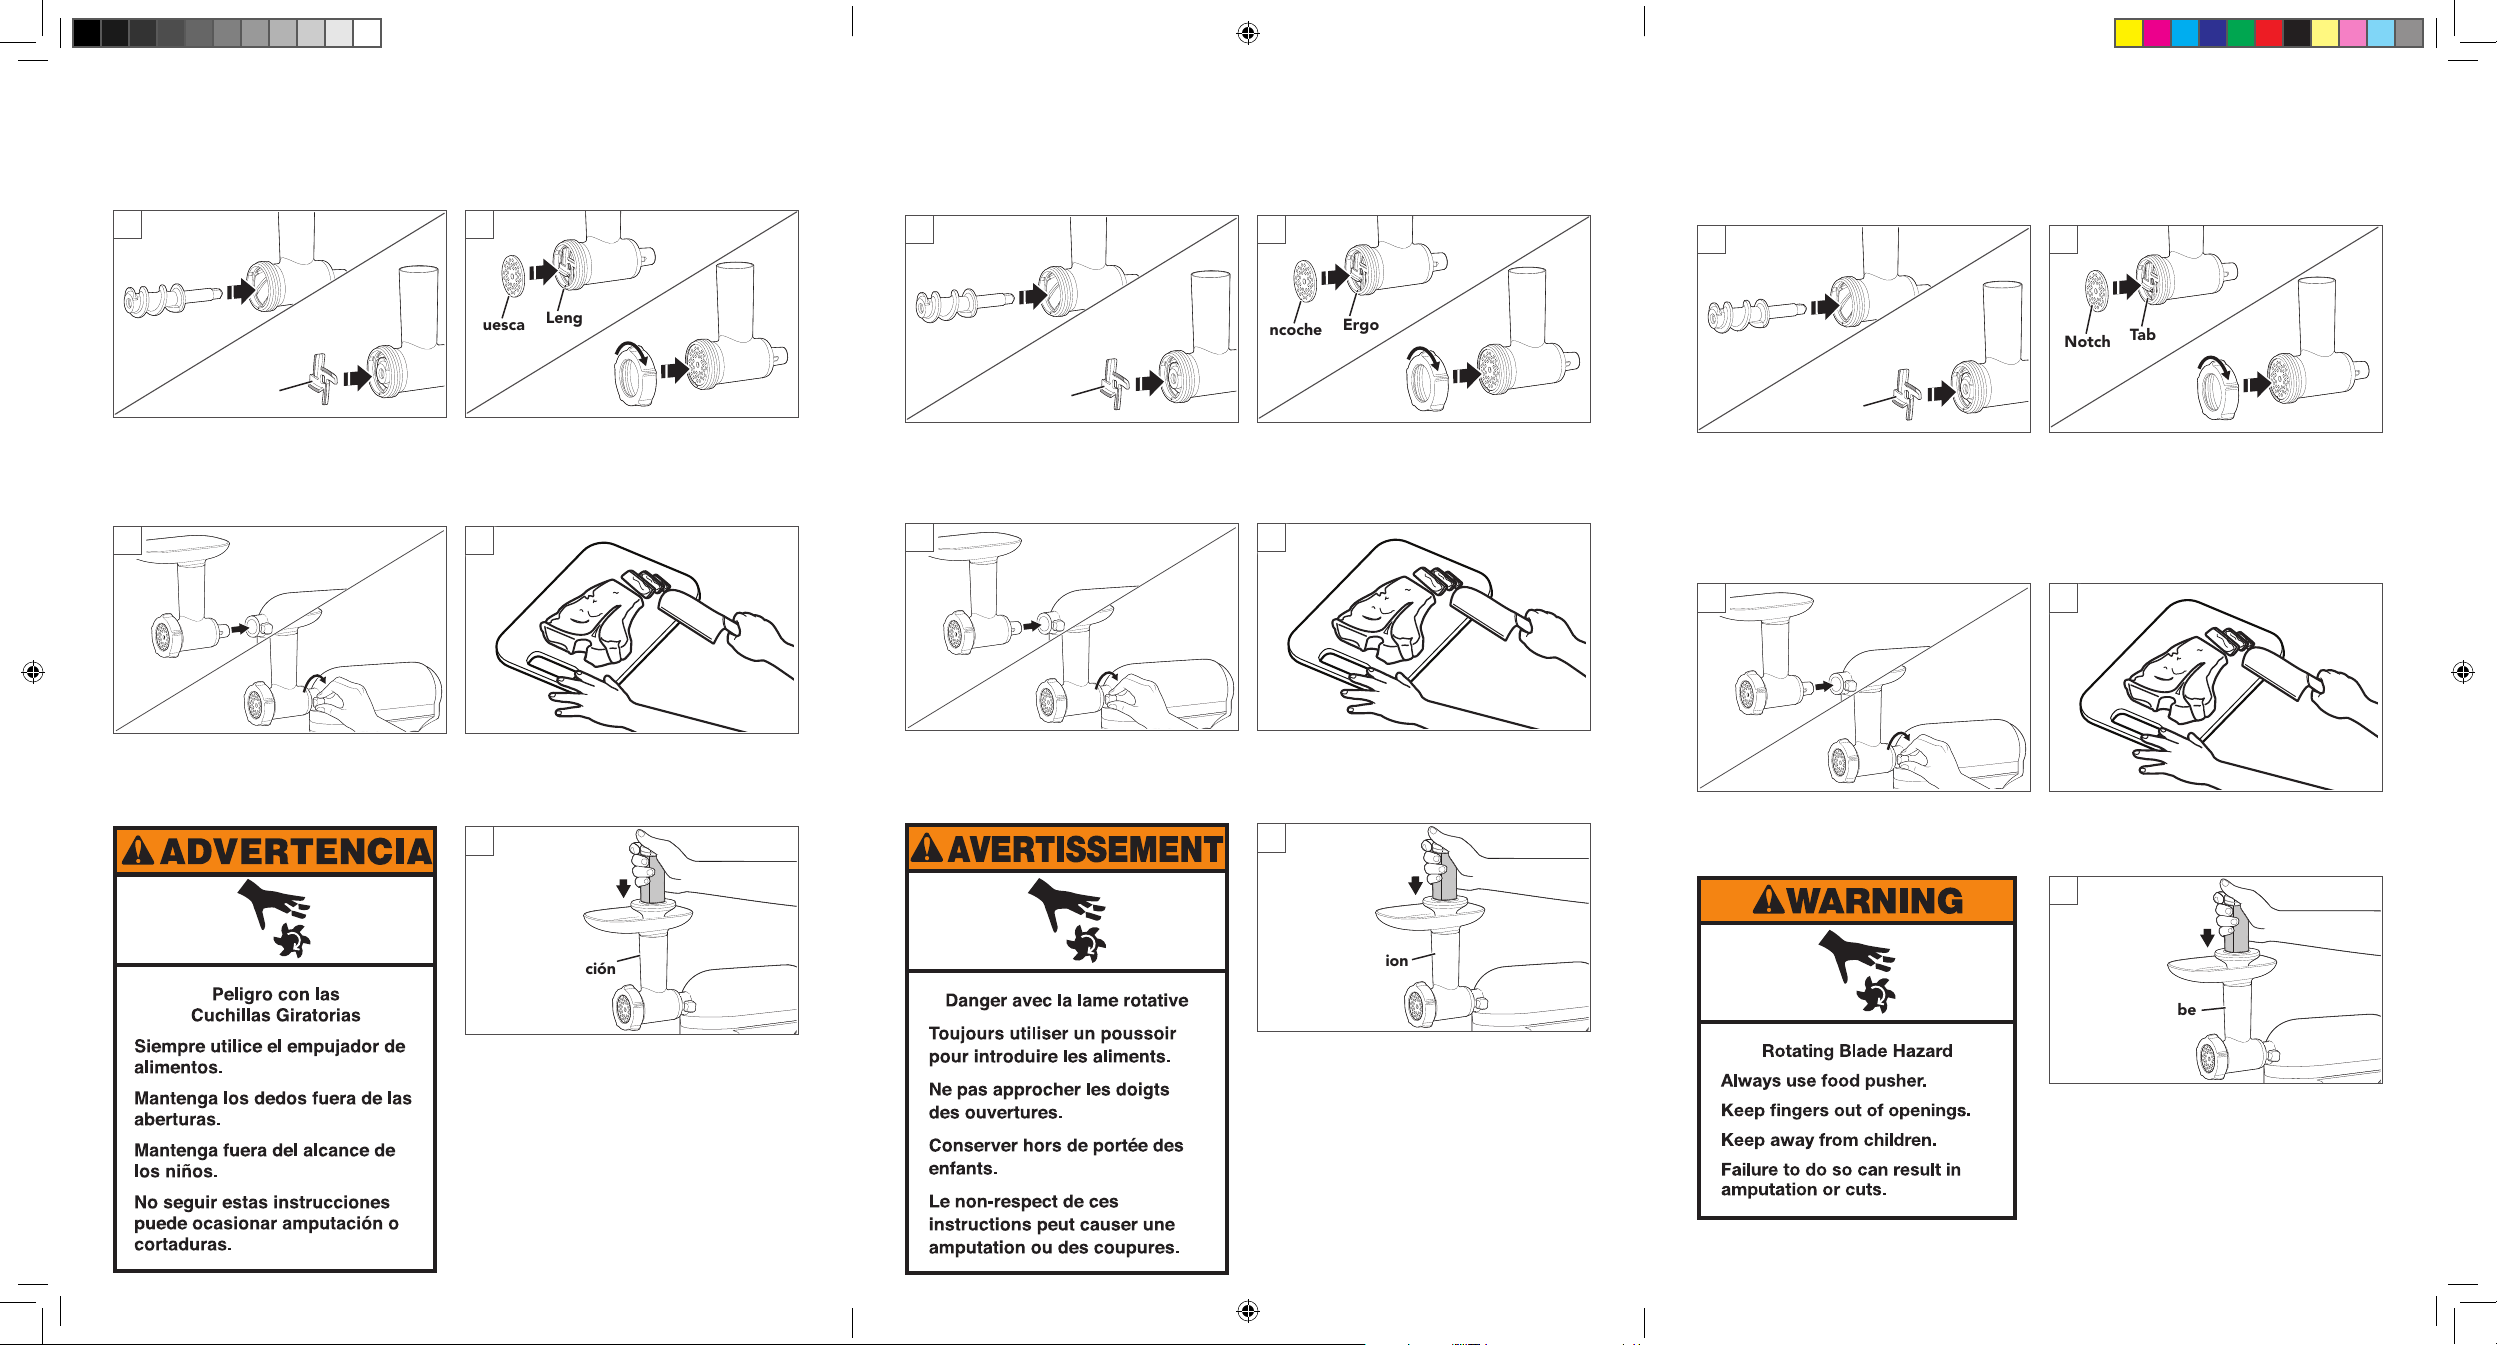
Lado filoso
Inserte el tornillo para moler en el
alojamiento principal. Coloque la cuchilla
sobre el extremo del tornillo para moler.
NOTA: Asegúrese de que el lado filoso de la
cuchilla quede mirando hacia afuera.
3
Inserte el eje del accesorio en el receptáculo
para el accesorio. Apriete la perilla del
receptáculo del accesorio de la batidora con
base hacia la derecha hasta que el accesorio
quede completamente fijo en la batidora.
Muesca
Coloque el disco de molienda que desea
sobre la cuchilla, alineando la muesca del
disco con la lengüeta ubicada en la parte
inferior del alojamiento principal. Gire el
collar manualmente en sentido horario hasta
asegurarlo, pero sin ajustarlo demasiado.
Lengüeta
4
Corte los alimentos en tiras o trozos lo
suficientemente pequeños para que quepan
en el tubo de alimentación.
5
Côté tranchant
Insérer la vis de hachage dans le boîtier
principal. Placer la lame sur l’extrémité de la vis
de hachage.
REMARQUE: S’assurer que le côté tranchant
de la lame est orienté vers l’extérieur.
3
Insérer le logement de l’arbre de l’accessoire
dans la prise à accessoires. Serrer le bouton de
la prise à accessoires du batteur sur socle en
sens horaire jusqu’à ce que l’accessoire ysoit
parfaitement fixé.
Encoche
Placer le disque de hachage par-dessus la lame,
enfaisant correspondre l’encoche du disque
avec l’ergot au bas du boîtier principal. Tourner
à la main le raccord dans le sens horaire jusqu’à
ce qu’il soit bien fixé sans être serré.
Ergot
4
Couper les aliments en petites lanières ou
en morceaux pour insertion dans le tube
d’alimentation.
5
Sharp side
Insert the Grind Screw into the Main Housing
securely. Place the Blade over the end of the
Grind Screw.
NOTE: Make sure the sharp side of the Blade
is facing out.
3
Insert the attachment shaft Housing into
the attachment hub. Tighten the Stand
Mixer attachment hub knob clockwise until
attachment is secured to the Stand Mixer.
Notch
Place the desired Grinding Plate over the
Blade, matching the notch of the plate with
the tab on the bottom of Main Housing.
Turn Collar clockwise by hand until secured
but not tightened.
Tab
4
Cut food into small strips or pieces sized to fit
into the feed tube.
5
Tubo de
alimentación
Encienda la batidora con base en la Velocidad
4 ycoloque los alimentos en el tubo de
alimentación conel empujador de alimentos.
NOTA: Consulte este manual de uso y
cuidado para obtener instrucciones más
detalladas.
W11339701B.indd 4-6 02/04/2019 14:10:44
Tube d’alimentation
Mettre en marche le batteur sur socle à la
vitesse 4 et introduire les aliments dans le tube
d’alimentation à l’aide du poussoir.
REMARQUE: Consulter ce Guide
d’utilisation et d’entretien pour des
instructions détaillées.
Feed Tube
Turn the Stand Mixer to Speed 4 and feed
food into the feed tube using the Food
Pusher.
NOTE: Please refer to your Use and Care
Guide for detailed instructions.
 Loading...