

Kitchenaid KSM95 User Manual
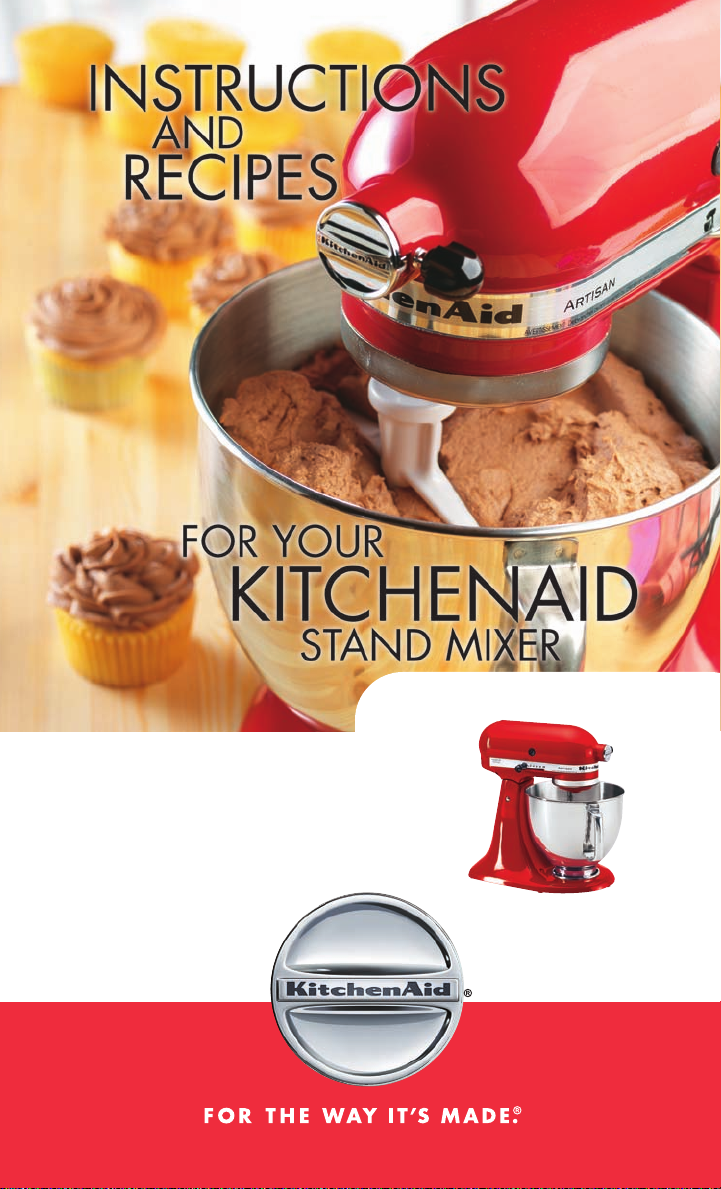
Techniques for peak
performance: The
use and care of your
KitchenAid
®
Tilt Head Mixer

ENGLISH
ENGLISH
Proof of Purchase and Product Registration .................................................... 3
Stand Mixer Safety ...................................................................................4
Important Safeguards ................................................................................ 4
Electrical Requirements ..............................................................................5
KitchenAid
Hassle-Free Replacement Warranty –
50 United States and District of Columbia ....................................................7
Hassle-Free Replacement Warranty – Canada ............................................... 7
How to Arrange for Warranty Service in Puerto Rico ......................................8
How to Arrange for Service after the Warranty Expires – All Locations ............... 8
How to Arrange for Service Outside these Locations .......................................8
How to Order Accessories and Replacement Parts ......................................... 9
Troubleshooting Problems ........................................................................... 9
Tilt-Head Stand Mixer Features .................................................................10
Assembling Your Tilt-Head Stand Mixer ...................................................... 11
Using Your Pouring Shield ........................................................................ 12
Using Your KitchenAid® Accessories ........................................................... 13
Mixing Time .......................................................................................... 13
Tilt-Head Stand Mixer Use .......................................................................14
Care and Cleaning ................................................................................ 14
Beater to Bowl Clearance ........................................................................14
Speed Control Guide .............................................................................15
Mixing Tips ........................................................................................... 16
Egg Whites .................................................................................... 17
Whipped Cream ............................................................................ 17
Attachments and Accessories .................................................................... 18
General Instructions ................................................................................ 19
Appetizers and Entrées ............................................................................ 60
Yeast Breads and Quick Breads ................................................................64
Cakes and Frostings ...............................................................................73
Pies and Desserts ...................................................................................78
Cookies, Bars, and Candies .................................................................... 82
Recipe Index ....................................................................................... 143
®
Stand Mixer Warranty .............................................................. 6
TABLE OF CONTENTS
2

TABLE DES MATIÈRES
Preuve d’achat et enregistrement du produit ................................................20
Sécurité du batteur sur socle ..................................................................... 21
Consignes de sécurité importantes ............................................................. 21
Contraintes électriques ............................................................................ 22
®
Garantie du batteur sur socle KitchenAid
Garantie de satisfaction totale et de remplacement -
50 États des États-Unis, district fédéral de Columbia ..................................... 24
Garantie de satisfaction totale et de remplacement - Canada .........................24
Comment obtenir une réparation sous garantie à Puerto Rico .........................25
Comment obtenir une réparation hors garantie – tous les territoires .................. 25
Comment obtenir une réparation en dehors de ces territoires .......................... 25
Comment commander des accessoires et des pièces de rechange .................. 26
Dépannage...........................................................................................27
Caractéristiques du batteur sur socle à tête inclinable .................................... 28
Assemblage du batteur sur socle à tête inclinable ......................................... 29
Utilisation de l’écran verseur ..................................................................... 31
Utilisation des accessoires KitchenAid® ...................................................... 32
Durée de mélange .................................................................................32
Utilisation du batteur sur socle à tête inclinable ............................................33
Entretien et nettoyage .............................................................................. 33
Jeu entre le batteur et le bol ...................................................................... 34
Guide de réglage de la vitesse ................................................................. 35
Conseils de mélange .............................................................................. 36
Blancs d’œufs ........................................................................... 37
Crème fouettée .......................................................................... 37
Accessoires ........................................................................................... 38
Directives Générales ............................................................................... 39
Hors-d’œuvre et entrées .......................................................................... 88
Pains à levure et pains éclair .................................................................... 92
Gâteaux et glaçages ............................................................................ 101
Tartes et desserts .................................................................................. 106
Biscuits, barres et bonbons .....................................................................110
Index des recettes .................................................................................143
...................................................23
FRANÇAIS
1

ENGLISHENGLISH
ÍNDICE
Comprobante de compra y registro del producto ......................................... 40
Seguridad de la batidora con base ........................................................... 41
Medidas de seguridad importantes ........................................................... 41
Requisitos eléctricos ................................................................................ 42
®
Garantía de la batidora con base KitchenAid
ESPAÑOL
Garantía de reemplazo sin difi cultades en los
............................................ 43
50 estados de los Estados Unidos y en el Distrito de Columbia ...................... 44
Garantía de reemplazo sin difi cultades en Canadá ..................................... 44
Cómo obtener el servicio de garantía en Puerto Rico .................................... 45
Cómo obtener el servicio de garantía una vez que ésta haya expirado –
Todos los lugares.................................................................................... 45
Cómo obtener el servicio técnico en otros lugares ........................................ 45
Cómo realizar un pedido de accesorios y repuestos ....................................46
Solución de problemas............................................................................ 47
Características de la batidora con base con cabeza reclinable ...................... 48
Cómo ensamblar su batidora con base con cabeza reclinable ......................49
Cómo utilizar su vertedor antisalpicaduras .................................................. 51
Cómo utilizar sus accesorios KitchenAid
®
................................................... 52
Tiempo de mezclado .............................................................................. 52
Características de la batidora con base con cabeza reclinable ...................... 53
Cuidado y limpieza ................................................................................53
Distancia entre el batidor y el bol .............................................................. 54
Guía para el control de la velocidad ......................................................... 55
Consejos útiles para mezclar .................................................................... 56
Claras de huevo ........................................................................ 57
Crema batida ........................................................................... 57
Accesorios ............................................................................................ 58
Instrucciones generales ............................................................................ 59
Entremeses y platos de entrada ...............................................................114
Panes con levadura y panes rápidos .......................................................118
Repostería y glaseados ......................................................................... 127
Pasteles y postres .................................................................................132
Galletas, barras, y dulces ...................................................................... 136
Índice de recetas .................................................................................143
2

PROOF OF PURCHASE &
PRODUCT REGISTRATION
Always keep a copy of the sales receipt showing the date of purchase of your
Stand Mixer. Proof of purchase will assure you of in-warranty service.
Before you use your Stand Mixer, please fi ll out and mail your product registration
card packed with the unit.
This card will enable us to contact you in the unlikely event of a product safety
notifi cation and assist us in complying with the provisions of the Consumer Product
Safety Act. This card does not verify your warranty.
Please complete the following for your personal records:
Model Number _______________________________________________________
Serial Number _______________________________________________________
Date Purchased _______________________________________________________
Store Name and Location ______________________________________________
____________________________________________________________________
ENGLISH
3
ENGLISH
STAND MIXER SAFETY
Your safety and the safety of others
are very important.
We have provided many important safety messages in this manual
and on your appliance. Always read and obey all safety messages.
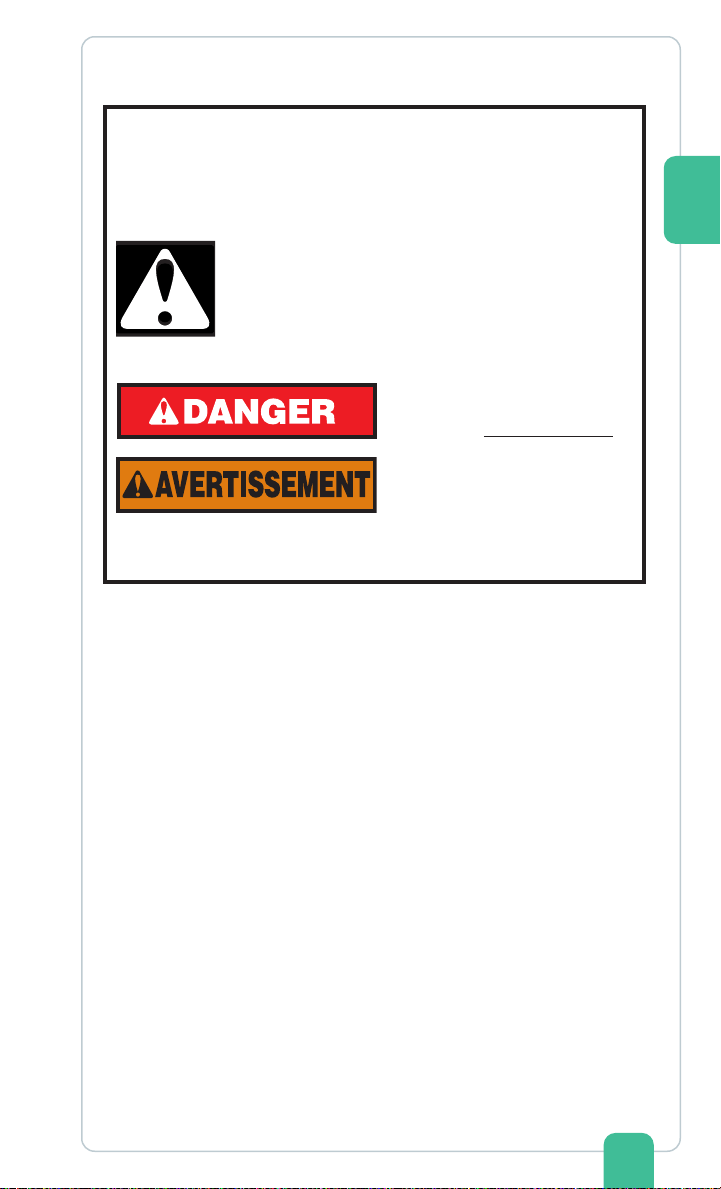
This is the safety alert symbol.
This symbol alerts you to potential hazards that
can kill or hurt you and others.
All safety messages will follow the safety aler t
symbol and either the word “DANGER” or
“WARNING.” These words mean:
You can be killed or
seriously injured if you
don’t immediately follow
instructions.
You can be killed or
WARNING
All safety messages will tell you what the potential hazard is, tell
you how to reduce the chance of injury, and tell you what can
happen if the instructions are not followed.
seriously injured if you
don’t follow instructions.
IMPORTANT SAFEGUARDS
When using electrical appliances, basic safety precautions should always be
followed including the following:
1. Read all instructions.
2. To protect against risk of electrical shock, do not put Stand Mixer in water or
other liquid.
3. Close supervision is necessary when any appliance is used by or
near children.
4. Unplug Stand Mixer from outlet when not in use, before putting on or taking off
parts and before cleaning.
5. Avoid contacting moving parts. Keep hands, hair, clothing, as well as spatulas
and other utensils away from beater during operation to reduce the risk of
injury to persons and/or damage to the Stand Mixer.
6. Do not operate Stand Mixer with a damaged cord or plug or after the
Stand Mixer malfunctions, or is dropped or damaged in any manner.
Return appliance to the nearest Authorized Service Center for examination,
repair or electrical or mechanical adjustment. Call the KitchenAid Customer
Satisfaction Center at 1-800-541-6390 (1-800-807-6777 in Canada) for
more information.
4
7. The use of attachments not recommended or sold by KitchenAid may cause
fi re, electrical shock or injury.
8. Do not use the Stand Mixer outdoors.
9. Do not let the cord hang over edge of table or counter.
10. Remove Flat Beater, Wire Whip or Dough Hook from Stand Mixer
before washing.
11. This product is designed for household use only.
SAVE THESE INSTRUCTIONS
ELECTRICAL REQUIREMENTS
Volts: 120 V.A.C. Hertz: 60 Hz
The wattage rating for your Stand Mixer
is printed on a tag under the mixer
base. It is also listed on the trim band.
If the power cord is too short, have
a qualifi ed electrician or serviceman
install an outlet near the appliance.
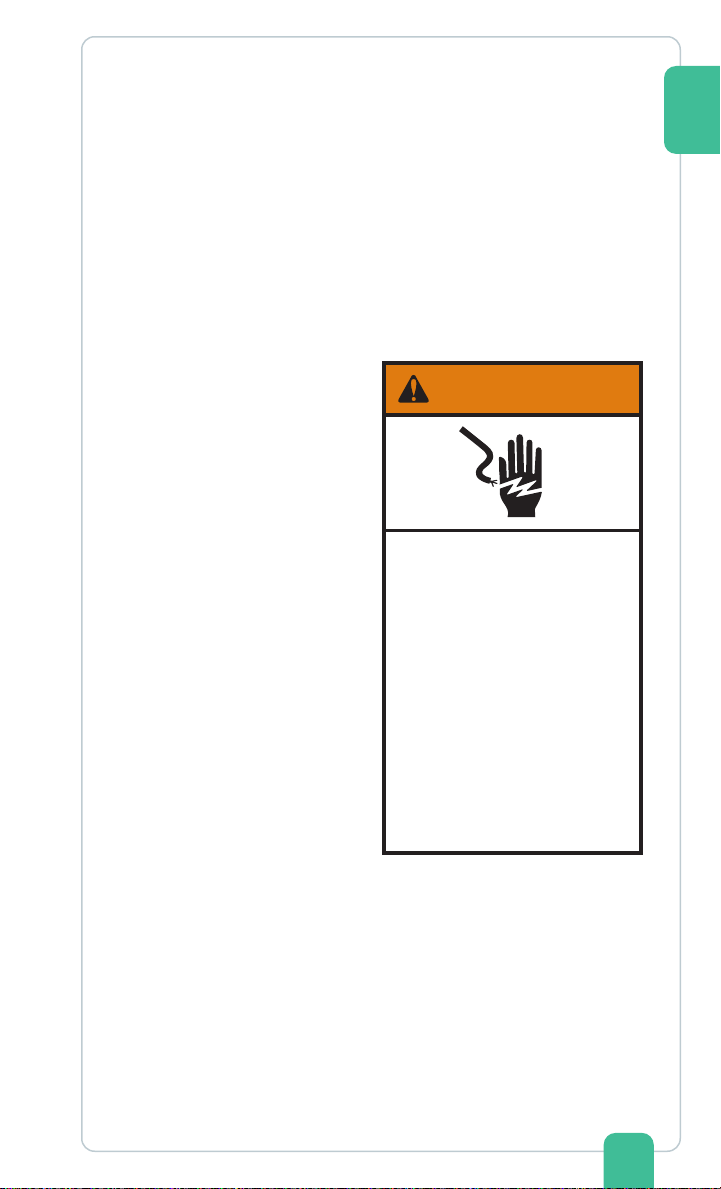
WARNING
ENGLISH
Electrical Shock Hazard
Plug into a grounded
3 prong outlet.
Do not remove
ground prong.
Do not use an adapter.
Do not use an
extension cord.
Failure to follow these
instructions can result
in death, fire, or
electrical shock.
5

ENGLISH
KITCHENAID® STAND MIXER WARRANTY
Length of
Warranty:
50 United States, the
District of Columbia,
Canada, and Puerto
Rico: One-year limited
warranty from date
of purchase.
DISCLAIMER OF IMPLIED WARRANTIES; LIMITATION OF REMEDIES
IMPLIED WARRANTIES, INCLUDING TO THE EXTENT APPLICABLE WARRANTIES
OF MERCHANTABILITY OR FITNESS FOR A PARTICULAR PURPOSE, ARE
EXCLUDED TO THE EXTENT LEGALLY PERMISSIBLE. ANY IMPLIED WARRANTIES
THAT MAY BE IMPOSED BY LAW ARE LIMITED TO ONE YEAR, OR THE
SHORTEST PERIOD ALLOWED BY LAW. SOME STATES AND PROVINCES DO
NOT ALLOW LIMITATIONS OR EXCLUSIONS ON HOW LONG AN IMPLIED
WARRANTY OF MERCHANTABILITY OR FITNESS LASTS, SO THE ABOVE
LIMITATIONS OR EXCLUSIONS MAY NOT APPLY TO YOU.
IF THIS PRODUCT FAILS TO WORK AS WARRANTED, CUSTOMER’S SOLE
AND EXCLUSIVE REMEDY SHALL BE REPAIR OR REPLACEMENT ACCORDING
TO THE TERMS OF THIS LIMITED WARRANTY. KITCHENAID AND KITCHENAID
CANADA DO NOT ASSUME ANY RESPONSIBILITY FOR INCIDENTAL OR
CONSEQUENTIAL DAMAGES. This warranty gives you specifi c legal rights and
you may also have other rights which vary from state to state or province
to province.
KitchenAid
Will Pay For:
50 United States, the
District of Columbia
and Canada: Hassle-
free replacement of
your Stand Mixer. See
the following page
for details on how to
arrange for replacement.
OR
In Puerto Rico:
The replacement parts
and repair labor costs
to correct defects
in materials and
workmanship. Service
must be provided by an
Authorized KitchenAid
Service Center. To
arrange for service,
follow the instructions on
page 8.
KitchenAid
Will Not Pay For:
A. Repairs when Stand
Mixer is used in other
than normal single
family home use.
B. Damage resulting
from accident,
alteration, misuse or
abuse or use with
products not
approved by
KitchenAid.
C. Replacement parts or
repair labor costs for
Stand Mixer when
operated outside the
country of purchase.
6

HASSLE-FREE REPLACEMENT WARRANTY –
50 UNITED STATES AND DISTRICT
OF COLUMBIA
We’re so confi dent the quality of our
products meets the exacting standards
of KitchenAid that, if your Stand Mixer
should fail within the fi rst year of
ownership, KitchenAid will arrange
to deliver an identical or comparable
replacement to your door free of charge
and arrange to have your original
Stand Mixer returned to us. Your
replacement unit will also be covered
by our one year limited warranty.
Please follow these instructions to
receive this quality service.
If your KitchenAid
fail within the fi rst year of ownership,
simply call our toll-free Customer
Satisfaction Center at 1-800-541-6390
Monday through Friday, 8 a.m. to
8 p.m. (Eastern Time), or Saturday,
10 a.m. to 5 p.m. Give the consultant
your complete shipping address.
(No P.O. Box numbers, please.)
When you receive your replacement
Stand Mixer, use the carton and
packing materials to pack up your
original Stand Mixer. In the carton,
include your name and address on a
sheet of paper along with a copy of the
proof of purchase (register receipt, credit
card slip, etc.).
®
HASSLE-FREE REPLACEMENT WARRANTY –
CANADA
We’re so confi dent the quality of our
products meets the exacting standards
of the KitchenAid brand that, if your
Stand Mixer should fail within the fi rst
year of ownership, KitchenAid Canada
will replace your Stand Mixer with an
identical or comparable replacement.
Your replacement unit will also be
covered by our one year limited
warranty. Please follow these instructions
to receive this quality service.
If your KitchenAid® Stand Mixer should
fail within the fi rst year of ownership,
take the Stand Mixer or ship collect
to an Authorized KitchenAid Canada
Service Centre. In the carton include
your name and complete shipping
address along with a copy of the proof
of purchase (register receipt, credit card
slip, etc.). Your replacement Stand Mixer
will be returned prepaid and insured.
If you are unable to obtain satisfactory
service in this manner call our toll-free
Customer Interaction Centre at
1-800-807-6777.
Or write to us at:
Customer Interaction Centre
KitchenAid Canada
1901 Minnesota Court
Mississauga, ON L5N 3A7
ENGLISH
Stand Mixer should
7

ENGLISH
HOW TO ARRANGE FOR WARRANTY SERVICE
IN PUERTO RICO
Your KitchenAid® Stand Mixer is
covered by a one-year limited warranty
from the date of purchase. KitchenAid
will pay for replacement parts and
labor costs to correct defects in
materials and workmanship. Service
must be provided by an Authorized
KitchenAid Service Center.
Take the Stand Mixer or ship prepaid
and insured to an Authorized KitchenAid
Service Center. Your repaired Stand
Mixer will be returned prepaid and
insured. If you are unable to obtain
satisfactory service in this manner, call
toll-free 1-800-541-6390 to learn the
location of a Service Center near you.
HOW TO ARRANGE FOR SERVICE
AFTER THE WARRANTY EXPIRES –
ALL LOCATIONS
Before calling for service, please review
the Troubleshooting section on page 9.
For service information in the 50
United States, District of Columbia,
and Puerto Rico, call toll-free
1-800-541-6390.
Or write to:
Customer Satisfaction Center
KitchenAid Portable Appliances
P.O. Box 218
St. Joseph, MI 49085- 0218
Or contact an Authorized Service
Center near you.
For service information in Canada,
call toll-free 1-800 -807- 6777.
Or write to:
Customer Interaction Centre
KitchenAid Canada
1901 Minnesota Court
Mississauga, ON L5N 3A7
HOW TO ARRANGE FOR SERVICE
OUTSIDE THESE LOCATIONS
Consult your local KitchenAid dealer
or the store where you purchased the
Stand Mixer for information on how to
obtain service.
8
For service information in Mexico,
call toll-free
01-800-024-17-17
(JV Distribuciones)
Or
01-800-902-31-00
(Industrias Birtman)

HOW TO ORDER ACCESSORIES
AND REPLACEMENT PARTS
To order accessories or replacement
parts for your Stand Mixer in the 50
United States, District of Columbia,
and Puerto Rico,
call toll-free 1-800-541-6390
Monday through Friday,
8 a.m. to 8 p.m. (Eastern Time),
or Saturday, 10 a.m. to 5 p.m.
Or write to:
Customer Satisfaction Center
KitchenAid Portable Appliances
P.O. Box 218
St. Joseph, MI 49085- 0218
TROUBLESHOOTING PROBLEMS
Please read the following before
calling your service center.
1. The Stand Mixer may warm
up during use. Under heavy
loads with extended mixing time
periods, you may not be able to
comfortably touch the top of the
Stand Mixer. This is normal.
2. The Stand Mixer may emit a
pungent odor, especially when
new. This is common with
electric motors.
3. If the Flat Beater hits the bowl,
stop the Stand Mixer. See “Beater
to Bowl Clearance,” page 14.
Keep a copy of the sales receipt showing
the date of purchase. Proof of purchase
will assure you of in-warranty service.
If your Stand Mixer should
malfunction or fail to operate, please
check the following:
– Is the Stand Mixer plugged in?
– Is the fuse in the circuit to the Stand
Mixer in working order? If you have
a circuit breaker box, be sure the
circuit is closed.
To order accessories or replacement
parts for your Stand Mixer in Canada,
call toll-free 1-800 -807-6777.
Or write to:
Customer Interaction Centre
KitchenAid Canada
19 01 Minnesota Court
Mississauga, ON L5N 3A7
To order accessories or replacement
parts for your Stand Mixer in Mexico,
call toll-free
01- 800- 024-17-17
(JV Distribuciones)
Or
01-80 0- 902-31- 00
(Industrias Birtman)
– Tu rn the Stand Mixer off for 10-15
seconds, then turn it back on. If the
mixer still does not start, allow it to
cool for 30 minutes before turning it
back on.
If the problem cannot be fi xed with
the steps provided in this section, then
contact KitchenAid or an Authorized
Service Center:
USA/Puerto Rico: 1-800-541-6390
Canada: 1-800-807-6777
Mexico: 01-800-024-17-17
(JV Distribuciones)
Or
01-800-902-31-00
(Industrias Birtman)
See the KitchenAid Warranty and
Service section on page 6 for
additional details. Do not return the
Stand Mixer to the retailer – they do
not provide service.
ENGLISH
9
ENGLISH
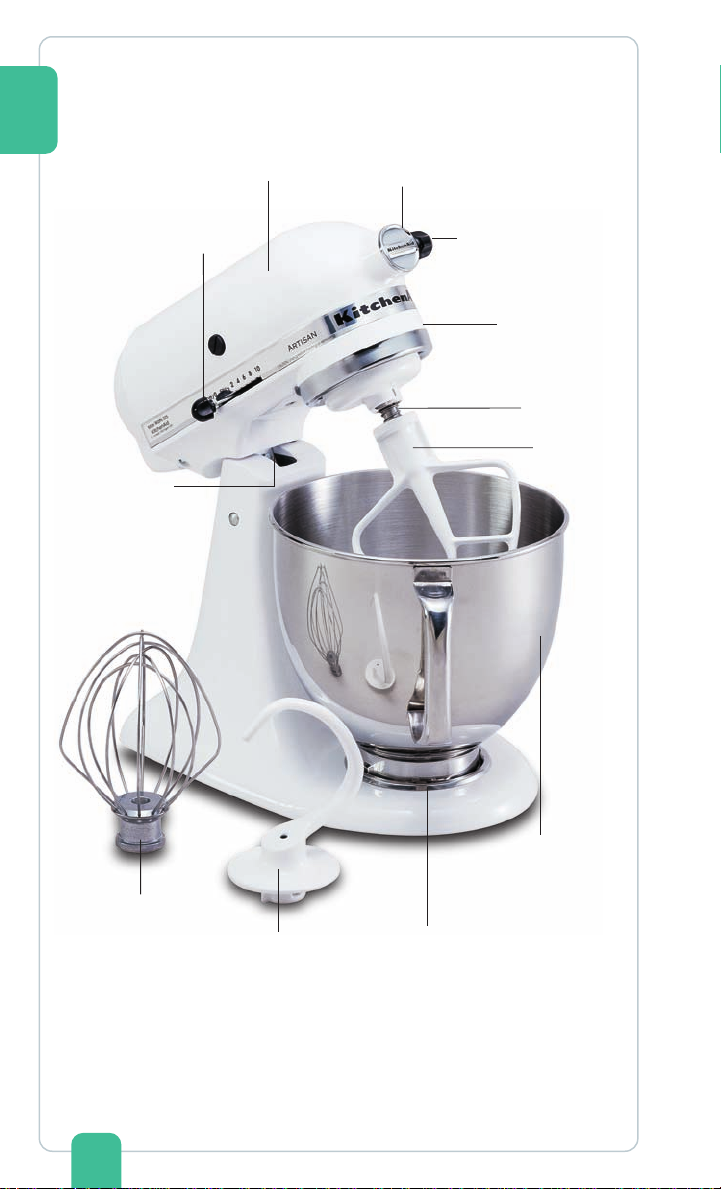
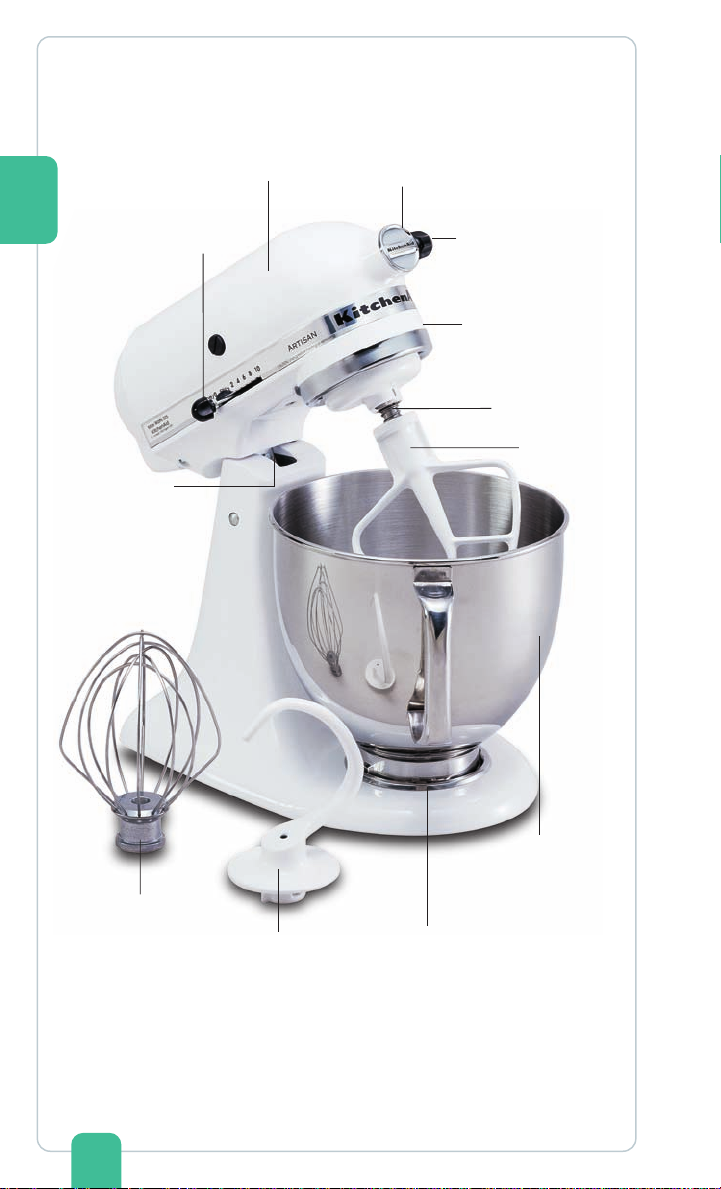
TILT-HEAD STAND MIXER FEATURES
Beater Height
Adjustment
Screw
Speed
Control
Knob
Motor Head
Attachment Hub
Attachment Knob
Motor Head
Locking Lever
(not shown)
Beater Shaft
Flat Beater
Wire Whip
Dough Hook
NOTE: This photo shows the Artisan
mixer model may differ slightly.
10
1
4
⁄2 or 5 Quart
(4.26 or 4.73 L)
Stainless Steel
Bowl
Bowl Clamping Plate
®
Series Stand Mixer. The features on your
ASSEMBLING YOUR TILT-HEAD STAND MIXER
WARNING
Electrical Shock Hazard
Plug into a grounded
3 prong outlet.
Do not remove
ground prong.
Do not use an adapter.
Do not use an
extension cord.
Failure to follow these
instructions can result
in death, fire, or
electrical shock.
OnOff
ENGLISH
Pin
To Attach Flat Beater, Wire Whip, or
Dough Hook
1. Turn speed control to OFF.
2. Unplug Stand Mixer or
disconnect power.
3. Tilt motor head back.
4. Slip beater onto beater shaft and
press upward as far as possible.
5. Turn beater to right, hooking beater
over pin on shaft.
6. Plug into a grounded 3 prong outlet.
To Remove Flat Beater, Wire Whip or
Dough Hook
1. Turn speed control to OFF.
2. Unplug Stand Mixer or
disconnect power.
3. Tilt motor head back.
4. Press beater upward as far as
possible and turn left.
5. Pull beater from beater shaft.
To Attach Bowl
1. Tu rn speed control to OFF.
2. Unplug Stand Mixer or
disconnect power.
3. Tilt motor head back.
4. Place bowl on bowl
clamping plate.
5. Turn bowl gently into
clockwise direction.
6. Plug into a grounded
3 prong outlet.
To Remove Bowl
1. Turn speed control to OFF.
2. Unplug Stand Mixer or
disconnect power.
3. Tilt motor head back.
4. Turn bowl counterclockwise.
Continued on next page
11
ENGLISH
ASSEMBLING YOUR TILT-HEAD STAND MIXER
To Operate Speed Control
Speed control lever should always be
set on lowest speed for starting, then
gradually moved to desired higher
speed to avoid splashing ingredients
out of bowl. See page 15 for Speed
Control Guide.
To Lock Motor Head
1. Make sure motor head is
completely down.
2. Place locking lever in LOCK
position.
3. Before mixing, test lock by
attempting to raise head.
To Unlock Motor Head
1. Place lever in UNLOCK position.
NOTE: Motor head should always be
kept in LOCK position when using mixer.
USING YOUR POURING SHIELD*
To Attach Pouring Shield
1. Turn speed control to OFF.
2. Unplug Stand Mixer or
disconnect power.
3. Attach Flat Beater, Dough Hook,
or Wire Whip and bowl (see
page 11).
4. From the front of the mixer, slide
the Pouring Shield over the bowl
until the shield is centered. The
bottom rim of the shield should fit
within the bowl.
To Remove Pouring Shield
1. Turn speed control to OFF.
2. Unplug Stand Mixer or
disconnect power.
3. Lift the front of the Pouring Shield
clear of the bowl rim and
pull forward.
4. Remove attachment and bowl.
Speed Control
Lock
Unlock
Pouring Chute
To Use Pouring Shield
1. For best results, rotate the shield
so the motor head covers the “u”
shaped gap in the shield. The
pouring chute will be just to the
right of the attachment hub as you
face the mixer.
2. Pour the ingredients into the bowl
through the pouring chute.
* If Pouring Shield is included.
12
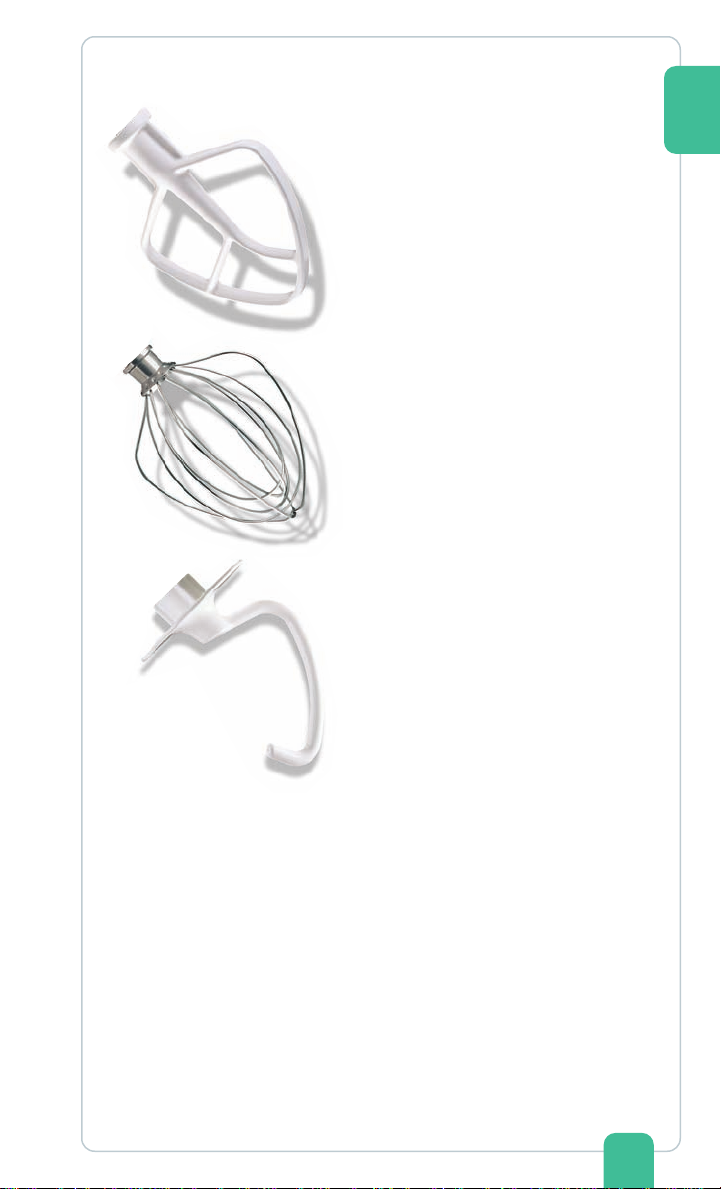
USING YOUR KITCHENAID® ACCESSORIES
Flat Beater for normal to heavy
mixtures:
cakes biscuits
creamed frostings quick breads
candies meat loaf
cookies mashed potatoes
pie pastry
Wire Whip for mixtures that need
air incorporated:
eggs sponge cakes
egg whites angel food cakes
heavy cream mayonnaise
boiled frostings some candies
Dough Hook for mixing and kneading
yeast doughs:
breads coffee cakes
rolls buns
ENGLISH
MIXING TIME
Your KitchenAid® Stand Mixer will mix faster and more thoroughly than most other
electric Stand Mixers. Therefore, the mixing time in most traditional and
non-packaged recipes must be adjusted to avoid overbeating. With cakes, for
example, beating time may be half as long as with other Stand Mixers.
13
ENGLISH
TILT-HEAD STAND MIXER USE
WARNING
Injury Hazard
Unplug mixer before
touching beaters.
Failure to do so can
result in broken bones,
cuts or bruises.
CARE AND CLEANING
Bowl, white Flat Beater and white
Dough Hook may be washed in an
automatic dishwasher. Or, clean them
thoroughly in hot sudsy water and
rinse completely before drying. Wire
Whip, burnished Dough Hook and
burnished Flat Beater should be hand
washed and dried immediately. Do
not wash the Wire Whip, burnished
Dough Hook and burnished Flat
Beater in a dishwasher. Do not store
the beaters on the shaft.
NOTE: Do not scrape the bowl while
the Stand Mixer is operating.
The bowl and beater are designed
to provide thorough mixing without
frequent scraping. Scraping the bowl
once or twice during mixing is usually
suffi cient. Turn the Stand Mixer off
before scraping.
The Stand Mixer may warm up during
use. Under heavy load with extended
mixing time, you may not be able to
comfortably touch the top of the Stand
Mixer. This is normal.
NOTE: Always be sure to unplug
the Stand Mixer before cleaning.
Wipe the Stand Mixer with a soft,
damp cloth. Do not use household or
commercial cleaners. Do not immerse
in water. Wipe off the beater shaft
frequently, removing any residue that
may accumulate.
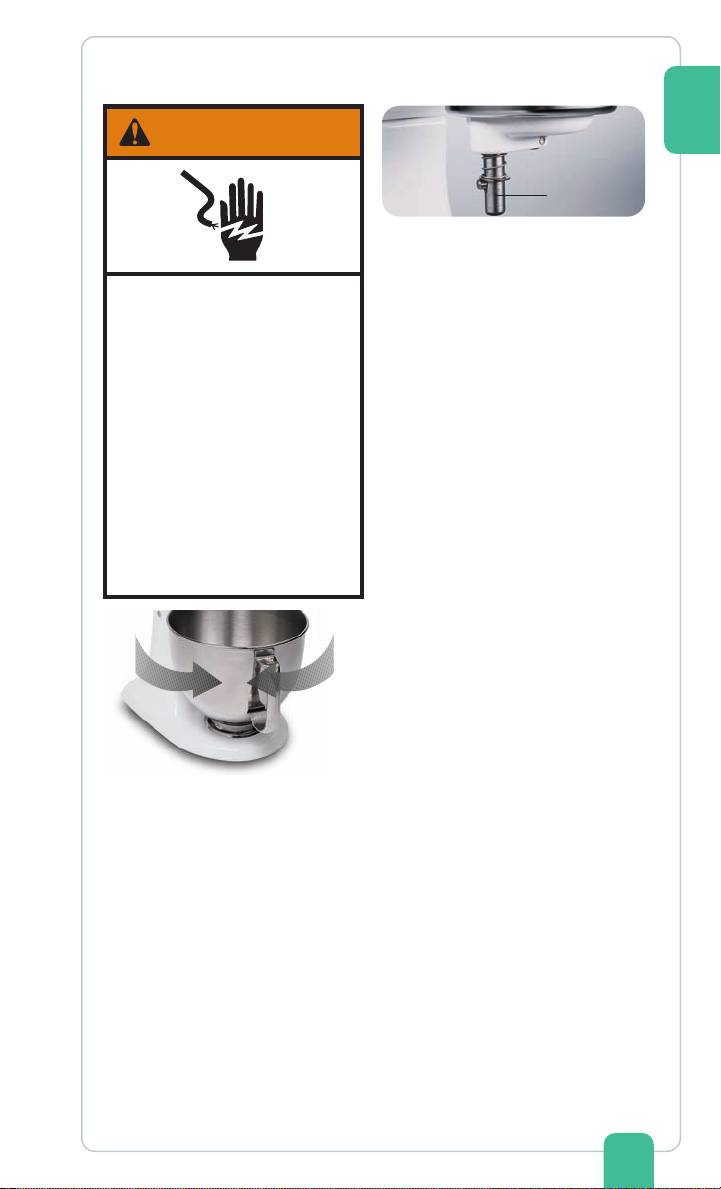
BEATER TO BOWL CLEARANCE
Your Stand Mixer is adjusted at the
factory so the Flat Beater just clears the
bottom of the bowl. If, for any reason,
the Flat Beater hits the bottom of the
bowl or is too far away from the bowl,
you can correct the clearance easily.
1. Turn speed control to OFF.
2. Unplug Stand Mixer or
disconnect power.
3. Tilt motor head back.
4. Turn screw (A) SLIGHTLY
counterclockwise (left) to raise the
Flat Beater or clockwise (right) to
lower the Flat Beater.
5. Make adjustment so that the Flat
Beater just clears the surface of the
bowl. If you over adjust the screw,
you may not be able to lock the
motor head when it is lowered.
14
NOTE: When properly adjusted, the
Flat Beater will not strike the bottom or
side of the bowl. If the Flat Beater or
the Wire Whip is adjusted so that it
strikes the bowl, the coating may wear
off the beater, or the wires on the whip
may wear.
A

SPEED CONTROL GUIDE
SPEED USE FOR DESCRIPTION
Stir STIRRING For slow stirring, combining, mashing, starting
all mixing procedures. Use to add fl our and dry
ingredients to batter, add liquids to dry ingredients,
and combine heavy mixtures. Use with Ice Cream
Maker attachment.
2 SLOW MIXING For slow mixing, mashing, faster stirring. Use to mix
heavy batters and candies, start mashing potatoes or
other vegetables, cut shortening into flour, mix thin or
splashy batters, and mix and knead yeast dough. Use
with Can Opener attachment.
4 MIXING, For mixing semi-heavy batters, such as cookies. Use
BEATING to combine sugar and shortening and to add sugar
to egg whites for meringues. Medium speed for cake
mixes. Use with: Food Grinder, Rotor Slicer/Shredder,
and Fruit/Vegetable Strainer.
6 BEATING, For medium fast beating (creaming) or whipping.
CREAMING Use to finish mixing cake, doughnut, and other
batters. High speed for cake mixes. Use with Citrus
Juicer attachment.
8 FAST BEATING, For whipping cream, egg whites, and boiled frostings.
WHIPPING
10 FAST WHIPPING For whipping small amounts of cream or egg whites.
Use with Pasta Maker and Grain Mill attachments.
NOTE: Mixer may not maintain fast speeds under
heavy load, such as when the Pasta Maker or Grain
Mill attachments are used. This is normal.
NOTE: The Speed Control Lever can be set between the speeds listed in the above
chart to obtain speeds 3, 5, 7, and 9 if a fi ner adjustment is required.
Use Speed 2 when preparing yeast dough – using any other speed may damage
the mixer.
ENGLISH
15

ENGLISH
Converting Your Recipe
for the Mixer
The mixing instructions for recipes in
this book can guide you in converting
your own favorite recipes for
preparation with your KitchenAid
Stand Mixer. Look for recipes similar
to yours and then adapt your recipes
to use the procedures in the similar
KitchenAid recipes.
For example, the “quick mix” method
(sometimes referred to as the “dump”
method) is ideal for simple cakes,
such as the Quick Yellow Cake and
Easy White Cake included in this
book. This method calls for combining
dry ingredients with most or all liquid
ingredients in one step.
More elaborate cakes, such as
tortes, should be prepared using the
traditional cake mixing method. With
this method, sugar and the shortening,
butter, or margarine are thoroughly
mixed (creamed) before other
ingredients are added.
For all cakes, mixing times may change
because your KitchenAid
®
Stand Mixer
works more quickly than other mixers.
In general, mixing a cake with the
KitchenAid
®
Stand Mixer will take about
half the time called for in most traditional
and non-packaged cake recipes.
To help determine the ideal mixing time,
observe the batter or dough and mix
only until it has the desired appearance
described in your recipe, such as
“smooth and creamy.”
To select the best mixing speeds, use
the Speed Control Guide on page 15.
MIXING TIPS
Adding Ingredients
Always add ingredients as close to side
of bowl as possible, not directly into the
moving beater. The Pouring Shield can
®
be used to simplify adding ingredients.
NOTE: If ingredients in very bottom of
bowl are not thoroughly mixed, then the
beater is not far enough into the bowl.
See “Beater to Bowl Clearance” on
page 14.
Cake Mixes
When preparing packaged cake
mixes, use Speed 2 for low speed,
Speed 4 for medium speed, and
Speed 6 for high speed. For best
results, mix for the time stated on the
package directions.
Adding Nuts, Raisins, or
Candied Fruits
Follow individual recipes for guidelines
on including these ingredients. In
general, solid materials should be
folded in the last few seconds of mixing
on Stir Speed. The batter should be
thick enough to prevent the fruit or nuts
from sinking to the bottom of the pan
during baking. Sticky fruits should be
dusted with fl our for better distribution in
the batter.
Liquid Mixtures
Mixtures containing large amounts
of liquid ingredients should be mixed
at lower speeds to avoid splashing.
Increase mixer speed only after the
mixture has thickened.
16

EGG WHITES
Place room temperature egg whites in a clean, dry bowl. Attach bowl and Wire
Whip. To avoid splashing, gradually turn to designated speed and whip to the
desired stage. See chart below.
AMOUNT SPEED
1 egg white ...... GRADUALLY to 10
2+ egg whites ..... GRADUALLY to 8
Whipping Stages
With your KitchenAid® Stand Mixer,
egg whites whip quickly. So, watch
closely to avoid overwhipping. This list
tells you what to expect.
Frothy
Large, uneven air bubbles.
Begins to Hold Shape
Air bubbles are fi ne and compact;
product is white.
Soft Peak
Tips of peaks fall over when Wire
Whip is removed.
Almost Stiff
Sharp peaks form when Wire Whip is
removed, but whites are actually soft.
Stiff But Not Dry
Sharp, stiff peaks form when Wire
Whip is removed. Whites are uniform
in color and glisten.
Stiff and Dry
Sharp, stiff peaks form when Wire
Whip is removed. Whites are
speckled and dull in appearance.
WHIPPED CREAM
Pour cold whipping cream into a chilled bowl. Attach bowl and Wire Whip.
To avoid splashing, gradually turn to designated speed and whip to the desired
stage. See chart below.
AMOUNT SPEED
1
⁄4 - 3⁄4 cup ........... GRADUALLY to 10
(60 ml -175 ml)
1+ cup .................. GRADUALLY to 8
(235 ml +)
Whipping Stages
Watch the cream closely during
whipping. Because your KitchenAid®
Stand Mixer whips so quickly, there
are just a few seconds between
whipping stages. Look for these
characteristics:
Begins to Thicken
Cream is thick and custard-like.
Holds Its Shape
Cream forms soft peaks when Wire
Whip is removed. Can be folded
into other ingredients when making
desserts and sauces.
Stiff
Cream stands in stiff, sharp peaks
when Wire Whip is removed. Use for
topping on cakes or desserts, or fi lling
for cream puffs.
ENGLISH
17

ENGLISH
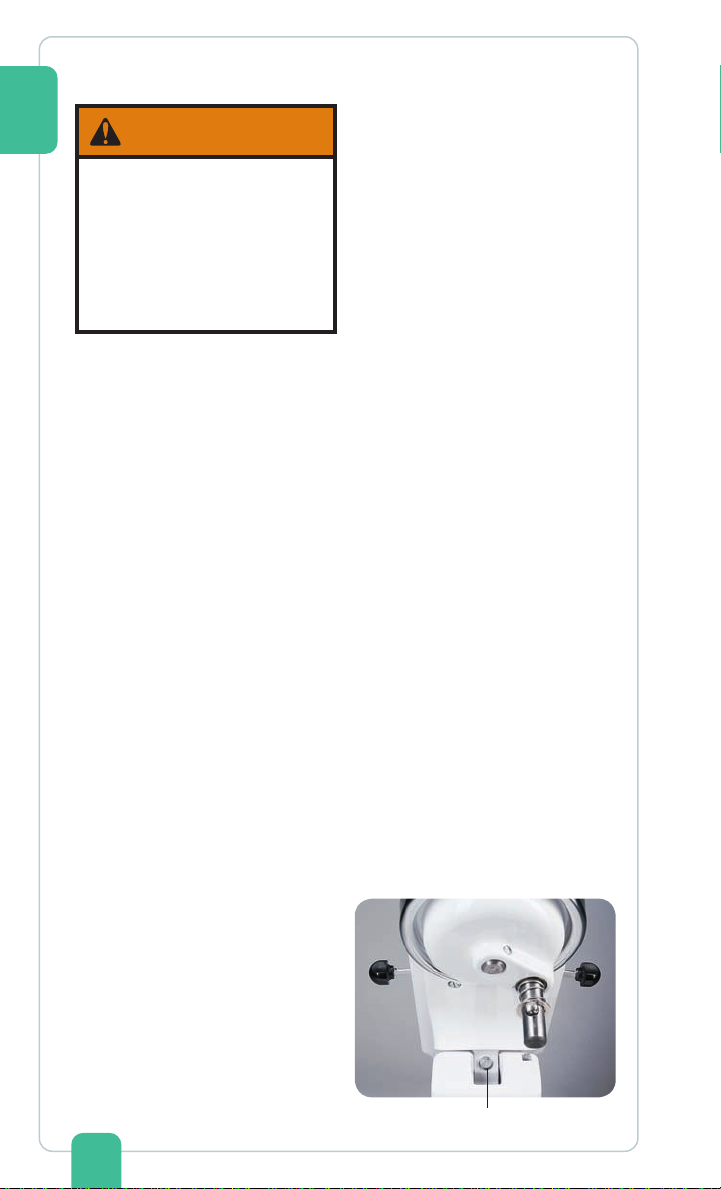
General Information
KitchenAid
ATTACHMENTS AND ACCESSORIES
®
attachments are designed to assure long life. The attachment power
shaft and hub socket are of a square design, to eliminate any possibility of slipping
during the transmission of power to the attachment. The hub and shaft housing
are tapered to assure a snug fi t, even after prolonged use and wear. KitchenAid®
attachments require no extra power unit to operate them; the power unit is built in.
Attachment
Knob
Hub
Attachment Power
Shaft‡
Attachment
Hub Socket
‡Not part of mixer.
Notch
Pin‡
Attachment Shaft
Housing‡
18

GENERAL INSTRUCTIONS
To Attach
1. Turn the speed control to OFF.
2. Unplug mixer or disconnect power.
3. Loosen the attachment knob by
turning it counterclockwise, and
remove the attachment hub cover
or flip up hinged hub cover.
4. Insert the attachment shaft housing
into the attachment hub, making
certain the attachment power shaft
fits into the square attachment hub
socket. It may be necessary to
rotate the attachment back and
forth. When the attachment is in
proper position, the pin on the
attachment will fit into the notch on
the hub rim.
5. Tighten the attachment knob
by turning it clockwise until the
attachment is completely secured
to mixer.
WARNING
To Remove
1. Turn the speed control to OFF.
2. Unplug mixer or disconnect power.
3. Loosen the attachment knob by
turning it counterclockwise. Rotate
the attachment slightly back and
forth while pulling it out.
4. Replace the attachment hub cover.
Tighten attachment knob by turning
it clockwise.
ENGLISH
Electrical Shock Hazard
Plug into a grounded
3 prong outlet.
Do not remove
ground prong.
Do not use an adapter.
Do not use an
extension cord.
Failure to follow these
instructions can result
in death, fire, or
electrical shock.
6. Plug into a grounded
3 prong outlet.
19

PREUVE D’ACHAT ET
ENREGISTREMENT DU PRODUIT
Veuillez conserver une copie du coupon de caisse indiquant la date d’achat de
FRANÇAIS
votre batteur sur socle. La preuve d’achat vous assure du service d’après-vente
sous garantie.
Avant d’utiliser votre batteur sur socle, veuillez remplir et poster la carte
d’enregistrement du produit accompagnant l’appareil.
Grâce à cette carte, nous pourrons vous appeler dans l’éventualité improbable d’un
avis de sécurité et nous conformer plus facilement aux dispositions de la loi sur la
sécurité des produits de consommation. Cette carte ne confi rme pas votre garantie.
Veuillez remplir ce qui suit pour vos dossiers personnels :
Numéro de modèle ___________________________________________________
Numéro de série ______________________________________________________
Date d’achat _________________________________________________________
Nom du marchand et adresse __________________________________________
____________________________________________________________________
20
SÉCURITÉ DU BATTEUR SUR SOCLE
Votre sécurité et celle des autres est
très importante.
Nous donnons de nombreux messages de sécurité importants
dans ce manuel et sur votre appareil ménager. Assurez-vous de
toujours lire tous les messages de sécurité et de vous y conformer.
Voici le symbole d’alerte de sécurité.
Ce symbole d’alerte de sécurité vous signale les
dangers potentiels de décès et de blessures graves
à vous et à d’autres.
Tous les messages de sécurité suivront le symbole
d’alerte de sécurité et le mot “DANGER” ou
“AVERTISSEMENT”. Ces mots signifient :
Risque possible de décès ou
de blessure grave si vous ne
suivez pas immédiatement
les instructions.
Risque possible de décès ou
de blessure grave si vous ne
suivez pas les instructions.
Tous les messages de sécurité vous diront quel est le danger
potentiel et vous disent comment réduire le risque de blessure et
ce qui peut se produire en cas de non-respect des instructions.
CONSIGNES DE SÉCURITÉ
FRANÇAIS
IMPORTANTES
Lors de l’utilisation d’appareils électriques, des précautions élémentaires de sécurité
devraient toujours être observées, incluant les suivantes :
1. Lisez toutes les instructions.
2. Pour éviter tout risque d’électrocution, ne mettez pas le batteur sur socle dans
l’eau ni dans tout autre liquide.
3. Il est indispensable d’exercer une surveillance étroite lors de l’emploi à
proximité d’enfants de cet appareil ou de tout autre appareil électroménager.
4. Débranchez le batteur sur socle lorsque vous ne l’utilisez pas, avant d’y ajouter
des pièces ou d’en enlever et avant de le nettoyer.
5. Évitez tout contact avec les pièces en mouvement. Tenez les mains, cheveux,
vêtements ainsi que les spatules et autres ustensiles à l’écart du batteur lorsqu’il
fonctionne afi n de réduire le risque de blessures ou de détériorations du batteur.
6. N’utilisez pas le batteur sur socle si le cordon ou la fi che est endommagé(e),
si l’appareil présente un défaut de fonctionnement, s’il est tombé ou s’il a été
endommagé de quelque manière que ce soit. Retournez l’appareil au centre
de réparation autorisé le plus proche pour le faire inspecter ou réparer, ou
pour effectuer un réglage électrique ou mécanique. Pour de plus amples
renseignements, téléphonez au Centre de satisfaction de la clientèle de
KitchenAid, au numéro 1 800 541 6390 (1 800 807 6777 au Canada).
Suite à la page suivante
21
7. L’utilisation d’accessoires non recommandés ou non vendus par KitchenAid
peut causer un incendie, une électrocution ou des blessures.
8. N’utilisez pas le batteur sur socle à l’extérieur.
9. Ne laissez pas le cordon prendre du bord de la table ou du comptoir.
FRANÇAIS
10. Enlevez le batteur plat, le fouet à fi l ou le crochet pétrisseur avant de laver le
batteur sur socle.
11. Ce produit est conçu pour un usage domestique seulement.
CONSERVEZ CES INSTRUCTIONS
CONTRAINTES ÉLECTRIQUES
Tension : 120 volts c.a.
Fréquence : 60 Hz
La puissance nominale du batteur sur
socle est imprimée sur une étiquette se
trouvant sous le socle. Elle apparaît
également sur la bande de garnissage.
Si le cordon fourni est trop court,
demandez à un électricien ou à un
technicien compétent d’installer une
prise de courant près de l’appareil.
Risque de choc électrique
Brancher sur une prise à
3 alvéoles reliée à la terre.
Ne pas enlever la broche
de liaison à la terre.
Ne pas utiliser un
adaptateur.
Ne pas utiliser un câble
de rallonge.
Le non-respect de ces
instructions peut causer
un décès, un incendie ou
un choc électrique.
22

GARANTIE DU BATTEUR
SUR SOCLE KITCHENAID
®
Durée de la
garantie :
50 États des États-Unis,
le district fédéral de
Columbia, le Canada et
Puerto Rico : Garantie
limitée d’un an à compter
de la date d’achat.
DÉSAVEU DE GARANTIE TACITE, LIMITATION DES RECOURS LES GARANTIES
TACITES, Y COMPRIS DANS LA MESURE APPLICABLE LES GARANTIES DE
QUALITÉ MARCHANDE OU D’APTITUDE À UN EMPLOI PARTICULIER, SONT
EXCLUES DANS LA MESURE AUTORISÉE PAR LA LOI. TOUTE GARANTIE
TACITE IMP0SÉE PAR LA LOI EST LIMITÉE À UN AN, OU LA DURÉE MINIMUM
PERMISE PAR LA LOI. PUISQUE CERTAINES JURIDICTIONS NE PERMETTENT
PAS L’EXCLUSION OU LA LIMITATION DE DURÉE DES GARANTIES IMPLICITES
DE QUALITÉ MARCHANDE OU D’APTITUDE À UN EMPLOI PARTICULIER, LES
LIMITATIONS CI-DESSUS PEUVENT DONC NE PAS S’APPLIQUER À VOUS.
SI CET APPAREIL NE FONCTIONNE PAS COMME GARANTI, LE SEUL ET
EXCLUSIF RECOURS DES CLIENTS EST LA RÉPARATION OU LE REMPLACEMENT
SELON LES DISPOSITIONS DE LA GARANTIE LIMITÉE. KITCHENAID ET
KITCHENAID-CANADA N’ASSUMENT AUCUNE RESPONSABILITÉ EN CAS DE
DOMMAGES ACCESSOIRES OU INDIRECTS. Cette garantie vous confère des
droits spécifi ques auxquels peuvent s’ajouter d’autres droits variant d’un État ou
d’une province à l’autre.
KitchenAid prendra
en charge :
50 États des
États-Unis, district
fédéral de Columbia
et Canada : Garantie
de remplacement d’un
an sans diffi culté de
votre batteur sur socle.
Consultez la page
suivante pour obtenir
des détails sur la façon
de remplacer le batteur
sur socle.
OU
À Puerto Rico : Les
coûts des pièces de
rechange et de maind’œuvre pour corriger
les défauts de matériaux
et de main-d’œuvre. Le
service après-vente doit
être assuré par un centre
de réparation autorisé
KitchenAid. Pour obtenir
une réparation, suivez les
directives de la page 25.
KitchenAid ne prendra
pas en charge :
A. Les réparations
découlant de
l’utilisation du batteur
sur socle dans un
contexte autre qu’un
foyer unifamilial
normal.
B. Les dommages
attribuables aux
causes suivantes :
un accident, une
modification, la
mauvaise utilisation,
un emploi abusif
ou une utilisation
non approuvée par
KitchenAid.
C. Les coûts des pièces
de rechange ou de
main-d’oeuvre pour
le batteur sur socle si
ce dernier est utilisé
à l’extérieur du pays
d’achat.
FRANÇAIS
23

GARANTIE DE SATISFACTION TOTALE ET DE
REMPLACEMENT - 50 ÉTATS DES ÉTATS-UNIS,
DISTRICT FÉDÉRAL DE COLUMBIA
FRANÇAIS
Nous sommes tellement certains que
la qualité de nos produits satisfait aux
normes exigeantes de KitchenAid
que, si le batteur sur socle cesse de
fonctionner au cours de la première
année, KitchenAid livrera gratuitement
un appareil identique ou comparable à
votre porte et s’occupera de récupérer
le batteur sur socle originel. L’appareil
de rechange sera aussi couvert par
notre garantie limitée d’un an. Veuillez
suivre ces instructions pour recevoir ce
service de qualité.
GARANTIE DE SATISFACTION TOTALE ET DE
REMPLACEMENT - CANADA
Nous sommes tellement certains que
la qualité de nos produits satisfait aux
normes exigeantes de KitchenAid
que, si le batteur sur socle cesse de
fonctionner au cours de la première
année, KitchenAid le remplacera
par un batteur sur socle identique ou
comparable. L’appareil de rechange
sera aussi couvert par notre garantie
limitée d’un an. Veuillez suivre ces
instructions pour recevoir ce service
de qualité.
Si le batteur sur socle KitchenAid® cesse
de fonctionner au cours de la première
année, apportez-le ou retournez-le port
dû à un centre de réparation KitchenAid
Canada autorisé.
Si le batteur sur socle KitchenAid® cesse
de fonctionner au cours de la première
année, il suffi t d’appeler le numéro
sans frais 1 800 541 6390 du Centre
de satisfaction de la clientèle du lundi
au vendredi de 8 h à 20 h (heure de
l’est) ou le samedi de 10 h à 17 h.
Fournissez votre adresse de livraison
complète au représentant. (Pas de
boîte postale).
Quand vous recevez le batteur sur
socle, veuillez utiliser le carton et les
matériaux d’emballage pour emballer
le batteur sur socle originel. Écrivez vos
nom et adresse sur une feuille de papier
et mettez-la dans le carton avec une
copie de la preuve d’achat (reçu de
caisse, facture de règlement par carte
de crédit, etc.).
Écrivez votre nom et adresse complète
sur une feuille de papier et mettez-la
dans le carton avec une copie de la
preuve d’achat (reçu de caisse, facture
de règlement par carte de crédit, etc.)
Le batteur sur socle sera expédié port
prépayé et assuré. Si le service ne
s’avère pas satisfaisant, appelez le
numéro sans frais du Centre de relations
avec la clientèle : 1 800 807 6777.
Ou écrivez à :
Centre de relations avec la clientèle
KitchenAid Canada
1901 Minnesota Court
Mississauga, ON L5N 3A7
24

COMMENT OBTENIR UNE RÉPARATION SOUS
GARANTIE À PUERTO RICO
Le batteur sur socle KitchenAid
couvert par une garantie limitée d’un an
à partir de la date d’achat. KitchenAid
prendra en charge les coûts des pièces
de rechange et de main-d’œuvre pour
corriger les défauts de matériaux et
de main-d’œuvre. Le service aprèsvente doit être assuré par un centre de
réparation autorisé KitchenAid.
®
est
Apportez le batteur sur socle ou
retournez-le port payé et assuré à
un centre de réparation autorisé de
KitchenAid. Le batteur sur socle réparé
sera expédié port prépayé et assuré. S’il
est impossible d’obtenir des réparations
satisfaisantes de cette manière, appelez
le numéro sans frais 1 800 541 6390
pour obtenir l’adresse d’un centre de
réparation près de chez vous.
COMMENT OBTENIR UNE RÉPARATION HORS
GARANTIE – TOUS LES TERRITOIRES
Avant d’appeler pour faire réparer,
consultez la section Dépannage de la
page 27.
Pour obtenir de l’information sur
les réparations dans les 50 États
des États-Unis, le district fédéral de
Columbia et Puerto Rico,
appelez le numéro sans frais
1 800 541 6390.
Ou écrivez à :
Centre de satisfaction de la clientèle
KitchenAid Portable Appliances
P.O. Box 218
St. Joseph, MI 49085-0218
Ou contactez un centre de réparation
autorisé près de chez vous.
Pour obtenir de l’information sur les
réparations au Canada,
appelez le numéro sans frais
1 800 807 6777.
Ou écrivez à :
Centre de relations avec la clientèle
KitchenAid Canada
1901 Minnesota Court
Mississauga, ON L5N 3A7
FRANÇAIS
COMMENT OBTENIR UNE RÉPARATION EN
DEHORS DE CES TERRITOIRES
Demandez à votre distributeur local
KitchenAid ou au détaillant où le
batteur sur socle a été acheté où le
faire réparer.
Pour obtenir de l’information sur les
réparations au Mexique,
appelez le numéro sans frais
01-800-024-17-17
(JV Distribuciones)
Ou
01-800-902-31-00
(Industrias Birtman)
25

COMMENT COMMANDER DES ACCESSOIRES ET
DES PIÈCES DE RECHANGE
Pour commander des accessoires
ou des pièces de rechange pour le
FRANÇAIS
batteur sur socle dans les 50 États des
États-Unis, dans le district fédéral de
Columbia et à Puerto-Rico, appelez
sans frais le 1 800 541 6390 du lundi
au vendredi, de 8 h à 20 h (heure de
l’est), le samedi de 10 h à 17 h.
Ou écrivez à :
Centre de satisfaction de la clientèle
KitchenAid Portable Appliances
P.O. Box 218
St. Joseph, MI 49085- 0218
Pour commander des accessoires
ou des pièces de rechange pour le
batteur sur socle au Canada,
appelez sans frais le 1 800 807 6777.
Ou écrivez à :
Centre de relations avec la clientèle
KitchenAid Canada
1901 Minnesota Court
Mississauga, ON L5N 3A7
Pour commander des accessoires
ou des pièces de rechange pour le
batteur sur socle au Mexique,
appelez sans frais le
01-800-024-17-17
(JV Distribuciones)
Ou
01-800- 902-31-00
(Industrias Birtman)
26

DÉPANNAGE
Veuillez lire les directives suivantes
avant de téléphoner au centre
de réparation.
1. Le batteur sur socle peut se
réchauffer durant l’utilisation.
Dans le cas de charges
importantes et d’une durée
de mélange prolongée, il est
possible que vous ne puissiez pas
toucher facilement le dessus du
batteur. Ceci est normal.
2. Le batteur sur socle peut dégager
une odeur désagréable,
particulièrement s’il est neuf. Cela
se produit couramment avec les
moteurs électriques.
3. Si le batteur plat frappe le bol,
éteignez le batteur sur socle.
Consultez la section « Jeu entre le
batteur et le bol », page 34.
Veuillez conserver une copie du
coupon de caisse indiquant la date
d’achat de votre batteur. La preuve
d’achat vous assure du service
d’après-vente sous garantie.
Si le batteur sur socle fonctionne
mal ou pas du tout, vérifi ez les
points suivants :
- Le batteur est-il branché?
- Le fusible du circuit relié au batteur
sur socle est-il en état de marche?
Si vous avez un disjoncteur,
assurez-vous que le circuit
est fermé.
- Débranchez le batteur sur socle
et attendez 10 à 15 secondes,
puis remettez-le en fonction. Si le
batteur ne fonctionne pas, laissezle refroidir pendant 30 minutes
avant de le rebrancher.
Si le problème ne peut pas être résolu
en suivant les étapes fournies dans
cette section, veuillez communiquer
avec KitchenAid ou un centre de
réparation autorisé :
États-Unis/Puerto Rico :
1-800-541- 6390,
Canada : 1 800 807 6777
Mexique : 01-800-024-17-17
(JV Distribuciones)
Ou
01-800-902-31-00
(Industrias Birtman)
Consultez la section Garantie et
réparations des produits KitchenAid de
la page 23 pour obtenir plus de détails.
Ne retournez pas le batteur chez le
détaillant, car celui-ci n’offre pas de
service de réparation.
FRANÇAIS
27
CARACTÉRISTIQUES DU BATTEUR SUR SOCLE
À TÊTE INCLINABLE
FRANÇAIS
Vis de réglage
de la hauteur
du batteur
Culasse du moteur
Levier de
réglage de
la vitesse
Prise d’accessoires
Bouton d’accessoires
Levier de verrouillage
de la culasse de
moteur (non illustré)
Arbre du batteur
Batteur plat
Bol en acier
inoxydable de
4,26 ou 4,73 L
1
Fouet à fil
Crochet
pétrisseur
REMARQUE : Cette photo illustre le batteur sur socle série Artisan®. Les
caractéristiques de votre modèle de batteur peuvent différer légèrement.
28
Plaque de
serrage du bol
(4
5 pintes)
⁄2 ou de
 Loading...