

KitchenAid KSM7586PMS1, KSM7589PBK0, KSM7589PNK0, KSM7589PMW0, KSM7589PIT0 Owner’s Manual
...
7 QT BOWL-LIFT STAND MIXER
BATTEUR SUR SOCLE AVEC LÈVE-BOL DE 7 PINTES
BATIDORA CON BASE Y TAZÓN QUE SE LEVANTA DE 7 CUARTOS
INSTRUCTIONS
INSTRUCTIONS
INSTRUCCIONES

PROOF OF PURCHASE & PRODUCT REGISTRATIONPROOF OF PURCHASE & PRODUCT REGISTRATION
WELCOME TO THE WORLD OF KITCHENAID.
We’re committed to helping you
create a lifetime of delicious meals for
family and friends. To help ensure the
longevity and performance of your
appliance, keep this guide handy. It will
empower you with the best way to
use and care for your product. Your
satisfaction is our #1 goal. Remember
to register your product online at
www.kitchenaid.com, or by
mail using the enclosed
Product Registration Card.
Join us in the kitchen at www.kitchenaid.com.
USA: 1.800.832.7173
2
Canada: 1.800.807.6777
KitchenAid.com
KitchenAid.ca

STAND MIXER INSTRUCTIONS
PROOF OF PURCHASE & PRODUCT REGISTRATIONPROOF OF PURCHASE & PRODUCT REGISTRATION
TABLE OF CONTENTS
STAND MIXER SAFETY
Important safeguards ................................................................................................. 4
Electrical requirements .............................................................................................5
PARTS AND FEATURES
Parts and accessories ................................................................................................. 6
ASSEMBLING YOUR BOWL-LIFT STAND MIXER ................................................. 7
BEATER TO BOWL CLEARANCE ............................................................................... 8
USING YOUR STAND MIXER
Mixing time ................................................................................................................ 8
Mixer use ................................................................................................................... 8
Using the pouring shield ............................................................................................ 9
Using your KitchenAid
SPEED CONTROL GUIDE-10 SPEED STAND MIXERS ....................................... 10
MIXING TIPS
General information ................................................................................................ 11
Egg whites ...............................................................................................................12
Whipped cream ....................................................................................................... 12
BREAD MAKING TIPS
General information ................................................................................................ 13
Mixing and kneading yeast dough with the rapid mix method ................................ 14
Shaping a loaf ........................................................................................................... 15
ATTACHMENTS AND ACCESSORIES
General information ................................................................................................ 16
General instructions ................................................................................................17
ATTACHMENTS GUIDE ............................................................................................. 18
CARE AND CLEANING .............................................................................................. 20
TROUBLESHOOTING ................................................................................................ 21
WARRANTY AND SERVICE ...................................................................................... 22
®
beater attachments ............................................................. 9
English
Always keep a copy of the itemized sales receipt showing the date of purchase of your Stand
Mixer. Proof of purchase will assure you of in-warranty service. Before you use your Stand
Mixer, please ll out and mail your product registration card packed with the unit, or register
on-line at www.kitchenaid.com. This card will enable us to contact you in the unlikely event
of a product safety notication and assist us in complying with the provisions of the Consumer
Product Safety Act. This card does not verify your warranty. Please complete the following for
your personal records:
Model Number _______________________________________________________________________
Serial Number _______________________________________________________________________
Date Purchased ______________________________________________________________________
Store Name _________________________________________________________________________
3

Your safety and the safety of others are very important.
We have provided many important safety messages in this manual and on your
appliance. Always read and obey all safety messages.
This is the safety alert symbol.
This symbol alerts you to potential hazards that can kill or hurt you
and others.
All safety messages will follow the safety alert symbol and either the
word “DANGER” or “WARNING.” These words mean:
You can be killed or seriously injured
DANGER
WARNING
All safety messages will tell you what the potential hazard is, tell you how to reduce
the chance of injury, and tell you what can happen if the instructions are not followed.
if you don't immediately follow
instructions.
You can be killed or seriously injured
if you don't follow instructions.
IMPORTANT SAFEGUARDS
When using electrical appliances, basic safety precautions
should always be followed, including the following:
1. Read all instructions.
2. To avoid risk of electrical shock, do not put Stand Mixer in water
or other liquid.
3. Close supervision is necessary when any appliance is used by
or near children.
4. Unplug Stand Mixer from outlet when not in use, before putting on
or taking off parts, and before cleaning.
5. Avoid contacting moving parts. Keep hands, hair, and clothing, as well
as spatulas and other utensils away from beater during operation to
reduce the risk of injury to persons and/or damage to the Stand Mixer.
6. Do not operate Stand Mixer with a damaged cord or plug or after
the Stand Mixer malfunctions, or is dropped or damaged in any manner.
Call the KitchenAid
for more information.
7. The use of attachments not recommended or sold by KitchenAid
may cause re, electrical shock, or injury.
8. Do not use the Stand Mixer outdoors.
9. Do not let the cord hang over edge of table or counter.
10. Remove at beater, wire whip, or dough hook from Stand Mixer
before washing.
®
Customer Satisfaction Center at 1-800-832-7173
SAVE THESE INSTRUCTIONS
THIS PRODUCT IS DESIGNED FOR HOUSEHOLD
USE ONLY.
4
STAND MIXER SAFETYSTAND MIXER SAFETY
Electrical requirements
WARNING
Electrical Shock Hazard
Plug into a grounded 3 prong
outlet.
Do not remove ground prong.
Do not use an adapter.
Do not use an extension cord.
Failure to follow these
instructions can result in
death, fire, or electrical shock.
Volts: 120 VAC
Hertz: 60 Hz
NOTE: The power rating for your
Stand Mixer is printed on the
serial plate.
Do not use an extension cord. If the
power supply cord is too short, have
a qualied electrician or serviceman
install an outlet near the appliance.
The maximum rating is based on the
attachment that draws the greatest
load (power). Other recommended
attachments may draw signicantly
less power.
English
5
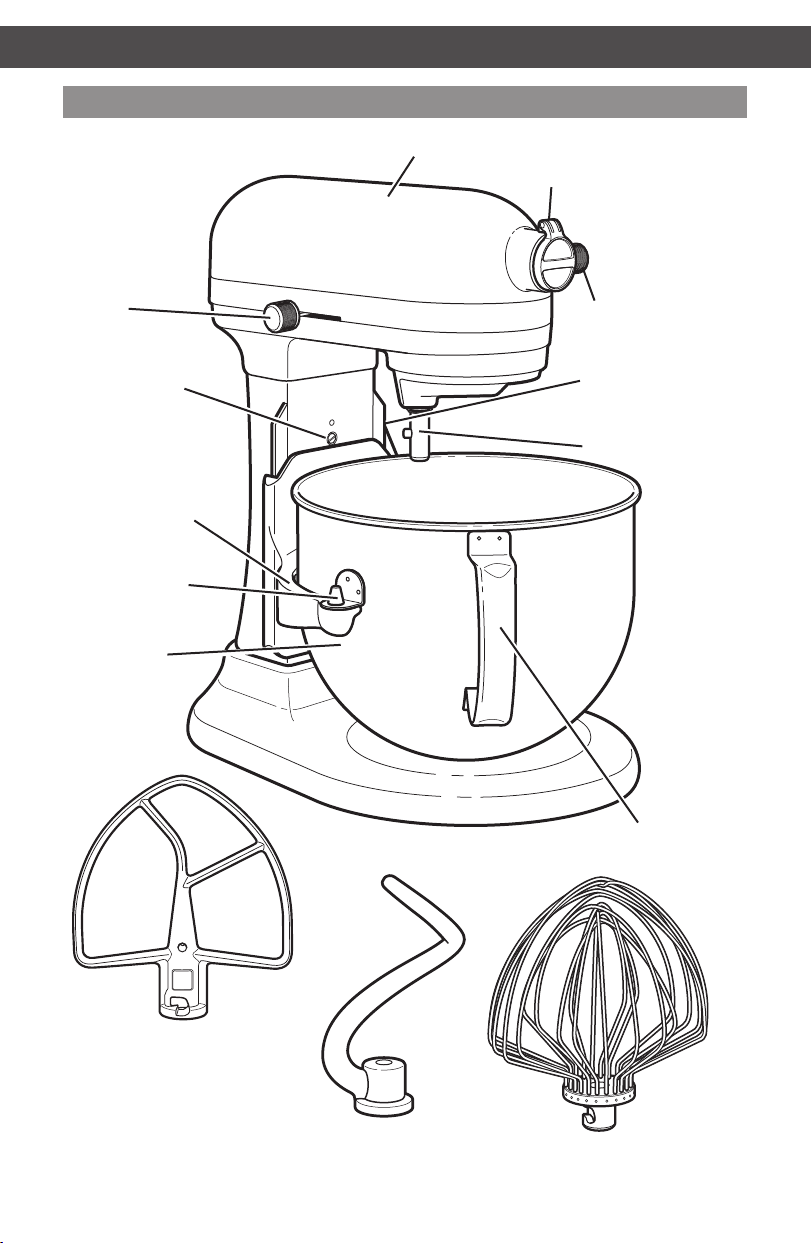
Parts and accessories
Speed control
lever
Beater height
adjustment screw
Bowl support
Locating pins
7 Qt. Stainless
steel bowl
Motor head
Attachment hub
(see the “attachments
and accessories” section)
Attachment
knob
Bowl-lift lever
(Not shown)
Beater shaft
Bowl handle (style may
vary depending on model)
Flat beater
Spiral dough hook
6
11-Wire stainless steel
elliptical whip
ASSEMBLING YOUR BOWL-LIFT STAND MIXERPARTS AND FEATURES
WARNING
Electrical Shock Hazard
Plug into a grounded 3 prong
outlet.
Do not remove ground prong.
Do not use an adapter.
Do not use an extension cord.
Failure to follow these
instructions can result in
death, fire, or electrical shock.
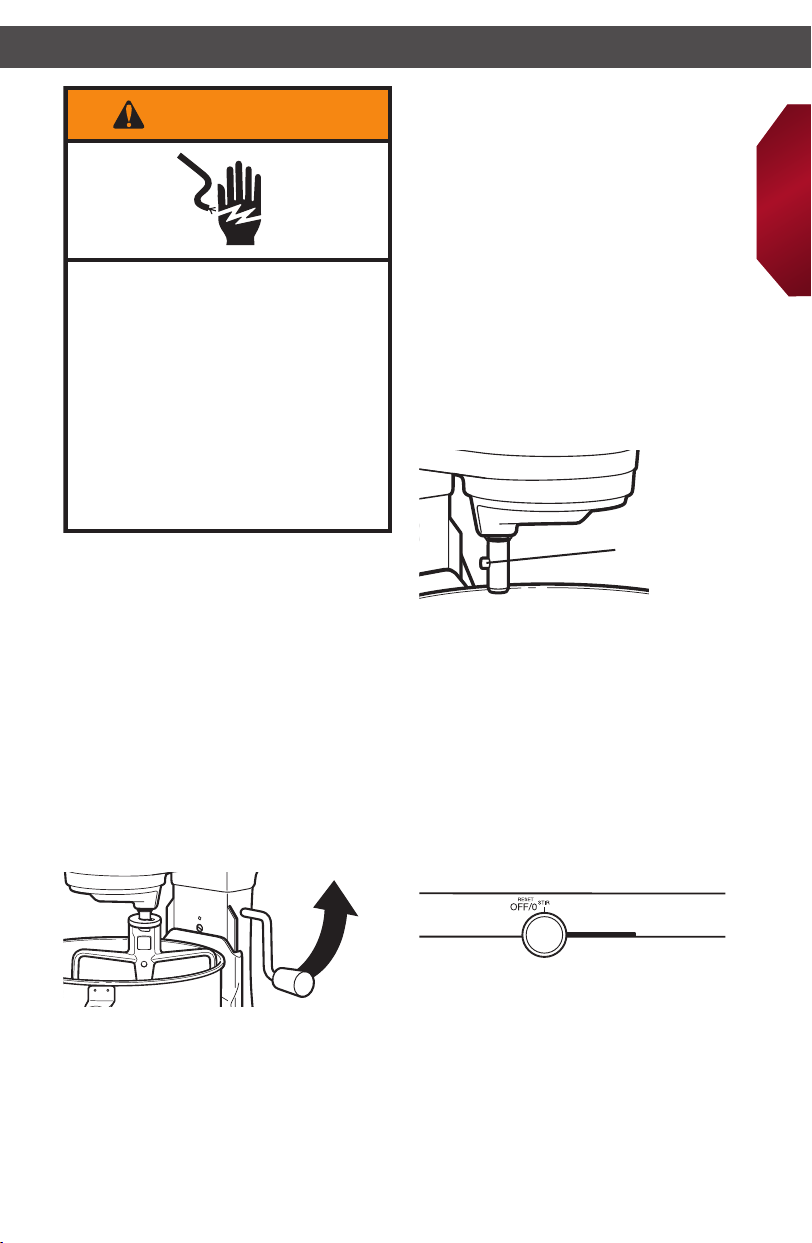
To Attach Bowl
1. Be sure speed control is OFF
and Stand Mixer is unplugged.
2. Place bowl-lift lever in down
position.
3. Fit bowl supports over locating
pins.
4. Press down on back of bowl
until bowl pin snaps into spring
latch.
5. Raise bowl before mixing.
6. Plug into a grounded 3 prong
outlet.
To Lower Bowl
1. Rotate lever back and down.
To Remove Bowl
1. Be sure speed control is OFF and
Stand Mixer is unplugged.
2. Place bowl-lift lever in down
position.
3. Remove at beater, wire whip,
or spiral dough hook.
4. Grasp bowl handle and lift straight
up and off locating pins.
To Attach Flat Beater, Wire Whip,
or PowerKnead™ Spiral Dough Hook
1. Slide speed control to OFF
and unplug.
2. Slip at beater on beater shaft.
Pin
3. Turn beater to right, hooking
beater over the pin on shaft.
4. Plug into a grounded 3 prong outlet.
To Remove Flat Beater, Wire Whip,
or PowerKnead™ Spiral Dough Hook
1. Slide speed control to OFF
and unplug.
2. Press beater upward and turn to
the left.
3. Pull beater from beater shaft.
Household Stand Mixer
Speed Control
English
To Raise Bowl
1. Rotate lever to straight-up
position.
2. Bowl must always be in raised,
locked position when mixing.
Plug into a grounded 3 prong outlet.
Speed control lever should always be
set on lowest speed for starting, then
gradually moved to desired higher speed
to avoid splashing ingredients out of bowl.
See the “Speed Control Guide” section.
7
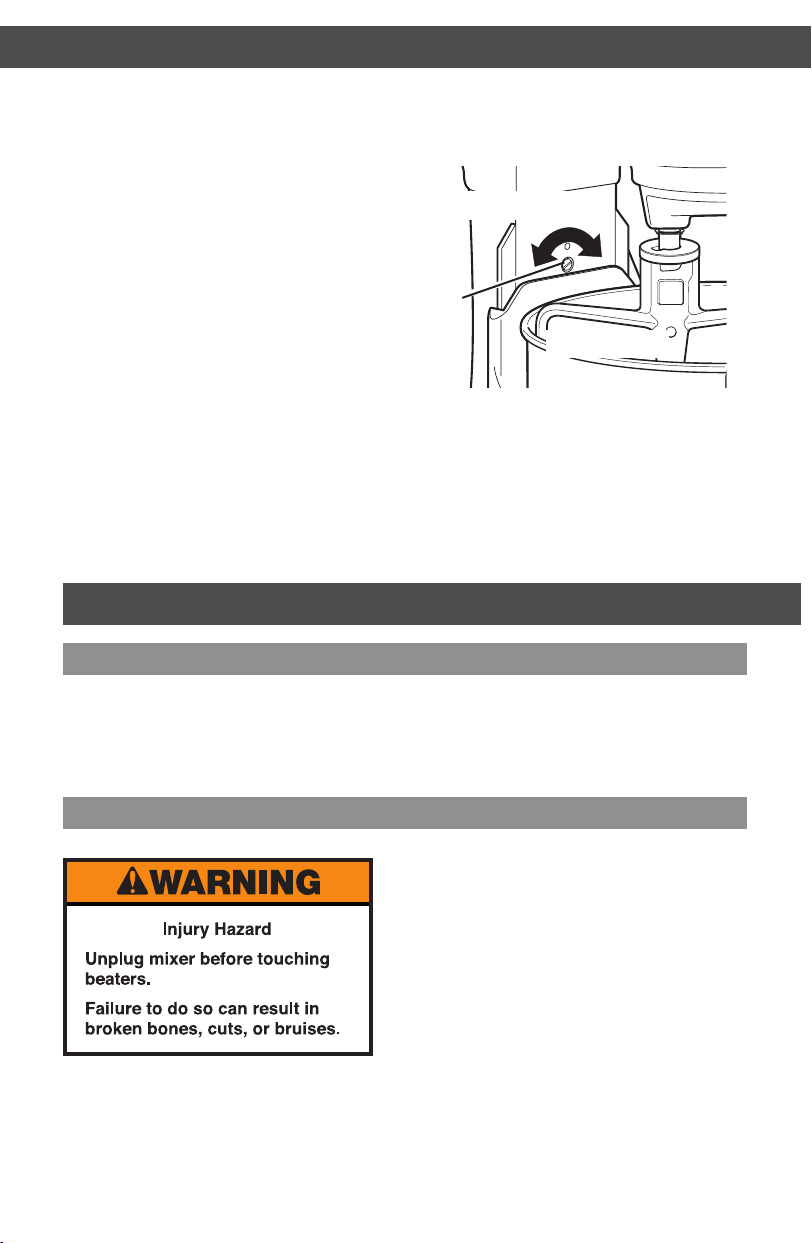
BEATER TO BOWL CLEARANCE
Your Stand Mixer is adjusted at the factory so the at beater just clears the bottom of the bowl.
If, for any reason, the at beater hits the bottom of the bowl or is too far away from the bowl,
you can correct the clearance easily.
1. Unplug Stand Mixer.
2. Place bowl-lift lever in down
position.
3. Attach at beater.
4. Adjust so at beater just clears
bottom surface of bowl when
in lifted position by turning screw
(A) counterclockwise to raise the
bowl and clockwise to lower the
bowl. Just a slight turn is all that is
required: the screw will not rotate
more than 1/4 turn (90 degrees)
in either direction. (The full range
of adjustment is 1/2 turn, or
180 degrees.)
5. Place bowl-lift lever in up
position to check clearance.
6. Repeat steps 4 and 5 if necessary.
Raise Bowl
A
Lower Bowl
NOTE: When properly adjusted, the at
beater will not strike on the bottom or
side of the bowl. If the at beater or the
wire whip is so close that it strikes the
bottom of the bowl, coating may wear off
the beater or wires on whip may wear.
USING YOUR STAND MIXER
Mixing time
Your KitchenAid® Stand Mixer will mix
faster and more thoroughly than most
other electric stand mixers. Therefore,
the mixing time in most recipes must
Mixer use
8
be adjusted to avoid overbeating. With
cakes, for example, beating time may be
half as long as with other stand mixers.
NOTE: Do not scrape bowl while
Stand Mixer is operating.
The bowl and beater are designed
to provide thorough mixing without
frequent scraping. Scraping the bowl
once or twice during mixing is usually
sufcient. Turn Stand Mixer off before
scraping. The Stand Mixer may warm
up during use. Under heavy loads with
extended mixing time, you may not
be able to comfortably touch the top
of the Stand Mixer. This is normal.
 Loading...