

KitchenAid KSB585CR, KSB585NK, KSB565BU, KSB565AC, KSB565SM Owner's Manual
...
5
SPEED
VITESSE
VELOCIDAD
BLENDER
INSTRUCTIONS AND RECIPES
MÉLANGEUR
INSTRUCTIONS ET RECETTES
LICUADORA
INSTRUCCIONES Y RECETAS
KSB565 / KSB585
USA: 1-800-541-6390
Canada: 1-800-807-6777
KitchenAid.com
KitchenAid.ca

Proof of Purchase & Product Registration
Always keep a copy of the sales receipt
showing the date of purchase of your
Blender. Proof of purchase will assure you
of in-warranty service.
Before you use your Blender, please fill out
and mail your product registration card
packed with the unit. This card will enable
Model Number ______________________________________________________________
Serial Number _______________________________________________________________
Date Purchased ______________________________________________________________
Store Name and Location ______________________________________________________
us to contact you in the unlikely event of
a product safety notification and assist us
in complying with the provisions of the
Consumer Product Safety Act. This card
does not verify your warranty.
Please complete the following for your
personal records:
Preuve d’achat et enregistrement du produit
Veuillez conserver une copie du coupon de
caisse indiquant la date d’achat de votre
mélangeur. La preuve d’achat vous assure
du service d’après-vente sous garantie.
Avant d’utiliser votre mélangeur, veuillez
remplir et poster la carte d’enregistrement
du produit accompagnant l’appareil.
Grâce à cette carte, nous pourrons vous
Numéro de modèle __________________________________________________________
appeler dans l’éventualité improbable d’un
avis de sécurité et nous conformer plus
facilement aux dispositions de la loi sur la
sécurité des produits de consommation.
Cette carte ne confirme pas votre garantie.
Veuillez remplir ce qui suit pour vos
dossiers personnels :
Numéro de série _____________________________________________________________
Date d’achat ________________________________________________________________
Nom du marchand et adresse __________________________________________________
Comprobante de compra y registro del producto
Siempre conserve una copia del recibo
de ventas que especifique la fecha de
compra de su licuadora. El comprobante
de compra le asegurará el servicio técnico
bajo garantía.
Antes de utilizar la licuadora, complete y
envíe por correo su tarjeta de registro del
producto que viene junto con la unidad.
Esta tarjeta nos permitirá contactarnos
Número del modelo __________________________________________________________
Número de serie _____________________________________________________________
Fecha de compra ____________________________________________________________
Nombre de la tienda y dirección ________________________________________________
con usted en el improbable caso de
una notificación de algún problema de
seguridad con el producto y nos ayudará a
cumplir con las cláusulas de la Consumer
Product Safety Act (Ley sobre la seguridad
de los productos para el consumidor). Esta
tarjeta no asegura su garantía.
Complete lo siguiente para su
registro personal:

Table of Contents
INTRODUCTION
Proof of Purchase & Product Registration Card ......................................Inside Front Cover
Blender Safety .................................................................................................................3
Important Safeguards .....................................................................................................4
Electrical Requirements ...................................................................................................5
FEATURES AND OPERATION
Blender Features .............................................................................................................6
Preparing the Blender for Use .........................................................................................8
Before First Use .......................................................................................................8
Blender Assembly ....................................................................................................8
Using the Blender .........................................................................................................10
Before Use .............................................................................................................10
Operating the Blender ...........................................................................................10
CRUSH ICE .............................................................................................................10
PULSE MODE .........................................................................................................11
Ingredient Cup ......................................................................................................11
Soft Start
Speed Control Guide .....................................................................................................12
CARE AND CLEANING
To Clean Individual Components ...................................................................................13
To Clean Without Disassembly ......................................................................................13
Troubleshooting ............................................................................................................14
BLENDER TIPS
Quick Tips .............................................................................................................15
How To ..................................................................................................................15
®
Blending Feature...................................................................................11
ENGLISH
Continued on next page
1

Table of Contents
RECIPES
Blended Margarita .......................................................................................................17
Sparkling Cran-Pineapple Drink ....................................................................................17
Strawberry-Banana Smoothie .......................................................................................17
ENGLISH
Rum Mocha .................................................................................................................18
Italian Tortellini Tomato Soup .......................................................................................18
Blueberry Pancakes and Sauce .....................................................................................19
Raspberry Vinaigrette Dressing .....................................................................................20
Chocolate Pot De Crème ..............................................................................................20
Fresh Fruit Milk Shake ..................................................................................................20
WARRANTY AND SERVICE INFORMATION
KitchenAid
Hassle-Free Replacement Warranty – 50 United States and District of Columbia ...........22
Hassle-Free Replacement Warranty – Canada ................................................................22
How to Arrange for Warranty Service in Puerto Rico .....................................................22
How to Arrange for Service after the Warranty Expires – All Locations ..........................23
How to Arrange for Service Outside these Locations .....................................................23
How to Order Accessories and Replacement Parts .........................................................23
®
Blender Warranty .......................................................................................21
NOTE: DUE TO THE UNIQUE CONTAINER AND BLADE DESIGN, READ THESE
INSTRUCTIONS BEFORE USING YOUR NEW KITCHENAID
®
BLENDER TO ACHIEVE
MAXIMUM PERFORMANCE RESULTS.
2

Blender Safety
Your safety and the safety of others are very important.
We have provided many important safety messages in this manual and on your
appliance. Always read and obey all safety messages.
This is the safety alert symbol.
This symbol alerts you to potential hazards that can kill or hurt you
and others.
All safety messages will follow the safety alert symbol and either
the word “DANGER” or “WARNING.” These words mean:
You can be killed or seriously injured
DANGER
WARNING
All safety messages will tell you what the potential hazard is, tell you how to
reduce the chance of injury, and tell you what can happen if the instructions are
not followed.
if you don’t immediately follow
instructions.
You can be killed or seriously injured
if you don’t follow instructions.
ENGLISH
3

IMPORTANT SAFEGUARDS
When using electrical appliances, basic safety precautions should always be followed to
reduce the risk of fire, electric shock, and/or injury to persons including the following:
1. Read all instructions.
2. To protect against risk of electrical shock, do not put Blender in water or other liquid.
ENGLISH
3. Close supervision is necessary when any appliance is used by or near children.
4. Unplug from outlet when not in use, before putting on or taking off parts, and
before cleaning.
5. Avoid contact with moving parts.
6. Do not operate the Blender with a damaged cord or plug or after appliance malfunctions,
or is dropped or damaged in any manner. Return appliance to the nearest Authorized
Service Center for examination, repair or electrical or mechanical adjustment.
7. Do not use outdoors.
8. Do not let cord hang over edge of table or counter.
9. Keep hands and utensils out of container while blending to reduce the risk of severe
injury to persons or damage to the Blender. A scraper may be used but must be used
only when the Blender is not running.
10. Blade assembly is sharp. Handle carefully.
11. To reduce risk of injury, never put locking collar and blade assembly on the base
without having the pitcher properly attached.
12. Always operate Blender with cover in place.
13. The use of attachments, including canning jars, not recommended by KitchenAid may
cause a risk of injury to persons.
14. When blending hot liquids, remove center piece of two-piece cover.
15. Flashing light indicates ready to operate. Avoid any contact with blades or
moveable parts.
16. Do not use appliance for other than intended use.
SAVE THESE INSTRUCTIONS
THIS PRODUCT IS DESIGNED FOR
HOUSEHOLD USE ONLY
4

Electrical Requirements
Volts: 120 Volts A.C. only.
Hertz: 60 Hz
NOTE: Your Blender has a 3-prong
grounded plug. To reduce the risk of
electrical shock, this plug will fit in an
outlet only one way. If the plug does not fit
in the outlet, contact a qualified electrician.
Do not modify the plug in any way.
Do not use an extension cord. If the
power supply cord is too short, have a
qualified electrician or serviceman install
an outlet near the appliance.
WARNING
ENGLISH
Electrical Shock Hazard
Plug into a grounded 3 prong
outlet.
Do not remove ground prong.
Do not use an adapter.
Do not use an extension cord.
Failure to follow these
instructions can result in death,
fire, or electrical shock.
5
8
1
16
2
24
3
32
4
40
5
48
6
8
1
16
2
24
3
32
4
40
5
48
6
oz
cups
oz
cups
Stay-Put Lid with
Clear, 2 oz. (60 ml)
ENGLISH
Ingredient Cup
Easy Pour
48 oz. (1.5 L)
Glass Pitcher
Patented
Stainless
Steel Blade
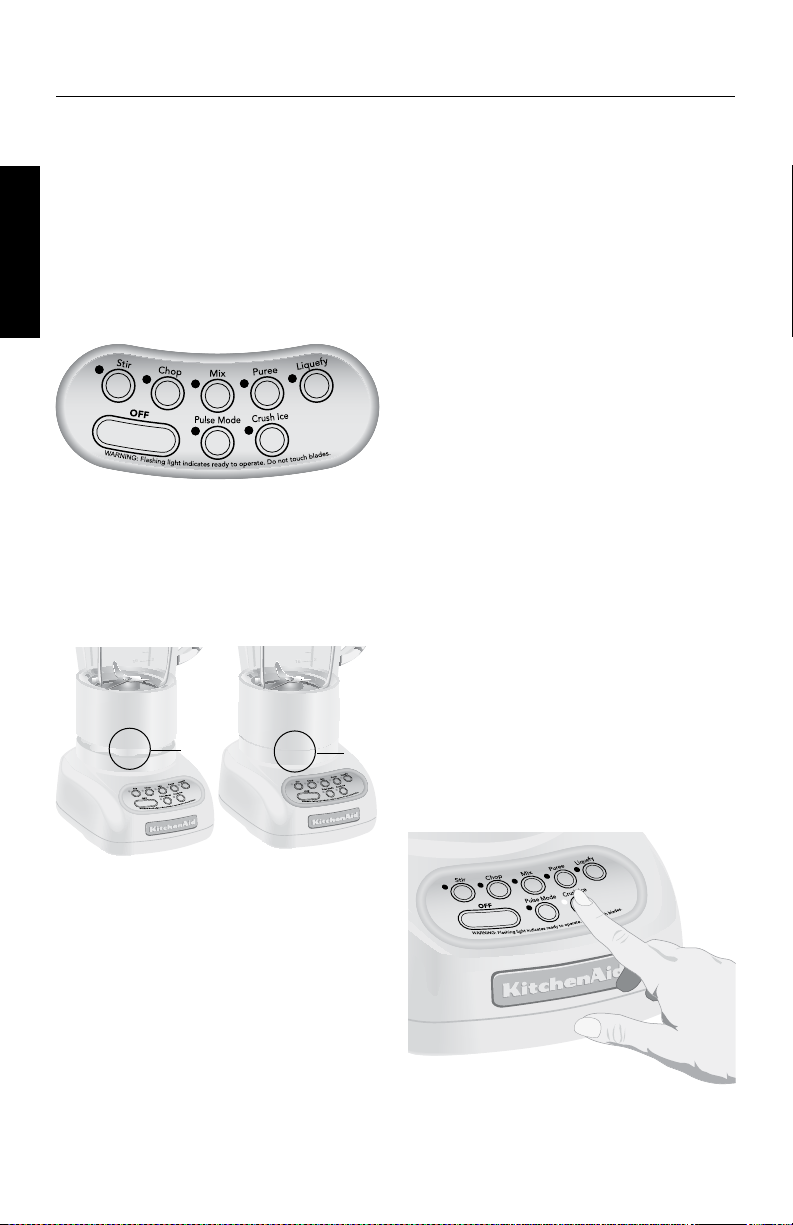
Blender Features
Locking Collar
and Blade
Assembly
Durable
Steel-Reinforced
Coupler
Speed
Selection
Buttons
Clean Touch™
Control Pad
Die-Cast
Metal Base
6

Blender Features
This blender was built and tested to
KitchenAid quality standards for optimum
performance and long, trouble-free life.
Robust Motor
Rugged 0.9-horsepower motor supplies
the power for superb performance with
all blending tasks — from puréeing sauces
to making chunky salsas, or uniformly
crushing a pitcher of ice or frozen fruit
within seconds for silky smoothies.
Easy Pour 48 oz. (1.5 L) Glass Pitcher
Glass Pitcher resists scratches, stains and
odors. Pitcher is removable from locking
collar for easy cleaning, and withstands a
range of extreme temperatures. Easy pour
spout provides smooth, drip-free pouring.
Stay-Put Lid with Clear 2 oz. (60 ml)
Ingredient Cup
Provides a strong seal. The flexible lid will
maintain its tight seal throughout the
life of the Blender. The lid incorporates
a removable 2 oz. (60 ml) cup for
convenience in measuring and adding
ingredients.
Patented Stainless Steel Blade
Sharp over-sized tines are positioned on
four different planes for fast, thorough
and consistent blending.
Locking Collar and Blade Assembly
Durable, one-piece blade design is built
into the locking collar for easy handling
and cleaning. Dishwasher-safe assembly
keeps the blades from rotating until the
pitcher is properly attached to the collar
and put on the Blender base.
Durable Steel-Reinforced Coupler
Commercial-quality coupler with 12
interlocking teeth provide direct transfer
of motor power to the blades. Pitcher
coupler is coated for quiet operation.
Speed Selection Buttons
Create frozen drinks and purée sauces or
soups in seconds. Blend with confidence,
control and consistency at all speed settings:
STIR, CHOP, MIX, PURÉE and LIQUEFY. The
PULSE MODE works with all five speeds. The
CRUSH ICE feature is designed specifically
for crushing ice and will automatically pulse
at staggered intervals for optimal results.
Intelli-Speed
Exclusive Intelli-Speed
®
Motor Control
®
control automatically
works to keep speed constant – even
through density changes when ingredients
are added. This advanced KitchenAid design
maintains an optimal blending speed for
each culinary task and control-pad setting.
Soft Start
®
Blending Feature
The Blender starts at a slower speed to
pull ingredients into the blade then quickly
increases to selected speed setting. This
design feature reduces start-up kick and
allows hands-free operation.
Die-Cast Metal Base
Heavy, die-cast metal base ensures stable,
quiet operation when blending a full
pitcher of ingredients. Four rubber feet on
wide, solid base provide a no-slip, nonmarring grip. Smooth and rounded, the
base is easy-to-clean and features cord
storage underneath.
Clean Touch™ Control Pad
Wipes clean in an instant. Smooth control pad
has no crevices or cracks to trap ingredients.
ENGLISH
7
Preparing the Blender for Use
Before First Use
Before using your Blender for the first time,
wipe Blender base with a warm sudsy cloth,
then wipe clean with a damp cloth. Dry
ENGLISH
with a soft cloth. Wash pitcher, lid, locking
collar and blade assembly, sealing ring and
ingredient cup in warm, sudsy water (see
Care and Cleaning). Rinse parts and wipe dry.
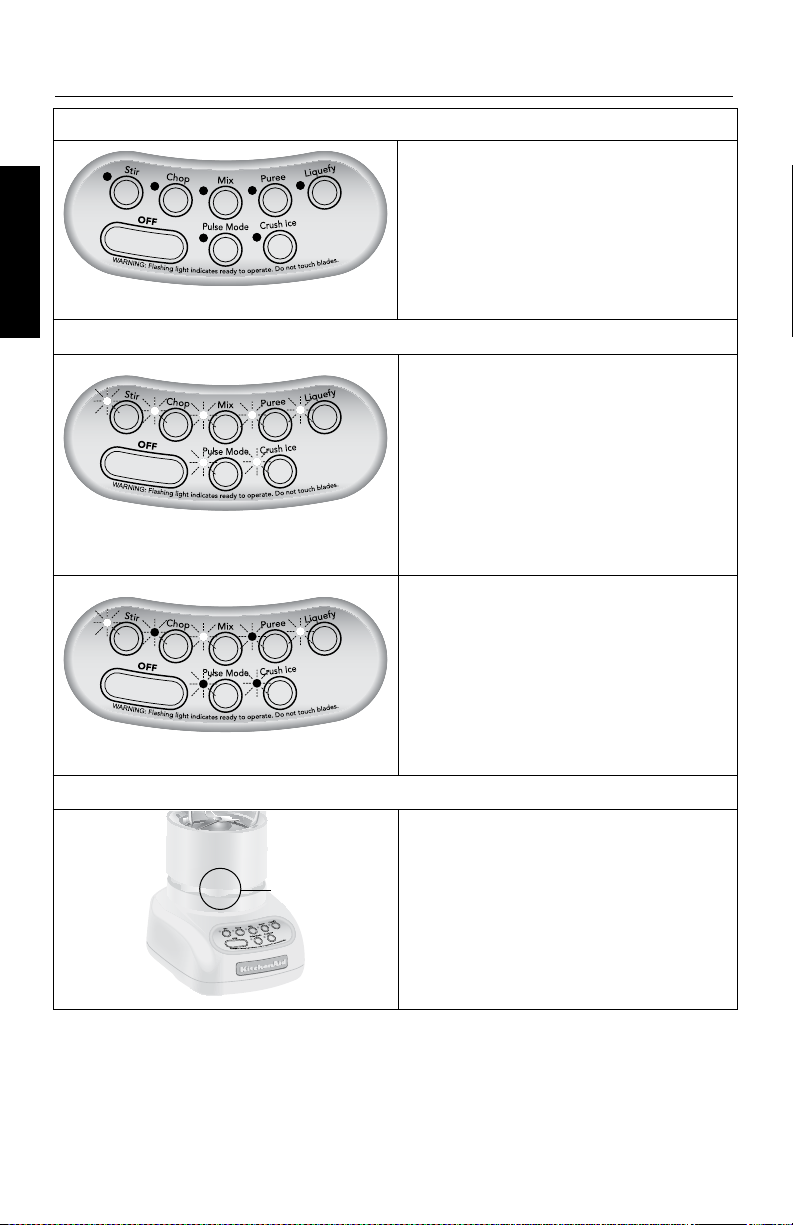
Blender Assembly
1. Put locking collar with blade assembly
pointing up on a sturdy surface.
2. Put sealing ring, flat side down, around
the blades and into the groove within
the locking collar.
Sealing
Ring
3. Align the pitcher tabs with the slots of
the locking collar.
4. Press down and rotate pitcher
clockwise, approximately ¼ turn until
two clicks are heard.
5. Adjust the length of the Blender
power cord.
Locking
Collar
NOTE: For easier jar and collar assembly,
you can dip the gasket in water before
placing it into the collar. A damp gasket
makes it easier to attach the glass jar to
the collar.
8
Preparing the Blender for Use
8
1
16
2
24332
4
40548
6
8
1
16
2
24
3
32
4
40
5486
oz
cups
oz
cups
8
1
16
2
24332
4
40
5486
8
1
16
2
24
3
32
4
40
5486
oz
cups
oz
cups
8
1
16
2
24
3
32
4
40
5
48
6
8
1
16
2
24
3
32
4
40
5
48
6
oz
cups
oz
cups
6. Put pitcher assembly onto the
Blender base.
WARNING
NOTE: When properly positioned, pitcher
assembly will rest completely on Blender
base. If not, repeat steps 3 and 4.
Gap
7. Put lid on pitcher.
No
Gap
Electrical Shock Hazard
Plug into a grounded 3 prong
outlet.
Do not remove ground prong.
Do not use an adapter.
Do not use an extension cord.
Failure to follow these
instructions can result in death,
fire, or electrical shock.
8. Plug power cord into a grounded
3-prong outlet. Blender is now ready
for operation.
9. Before removing the pitcher from the
base, always press OFF and unplug the
power cord.
ENGLISH
9
Using the Blender
8
1
16
2
24
3
32
4
40
5
48
6
8
1
16
2
24
3
32
4
40
5
48
6
56
8
oz
cups
oz
cups
56
8
8
1
16
2
24
3
32
4
40548
6
8
1
16
2
24
3
32
4
40548
6
oz
cups
oz
cups
8
1
16
2
24332
4
40548
6
8
1
16
2
24
3
32
4
40548
6
oz
cups
oz
cups
Before Use
NOTE: While the Blender is on or the
PULSE MODE indicator light is blinking:
- Do not interfere with blade movement
ENGLISH
- Do not remove pitcher lid
Operating the Blender
The KitchenAid
®
Blender has five speeds:
STIR, CHOP, MIX, PURÉE and LIQUEFY. In
addition, it also features CRUSH ICE and
PULSE MODE.
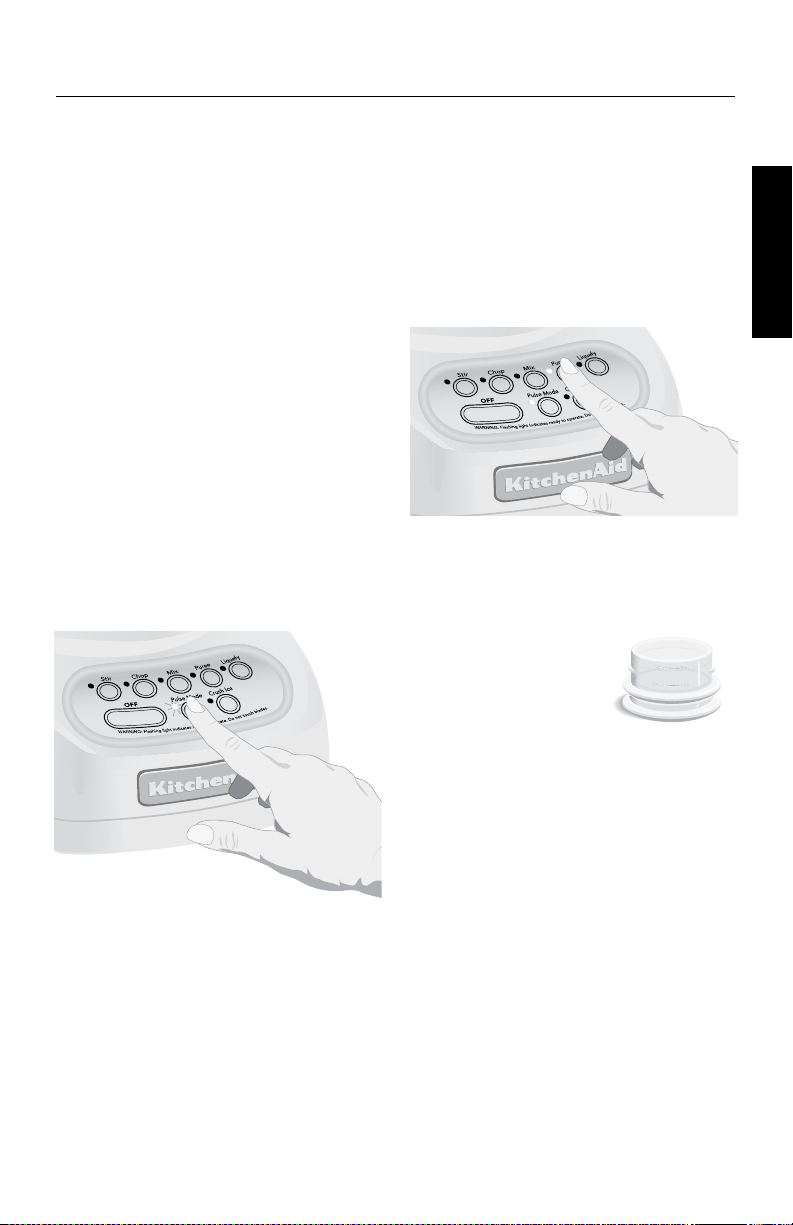
1. With convenient one-step operation,
this unit will operate only when a
speed selection button is pressed.
2. Before operating the Blender, make
sure the pitcher is properly secured
in the locking collar and assembly is
positioned on the Blender base.
Gap
4. Press the desired speed button for
continuous operation at that speed.
The red indicator light above the
selected speed will stay lit. You may
change settings without stopping the
unit by pressing a new speed button.
IMPORTANT: If blending hot foods or
liquids, remove the center ingredient cup.
Operate only on STIR speed.
5. To turn off the Blender, press OFF.
The Off button will stop any speed
and deactivate the Blender at the
same time.
6. Before removing the pitcher assembly,
unplug the power cord.
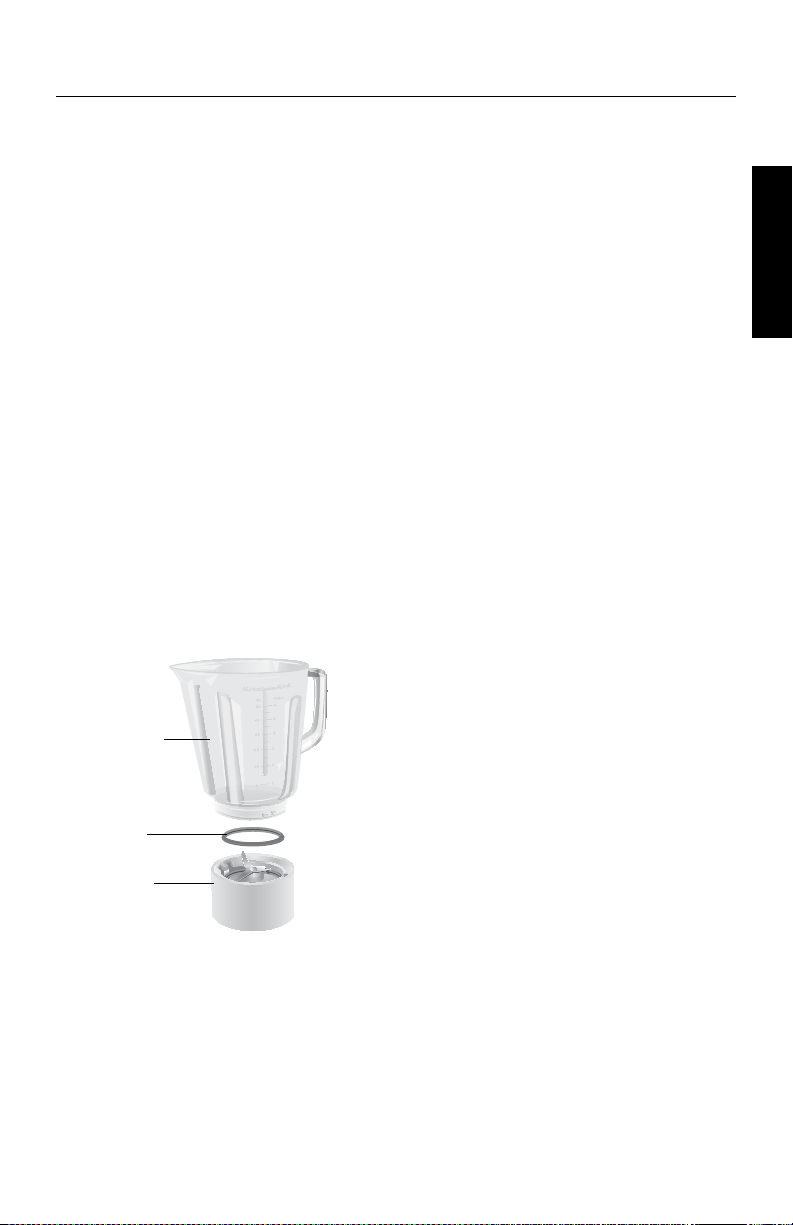
CRUSH ICE
Your KitchenAid
®
Blender offers a CRUSH
ICE feature. When selected, the Blender
will automatically pulse at staggered
intervals at the optimal speed for crushing
ice or other ingredients.
1. Before operating the Blender, make
sure the pitcher assembly is properly
positioned on the Blender base.
NOTE: If a gap exists between the locking
collar and the base, the pitcher might not
be locked into the locking collar or the
collar is not positioned properly on the
Blender base. See Blender Assembly for
further instructions.
No
2. Put ingredients into the pitcher and
Gap
firmly attach lid.
3. Press CRUSH ICE. The indicator light will
stay lit. The Blender will automatically
pulse at staggered intervals.
NOTE: If a gap exists between the locking
collar and the base, the pitcher might not
be locked into the locking collar or the
assembly is not positioned properly on the
Blender base. See Blender Assembly for
further instructions.
3. Put ingredients into the pitcher and
firmly attach lid.
10
Using the Blender
4. To turn off the CRUSH ICE feature
press OFF. The Blender is now ready for
continuous operation.
5. Before removing the pitcher assembly,
unplug the power cord.
PULSE MODE
Your KitchenAid
®
Blender offers PULSE
MODE, which allows a “Pulse-at-any
Speed” feature.
NOTE: PULSE MODE will not work with
the CRUSH ICE feature.
1. Before operating the Blender, make
sure the pitcher assembly is properly
positioned on the Blender base.
NOTE: If a gap exists between the locking
collar and the base, the pitcher might not
be locked into the locking collar or the
collar is not positioned properly on the
Blender base. See Blender Assembly for
further instructions.
2. Put ingredients into pitcher, and firmly
attach lid.
3. Press PULSE MODE. The indicator light on
the button will blink to indicate that all
five speeds are in the PULSE MODE.
4. Select a speed button. Press and hold
for the desired length of time. Both
the speed button and PULSE MODE
indicators will stay lit when pulsing
at the selected speed. When button
is released, the blending will stop,
but the Blender will remain in PULSE
MODE and the PULSE MODE indicator
will return to blinking. To pulse again
or at another speed, simply press and
hold the button of the desired speed.
5. To turn off the PULSE MODE feature,
press OFF. The Blender is now ready for
continuous operation.
6. Before removing the pitcher assembly,
unplug the power cord.
Ingredient Cup
The 2 oz. (60 ml)
ingredient cup can be
used to measure and add
ingredients to the pitcher. Remove cup
and add ingredients at STIR, CHOP or MIX
speeds. When operating at higher speeds,
with a full pitcher or with hot contents,
stop the Blender and then add ingredients.
Soft Start
The Soft Start
®
Blending Feature
®
blending feature
automatically starts the Blender at a slower
speed to pull ingredients into the blade
then quickly increases to selected speed
setting for optimal performance.
NOTE: The Soft Start
®
blending feature
only works when a speed is selected from
the OFF mode and does not work with the
PULSE MODE or CRUSH ICE features.
ENGLISH
11

Speed Control Guide
Item Speed
Blended ice drink . . . . . . . . . . . . . Liquefy
Cheesecake . . . . . . . . . . . . . . . . . . Liquefy
Chopped fruits . . . . . . . . . . . Pulse on Stir
ENGLISH
Chopped vegetables . . . . . . . Pulse on Stir
Cream cheese-based spread . . . . . . . . Stir
Cream soup . . . . . . . . . . . . . . . . . . . . Stir
Crushed/chopped Ice . . . . . . . . .Crush Ice
Dip . . . . . . . . . . . . . . . . . . . . . . . . . . . Stir
Finely chopped fresh fruits . . . . .Crush Ice
Finely chopped fresh vegetables . . Liquefy
Frozen chopped fruit (defrost
slightly until it can be probed
with a knife tip) . . . . . . . . . . .Crush Ice
Frozen yogurt-based drink . . . . . . Liquefy
Fruit juice from frozen concentrate . . . Mix
Fruit-based drink (Thick) . . . . . . . . . . . Stir
Fruit-based drink (Thin) . . . . . . . . . Liquefy
Fruit-based sauce . . . . . . . . . . . . . . . . Stir
Grated hard cheese . . . . . . . . . . . . Liquefy
Gravy . . . . . . . . . . . . . . . . . . . . . . . . . Mix
Tip - Process up to one standard ice cube tray or 12 to 14 standard ice cubes at a
time. Occasional stirring with a spatula will be helpful only when Blender is off. The
CRUSH ICE feature has been optimized to crush and chop ice without adding any liquid
ingredients.
Item Speed
Ice milk-based drink . . . . . . . . . . . Liquefy
Meat salad for
sandwich filling . . . . . . . .Pulse on Chop
Mousse . . . . . . . . . . . . . . . . . . . . . Liquefy
Oatmeal . . . . . . . . . . . . . . . . . . . . . .Puree
Pancake batter . . . . . . . . . . . . . . . . . . Mix
Pesto. . . . . . . . . . . . . . . . . . . . . . . . .Chop
Pureed fruit/Baby food . . . . . . . . . . .Puree
Pureed meat/Baby food meat . . . . . .Puree
Pureed vegetables/
Baby food vegetables . . . . . . . . . .Puree
Vegetable-based main dish sauce . . . . Stir
Salad dressing . . . . . . . . . . . . . . . . . . . Mix
Savory crumb topping . . . .Pulse on Chop
Sherbet-based drink . . . . . . . . . . . Liquefy
Smooth ricotta or cottage cheese . . . . Mix
Streusel topping . . . . . . . . . . . . . . . .Chop
Sweet crumb topping . . . . .Pulse on Chop
Sweet crunch topping. . . . .Pulse on Chop
Waffle batter . . . . . . . . . . . . . . . . . . . Mix
White sauce . . . . . . . . . . . . . . . . . . . . Stir
12
Care and Cleaning
The Blender pitcher, locking collar and
blade assembly can be easily cleaned
as individual components or together
without disassembly.
•CleantheBlenderthoroughlyafter
every use
•DonotimmersetheBlenderbaseor
cord in water
•Donotuseabrasivecleansersor
scouring pads
To Clean Individual Components
1. Lift the pitcher assembly in a straight,
upwards motion off the Blender base.
Then, while holding locking collar,
rotate pitcher counterclockwise, two
clicks, to separate locking collar and
blade assembly, and sealing ring from
the pitcher. Wash components with
soapy water. Rinse and wipe dry.
NOTE: Pitcher can be placed in the
bottom rack of an automatic dishwasher.
The lid, ingredient cup, locking collar and
blade assembly, and sealing ring can be
put in the top rack. For best results, hand
washing is recommended.
To Clean Without Disassembly
1. Put the pitcher on the Blender base,
fill half full with warm (not hot) water,
and add 1 or 2 drops of dishwashing
liquid. Put the lid on the pitcher, press
the STIR speed setting, and run the
Blender for 5 to 10 seconds. Remove
the pitcher and empty contents. Rinse
with warm water until clean.
2. To clean the lid and ingredient cup,
wash in warm soapy water, then rinse
and dry thoroughly.
3. Wipe the Blender base and cord with
a warm, sudsy cloth; wipe clean with a
damp cloth, and dry with a soft cloth.
ENGLISH
Pitcher
Sealing
Ring
Locking
Collar
and Blade
Assembly
2. Wipe the Blender base and cord with
a warm, sudsy cloth; wipe clean with a
damp cloth, and dry with a soft cloth.
13
Troubleshooting
8
1
16
2
24
3
32
4
40
5486
8
1
16
2
24
3
32
4
40548
6
oz
cups
oz
cups
The Blender does not operate when a setting is selected:
Check to see if the Blender is plugged
into a grounded 3-prong outlet. If it
ENGLISH
No indicator lights are lit.
The Blender stops while blending:
All indicator lights are flashing
at the same time.
Indicator lights are flashing alternately.
is, press OFF, then unplug the Blender.
Plug it back into the same outlet. If the
Blender still does not work, check the
fuse or circuit breaker on the electrical
circuit the Blender is connected to and
make sure the circuit is closed.
The Blender may be overloaded. If the
Blender becomes overloaded when
blending heavy ingredients, it will
automatically shut off to avoid damage to
the motor. Press OFF to reset the Blender
and unplug the power cord. Remove the
pitcher assembly from the base and divide
contents into smaller batches. Adding
liquid to the ingredients may also reduce
the load on the Blender.
The Blender may be jammed. If it’s
jammed, the Blender will stop running to
avoid damage to the motor. Press OFF to
reset the Blender and unplug the power
cord. Remove the pitcher assembly from
the base and with a scraper, free the
blades by breaking-up or removing the
contents at the bottom of the pitcher.
The Blender turns on, but blades will not rotate:
The pitcher is not properly secured in
the locking collar, not allowing couplers
to engage. Remove pitcher from base
Gap
and fully seat into collar. Press down and
rotate pitcher clockwise in the locking
collar past the second “click.” This will
allow the pitcher assembly to engage the
coupler. See Blender Assembly.
If the problem cannot be fixed with the steps provided in this section, contact KitchenAid
or an Authorized KitchenAid Service Center.
USA/Puerto Rico: Canada: Mexico:
1-800-541-6390 1-800-807-6777 01-800-024-17-17 (JV Distribuciones)
01-800-902-31-00 (Industrias Birtman)
See the KitchenAid Warranty and Service section additional details.
Do not return the Blender to the retailer – they do not provide service.
14

Blender Tips
Quick Tips
•Inordertoproduceasmoothertexture,
blend with CRUSH ICE if you’re making
beverages using ice.
•Smallericecubescanbechoppedor
crushed faster than large ones.
•AddfoodtothisBlenderpitcherin
larger quantities than you would with
other blenders – you can add 2 to 3
cups (475 to 710 ml) at a time versus 1
cup (235 ml) portions.
•Formanyingredientmixtures,startthe
blending process at STIR to thoroughly
combine the ingredients. Then increase
to a higher speed, if necessary.
•Besuretokeeplidonpitcherwhile
blending.
•Ifdesired,removecenteringredientcup
of the pitcher lid to add liquids or ice
cubes while the Blender is operating on
STIR, CHOP or MIX speeds.
•Whenoperatingathigherspeedswith
a full pitcher or with hot contents, stop
the Blender and then add ingredients.
•StoptheBlenderbeforeusingutensils
in the pitcher. Use a rubber spatula to
mix ingredients only when the Blender
is OFF. To avoid damaging the utensil or
blender blades, do not use any utensil,
including spatulas, in the pitcher while
the motor is running.
•Coolhotfoods,ifpossible,before
blending. Begin blending warm foods
on STIR. Increase to higher speed, if
necessary.
•Removecenteringredientcupwhen
blending hot liquids and operate only
on STIR. Do not place bare hand on lid
when processing hot liquids.
•Stopandchecktheconsistencyof
foods after a few seconds to avoid
over-processing.
How To ...
Reconstitute frozen juice: For a 6 oz.
(175 ml) can of orange juice concentrate,
combine the juice and correct amount of
water in the pitcher. Cover and blend at
MIX until thoroughly combined, about 10
to 15 seconds.
For a 12 oz. (355 ml) can, combine the
juice and 1 can of water in the pitcher.
Cover and blend on MIX until thoroughly
combined, about 20 to 30 seconds. Stir in
remaining 2 cans of water.
Dissolve flavored gelatin: Pour boiling
water into the pitcher; add gelatin.
Remove center ingredient cup and blend
on STIR until gelatin is dissolved, about 10
to 30 seconds. Add other ingredients.
Make cookie and graham cracker
crumbs: Break larger cookies into
pieces about 1½ inches (3.75 cm) in
diameter. Use smaller cookies as-is. Place
in pitcher. In PULSE MODE, cover and
blend on CHOP, pulsing a few times,
about 3 seconds each time, until desired
consistency is reached. Use the crumbs to
make a quick topping for frozen yogurt,
pudding, or a fruit compote.
To make finer crumbs for pie and dessert
crusts, break graham crackers or cookies
into pieces about 1½ inches (3.75 cm)
in diameter and place in the pitcher.
In PULSE MODE, cover and blend on
LIQUEFY, pulsing a few times until desired
consistency is reached, about 20 to 30
seconds.
Make cracker crumbs: Follow procedure
for cookies. Use as a topping or as an
ingredient in main dish casseroles and
vegetable dishes.
Make bread crumbs: Tear bread into
pieces about 1½ inches (3.75 cm) in
diameter. Follow procedure for cookies.
Use as a topping or as an ingredient in
main dish casseroles and vegetable dishes.
ENGLISH
15

Blender Tips
Chop fruits and vegetables: Put 2 cups
(475 ml) of fruit or vegetable chunks in
pitcher. In PULSE MODE, cover and blend
on STIR, pulsing a few times, about 2
to 3 seconds each time, until desired
ENGLISH
consistency is reached.
Puree fruits: Place 2 cups (475 ml)
canned or cooked fruit in pitcher. Add 2
to 4 tablespoons (30 to 60 ml) fruit juice
or water per cup (235 ml) of fruit. Cover
and blend on PUREE about 5 to
10 seconds.
Puree vegetables: Place 2 cups (475 ml)
canned or cooked vegetables in pitcher.
Add 2 to 4 tablespoons (30 to 60 ml)
broth, water, or milk per cup (235 ml) of
vegetables. Cover and blend on PUREE
about 10 to 20 seconds.
Puree meats: Place cooked, cubed, tender
meat in pitcher. Add 3 to 4 tablespoons
(45 to 60 ml) broth, water, or milk per cup
(235 ml) of meat. Cover and blend on STIR
10 seconds. Stop the Blender and scrape
sides of pitcher. Cover and blend on PUREE
10 to 20 seconds longer.
Puree cottage cheese or ricotta
cheese: Place cottage cheese or ricotta
cheese in pitcher. Cover and blend on MIX
until smooth, about 25 to 35 seconds.
Stop the Blender and scrape sides as
needed. If necessary, add 1 tablespoon
(15 ml) of skim milk per cup (235 ml) of
cottage cheese. Use as a base for low-fat
dips and spreads.
Combine liquid ingredients for baked
goods: Pour liquid ingredients in pitcher.
Cover and blend on LIQUEFY until well
mixed, about 10 to 15 seconds. Pour
liquid mixture over dry ingredients and
stir well.
Take lumps out of gravy: If sauce or
gravy becomes lumpy, place in the pitcher.
Cover and blend on MIX until smooth,
about 5 to 10 seconds.
Combine flour and liquid for
thickening: Place flour and liquid in
pitcher. Cover and blend on STIR until
smooth, about 5 to 10 seconds.
Prepare white sauce: Place milk, flour,
and salt, if desired, in pitcher. Cover, and
blend on STIR until well mixed, about 5 to
10 seconds. Pour into saucepan and cook
as usual.
Prepare pancake or waffle batter
from mix: Place mix and other ingredients
in pitcher. Cover and blend on MIX until
well-mixed, 10 to 20 seconds. Stop the
Blender and scrape sides of the pitcher
as needed.
Grate cheese: Cut very cold cheese
into ½ to 1 inch (1.25 to 1.5 cm) cubes.
Place up to ½ cup (120 ml) cheese in
the pitcher. Cover and blend on LIQUEFY
about 5 to 10 seconds. For hard cheeses,
such as Parmesan, bring to room
temperature, then blend on LIQUEFY for
10 to 15 seconds.
Make oatmeal for a baby: Place
uncooked rolled oats in pitcher. In PULSE
MODE, blend on MIX until desired
consistency, about 5 pulses, 2 to 3 seconds
each pulse. Cook as usual.
Make baby food from adult food:
Place prepared adult food in pitcher. Cover
and blend on STIR about 10 seconds. Then
blend on PUREE about 10 to 30 seconds.
Rinse your Blender jar: Fill pitcher half
full with warm water. Add a few drops
of dishwashing liquid. Cover and blend
on STIR until sides are clean, about 5 to
10 seconds. Rinse and dry. For complete
cleaning, pitcher, lid, ingredient cup,
and locking collar and blade assembly
and sealing ring can also be cleaned in
an automatic dishwasher. Refer to Care
and Cleaning.
16

3
⁄4 cup (175 ml) tequila
1
⁄2 cup (120 ml)
orange-flavored
liqueur
1
⁄2 cup (120 ml) fresh
lime juice
1
⁄4 cup (60 ml)
simple syrup or
3 tablespoons
(45 ml) sugar
4 cups (945 ml) ice
cubes
Simple Syrup
1 cup (235 ml) sugar
1 cup (235 ml) water
Sparkling Cran-Pineapple Drink
Blended Margarita
Place ingredients in pitcher. Cover and blend at
CRUSH ICE, 15 to 20 pulses, or until slushy.
3
Yield: 6 servings (
Per Serving: About 118 cal, 0 g pro, 16 g carb,
0 g total fat, 0 g sat fat, 0 mg chol, 6 mg sod.
Simple Syrup
In small saucepan, combine sugar and water. Boil
until sugar dissolves, 2 to 4 minutes. Cool; cover and
refrigerate.
Yield: About 1
⁄4 cup [175 ml] per serving).
1
⁄4 cups (295 ml).
ENGLISH
1 can (12 oz. [355 ml])
frozen cranberry
juice cocktail
concentrate
1 can (8 oz. [235 ml])
crushed pineapple,
packed in juice and
undrained
2 cups (475 ml)
lemon-lime flavored
carbonated
beverage, chilled
Strawberry-Banana Smoothie
11⁄2 cups (355 ml)
buttermilk
1 cup (235 ml) frozen
unsweetened
strawberries
1 cup (235 ml) milk
3 medium bananas,
broken into quarters
3 tablespoons (45 ml)
orange marmalade
Place cranberry concentrate and pineapple in pitcher.
Cover and blend at LIQUEFY about 10 seconds, or until
smooth. Add carbonated beverage. Cover and blend at
STIR just until mixed, 2 to 4 seconds.
Yield: 5 servings (about 1 cup [235 ml] per serving).
Per Serving: About 171 cal, 0 g pro, 44 g carb,
0 g total fat, 0 g sat fat, 0 mg chol, 10 mg sod.
Place ingredients in pitcher. Cover and blend at LIQUEFY
15 to 20 seconds, or until smooth.
Yield: 5 servings (1 cup [235 ml] per serving).
Per Serving: About 170 cal, 6 g pro, 34 g carb,
2.5 g total fat, 1.5 g sat fat, 10 mg chol, 90 mg sod.
17

Rum Mocha
2 cups (475 ml)
chocolate ice cream
1
⁄2 cup (120 ml) double-
strength coffee, cold
1
⁄2 cup (120 ml)
ENGLISH
dark rum
4 ice cubes
2 tablespoons (30 ml)
olive oil
1
⁄2 cup (120 ml)
chopped onion
1
⁄2 cup (120 ml)
chopped green
pepper
2 cans (14.5 oz.
[429 ml] each)
Italian-seasoned
diced tomatoes,
undrained
1 tablespoon (15 ml)
sugar
1
⁄2 teaspoon (2 ml) salt
1
⁄4 teaspoon (1 ml)
fennel seed
1
⁄8 teaspoon (0.5 ml)
cayenne pepper
1 can (14 oz. [415 ml])
beef broth
1 package (9 oz.
[265 ml]) refrigerated
cheese-filled tortellini
Shredded mozzarella
cheese, if desired
Chopped fresh
parsley, if desired
Place ingredients in pitcher. Cover and blend at CRUSH ICE,
12 to 15 pulses, or until smooth.
3
Yield: 4 servings (
⁄4 cup [175 ml] per serving).
Per Serving: About 210 cal, 3 g pro, 19 g carb,
7 g total fat, 4.5 g sat fat, 20 mg chol, 50 mg sod.
Italian Tortellini Tomato Soup
In large saucepan over medium-high heat, heat olive oil.
Add onion and green pepper; cook 3 to 5 minutes, or
until limp. Add tomatoes, sugar, salt, fennel seed, and
cayenne pepper. Reduce heat to low; simmer, uncovered,
15 to 20 minutes, or until thickened, stirring occasionally.
Cool 5 minutes.
Pour half of cooled tomato mixture into pitcher. Cover
and blend at STIR about 15 seconds. Add remaining
tomato mixture. Cover and blend at STIR about
15 seconds. Blend at LIQUEFY about 10 seconds,
or until smooth.
Return mixture to saucepan. Add broth. Bring to a boil.
Add tortellini. Reduce heat to low; simmer, uncovered,
8 to 10 minutes, or until tortellini is tender, stirring
occasionally.
Serve hot, sprinkled with mozzarella cheese and
chopped parsley, if desired.
Yield: 6 (1 cup [235 ml]) servings.
Per Serving: About 250 cal, 8 g pro, 35 g carb,
8 g total fat, 2.5 g sat fat, 20 mg chol, 1,100 mg sod.
18
18

Blueberry Pancakes and Sauce
Sauce
1
⁄4 cup (60 ml) sugar
2 teaspoons (10 ml)
cornstarch
2
⁄3 cup (160 ml) water
1
⁄2 teaspoon (2 ml)
grated lemon peel
2 cups (475 ml) fresh
or frozen blueberries
(do not thaw)
Pancakes
2 eggs
2 cups (475 ml)
buttermilk
2 tablespoons (30 ml)
vegetable oil
1
⁄2 teaspoon (2 ml)
grated lemon peel
1
⁄4 cups (535 ml)
2
all-purpose flour
2 tablespoons (30 ml)
sugar
1 teaspoon (5 ml)
baking powder
1 teaspoon (5 ml)
baking soda
1
⁄2 teaspoon (2 ml) salt
1
⁄4 teaspoon (1 ml)
nutmeg
1 cup (235 ml) fresh or
frozen blueberries
(do not thaw)
Place sauce ingredients in saucepan. Cook over medium
heat until mixture thickens, stirring constantly. Cool
5 minutes. Pour mixture into pitcher. Cover and blend at
STIR about 5 seconds; scrape sides of pitcher if necessary.
Blend at MIX about 10 seconds, or until smooth. Pour
into serving container. Rinse pitcher.
Place eggs in pitcher. Cover and blend at STIR about
5 seconds. Add buttermilk, oil, and lemon peel. Blend at
MIX about 5 seconds. Add flour, sugar, baking powder,
baking soda, salt, and nutmeg. Using PULSE feature,
blend at MIX, pulsing 5 times, 2 to 3 seconds each time,
or just until dry ingredients are moistened. By hand,
gently stir in blueberries.
Heat nonstick griddle to medium-high, greasing griddle
if it is not nonstick. Pour scant
1
⁄4 cup (60 ml) batter for
each pancake onto griddle, stirring batter occasionally to
distribute blueberries. Cook until bubbles form on surface
and edges become dry, 1 to 2 minutes. Turn; cook until
golden brown on underside, 1 to 2 minutes. Serve with
warm blueberry sauce.
Yield: About 8 servings (2, 4-inch [10 cm] pancakes and
1
⁄4 cup [60 ml] sauce per serving).
Per Serving: About 280 cal, 8 g pro, 48 g carb,
6 g total fat, 1 g sat fat, 55 mg chol, 280 mg sod.
ENGLISH
19

Raspberry Vinaigrette Dressing
1 cup (235 ml) fresh or
frozen raspberries,
thawed
2 tablespoons (30 ml)
ENGLISH
sugar
3 tablespoons (45 ml)
raspberry vinegar
2 tablespoons (30 ml)
vegetable oil
1 cup (235 ml)
semisweet chocolate
chips
1
⁄4 cup (60 ml) egg
substitute or
1 pasteurized egg,
beaten
1
⁄2 teaspoon (2 ml)
vanilla
3
⁄4 cup (175 ml)
half-and-half
Sweetened whipped
cream or whipped
topping, if desired
Place ingredients in pitcher. Cover and blend at STIR
about 15 seconds; scrape sides of pitcher if necessary.
Blend at LIQUEFY 10 to 15 seconds, or until smooth.
Serve over tossed green salads or fruit salads. Store in
refrigerator.
Yield: 6 servings (2 tablespoons [10 ml] per serving).
Per Serving: About 70 cal, 0 g pro, 7 g carb,
4.5 g total fat, 0 g sat fat, 0 mg chol, 0 mg sod.
Chocolate Pot De Crème
Place chocolate chips, egg substitute, and vanilla in
pitcher. Heat half-and-half until bubbles form around
edge. Pour over chocolate chips. Cover and blend at
LIQUEFY 20 to 25 seconds, or until chocolate chips are
melted and mixture is smooth; scrape sides of pitcher
if necessary.
Pour into small cups. Refrigerate until set, 4 to 6 hours.
Serve with whipped cream, if desired.
1
Yield: 4 servings (
Per Serving: About 350 cal, 7 g pro, 38 g carb,
22 g total fat, 13 g sat fat, 15 mg chol, 45 mg sod.
⁄2 cup [120 ml] per serving).
Fresh Fruit Milk Shake
2 cups (475 ml) milk
1
⁄2 cups (355 ml) vanilla
1
ice cream
3 cups (710 ml) fresh
sliced peaches,
strawberries or other
favorite fruit*
2 tablespoons (30 ml)
powdered sugar,
if desired
Place ingredients in pitcher. Cover and blend at LIQUEFY
10 to 15 seconds, or until smooth.
Yield: 5 servings (about 1 cup [235 ml] per serving).
*Three cups (710 ml) frozen, slightly thawed favorite fruit
may be used instead.
Per Serving: About 170 cal, 6 g pro, 24 g carb,
7 g total fat, 4 g sat fat, 25 mg chol, 70 mg sod.
20

KitchenAid® Blender Warranty
Length of
Warranty:
50 United States, the
District of Columbia,
Canada, and Puerto
Rico: One-year limited
warranty from date of
purchase.
DISCLAIMER OF IMPLIED WARRANTIES; LIMITATION OF REMEDIES IMPLIED
WARRANTIES, INCLUDING TO THE EXTENT APPLICABLE WARRANTIES OF
MERCHANTABILITY OR FITNESS FOR A PARTICULAR PURPOSE, ARE EXCLUDED TO THE
EXTENT LEGALLY PERMISSIBLE. ANY IMPLIED WARRANTIES THAT MAY BE IMPOSED BY
LAW ARE LIMITED TO ONE YEAR, OR THE SHORTEST PERIOD ALLOWED BY LAW. SOME
STATES AND PROVINCES DO NOT ALLOW LIMITATIONS OR EXCLUSIONS ON HOW LONG
AN IMPLIED WARRANTY OF MERCHANTABILITY OR FITNESS LASTS, SO THE ABOVE
LIMITATIONS OR EXCLUSIONS MAY NOT APPLY TO YOU.
KitchenAid
Will Pay For:
50 United States, the
District of Columbia
and Canada: Hassle-free
replacement of your
Blender. See the following
page for details on how to
arrange for replacement.
OR
In Puerto Rico:
The replacement parts
and repair labor costs to
correct defects in materials
and workmanship. Service
must be provided by an
Authorized KitchenAid
Service Center. To arrange
for service, see instructions
on the following page.
KitchenAid
Will Not Pay For:
A. Repairs when Blender
is used in other than
normal single family
home use.
B. Damage resulting from
accident, alteration,
misuse or abuse or
use with products
not approved by
KitchenAid.
C. Replacement parts or
repair labor costs for
Blender when operated
outside the country of
purchase.
ENGLISH
IF THIS PRODUCT FAILS TO WORK AS WARRANTED, CUSTOMER’S SOLE AND EXCLUSIVE
REMEDY SHALL BE REPAIR OR REPLACEMENT ACCORDING TO THE TERMS OF THIS
LIMITED WARRANTY. KITCHENAID AND KITCHENAID CANADA DO NOT ASSUME ANY
RESPONSIBILITY FOR INCIDENTAL OR CONSEQUENTIAL DAMAGES. This warranty gives
you specific legal rights and you may also have other rights which vary from state to
state or province to province.
21
 Loading...