

Page 1

KOMS 3610
Instructions for use
Page 2

Page 3

Installation 4
Important safety instructions 5
Precautions 6
Accessories 7
Child lock 8
Cooling down 8
Stand by 8
Function change protection 8
Special cooking interruption 8
Changing settings 9
Delayed start 11
Kitchen timer 11
Rapid preheat 12
Conventional 13
Grill 14
Turbo grill 15
Forced air 16
Special functions 17
Pro bakery 18
Pro pastry 19
Pro roasting 20
Probe placement 21
Maintenance & cleaning 22
Trouble shooting guide 23
Safeguarding the environment 23
After sales service 24
Page 4

PRIOR TO INSTALLATION
C
HECK THAT THE VOLTAGE on the rating
plate corresponds to the voltage in your
home.
E
NSURE the oven cavity is empty before
installation.
E
NSURE THAT THE APPLIANCE IS NOT DAMAGED.
Check that the oven door closes firmly against the
door support. Empty the oven and clean the
interior with a soft, damp cloth.
D
O NOT OPERATE THIS APPLIANCE if it has a
damaged mains cord or plug, if it is not
working properly, or if it has been damaged
or dropped. Do not immerse the mains
cord or plug in water. Keep the cord away
from hot surfaces. Electrical shock, fire or
other hazards may result.
AFTER CONNECTION
R
EMOVE ALL STICKERS from the oven door
and front of the oven with the exception of
the rating plate which must remain in place.
R
EMOVE ALL PROTECTIVE cardboard
packaging and plastic films from the control panel
and oven.
R
EMOVE ALL LABELS from accessories (for
example, underneath the Glass Drip Tray).
R
EMOVE ALL ACCESSORIES from the oven
and ensure the oven cavity is empty.
B
EFORE USING the oven for the first time.
We recommend that the oven be heated to
200ºC for 1 hour to allow any greases and
residues from manufacture to burn off. As
the smell of the fumes can be unpleasant
ensure the room is well ventilated by
opening the kitchen window.
T
HE EARTHING OF THIS APPLIANCE is
compulsory. The manufacturer will accept
no responsibility for injury to persons,
animals or damage to objects arising from
the non-observance of this requirement.
The manufacturers are not liable for any
problems caused by the user ’s failure to
observe these instructions.
Installation
4
Page 5
READ CAREFULLY AND KEEP FOR FUTURE
REFERENCE
D
O NOT HEAT, OR USE FLAMMABLE
MATERIALS
in or near the oven. Fumes can
create a fire hazard or explosion.
D
O NOT USE YOUR APPLIANCE FOR DRYING
TEXTILES, PAPER, SPICES, HERBS, WOOD,
FLOWERS, FRUIT OR OTHER COMBUSTIBLE
MATERIALS.
FIRE COULD RESULT.
I
F MATERIAL INSIDE / OUTSIDE THE OVEN
SHOULD IGNITE OR SMOKE IS OBSERVED
,
keep the oven door closed and turn the
oven off. Disconnect the power cord or
shut off power at the fuse or circuit breaker
panel.
D
O NOT OVER-COOK FOOD. Fire could
result.
D
O NOT LEAVE THE OVEN UNATTENDED,
especially when using paper, plastic or other
combustible materials in the cooking
process. Paper can char or burn and some
plastics can melt if used when heating
foods. Large quantities of fat and oil can
overheat and are flammable.
D
O NOT USE corrosive chemicals or vapors
in this appliance. This type of oven is
specifically designed to heat or cook food. It
is not designed for industrial or laboratory
use.
D
O NOT COVER the bottom of the oven with
aluminum foil or other objects.
D
O NOT DRAG pots or pans across the
bottom of the oven as this could scratch the
enamel.
D
O NOT ALLOW CHILDREN or the infirm to use
the oven without adequate supervision and
instruction. Young children must be
supervised to ensure they do not play with the
appliance.
D
O NOT USE YOUR APPLIANCE FOR HEATING
ANYTHING IN AIRTIGHT SEALED CONTAINERS
.
THE PRESSURE INCREASES AND MAY CAUSE
DAMAGE WHEN OPENING OR MAY EXPLODE
.
D
O NOT HANG OR PLACE heavy items on the
door, as this can damage the oven opening
and hinges.
During use, the appliance becomes hot.
Care should be taken to avoid touching
heating elements inside the oven.
Accessible parts may become hot when the
grill is in use. Children should be kept away.
Important safety instructions
5
Page 6

GENERAL
T
HIS APPLIANCE IS DESIGNED FOR DOMESTIC USE
ONLY
!
D
O NOT USE THE CAVITY for any storage purposes.
DEEP-FRYING
D
O NOT USE YOUR APPLIANCE FOR DEEP-FRYING,
BECAUSE THE OIL TEMPERATURE CANNOT BE
CONTROLLED
.
U
SE OVEN GLOVES OR HAND PROTECTION to
prevent burns, when removing or inserting
hot pans and trays whilst cooking.
CAREFUL
F
OOD & ALCOHOL. Be extra careful when cooking
or reheating food that contains alcohol. If you are
adding alcohol (e.g. rum, cognac, wine etc.) while
roasting meats or baking cakes, remember that
alcohol evaporates easily at high temperatures. You
should therefore bear in mind that the vapors
released can ignite when they come in contact with
the electrical heating element.
If possible you should refrain from using alcohol in
this oven.
TEMPERATURE COOKING
W
HEN USING THE TEMPERATURE PROBE, insert the
tip of the probe into the thickest part of the food,
as this is the part that takes the longest to heat.
P
LACE THE PROBE INTO THE FLESHIEST PART OF THE
MEAT. The tip of the probe must not touch any
bones in the food, nor should it touch the side or
bottom of the cooking vessel. If the probe is placed
in these areas it will give an incorrect temperature
reading.
T
HE PROGRAMMED TEMPERATURE must be set to a
temperature that is higher than the current
temperature of the food.
W
HEN MAKING DISHES that need to be cooked for
a long period of time at very high temperatures,
such as jam, marmalade or sweets we recommend
that the temperature probe is not used as the
probe is not designed to read over 90ºC.
N
EVER IMMERSE the probe in water when cleaning.
Simply wipe clean with a clean, damp cloth or
kitchen roll after use.
T
HE OVEN MUST NOT BE OPERATED with the
temperature probe in the cavity if it is not plugged
into the oven.
If you do operate the oven without complying with
the above you will damage the probe.
Precautions
6
Page 7
GENERAL
THERE ARE a number of accessories available on
the market. Before you buy, ensure they are oven
proof.
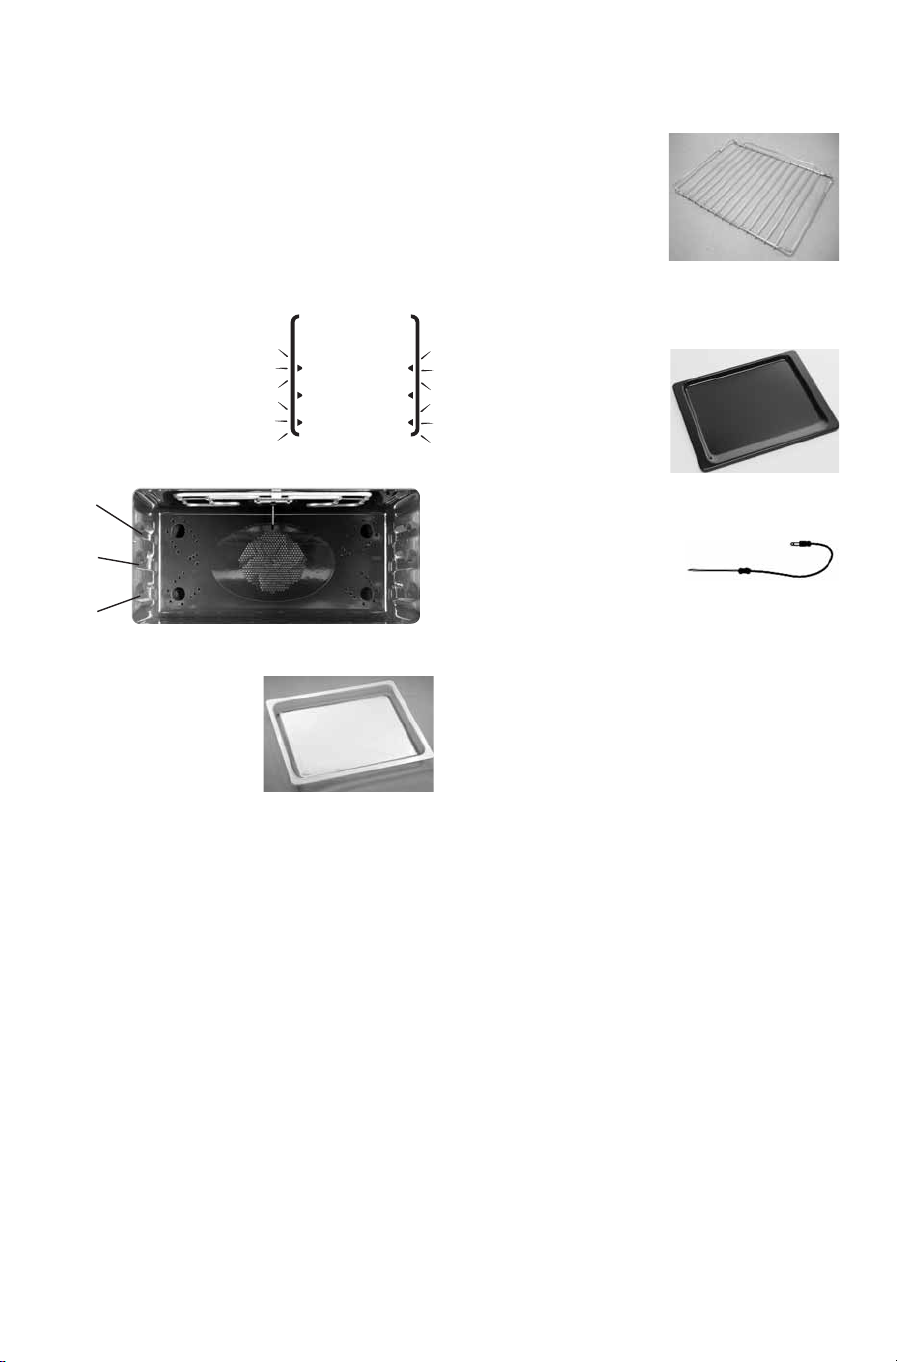
LEVEL INDICATOR
WHEN SOME FUNCTIONS ARE SELECTED, the level
indicators will flash and light up. All the level
indicators for the selected function light up and
flash briefly, then the
recommended level is
illuminated. In this example
levels 1&3 light up and flash
briefly whilst level 2
(recommended) is
illuminated.
GLASS DRIP TRAY
U
SE THE GLASS DRIP TRAY
beneath the wire shelf. It
may also be used as a
cooking utensil or as a
baking plate.
T
HE GLASS DRIP TRAY is
used to collect the dripping juices and food
particles that otherwise would stain and soil the
interior of the oven.
T
HE GLASS DRIP TRAY should be placed on shelf
level 1. Do not place anything on the oven
floor/bottom.
WIRE SHELF
THE WIRE SHELF allows hot
air to circulate around the
food and can be placed
with the high ends either
up or down, to adjust the
distance from the grill.
When food is placed directly on the wire shelf,
place the Glass Drip Tray under the shelf.
BAKING PLATE
U
SE THE BAKING PLATE
when cooking or baking.
PROBE
T
HE PROBE IS DESIGNED to
be used with Pro Roasting
function only.
It is not possible to use the
probe in any other function. It measures the
internal temperature of the food which is then
shown on the display.
N
EVER IMMERSE the probe in water when cleaning.
Simply wipe clean with a damp cloth or kitchen roll
after use.
Only use the temperature probe recommended for
this oven.
Accessories
7
쩺
쩹
쩸
Page 8

THIS FUNCTION IS TURNED ON/OFF by pressing
the Back and OK buttons simultaneously for 5
seconds until the key symbol is displayed. No
buttons or knobs will
function when this safety
feature is activated.
IT CAN BE TURNED ON/OFF AT ANY TIME even
during cooking.
Child lock
8
W
HEN A FUNCTION IS FINISHED, the oven may
carry out a cooling procedure. This is normal and
switches off automatically when finished.
THE COOLING PROCEDURE can be interrupted
without any harm to the oven by opening the door.
Cooling down
THE OVEN IS IN “STAND BY” when the 24 hour
clock is displayed. The clock display can be turned
off by turning the function control knob to the zero
position and pressing the “<<” button.
THE CLOCK WILL RETURN as soon as any
button or knobs are operated or simply
by pressing the “<<” button again.
Stand by
IF THE MULTIFUNCTION KNOB is rotated e.g.
switching to another function, during cooking, the
oven will ask you to confirm this change before
switching to the new function. This is to prevent
accidental function change during the cooking
procedure.
THE OVEN WILL CONTINUE COOKING with the
current settings until the change is confirmed. If the
multifunction knob rotation was accidental, simply
return the knob to its previous position and the
display will once again show the current cooking
settings.
Function change protection
ITISUSUALto check, stir or turn food during
cooking. However for foods that require insertion
into a cold oven, or that require cooking on very
low temperatures we recommend that the cooking
procedure should not be interrupted. Interruption
will prompt the oven to automatically restart the
cooking programme from the beginning and the
oven will wait until the oven temperature has
returned to room temperature, before starting the
cooking programme. If the cooking programme is
interrupted we recommend that the cooking
process is continued using the conventional oven
function.
Special cooking interruption
Page 9

WHEN THE APPLIANCE IS FIRST PLUGGED IN it will ask you to set the Language & Clock.
AFTER A POWER FAILURE the Clock will flash and needs to be reset.
Y
OUR OVEN HAS a number of functions which can be adjusted to your personal taste.
T
O RESET to the factory settings, simply keep the Back button pressed for 5 seconds.
1. T
URN THE MULTIFUNCTION KNOB to the setting position.
2. USE THE ADJUST KNOB to choose one of the following settings to adjust.
LANGUAGE
1. P
RESS THE OK BUTTON.
2. TURN THE ADJUST KNOB to choose one of the available languages.
3. P
RESS THE OK BUTTON again to confirm your selection.
4. PRESS THE BACK BUTTON TO EXIT the settings function and save all your changes when you are done.
CLOCK
1. P
RESS THE OK BUTTON.
2. TURN THE ADJUST KNOB to set the correct time of day.
3. P
RESS THE OK BUTTON again to confirm your selection.
4. PRESS THE BACK BUTTON TO EXIT the settings function and save all your changes when you are done.
Changing settings
9
Page 10

BUZZER
1. P
RESS THE OK BUTTON.
2. T
URN THE ADJUST KNOB to turn the buzzer on or off .
3. PRESS THE OK BUTTON again to confirm your selection.
4. PRESS THE STOP BUTTON TO EXIT the settings function and save all your changes when you are done.
CONTRAST
1. PRESS THE OK BUTTON.
2. TURN THE ADJUST KNOB to set the level of contrast suitable to your preference.
3. P
RESS THE OK BUTTON again to confirm your selection.
4. PRESS THE BACK BUTTON TO EXIT the settings function and save all your changes when you are done.
BRIGHTNESS
1. PRESS THE OK BUTTON.
2. TURN THE ADJUST KNOB to set the level of brightness suitable to your preference.
3. PRESS THE OK BUTTON again to confirm your selection.
4. PRESS THE BACK BUTTON TO EXIT the settings function and save all your changes when you are done.
Changing settings
10
Page 11

USE THIS FUNCTION when you need to have the cooking finished at a specific time. The oven needs to
know the desired cooking duration and the time of day when the food should be ready.
1. F
OLLOW THE SETTING PROCEDURE for the function you wish to
use and stop when the cooking time has been set.
2. PRESS THE OK BUTTON. You will automatically be taken to the
next setting.
3. T
URN THE ADJUST KNOB to set the Cooking End Time.
4. PRESS THE OK BUTTON again. Delayed Start is automatically
activated and the oven starts when the time left to “ready time”
equals the cooking time set.
Delayed start
11
U
SE THIS FUNCTION when you need a kitchen timer to measure time for various purposes such as cooking
eggs or letting the dough rise before baking etc.
1. T
URN THE MULTIFUNCTION KNOB to the zero position. The clock is displayed if it has been set, else the
display will be blank.
2. T
URN THE ADJUST KNOB TO SET THE TIME to measure.
3. PRESS THE OK BUTTON to activate the timer.
THE KITCHEN TIMER AUTOMATICALLY STARTS the countdown after 10 seconds. Press the OK button again
if you wish it to start sooner.
A
N ACOUSTIC SIGNAL will be heard when the time has expired.
4. TO TURN THE KITCHEN TIMER OFF before the countdown has finished, press the “<<” button twice.
Kitchen timer
DELAYED START WORKS WITH
THESE FUNCTIONS
CONVENTIONAL
GRILL
TURBO GRILL
FORCED AIR
Page 12
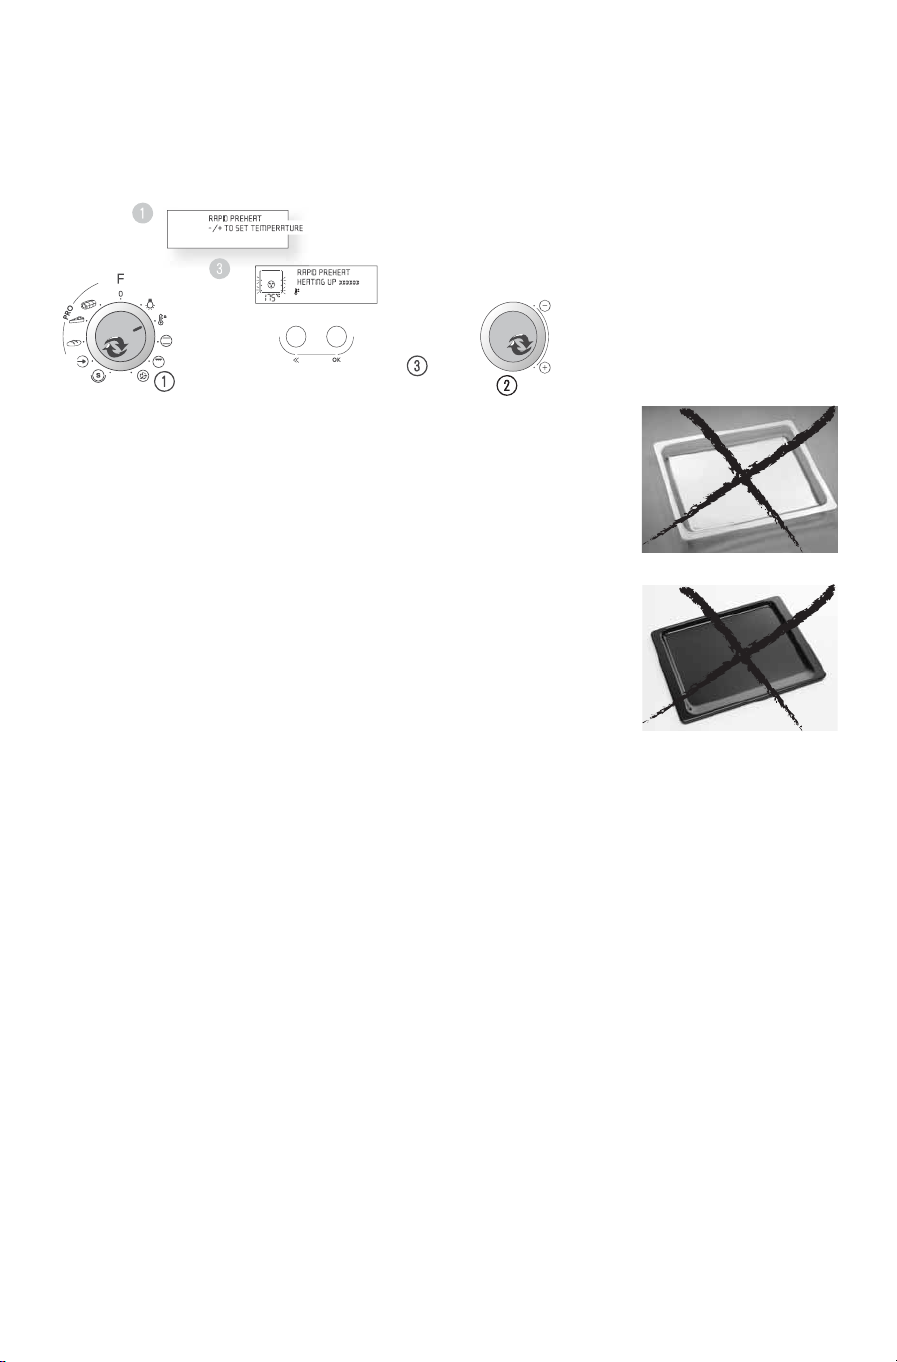
USE THIS FUNCTION TO PREHEAT the empty oven.
PREHEATING is always done with the oven empty just like you would in a conventional oven before
cooking or baking.
D
O NOT PLACE FOOD BEFORE OR DURING preheating in the oven. It will be burned from the intense heat.
1. T
URN THE MULTIFUNCTION KNOB to the Rapid preheat position.
2. TURN THE ADJUST KNOB to set the temperature.
3. PRESS THE OK BUTTON.
DURING THE HEATING PROCESS the indicator bar rises until the set
temperature is reached.
O
NCE THE HEATING PROCESS has been started the temperature can easily be
adjusted by turning the adjust knob.
W
HEN THE SET TEMPERATURE IS REACHED The oven then keeps the set
temperature for 10 minutes before switching off. During this time insert the
food and select the Forced air, or Conventional function to begin cooking.
Rapid preheat
12
Page 13

USE THIS FUNCTION just as you use your traditional oven when baking cookies, cakes, rolls and meringues.
DELAYED START can be used with this function.
1. T
URN THE MULTIFUNCTION KNOB to the Conventional position.
2. TURN THE ADJUST KNOB to set the temperature.
3. P
RESS THE OK BUTTON to confirm your selection. You will automatically be taken to the next setting.
4. TURN THE ADJUST KNOB to set the cooking time.
5. PRESS THE OK BUTTON.
N
OTE: If time is not set, this function will automatically shut off after 4 hours. Turn the multifunction knob
to zero if you want to shut it off earlier.
WHEN COOKING FOOD IN DISHES, place the dishes on the Wire shelf.
U
SE BAKING PLATE for rolls and pizzas.
Conventional
13
Page 14

USE THIS FUNCTION TO quickly give a pleasing brown colour to the food.
DELAYED START can be used with this function.
1. T
URN THE MULTIFUNCTION KNOB to the Grill position.
2. T
URN THE ADJUST KNOB to set the Grill level (1-5).
3. PRESS THE OK BUTTON to confirm your selection. You will automatically
be taken to the next setting.
4. TURN THE ADJUST KNOB to set the cooking time.
5. P
RESS THE OK BUTTON.
N
OTE: If time is not set, this function will automatically shut off after 4 hours. Turn the multifunction knob
to zero if you want to shut it off earlier.
DO NOT LEAVE THE OVEN DOOR OPEN for long periods when the Grill is in operation, as this will cause a
drop in temperature.
F
OR FOOD LIKE cheese, toast, steaks and sausages, preheat the grill for 3 minutes. For best results place
the food on the wire shelf and the wire shelf in the Glass drip tray to collect crumbs and excess juices.
• ENSURE THAT THE UTENSILS used are heat resistant and ovenproof before grilling with them.
• D
O NOT USE PLASTIC utensils when grilling. They will melt. Items of wood or paper are not suitable either.
Grill
14
GRILL POWER LEVEL
LEVEL SUGGESTED USE:
4-5
COOKING fish steaks, thin slices
of meat and poultry.
1-3 BROWNING foods like gratin
GRILL SHELF LEVEL
LEVEL SUGGESTED USE:
3
THIN SLICES OF MEAT, SAUSAGES
& CHEESE ON TOAST.
1 - 2 CHICKEN PIECES, VEGETABLES.
Page 15

USE THIS FUNCTION TO cook such food as stuffed vegetables and chicken pieces.
DELAYED START can be used with this function.
1. T
URN THE MULTIFUNCTION KNOB to the Grill position.
2. TURN THE ADJUST KNOB to change the mode to Turbo Grill.
3. PRESS THE OK BUTTON to confirm your selection. You will automatically
be taken to the next setting.
4. T
URN THE ADJUST KNOB to set the Grill level (1-5).
5. PRESS THE OK BUTTON to confirm your selection. You will automatically
be taken to the next setting.
6. T
URN THE ADJUST KNOB to set the cooking time.
7. PRESS THE OK BUTTON.
NOTE: If time is not set, this function will automatically shut off after 4 hours. Turn the multifunction knob
to zero if you want to shut it off earlier.
Turbo grill
15
TURBO GRILL POWER LEVEL
LEVEL SUGGESTED USE:
4-5
COOKING fish steaks, thin slices
of meat and poultry.
1-3 BROWNING foods like gratin
TURBO GRILL SHELF LEVEL
LEVEL SUGGESTED USE:
3 FISH STEAKS, MEAT
2 CHICKEN PIECES
1 GRATINS
Page 16

USE THIS FUNCTION when baking rolls and cakes, cooking poultry and roast meats or baking on two levels.
DELAYED START can be used with this function.
1. T
URN THE MULTIFUNCTION KNOB to the Forced Air position.
2. T
URN THE ADJUST KNOB to set the temperature.
3. PRESS THE OK BUTTON to confirm your selection. You will automatically be taken to the next setting.
4. TURN THE ADJUST KNOB to set the cooking time.
5. P
RESS THE OK BUTTON.
PLACE THE FOOD on the wire shelf to allow the air to circulate properly around the food.
U
SE THE BAKING PLATE when baking small items like rolls.
ONCE THE HEATING PROCESS has been started the cooking time can easily be adjusted by
turning the adjust knob. Use the << button to return to where you can change the end
temperature.
N
OTE: If time is not set, this function will automatically shut off after 4 hours. Turn the
multifunction knob to zero if you want to shut it off earlier.
Forced air
16
FORCED AIR SHELF LEVEL
LEVEL SUGGESTED USE:
3
USED WHEN BAKING ON TWO
LEVELS
2 CHICKEN PIECES
1 ROASTS
Page 17

USE THIS FUNCTION for slow cooking, keeping warm, defrosting and sabbath mode (prolonged cooking of
recipes).
D
ELAYED START can be used with this function.
1. T
URN THE MULTIFUNCTION KNOB to the Special position.
2. T
URN THE ADJUST KNOB to select the special function desired.
3. PRESS THE OK BUTTON to confirm your selection. You will automatically be taken to the next setting.
4. TURN THE ADJUST KNOB to set the cooking time.
5. P
RESS THE OK BUTTON.
Special functions
17
SPECIAL FUNCTIONS
FUNCTION SUGGESTED USE:
Keep warm USE TO KEEP A CONSTANT TEMPERATURE OF 60°C INSIDE THE OVEN (SERVING TEMPERATURE)
Defrost USE TO DEFROST AT ROOM TEMPERATURE (LEAVE FOOD IN ITS PACKAGING)
Slow meat USE TO COOK MEAT IN A LOW HEAT FOR A LONGER TIME PERIOD FOR OPTIMUM RESULTS
Slow fish USE TO DELICATELY COOK FISH FOR BEST RESULTS
Sabbath USE FOR PROLONGED COOKING OF RECIPES
Page 18

USE THIS FUNCTION when baking bread and Pizzas.
1. T
URN THE MULTIFUNCTION KNOB to the Pro Bakery position.
2. TURN THE ADJUST KNOB to select food class.
3. PRESS THE OK BUTTON to confirm your selection.
4. THE OVEN WILL NOW PREHEAT. When preheated the oven will prompt you
to insert the food before continuing to cook.
5. I
NSERT FOOD AND PRESS THE OK BUTTON.
Pro bakery
18
FOOD TYPE UTENSILS SHELF LEVEL OVEN °C TIME
ADD
TOPPING
BREAD BAKING PLATE LEVEL 2 170°C 35 MINS
MALT BREAD BAKING PLATE LEVEL 2 190°C 30 MINS
PAN PIZZA BAKING PLATE LEVEL 2 175°C 15 + 20 MINS AFTER 15 MINS
THIN PIZZA BAKING PLATE LEVEL 2 230°C * 10 - 15 MINS
FOCACCIA BAKING PLATE LEVEL 2 185°C 35 - 40 MINS
BREAD STICKS BAKING PLATE LEVEL 2 160°C 20 - 30 MINS
*) 210°C during preheat
Page 19

USE THIS FUNCTION when baking pastry.
1. T
URN THE MULTIFUNCTION KNOB to the Pro Pastry position.
2. TURN THE ADJUST KNOB to select food class.
3. PRESS THE OK BUTTON to confirm your selection.
4. THE OVEN WILL NOW PREHEAT. When preheated the oven will prompt you
to insert the food before continuing to cook.
5. I
NSERT FOOD AND PRESS THE OK BUTTON.
Pro pastry
19
FOOD TYPE UTENSILS SHELF LEVEL OVEN °C TIME
CHOUX
PASTRY
BAKING PLATE LEVEL 2 160°C 30 - 40 MINS
CROISSANTS BAKING PLATE LEVEL 2 140°C 20 - 30 MINS
SPONGE CAKE MOULD & WIRE RACK LEVEL 1 150°C 30 - 40 MINS
PLUM CAKE TIN &WIRE RACK LEVEL 1 150°C 75 - 85 MINS
SHORT PASTRY TIN & WIRE RACK LEVEL 1 160°C 25 - 35 MINS
Page 20
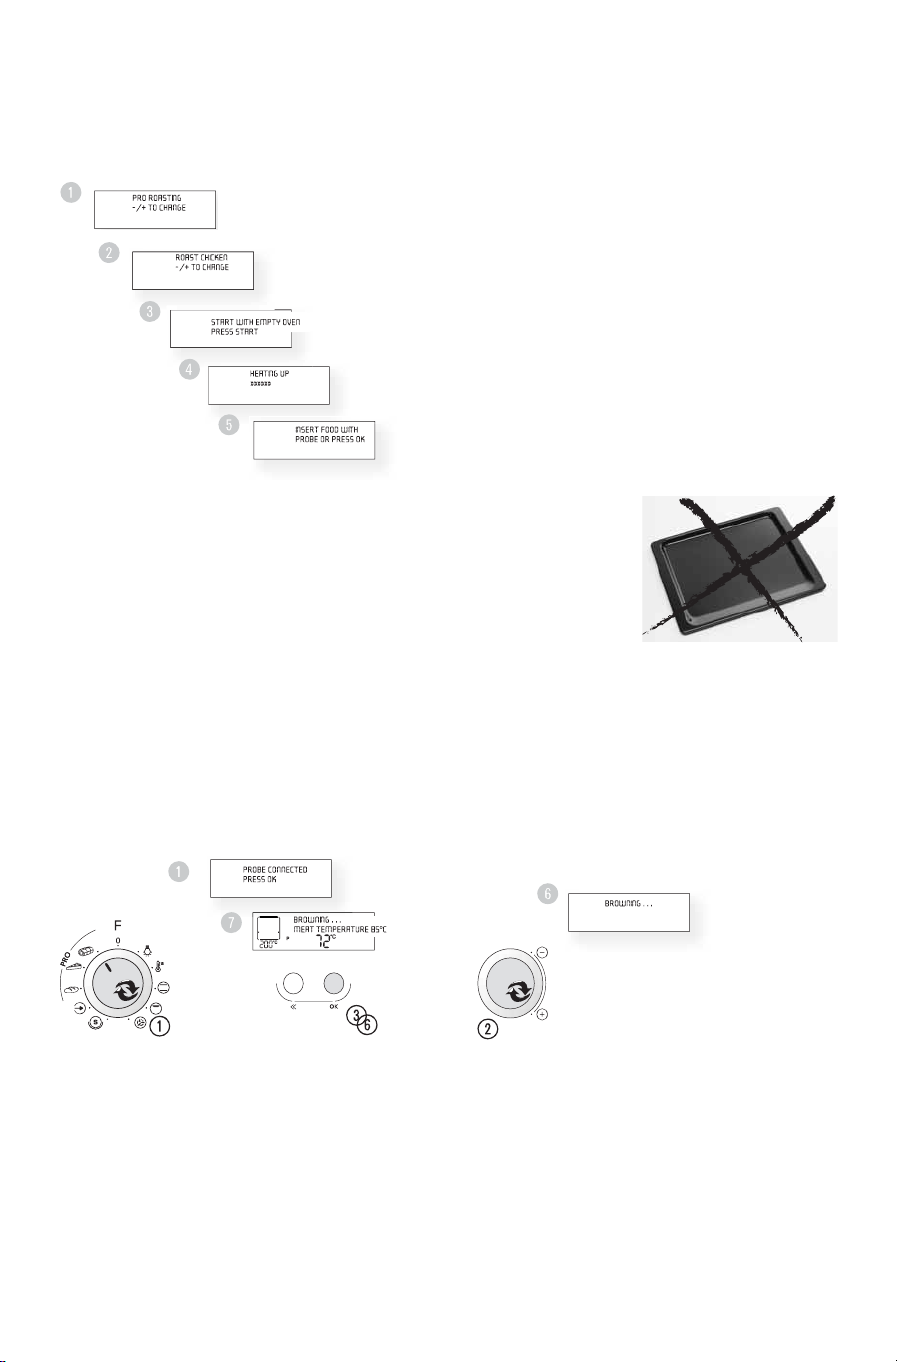
USE THIS FUNCTION when preparing roasts.
THIS FUNCTION IS PRIMARILY DESIGNED to be used with the meat probe, but can also be run as a traditional
oven without the probe.
1. T
URN THE MULTIFUNCTION KNOB to the Pro Roasting position.
2. TURN THE ADJUST KNOB to select food class.
3. PRESS THE OK BUTTON to confirm your selection.
4. THE OVEN WILL NOW PREHEAT. When preheated the oven will prompt you
to insert the food before continuing to cook.
I
F THE PROBE IS USED:
5. O
PEN THE DOOR. Insert the food (ensure that the probe is correctly placed) and connect the probe to
the right side of the oven.
6. PRESS THE OK BUTTON the oven automatically starts browning.
I
F THE PROBE IS NOT USED:
5. OPEN THE DOOR, insert the food.
6. P
RESS THE OK BUTTON the oven automatically starts browning.
T
HIS FUNCTION REQUIRES the adding of water during cooking. 12 or 20 minutes into the cooking the oven
will beep to prompt you to add the water. After the beep the display will say ROASTING and the oven
continues to operate. The water can be added later, but if water isn't added the result may be inferior.
W
HEN THE COOKING HAS FINISHED you may continue (if needed) by simply turning the Adjust knob to add
additional cooking time.
Pro roasting
20
Page 21

21
Pro roasting
FOOD TYPE UTENSILS
SHELF
LEVEL
OVEN°CPROBE
°C
TIME
ADD
WATER
ROAST PORK / VEAL
ROASTING PAN
ON WIRE RACK
LEVEL 1
190°C
68°C
50-80
MINS.
AFTER 20
MINS.
ROAST BEEF (rare)
WIRE RACK ON
GLASS DRIP PAN
LEVEL 1
200°C
48°C
35 MINS.
AFTER 12
MINS.
ROAST BEEF (medium)
WIRE RACK ON
GLASS DRIP PAN
LEVEL 1
200°C
54°C
55 MINS.
AFTER 12
MINS.
ROAST CHICKEN
ROASTING PAN
ON WIRE RACK
LEVEL 1
200°C
85°C
60-80
MINS.
AFTER 20
MINS.
LEG OF LAMB (medium)
ROASTING PAN
ON WIRE RACK
LEVEL 1
190°C
70°C
70 MINS.
AFTER 20
MINS.
LEG OF LAMB (well
done)
ROASTING PAN
ON WIRE RACK
LEVEL 1
190°C
75°C
90 MINS.
AFTER 20
MINS.
MANUAL OVEN PROOF
LEVEL 1
OR 2
50-
250°C
45-
90°C
0-4
HOURS
CHICKEN
WHEN USING THE TEMPERATURE PROBE to roast
chicken, position the tip of the probe into the
fleshiest part of the chicken. We suggest the inside
of the leg nearest the carcass. The probe must not
touch any bone, or it will give an incorrect reading.
L
AMB
WHEN COOKING A LAMB JOINT/LEG OF LAMB, insert
the tip of the probe into the thickest part so that it
does not touch the bone.
P
ORK
WHEN COOKING PORK, e.g. pork shoulder,
gammon, silver side, etc, the probe should be
inserted into the ‘end’ of the joint rather than
through the layer of fat on the surface. Avoid
placing the tip of the probe in fatty areas of the
pork.
F
ISH
THE PROBE CAN BE USED WHEN COOKING WHOLE
FISH
, large fish such as pike or salmon. Position the
tip of the probe in the thickest part, not too close
to the backbone.
Probe placement
Page 22

CLEANING IS THE ONLY MAINTENANCE normally
required. Always allow the oven to cool to room
temperature before cleaning.
F
AILURE TO MAINTAIN THE OVEN in a clean & dry
condition could lead to deterioration of the surface
that could adversely affect the life of the appliance
and possibly result in a hazardous situation.
• DO NOT USE METAL SCOURING PADS, gritty wash
cloths etc, which can damage the control panel,
and the interior and exterior oven surfaces. Use a
sponge with a mild detergent or a paper towel
with spray glass cleaner. Apply spray glass cleaner
to a paper towel.
D
O NOT SPRAY directly on the oven.
AT REGULAR INTERVALS, especially if spill overs
have occurred, wipe the base of the oven clean.
A
FTER PROLONGED COOKING or cooking on several
layers, especially food with high water content such
as; Pizza, stuffed vegetables etc., condensation can
form on the inside of the door. Always wipe the
door off when the oven has cooled to room
temperature.
U
SE A MILD DETERGENT, water and a soft cloth to
clean the interior surfaces, front and rear of the
door and the door opening.
•D
O NOT ALLOW GREASE or food particles to
build up around the door.
•D
O NOT USE WATER PRESSURE OR STEAM
CLEANING APPLIANCES
when cleaning your
appliance.
F
RUIT JUICES that drip from a tray could leave
indelible marks. The oven should be cleaned
before next use.
N
EVER POUR WATER directly into the hot oven. The
surface may be damaged.
R
ESIDUAL CONDENSATION after the last use, could
over time, damage the oven and the surrounding
units.
We advise you to:
• Set the lowest temperature
• Cover the food
• Remove the food from the oven
• Dry the damp parts of the cold oven
T
HE GRILL ELEMENT does not need cleaning since
the intense heat will burn off any splashes, but the
ceiling above it may need regular cleaning.
This should be done with warm water, detergent
and a sponge.
• Twist and remove the ceramic hook.
• Fold down the front end of the grill element to
access the ceiling for cleaning.
DISHWASHER SAFE:
W
IRE SHELF
BAKING PLATE
GLASS DRIP TRAY
CAREFUL CLEANING:
T
HE PROBE should be
cleaned in mild, detergent
water.
•N
EVER IMMERSE the probe in water when
cleaning. Simply wipe clean with a clean, damp
cloth or kitchen roll after use.
•D
O NOT USE STEEL-WOOL PADS. This will scratch
the surface.
Maintenance & cleaning
22
Page 23

IF THE OVEN DOES NOT WORK, do not make a
service call until you have made the following
checks:
• The plug is properly inserted into the wall
socket.
• Check your fuses and ensure there is power
available.
• Check that the oven has ample ventilation.
• Wait for 10 minutes, then try to operate the
oven once more.
T
HIS IS TO AVOID unnecessary calls for which you
will be charged.
When calling for Service, please give the serial
number and type number of the oven (see Service
label). Consult your warranty booklet for further
advice.
I
F THE MAINS CORD NEEDS REPLACING it
should be replaced by the original mains
cord, which is available via our service
organisation.
The mains cord may only be replaced by a
trained service technician.
SERVICE ONLY TO BE CARRIED OUT BY A
TRAINED SERVICE TECHNICIAN
. It is hazardous
for anyone other than a trained person to
carry out any service or repair operation,
which involves the removal of any cover.
D
O NOT REMOVE ANY COVER.
Trouble shooting guide
23
Disposing of packaging
• The packing material can be 100% recycled as confirmed by the recycling symbol .
• The various pieces of packaging should not be disposed of into the environment but disposed of in
compliance with local authority standards.
Disposal of old appliances
• The appliances are made with recyclable or re-usable material. Disposal must be carried out in
accordance with local environmental regulations for waste disposal. Cut the power cable to make them
unusable before disposing of them.
Product
• This appliance is marked according to the European Directive 2002/96/EC, Waste Electrical and
Electronic Equipment (WEEE).
• By ensuring that this product is disposed of correctly, you will help prevent potentially negative
consequences for the environment and human health.
• The symbol on the product or on the documents accompanying the product indicates that this
appliance should not be treated as household waste. Instead, it should be handed over to the
applicable collection point for the recycling of electrical and electronic equipment.
Disposal must be carried out in accordance with local environmental regulations for waste disposal. For
more detailed information on treatment, recovery and recycling of this product, contact your local
authority, the household waste disposal service or the shop where you purchased the product.
Safeguarding the environment
Page 24

Before contacting the Customer Care Centre:
1. Try to solve the problem yourself based on the descriptions given in the “ Troubleshooting guide”.
2. Turn the appliance off and restart it to see if the fault persists.
If after carrying out the above checks, the fault persists, contact your Customer Care Centre
on 00800-3810-4026.
Please give:
• a short description of the fault;
• the exact model of the oven;
• the service number (this is the number found after the word Service on the rating plate), located on the
internal edge on the right hand side of the oven opening (visible when the oven door is open). The
service number can also be found in the warranty booklet;
• your full address;
• your telephone number.
If repair work has to be carried out, contact an authorised after sales service (use of original spare parts
and proper repair is guaranteed).
Failure to comply with these instructions could compromise the safety and quality of your
product.
D
ECLARATION OF CONFORMITY
• This oven was designed to come into contact with food stuffs and complies with EEC (CE) Regulation
n. 1935/2004.
• It was exclusively designed for use as a cooking appliance. Any other use of the appliances (e.g. heating
rooms) is considered improper and subsequently dangerous.
• It was designed, produced and launched onto the market in compliance with:
• safety objectives of the “Low Voltage” Directive 2006/95/CE (which replaces 73/23/CEE and
subsequent amendments).
• the safety requirements in the “EMC” Directive 89/336/EEC.
• the requirements of Directive 93/68/EEC.
After sales service
24
Page 25
25
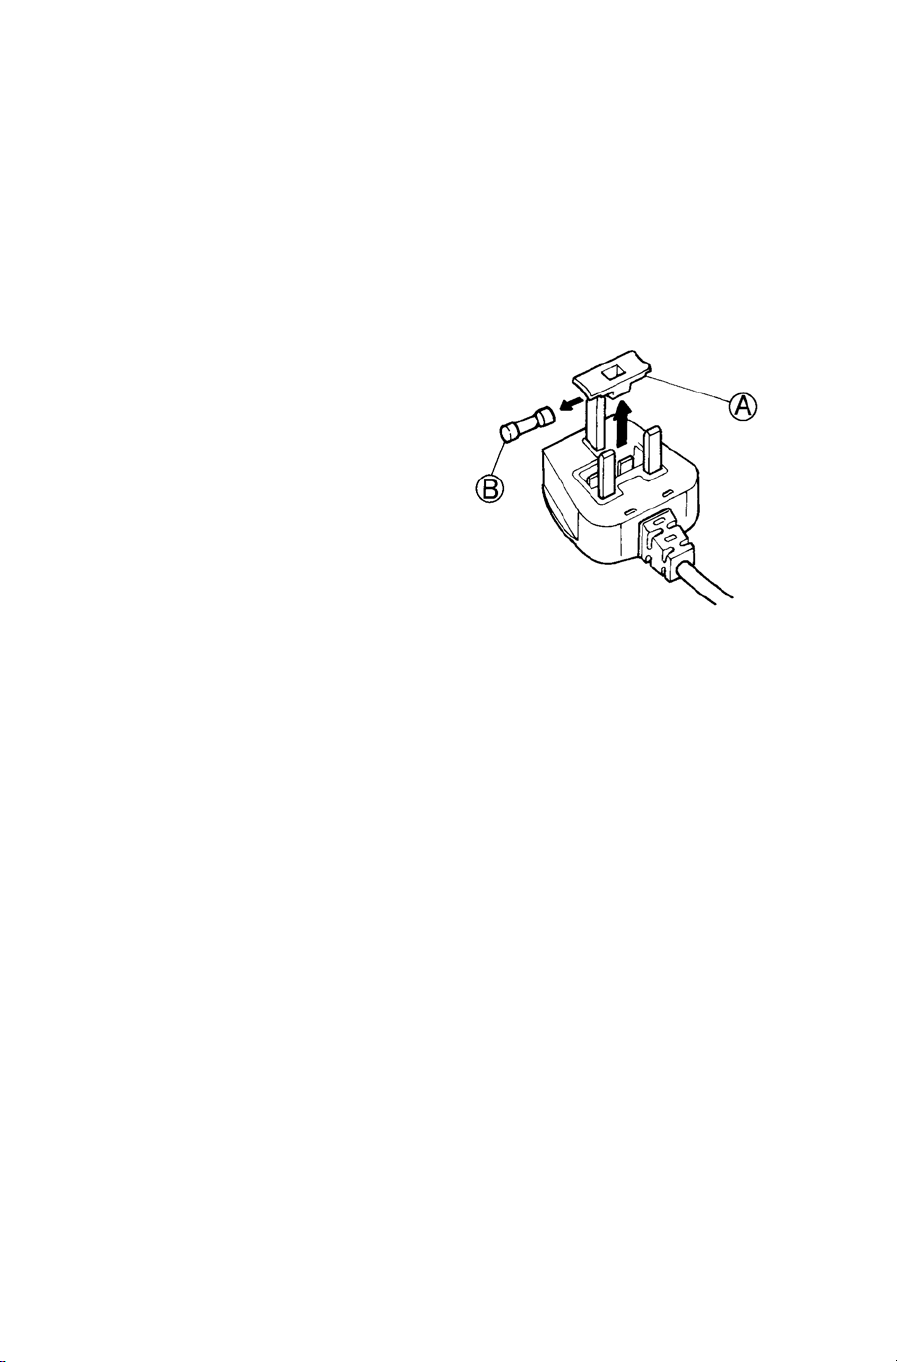
Warning - this appliance must be earthed
Fuse replacement
If the mains lead of this appliance is fitted with a BS
1363A 13amp fused plug, to change a fuse in this
type of plug use an A.S.T.A. approved fuse to BS
1362 type and proceed as follows:
1. Remove the fuse cover (A) and fuse (B).
2. Fit replacement 13A fuse into fuse cover.
3. Refit both into plug.
Important:
The fuse cover must be refitted when changing a
fuse and if the fuse cover is lost the plug must not
be used until a correct replacement is fitted.
Correct replacement are identified by the colour
insert or the colour embossed in words on the
base of the plug.
Replacement fuse covers are available from your
local electrical store.
For the Republic of Ireland only
The information given in respect of Great Britain
will frequently apply, but a third type of plug and
socket is also used, the 2-pin, side earth type.
Socket outlet / plug (valid for both countries)
If the fitted plug is not suitable for your socket
outlet, please contact KitchenAid Service for
further instruction. Please do not attempt to
change plug yourself. This procedure needs to be
carried out by a qualified technician in compliance
with the manufactures instructions and current
standard safety regulations.
Electrical connection for Great Britain and Ireland only
Page 26

Page 27

Page 28

5019 721 02011
Printed in Italy
n
11/07
GB
 Loading...