

Page 1

2/4
SLICE
TRANCHE
REBANADA
TOASTERS
INSTRUCTIONS
GRILLE-PAIN
INSTRUCTIONS
TOSTADORES
INSTRUCCIONES
KMTT200, KMTT400
KMTT200
USA: 1-800-541-6390
Canada: 1-800-807-6777
®
FOR THE WAY IT’S MADE.
KMTT400
KitchenAid.com
KitchenAid.ca
™
Page 2

Proof of Purchase & Product Registration
Always keep a copy of the sales receipt
showing the date of purchase of your
Toaster. Proof of purchase will assure you
of in-warranty service.
Before you use your Toaster, please fill out
and mail your product registration card
packed with the unit. This card will enable
Model Number ______________________________________________________________
Serial Number _______________________________________________________________
Date Purchased ______________________________________________________________
Store Name and Location ______________________________________________________
us to contact you in the unlikely event of
a product safety notification and assist us
in complying with the provisions of the
Consumer Product Safety Act. This card
does not verify your warranty.
Please complete the following for your
personal records:
Preuve d’achat et enregistrement du produit
Veuillez conserver une copie du coupon de
caisse indiquant la date d’achat de votre
Grille-pain. La preuve d’achat vous assure
du service d’après-vente sous garantie.
Avant d’utiliser votre Grille-pain, veuillez
remplir et poster la carte d’enregistrement
du produit accompagnant l’appareil.
Grâce à cette carte, nous pourrons vous
Numéro de modèle __________________________________________________________
appeler dans l’éventualité improbable d’un
avis de sécurité et nous conformer plus
facilement aux dispositions de la loi sur la
sécurité des produits de consommation.
Cette carte ne confirme pas votre garantie.
Veuillez remplir ce qui suit pour vos
dossiers personnels :
Numéro de série _____________________________________________________________
Date d’achat ________________________________________________________________
Nom du marchand et adresse __________________________________________________
Comprobante de compra y registro del producto
Siempre conserve una copia del recibo
de ventas que especifique la fecha de
compra de su Tostador. El comprobante
de compra le asegurará el servicio técnico
bajo garantía.
Antes de utilizar el Tostador, complete y
envíe por correo su tarjeta de registro del
producto que viene junto con la unidad.
Esta tarjeta nos permitirá contactarnos
Número del modelo __________________________________________________________
Número de serie _____________________________________________________________
Fecha de compra ____________________________________________________________
Nombre de la tienda y dirección ________________________________________________
con usted en el improbable caso de
una notificación de algún problema de
seguridad con el producto y nos ayudará a
cumplir con las cláusulas de la Consumer
Product Safety Act (Ley sobre la seguridad
de los productos para el consumidor). Esta
tarjeta no asegura su garantía.
Complete lo siguiente para su
registro personal:
Page 3

Table of Contents
INTRODUCTION
Proof of Purchase & Product Registration .............................................Inside Front Cover
Toaster Safety ................................................................................................................2
Important Safeguards ....................................................................................................2
Electrical Requirements ..................................................................................................3
FEATURES AND OPERATION
®
KitchenAid
Using Your KitchenAid
To aster Features (Models KMTT200 and KMTT400) .....................................4
®
To aster (Models KMTT200 and KMTT400) ................................6
Special Toasting Functions .............................................................................................7
Baker’s Bagel™ Toasting .........................................................................................7
To Warm Toasted Items ..........................................................................................8
CARE AND CLEANING
Cleaning Your Toaster ....................................................................................................8
Troubleshooting .............................................................................................................9
WARRANTY AND SERVICE INFORMATION
KitchenAid
®
To aster Warranty ......................................................................................10
Hassle-Free Replacement Warranty – 50 United States and District of Columbia ..........11
Hassle-Free Replacement Warranty – Canada ...............................................................11
How to Arrange for Warranty Service in Puerto Rico ....................................................11
How to Arrange for Service after the Warranty Expires – All Locations .........................12
How to Arrange for Service Outside these Locations ....................................................12
How to Order Accessories and Replacement Parts ........................................................12
ENGLISH
1
Page 4

Toaster Safety
Your safety and the safety of others are very important.
We have provided many important safety messages in this manual and on your
appliance. Always read and obey all safety messages.
ENGLISH
potential hazard is, tell you how to reduce the chance of injury, and tell you what
can happen if the instructions are not followed.
This is the safety alert symbol.
This symbol alerts you to potential hazards that can kill or hurt you
and others.
All safety messages will follow the safety alert symbol and either
the word “DANGER” or “WARNING.” These words mean:
You can be killed or seriously injured
DANGER
WARNING
if you don’t immediately follow
instructions.
You can be killed or seriously injured
if you don’t follow instructions.
All safety messages will tell you what the
IMPORTANT SAFEGUARDS
When using electrical appliances, basic safety precautions should always be followed,
including the following:
1. Read all instructions.
2. Do not touch hot surfaces. Use handles or knobs.
3. To protect against electrical shock, do not immerse cord, plugs, or Toaster in water
or other liquid.
4. Close supervision is necessary when any appliance is used by or near children.
5. Unplug Toaster from outlet when not in use and before cleaning. Allow to cool
before putting on or taking off parts.
6. Do not operate any appliance with a damaged cord or plug or after the appliance
malfunctions or has been damaged in any manner. Return appliance to the nearest
Authorized Service Facility for examination, repair or adjustment.
7. The use of accessory attachments not recommended by the appliance manufacturer
may cause injuries.
8. Do not use outdoors.
9. Do not let cord hang over edge of table or counter, or touch hot surfaces.
10. Do not place on or near a hot gas or electric burner, or in a heated oven.
11. To disconnect, turn any control to “OFF,” then remove plug from outlet.
12. Do not use appliance for other than intended use.
2
Page 5

13. Oversize foods, metal foil packages, or utensils must not be inserted in Toaster as
they may involve a risk of fire or electric shock.
14. A fire may occur if Toaster is covered with or touching flammable material, including
curtains, draperies, walls and the like, when in operation.
15. Do not attempt to dislodge food when Toaster is plugged in.
16. This product is designed for household use only.
SAVE THESE INSTRUCTIONS
Electrical Requirements
WARNING
Electrical Shock Hazard
Plug into a grounded 3 prong
outlet.
Do not remove ground prong.
Do not use an adapter.
Do not use an extension cord.
Failure to follow these
instructions can result in death,
fire, or electrical shock.
Volts: 120 Volts A.C. only.
Hertz: 60 Hz
ENGLISH
NOTE: Yo ur Toaster has a 3-prong
grounded plug. To reduce the risk of
electrical shock, this plug will fit in an
outlet only one way. If the plug does
not fit in the outlet, contact a qualified
electrician. Do not modify the plug in
any way.
Do not use an extension cord. If the
power supply cord is too short, have a
qualified electrician or serviceman install
an outlet near the appliance.
3
Page 6
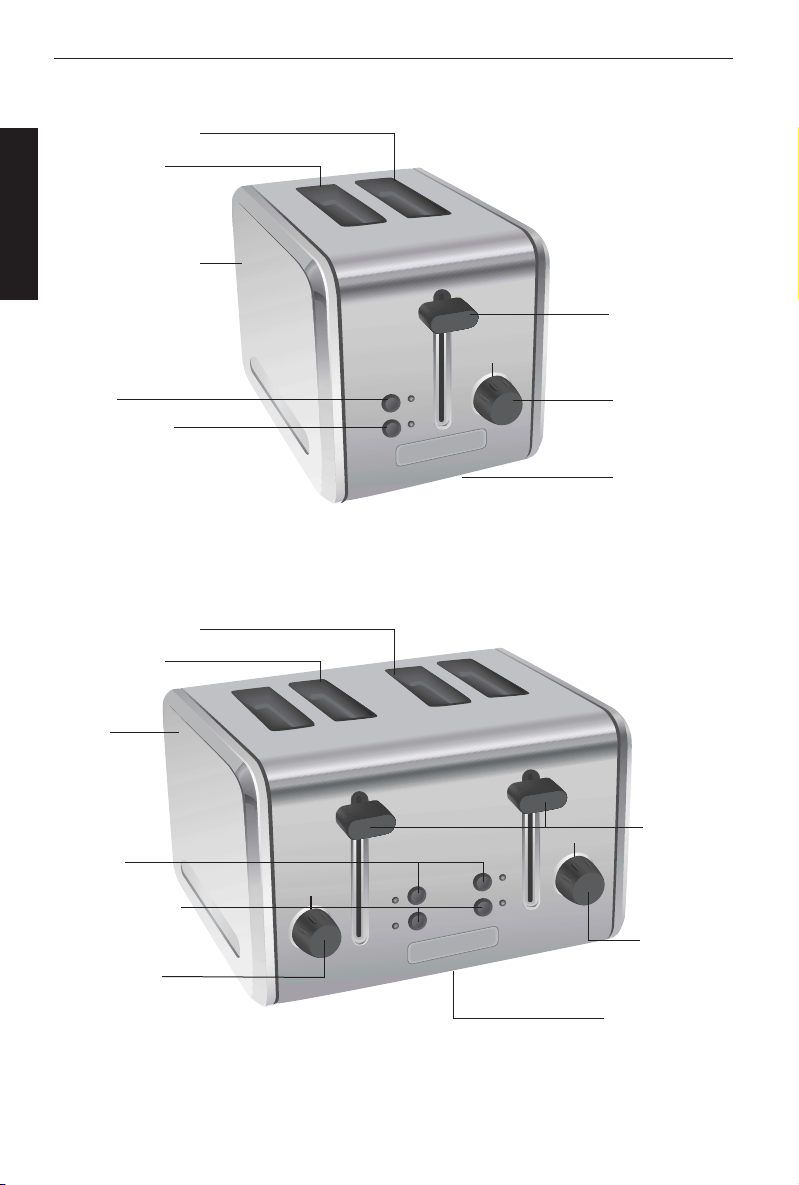
Extra-Wide Slots
Steel Interior
ENGLISH
Cool Reach™
Steel Side Panels
KitchenAid® Toaster
Models KMTT200 and KMTT400
Features
Removable
Crumb Tray
(not shown)
Easy Lift™
Lever
Baker’s Bagel™
Button
Warm Button
Extra-Wide Slots
Steel Interior
Cool Reach™
Steel Side
Panels
Baker’s
Bagel™
Buttons
Warm Buttons
Dial Shade
Control
bagel
warm
6
7
YIP
YIP
5
Dial Shade
Control
Under Base
Cord Wrap
Removable
Crumb Trays
(not shown)
Easy Lift™
Levers
5
6
5
6
7
bagel
warm
YIP
YIP
7
Dial Shade
Control
Under Base
Cord Wrap
4
Page 7

KitchenAid® Toaster
Models KMTT200 and KMTT400
Even-Heat™ System
Heavy gauge heating elements mounted
on extra-thick mica boards ensure even
browning. A heat sensor automatically
adjusts toasting time to ensure consistent
toasting slice after slice.
Easy Lift™ Lever
Cancel toasting with just a touch
of the lever.
Features
Cool Reach™ Steel Side Panels
Work more comfortably around this
toaster. Heat shields inside the toaster help
keep the Cool Reach™ exterior steel side
panels cooler.
Steel Interior
The ultimate in durability.
Extra-deep toasting cavity helps ensure
even browning.
ENGLISH
Extra-Wide Slots
Handles bagels, English muffins,
and thick breads easily.
Self-Centering Bread Racks
Centers thick or thin breads perfectly for
even toasting.
Removable Crumb Tray(s)
Rugged, full-width, steel tray
(two side-by-side trays on KMTT400)
is top rack dishwasher safe.
Under Base Cord Wrap
Keeps extra cord out of sight and
out of the way.
Dial Shade Control
Exact-stop knobs control toasting
levels with precision. Turn the dial
knob clockwise for darker toast,
counterclockwise for lighter.
Stainless Steel or
Painted Steel Housing
Stylish and durable. Stainless steel and
painted steel surfaces are easy to clean.
SPECIAL TOASTING FUNCTIONS
Baker’s Bagel™ Button
Automatically varies the power
level to each side of a bagel or English
muffin, for perfect results!
Warm Button
Warms previously toasted foods without
additional browning.
Function Lights
Indicate special functions when they
are selected.
Dual Independent Controls
(Model KMTT400 Only)
One-Touch Buttons and Dial Knobs for
each pair of slots work independently of
each other, allowing toasting of a bagel
or other item in one pair of slots while the
second pair of slots could make toast or
warm a pastry.
5
Page 8

Using Your KitchenAid® Toaster
Models KMTT200 and KMTT400
Before using your Toaster, check the
Extra-Wide Slots and remove any packing
or printed material that may have fallen
ENGLISH
inside during shipping or handling.
Do not probe inside the Toaster with a
metal object.
You may see light smoke the first time
you use the Toaster. This is normal. The
smoke is harmless and will soon disappear.
TO USE:
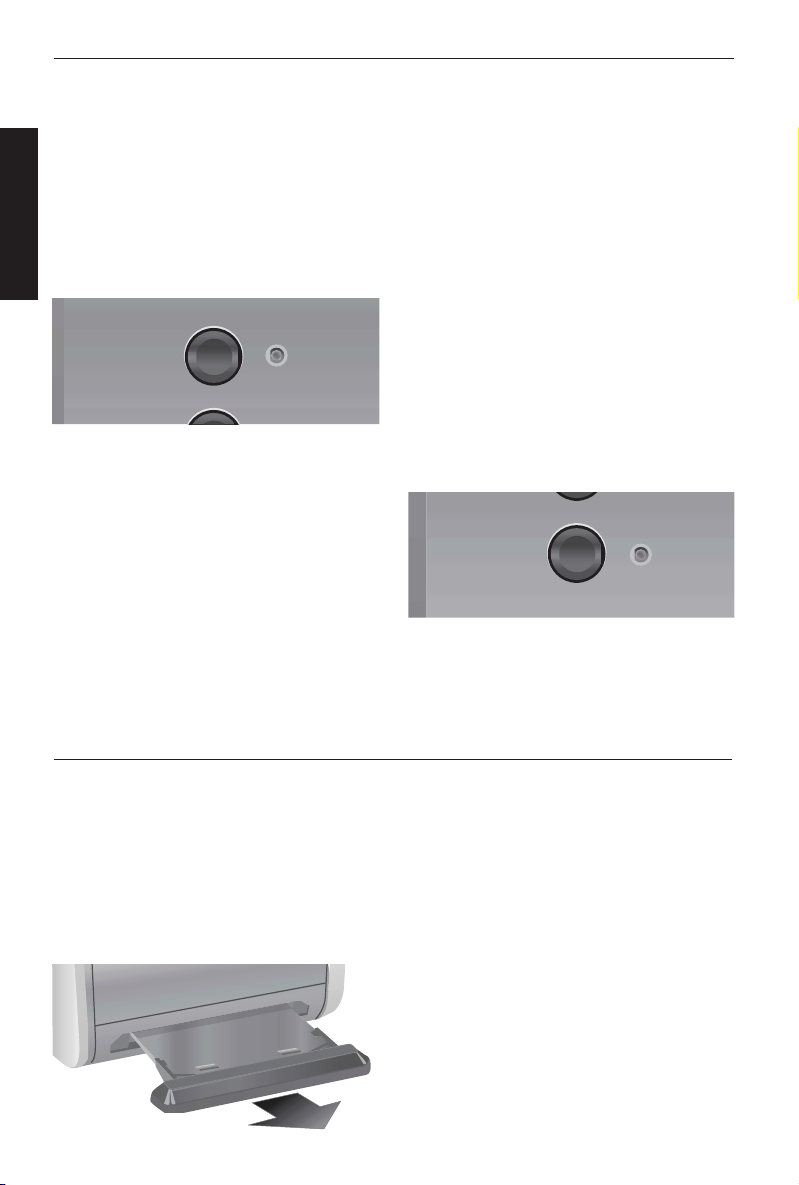
1. Shorten cord, if necessary, by wrapping
cord under the base.
KMTT200
WARNING
Electrical Shock Hazard
Plug into a grounded 3 prong
outlet.
Do not remove ground prong.
Do not use an adapter.
Do not use an extension cord.
Failure to follow these
instructions can result in death,
fire, or electrical shock.
2. Plug into a grounded 3-prong outlet.
3. Insert bread or other food to be
toasted in slot.
4. Turn the Dial Shade Control to select
the degree of darkness you want. Turn
the Shade Control clockwise for darker
toast, counterclockwise for lighter.
KMTT400
5
6
7
NOTE: Different types of bread and their
moisture levels may require different
shade settings. For example, dry bread will
brown more rapidly than moist bread and
will require a lighter setting.
6
Page 9

Using Your KitchenAid® Toaster
Models KMTT200 and KMTT400
For even toasting on model KMTT200, toast
only one bread type and thickness at a
time. For 4-slot model KMTT400, with Dual
Independent Controls, if toasting of two
different breads is desired be sure to toast
only one bread type in each pair of slots.
5. Push the Easy Lift™ lever
down until it locks in place.
The centering racks will adjust slot
width automatically to hold food
upright for even toasting. When
toasting is completed, the Toaster will
shut off and raise the toast.
Special Toasting Functions
To cancel toasting anytime, lift gently on
the Easy Lift™ lever. The Toaster will
shut off and raise the toast.
5
6
l
7
ENGLISH
After you lower the Easy Lift™ lever
to begin toasting, you can select the
special toasting functions by pressing the
appropriate button. The function lights will
indicate which function is selected. After a
toasting cycle is complete, all functions will
be cleared.
Baker’s Bagel™ Toasting
Selecting the Bagel Button will toast
the thickest bagels and English muffins
evenly, gently browning the bottoms
while toasting the sides that are sliced.
An exclusive KitchenAid process, Baker’s
Bagel™ Toasting produces perfect results
by reducing power to the heating elements
on one side of the toasting cavity by 50%.
1. Insert the bagel so that the flat (sliced)
side of the bagel faces the center of
the Toaster.
bagel
7
Page 10
Special Toasting Functions
2. Set the Shade Control to the level you
want. English muffins will generally
take more time to toast than bagels.
3. Push the Easy Lift™ lever down until
ENGLISH
it locks.
4. Press the Bagel Button. The Baker’s
Bagel™ function, once selected, cannot
be cancelled except by cancelling the
toasting cycle. Do this by lifting gently
on the Easy Lift™ lever. The Toaster will
shut off and raise the bagel.
bagel
To Warm Toasted Items
The Warm function will warm toast and
other items quickly without additional
browning.
1. Insert the previously toasted item in
bread slot. Do not place bread with
butter or any other topping in the
Toaster! Use Warm for dry bread and
bagels only.
2. No Shade adjustment is necessary –
the Warm function overrides whatever
Shade level you have set.
3. Push the Easy Lift™ lever down until
it locks.
4. Press the Warm Button. The Warm
function, once selected, cannot be
cancelled except by cancelling the
toasting cycle. Do this by lifting gently
on the Easy Lift™ lever. The Toaster will
shut off and raise the toast.
warm
The Warm function cannot be used in
combination with the Baker’s Bagel™
function.
Cleaning Your Toaster
1. Unplug the Toaster and let it cool
before cleaning.
2. Slide out the crumb tray and shake
the crumbs into a waste container. It is
recommended that the crumb tray be
emptied after each use. The crumb tray
is top rack dishwasher safe.
IMPORTANT: the tray will be hot
immediately following a toasting cycle.
3. Wipe Toaster with a soft, damp cotton
cloth. Do not use paper towels,
abrasive cleansers or liquid cleaning
products. Do not immerse Toaster
in water.
NOTE: If grease or oil splatters on the
Toaster, wipe splatters away immediately
using a clean, damp cotton cloth.
4. Return crumb tray to Toaster. Press it
in firmly until it clicks into position. Do
not use the Toaster without the crumb
tray in proper position.
NOTE: KitchenAid does not recommend
the use of a Toaster cover.
8
Page 11
Troubleshooting
If your Toaster should fail to operate,
check the following:
– See if the Toaster is plugged into a
proper electrical outlet. If it is, unplug
the Toaster.
WARNING
Electrical Shock Hazard
Plug into a grounded 3 prong
outlet.
Do not remove ground prong.
Do not use an adapter.
Do not use an extension cord.
Failure to follow these
instructions can result in death,
fire, or electrical shock.
– Plug in Toaster.
– If the Toaster still does not work, check
the household fuse or circuit breaker
on the electrical circuit the Toaster is
connected to and make sure the circuit
is closed.
If the problem cannot be corrected:
– Or if the error codes have rendered the
Toaster permanently inoperable, see
the KitchenAid Warranty and Service
sections on pages 10-11. Do not return
the Toaster to the retailer; they do not
provide service.
ENGLISH
9
Page 12

KitchenAid® Toaster Warranty
Length of
Warranty:
50 United States, the
District of Columbia,
ENGLISH
Canada, and Puerto
Rico: One-year limited
warranty from date of
purchase.
DISCLAIMER OF IMPLIED WARRANTIES; LIMITATION OF REMEDIES IMPLIED
WARRANTIES, INCLUDING TO THE EXTENT APPLICABLE WARRANTIES OF
MERCHANTABILITY OR FITNESS FOR A PARTICULAR PURPOSE, ARE EXCLUDED TO THE
EXTENT LEGALLY PERMISSIBLE. ANY IMPLIED WARRANTIES THAT MAY BE IMPOSED BY
LAW ARE LIMITED TO ONE YEAR, OR THE SHORTEST PERIOD ALLOWED BY LAW. SOME
STATES AND PROVINCES DO NOT ALLOW LIMITATIONS OR EXCLUSIONS ON HOW LONG
AN IMPLIED WARRANTY OF MERCHANTABILITY OR FITNESS LASTS, SO THE ABOVE
LIMITATIONS OR EXCLUSIONS MAY NOT APPLY TO YOU.
KitchenAid
Will Pay For:
50 United States, the
District of Columbia
and Canada: Hassle-free
replacement of your
Toaster. See the following
page for details on how to
arrange for replacement.
OR
In Puerto Rico:
The replacement parts
and repair labor costs to
correct defects in materials
and workmanship. Service
must be provided by an
Authorized KitchenAid
Service Center. To arrange
for service, follow the
instructions on page 11.
KitchenAid
Will Not Pay For:
A. Repairs when Toaster
is used in other than
normal single family
home use.
B. Damage resulting from
accident, alteration,
misuse or abuse or
use with products
not approved by
KitchenAid.
C. Replacement parts or
repair labor costs for
Toaster when operated
outside the country of
purchase.
IF THIS PRODUCT FAILS TO WORK AS WARRANTED, CUSTOMER’S SOLE AND EXCLUSIVE
REMEDY SHALL BE REPAIR OR REPLACEMENT ACCORDING TO THE TERMS OF THIS
LIMITED WARRANTY. KITCHENAID AND KITCHENAID CANADA DO NOT ASSUME ANY
RESPONSIBILITY FOR INCIDENTAL OR CONSEQUENTIAL DAMAGES. This warranty gives
you specific legal rights and you may also have other rights which vary from state to
state or province to province.
10
Page 13

Hassle-Free Replacement Warranty –
50 United States and District of Columbia
We’re so confident the quality of our
products meets the exacting standards
of KitchenAid that, if your Toaster should
fail within the first year of ownership,
KitchenAid will arrange to deliver an
identical or comparable replacement to
your door free of charge and arrange to
have your original Toaster returned to us.
Your replacement unit will also be covered
by our one year limited warranty. Please
follow these instructions to receive this
quality service.
If your KitchenAid
within the first year of ownership, simply
call our toll-free Customer Satisfaction
Center at 1-800-541-6390 Monday
through Friday, 8 a.m. to 8 p.m. (Eastern
Time), or Saturday, 10 a.m. to 5 p.m. Give
the consultant your complete shipping
address. (No P.O. Box numbers, please.)
When you receive your replacement
Toaster, use the carton and packing
materials to pack up your original Toaster.
In the carton, include your name and
address on a sheet of paper along with
a copy of the proof of purchase (register
receipt, credit card slip, etc.).
®
To aster should fail
Hassle-Free Replacement Warranty – Canada
We’re so confident the quality of our
products meets the exacting standards
of the KitchenAid
Toaster should fail within the first year
of ownership, KitchenAid Canada will
replace your Toaster with an identical
or comparable replacement. Your
replacement unit will also be covered
by our one year limited warranty. Please
follow these instructions to receive this
quality service.
®
brand that, if your
If your KitchenAid
within the first year of ownership, take the
Toaster or ship collect to an Authorized
KitchenAid Service Centre. In the carton
include your name and complete shipping
address along with a copy of the proof
of purchase (register receipt, credit card
slip, etc.). Your replacement Toaster will
be returned prepaid and insured. If you
are unable to obtain satisfactory service
in this manner call our toll-free Customer
Interaction Centre at 1-800-807-6777.
Or write to us at:
Customer Interaction Centre
KitchenAid Canada
1901 Minnesota Court
Mississauga, ON L5N 3A7
®
To aster should fail
ENGLISH
How to Arrange for Warranty Service
in Puerto Rico
Your KitchenAid® To aster is covered by
a one-year limited warranty from the
date of purchase. KitchenAid will pay
for replacement parts and labor costs
to correct defects in materials and
workmanship. Service must be provided by
an Authorized KitchenAid Service Center.
Ta ke the Toaster or ship prepaid and
insured to an Authorized KitchenAid
Service Center. Your repaired Toaster will
be returned prepaid and insured. If you
are unable to obtain satisfactory service in
this manner, call toll-free 1-800-541-6390
to learn the location of a Service Center
near you.
11
Page 14

How to Arrange for Service
after the Warranty Expires – All Locations
Before calling for service, please review the
Troubleshooting section on page 9.
For service information in the 50
ENGLISH
United States, District of Columbia,
and Puerto Rico,
call toll-free 1-800-541-6390.
Or write to:
Customer Satisfaction Center
KitchenAid Portable Appliances
P. O. Box 218
St. Joseph, MI 49085-0218
Or contact an Authorized Service Center
near you.
How to Arrange for Service
Outside these Locations
Consult your local KitchenAid dealer or the
store where you purchased the Toaster for
information on how to obtain service.
For service information in Canada,
call toll-free 1-800-807-6777.
Or write to:
Customer Interaction Centre
KitchenAid Canada
1901 Minnesota Court
Mississauga, ON L5N 3A7
For service information in Mexico,
call toll-free
01-800-024-17-17
(JV Distribuciones)
Or
01-800-902-31-00
(Industrias Birtman)
How to Order Accessories
and Replacement Parts
To order accessories or replacement
parts for your Toaster in the 50
United States, District of Columbia,
and Puerto Rico,
call toll-free 1-800-541-6390 Monday
through Friday, 8 a.m. to 8 p.m. (Eastern
Time), or Saturday, 10 a.m. to 5 p.m.
Or write to:
Customer Satisfaction Center,
KitchenAid Portable Appliances,
P. O. Box 218,
St. Joseph, MI 49085-0218
To order accessories or replacement
parts for your Toaster in Canada,
call toll-free 1-800-807-6777.
Or write to:
Customer Interaction Centre
KitchenAid Canada
1901 Minnesota Court
Mississauga, ON L5N 3A7
To order accessories or replacement
parts for your Toaster in Mexico,
call toll-free
01-800-024-17-17
(JV Distribuciones)
Or
01-800-902-31-00
(Industrias Birtman)
12
Page 15

Table des Matières
INTRODUCTION
Preuve d’achat et enregistrement du produit ...............................Deuxième de couverture
Sécurité du grille-pain ...................................................................................................14
Consignes de sécurité importantes ................................................................................14
Contraintes électriques ..................................................................................................15
CARACTÉRISTIQUES ET OPÉRATION
Caractéristiques du grille-pain KitchenAid
Mode d’emploi de votre grille-pain KitchenAid
Fonctions spéciales de brunissement .............................................................................19
Griller Baker’s Bagel™ ..................................................................................................19
Pour réchauffer les aliments grillés ................................................................................20
®
(modèles KMTT200 et KMTT400) ................16
®
(modèles KMTT200 et KMTT400) ........18
ENTRETIEN ET NETTOYAGE
Nettoyage de votre grille-pain .......................................................................................20
Dépannage ...................................................................................................................21
INFORMATION SUR LA GARANTIE ET LE SERVICE
Garantie du Grille-pain KitchenAid
®
..............................................................................22
Garantie de satisfaction totale et de remplacement –
50 États des États-Unis, district fédéral de Columbia .....................................................23
Garantie de satisfaction totale et de remplacement – Canada .......................................23
Comment obtenir une réparation sous garantie à Puerto Rico ......................................23
Comment obtenir une réparation hors garantie – tous les territoires .............................24
Comment obtenir une réparation en dehors de ces territoires .......................................24
Comment commander des accessoires et des pièces de rechange. ................................24
FRANÇAIS
13
Page 16

Sécurité du Grille-pain
Votre sécurité et celle des autres est très importante.
Nous donnons de nombreux messages de sécurité importants dans ce manuel
et sur votre appareil ménager. Assurez-vous de toujours lire tous les messages
de sécurité et de vous y conformer.
Voici le symbole d’alerte de sécurité.
Ce symbole d’alerte de sécurité vous signale les dangers
potentiels de décès et de blessures graves à vous et à d’autres.
Tous les messages de sécurité suivront le symbole d’alerte de
sécurité et le mot “DANGER” ou “AVERTISSEMENT”. Ces mots
FRANÇAIS
AVERTISSEMENT
Tous les messages de sécurité vous diront quel est le danger potentiel et vous
disent comment réduire le risque de blessure et ce qui peut se produire en cas
de non-respect des instructions.
signifient :
DANGER
Risque possible de décès ou de
blessure grave si vous ne suivez pas
immédiatement les instructions.
Risque possible de décès ou de
blessure grave si vous ne suivez
pas les instructions.
CONSIGNES DE SÉCURITÉ
IMPORTANTES
Lorsqu’on utilise un appareil électrique, il faut toujours respecter certaines règles de
sécurité fondamentales, notamment les suivantes.
1. Lire toutes les instructions.
2. Ne pas toucher les surfaces chaudes. Utiliser les poignées ou les boutons.
3. Pour protéger contre les risques de choc électrique, ne pas plonger le cordon, les
fiches ou le Grille-pain dans l’eau ou dans tout autre liquide.
4. Il est nécessaire de surveiller de près l’utilisation de cet appareil par ou à proximité
d’enfants.
5. Débrancher le Grille-pain lorsqu’on ne s’en sert pas et avant de le nettoyer. Laisser
refroidir avant de monter ou d’enlever des pièces.
6. Ne pas utiliser un appareil dont la fiche ou le cordon sont est abîmé(e), qui présente un problème de fonctionnement ou qui est endommagé de quelque manière
que ce soit. Le rapporter au centre de réparations autorisé le plus proche pour le
faire examiner, réparer ou régler.
7. Utiliser des accessoires non recommandés par le fabricant peut être dangereux.
8. Ne pas utiliser à l’extérieur.
9. Ne pas laisser pendre le cordon de la table ou du comptoir ou toucher des surfaces
chaudes.
10. Ne pas placer près d’une plaque électrique chaude, d’un brûleur allumé ou dans un
four chaud.
14
Page 17

11. Pour débrancher, mettre les commandes sur « OFF » puis tirer la fiche de la prise.
12. N’utiliser cet appareil que pour ce qu’il est prévu.
13. Il ne faut pas mettre des aliments trop grands, des produits emballés dans du papier
métallique ou des ustensiles dans le Grille-pain à cause du risque d’incendie ou de
choc électrique.
14. Couvrir le Grille-pain de matériaux inflammables tels que rideaux, draperies, murs et
autres pendant qu’il fonctionne peut causer un incendie.
15. Ne pas essayer de déloger des aliments quand le grille-pain est branché.
16. Cet appareil est pour usage domestique uniquement.
CONSERVEZ CES INSTRUCTIONS
Contraintes électriques
REMARQUE : Votre grille-pain a une
AVERTISSEMENT
Risque de choc électrique
Brancher sur une prise à 3
alvéoles reliée à la terre.
Ne pas enlever la broche de
liaison à la terre.
Ne pas utiliser un adaptateur.
Ne pas utiliser un câble de
rallonge.
Le non-respect de ces
instructions peut causer
un décès, un incendie ou un
choc électrique.
fiche mise à la terre à 3 broches. Pour
réduire le risque de choc électrique,
cette fiche entre dans une prise d’une
seule manière. Si la fiche n’entre pas
entièrement dans la prise, contactez un
électricien qualifié. Ne modifiez pas la
fiche de quelque façon que ce soit.
N’utilisez pas de rallonges. Si le cordon
est trop court, demandez à un électricien
qualifié ou à un réparateur d’installer une
prise plus près de l’appareil.
FRANÇAIS
Volts : 120 volts de c.a. seulement.
Hertz : 60 Hz
15
Page 18

Caractéristiques du Grille-pain KitchenAid
Fentes extra-larges
Intérieur d’acier
Panneaux
latéraux d’acier
Cool Reach™
FRANÇAIS
Bouton Baker’s
Bagel™
Bouton de
réchauffement
Modèles KMTT200 et KMTT400
5
6
I
I
P
P
7
l
e
g
a
b
m
r
a
w
Y
Y
®
Ramasse-miettes
amovible
(non illustré)
Levier
Easy Lift™
Contrôle du
cadran de
couleur
Enrouleur de
cordon sous
la base
Fentes extra larges
Intérieur d’acier
Panneaux
latéraux
d’acier
Cool Reach™
Boutons
Baker’s
Bagel™
Boutons de
réchauffement
Contrôle du
cadran de
couleur
Ramasse-miettes
amovible
(non illustrés)
Leviers
Easy Lift™
5
6
l
e
g
a
Y
Y
b
m
r
a
w
I
I
P
P
5
6
7
7
Contrôle du
cadran de
couleur
Enrouleur de
cordon sous
la base
16
Page 19

Caractéristiques du grille-pain KitchenAid®
Modèles KMTT200 et KMTT400
Système Even-Heat™
Les éléments chauffants de fort calibre
montés sur des plaques de mica extra-épaisses
assurent un brunissage uniforme. Un capteur
thermique ajuste automatiquement le temps
de brunissement pour avoir des tranches
brunies de la même manière d’une tranche
à l’autre.
Levier Easy Lift™
Annulez le brunissement en touchant le
levier, tout simplement.
Fentes extra larges
Convient pour les bagels, les muffins
anglais et les tranches de pain épaisses.
Clayettes de pain à auto-centrage
Centre parfaitement les pains minces ou
épais pour brunir uniformément.
Ramasse-miettes amovible(s)
Le plateau d’acier robuste, pleine largeur
(deux plateaux côte à côte pour le modèle
KMTT400) convient pour le panier
supérieur du lave-vaisselle.
Enrouleur de cordon sous la base
Gardez le surplus de cordon hors de vue et
en retrait.
Contrôle du cadran de couleur
Des boutons d’arrêt exact contrôlent les
niveaux de brunissement avec précision.
Tournez le cadran dans le sens horaire
pour des rôties plus foncées, dans le sens
antihoraire pour des rôties plus pâles.
Intérieur d’acier
Le nec plus ultra pour la durabilité. La
cavité de brunissement extra-profonde
permet d’assurer un brunissage uniforme.
FONCTIONS SPÉCIALES DE
BRUNISSEMENT
Bouton Baker’s Bagel™
Modifie automatiquement le niveau de
puissance de chaque côté d’un bagel
ou d’un muffin anglais, pour des
résultats parfaits !
Bouton de réchauffement
Réchauffe les aliments déjà grillés sans
brunissage supplémentaire.
Voyants
Indique les fonctions spéciales lorsque vous
les choisissez.
Doubles contrôles indépendants
(modèle KMTT400 seulement)
Les boutons d’une touche et les boutons
à cadran pour chaque paire de fentes
fonctionnent indépendamment les uns
des autres, permettant ainsi de griller un
bagel ou tout autre aliment dans une
paire de fentes tandis que la seconde
paire de fentes peut préparer des rôties ou
réchauffer une pâtisserie.
FRANÇAIS
Boîtier d’acier peint ou
d’acier inoxydable
Modèle à la mode et durable. Les surfaces
d’acier peint et d’acier inoxydable sont
faciles à nettoyer.
Panneaux latéraux d’acier
Cool Reach™
Travaillez plus confortablement autour
de ce grille-pain. Les écrans thermiques à
l’intérieur du grille-pain aident à garder
les panneaux latéraux d’acier extérieurs
CoolReach™ plus frais.
17
Page 20

Mode d’emploi de votre grille-pain KitchenAid
MODÈLES KMTT200 et KMTT400
Avant d’utiliser votre grille-pain, vérifiez les
fentes extra-larges et retirez tout matériel
d’emballage ou imprimé qui aurait pu
tomber à l’intérieur durant l’expédition
ou la manutention. N’entrez pas d’objets
métalliques dans le grille-pain.
Lorsque vous utilisez le grille-pain pour
la première fois, vous pourriez voir un peu
de fumée. Ceci est normal. La fumée n’est
pas dangereuse et disparaît rapidement.
MODE D’EMPLOI :
FRANÇAIS
1. Raccourcissez le cordon, au besoin, en
l’enroulant sous la base.
KMTT200
AVERTISSEMENT
Risque de choc électrique
Brancher sur une prise à 3
alvéoles reliée à la terre.
Ne pas enlever la broche de
liaison à la terre.
Ne pas utiliser un adaptateur.
Ne pas utiliser un câble de
rallonge.
Le non-respect de ces
instructions peut causer
un décès, un incendie ou un
choc électrique.
2. Branchez l’appareil dans une prise mise
à la terre à 3 branches.
3. Insérez le pain ou tout autre aliment à
griller dans la fente.
4. Tournez le contrôle du cadran de
couleur pour choisir la couleur que
vous désirez. Tournez le contrôle de
couleur dans le sens horaire pour les
rôties plus foncées, et dans le sens
antihoraire pour les rôties plus pâles.
®
KMTT400
5
6
7
REMARQUE : Différents types de pain
et leurs niveaux d’humidité peuvent
exiger différents réglages de couleur.
Par exemple, le pain sec brunit plus
rapidement que le pain moelleux et il
exige un réglage plus pâle.
18
Page 21

Mode d’emploi de votre grille-pain KitchenAid
MODÈLES KMTT200 et KMTT400
Pour un brunissement uniforme avec le modèle
KMTT200, grillez un seul type et une seule
épaisseur de pain à la fois. Pour le modèle
KMTT400 à 4 fentes et à doubles contrôles
indépendants, si vous voulez faire griller deux
pains différents, assurez-vous de griller un seul
type de pain dans chaque paire de fentes.
5. Poussez le levier Easy Lift™ vers le bas
jusqu’à ce qu’il se verrouille en place.
Les clayettes de centrage ajusteront
automatiquement la largeur de fente
pour garder les aliments droits pour
un brunissement uniforme. À la fin de
l’opération, le grille-pain s’éteindra et
relèvera la rôtie.
Pour annuler le brunissement en tout
temps, soulevez délicatement le levier
Easy Lift™. Le grille-pain s’éteindra et la
rôtie se relèvera.
5
6
l
7
®
FRANÇAIS
Fonctions spéciales de brunissement
Après avoir abaissé le levier Easy Lift™
pour commencer le brunissement, vous
pouvez choisir les fonctions spéciales de
brunissement en enfonçant le bouton
approprié. Les voyants indiqueront la
fonction choisie. Après la fin du cycle de
brunissement, toutes les fonctions seront
effacées.
Griller Baker’s Bagel™
Choisir le bouton Bagel permettra de faire
griller les muffins anglais et les bagels
les plus épais uniformément. Le bas sera
brun tandis que les côtés coupés seront
grillés. Un processus exclusif KitchenAid,
Griller Baker’s Bagel™ produit des résultats
parfaits en réduisant la puissance des
éléments chauffants d’un côté de la cavité
de brunissement de 50 %.
1. Insérez le bagel pour que le côté plat
(tranché) du bagel soit face au centre
du grille-pain.
bagel
19
Page 22

Fonctions spéciales de brunissement
2. Réglez le contrôle de couleur au niveau
que vous désirez. Les muffins anglais
prennent normalement plus de temps
à griller que les bagels.
3. Poussez le levier Easy Lift™ vers le bas
jusqu’à ce qu’il se verrouille en place.
4. Enfoncez le bouton Bagel. Après avoir
choisi la fonction Baker’s Bagel™,
vous ne pouvez pas l’annuler à moins
d’annuler le cycle de brunissement.
Pour ce faire, soulevez délicatement
le levier Easy Lift™. Le grille-pain
FRANÇAIS
s’éteindra et le bagel se relèvera.
bagel
Pour réchauffer les aliments grillés
La fonction Réchauffe réchauffera les
rôties et autres aliments sans brunissage
supplémentaire et rapidement.
1. Insérez l’aliment déjà grillé dans
la fente du pain. Ne placez pas le
pain avec du beurre ou toute autre
garniture dans le grille-pain ! Utilisez
l’option Réchauffe pour les bagels et le
pain sec seulement.
2. Aucun réglage de couleur n’est
nécessaire - la fonction Réchauffe
remplace tout niveau de couleur réglé.
3. Poussez le levier Easy Lift™ vers le bas
jusqu’à ce qu’il se verrouille en place.
4. Enfoncez le bouton Réchauffe. Après
avoir choisi la fonction Réchauffe,
vous ne pouvez pas l’annuler à moins
d’annuler le cycle de brunissement.
Pour ce faire, soulevez délicatement
le levier Easy Lift™. Le grille-pain
s’éteindra et la rôtie se relèvera.
warm
Nettoyage de votre grille-pain
1. Débranchez le grille-pain et laissez-le
refroidir avant le nettoyage.
2. Sortez le ramasse-miettes et jetez
les miettes dans une poubelle. Il est
recommandé de vider le ramassemiettes après chaque utilisation. Le
ramasse-miettes convient pour le
panier supérieur du lave-vaisselle.
IMPORTANT : le ramasse-miettes sera
chaud immédiatement après un cycle de
brunissement.
La fonction Réchauffe ne peut pas être
utilisée avec la fonction Baker’s Bagel™.
3. Essuyez le grille-pain avec un chiffon
de coton doux et humide. N’utilisez
pas d’essuie-tout, de nettoyants
abrasifs ou de produits nettoyants
liquides. Ne plongez pas le grille-pain
dans l’eau.
REMARQUE : s’il y a des éclaboussures
de graisse ou d’huile sur le grille-pain,
essuyez-les immédiatement avec un
chiffon de coton propre et humide.
4. Replacez le ramasse-miettes dans le
grille-pain. Pressez-le fermement jusqu’à
ce qu’il clique en place. N’utilisez pas le
grille-pain sans ramasse-miettes dans sa
bonne position.
REMARQUE : KitchenAid ne recommande
pas d’utiliser d’enveloppe de grille-pain.
20
Page 23

Dépannage
Si votre grille-pain ne fonctionne pas,
vérifiez ce qui suit :
– Assurez-vous que le grille-pain est bien
branché dans une prise de courant
appropriée. S’il l’est, débranchez-le.
AVERTISSEMENT
Risque de choc électrique
Brancher sur une prise à 3
alvéoles reliée à la terre.
Ne pas enlever la broche de
liaison à la terre.
Ne pas utiliser un adaptateur.
Ne pas utiliser un câble de
rallonge.
Le non-respect de ces
instructions peut causer
un décès, un incendie ou un
choc électrique.
Si le problème ne peut pas être corrigé :
– Ou si les codes d’erreur ont rendu
le grille-pain inutilisable, consultez
les sections de garantie et de service
KitchenAid des pages 22 et 23.
Ne rapportez pas le grille-pain au
détaillant car il ne peut pas fournir le
service.
FRANÇAIS
– Branchez le grille-pain.
– Si le grille-pain ne fonctionne
toujours pas, vérifiez les fusibles ou
le disjoncteur de la maison du circuit
électrique où le grille-pain est branché
et assurez-vous que le circuit est fermé.
21
Page 24

Garantie du Grille-pain KitchenAid
®
Durée de la garantie :
50 États des États-Unis,
le district fédéral de
Columbia, le Canada et
Puerto Rico : Garantie
limitée d’un an à compter
de la date d’achat.
FRANÇAIS
DÉSAVEU DE GARANTIE TACITE, LIMITATION DES RECOURS.
TACITES, Y COMPRIS DANS LA MESURE APPLICABLE LES GARANTIES DE QUALITÉ
MARCHANDE OU D’APTITUDE À UN EMPLOI PARTICULIER, SONT EXCLUES DANS LA
MESURE AUTORISÉE PAR LA LOI. TOUTE GARANTIE TACITE IMPOSÉE PAR LA LOI EST
LIMITÉE À UN AN, OU LA DURÉE MINIMUM PERMISE PAR LA LOI. PUISQUE CERTAINES
JURIDICTIONS NE PERMETTENT PAS L’EXCLUSION OU LA LIMITATION DE DURÉE DES
GARANTIES IMPLICITES DE QUALITÉ MARCHANDE OU D’APTITUDE À UN EMPLOI
PARTICULIER, LES LIMITATIONS CI-DESSUS PEUVENT DONC NE PAS S’APPLIQUER À VOUS.
KitchenAid
prendra en charge :
50 États des États-Unis,
district fédéral de
Columbia et le Canada :
Garantie de satisfaction
totale et de remplacement
de votre Grille-pain.
Consultez la page suivante
pour obtenir des détails sur
la façon de remplacer le
Grille-pain.
OU
À Puerto Rico :
Les coûts des pièces de
rechange et de maind’œuvre pour corriger
les défauts de matériaux
et de main-d’œuvre. Le
service après-vente doit
être assuré par un Centre
de réparation autorisé
KitchenAid. Pour obtenir
une réparation, suivez les
directives de la page 23.
KitchenAid ne prendra
pas en charge :
A. Les réparations
découlant de
l’utilisation du Grillepain dans un contexte
autre qu’un foyer
unifamilial normal.
B. Les dommages
attribuables aux causes
suivantes : un accident,
une modification, la
mauvaise utilisation,
un emploi abusif
ou une utilisation
non approuvée par
KitchenAid.
C. Les coûts des pièces
de rechange ou de
main-d’oeuvre pour le
Grille-pain si ce dernier
est utilisé à l’extérieur
du pays d’achat.
LES GARANTIES
SI CET APPAREIL NE FONCTIONNE PAS COMME GARANTI, LE SEUL ET EXCLUSIF
RECOURS DES CLIENTS EST LA RÉPARATION OU LE REMPLACEMENT SELON LES
DISPOSITIONS DE LA GARANTIE LIMITÉE. KITCHENAID ET KITCHENAID-CANADA
N’ASSUMENT AUCUNE RESPONSABILITÉ EN CAS DE DOMMAGES ACCESSOIRES OU
INDIRECTS. Cette garantie vous confère des droits spécifiques auxquels peuvent s’ajouter
d’autres droits variant d’un État ou d’une province à l’autre.
22
Page 25

Garantie de satisfaction totale et de
remplacement - 50 États des États-Unis,
district fédéral de Columbia
Nous sommes tellement certains que
la qualité de nos produits satisfait aux
normes exigeantes de KitchenAid que, si le
Grille-pain cesse de fonctionner au cours
de la première année, KitchenAid livrera
gratuitement un appareil identique ou
comparable à votre porte et s’occupera de
récupérer le Grille-pain originel.
L’appareil de rechange sera aussi couvert
par notre garantie limitée d’un an. Veuillez
suivre ces instructions pour recevoir ce
service de qualité.
Si le Grille-pain KitchenAid
fonctionner durant la première année, il
suffit d’appeler le numéro sans frais
®
cesse de
Garantie de satisfaction totale et de
remplacement - Canada
Nous sommes tellement certains que
la qualité de nos produits satisfait aux
normes exigeantes de KitchenAid que,
si le Grille-pain cesse de fonctionner au
cours de la première année, KitchenAid le
remplacera par un appareil identique ou
comparable. L’appareil de rechange sera
aussi couvert par notre garantie limitée
d’un an. Veuillez suivre ces instructions
pour recevoir ce service de qualité.
Si le Grille-pain KitchenAid
fonctionner au cours de la première
année, apportez-le ou retournez-le port
dû à un Centre de Réparation KitchenAid
®
cesse de
1-800-541-6390 du Centre de satisfaction
de la clientèle du lundi au vendredi de 8
h à 20 h (heure de l’Est) ou le samedi de
10 h à 17 h. Fournissez votre adresse de
livraison complète au représentant. (Pas de
boîte postale).
Quand vous recevez le Grille-pain de
rechange, veuillez utiliser le carton et les
matériaux d’emballage pour emballer le
Grille-pain originel.
Écrivez vos nom et adresse sur une feuille
de papier et mettez-la dans le carton avec
une copie de la preuve d’achat (reçu de
caisse, facture de règlement par carte de
crédit, etc.)
autorisé. Écrivez vos nom et adresse
complète sur une feuille de papier et
mettez-la dans le carton avec une copie de
la preuve d’achat (reçu de caisse, facture
de règlement par carte de crédit, etc.)
Le Grille-pain de rechange sera expédié
port prépayé et assuré. Si le service ne
s’avère pas satisfaisant, appelez le numéro
sans frais du Centre de relations avec la
clientèle : 1-800-807-6777. Ou écrivez à :
Centre de relations avec la clientèle
KitchenAid Canada
1901 Minnesota Court
Mississauga, ON L5N 3A7
FRANÇAIS
Comment obtenir une réparation sous
garantie à Puerto Rico
Le Grille-pain KitchenAid® est couvert par
une garantie limitée d’un an à partir de
la date d’achat. KitchenAid prendra en
charge les coûts des pièces de rechange et
de main-d’œuvre pour corriger les défauts
de matériaux et de main-d’œuvre. Le
service après-vente doit être assuré par un
Centre de réparation autorisé KitchenAid.
Apportez le Grille-pain ou retournez-le port
payé et assuré à un Centre de réparation
autorisé de KitchenAid. Le Grille-pain réparé
vous sera retourné port prépayé et assuré.
S’il est impossible d’obtenir des réparations
satisfaisantes de cette manière, appelez le
numéro sans frais 1-800-541-6390 pour
obtenir l’adresse d’un Centre de réparation
près de chez vous.
23
Page 26

Comment obtenir une réparation hors
garantie – tous les territoires
Avant d’appeler pour faire réparer l’appareil,
consultez la section Dépannage de la page 21.
Pour obtenir de l’information sur
les réparations dans les 50 États
des États-Unis, le district fédéral de
Columbia et Puerto Rico, appelez le
numéro sans frais 1-800-541-6390.
Ou écrivez à :
Centre de satisfaction de la clientèle
KitchenAid Portable Appliances
FRANÇAIS
P.O. Box 218
St. Joseph, MI 49085-0218
Comment obtenir une réparation
en dehors de ces territoires
Demandez à votre distributeur local
KitchenAid ou au détaillant où le Grillepain a été acheté où le faire réparer.
Comment commander des accessoires
et des pièces de rechange
Ou contactez un centre de réparation
autorisé près de chez vous.
Pour obtenir de l’information sur
les réparations au Canada, appelez le
numéro sans frais 1-800-807-6777.
Ou écrivez à :
Centre de relations avec la clientèle
KitchenAid Canada
1901 Minnesota Court
Mississauga, ON L5N 3A7
Pour obtenir de l’information sur les
réparations au Mexique, appelez le
numéro sans frais
01-800-024-17-17
(JV Distribuciones)
ou
01-800-902-31-00
(Industrias Birtman)
Pour commander des accessoires ou
des pièces de rechange pour le Grillepain dans les 50 États des États-Unis,
dans le district fédéral de Columbia
et à Puerto-Rico,
appelez sans frais le 1-800-541-6390 du
lundi au vendredi, de 8 h à 20 h (heure de
l’Est), le samedi de 10 h à 17 h.
Ou écrivez à :
Centre de satisfaction de la clientèle
KitchenAid Portable Appliances
P.O. Box 218
St. Joseph, MI 49085-0218
Pour commander des accessoires ou
des pièces de rechange pour le Grillepain au Canada, appelez le numéro sans
frais 1-800-807-6777.
Ou écrivez à :
Centre de relations avec la clientèle
KitchenAid Canada
1901 Minnesota Court
Mississauga, ON L5N 3A7
Pour commander des accessoires ou
des pièces de rechange pour le Grillepain au Mexique, appelez le numéro
sans frais
01-800-024-17-17
(JV Distribuciones)
ou
01-800-902-31-00
(Industrias Birtman)
24
Page 27

Índice
INTRODUCCIÓN
Prueba de compra y registro del producto .................................. En el interior de la portada
Seguridad del tostador .................................................................................................26
Medidas de seguridad importantes ...............................................................................26
Requisitos eléctricos ......................................................................................................27
CARACTERÍSTICAS Y FUNCIONAMIENTO
Características del Tostador KitchenAid
Utilización de su Tostador KitchenAid
Funciones especiales de tostado ....................................................................................31
Tostado Baker’s Bagel™ .........................................................................................31
Para calentar piezas tostadas .................................................................................32
CUIDADO Y LIMPIEZA
Limpieza de su tostador ................................................................................................32
Resolución de problemas ..............................................................................................33
INFORMACIÓN DE GARANTÍA Y SERVICIO
Garantía del Tostador KitchenAid
Garantía de reemplazo sin dificultades en los 50 estados de los Estados Unidos y en el
Distrito de Columbia ......................................................................................................35
Garantía de reemplazo sin dificultades en Canadá ..........................................................35
Cómo obtener el servicio de garantía en Puerto Rico ......................................................36
Cómo obtener el servicio de garantía una vez vencida la garantía – Todos los lugares ......36
Cómo obtener el servicio técnico en otros lugares .........................................................36
Como realizar un pedido de accesorios y repuestos ........................................................37
®
(modelos KMTT200 y KMTT400 ......................28
®
(modelos KMTT200 y KMTT400) ........................30
®
...............................................................................34
ESPAÑOL
25
Page 28

Seguridad del Tostador
Su seguridad y la seguridad de los demás es muy importante.
Hemos incluido muchos mensajes importantes de seguridad en este manual y en
su electrodoméstico. Lea y obedezca siempre todos los mensajes de seguridad.
Este es el símbolo de advertencia de seguridad.
Este símbolo le llama la atención sobre peligros potenciales que
pueden ocasionar la muerte o una lesión a usted y a los demás.
Todos los mensajes de seguridad irán a continuación del símbolo
de advertencia de seguridad y de la palabra “PELIGRO” o
“ADVERTENCIA”. Estas palabras significan:
Si no sigue las instrucciones de
PELIGRO
ADVERTENCIA
Todos los mensajes de seguridad le dirán el peligro potencial, le dirán cómo
reducir las posibilidades de sufrir una lesión y lo que puede suceder si no se
ESPAÑOL
siguen las instrucciones.
inmediato, usted puede morir o
sufrir una lesión grave.
Si no sigue las instrucciones, usted
puede morir o sufrir una lesión grave.
MEDIDAS DE SEGURIDAD
IMPORTANTES
Cuando utilice electrodomésticos, siempre se deben seguir las precauciones básicas de
seguridad. Las instrucciones son las siguientes:
1. Lea todas las instrucciones.
2. No toque superficies calientes. Utilice las manijas o perillas.
3. Para protegerse contra descargas eléctricas no sumerja el cable, los enchufes ni el
Tostador en agua ni en ningún otro líquido.
4. Es necesario que supervise de cerca cuando algún electrodoméstico está siendo
utilizado cerca de los niños o está siendo utilizado por éstos.
5. Desenchufe el Tostador cuando no esté en uso y antes de la limpieza. Deje que se
enfríe antes de colocar o quitar las piezas.
6. No utilice ningún electrodoméstico con un cable o un enchufe dañado, ni luego
de un mal funcionamiento, ni si se ha dañado de alguna forma. Devuelva el
electrodoméstico al Centro de servicio técnico autorizado más cercano para su
inspección, reparación o ajuste.
7. El uso de acoplamientos accesorios no recomendados por el fabricante del
electrodoméstico puede ocasionar lesiones.
8. No lo utilice a la intemperie.
9. No deje que el cable cuelgue del borde de la mesa o mesada de cocina ni que
toque superficies calientes.
26
Page 29

10. No lo coloque sobre ni cerca de un quemador eléctrico o a gas caliente ni dentro de
un horno caliente.
11. Para desconectar el electrodoméstico, lleve todos los controles a la posición “OFF”
(APAGADO), luego desenchufe.
12. No utilice el electrodoméstico con ningún otro fin que no sea el indicado.
13. No se deben introducir alimentos de gran tamaño ni paquetes con envoltorio
metálico ni utensilios de metal en el Tostador ya que se corre el riesgo de ocasionar
incendios o descargas eléctricas.
14. Si el Tostador está cubierto o si entra en contacto con materiales inflamables como
cortinas, paredes y materiales similares cuando esté funcionando, se puede producir
un incendio.
15. No intente quitar los alimentos mientras el Tostador esté enchufado.
16. Este producto está diseñado para ser utilizado sólo para uso doméstico.
GUARDE ESTAS INSTRUCCIONES
Requisitos eléctricos
NOTA: Su tostador tiene un enchufe de 3
ADVERTENCIA
Peligro de Choque Eléctrico
Conecte a un contacto de pared
de conexión a tierra de 3
terminales.
No quite la terminal de conexión
a tierra.
No use un adaptador.
No use un cable eléctrico de
extensión.
No seguir estas instrucciones
puede ocasionar la muerte,
incendio o choque eléctrico.
puntas con conexión a tierra. Para reducir
el riesgo de una descarga eléctrica,
este enchufe sólo entra en una toma
de corriente en un sólo sentido. Si el
enchufe no entra en la toma de corriente,
comuníquese con un electricista
calificado. No modifique el enchufe de
ningún modo.
No utilice un cable de extensión. Si el
cable de corriente es muy corto, pida a un
electricista calificado o a un técnico que
instale una toma de corriente cerca
del aparato.
ESPAÑOL
Voltaje: 120 Voltios CA únicamente.
Hertz: 60 Hz
27
Page 30

Características del Tostador KitchenAid®
Modelos KMTT200 y KMT400
Ranuras de
ancho extra
Interior de
acero inoxidable
Paneles laterales
de acero
inoxidable
Cool Reach™
Charola para
migajas
desmontable
(no se muestra)
Palanca
“Easy Lift™”
Botón
“Baker’s Bagel™”
Botón “Warm”
ESPAÑOL
Ranuras de
ancho extra
Interior de
acero inoxidable
Paneles
laterales
de acero
inoxidable
Cool Reach™
Botones
“Baker’s
Bagel™”
Botones
“Warm”
Perilla de
control de
tostado
Perilla de
control de
tostado
Carrete para
bagel
warm
6
7
YIP
YIP
5
enrollar el
cable bajo
la base
Charolas
para migajas
desmontables
(no se muestran)
Palancas
“Easy Lift™”
5
6
5
6
7
bagel
warm
YIP
YIP
7
Perilla de
control de
tostado
Carrete para
enrollar el
cable bajo
la base
28
Page 31

Características del Tostador KitchenAid®
Modelos KMTT200 y KMT400
Sistema Even-Heat™
Los elementos calentadores de grueso calibre,
montados en placas de mica extra gruesa,
aseguran un tostado uniforme. Un sensor de
calor automáticamente ajusta el tiempo de
tostado para asegurar un tostado uniforme,
rebanada tras rebanada.
Paneles laterales de acero inoxidable
Cool Reach™
Trabaje de manera más cómoda cerca del
tostador. Los escudos térmicos dentro del
tostador ayudan a reducir la temperatura
de los paneles laterales exteriores de acero
inoxidable Cool Reach™.
Palanca “Easy Lift™”
Cancele el tostado con un solo toque de
la palanca.
Ranuras de ancho extra
Admiten bollos, panecillos ingleses (English
muffins) y panes gruesos con facilidad.
Rejillas para pan que se centran
automáticamente
Centran panes gruesos o delgados
perfectamente para un tostado uniforme.
Charola(s) para migajas
desmontable(s)
La charola de acero inoxidable resistente,
de ancho completo (dos charolas lado a
lado en el KMTT400) se puede colocar en
el estante superior de un lavavajillas.
Carrete para enrollar el cable bajo
la base
Conserva el cable extra fuera de la vista y
sin estorbar.
Perilla de control de tostado
Las perillas de tope exacto controlan con
precisión los niveles de tostado. Gire la
perilla a su derecha para un tostado más
oscuro y a su izquierda para un tostado
más claro.
Interior de acero inoxidable
Lo máximo en durabilidad. La cavidad
extra profunda de tostado ayuda a
garantizar un tostado uniforme.
FUNCIONES ESPECIALES DE TOSTADO
Botón “Baker’s Bagel™”
Automáticamente varía el nivel de potencia
a cada lado del bollo o panecillo inglés,
¡para obtener un resultado perfecto!
Botón “Warm”
Calienta alimentos previamente tostados
sin tostarlos más.
Luces de funcionamiento
Indican funciones especiales cuando
se seleccionan.
Dos controles independientes
(Sólo modelo KMTT400)
Los botones que se activan con un solo
toque y las perillas de control para cada
par de ranuras funcionan de manera
independiente, y permiten tostar un bollo
u otra pieza en un par de ranuras, mientras
el segundo par de ranuras puede tostar
pan o calentar un pastelillo.
ESPAÑOL
Cubierta de acero inoxidable
o de acero pintado
Elegante y durable. Las superficies de acero
inoxidable y acero pintado son fáciles
de limpiar.
29
Page 32

Utilización de su Tostador KitchenAid®
Modelos KMTT200 y KMT400
Antes de utilizar su tostador, revise las
ranuras de ancho extra y retire cualquier
paquete o material impreso que pudiera
haberse introducido durante el envío o el
manejo. No introduzca en el tostador un
objeto metálico.
Puede ver un poco de humo la primera
vez que utilice el tostador. Esto es normal. El
humo es inofensivo y desaparecerá pronto.
PARA UTILIZAR:
1. Acorte el cable, de ser necesario,
enrollando el cable bajo la base.
ESPAÑOL
KMTT200
ADVERTENCIA
Peligro de Choque Eléctrico
Conecte a un contacto de pared
de conexión a tierra de 3
terminales.
No quite la terminal de conexión
a tierra.
No use un adaptador.
No use un cable eléctrico de
extensión.
No seguir estas instrucciones
puede ocasionar la muerte,
incendio o choque eléctrico.
KMTT400
2. Conecte en una toma de corriente de 3
puntas con conexión a tierra.
3. Introduzca dentro de la ranura el pan
o el alimento que se va a tostar.
4. Gire la perilla de control de tostado
para seleccionar el grado de tostado
que desea. Gire la perilla a su derecha
para un tostado más oscuro y a su
izquierda para un tostado más claro.
5
6
7
NOTA: Distintos tipos de pan y sus niveles
de humedad pueden necesitar distintos
niveles de tostado. Por ejemplo, el pan
seco se tostará más rápidamente que
el pan húmedo y necesitará un nivel de
tostado más bajo.
30
Page 33

Utilización de su Tostador KitchenAid®
Modelos KMTT200 y KMT400
Para un tostado uniforme en el modelo
KMTT200, tueste sólo un tipo de pan del
mismo grosor a la vez. Para el modelo de
cuatro ranuras KMTT400 con dos controles
independientes, si desea tostar dos tipos de
pan distintos asegúrese de tostar sólo un
tipo de pan en cada par de ranuras.
5. Mueva la palanca Easy Lift™ hacia
abajo hasta fijarla en su posición. Las
rejillas para centrar ajustarán el ancho
de la ranura de manera automática
para sostener el alimento en posición
vertical y así obtener un tostado
uniforme. Al terminar de tostar, el
tostador se apagará y expulsará el
pan tostado.
l
5
6
7
Funciones especiales de tostado
Después de que baje la palanca Easy Lift™
para comenzar a tostar, puede seleccionar
las funciones especiales de tostado
presionando el botón correspondiente.
Las luces de funcionamiento indicarán
la función seleccionada. Después de
completar un ciclo de tostado todas las
funciones se borrarán.
To stado Baker’s Bagel™
Seleccione el botón “Bagel” para tostar los
bollos y panecillos ingleses más gruesos de
manera uniforme, dorando ligeramente la
parte de abajo al mismo tiempo que tuesta
los lados que están rebanados. El tostado
Baker’s Bagel™, un proceso exclusivo de
KitchenAid, produce resultados perfectos
al reducir en un 50% la energía a los
elementos calentadores de un lado de la
cavidad de tostado.
ESPAÑOL
1. Inserte el bollo de modo que el lado
plano (rebanado) quede al centro
del tostador.
bagel
31
Page 34

Funciones especiales de tostado
2. Ajuste el control de tostado al nivel
deseado. Por lo general los panecillos
ingleses tardan más tiempo en tostarse
que los bollos.
3. Mueva la palanca Easy Lift™ hacia
abajo hasta fijarla en su posición.
4. Presione el botón “Bagel”. Una vez
seleccionada la función de Baker’s
Bagel™ no puede cancelarse a menos
que se cancele el ciclo de tostado.
Haga esto levantando suavemente
la palanca Easy Lift™. El tostador se
apagará y expulsará el pan tostado.
bagel
ESPAÑOL
Para calentar piezas tostadas
La función de calentamiento “Warm”
calentará el pan tostado y otras piezas de
forma rápida y sin volverlas a tostar.
1. Inserte la pieza previamente tostada
en la ranura para el pan. ¡No coloque
pan con mantequilla ni cubierto con
otro ingrediente en el tostador! Utilice
la función “Warm” para pan seco y
bollos únicamente.
2. No necesita ajustar el nivel de tostado;
la función “Warm” cancela el nivel de
tostado que haya determinado.
3. Mueva la palanca Easy Lift™ hacia
abajo hasta fijarla en su posición.
4. Presione el botón “Warm”. Una vez
seleccionada la función de “Warm”
no puede cancelarse a menos que se
cancele el ciclo de tostado. Haga esto
levantando suavemente la palanca
Easy Lift™. El tostador se apagará y
expulsará el pan tostado.
warm
La función “Warm” no puede utilizarse en
combinación con la función de
Baker’s Bagel™.
Limpieza de su tostador
1. Desconecte el tostador y permita que
se enfríe antes de limpiarlo.
2. Deslice la charola para migajas y
sacúdalas en un bote de basura.
Se recomienda que la charola para
migajas se limpie después de cada
uso. Se puede colocar la charola para
migajas en el estante superior de
un lavavajillas.
IMPORTANTE: La charola estará caliente
inmediatamente después de un ciclo
de tostado.
3. Limpie el tostador con un paño de
algodón suave y húmedo. No utilice
toallas de papel, limpiadores abrasivos
o productos de limpieza líquidos. No
sumerja el tostador en agua.
NOTA: Si el tostador se salpica de
grasa o aceite, limpie las salpicaduras
inmediatamente utilizando un paño de
algodón limpio y húmedo.
4. Vuelva a colocar la charola para
migajas en el tostador. Presione
firmemente hasta que escuche un clic.
No utilice el tostador sin la charola
para migajas en su posición correcta.
NOTA: KitchenAid no recomienda el uso
de una cubierta para tostador.
32
Page 35

Resolución de problemas
Si su tostador no funciona, revise
lo siguiente:
– Vea si el tostador está conectado a una
toma de corriente adecuada. Si está
conectado, desconecte el tostador.
ADVERTENCIA
Peligro de Choque Eléctrico
Conecte a un contacto de pared
de conexión a tierra de 3
terminales.
No quite la terminal de conexión
a tierra.
No use un adaptador.
No use un cable eléctrico de
extensión.
No seguir estas instrucciones
puede ocasionar la muerte,
incendio o choque eléctrico.
Si no puede solucionar el problema:
– O si los códigos de error han
inutilizado permanentemente el
tostador, consulte las secciones de
Garantía y Servicio de KitchenAid en las
páginas 34-35. No devuelta el tostador
al vendedor, pues no brindan el servicio
técnico de mantenimiento.
ESPAÑOL
– Conecte el tostador.
– Si el tostador aún no funciona, revise
los fusibles de la casa o el interruptor
del circuito eléctrico al que está
conectado el tostador, y asegúrese que
el circuito esté cerrado.
33
Page 36

Garantía del Tostador KitchenAid
®
Duración de la
garantía:
50 estados de los
Estados Unidos, el
Distrito de Columbia,
Canadá y Puerto Rico:
Un año de garantía
limitada a partir de la
fecha de compra.
ESPAÑOL
LA EXENCIÓN DE RESPONSABILIDADES DE LAS GARANTÍAS IMPLÍCITAS, LAS
GARANTÍAS IMPLÍCITAS DE LIMITACIÓN DE LOS RECURSOS, INCLUYENDO
GARANTÍAS EN LA MEDIDA EN QUE SE APLIQUEN A LA COMERCIABILIDAD O APTITUD
CON UN FIN DETERMINADO, SON EXCLUIDAS EN LA MEDIDA PERMITIDA POR LEY.
CUALQUIER GARANTÍA IMPLÍCITA QUE PUEDA SER IMPUESTA POR LEY ESTÁ LIMITADA
A UN AÑO O AL PERÍODO MÁS CORTO PERMITIDO POR LEY. ALGUNOS ESTADOS Y
PROVINCIAS NO PERMITEN LIMITACIONES NI EXCLUSIONES EN RELACIÓN CON LA
DURACIÓN DE UNA GARANTÍA IMPLÍCITA DE COMERCIABILIDAD O DE APTITUD, DE
MANERA TAL QUE LAS LIMITACIONES O EXCLUSIONES ANTERIORES PUEDE QUE NO SE
APLIQUEN EN SU CASO.
KitchenAid
pagará por:
50 estados de los
Estados Unidos, el
Distrito de Columbia y
Canadá: El reemplazo de
su Tostador sin dificultades.
Consulte la siguiente página
para obtener los detalles
sobre cómo realizar el
reemplazo.
O
En Puerto Rico:
Los costos de los repuestos
y del trabajo de reparación
para corregir los defectos
en los materiales y la
mano de obra. El servicio
técnico debe ser provisto
por un Centro de servicio
técnico de KitchenAid
autorizado. Para solicitar
un servicio técnico, siga las
instrucciones de la
página 35.
KitchenAid
no pagará por:
A. Las reparaciones
cuando el Tostador
sea utilizado con otro
fin que no sea el uso
doméstico normal de
una familia.
B. Los daños como
consecuencia de un
accidente, alteración,
mal uso, abuso o
uso con productos
no aprobados por
KitchenAid.
C. Los costos de
repuestos o de mano
de obra de reparación
del Tostador cuando
haya sido utilizado
fuera del país en
donde fue comprado.
SI ESTE PRODUCTO NO FUNCIONA SEGÚN SE GARANTIZA, EL ÚNICO Y EXCLUSIVO
RECURSO DEL CLIENTE SERÁ LA REPARACIÓN O EL REEMPLAZO SEGÚN LOS TÉRMINOS
Y LAS CONDICIONES DE ESTA GARANTÍA LIMITADA. KITCHENAID Y KITCHENAID
CANADA NO ASUMEN NINGUNA RESPONSABILIDAD POR DAÑOS INCIDENTALES
O CONSIGUIENTES. Esta garantía le otorga derechos legales específicos y es posible
que usted goce de otros derechos que varían de estado en estado o de provincia en
provincia.
34
Page 37

Garantía de reemplazo sin dificultades en
los 50 estados de los Estados Unidos y en el
Distrito de Columbia
Confiamos tanto en que la calidad de
nuestros productos cumple con las
exigentes normas de KitchenAid, que si el
Tostador presentara alguna falla durante
el primer año, le enviaremos un reemplazo
sin cargo idéntico o comparable a su
domicilio y arreglaremos la devolución
del Tostador original. El reemplazo de
su unidad también estará cubierto por
nuestra garantía limitada de un año. Siga
estas instrucciones para recibir este servicio
de calidad.
Si su Tostador KitchenAid
falla durante el primer año, simplemente
llame gratis a nuestro Centro de satisfacción
al cliente KitchenAid al 1-800-541-6390, de
lunes a viernes de 8 a.m. a 8 p.m. (Hora del
Este), o los sábados, de 10 a.m. a 5 p.m.
Proporcione al asesor su dirección completa
para el envío. (No se aceptan números de
casillas postales).
Cuando reciba la unidad de reemplazo de
su Tostador, utilice la caja y los materiales
de embalaje para embalar el Tostador
original. En la caja, escriba su nombre y
dirección en un papel junto con la copia
del comprobante de compra (recibo de
compra, ticket de la tarjeta de crédito, etc.)
®
presentara alguna
Garantía de reemplazo sin
dificultades en Canadá
Confiamos tanto en que la calidad de
nuestros productos cumple con las
exigentes normas de KitchenAid que,
si su Tostador presentara alguna falla
durante el primer año, KitchenAid Canada
lo reemplazará por uno idéntico o
comparable. El reemplazo de su unidad
también estará cubierto por nuestra
garantía limitada de un año. Siga estas
instrucciones para recibir este servicio de
calidad.
Si su Tostador KitchenAid
alguna falla durante el primer año, lleve el
Tostador, o mándelo con envío a cobrar, a
un Centro de servicio técnico KitchenAid
autorizado. En la caja, escriba su nombre
y dirección postal en un papel junto con la
copia el comprobante de compra (recibo
de compra, ticket de la tarjeta de crédito,
etc.) El Tostador de reemplazo se le
entregará de forma prepaga y asegurada.
Si no queda satisfecho con el servicio,
llame de manera gratuita a nuestro Centro
de interacción con el cliente al
1-800-807-6777. O escríbanos a:
Customer Interaction Centre
KitchenAid Canada
1901 Minnesota Court
Mississauga, ON L5N 3A7
35
®
presentara
ESPAÑOL
®
Page 38

Cómo obtener el servicio de
garantía en Puerto Rico
Su Tostador KitchenAid® tiene garantía de
un año a partir de la fecha de compra.
KitchenAid pagará los repuestos y la
mano de obra para corregir defectos en
los materiales y en la mano de obra. El
servicio técnico debe ser provisto por un
Centro de servicio técnico de KitchenAid
autorizado.
Lleve el Tostador o mándelo con envío
asegurado a cobrar a un Centro de
servicio técnico de KitchenAid autorizado.
El Tostador reparado se le entregará de
forma prepaga y asegurada. Si no queda
satisfecho con el servicio, llame de manera
gratuita al 1-800-541-6390 para averiguar
la ubicación del Centro de servicio técnico
más cercano.
Cómo obtener el servicio de garantía una vez
vencida la garantía – Todos los lugares
Antes de llamar al servicio técnico, revise
la sección de Solución de problemas en la
página 33.
Para obtener información sobre el
servicio técnico en los 50 estados
ESPAÑOL
de los Estados Unidos, Distrito de
Columbia y Puerto Rico,
llame de manera gratuita al
1-800-541-6390.
O escriba a:
Customer Satisfaction Center
KitchenAid Portable Appliances
P. O . B ox 218
St. Joseph, MI 49085-0218
O contáctese con un Centro de servicio
técnico autorizado cercano a su domicilio.
Para obtener información sobre el
servicio técnico en Canadá,
llame de manera gratuita al
1-800-807-6777.
O escriba a:
Customer Interaction Centre
KitchenAid Canada
1901 Minnesota Court
Mississauga, ON L5N 3A7
Cómo obtener el servicio técnico
en otros lugares
Consulte su distribuidor de KitchenAid
local o a la tienda donde compró el
Tostador para obtener información sobre
el servicio técnico.
Para obtener información sobre el
servicio técnico en México,
llame de manera gratuita al
01-800-024-17-17
(JV Distribuciones)
O
01-800-902-31-00
(Industrias Birtman)
36
Page 39

Como realizar un pedido de
accesorios y repuestos
Para solicitar accesorios o repuestos
para su Tostador en los 50 estados
de los Estados Unidos, Distrito de
Columbia y Puerto Rico,
llame de manera gratuita al
1-800-541-6390 de lunes a viernes, de
8 a.m. a 8 p.m. (Hora del Este) o los
sábados, de 10 a. m. a 5 p. m.
O escriba a:
Customer Satisfaction Center,
KitchenAid Portable Appliances,
P. O . B ox 218,
St. Joseph, MI 49085-0218
Para solicitar accesorios o repuestos
para su Tostador en Canadá,
llame de manera gratuita al
1-800-807-6777.
O escriba a:
Customer Interaction Centre
KitchenAid Canada
1901 Minnesota Court
Mississauga, ON L5N 3A7
Para solicitar accesorios o repuestos
para su Tostador en México,
llame de manera gratuita al
01-800-024-17-17
(JV Distribuciones)
o al
01-800-902-31-00
(Industrias Birtman)
ESPAÑOL
37
Page 40

®Registered trademark/Marque déposée/Marca registrada KitchenAid, U.S.A.
™ Trademark/Marque de commerce/Marca de comercio KitchenAid, U.S.A.,
KitchenAid Canada licensee in Canada/Emploi licencié par KitchenAid Canada au Canada.
©2005. All rights reserved. Tout droits réservés. Todos los derechos reservados.
(4885dZw1205)
BIEN PENSÉ. BIEN FABRIQUÉ.
®
™
 Loading...