

KitchenAid KHM312WH, KHM312OB Owner's Manual
KHM31, KHM51, KHM61
W10586270C_V2.indd 1 4/27/2018 2:13:09 PM
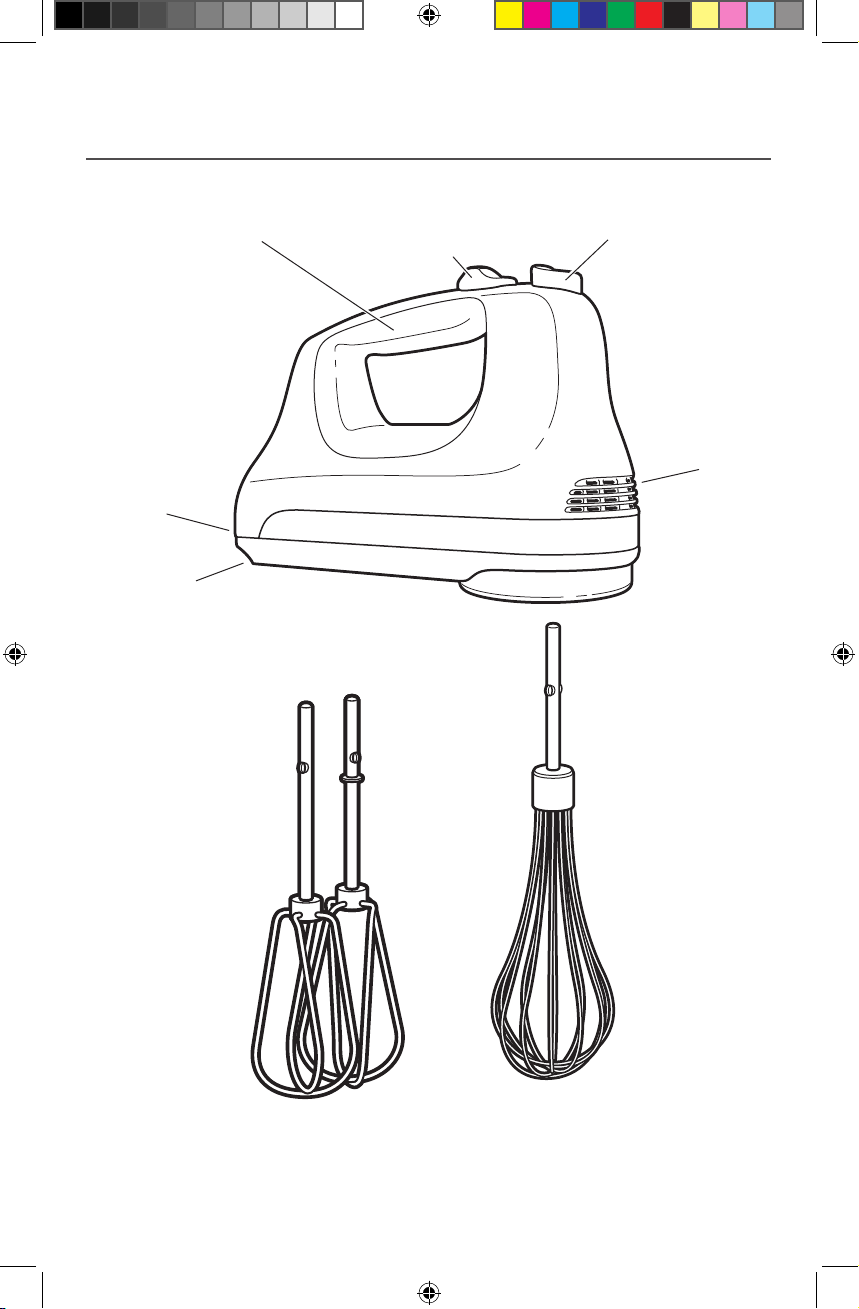
PARTS AND FEATURES
PARTS AND ACCESSORIES
Comfort
designed handle
Non-top
heel rest
Swivel lock
power cord
Easy-to-use
speed control
Oversized beater
ejector button
Air
vents
Stainless Steel Turbo
2 | PARTS AND FEATURES
W10586270C_V2.indd 2 4/27/2018 2:13:10 PM
Beater
TM
accessory
Stainless Steel
12-tine whisk accessory
ENGLISH
PARTS AND FEATURES
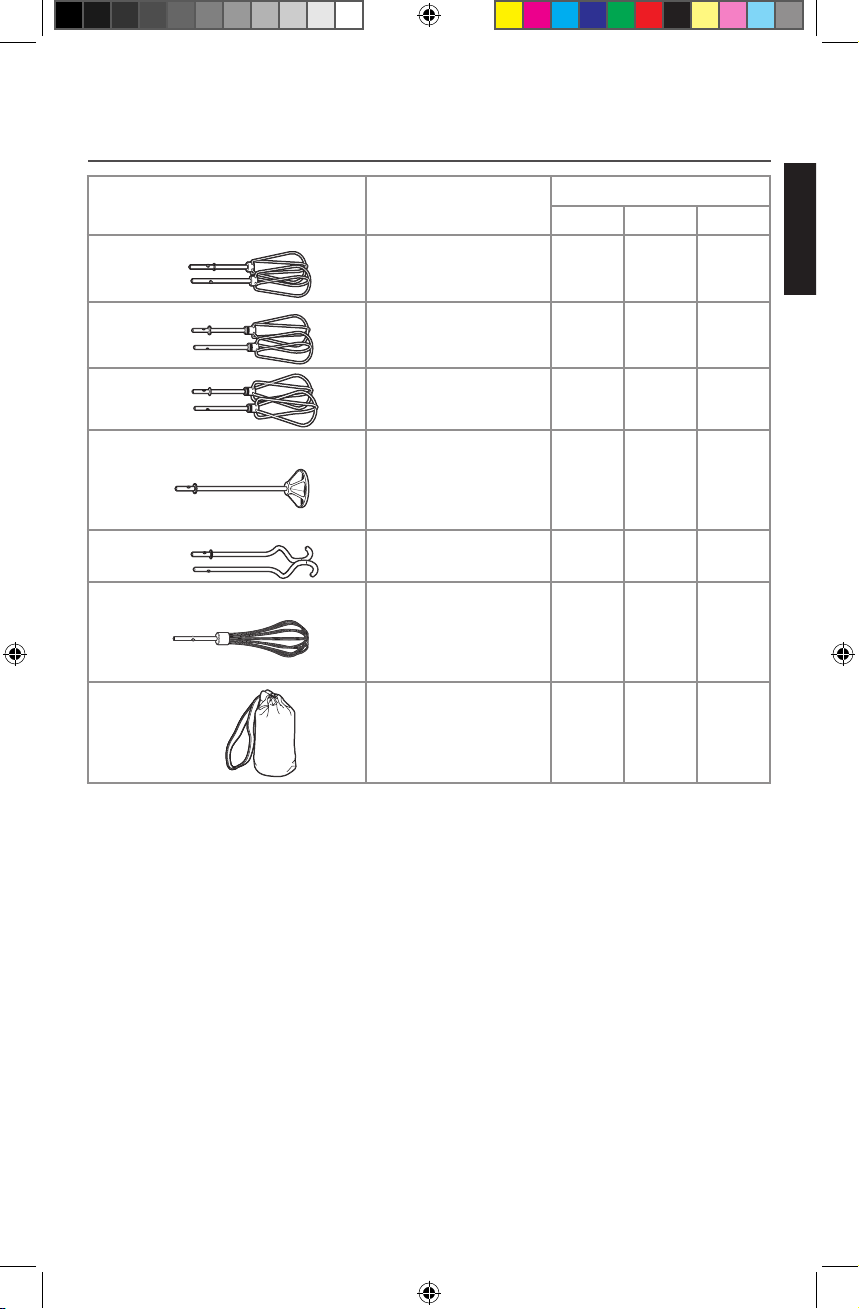
ACCESSORY GUIDE
Accessory Uses
Turbo Beater™ cookie dough, cake
batter
Turbo Beater™ II cookie dough, cake
batter
Artisan™ Beater† cookie dough, cake
batter
Liquid blender rod smoothies, diet drink
mixes,
chocolate milk, iced tea
milkshakes, soups,
sauces
Dough hooks yeast bread doughs
12-tine whisk whipped cream,
puddings
whipped egg whites,
sauces
Storage bag† to store accessories
Included with Model
KHM31 KHM51 KHM61
• • •
•
†Not sold as an accessory.
To order these accessories
In USA: visit www.shopkitchenaid.com, or call 1-800-541-6390.
W10586270C_V2.indd 3 4/27/2018 2:13:11 PM
In Canada: call 1-800-807-6777.
PARTS AND FEATURES | 3
HAND MIXER SAFETY
IMPORTANT SAFEGUARDS
When using electrical appliances, basic safety precautions should always be
followed, including the follwing:
1. Read all instructions.
2. To protect against risk of electrical shock, do not put Hand Mixer in water or
other liquid.
3. This appliance is not intended for use by persons (including children) with
reduced physical, sensory, or mental capabilities, or lack of experience and
knowledge, unless they are closely supervised and instructed concerning use
of the appliance by a person responsible for their safety. Close supervision is
necessary when any appliance is used by or near children. Children should be
supervised to ensure that they do not play with the appliance.
4. Turn the appliance OFF, then unplug from the outlet when not in use, before
assembling or disassembling parts and before cleaning. To unplug, grasp the
plug and pull from the outlet. Never pull from the power cord.
5. Avoid contacting moving parts. Keep hands, hair, clothing, as well as spatulas
and other utensils away from all accessories during operation to reduce the risk
of injury to persons and/or damage to the Hand Mixer.
4 | HAND MIXER SAFETY
W10586270C_V2.indd 4 4/27/2018 2:13:11 PM

ENGLISH
HAND MIXER SAFETY
6. Do not operate the Hand Mixer with a damaged cord or plug, or after the Hand
Mixer malfunctions, or is dropped or damaged in any manner. Return the Hand
Mixer to the nearest Authorized Service Center for examination, repair, or
electrical or mechanical adjustment.
7. The use of attachments not recommended or sold by KitchenAid may cause re,
electric shock, or injury.
8. Do not use the Hand Mixer outdoors.
9. Do not let cord hang over edge of table or counter.
10. Do not let cord contact hot surface, including the stove.
11. Remove any accessories from the Hand Mixer before washing.
SAVE THESE INSTRUCTIONS
This product is designed for household use only.
ELECTRICAL REQUIREMENTS
Volts: 120 A.C. only.
Hertz: 60 Hz
NOTE: This Hand Mixer has a polarized
plug (one blade is wider than the other).
To reduce the risk of electric shock, this
plug will fit in a polarized outlet only one
way. If the plug does not fit fully in the
outlet, reverse the plug. If it still does not
fit, contact a qualified electrician. Do not
modify the plug in any way. This product
is designed for household use only.
HAND MIXER SAFETY | 5
W10586270C_V2.indd 5 4/27/2018 2:13:11 PM
USING THE HAND MIXER
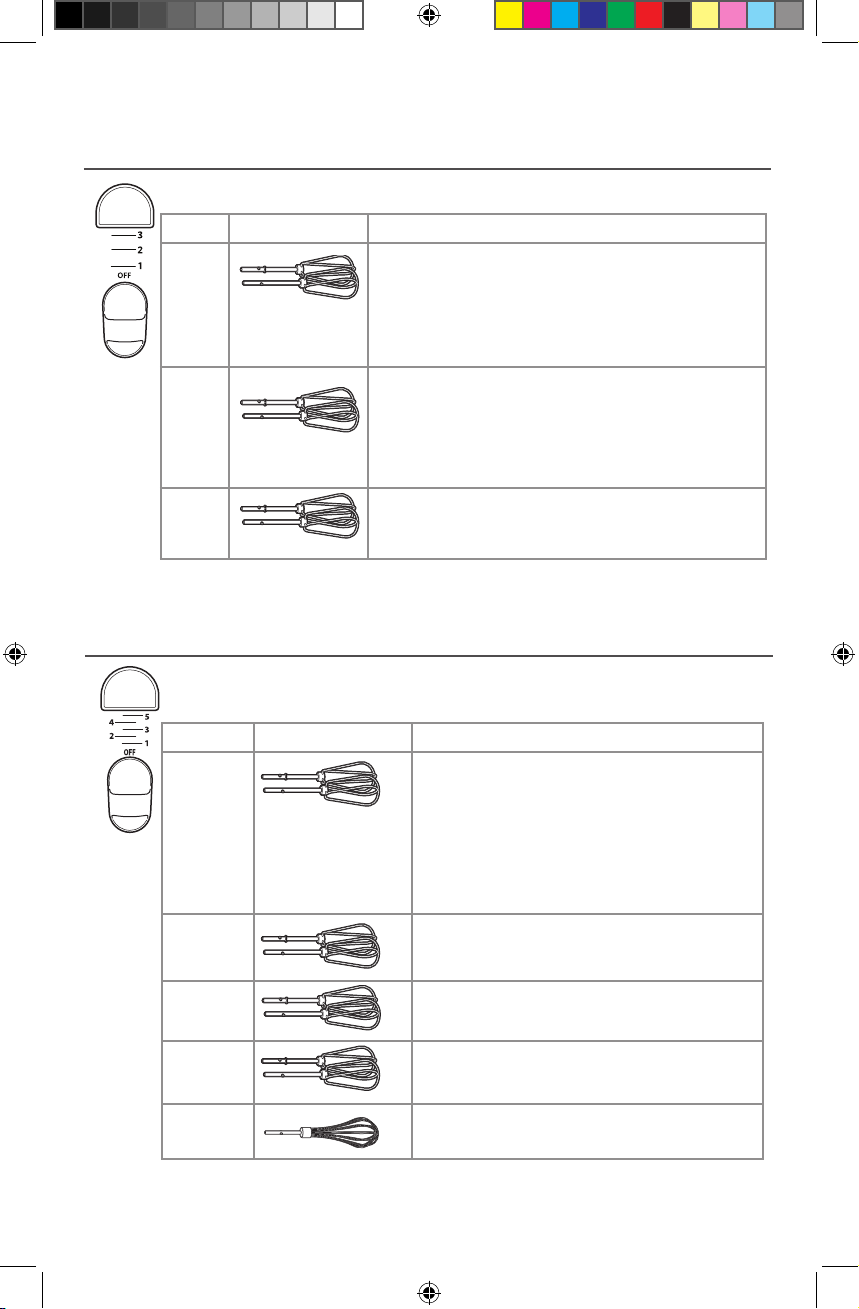
SPEED CONTROL GUIDE: 3-SPEED HAND MIXERS
The 3-speed Hand Mixer should always be set on the lowest speed to start
mixing. Move to higher speeds as needed.
Speed Attachment Description
1 For slow stirring, combining, and starting all
2 Stir batters and gelatin mixtures. Combine heavy
3 Beat egg whites and meringue mixtures. Whip
NOTE: The Turbo Beater™ accessories are not designed for mixing and kneading
bread dough. See “Accessory guide” section to order special dough hooks.
SPEED CONTROL GUIDE: 5-SPEED HAND MIXERS
The 5-speed Hand Mixer should always be set on the lowest speed to start
mixing. Move to higher speeds as needed.
mixing procedures. Use this speed to stir in nuts,
chocolate chips, shredded cheese, onions, olives,
and other chunky ingredients. Mix flour and
other dry ingredients with liquids or other moist
mixtures. Helps aviod ingredient splash out.
mixtures, such as cookie dough. Mix light cream
cheese spreads. Mash potatoes. Combine heavy
cream cheese mixtures. Mash squash. Blend butter
and sugar. Mix muffins, quick breads, cake batters,
and frostings.
heavy cream and mousse mixtures.
Speed Attachment Description
1 For slow stirring, combining, and starting
2 Stir batters and gelatin mixtures. Combine
3 Combine heavy cream cheese mixtures.
4 Blend butter and sugar. Mix muffins, quick
5 Beat egg whites and meringue mixtures.
NOTE: The Turbo Beater™ accessories are not designed for mixing and kneading
bread dough. See “Accessory guide” section to order special dough hooks.
6 | USING THE HAND MIXER
W10586270C_V2.indd 6 4/27/2018 2:13:12 PM
all mixing procedures. Use this speed to
stir in nuts, chocolate chips, shredded
cheese, onions, olives, and other chunky
ingredients. Mix flour and other dry
ingredients with liquids or other moist
mixtures. Helps aviod ingredient splash
out.
heavy mixtures, such as cookie dough. Mix
light cream cheese spreads. Mash potatoes.
Mash squash.
breads, cake batters, and frostings.
Whip heavy cream and mousse mixtures.
ENGLISH
USING THE HAND MIXER
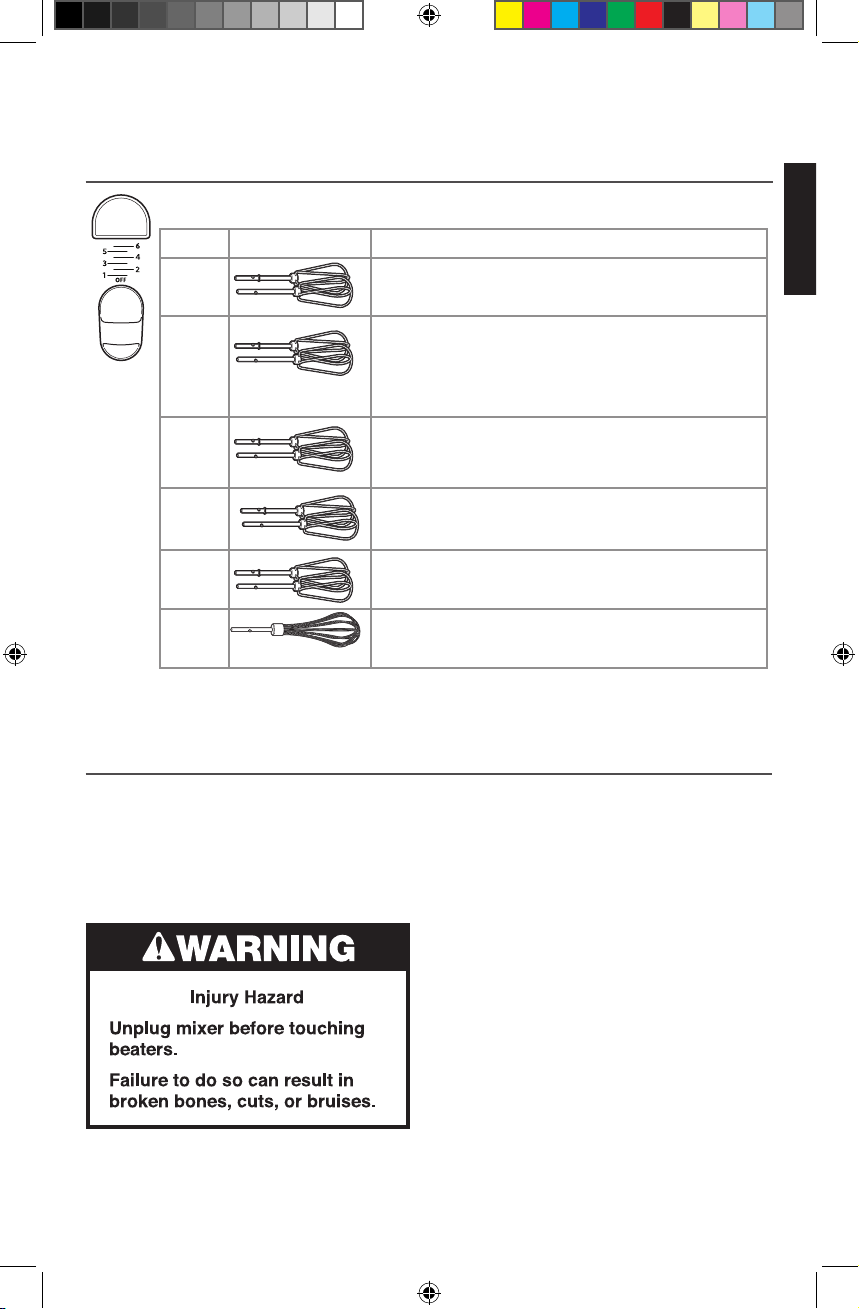
SPEED CONTROL GUIDE: 6-SPEED HAND MIXERS
The 6-speed Hand Mixer should always be set on the lowest speed to start
mixing. Move to higher speeds as needed.
Speed Attachment Description
1
2
3
For slow stirring, combining, and starting all mixing
procedures.
Use this speed to stir in nuts, chocolate chips,
shredded cheese, onions, olives, and other chunky
ingredients. Mix flour and other dry ingredients
with liquids or other moist mixtures. Helps avoid
ingredient splash out.
Stir batters and gelatin mixtures. Combine heavy
mixtures, such as cookie dough. Mix light cream
cheese spreads. Mash potatoes.
4
5
6
NOTE: The Turbo Beater™ accessories are not designed for mixing and kneading
bread dough. See “Accessory guide” section to order special dough hooks.
Combine heavy cream cheese mixtures. Mash
squash.
Blend butter and sugar. Mix muffins, quick breads,
cake batters, and frostings.
Beat egg whites and meringue mixtures. Whip
heavy cream and mousse mixtures.
OPERATING THE SPEED CONTROL
This KitchenAid® Hand Mixer will beat faster and more thoroughly than most other
electric hand mixers. Therefore, the beating time in most recipes must be adjusted to
avoid over beating. Beating time is faster due to larger beater sizes.
To help determine the ideal beating time, observe the batter or dough and beat only
until it has the desired appearance described in your recipe, such as “smooth and
creamy”. To select the best beating speeds, use the “Speed control guide” section.
USING THE HAND MIXER | 7
W10586270C_V2.indd 7 4/27/2018 2:13:12 PM
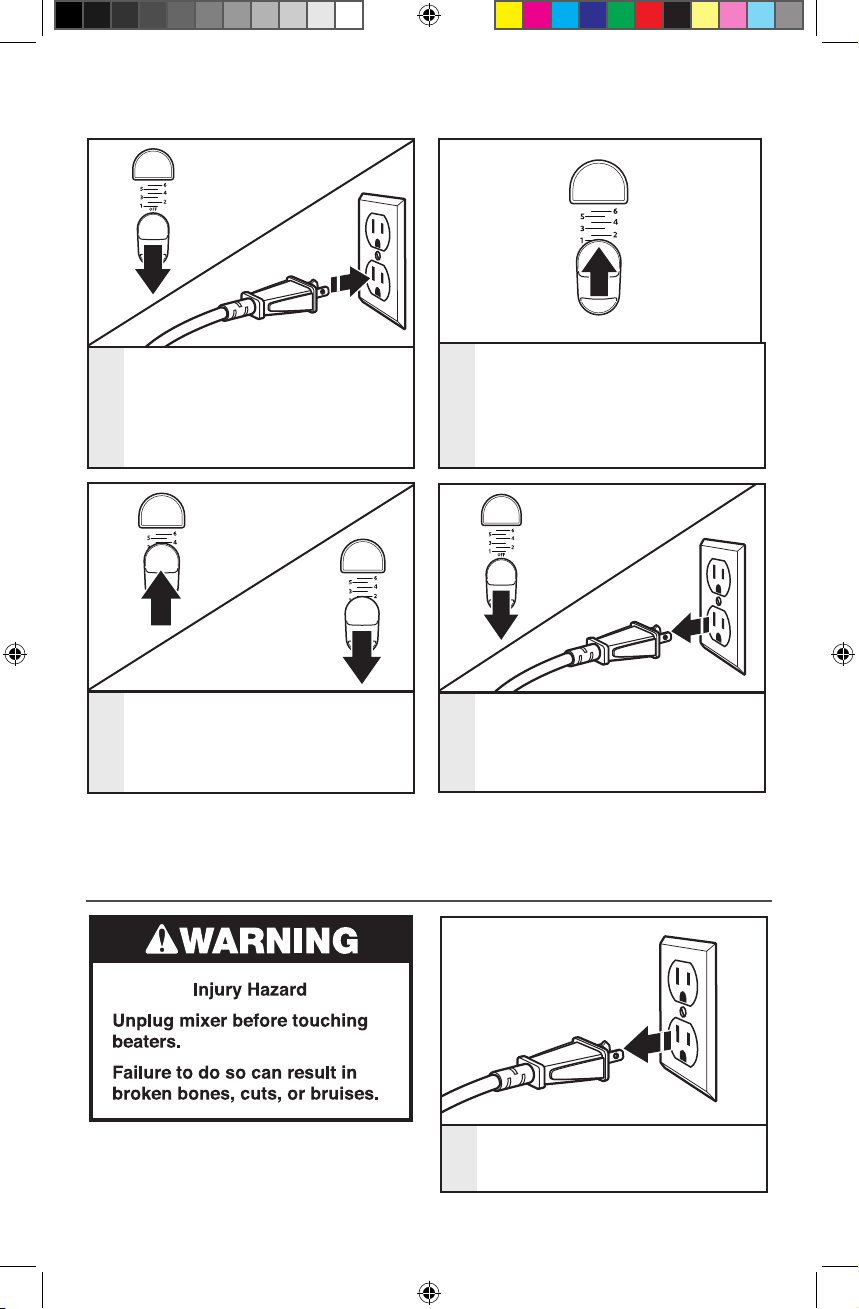
USING THE HAND MIXER
Make sure the Speed Control is
in the “OFF” position by sliding it
backward as far as possible. “OFF”
1
will be visible on the speed control
pad. Then plug the Hand Mixer into
an electrical outlet.
To increase the Hand Mixer speed,
slide the Speed Control forward.
To decrease the Hand Mixer speed,
3
slide the Speed Control backward.
See “Speed control guide” section.
Start mixing at the lowest speed by
sliding the Speed Control forward
to the first position mark, which is
2
Speed 1.
When finished, slide speed control
to “OFF”. Unplug the Hand Mixer
before removing the accessories.
4
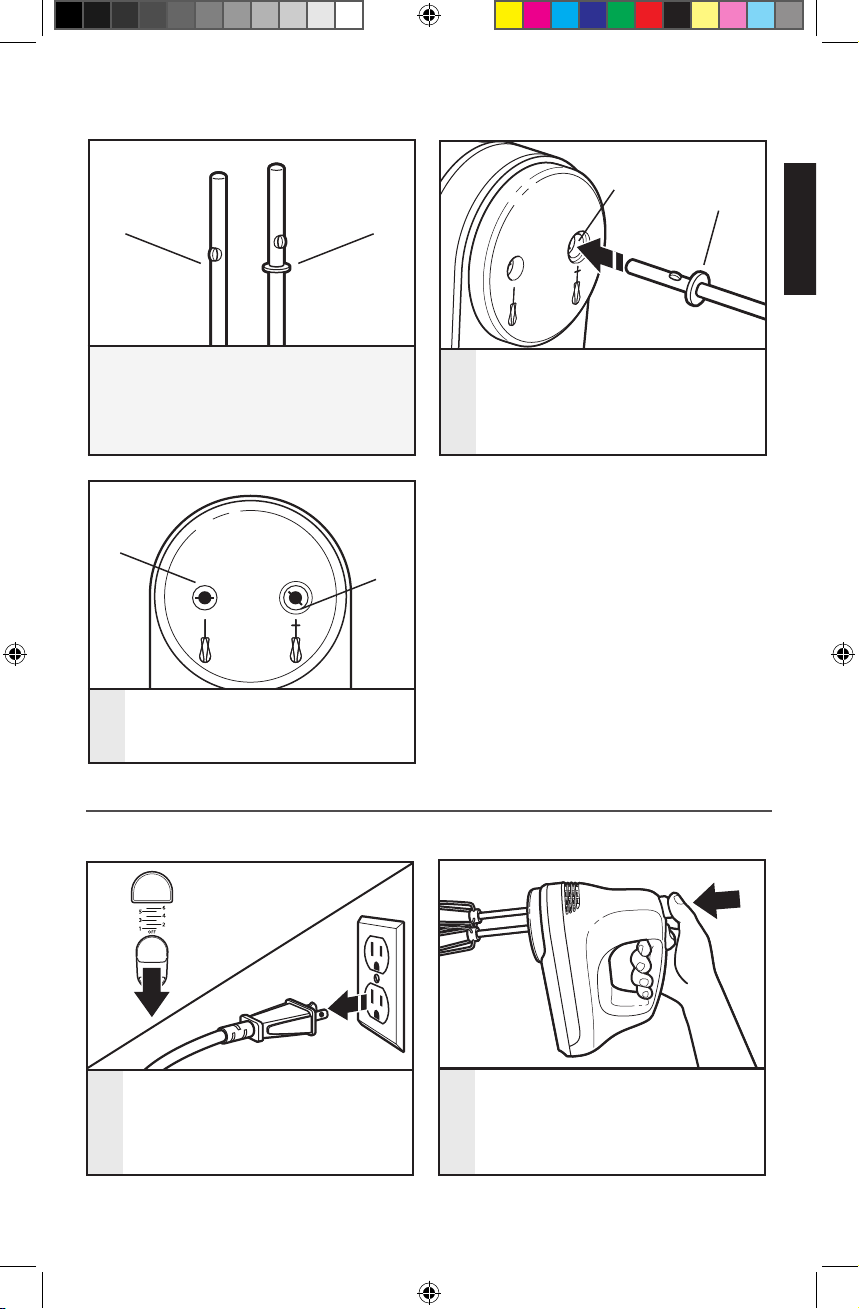
SETTING UP THE HAND MIXER
ATTACHING THE ACCESSORIES
IMPORTANT: Be sure to read and follow
the specific instructions in this manual for
proper use of the Hand Mixer.
8 | SETTING UP THE HAND MIXER
W10586270C_V2.indd 8 4/27/2018 2:13:13 PM
Make sure the Hand Mixer is
unplugged from the electrical
1
outlet.
ENGLISH
SETTING UP THE HAND MIXER
C
Paired accessories (beaters, optional
dough hooks) include one accessory with
a collar (D), and one without (C). Single
accessories come with a collar (D) (liquid
blending rod) or without (C) (whisk).
A
Insert the accessory without a collar
(C) into the smaller opening (A).
3
Align and push to lock into place.
D
B
B
Insert the accessory shaft with the
collar (D) into the larger opening (B)
of the hand mixer. Align the flanges
2
on the shaft with the slots in the
opening. Push to lock into place.
NOTE: An accessory shaft without a collar
may be used in either opening (A or B).
Those with a collar may only be used in the
larger opening (B).
D
REMOVING THE ACCESSORIES
If the Hand Mixer is running, stop
the Hand Mixer by sliding the
Power switch to the “O” (Off)
1
position. Then unplug from the
electrical outlet.
W10586270C_V2.indd 9 4/27/2018 2:13:14 PM
Press the ejector button to release
the accessories from the Hand
Mixer, then remove them.
2
SETTING UP THE HAND MIXER | 9
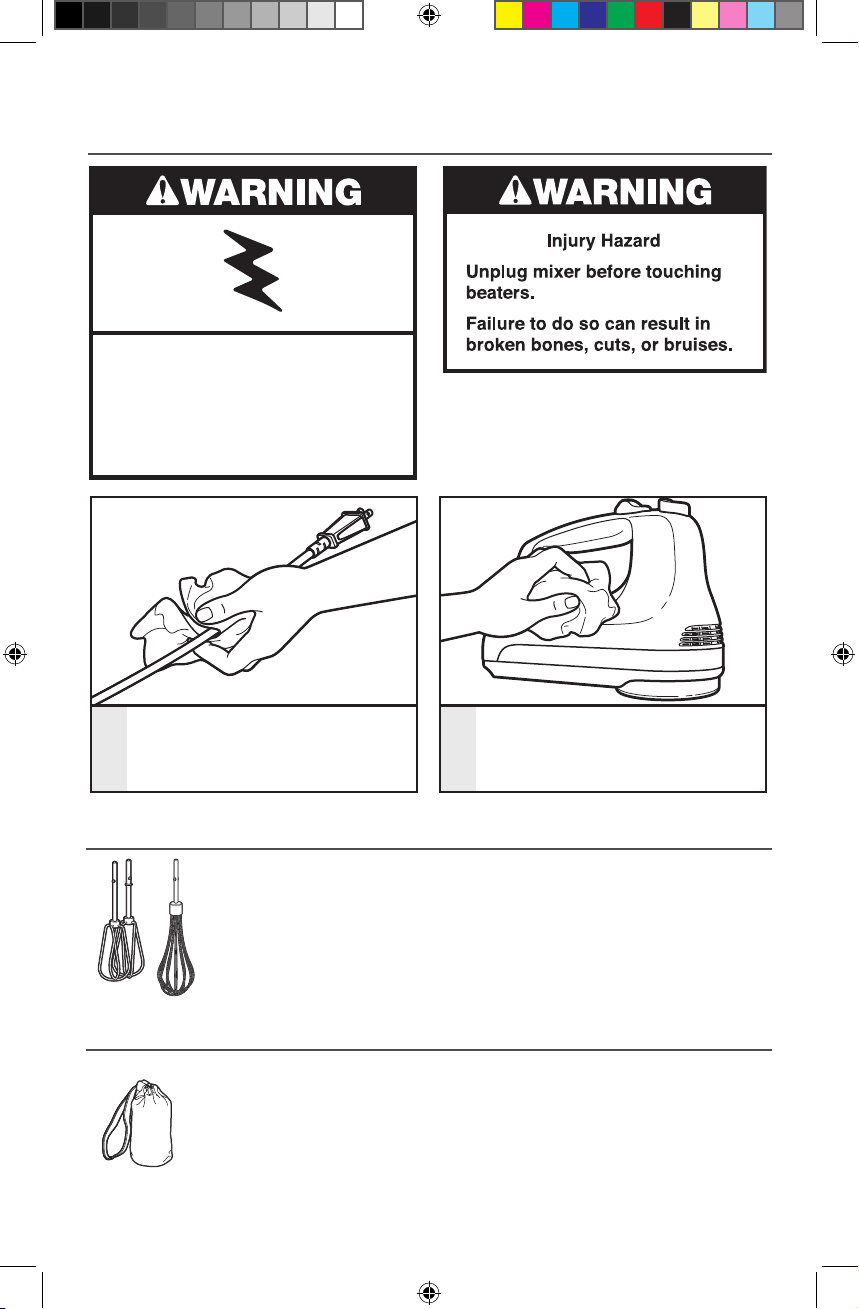
CARE AND CLEANING
CLEANING THE HAND MIXER BODY
Electrical Shock Hazard
Do not put in water.
Doing so can result in death or
electrical shock.
NOTE: Do not immerse Hand Mixer
in water.
Always unplug Hand Mixer before
cleaning. Wipe power cord and
1
cord strap with damp cloth. Dry
with a soft cloth.
Wipe Hand Mixer with a damp
cloth. Dry with a soft cloth.
2
CLEANING THE ACCESSORIES
Always remove beaters
from Hand Mixer before
cleaning. Wash in
dishwasher, or by hand in
warm, soapy water. Rinse
and wipe dry.
CLEANING THE STORAGE BAG
Machine wash warm, tumble
dry low. Or wipe clean with a
warm soapy cloth.
10 | CARE AND CLEANING
W10586270C_V2.indd 10 4/27/2018 2:13:14 PM

ENGLISH
TROUBLESHOOTING
IF HAND MIXER MALFUNCTIONS OR FAILS TO OPERATE
First try the solutions suggested here and possibly avoid the cost of service.
1. Is the Hand Mixer plugged in?
2. Is the fuse in the circuit to the Hand
Mixer in working order? If you have
a circuit breaker box, make sure the
circuit is closed.
3. Try unplugging the Hand Mixer, then
plug it back in.
If the problem cannot be fixed with the
steps provided in this section, then contact
KitchenAid or an Authorized Service
Center.
USA/Puerto Rico: 1-800-541-6390,
Canada: 1-800-807-6777,
Mexico: 01-800-024-17-17
(JV Distribuciones)
or
01-800-902-31-00
(Industrias Birtman)
See the “Warranty” section for additional
details. Do not return the Hand Mixer
to the retailer – they do not provide
service.
TROUBLESHOOTING | 11
W10586270C_V2.indd 11 4/27/2018 2:13:14 PM

WARRANTY AND SERVICE
KitchenAid® Hand Mixer Warranty for the 50 United States,
the District of Columbia, Puerto Rico, and Canada
This warranty extends to the purchaser and any succeeding owner for Hand Mixers operated in the 50 United
States, the District of Columbia, Puerto Rico, and Canada.
Length of Warranty: One Year Full Warranty from date of purchase.
KitchenAid Will Pay Hassle-Free Replacement of your Hand Mixer.
for Your Choice of: See the next page for details on how to arrange for service,
or call the Customer Satisfaction Center toll-free at
1-800-541-6390.
OR
The replacement parts and repair labor costs to correct
defects in materials and workmanship. Service must be
provided by an Authorized KitchenAid Service Center.
KitchenAid Will A. Repairs when the Hand Mixer is used in other than
Not Pay for: normal single family home use.
B. Damage resulting from accident, alteration, misuse
or abuse.
C. Any shipping or handling costs to deliver your Hand
Mixer to an Authorized Service Center.
D. Replacement parts or repair labor costs for Hand
Mixers operated outside the 50 United States,
District of Columbia, Puerto Rico, and Canada.
DISCLAIMER OF IMPLIED WARRANTIES; LIMITATION OF REMEDIES
IMPLIED WARRANTIES, INCLUDING TO THE EXTENT APPLICABLE WARRANTIES OF
MERCHANTABILITY OR FITNESS FOR A PARTICULAR PURPOSE, ARE EXCLUDED TO THE EXTENT
LEGALLY PERMISSIBLE. ANY IMPLIED WARRANTIES THAT MAY BE IMPOSED BY LAW ARE LIMITED
TO ONE YEAR, OR THE SHORTEST PERIOD ALLOWED BY LAW. SOME STATES AND PROVINCES
DO NOT ALLOW LIMITATIONS OR EXCLUSIONS ON HOW LONG AN IMPLIED WARRANTY OF
MERCHANTABILITY OR FITNESS LASTS, SO THE ABOVE LIMITATIONS OR EXCLUSIONS MAY NOT
APPLY TO YOU.
IF THIS PRODUCT FAILS TO WORK AS WARRANTED, CUSTOMER’S SOLE AND EXCLUSIVE REMEDY
SHALL BE REPAIR OR REPLACEMENT ACCORDING TO THE TERMS OF THIS LIMITED WARRANTY.
KITCHENAID AND KITCHENAID CANADA DO NOT ASSUME ANY RESPONSIBILITY FOR INCIDENTAL
OR CONSEQUENTIAL DAMAGES. This warranty gives you specific legal rights and you may also have
other rights which vary from state to state or province to province.
12 | WARRANTY AND SERVICE
W10586270C_V2.indd 12 4/27/2018 2:13:14 PM
 Loading...