

KITCHENAID KHIMS 86500 User Manual

Quick Reference Guide
Cooking gestures are
invisible ingredients.
They turn inspiration
into emotions and
emotions into a
masterpiece.
It’s all about artisanality,
that’s why we take it so
seriously.
Thanks for choosing

Index
EN ����������������������������������������������������������������������������������������������������������������������������������������������page 3

KitchenAid
,
Induction Hob
Quick reference guide
EN
Cooking gestures are
invisible ingredients.
They turn inspiration
into emotions and
emotions into a
masterpiece.
It’s all about artisanality
that’s why we take it so
seriously.
Thanks for choosing
3
Quick Guide
2 3 4 4 478 465 9 10 119
12 13
13
1514 16 17
1
P
Max
18
MinMed
Off
!
THANK YOU FOR BUYING A
KITCHENAID PRODUCT
In order to receive a more complete assistance, please
register your product on www . kitchenaid . eu/ register
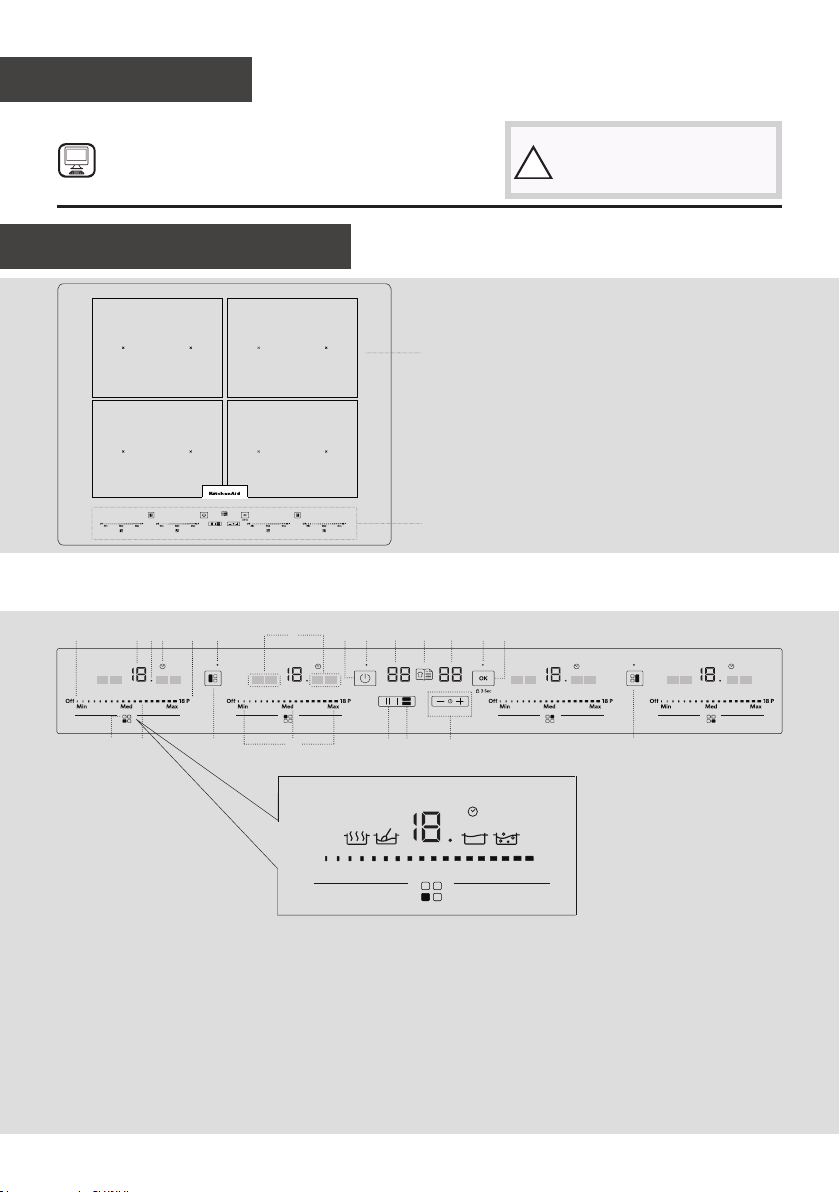
Product description
Control Panel
Before using the appliance
carefully read the Safety
Instruction.
1. Hob
2. Control panel
1
2
Example of cooking zone
1. Identifying the cooking
zone
2. Cooking zone off button
3. Cooking level selected
4. Indicator light - function
active
5. Timer indicator
6. Quick heat button
7. Special function indicators
8. On/ off button
9. Time / functions indicator
10. “Gourmet Library” button
(special functions)
11. OK/ Key lock button - 3
sec
12. Slide touchscreen
13. Vertical exible zone
button
14. Presets and adjustment
buttons
15. Pause button
16. “Dynamic Surface” zone
button
17. Timer
4
NOOK
Accessories
POTS AND PANS
Only use pots and pans made from ferromagnetic material which are suitable for
use with induction hobs� To determine whether a pot is suitable, check for the
symbol (usually stamped on the bottom)� A magnet may be used to check
whether pots are magnetic�
The quality and the structure of the pot base can alter cooking performance�
Some indications for the diameter of the base do not correspond to the actual diameter of the
ferromagnetic surface�
EMPTY POTS OR POTS WITH A THIN BASE
Do not use empty pots or pans when the hob is on�
The hob is equipped with an internal safety system that constantly monitors the temperature, activating
the “automatic off” function where high temperatures are detected� When used with empty pots or
pots with thin bases, the temperature may rise very quickly, and the “automatic off” function may be
triggered with a slight delay, damaging the pot or pan� If this occurs, do not touch anything, and wait
for all components to cool down�
If any error messages appear, call the service centre�
MINIMUM DIAMETER OF POT/PAN BASE FOR THE DIFFERENT COOKING AREAS
centred on 1
point
10 cm 19 cm
2 points
covered
3 points
covered
sh kettle/wire
rack
4 horizontal
points
covered
sh kettle/wire
rack
4 vertical
points
covered
24 cm
First time use
POWER CONTROL
With the “Power control” function, you can set the maximum power level for the hob, based on your
needs or on the capacity of your mains power supply�
Once the maximum power has been set, the hob automatically adjusts the charge distribution to the
different cooking zones and an acoustic signal will sound when the limit is reached�
This setting can be used at any time and will remain until it is changed�
At the time of purchase, the hob is set to the maximum possible power (nL)� The maximum power level
(nL) is printed on the identication plate on the bottom of the hob.
To set the hob power:
Once the appliance is connected to the mains power, the power level can be set within 60 seconds�
• Press and hold down the “+” control for 3 seconds� The display will read �
• Hold down the control until the last power setting is shown�
• Use the “+” and “−” controls to select the required power�
Available power settings are: 2�5 kW – 4�0 kW – 6�0 kW – 7�4 kW�
• Press to conrm.
The selected power will remain in the memory, even in the case of a power outage�
To vary power levels, disconnect the appliance from the mains power for at least 60 seconds, then
reconnect it and repeat the steps above�
In case of error during the setting sequence, the display will show the symbol and an acoustic signal
5
 Loading...