

KITCHENAID KHIAF 10900 Daily Reference Guide
Quick Reference Guide
Cooking gestures are
invisible ingredients.
They turn inspiration
into emotions and
emotions into a
masterpiece.
It’s all about artisanality,
that’s why we take it so
seriously.
Thanks for choosing
1

Index
EN ����������������������������������������������������������������������������������������������������������������������������������������������������������� page 3
KitchenAid
,
Induction
Hob
Quick reference guide
EN
Cooking gestures are
invisible ingredients.
They turn inspiration
into emotions and
emotions into a
masterpiece.
It’s all about artisanality
that’s why we take it so
seriously.
Thanks for choosing
3

1 532 4
6 108 97
Quick Guide
!
NOOK
THANK YOU FOR BUYING A KITCHENAID
PRODUCT
In order to receive a more complete assistance, please
register your product on www . kitchenaid . eu/ register
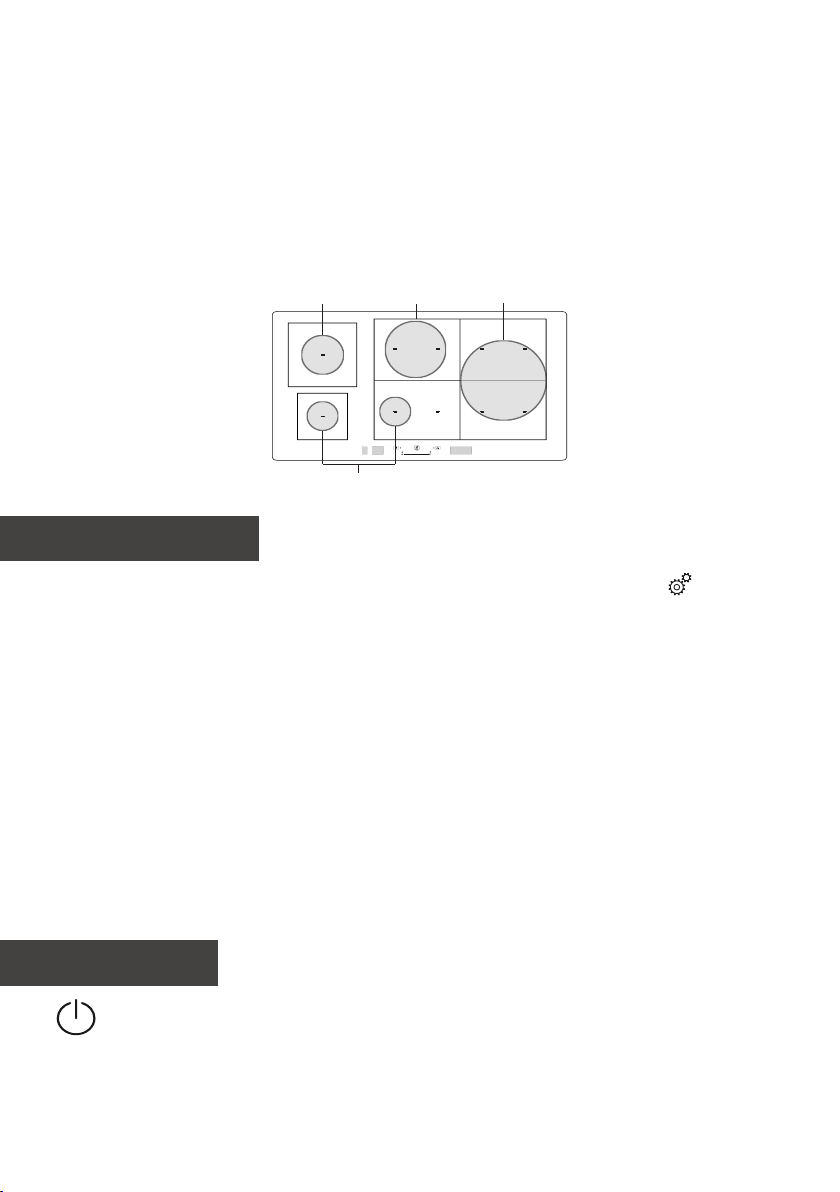
Product description
Control Panel
Before using the appliance
carefully read the Safety
Instruction.
1. Hob
2. Control panel
1
2
1. On/ off button
2. Indicator light - hob
switched on
3. “Gourmet Library” button
(special functions)
4. Indicator light - key lock
active
5. Key lock
6. Cooking zone selection
display
7. Cooking zone off button
8. Slide touchscreen
9. Quick heat button
10. “Manage functions”
display
Accessories
POTS AND PANS
Only use pots and pans made from ferromagnetic material which are suitable for
use with induction hobs� To determine whether a pot is suitable, check for the
symbol (usually stamped on the bottom)� A magnet may be used to check
whether pots are magnetic�
The quality and the structure of the pot base can alter cooking performance�
Some indications for the diameter of the base do not correspond to the actual diameter of the
ferromagnetic surface�
4
EMPTY POTS OR POTS WITH A THIN BASE
120
100
220
240
Do not use empty pots or pans when the hob is on�
The hob is equipped with an internal safety system that constantly monitors the temperature, activating
the “automatic off” function where high temperatures are detected� When used with empty pots or
pots with thin bases, the temperature may rise very quickly, and the “automatic off” function may be
triggered with a slight delay, damaging the pot or pan� If this occurs, do not touch anything, and wait
for all components to cool down�
If any error messages appear, call the service centre�
MINIMUM DIAMETER OF POT/PAN BASE FOR THE DIFFERENT COOKING AREAS
To ensure that the hob functions properly, the pot must cover one or more of the reference points
indicated on the surface of the hob, and must be of a suitable minimum diameter�
First time use
The hob settings can be changed at any time� To change the settings, click on the symbol that
appears on the manage functions display�
From the settings menu, you can:
• select the language;
• adjust the brightness;
• adjust the volume of the sound alerts;
• adjust the button tones;
• adjust the power of the hob;
• restore the factory settings of the hob;
• check the software version installed�
If a power failure occurs, the settings are maintained�
ADJUSTING THE POWER OF THE HOB
The maximum power level of the hob can be set from the settings menu, in accordance with requirements,
or with the timer duration�
The power levels available are: 4�0kW – 6�0kW – 7�4kW – 11kW�
Daily use
To switch the hob on, press the on button for approx� 1 second until the displays light up�
The hob will be automatically deactivated after 10 seconds if you do not select a function within this time�
To switch off, press the same button until the displays switch off� All the cooking zones are deactivated�
The hob turns off if you press any button for more than 10 seconds�
SWITCHING THE HOB ON/OFF
5
 Loading...