

KitchenAid SCS3014LT0, SCS3014LS01, SCS3614LT02, SCS3614LT0, SCS3614LS01 Installation Guide
...
lati °
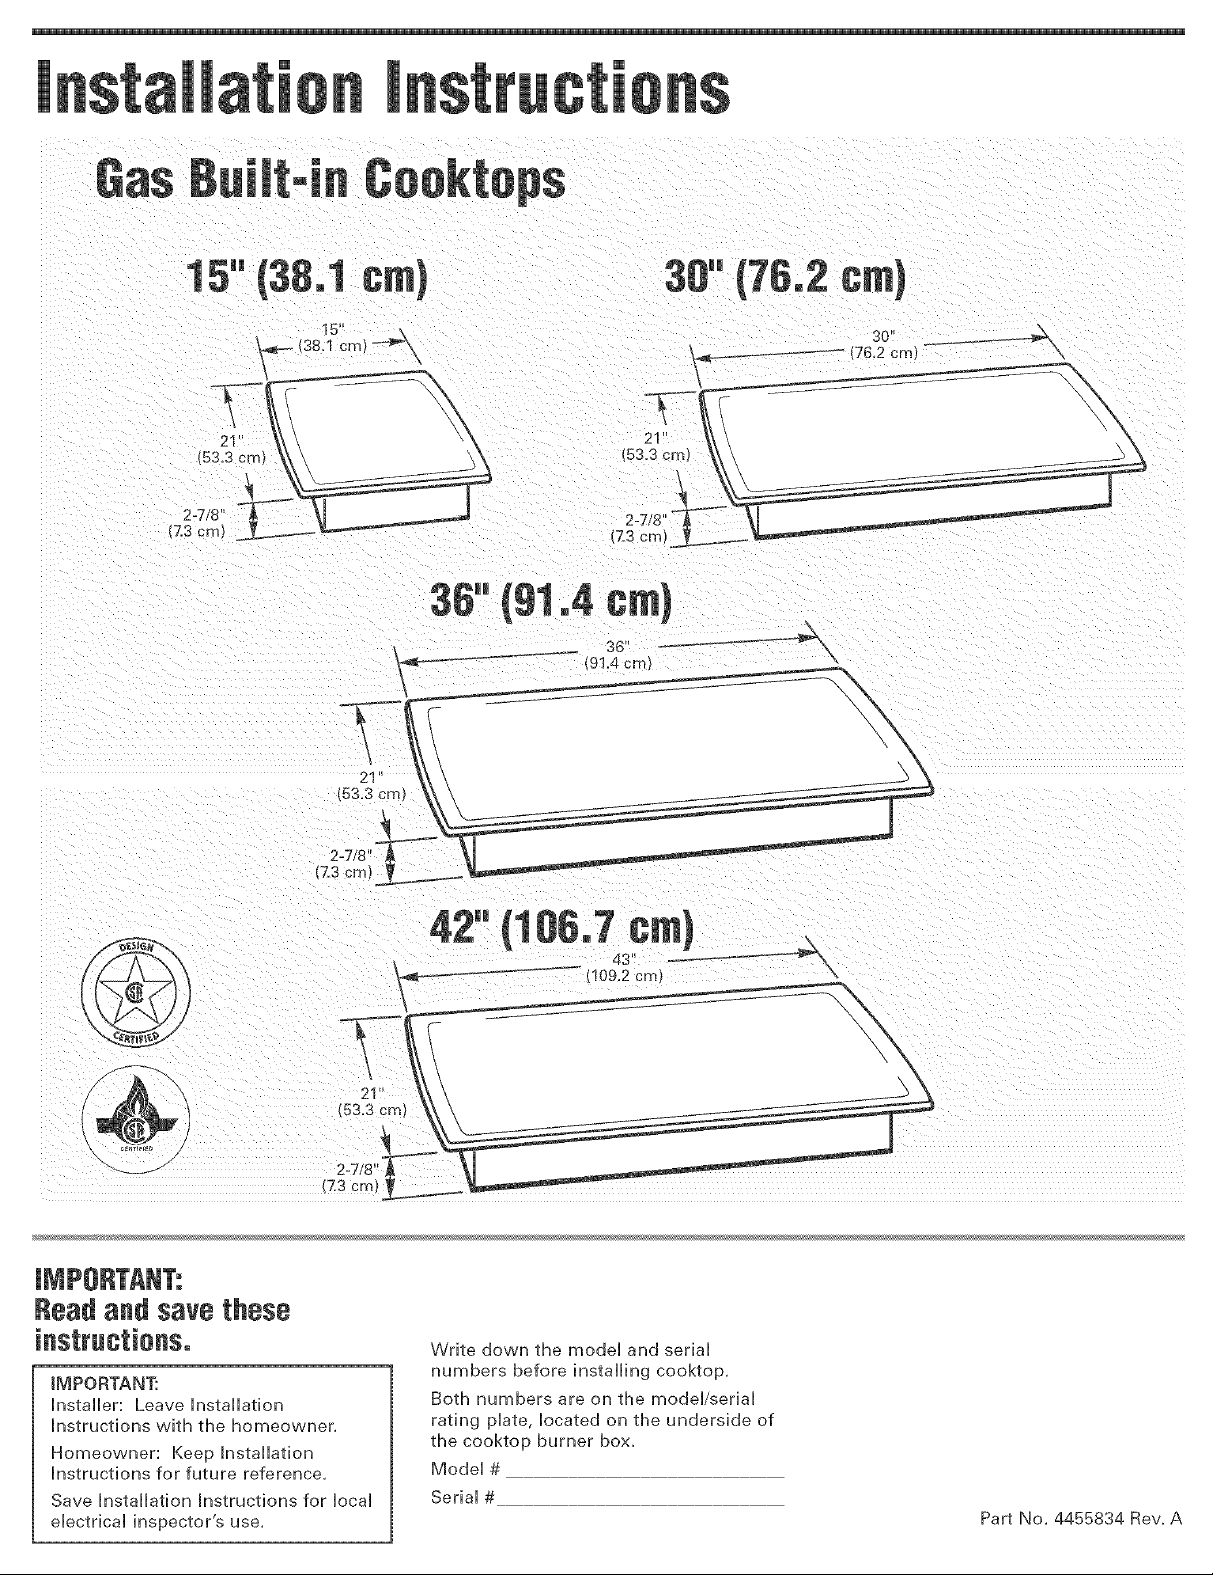
15"
21
53.3 cm)
2 =¸
_7
(7.3 crn_ 1
Z3 cm
Readandsave these
IMPORTANT:
HnstaHHer: Leave HnstaHHafion
Instructions with the homeowner,
Homeowner: Keep [nstaHHafion
Hnstrucfions for future reference,
Save HnstaHHafion instructions for HocaH
eHectrical inspector's use,
21
153.3 c
2-7/8' 4
2=7/8
Write down the model and serial
numbers before installing cooktop,
Both numbers are on the model/serial
rating plate, located on the underside of
the cooktop burner box,
Model #
Serial #
Part No, 4455834 Rew A
Before youstart+++
Your safety and the safety of others are
very important.
We have provided many important
safety messages in this manua[ and on
your appiiance. Aiways read and obey
all[ safety messages.
This is the safety aiert symbol
This symbo[ aierts you to
potenfia[ hazards that can MH[
or hurt you and others.
AH[ safety messages will[ foiiow the
safety aiert symbo[ and either the word
"DANGER" or "WARNHNG".These
words mean:
You can be killed or sedousJy injured
if you don't immediateJy foJJow
instructions.
You can be k+Hed or seriously injured if
you don't follow instructions.
All safety messages will tell you what
the potential hazard is, tell you how to
reduce the chance of injury, and tell
you what can happen if the
instructions are not followed.
iMPORTANT: Observe all governing
codes and ordinances,
WARNING: Jf the
information +nthis manua_
+s not followed exactmy, a
fire or expRos+on may result
causing property damage,
persona_ injury or death.
m Do not store or use
gasom+ne or other
flammabme vapors and
[iqu+ds +n the v+c+nity of
th+s or any other
appliance.
WHAT TO DO +FYOU
SMELL GAS
o Do not try to light any
app[+ance.
o Do not touch any
emectr+ca[ sw+tch.
o Do not use any phone +n
your bu+[d+ng.
o +mmed+atemy caromyour
gas supplier from a
ne+ghbor's phone. Follow
the gas suppHer's
+nstruct+ons.
o +fyou cannot reach your
gas supplier, call the fire
department.
+nstaHat+on and service
must be performed by a
qualified +nstaHer, service
agency or the gas
supplier.
NOTE:This cooktop is manufactured for
use with Natural gas×+.To convert to
hR/Propane gas, see instructions in the
Gas Conversion Kit provided in literature
package_
Proper gas supply connection must be
available. See "Gas supply
requirements;' Page 4_
Proper installation is your responsibility.
Have a qualified technician install this
cooktop.
Make sure you have everything
necessary for correct installation. It is the
responsibility of the installer to comply
with the installation clearances specified
on the model/serial rating plate.The
model/serial rating plate can be found on
the underside of the cooktop burner box.
Check location where cooktop will be
instalbd.The location should be away
from strong draft areas, such as
windows, doors and strong heating vents
or fans.
Do not obstruct flow of combustion and
ventilation air.
All openings in the wall or floor where
the cooktop is to be installed must be
sealed.
When installing a cooktop under existing
cabinets and the installation does not
meet the minimum cabinet clearances,
install a range hood above the cooktop
to avoid burn hazards.
Electrical ground is required. See
"Electrical Requirements;' Pages 4-5.
It is the customer's responsibility:
+ To contact a qualified electrical installer.
+ To assure that electrical installation is
adequate and in conformance with
National Electrical Code, ANSl/NEPA
70 -- latest edition xx, or Canadian
Electrical Code, C22.1 -1982 antiC22.2
No. 01982 (or latest edition) +__+ and aii
local codes and ordinances.
Copies of the standards listed may be
obtained from:
_National Fire Protection Association
One Batterymarch Park
Quincy, Massachusetts 02269
_*_CSA International
8501 East Pleasant Valley Rd.
Cleveland, OH 44131-5575
Assemble the required tools and parts
before starting installation. Read and
follow the instructions provided with any
tools listed here.
+Exception: Model KGCR055 is
manufactured for use with LP gas _,
+ ruler or tape measure
* flat-blade screwdriver
* pencil
* pliers
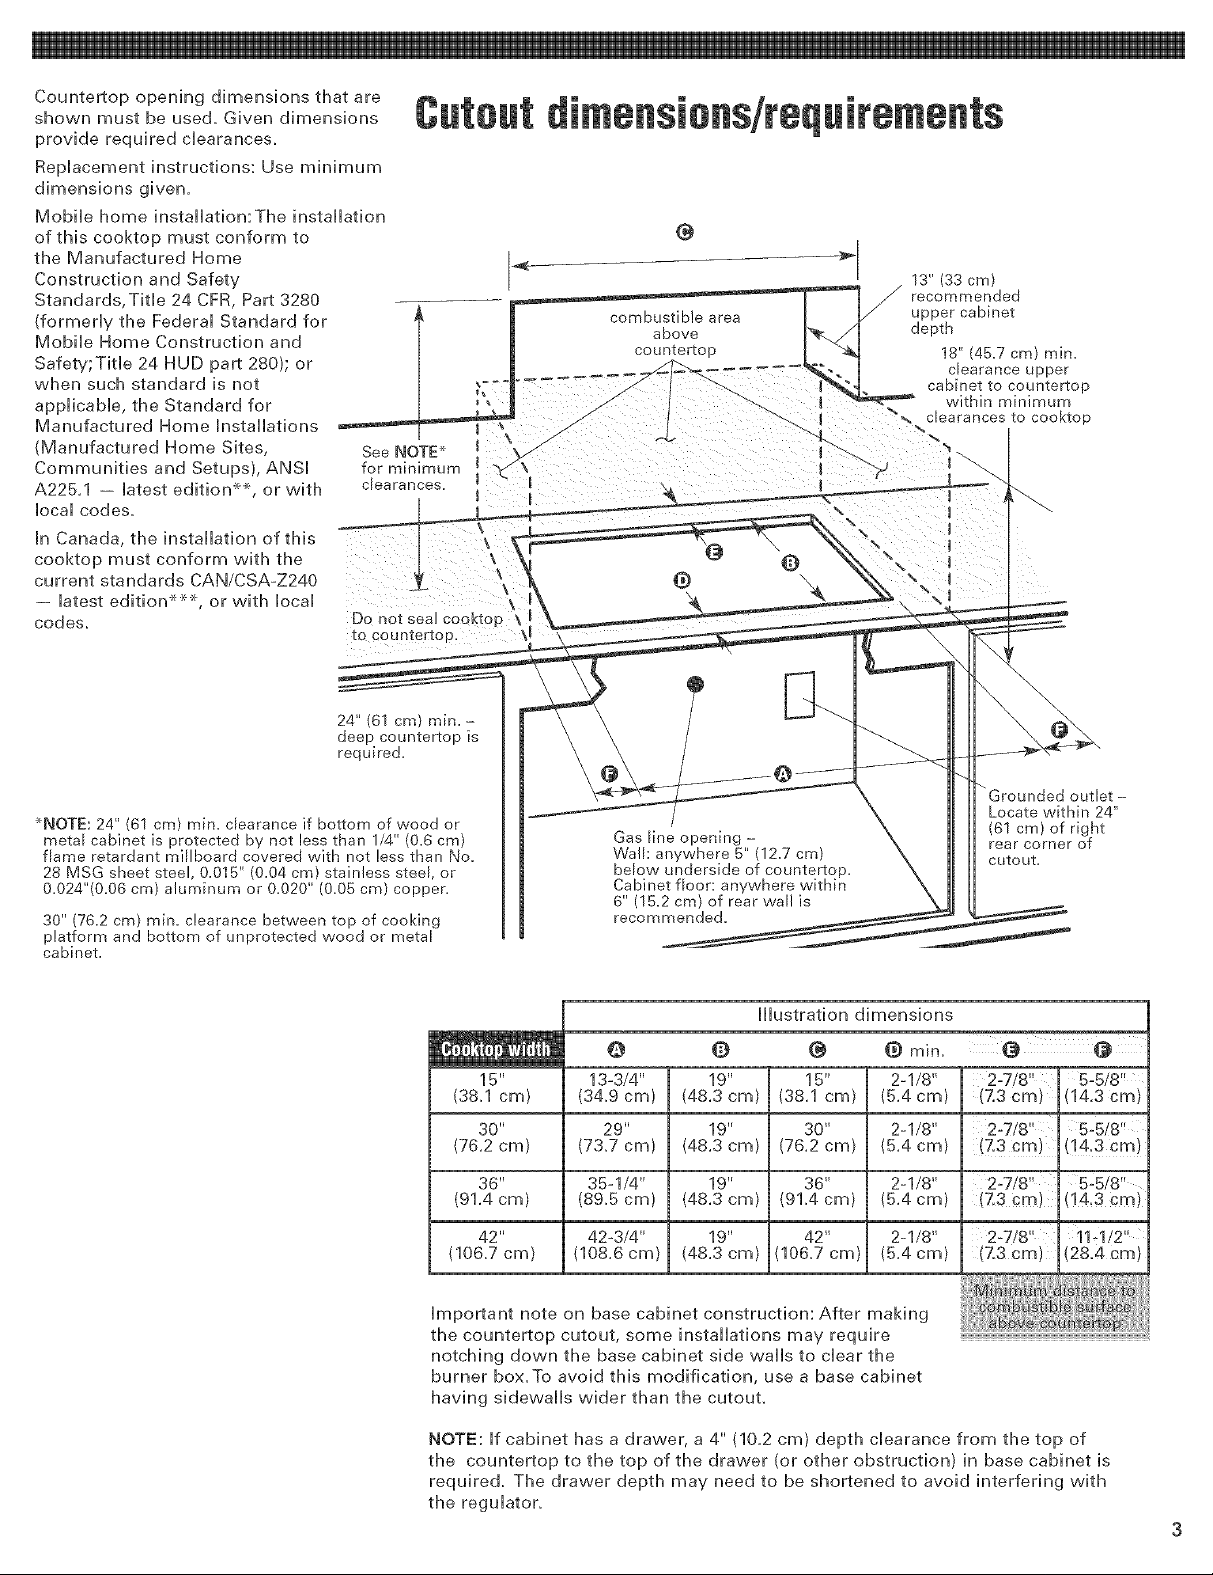
Countertop opening dimensions that are
shown must be used. Given dimensions
provide required clearances.
Replacement instructions: Use minimum
dimensions given.
Mobile home installation:The installation
of this cooktop must conform to
the Manufactured Home
Construction and Safety
Standards, Title 24 CFR, Part 3280
(formerly the Federal Standard for
Mobile Home Construction and
Safety;Title 24 HUD part 280); or
when such standard is not
applicable, the Standard for
Manufactured Home installations
(Manufactured Home Sites,
Communities and Setups}, ANSi
A225,1 latest edition x_, or with
local codes.
In Canada, the installation of this
cooktop must conform with the
current standards CAN/CSA-Z240
-- latest edition ___, or with local
codes.
Do
110 COU
Cuteutdimensiens/requir ents
@
L
See NOTE _ I
for minimum lj
c_earances.
not sea_ cooktop
J
\
O
13" (33 cm)
24" (61 cm) min.-
deep countertop is
required.
_NOTE: 24" (61 cm) rain. clearance if bottom of wood or
metal cabinet is protected by not less than 1/4" (0.6 cm}
flame retardant millboard covered with not less than No.
28 MSG sheet steel, 0.015" (0.04 cm) stainless steeF, or
0.024"(0.06 cm) aluminum or 0.020" (0.05 cm) copper.
30" (76.2 cm} rnin. clearance between top of cooldng
platform and bottom of unprotected wood or metaF
cabinet.
30"
(76,2 cm}
36"
(91,4 cm)
42"
(106.7 cm}
Gas Fine opening -
Walk anywhere 5" (12.7 cm)
below underside of countertop.
Cabinet floor: anywhere within
6" (15.2 cm) of rear wall is
recommended.
illustration dimensions
@ @ @ @ min.
13-3/4" 19" 16" 2-1/8"
(34.9 cm} (48,3 cm) (38,1 cm) (5,4 cm}
29"
(73.7 cm}
35-1/4"
(89.5 cm)
42_3/4"
(108.6 cm)
19"
(48,3 cm}
19"
(48.3 cm}
19"
(48.3 cm}
36"
(91.4 cm}
42"
(106.7 cm)
2-1/8"
(5.4 cm}
2-1/8"
(B.4 cm)
2-1/8"
(B.4 cm)
Locate within 24"
(61 crn) of right
rear corner of
cutout.
2-7/8"
(Z3 cm)
2-7/8"
(7.3 cm)
(7.3 cm)
outlet -
: Z7
5-5/8"
(14.3 cm)
5-518"
(14t3 cm)
5-5/8"
(14,3 cm)
11-1/2'_
(28.4 cm)
important note on base cabinet construction: After making
the countertop cutout, some installations may require
notching down the base cabinet side wails to clear the
burner box.To avoid this modification, use a base cabinet
having sidewalls wider than the cutout.
NOTE: if cabinet has a drawer, a 4" (10,2 cm} depth clearance from the top of
the countertop to the top of the drawer (or other obstruction} in base cabinet is
required. The drawer depth may need to be shortened to avoid interfering with
the regulator.
GaS $U
Explosion Hazard
Use a new AGA or CSA approved gas
supply line.
Install a shutoff valve.
Securely tighten all gas connections.
[f connected to LP, have a qualified
person make sure gas pressure does
not exceed 14" water column.
Examples of a qua[flied person
include:
licensed heating personnel,
authorized gas company
personnel, and
authorized service personnel.
Failure to do so can result in death,
explosion, or fire.
m Provide a gas supply line of 3/4"
rigid pipe to the cooktop location. A
smaller size pipe on long runs may result
in insufficient gas supp[% Pipe+joint
compounds, suitable for use with LR
gas, must be used. With LR gas, piping
or tubing size can be 1/2" minimum. L.R
gas suppliers usually determine the size
and materials used on the system.
E m [f local codes permit, a newAGA
or CSA design-certified, 4% foot (1.2ol.5
m) long, 1/2" or 3/4" I.D., flexible metal
appliance connector is recommended for
connecting this cooktop to the gas supply
line. Do not kink or damage the flexible
connector when moving the cooktop.The
pressure regulator has 3/8" female pipe
threads.You will need to determine the
fittings required, depending on the size of
your gas supply line, flexible metal
connector and shutoff valve.
mLine pressure testing:
Testing above 1/2 psi (3.5 kPa)
(14 inches (3&6 cm)) W.C. (gauge)
The cooktop and its individual shutoff
valve must be disconnected from the gas
supply piping system during any
pressure testing of that system at test
pressures greater than 1/2 psig (3.5kPa).
Testing below 1/2 psi (3.5 kPa) (14 inches
(35.6 cm)) W.C_ (gauge) or lower
The cooktop must be isolated from the
gas supply piping system by closing its
individual manual shutoff valve during
any pressure testing of the gas supply
piping system at test pressures equal to
or less than 1/2 psig (3.5 kPa).
Observe all[ governing codes and
ordinances.
iMPORTANT: Cooktop must be connected
to a reguHated gas suppHy.
Am This instaHHafion must conform
with HocaHcodes and ordinances. Hnthe
absence of [oca[ codes, instaHHations must
conform with American National
Standard, National Fuel Gas Code ANSI
Z223.1 -- latest edition +_ or CAN[ --
B149.1 or 2+__+,
input ratings shown on the
model/serial rating plate are for
elevations up to 2,000 feet (610 m). For
elevations above 2,000 feet (610 m),
ratings are reduced at a rate of 4% for
each 1,000 feet (305 m) above sea level.
C m The cooktop is equipped for use
with natural gas +, It is design-certified by
CSA international for natural and L.R
gases with appropriate conversion.The
model/serial rating plate, located on
the underside of the burner box, has
information on the type of gas that can be
used. If this information does not agree
with the type of gas available, check with
the local gas supplier. See Page 2 for L.R
gas conversion instructions.
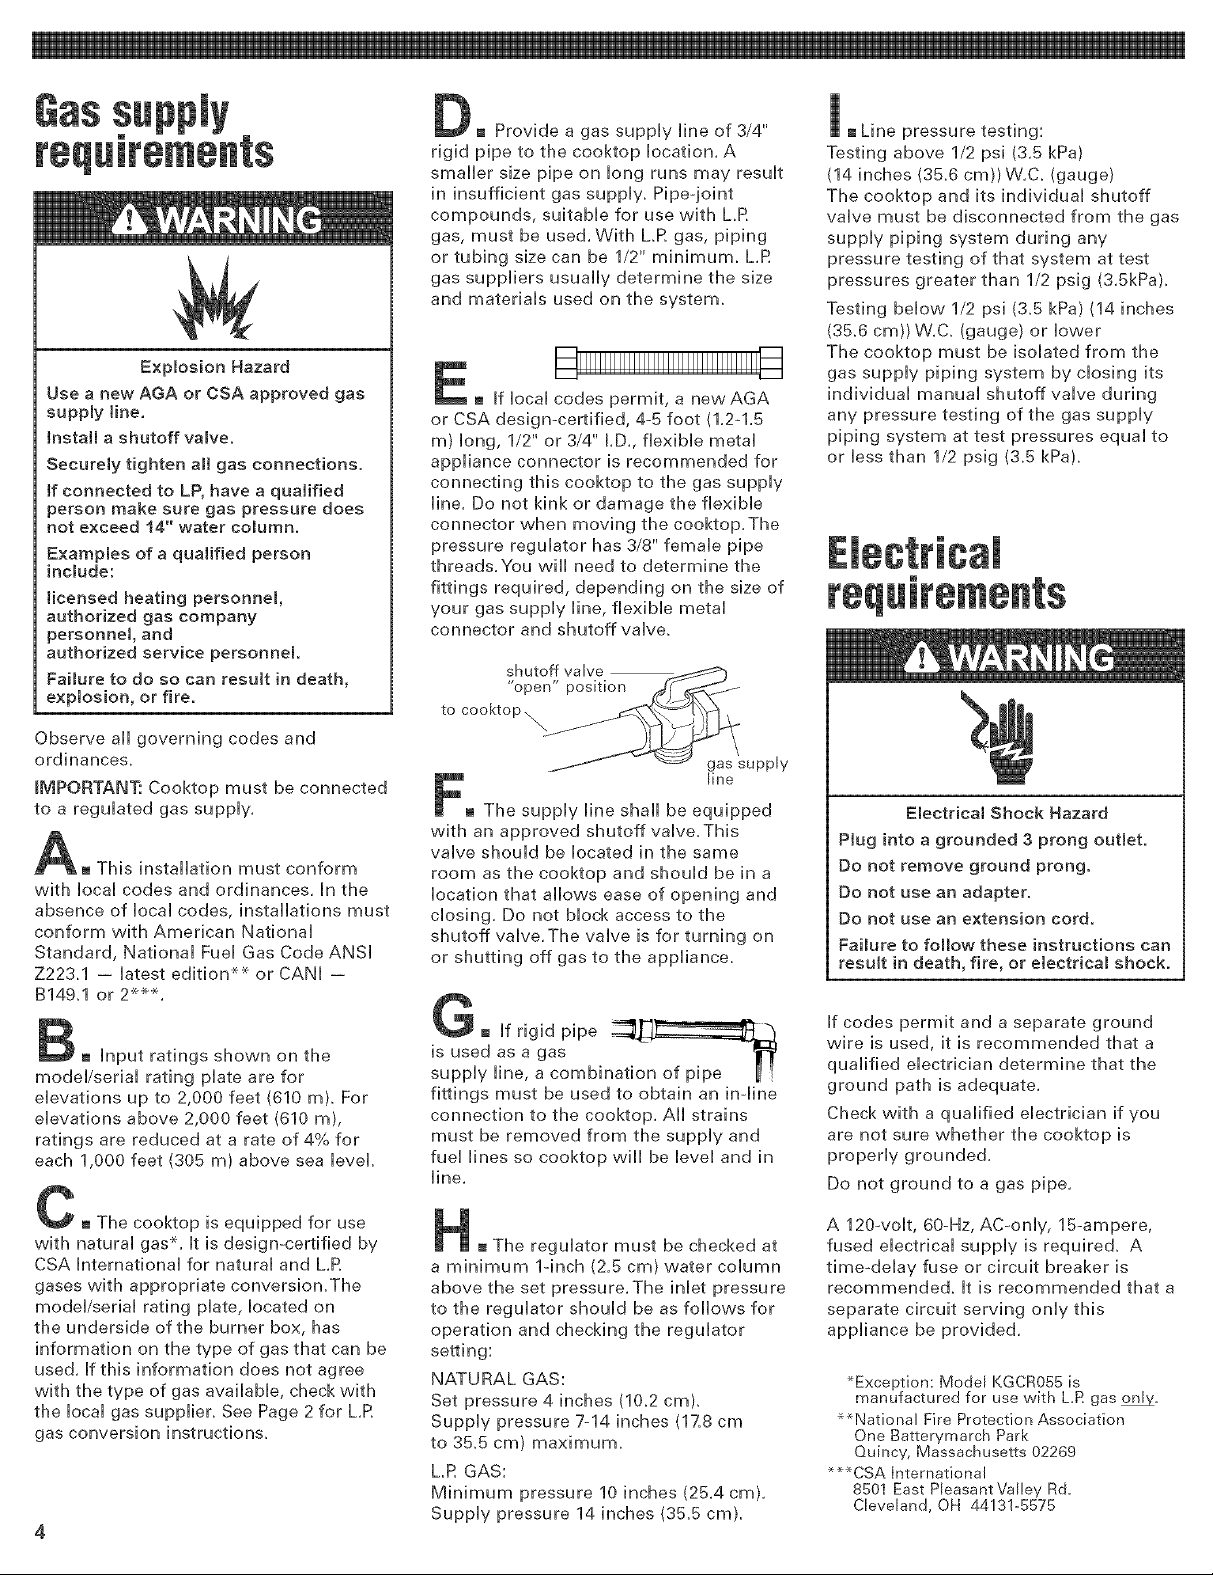
tocooktop
_-_ gas supply
F line
m The supply line shall be equipped
with an approved shutoff valve.This
valve should be located in the same
room as the cooktop and should be in a
location that allows ease of opening and
closing. Do not block access to the
shutoff valve.The valve is for turning on
or shutting off gas to the appliance.
fittings must be used to obtain an in-line
connection to the cooktop. A[[ strains
must be removed from the supply and
fuel lines so cooktop will be level and in
line+
mThe regulator must be checked at
a minimum 1-inch (2.5 cm) water column
above the set pressure.The inlet pressure
to the regulator should be as follows for
operation and checking the regulator
setting:
NATURAL GAS:
Set pressure 4 inches (10.2 cm).
Supply pressure 7-14 inches (17.8 cm
to 3&5 cm) maximum.
LR GAS:
Minimum pressure 10 inches (25.4 cm).
Supply pressure 14 inches (35.5 cm).
Electrical Shock Hazard
Plug into a grounded 3 prong outlet.
Do not remove ground prong.
Do not use an adapter.
Do not use an extension cord.
Failure to foimow these instructions can
result in death, fire, or electrical shock.
If codes permit and a separate ground
wire is used, it is recommended that a
qualified electrician determine that the
ground path is adequate.
Check with a qualified electrician if you
are not sure whether the cooktop is
properly grounded.
Do not ground to a gas pipe.
A 120+volt, 60-Hz, AC+only, 15-ampere,
fused electrical supply is required. A
time-dehy fuse or circuit breaker is
recommended. It is recommended that a
separate circuit serving only this
appliance be provided.
_Exception: Model KGCR055 is
manufactured for use with L.R gas onl!i.
*_National Fire Protection Association
One Batterymarch Park
Quincy, Massachusetts 02269
_**CSA International
8501 East Pleasant Valley Rd+
Cleveland, OH 44131+5575
Ebctronicignitionsystemsoperate
withinwidevoitageiimits,butproper
groundandpoiarityarenecessary.In
additiontocheckingthattheoutlet
provides120-voitpowerandiscorrecdy
grounded,theoutletmustbecheckedby
aqualifiedeiectriciantoseeif itiswired
withcorrectpohrity.Awiringdiagramis
providedintheiiteraturepackage,
iMPORTANT:Thisrangeisequippedwith
aneiectronicignitionsystemthatwHinot
operateif piuggedintoanoutletthatis
notproperlypolarized,
Thisappliance,wheninstalled,mustbe
electricallygroundedinaccordancewith
localcodesor,intheabsenceoflocal
codes,withthecurrentCSAstandard
C22,1,CanadianElectricalCodePart1,
Recommendedgroundmethod
Foryourpersonalsafety,thiscooktop
mustbegrounded.Thiscooktopis
equippedwitha3opronggroundplug.To
minimizepossibleshockhazard,thecord
mustbepluggedintoamating3-prong
ground-typeoutlet,groundedin
accordancewiththeNationalElectrical
CodeANSI/NFPA70latestedition__or
CanadianElectricalCode(CSA)×,x_--
andlocalcodesandordinances,Ifa
matingoutletisnotavailable,itisthe
personalresponsibilityandobligationof
thecustomertohaveaproperly
polarizedandgrounded,3=prongoutlet
installedbyaqualifiedelectrician,
3-prongpolarized
ground-typeoutlet_
"--a_
3-prong
groundplug
power
supplycord
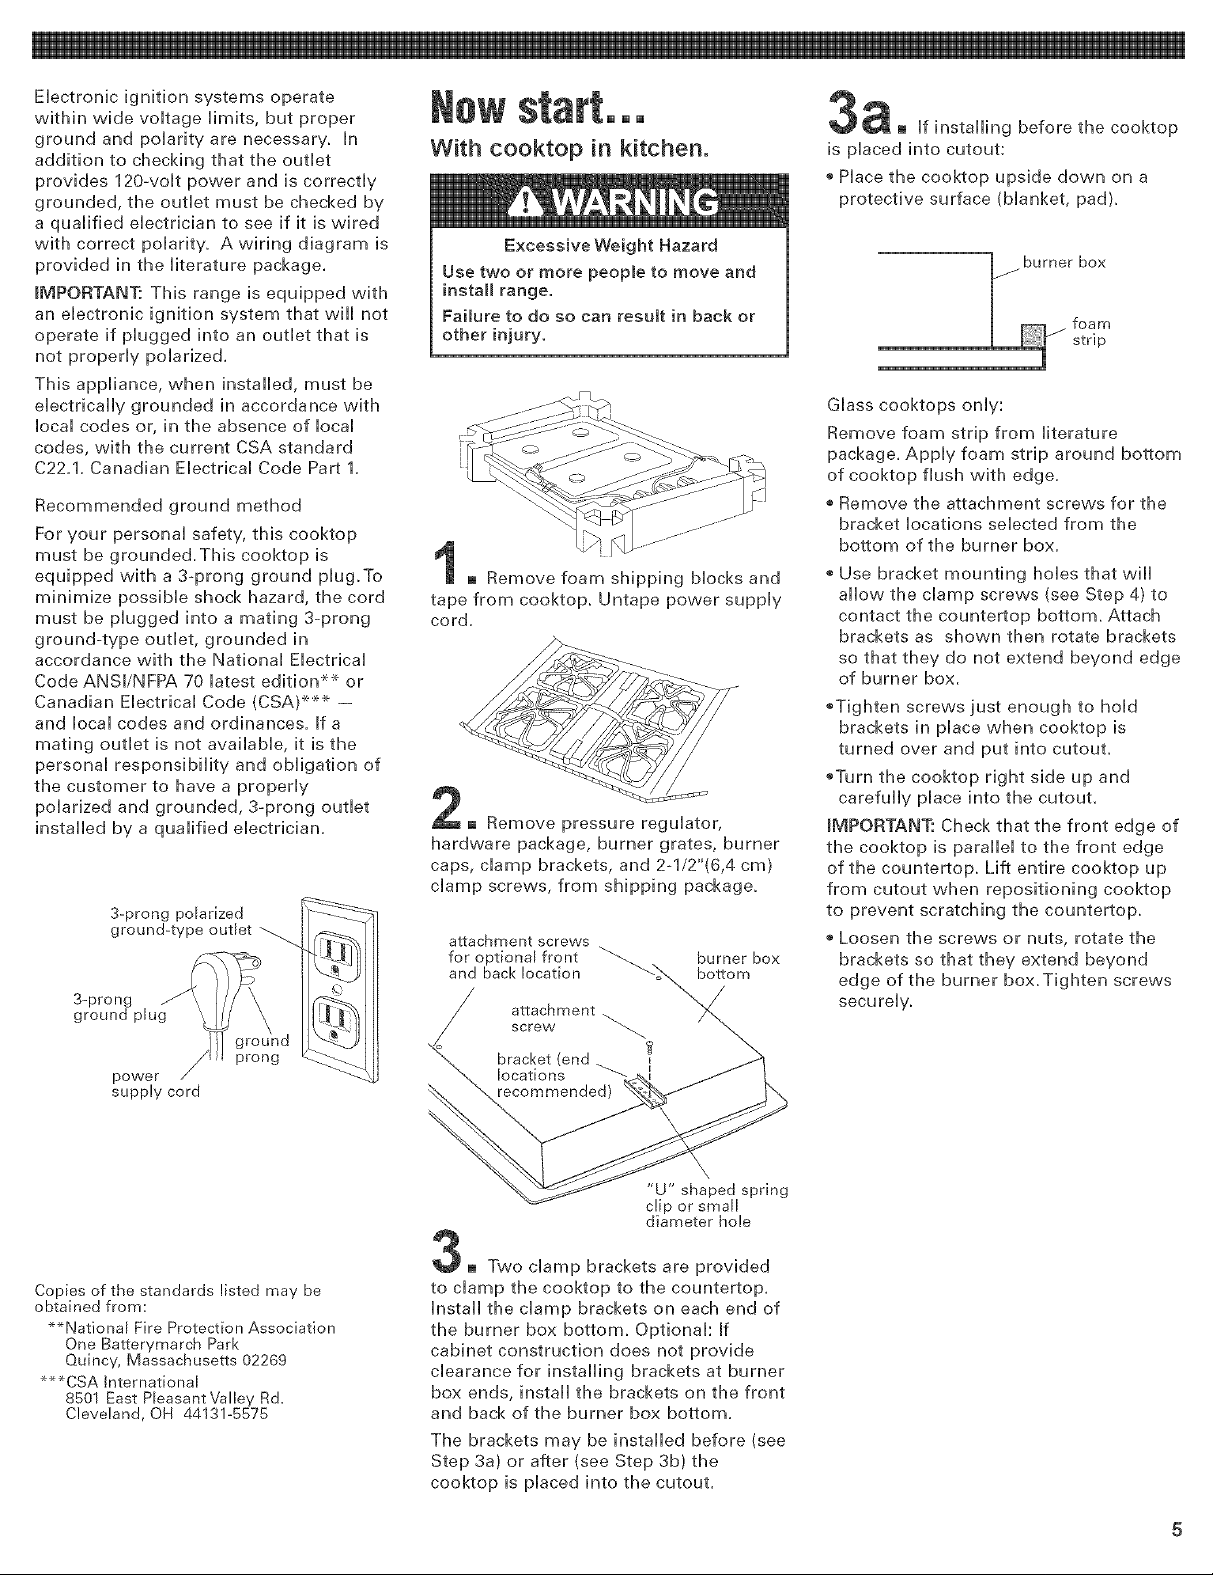
Nowstart,,,
With cooktop in kitchen.
Excessive Weight Hazard
Use two or more people to move and
install range.
Failure to do so can result in back or
other injury.
o Remove foam shipping blocks and
tape from cooktop, Untape power supply
cord,
o Remove pressure regulator,
hardware package, burner grates, burner
caps, clamp brackets, and 2ol/2"(6,4 cm)
clamp screws, from shipping package,
attachment screws
and back location bottom
for optional front _...burner box
attachment
screw
bracket (end _
locations
recommended)
a o if installing before the cooktop
is placed into cutout:
o Place the cooktop upside down on a
protective surface (blanket, pad).
Glass cooktops only:
Remove foam strip from literature
package. Apply foam strip around bottom
of cooktop flush with edge.
o Remove the attachment screws for the
bracket locations selected from the
bottom of the burner box.
o Use bracket mounting holes that will
allow the clamp screws (see Step 4) to
contact the countertop bottom. Attach
brackets as shown then rotate brackets
so that they do not extend beyond edge
of burner box.
oTighten screws just enough to hold
brackets in place when cooktop is
turned over and put into cutout.
oTurn the cooktop right side up and
carefully place into the cutout.
IMPORTANT: Check that the front edge of
the cooktop is parallel to the front edge
of the countertop, Lift entire cooktop up
from cutout when repositioning cooktop
to prevent scratching the countertop,
o Loosen the screws or nuts, rotate the
brackets so that they extend beyond
edge of the burner box,Tighten screws
securely_
Copies of the standards listed may be
obtained from:
_National Fire Protection Association
One Batteryrnarch Park
Quincy, Massachusetts 02269
_*CSA International
8501 East Pleasant \/alley Rd.
Cleveland, OH 44131-5575
"U" shaped spring
clip or small
diameter hole
3o Two clamp brackets are provided
to clamp the cooktop to the countertop,
Install the clamp brackets on each end of
the burner box bottom, Optional: If
cabinet construction does not provide
clearance for installing brackets at burner
box ends, install the brackets on the front
and back of the burner box bottom,
The brackets may be installed before (see
Step 3a) or after (see Step 3b) the
cooktop is placed into the cutout,

If installing after the cooktop
is phced into cutout:
Hace the cooktop upside down on a
protective surface (bianket, pad),
burner box
foam
strip
Giass cooktops oniy:
Remove foam strip from iiterature
package. Appiy foam strip around bottom
of cooktop flush with edge.Turn cooktop
right side up.
o Carefully phce cooktop into cutout.
IMPORTANT: Check that the front edge of
the cooktop is paraHei to the front edge
of the countertop.
Lift entire cooktop up from cutout when
repositioning cooktop to prevent
scratching the countertop.
o Remove the attachment screw, s from
seiected bracket bcations on the
bottom of the burner box.
Attach brackets as shown so that they
are beyond edge of burner box and the
champ screws (see Step 4) will contact
the countertop bottom.Tighten screws
secureiy.
aoces_
m Instal[ the pressure regulator with
the arrow on the reguiator pointing up
toward unit and in a position where you
can reach the access cap.
IMPORTANT: All connections must be
vvrench4ightened. Do not make
connections to the gas regulator too
tight. Making the connection too tight
may crack the regulator and cause a gas
leak. Do not allow the regulator to turn
on the pipe when tightening fittings.
adapter flexible metal 3/8"
shutoff valve
"open" position
to cooktop
\
gas supply
line
m Open shutoff valve in the gas
supply line, Wait a few minutes for gas to
move through the gas line,
9m Leak testing of the appliance shall
be conducted according to the following
instructions:
Test ail connections by brushing on an
approved non-corrosive leak-detection
solution, Bubbles wiii show a leak,
Correct any leak found,
burner
box clamping
bracket
4E Place the 2q/2" (6.4 cm) clamping
screws into the brackets. Use a
screwdriver to tighten the screws against
the countertop. Do not overtighten.
attachment screw
2-1/2" (6.4 cm)
screw
valve compound regulator
All connections must be
wrench4ightened.
6m Assemble flexible metal connector
from the gas supply pipe to the pressure
regulator, You will need to determine the
fittings required, depending on the size
of your gas supply line, flexible metal
connector and shutoff valve,
7m Use pipeojoint compound made for
use with NATURAL and L,R gas, if
flexible metal connector is used, be
certain tubing is not kinked,
E Hug into a grounded
3@rong outlet.
burner cap
ignitor __ burner
electrode "base
m Put burner caps on each burner
base. Place burner grates over burner
bases and caps.

ElectronicIgnitionSystem--
initiallighting
Cooktopburnersuseelectronicigniters
inplaceofstandingpilots.Whenthe
cooktopcontrolknobispushedinand
turnedtothe"LifE" position, the system
creates a spark to light the burner.Thb
sparking continues until the control knob
is turned to the desired setting.
O0
0
<0-/tH
m Check operation of the cooktop
burners. Push in and turn each control
knob to "LifE" position.The flame
should light within 4 seconds. Do not
leave the knob in the "LifE" position
after burner lights.
[f burners do not light properly, turn
control knob to the "OFF" position. Check
that burner cap is in the proper position.
Check that power supply cord is plugged
in and that circuit breaker or house fuse
has not blown. Check that the shutoff
valve is in the "ON" position. Check
operation again. [f a burner does not
light at this point, contact your Whirlpool
dealer for assistance.
co
[_ heck that the circuit breaker is not
tripped or the house fuse blown.
[_ heck that the power supply cord is
plugged into the outlet,
Check that gas valves are turned to
_the "ON" position,
See Use and Care Guide for
_ troubbshooting list,
If yell need
if you have questions about operating,
cleaning or maintaining your cooktop:
Refer to Use and Care Guide.
Caii the Consumer Assistance
Center. Check your Use and Care
Guide for the number to call or call
the dealer from whom you
purchased this appliance.The dealer
is listed in theYellow Pages of your
phone directory under "Appliances
-- Household -- Major -- Service
and RepairS'
Maintain the quality built into your
cooktop by calling an authorized service
company.
To obtain the name and number of the
authorized service company:
3 Contact the dealer from whom you
purchased your cooktop; or
[_] ook in theYellow Pages of your
telephone directory under
"Appliances -- Household --
Major -- Service and Repair;" or
3 Call the Consumer Assistance
Center.The number is listed in your
Use and Care Guide.
When you call, you wiii need:
_The cooktop model number.
_The cooktop serial number.
Both numbers are listed on the
model/serial rating plate located on the
underside of cooktop burner box.
ing and
maintenance
E Push in and turn each control
knob to the "LO" (or simmer) setting.The
"LO" setting of each burner has been
factory set to the lowest setting available
to provide reliable reignition of the
burner. If it does not stay lit on the "LO"
setting, check "LO" setting as follows:
a.Turn control to "L[TE" until burner
ignites.
L Quickly turn knob down to lowest
position.
c. [f burner goes out, readjust valve as
follows:
Remove the surface burner control knob.
Insert a flat-blade screwdriver into the
hollow valve stem and engage the
slotted screw. Flame size can be
increased or decreased by turning the
screw. Adjust flame until you can quickly
turn knob from "LifE" to lowest position
without extinguishing the flame. Flame
should be as small as possible without
going out.
If removing the cooktop is necessary for
cleaning or maintenance, shut off gas
supply. Disconnect the gas and electric
supply. Remove the mounting brackets
on the right and left side of burner box.
After disconnecting the gas and electric
supply, finish removing the unit for
cleaning and servicing. Reinstall in
reverse order and check gas connection
for leaks.

THE POWER CORD ON THIS APPLIANCE IS EQUIPPED WITH A
THREE PRONGED (GROUNDING) PLUG WHICH MATES WITH
STANDARD THREE PRONGED (GROUNDING) WALL RECEPTACLES
THE POWER CORD ON THIS APPLIANCE IS EQUIPPED WITH A
THREE PRONGED (GROUNDING) PLUG WHICH MATES WITH
STANDARD THREE PRONGED (GROUNDING) WALL RECEPTACLES
PLUG
LINE
1/4WIDE BLADE
GROUND
ROUND BLADE
BLK
VALVE
SW_TCHES
SWITCHESON VALVES
ELECTRICCIRCUIT
CLOSEDWREN KNOB IS
ROTATED55 TO 95
COUNTERCLOCKWISE
FROM OFF
Caution: Label all wires prior to disconnection when servicing controls
Wiring errors can cause _mproper and dangerous operation.
Verity proper operation after servicing.
NEUTRAL 5/16
WIDE BLADE
GRNOR GRN/Y Ill, GROUND
120VAC 60 Hz
1 PHASE
15 OR 20 AMP
ELECTRODES
SPARK
MODULE
YEL OR
BRN
PLUG
LINE
1/4WIDE BLADE WIDE BLADE
ROUND BLADE
BLK
CONNECT
.250TERMINALS
BLK
VALVE
SWITCHES
SWN'CBESON VALVES
ELECTRICBIRCUIT
CLOSEDWREN KNOB IS
ROTATED55 TO 95_
COUNTERCLOCKWISE
FROMOFF
Caution: Label all wires prior to disconnection when servicing controls.
Wiring errors can cause improper and dange_)us operation.
Verify proper operatiorl after servicing.
QRN OR GRN/Y I,GROUND
WHT
WHT
IGNITOR
ELECTRODES! .............
120VAC 60 Hz
1 PHASE
15 OR 20 AMP
SPARK
MODULE
YEL OR
BRN
(4) PLACES
THE POWER CORD ON THIS APPLIANCE IS EQUIPPED WITH A
THREE PRONGED (GROUNDING) PLUG WHICH MATES WITH
STANDARD THREE PRONGED (GROUNDING) WALL RECEPTACLES
GROUND--
ROUND BLADE
CONNECT
250TERMINALS
BLK
SWRCBESON VALVES
ELECTRICCIRCUIT
CLOSEDWHEN KNOB IS
ROTATED55 TO 95
COUNTER CLOCKWISE
FROM OFF
Caution: Label all wires prior to disconnection when servicing controls
Wiring errors can cause _mproper and dangerous operation.
Verity proper operation after servicing.
BLK
VALVE
SWITCHES
PLUG
THE POWER CORD ON THIS APPLIANCE IS EQUIPPED WITH A
THREE PRONGED (GROUNDING) PLUG WHICH MATES WITH
STANDARD THREE PRONGED (GROUNDING) WALL RECEPTACLES
120VAC 60 Hz
1 PHASE
.........NEIU]-RAL5/16WDEBLADE 15 OR 20 AMP
I' GROUND
ROUND BLADE
....................WRT
wm _,/l_7_r_...............................................................................SPARK_gK...................................................
--L--_i" MODULE p_L__-__
_-- _ [_
_GNITOR
ELECTRODES
I
i
i
, YEL OR
BRN
, (6) PLACES
COUNTERCLOCKWISE
FROM OFF ELECTRODES _
Caution: Label all wires prior to disconnection when servicing controls.
WMng errors can cause improper and dangerous operation
Verify proper operation after servicirlg
PLUG
BLK
GRN OR QRN/Y I, GROUND
120VAC 60 Hz
1 PHASE
SPARK
L
Part No. 4455834 Rev. A Printed in U.S.A.
(cb2O04Whirlpool Corporation Benton Harbor, Michigan 49022 04/2004

15 po138,1cm)
21 po
(53,3 cm
21
(53.3 cm
2-7/8" =
(73
30 po (76,2 cml
30 DO
',¢_p_ (7&2 cm \
21 pO_\_X_,
53,3 c_)
_ 21 po
2-7/8 po
mMPORTANTo"
Lifeet censerverCeS
IMPORTANT :
Installateur : Remettre les instructions
d'installation au proprietaire,
Proprietaire : Conserver les instructions
d'installation pour utilisation ulterieure
et consultation par I'inspecteur local
des installations 61ectriques,
(53,3 cm)
73 cm)
42
\
Inscrire ci-dessous les numeros de
modele et de serie, avant d'installer la
table de cuisson,
On trouve ces deux numeros sur la
plaque signaletique, situee en-dessous
de la caisse de la table de cuisson,
N ° de modele
N ° de serie
\
Piece N°4455834 Rew A

Avant de commencer,,,
Votre s&curit6 et ceHe des autresest tres
importante.
Nous donnons de nombreux messages
de securit6 importants dans ce manuei,
et sur votre appareH menager. Assurezo
vous de toujours Hire tous ies messages
de securit6 et de vous y conformer.
Voici Hesymbob d'abrte de
secu rita.
Ce symbob d'derte de
sacurit6 vous signab bs dangers
potentieJs de deces et de bJessures
graves a vous et _ d'autres.
Tous Jes messages de sacurit6 suivront
HesymboJe d'derte de sacurit6 et He
mot <<DANGER}> ou <<AVERTHSSEMEN%.
Ces roots signifient :
AVERT_SSEtVlENT : Si
['information pr_sent_e
darts ce manuel n'est pas
strictement respect_e, i_
peut se produire un
incendie ou une expmosion
provoquant des dommages
rnat_rie_s, des bbssures ou
un d_c_s.
m Ne pas entreposer
d'essence ou des
r_cipients de _iquides ou
produits vo_atimes
inflammabmes et Re jamais
utHiser de te_s produits au
voisinage de cet apparei_
ou de tout autre apparei_
Risque possible de d@c_s ou de
bJessure grave si vous ne suivez pas
imm@diatement lea instructions.
m_nager.
QUE FAJRE LORSQU'UNE
ODEUR DE GAZ EST
PERCEPTIBLE :
o Ne pas aHurner ou mettre
Risque possible de d@aes ou de
bJessure grave si vous ne suivez pas Sea
instructions,
Tous bs messages de s&curite vous
diront quell est Hedanger potentiei et
vous disent comment reduire He risque de
bbssure et ce qui peut se produire en cas
de non-respect des instructions.
en marche un appareiL
o Ne toucher aucun
commutateur 6mectrique.
o Ne pas uti_iser un
t_phone darts Vadifice.
o Contacter imm_diatement
_efournisseur de gaz en
iMPORTANT : respecter lea dispositions
et tousies codes et regHements en
vigueur_
uti_isant _e t_phone
d'un voisin. Ex_cuter _es
instructions du
fournisseur de gaz.
o S'imest impossible de
contacter _efournisseur
de gaz, appe_er _es
pomp[ers.
Les operations
d'instaHation et d'entretien
doivent _tre ex_cut_es par
un [nstaHateur quamifi_ ou
_e personne_ qua_ifi_ d'une
entreprise d'entretien ou
du fournisseur de gaz.
Rassembler I'outillage et les pieces necessaires avant de
commencer I'installation. Lire et suivre lea instructions
fournies avec i'un ou I'autre des outiis enumeres ici.
* m&tre-ruban
* tournev[s _ [arne plate
'_ crayon
,_pince
NOTE : Cette table de cuisson est concue pour
Falimentation au gaz naturel _, Pour la
conversion de I'appareil pour I'alimentation au
propane, voir les instructions qui
accompagnent I'ensemble de conversion.
II faut qu'un dispositif de raccordement
adequat a la canaiisation de gaz soit
disponibie. Voir a la page 4, <<Specifications
de la source de gaz,.
C'est au proprietaire qu'incombe la
responsabilite d'une installation correcte.
Faire installer la table de cuisson par un
technicien qualifie.
Verifier que tout le materiel necessaire est
disponible pour une installation correcte. C'est
I'installateur qu'incombe la responsabilite
de respecter les dimensions des degagements
de securite specifiees sur la plaque
signaletique. On trouve la plaque signaletique
en-dessous de la caisse de la table de cuisson.
Inspecter I'emplacement ou ia table de cuisson
sera installee. Jlfaut qu'il soit eloigne des
sources de courants d'air comme fen&tres,
portes et ventilateurs ou bouches de chauffage.
Ne pas entraver la circulation d'air de
ventilation et de combustion.
_, I'emplacement d'installation de la table de
cuisson, toutes les ouvertures dana les tours
ou le plancher doivent &tre obturees.
Lors de I'installation d'une table de cuisson
sous des placards existants, s'il n'est pas
possible de respecter les distances de
separation minimales des placards, installer
une hotte au-dessus de ia table de cuisson
pour eviter lea risques de bralures.
Une liaison electrique _ ia terre eat
necessaire. Voir aux pages 4-5
_Specifications de I'installation electrique_.
C'est a I'utilisateur qu'incombe la
responsabilite :
de contacter un electricien qualifie pour
I'installation.
de veiller ace que I'installation electrique
soit realisee adequatement et en
conformite avec les prescriptions du Code
national des installations electriques,
ANSI/NFPA 70 (edition la plus recentep - ou
du Code canadien des installations
electriquesC22.1-1982etC22.2 N° 01982
(ou edition la plus recente} __ et de tous lea
codes et r&glements Iocaux en vigueur.
_Exception : le modele KGCR055 eat fabrique
pour I'utilisation avec le gaz propane
seulement,
On peut obtenir des exemplaires des normes
mentionnees aux adresses suivantes :
_National Fire Protection Association
One Batterymarch Park
Quincy, Massachusetts 02269
_CSA International
8501 East Pleasant Valley Rd.
Cleveland, OH 44131-8578

Ondoitrespecteriesdimensions
indiqu6espouri'ouverturedecoup6e
#imensiens de l'eavertare d eeaper
dansHepiandetravailLesdimensions
indiqu6esNennentcomptedes
distancesdeseparationnecessaires.
Instaiiafionsderempiacement:Uflfiser
iesdimensionsminimaiesdonnees.
InstaiiaNondansuneresidence
mobile:LqnstaiiaNondecettetamede
cuissondoitrespecteriesprescriptions
deHaNormedeSecurit6des
ResidencesMobiies(Manufactured
L
HomeConstructionandSafety
Standards,Titre24CFR,Partie3280}-
(anciennementFederaiStandardfor
Voir NOTE _ oour
es distances
minimales.
MobiieHomeConstructionandSafety;
Titre24HUDpartie280);oubien
iorsquecettenormen'estpas
appiicabie,i'instaiiationdoitsatisfaire
iesprescriptionsdeHanormeANSI
A225.1- derniereedition_
(ManufacturedHomeinstaiiations-
ManufacturedHomeSites,
Ne pas sceiler la \
table de cuisson _..
au compl:oi r.
CommunitiesandSetups)oudetout
codeiocaienvigueur.
AuCanadai'instaiiationdecettetame
decuissondoitsatisfaireies
prescriptionsdeHapiusr¢eedition
Profondeur
minimum de 24
po (61 cm} pour
le comptoir.
deHanormeCAN/CSAZ240,oudetout
codeiocaienvigueurJ__
*NOTE:D6gagementdes_parationd'au
moins24po(61cm)silefondduplacardde
bois ou rn&tallique est prot&g& par une plaque de mat&riau ignifug6
d'au moins 1/4 po (0,6 cm) recouverte d'une t61e d'acier de calibre
28 MSG, d'acier inoxydable de 0,015 po (0,04 cm), d'alurninium de
0,024 po (0,06 crn), ou de cuivre de 0,020 po (0,05 cm).
Distance de s6paration minimale de 30 po (76,2 cm) entre le
sommet de la plate-forrne de cuisson et le fond d'un placard de
bois ou m_tallique non prot_g&.
_,_ (_ recornmand@e
w
\
Profondeur
13 po (33 cm)
@
\
Ouverture pour la canalisation de gaz-
Dans le tour : n'importe oQ &
5 po (12,7 crn) au-dessous de la face
inf@rieure du comptoir. Dans le plancher
du placard : n'importe oQ _ rnoins de
6 po (15,2 crn) du tour arri&re
(recommandation).
@
iiiustrations - Dimensions
Prise de courant
la terre -
plac6e _ moins
de 24 po (61
cm) de I'angle
arri&re droit de
I'ouverture
d6coupSe.
15 po
(38,1 cm)
30 po
(76,2 crn)
36 po
(91,4 cm)
42 po 42-3/4 po 19 po 42 po 2-1/8 po
(106,7 cm) (108,6 crn) (48,3 cm) (106,7 cm) (5,4 cm)
Apres le decoupage de I'ouverture dans le plan de travail,
il peut &tre necessaire d'entailler les parois laterales du
placard pour permettre le passage de la bo_te des brQleurs.
Pour eviter cette modification, il faut que la profondeur du
placard soit superieure a la largeur de I'ouverture
decoup6e dans le plan de travail.
NOTE : Si le placard comporte un tiroir, on doit respecter une distance de
separation de 4 po (10,2 cm) entre la table de cuisson et le sommet du tiroir (ou de
toute autre obstruction) dans le placard inferieur. II peut 6tre necessaire de reduire
la profondeur du tiroir pour qu'il n'y ait pas d'interference avec le detendeur.
13-3/4 po
(34,9 cm)
29 po
(73,7 cm)
35-1/4 po
(89,5 cm)
19 po
(48,3 cm)
19 po
(48,3 crn)
19 po
(48,3 cm)
15 po
(38,1 cm)
30 po
(76,2 cm)
36 po
(91,4 cm)
2-1/8 po
(5,4 cm)
2-1/8 po
(5,4 cm)
2-1/8 po
(5,4 cm)
(7,3 cm)
2:7/8Po
7,3 cm
2-7/8 po
7,3 cm) I
5_5/8 po
(14,3 Crn)
s-s/8P;
(14,3 cm)
5-s/8PO
(14,3 Crn)
11-1/2 po
(28,4 Cm)

a sourcede 9az
Risque d'expJosion
Utiliser une canal[sation de gaz neuve,
homologuee par AGA
ou CSA.
installer un robinet d'arr_t,
Setter refinement toutes lea
connex[ons de Ja canaJ[sation de gaz.
Dana Je cas de I'aJ[mentation au
propane, demander a un teahn[c[en
qualif[e de verifier que ta pression ne
depaase pas 14 po (coJonne d'eau}.
Technicien quaiifie : teahnicien tiaenc[e
en chauffage, personne_ d'un
etablisaement agree de service des
apparei_s a gaz, ou personnel du
fournisseur de gaz.
Le non respect de tea instructions
peut entrainer un d@c_s, une explosion
ou un incendie.
Respecter les dispositions de tousles
codes et rSglements en vigueur.
iMPORTANT : La table de cuisson doit
&tre raccordee a une source de gaz
pression regul6e.
Am L_instdlation doit satisfaire les
prescriptions des codes et regbments
Iocaux. En I'absence d'un code local,
Hnstalhtion doit satisfaire bs prescriptions
de Is plus recente edition de la norme
ANSI Z223.1 -(National Fuel Gas Code) __
ou CANI B149.1 ou 2×___.
B m La capacite thermique indiquee sur
la plaque signdetique correspond _ une
altitude d'utilisation inferieure _ 2 000 pi
(610 m}. Pour une altitude d'utilisation
superieure _ 2 000 pi (610 m), la capacite
thermique est reduite de 4 % pour chaque
tranche d'dtitude de 1 go0 pi (305 m} au_
dessus du niveau de lamer.
C m La table de cuisson est 6quipee
pour I'alimentation au gaz naturel_. La
conception du produit est homologuee par
*Exception : le rnod&le KGCR055 est fabriqu6
pour I'utilisation avec le gaz propane
seulement.
CSA International pour I'alimentation au
gaz naturel ou au propane, avec utilisation
des accessoires de conversion appropries.
On trouve sur la plaque signaletique situee
sur la face inferieure de la caisse
I'indication du type de gaz a utiliser. Si le
type de gaz _ utiliser ne correspond pas au
type de gaz disponible, consulter le
fournisseur de gaz Iocal. Voir _ la page 2
les instructions concernant la conversion
pour I'alimentation au propane.
m hstaller une canalisation de gaz
rigide de 3/4 po jusqu'a I'emplacement de la
table de cuisson. L_emploi d'une canalisation
trop Iongue ou de diametre trop petit peut
reduire excessivement le debit de gaz. On
doit appliquer sur les raccords un compose
d'etancheite compatible avec le propane.
Dans le cas de I'aiimentation au propane, le
diametre de la canalisation doit &tre d'au
moins 1/2 po. Les fournisseurs de propane
indiquent habituellement la taille et la
nature des materiaux a utiiiser iors de ia
realisation du systeme.
E m Si le code local le permet, ii est
recommande de raccorder I'appareil a la
canalisation d'arrivee de gaz au moyen d'un
conduit metallique flexible (homologation
AGA ou CSA) de 4 a 5 pi (1,2ol,5 m), de
diametre interne de 1/2 ou 3/4 po. Veillez a ne
pas deformer ou endommager le conduit
flexible Iors des manipulations de la table de
cuisson. Le detendeur comporte un filetage
femelle de 3/8 po. II sera necessaire de
determiner le type de raccord necessaire,
selon la taille de la canalisation d'arrivee de
gazet les caracteristiques du conduit
metallique flexible et du robinet d'arr&t,
position
d'ouverture
table de cuisson
Robinet d'arr_t :_
d'arriv6e de
F gaz
m La canalisation d'arrivee de gaz doit
comporter un robinet d'arr&t homologue. Ce
robinet doit 6tre installe dans la m6me piece
que la table de cuisson, _ un emplacement
facilement accessible pour ouverture/
fermeture. Ne pas entraver I'acces au robinet
d'arr&t; ce robinet est utilise pour etablir/
interrompre I'alimentation en gaz de I'appareil.
G meSt[ _a Csa_tul[sat: ° t udy_
on doit utiliser une combinaison de
raccords pour realiser le raccordement a la
table de cuisson. On doit veiller ace que la
canalisation n'exerce aucun effort sur
I'appareil, afin que Is table de cuisson soit
d'aplomb et bien alignee.
m On doit effectuer un contr61e du
detendeur sous une pression d'au moins 1
po (2,5 am} (colonne d'eau} au-dessus de la
pression de reglage. Pour I'utilisation de
I'appareil et le contr61e du reglage du
detendeur, la pression d'alimentation doit
correspondre aux indications ci_dessous :
GAZ NATUREL :
Pression de reglage : 4 po (10,2 am}.
Pression d'alimentation : 7-14 po
(17,8 cm _ 35,5 am} maximum.
PROPANE :
Pression minimum : 10 po (25,4 cm}.
Pression d'alimentation : 14 po (35,5 am).
m Test de la pression d'alimentation :
Test a une pression superieure a 1/2
Ib/po2 (3,5 kPa -14 po / 35,6 cm colonne
d'eau, pression relative}. Lors de tout test
du syst_me {tune pression de test
superieure a 1/2 Ib/po2 rel. (3,5 kPa)
I'appareil et son robinet d'arr6t individuel
doivent 6tre deconnectes de la
canalisation d'arrivee de gaz.
Test a une pression de 1/2 Ib/po2 (3,5 kPa
14 po/35,6 cm colonne d'eau, pression
relative/ou moins.
Lors de tout test de la canalisation
d'arrivee de gaz a une pression egale ou
inferieure a fi 1/2 Ib/po2 reL (3,5 kPa} la
table de cuisson doit 8tre isolee de la
canalisation d'arrivee de gaz par fermeture
du robinet d'arr6t manuel
Specifications de
l'installatien
Risque de choc eJectrique
Brancher la fiche sur _ne prise de
courant a 3 a_v@oJes, reJiee 8 _aterre.
_e pas arracher Ja broche de _iaison &
la terre.
Ne pas utHiaer un adaptateur.
Le _on respect de ces i_atructions
peut e_trai_er accident morteJ,
i_cendie ou choc eJeattique.
On peut obtenir des exemplaires des normes
mentionnees aux adresses suivantes :
_National Fire Protection Association
One Batterymarch Park
Quincy, Massachusetts 02269
_CSA international
8B01 East Pleasant Valley Rd.
Cleveland, OH 44131-5575

Siunconducteurdistinctdeliaisonala
terreest ufiNs& Iorsque le code local le
permet, on recommande qu'un
electricien quaNfie verifie que la liaison
la terre est adequate.
En cas dqncerfitude quanta la quaNte de
la liaison _ la terre de Vappareil,
consulter un electricien quaNfie.
Ne pas uNNser une canaNsaNon de gaz
pour la liaison _ la terre.
Eappareil doit 6tre aNmente par un circuit
120ovolts, 60-Hz, CA seubment, 15
amperes. Lecircuitdoit_treprot6gepar
un fusible temporise ou un disjoncteur.
On recommande que Vappareil soit
aNmente par un circuit independant, qui
n'aNmente que cet appareil.
La tolerance sur la tension d'aNmentation
du syst&me d'aNumage 61ectronique est
large, mais il faut que la polarit6 soit
correcte et qu'il y ait une bonne liaison
la terre. En plus de verifier que la prise
de courant est correctement reNee a la
terre et qu'eNe fournit une tension de 120
volts, un ebctricien quaNfie devrait
verifier que la pohrite est correcte. Un
schema de c_blage est fourni dab les
documents qui accompagnent Vappareil.
IMPORTANT : Cette cuisiniere est
6quipee d'un systeme d'aNumage
61ectronique qui ne fonctionnera pas si
eNe est branchee sur une prise qui n'est
pas bien pohrisee.
Apres VinstaNation, cet appareil doit 6tre
61ectriquement reNe _ la terre
conformement aux prescriptions du code
local, ou en Vabsence de code local,
conformement aux prescriptions de
V6dition en vigueur de la norme CSA
C22.1, Code canadien des installations
61ectriques, Partie 1.
Methode recommandee de liaison a la
terre
Pour la securit6 de tousles utiNsateurs,
cette table de cuisson doit &tre reNee a la
terre. Cette table de cuisson est equip6e
d'une fiche de branchement a 3 broches,
pour liaison & la terre. Pour minimiser le
risque de choc electrique, on doit
brancher le cordon d'aNmentation sur
une prise de courant de configuration
correspondante, & 3 alveoles, reNee & la
terre conformement aux prescriptions de
la plus recente edition du Code national
des installations electriques ANS[/NFPA
70 ×, ou du Code canadien des
installations electriques (CSA) x-_ - et de
tout code ou reglement local en vigueur.
Si une prise d'accouplement n'est pas
disponible, le client a la responsabiNte et
I'obNgation personneNes de faire installer
une prise bien polarisee, & 3 alveoles
reliee _ la terre.
prise bien polaris&e, _ 3
alv_oles reli_e _ la terre
-k!,l
pr,sodecouraot_ T
3alv6oles, _ i//-\
ill
ro, e ,atorro\'// /
cordon -_'[T_broche
d'alimentation ] ][ de liaisor
61ectrique a la terre
r_
l'installati ,,,
Avec la table de cuisson dans la cuisine.
Risque de poids excessif
Deux personnes ou plus doivent
deplacer et installer la table de
cuisson.
Le non-respect de aette instruction
peut causer une blessure au dos ou
d'autres blessures.
E Enlever les rubans adhesifs et les
materiaux d'emballage de la table de cuisson.
Enlever le ruban adhesif du cordon
d'alimentation.
.__-_-_
Separer des materiaux d'emballage
le detendeur, le paquet de petites pieces, les
grilles et chapeaux de brQleur, les brides
d'immobilisation et les vis de 6,4 cm (2,5
pc),
vis de fixation pour _..
emplacement facultatif
I'avant ou L_I'arri&re
vis de fixation
bride (emplacement
aux II
Deux brides sont fournies pour fixer
la table de cuisson au comptoir. Installer
les brides a chaque extremite du dessous
du coffret des brQleurs.
dessous du
brQleurs
attache _ ressort
en U ou trou de
faible diam&tre
Optionnel : sila construction de I'armoire
n'offre pas de degagement pour
I'installation des brides aux extremites du
coffret des brQleurs, installer les brides
I'avant et a I'arriSre du coffret des brQleurs.
Einstallation des brides peut se faire avant
(voir I'etape 3a) ou apres (voir I'etape 3b)
que la table de cuisson soit placee dans
I'ouverture.
a _ Dans le cas d'une installation
avant que la table de cuisson soit placee
dans I'ouverture :
Placer la table de cuisson a I'envers sur
une surface protegee (couverture,
protegeotable).
dessous du coffret
des brOleurs
bande de
mousse
Table de cuisson de verre seulement :
Prendre les rubans de mousse dans le
sachet de documents. Appliquer les
rubans de mousse sur la peripherie de la
table de cuisson, en affleurement avec le
bord.
Oter les vis de fixation du dessous du
coffret des brQleurs pour I'emplacement
des brides choisi.
Utiliser les trous de montage qui
permettront aux vis des brides (voir
I'etape 4) de toucher le dessous du
comptoir. Fixer les brides tel
qu'indique, puis les tourner pour
qu'elles ne depassent pas le bord du
coffret des brQleurs
Serrer les vis juste assez pour maintenir
les brides en place durant I'insertion de
la table de cuisson dans I'ouverture.
Remettre la table de cuisson a I'endroit
si necessaire. La placer avec precaution
dans Vouverture.
IMPORTANT : Verifier que le bord avant
de la table de cuisson est parallele
I'avant du comptoir. Sortir la table de
cuisson completement de I'ouverture iors
du repositionnement pour ne pas
egratigner le comptoir.
Desserrer les vis ou ecrous, tourner les
brides pour qu'elles depassent le bord
du coffret des brQleurs. Bien serrer les
vis ou @rous,
On peut obtenir des exemplaires des
normes mentionnees aux adresses
suivantes :
*National Fire Protection Association
One Batterymarch Park
Quincy, Massachusetts 02269
_CSA International
8501 East Pleasant VaNey Rd.
Cleveland, OH 44131-5575

DansHecasd'uneinstallation
apresqueHatamedecuissonsoitpiac6e
dansFouverture:
oHacerHatamedecuisson_Fenverssur
unesurfaceproteg6e(couverture,
prot_geotabb).
bouchon
_arri&re de
J !ie:Z
7E Appliquer sur les raccords un
compose d'etanch6ite compatible avec le
gaz naturel et le propane. Si un conduit
metallique flexible est utilise, veiller a ne
pas le deformer.
robinet d'arr&t
position '_'-_
_/ offretdes
brOburs
bande de
h_ mousse
Tabledecuissondeverreseulement:
Prendrelesrubansdemoussedansle
sachetdedocuments.Appliquerles
rubansdemoussesurlaperiph6riedela
tabledecuisson,enaffleurementavecle
bord.Remettrelatabledecuisson
I'endroit.
oPlacersoigneusementlatablede
cuissondansI'ouverture.
IMPORTANT:Verifierquelebordavant
delatabledecuissonestparallele
I'avantducomptoir.Souleverlatablede
cuissoncompletementdeI'ouvertureIors
durepositionnementpournepas
egratignerlecomptoir.
oOterlesvisdefixationdes
emplacementsdebridechoisissurle
dessousducoffretdesbrQleurs.
oFixerlesbridestelqu'indiquedetelle
sortequ'ellesdepassentleborddu
coffretdesbrQleursetquelesvisdes
brides(voirI'etape4)touchentle
dessousducomptoir.Bienserrerles
vis.
tabledecuisson comptoir
dela -_
table visdebridage
cuisson 2-1/2po(6,4
cm)
caisse
orienter la fleche vers le haut, vers
I'appareil; installer le detendeur a un endroit
ou le bouchon d'acces sera accessible.
IMPORTANT : Chaque raccord doit _tre
serre avec une cle. Ne pas trop serrer les
connexions sur le detendeur; un serrage
excessif peut fissurer le detendeur,
suscitant une fuite de gaz. Lors du serrage
des raccords, ne pas laisser le detendeur
tourner sur le tuyau.
adaptateur conduit
manuel compos@ d'@tanch@it@
Chaque raccord doit 6tre serre avec
une cle.
6E Raccorder le conduit metallique
flexible a la canalisation d'arrivee de gaz et
au detendeur. II sera necessaire de
determiner le type des raccords necessaires,
selon la taille de la canalisation d'arrivee de
gaz et les caracteristiques du conduit
metallique flexible et du robinet d'arr_t,
extension
CU_SSOR
tab'e de d__
/ _-=_ canalisation
m Ouvrir le robinet d'arrSt de la
canalisation d'arrivee de gaz. Attendre
quelques minutes que ie gaz expulse i'air
de la canalisation.
9E Executer un test de recherche des
fuites conformement aux instructions qui
suivent :
Effectuer un test de recherche des fuites
sur chaque connexion _ I'aide d'une
solution de detection des fuites, non
corrosive. La formation de bulles identifie
une fuite. Rectifier chaque connexion
manifestant une fuite.
alveoles reliee a la terre.
m Brancher sur une prise a 3
&lectrode base
d'allumage .du
__ brQleur
-_ brOleur
d'arriv6e de gaz
couvercle de
bride
visdefixation
mPlacerlesvisdeblocagede2q/2po
(6,4cm)danslesbrides.Utiliserun
tournevispourserrerlesviacontrele
comptoir.Nepasserrerexcessivement.
d'ardv&e
de gaz
E Placer ie couvercle de brQleur
sur chaque brQleur. Installer ia grille de
chaque brQleur.

Systemed'aiiumageeHectronique-
aiiumageinitiai
LesbrQieursdeHatamedecuissonne
Si la table de
¢aisseaae
comportentpasdefiammedeveHie;ills
sontmunisd'undisposififd'aiiumage
eHectronique.Lorsqu'onappuiesurHe
feaetieane pas:
boutondecommandeetHefaittourner
jusqu'aHapositionLHTE,Hesystemeemet
desefinceHHesquiprovoquenti'aiiumage
deHafiamme.Laproductiond'efinceHHes
sepoursuitjusqu'aumomentouon
rameneHeboutondecommande_Ha
[_ 6terminer si Haprise de courant est
aHimentee (disjoncteur ouvert /
fusibie griHHe?)
[_ 6rifier que Hecordon d'aiimentation
est branche sur Haprise de courant.
positionderegHagechoisie.
[_ V6rifier que ies robinets de gaz sont
ouverts, position de fonctionnement
O0
OO
E Contr6ieriefonctionnementdes Si une assistance
brQieurs. Manoeuvrerchaqueboutonde eSt necessaire ."
commande pour le placer a la position LITE.
La flamme devrait s'allumer en moins de 4 Pour toute question concernant le
secondes. Apr&s I'allumage du brQleur, ne pas fonctionnement, le nettoyage ou
laisser le bouton _ la position LITE I'entretien de la table de cuisson :
Si un brQleur ne s'allume pas correctement,
ramener le bouton de commande a la
position d'arr&t OFF. Verifier que le couvercle
de brQleur est a la position convenable.
Verifier que le cordon d'alimentation de
I'appareil est branche; determiner si la prise
de courant est alimentee (fusible grille,
disjoncteur ouvert ?). Verifier que le robinet
d'arr_t est a la position d'ouverture ON.
Essayer de nouveau d'allumer le brQleur. Si le
brQleur ne s'allume pas, demander I'aide du
concessionnaire Whirlpool.
E Pour chaque brQleur, appuyer sur
le bouton et faire tourner le bouton jusqu'a la
position LO (mijotage/. Pour la position LO, le
debit de gaz de chaque brQleur a 6te r6gle
I'usine a la plus faible valeur possible
permettant un reallumage fiable du brQleur.
Si le brQleur ne reste pas allume a la position
LO, contr61er le reglage de la position LO
comme suit :
a. Placer le bouton de commande a la
position LITE jusqu'a I'allumage du
brQleur.
b. Ramener rapidement le bouton a la
position Io.
c. Si le brQleur s'eteint, modifier le reglage du
robinet de commande comme suit :
0ter le bouton du robinet du brQleur. Jnserer
un tournevis a lame plate dans la tige creuse
du robinet, pour faire tourner la vis qui s'y
trouve. La rotation de la vis permet
d'augmenter ou diminuer la taille de la
flamme. Ajuster la taille de la flamme jusqu'au
point ou il sera possible de faire passer
rapidement le bouton du robinet de la position
LITF, a la position Io sans provoquer I'extinction
de la flamme. II faut que la flamme soit aussi
petite que possible, sans qu'elle s'eteigne.
ON.
[_ onsuiter Hasection Diagnostic dans
le Guide d'utilisation et d'entretien.
Consulter le Guide d'utilisation et
d'entretien.
Contacter le Centre d'assistance aux
consommateurs. Pour trouver le
numero de telephone necessaire,
consulter le Guide d'utilisation et
d'entretien, ou telephoner au
marchand chez qui I'appareil a ete
achet& On trouve les coordonnees
des concessionnaires dans
I'annuaire telephonique _<Pages
jaunes>_ a la rubrique Appareils
menagers -Service et reparations.
Pourebtenir des
services de
[]
[]
Pour preserver la qualite incorporee
votre table de cuisson, contactez un
etablissement de service apres_vente
agree.
Pour obtenir les coordonnees d'un
etablissement agree de service apres-
vente :
[_ ontacter le concessionnaire chez
qui I'appareil a ete achete.
[_ Chercher dans I'annuaire
telephonique _<Pages jaunes_) & la
rubrique Appareils menagers -
Service et reparations; ou bien
[_ Contacter le centre d'assistance aux
consommateurs. On trouve le
numero de telephone dans le Guide
d'utilisation et d'entretien.
Lors d'un appel, vous devrez
communiquer
le numero de modele de la table de
cuisson
31e numero de serie de la table de
cuisson.
On trouve ces deux numeros sur la
plaque signaletique, en-dessous de la
caisse de la table de cuisson.
Netteyageet
entretlen
S'il est necessaire d'enlever la table de
cuisson pour des operations de
nettoyage ou d'entretien, fermer I'arrivee
de gaz. Debrancher I'appareil de la
canalisation de gaz et de la prise de
courant. 0ter les brides de montage sur
le c6te droit et le c6te gauche de la
caisse. Apres avoir deconnecte I'appareil
de la canalisation de gaz et de la prise de
courant, retirer I'appareil de son
encastrement pour les operations de
nettoyage et d'entretien. Pour la
reinstallation, executer les re&rues
operations dans I'ordre inverse, puis
effectuer un test de recherche des fuites
de gaz.

Le cordon d'alimentation de cet appareil est _quip6 d'une fiche de
branchement a trois broches, (reli6e a la terre) s'adaptant a une prise
murale or dinaire & trois alv_oles, reli_e & la terre,
Broche
d'alimentation
de 1/4 pc de large
Broche ronde
de raise & la terre
Terminaux
de connection 0,250
Noir
F_CHE
5/16 pc de large
Noir 11, Terre
Vert ou Vert/,J
Blanc
Blanc
120VCA 60 Hz
1 phase
15 ou 20 A
/
/
£____ D'FINCELLES
Le cordon d'alimentation de cet appareil est _quip6 d'une fiche de
branchement a trois broches, (reli@e a la terre) s'adaptant a une prise
murale or dinaire a trois alv6,oles, reli_e a la terre,
FICHE 120VCA 60 Hz
1 phase
15ou20A
Broche ronde
de mise & la terre
Noir
Terminaux
MODULE
I
I
i
de connection 0,250
Blanc
__£.___J
t I, Terre
MODULE
D'F_NCELLES
I
I
I
Commutateurs sur soupapes
Circuit 6lectrique term6 lotsque
le bouton est tourn_ de 55__ 95_
dans le sens anti-horaire a par tit
de OFF
Broche
d'a[imentation
de 1/4 pc de large
Broche ronde
de mise & la terre
Terminaux
de connection 0,250
Noir
_J
__J
COMMUTATEURS
DE SOUPAPES
[_ J Sm
ELECTRODES t i
I
I Jau ou
D'ALLUMAGEL L
Mise en grade : Etiquetter tousles fib avant la d_conne xion pour
la reparation des commandes, Les erreurs de c_blage peuvent _tre
la cause d'un foncdonnement incorrect e/( dangereux.
S'assurer du bon fonctionnement apres la r_,paration
Le cordon d'alimentation de cet apparei[ est Bquip_ d'une fiche de
branchement _ trois broches, (reli@e & [a terre) s'adaptant & une prise
mura[e or dinaire &trois a[v_oJes, reli6,e & la terre,
F_CHE
5/16 pc de large
Noir
Vert ou Vert/J [ I ' Terre
120VCA 60 Hz
neutre 15 ou 20 A
Blanc Blanc
1 phase
i
i
I
i
COMMUTATEURS
DE SOUPAPES
Cornmutateurs sur soupapes
Circuit _lectrique ferm_ Iorsque
le bouton est tourn_ de 55_ _195_
darts le sens antbhoraire _1par tit
de OFF ELECTRODES
D'ALLUMAGEL Z Z Z
Mise en grade : Etiquetter tousles fib avant la dSconne xion pour
la r_paration des commandes Les erreurs de c&blage peuvent _,tre
la cause d'un fonctionnement incorrect et dangereux
S'assurer du bon fonctionnement apre, s la r_paration,
Le cordon d'alimentation de cet appare[[ est _quip_ d'une fiche de
branchement & trois broches,(re[i_e & la terre) s'adaptant & une prise
mura[e or dinaire a trois a[v_o[es, re[i_e a [a terre.
FICHE 120VCA 60 Hz
Broche
d'alimentation
de 1/4 pc de large
Broche ronde ........................
de mise a la terre
Noir _ ' Terre
Terminaux Noir [ D'F_NCELLES
connection 0,250 _N _ _
", 1 phase
Vert ou vert/J ]1
Vert ou Vert/J I1' Terre MODULE
15ou20A
,Jau ou
Bm
(4) plcs
ITene 3 I
COMMUTATEURS
DE SOUPAPES
Commutateurs sur soupapes
Circuit 6bctrique ferm_ Iorsque
le bouton est tourn6 de 55( a 95(
dans le sens anti horaire _ par tit
de OFF
ELECTRODES
D'ALLUMAGE
Mise en grade : Etiquetter tousles fib avant la d_conne xion pour
la r_paration des commandes Les erreurs de c_blage peuvent 6tre
la cause d'un fonctionnement incorrect et dangereux.
S'assurer du bon fonctionnement apres la r_paration
I
dau ou
Bm
(6) plcs
COMMUTATEURS | [-
Circuit 61ectrique ferm_ Iorsque (5) plcs
le bouton est tourn6 de 55: a 95:
dans ]e sens anti-horaire a par tit
de OFF ELECTRODES
D'ALLUM*GELL L
Mise en grade : Etiquetter tousles fib avant la d6conne xion pour
la r_paration des commandes Les erreurs de c&blage peuvent _,tre
la cause d'un fonctionnement incorrect et dangereux
S'assurer du bon fonctionnement apre, s la r_paration,
5 I I I
Piece N ° 4455834 Rew A Imprime aux E,oU,
(c_2004Whirlpool Corporation Benton Harbor, Michigan 49022 04/2004
 Loading...