

KitchenAid KGCS105G, KGCT366G, KGCS166G, KGCT305G, KGCT365G User Manual
...
3191828
Table of Contents..........2
A Note to You.................2
Cooktop Safety .............3
Using Your Cooktop .....5
Caring For Your
Cooktop........................13
Troubleshooting ..........17
Requesting Assistance
or Service.....................18
Warranty.......................20
For assistance or service in the U.S.A.,
call the Consumer Assistance Center.
For assistance or service
in Canada, see page 19.
KITCHENAID®Gas Sealed Burner Cooktop
Use and Care Guide
www.kitchenaid.com
MODELS KGCR055G KGCT055G KGCS105G KGCS127G KGCS166G
KGCT305G KGCT365G KGCT366G

2
2
Thank you for buying a KITCHENAID
®
appliance!
Because your life is getting busier and more complicated, KitchenAid appliances are easy to use, save
time, and help you manage your home better. To ensure that you enjoy many years of trouble-free operation, we developed this Use and Care Guide. It contains valuable information concerning how to operate
and maintain your new appliance properly and safely. Please read it carefully. Also, please complete and
mail the enclosed Product Registration Card.
A
Note to You
T
able of Contents
Caring for Your Cooktop .........................13
Cleaning chart.....................................13
Stainless steel surfaces ......................14
Sealed surface burners and cooktop..15
Troubleshooting.......................................17
Requesting Assistance or Service.........18
Warranty...................................................20
A Note to You.............................................2
Cooktop Safety ..........................................3
Using Your Cooktop ..................................5
Using the Surface Burners ....................5
Characteristics of
cookware materials.............................12
Please record your model’s information.
Whenever you call our Consumer Assistance Center at
1-800-422-1230 (in Canada, 1-800-461-5681) or
request service for your appliance, you need to know
your complete model number and serial number. You
can find this information on the model and serial number plate (see illustration on pages 6-10 for location
of plate).
Please also record the purchase information.
NOTE: You must provide proof of purchase or
installation date for in-warranty service.
Keep this book and the sales slip together in a safe place for future reference.
Model Number
Serial Number
Purchase/
Installation Date
Builder/Dealer
Name
Address
Phone
3
Cooktop Safety
continued on next page
WARNING: If the information in this manual is not followed exactly, a fire or
explosion may result causing property damage, personal injury or death.
– Do not store or use gasoline or other flammable vapors and liquids in the vicinity
of this or any other appliance.
– WHAT TO DO IF YOU SMELL GAS
•
Do not try to light any appliance.
•
Do not touch any electrical switch; do not use any phone in your building.
•
Immediately call your gas supplier from a neighbor’s phone. Follow the gas
supplier’s instructions.
•
If you cannot reach your gas supplier, call the fire department.
– Installation and service must be performed by a qualified installer, service
agency or the gas supplier.
You will be killed or seriously injured if you don’t
follow instructions.
You can be killed or seriously injured if you don’t
follow instructions.
Your safety and the safety of others is very important.
We have provided many important safety messages in this manual and on your appliance. Always read and
obey all safety messages.
This is the safety alert symbol.
This symbol alerts you to hazards that can kill or hurt you and others.
All safety messages will be preceded by the safety alert symbol and the word “DANGER” or
“WARNING.” These words mean:
wDANGER
wWARNING
All safety messages will identify the hazard, tell you how to reduce the chance of injury, and tell you what can
happen if the instructions are not followed.

4
– SAVE THESE INSTRUCTIONS –
WARNING: To reduce the risk of fire, electrical
shock, injury to persons, or damage when using the
cooktop, follow basic precautions, including the
following:
• CAUTION – Do not store items of interest to
children in cabinets above the cooktop – children
climbing on the cooktop to reach items could be
seriously injured.
• Proper Installation – The cooktop, when installed,
must be electrically grounded in accordance with
local codes or, in the absence of local codes, with
the
National Electrical Code, ANSI/NFPA 70 or the
Canadian Electrical Code, Part 1.
Be sure the
cooktop is properly installed and grounded by a
qualified technician.
• This cooktop is equipped with a three-prong
grounding plug for your protection against shock
hazard and should be plugged directly into a properly grounded receptacle. Do not cut or remove the
grounding prong from this plug.
IMPORTANT SAFETY INSTRUCTIONS
• Disconnect the electrical supply before
servicing the cooktop.
• Never Use the Cooktop for Warming or Heating
the Room.
• Injuries may result from the misuse of the cooktop such as stepping, leaning, or sitting on the
top surface.
• Maintenance – Keep cooktop area clear and free
from combustible materials, gasoline, and other
flammable vapors and liquids.
• Storage on the cooktop – Flammable materials
should not be stored on or near surface units.
• Top burner flame size should be adjusted so it
does not extend beyond the edge of the
cooking utensil.
Cooktop Safety
5
Using Your Cooktop
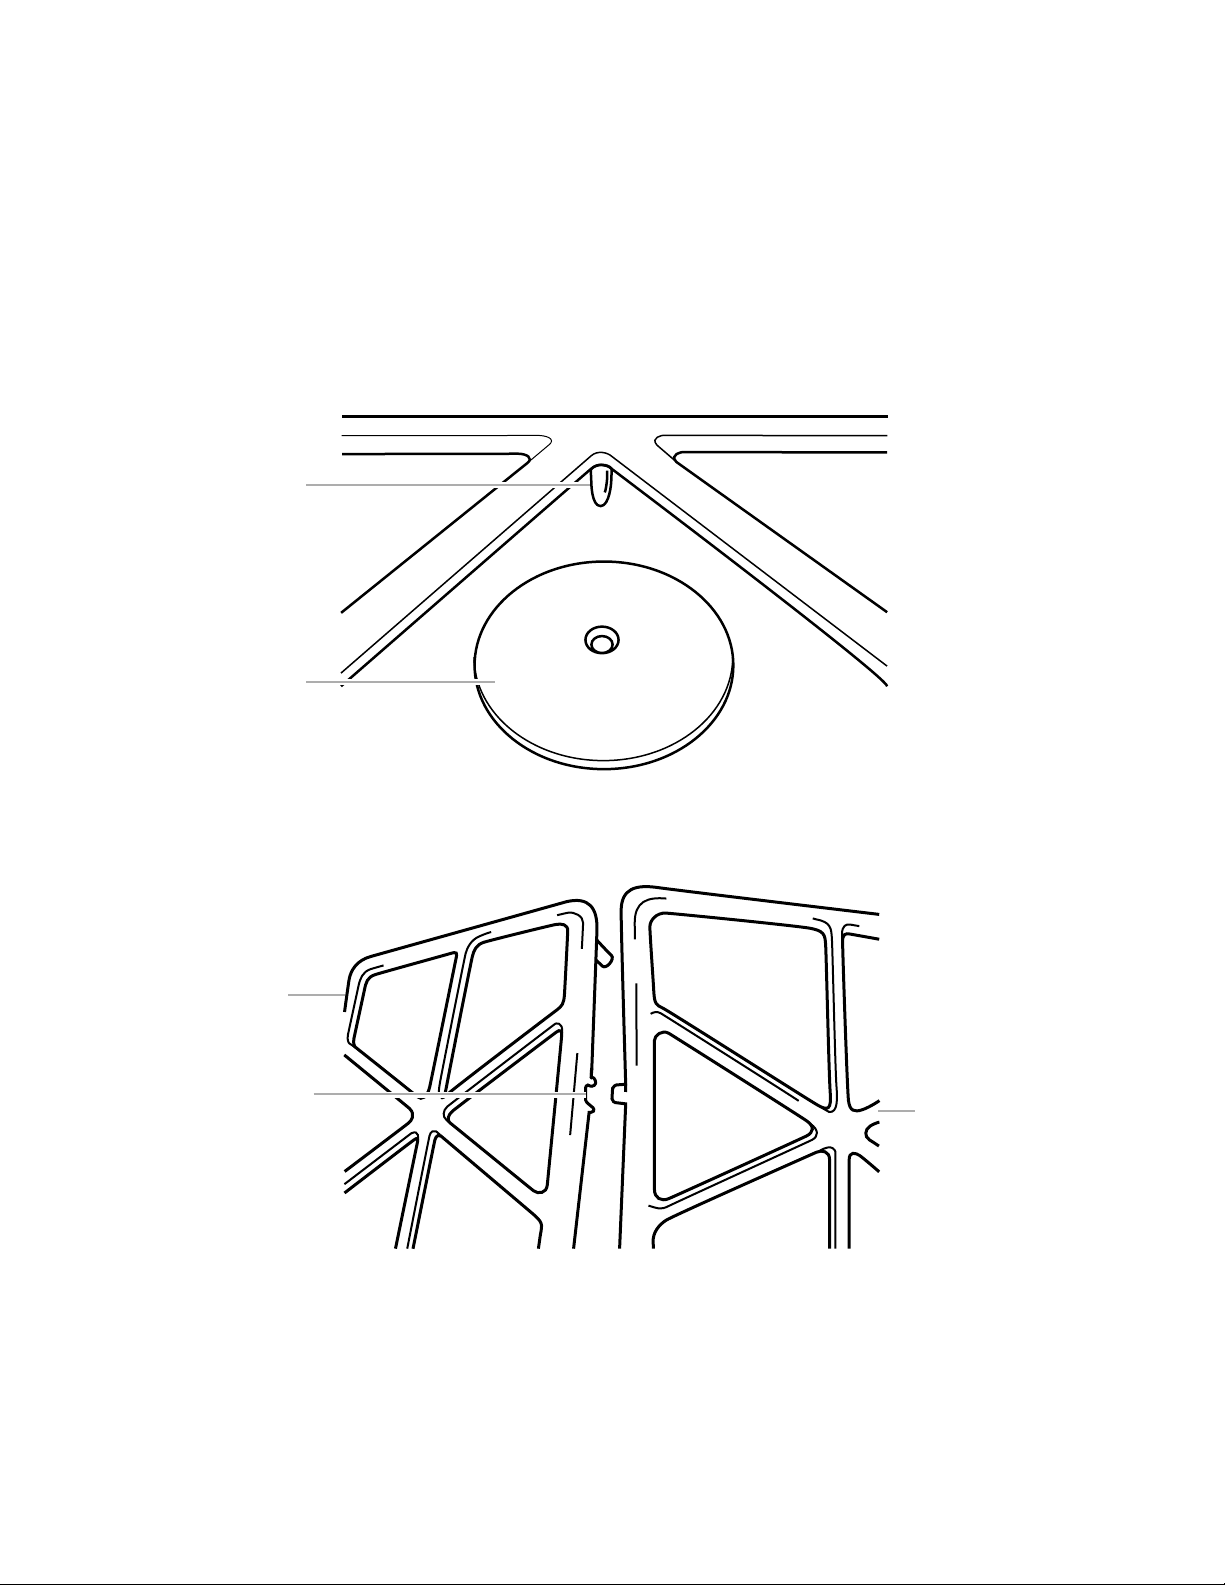
The locator pin on the grate must be positioned in the burner cap hole to hold the grate in
place.
The grates located on the left and right side of the cooktop contain grooves. These grooves
must always face inward toward the control knobs to hold the grates in place.
NOTE: The middle grate must be placed in position first followed by the left and right grates
(see pp. 7-10 for illustration)
Burner
cap
Locator
pin
Groove
Left
grate
Middle
grate
Surface Grates
Your cooktop has sealed gas burners with an electric
ignition system. The sealed burners spread the heat
evenly across the bottom of the cookware and
provide infinite heat control.
Using the surface burners
IMPORTANT: Your cooktop is factory-set for use
with Natural Gas. If you wish to use L.P. gas, an
L.P. Gas Conversion Kit is provided with the unit.
The conversion must be done by a qualified
service technician.

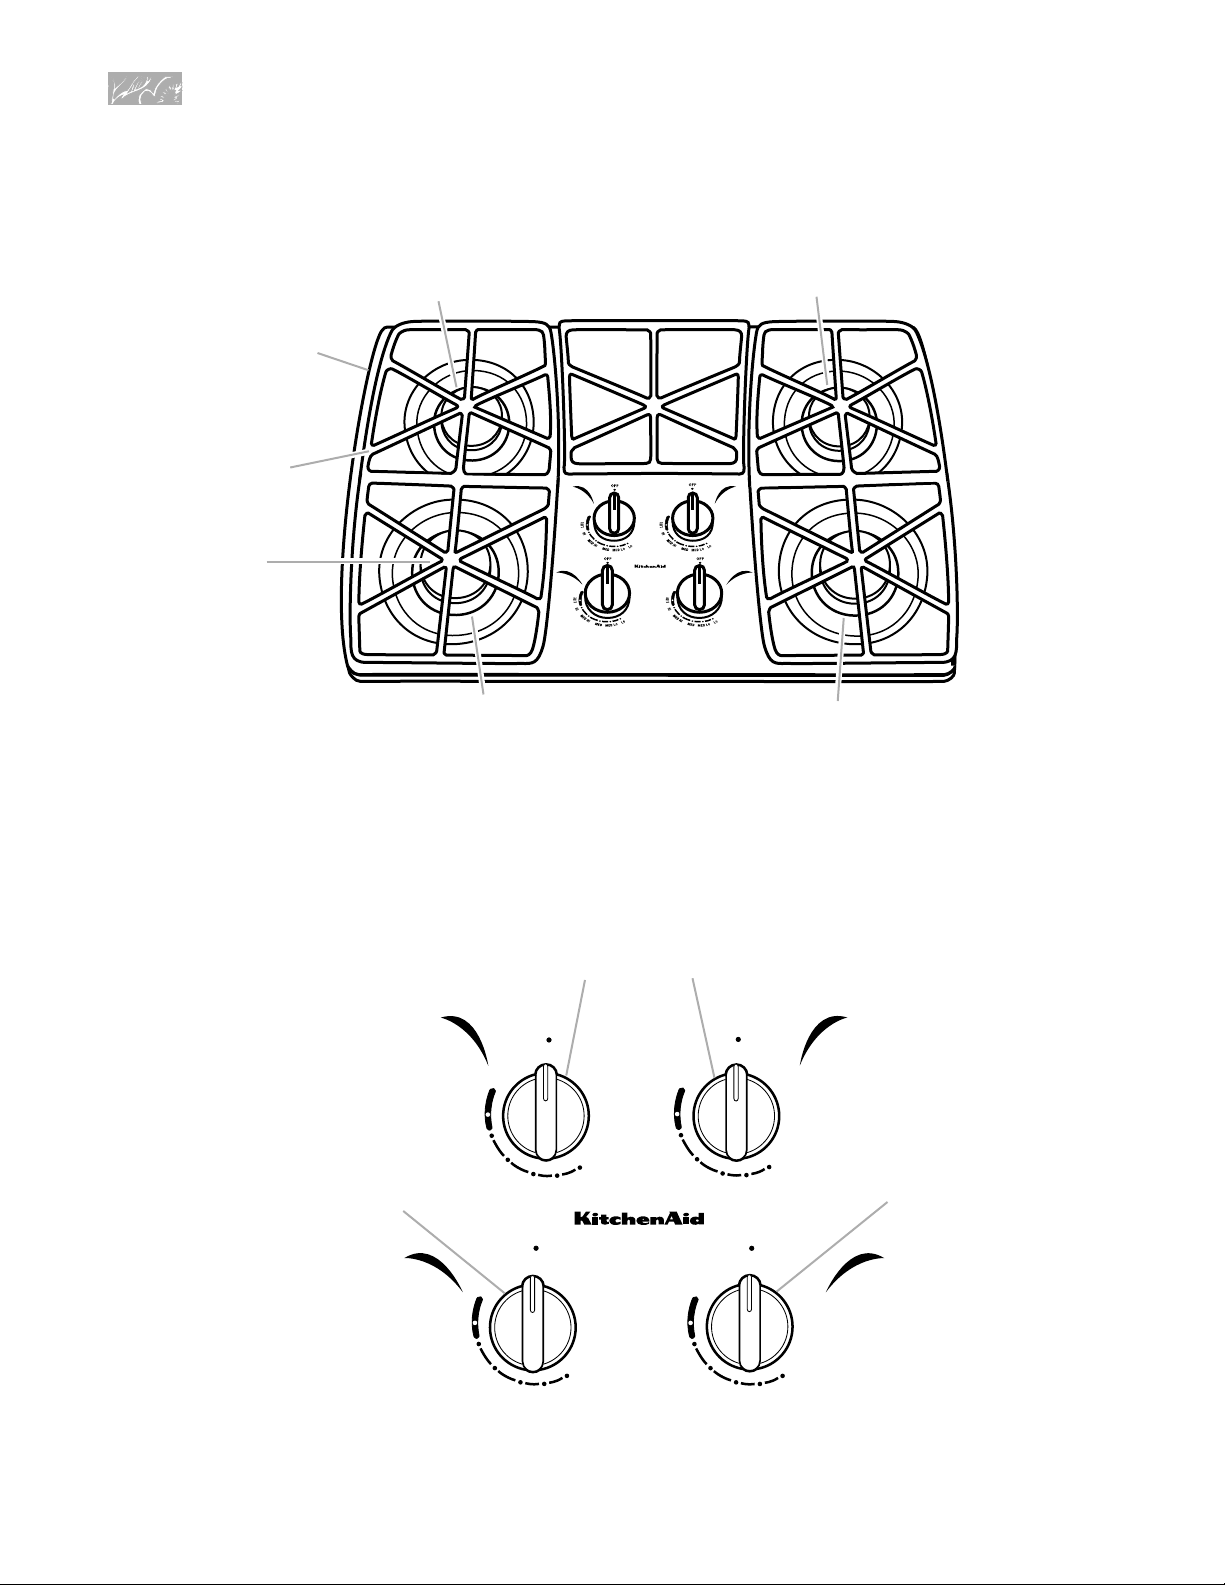
6
Control panel
H
I
M
E
D
H
I
M
E
D
M
E
D
L
O
L
O
L
I
T
E
OFF
H
I
M
E
D
H
I
M
E
D
M
E
D
L
O
L
O
L
I
T
E
OFF
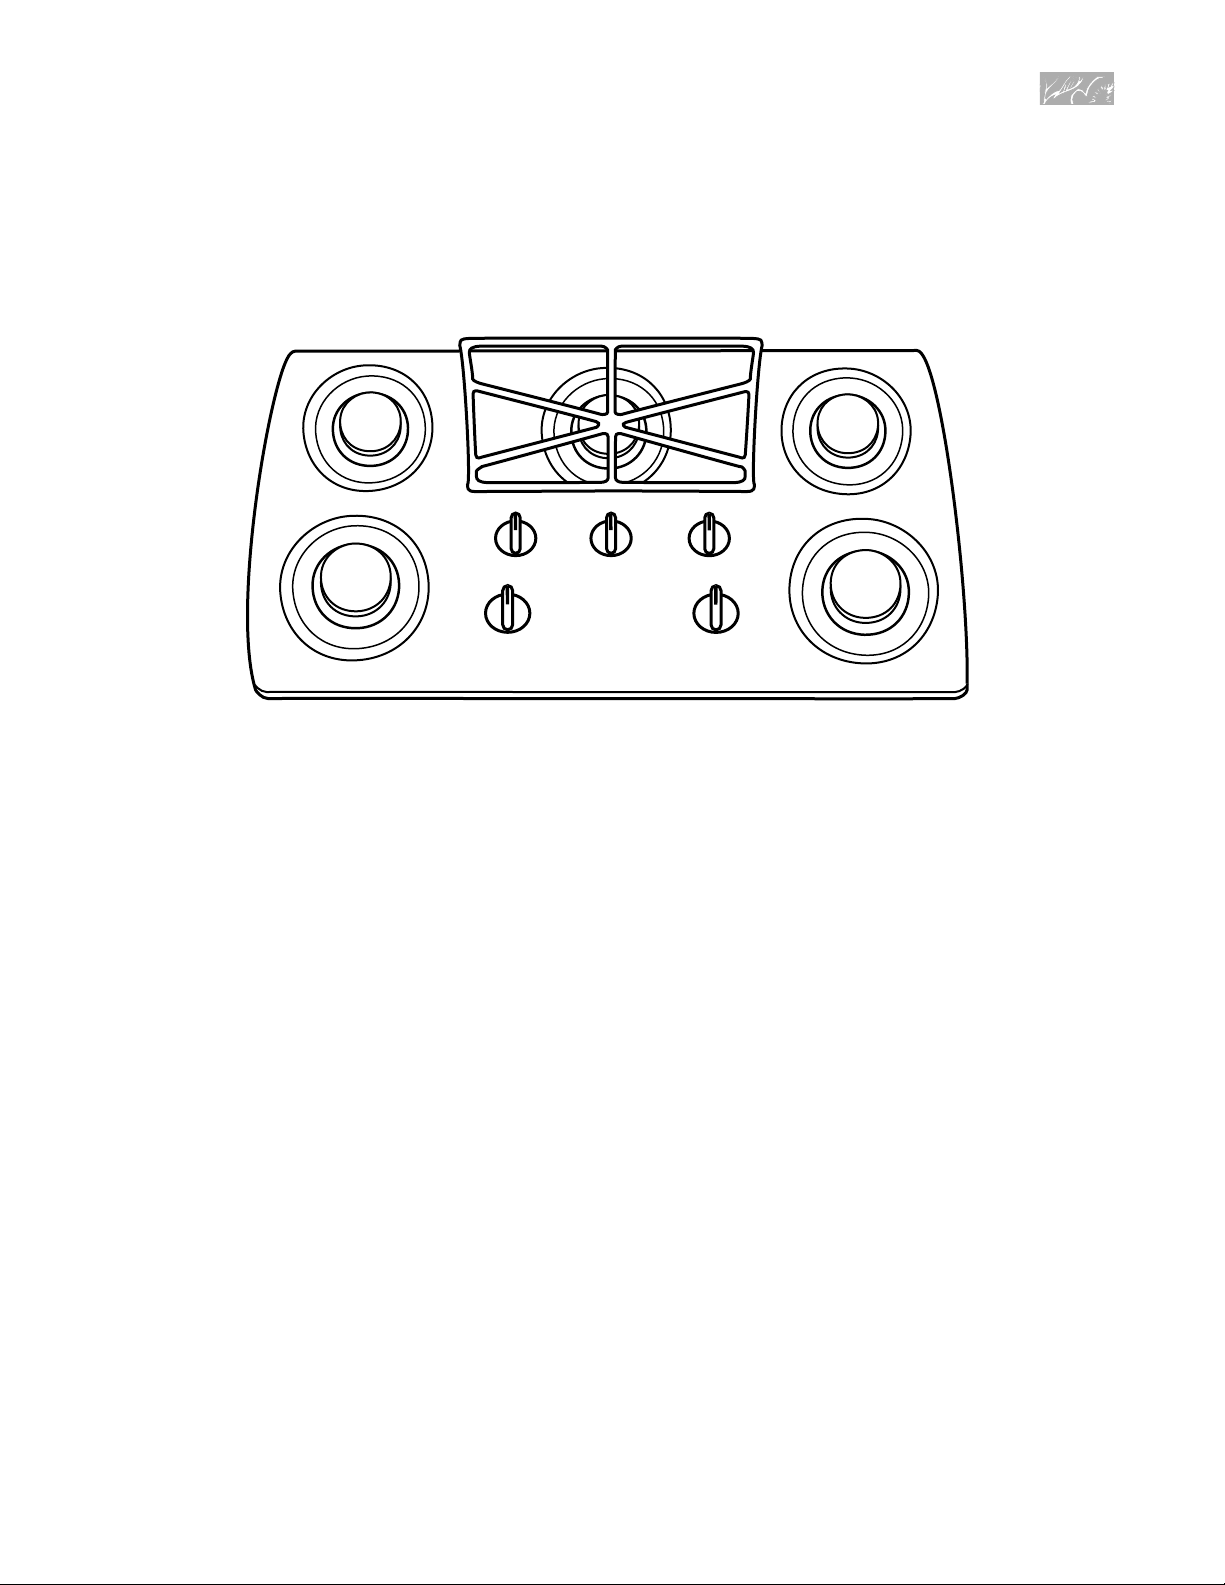
Models KGCT055G (15 inch/38.1 cm)
KGCR055G (15 inch/38.1 cm)-not shown
6,000 BTU
burner
Front burner
control knob
Rear burner
control knob
12,500 BTU
burner
Model and serial
number plate
(under cooktop)
(p. 2)
Surface burner
grate
(p. 14)
Surface
burner
cap
(pp. 14, 15, 16)
Using Your Cooktop
Use the rear burner for simmering or for cooking smaller quantities of food requiring small cookware.
Use the front burner for cooking large quantities of food, deep-fat frying, or cooking with large cookware.

7
Control panel
Using Your Cooktop
H
I
M
E
D
H
I
M
E
D
M
E
D
L
O
L
O
L
I
T
E
OFF
H
I
M
E
D
H
I
M
E
D
M
E
D
L
O
L
O
L
I
T
E
OFF
H
I
M
E
D
H
I
M
E
D
M
E
D
L
O
L
O
L
I
T
E
OFF
H
I
M
E
D
H
I
M
E
D
M
E
D
L
O
L
O
L
I
T
E
OFF
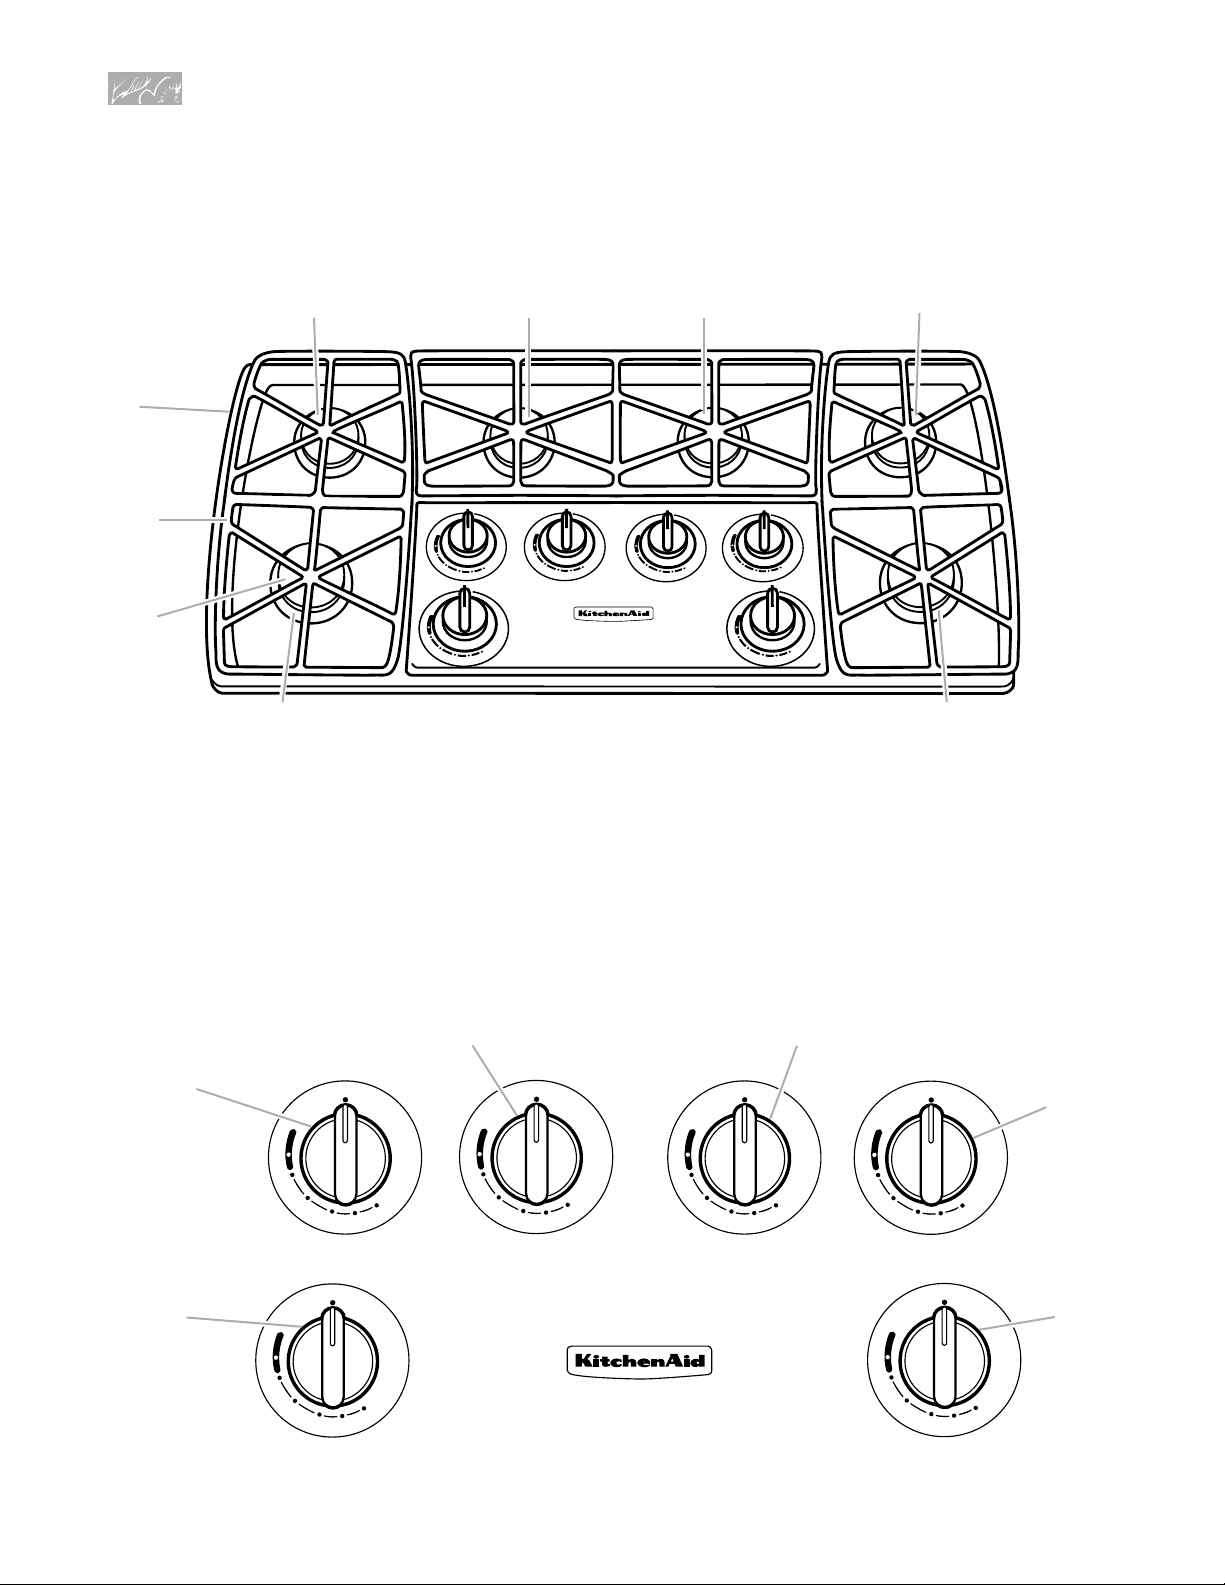
Model KGCT365G (36 inch/91.4 cm)
9,000 BTU
burner
12,500 BTU
burner
6,000 BTU
burner
Left front burner
control knob
Left rear burner
control knob
Right front burner
control knob
Right rear burner
control knob
14,000 BTU
burner
Model and serial
number plate
(under cooktop)
(p. 2)
Surface burner
grate
(p. 14)
Surface
burner
cap
(pp. 14, 15,
16)
Use the left rear and right front burners for simmering or for cooking smaller quantities of food requiring small
cookware.
Use the left front and right rear burners for cooking large quantities of food, deep-fat frying or cooking with
large cookware.
8
Control panel
Using Your Cooktop
H
I
M
E
D
H
I
M
E
D
M
E
D
L
O
L
O
L
I
T
E
OFF
H
I
M
E
D
H
I
M
E
D
M
E
D
L
O
L
O
L
I
T
E
OFF
H
I
M
E
D
H
I
M
E
D
M
E
D
L
O
L
O
L
I
T
E
OFF
H
I
M
E
D
H
I
M
E
D
M
E
D
L
O
L
O
L
I
T
E
OFF
Models KGCS105G (30 inch/76.2 cm)
KGCT305G (30 inch/76.2 cm)
14,000 BTU
burner
9,000 BTU
burner
12,500 BTU
burner
6,000 BTU
burner
Left front burner
control knob
Left rear burner
control knob
Right front burner
control knob
Right rear burner
control knob
Model and serial
number plate
(under cooktop)
(p. 2)
Surface burner
grate
(p. 14)
Surface
burner
cap
(pp. 14, 15, 16)
Use the left rear and right front burners for simmering or for cooking smaller quantities of food requiring small
cookware.
Use the left front and right rear burners for cooking large quantities of food, deep-fat frying, or cooking with
large cookware.
9
9
Using Your Cooktop
10
H
I
M
E
D
H
I
M
E
D
M
E
D
L
O
L
O
L
I
T
E
H
I
M
E
D
H
I
M
E
D
M
E
D
L
O
L
O
L
I
T
E
H
I
M
E
D
H
I
M
E
D
M
E
D
L
O
L
O
L
I
T
E
H
I
M
E
D
H
I
M
E
D
M
E
D
L
O
L
O
L
I
T
E
H
I
M
E
D
H
I
M
E
D
M
E
D
L
O
L
O
L
I
T
E
H
I
M
E
D
H
I
M
E
D
M
E
D
L
O
L
O
L
I
T
E
H
I
M
E
D
H
I
M
E
D
M
E
D
L
O
L
O
L
I
T
E
OFF
H
I
M
E
D
H
I
M
E
D
M
E
D
L
O
L
O
L
I
T
E
OFF
H
I
M
E
D
H
I
M
E
D
M
E
D
L
O
L
O
L
I
T
E
OFF
H
I
M
E
D
H
I
M
E
D
M
E
D
L
O
L
O
L
I
T
E
OFF
H
I
M
E
D
H
I
M
E
D
M
E
D
L
O
L
O
L
I
T
E
OFF
H
I
M
E
D
H
I
M
E
D
M
E
D
L
O
L
O
L
I
T
E
OFF
Control panel
Model KGCS127G (43 inch/109 cm)
Using Your Cooktop
9,000 BTU
burner
6,000 BTU
burner
12,500 BTU
burner
6,000 BTU
burner
9,000 BTU
burner
14,000 BTU
burner
Left
front
burner
control
knob
Left rear
burner
control
knob
Right
front
burner
control
knob
Right rear
burner
control
knob
Center left rear
burner
control knob
Center right rear
burner
control knob
Model and
serial number
plate
(under
cooktop)
(p. 2)
Surface
burner
grate
(p. 14)
Surface
burner
cap
(pp. 14, 15,
16)
Use the left rear, center left rear, center right rear, or right front burners for simmering or for cooking smaller quantities of food requiring small cookware.
Use the left front or right rear burners for cooking large quantities of food, deep-fat frying, or cooking with
large cookware.
11
11
Using Your Cooktop
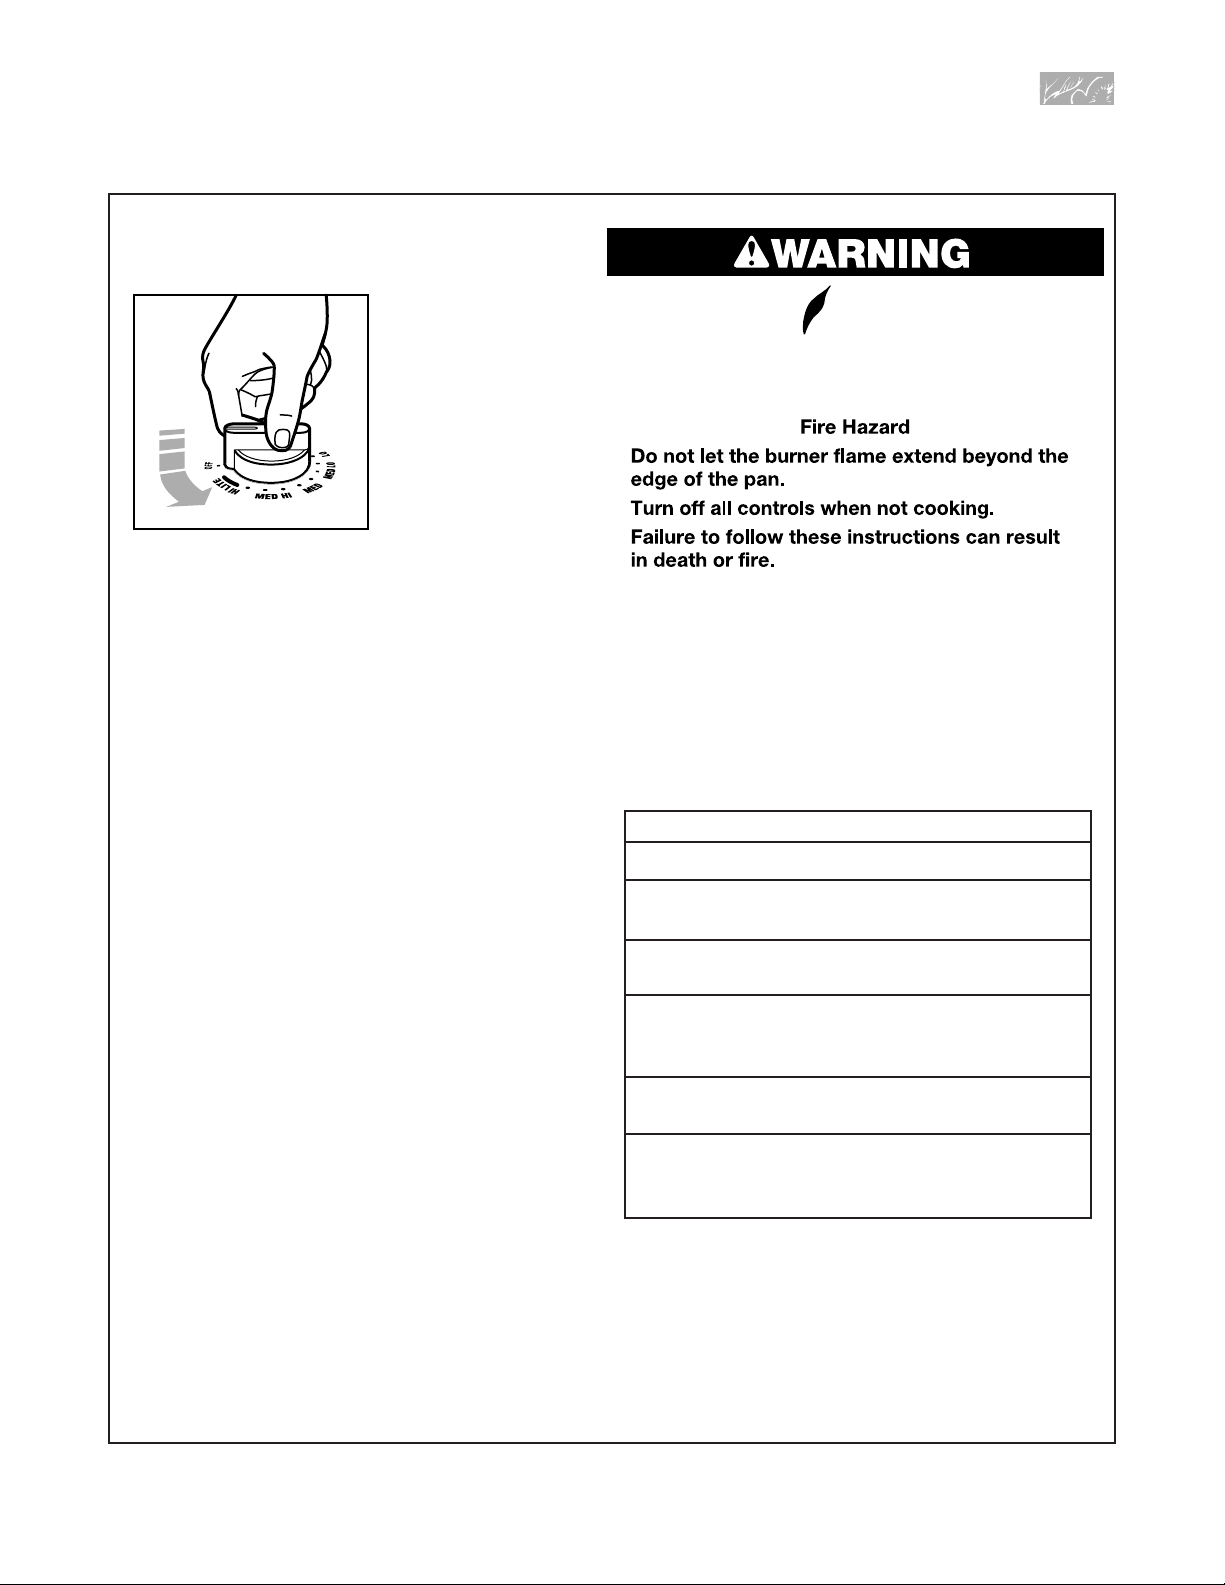
Using the control knobs
Your cooktop comes with electric ignitors. Electric
ignitors automatically
light the burners each
time you turn the control knobs to LITE.
• Place a filled pan on
the burner grate before
turning on the surface
burner. Do not operate
a burner for extended
periods of time without
having cookware on
the grate.
•
Push in the control knob and turn it counter-
clockwise to the LITE position. The clicking
sound is the ignitor sparking. Make sure the
burner has lit.
•
To stop the clicking sound after the burner lights,
turn the control knob to the cook setting you
want. You can set the control knob
anywhere between HI and LO.
NOTE: All electric ignitors will click at the same
time. However, the burner with the control knob
turned to LITE is the one that will ignite.
Energy saving tips
• To help shorten your cooking time, use the least
amount of liquid possible.
• Preheat your pans only when recommended and
for the shortest time possible.
• Start your food on a higher heat setting, then turn
the control to a lower setting to finish cooking.
SETTING
LITE
HI
MED HI
MED
MED LO
LO
RECOMMENDED USE
• To light the burner.
• To start food cooking.
• To bring liquid to a boil.
• To hold a boil.
• To fry chicken or pancakes.
• For gravy, pudding, and icing.
• To cook large amounts of
vegetables.
• To keep food cooking after
starting it on a higher setting.
• To keep food warm.
• To melt chocolate or butter.
• To simmer.
12
In case of a prolonged
power failure
You can manually light surface burners. Hold a lit
match near a burner and turn the control knob to
the LITE position. After the burner lights, turn the
control knob to the setting you want.
Home canning information
The large diameter of most water-bath or pressure
canners combined with high heat settings for long
periods of time can cause damage to the cooktop.
To protect your cooktop:
• Center the canner over the surface burner. Do
not extend more than 1 inch outside the burner
area.
• Do not place your canner on two surface burners
at the same time.
• Start with hot water, cover with a lid and bring to
a boil; then reduce heat to maintain a boil or
required pressure levels in a pressure canner.
•
Refer to your canner manual for specific
instructions.
For up-to-date information on canning, contact your
local U.S. Government Agricultural Department
Extension Office or companies who manufacture
home canning products.
Using the right cookware
makes a big difference
• The pan should have a flat bottom, straight sides,
and a well-fitting lid.
• Choose medium to heavy gauge (thickness)
cookware.
• The pan material (metal or glass) affects how
quickly and evenly the pan heats.
• When using glass or ceramic cookware, check to
make sure it is suitable for use on surface burners.
• To avoid tipping, make sure pots and pans are
centered on the grates.
The pan material affects how fast heat transfers from the surface cooking area through the pan material and how
evenly heat spre ads over the pan bottom. Choo se pans that provide the best cooking results.
Aluminum
• Heats quickly and evenly.
• Use for all types of cooking.
• Medium or heavy thickness is best for most cooking.
• Used as a core or base in cookware to provide even heating.
Cast iron
• Heats slowly and evenly.
• Good for browning and frying.
• Maintains heat for slow cooking.
• Can be coated with porcelain enamel.
Ceramic or
ceramic glass
• Heats s low ly a nd uneve nly.
• Use on low to medium settings.
• Follow manufacturer’s instructions.
Copper
• Heats very quickly and evenly.
• Used as a core or base in cookware to provide even heating.
Earthenware
• Can be used for cooktop cooking if recommended by the
manufacturer.
• Use on low settings.
Porcelain enamel-on-steel or
enamel-on-cast iron
• See cast iron and stainless steel.
Stainless steel
• Heats quic k ly but uneve nly.
•
A core or base of aluminum or copper on the cookware provides
even heating.
• Can be coated with porcelain enamel.
Characteristics of cookware materials
Using Your Cooktop
Using the Surface Burners (cont.)
 Loading...