

KitchenAid KGCP462, KGCP467, KGCP482, KGCP463, KGCP483 User Manual
...
COMMERCIAL STYLE GAS COOKTOP
Use &CareGuide
For questions about features, operation/performance, parts, accessories or service, call: 1-800-422-1230 or visit our website at
In Canada, call: 1-800-807-6777 or visit our website at www.KitchenAid.ca
TABLEDECUISSONÀGAZDESTYLE
COMMERCIAL
Guided’utilisation etd’entretien
Au Canada, pour assistance, installation ou service, composer le 1-800-807-6777 ou visiter notre site Web à www.KitchenAid.ca
Table of Contents/Table des matières.............................................................................2
www.kitchenaid.com

TABLE OF CONTENTS
TABLE DES MATIÈRES
COOKTOP SAFETY........................................................................3
PARTS AND FEATURES................................................................5
COOKTOP USE ..............................................................................8
Cooktop Controls.........................................................................8
Sealed Surface Burners ...............................................................9
Simmer Plate................................................................................9
Grill (on some models) ...............................................................10
Griddle........................................................................................11
Home Canning ...........................................................................12
Cookware...................................................................................12
COOKTOP CARE..........................................................................13
General Cleaning........................................................................13
TROUBLESHOOTING ..................................................................15
ASSISTANCE OR SERVICE.........................................................16
WARRANTY ..................................................................................17
SÉCURITÉ DE LA TABLE DE CUISSON ....................................18
PIÈCES ET CARACTÉRISTIQUES ..............................................20
UTILISATION DE LA TABLE DE CUISSON................................23
Commandes de la table de cuisson..........................................23
Brûleurs de surface scellés........................................................24
Plaque de mijotage.....................................................................24
Gril (sur certains modèles)..........................................................25
Plaque à frire (sur certains modèles)..........................................27
Préparation de conserves à la maison.......................................28
Ustensiles de cuisson ................................................................28
ENTRETIEN DE LA TABLE DE CUISSON ..................................29
Nettoyage général......................................................................29
DÉPANNAGE.................................................................................30
ASSISTANCE OU SERVICE.........................................................31
GARANTIE.....................................................................................32
2
COOKTOP SAFETY
Your safety and the safety of others are very important.
We have provided many important safety messages in this manual and on your appliance. Always read and obey all safety
messages.
This is the safety alert symbol.
This symbol alerts you to potential hazards that can kill or hurt you and others.
All safety messages will follow the safety alert symbol and either the word “DANGER” or “WARNING.”
These words mean:
You can be killed or seriously injured if you don't immediately
DANGER
WARNING
All safety messages will tell you what the potential hazard is, tell you how to reduce the chance of injury, and tell you what can
happen if the instructions are not followed.
WARNING: If the information in this manual is not followed exactly, a fire or explosion
may result causing property damage, personal injury or death.
follow instructions.
can be killed or seriously injured if you don't
You
instructions.
follow
– Do not store or use gasoline or other flammable vapors and liquids in the vicinity of this
or any other appliance.
– WHAT TO DO IF YOU SMELL GAS:
Do not try to light any appliance.
•
Do not touch any electrical switch.
•
Do not use any phone in your building.
•
Immediately call your gas supplier from a neighbor's phone. Follow the gas supplier's
•
instructions.
If you cannot reach your gas supplier, call the fire department.
•
– Installation and service must be performed by a qualified installer, service agency or
the gas supplier.
3
IMPORTANT SAFETY INSTRUCTIONS
WARNING: To reduce the risk of fire, electrical shock,
injury to persons, or damage when using the cooktop, follow
basic precautions, including the following:
■ WARNING: NEVER use this appliance as a space
heater to heat or warm the room. Doing so may result in
carbon monoxide poisoning and overheating of the cooktop.
■ CAUTION: Do not store items of interest to children in
cabinets above the cooktop – children climbing on the
cooktop to reach items could be seriously injured.
■ Proper Installation – The cooktop, when installed, must be
electrically grounded in accordance with local codes or, in
the absence of local codes, with the
Code, ANSI/NFPA70 or the Canadian Electrical Code,
. Be sure the cooktop is properly installed and
Part 1
grounded by a qualified technician.
National Electrical
■ This cooktop is equipped with a three-prong grounding
plug for your protection against shock hazard and should
be plugged directly into a properly grounded receptacle. Do
not cut or remove the grounding prong from this plug.
■ Disconnect the electrical supply before servicing the
cooktop.
■ Injuries may result from the misuse of the cooktop such as
stepping, leaning, or sitting on the top surface.
■ Maintenance – Keep cooktop area clear and free from
combustible materials, gasoline, and other flammable
vapors and liquids.
■ Storage on the cooktop – Flammable materials should not
be stored on or near surface units.
■ Top burner flame size should be adjusted so it does not
extend beyond the edge of the cooking utensil.
SAVE THESE INSTRUCTIONS
The California Safe Drinking Water and Toxic Enforcement Act requires the Governor of California to publish a list of substances
known to the State of California to cause cancer, birth defects, or other reproductive harm, and requires businesses to warn of
potential exposure to such substances.
WARNING: This product contains a chemical known to the State of California to cause cancer, birth defects, or other
reproductive harm.
This appliance can cause low-level exposure to some of the substances listed, including benzene, formaldehyde, carbon
monoxide, toluene, and soot.
4

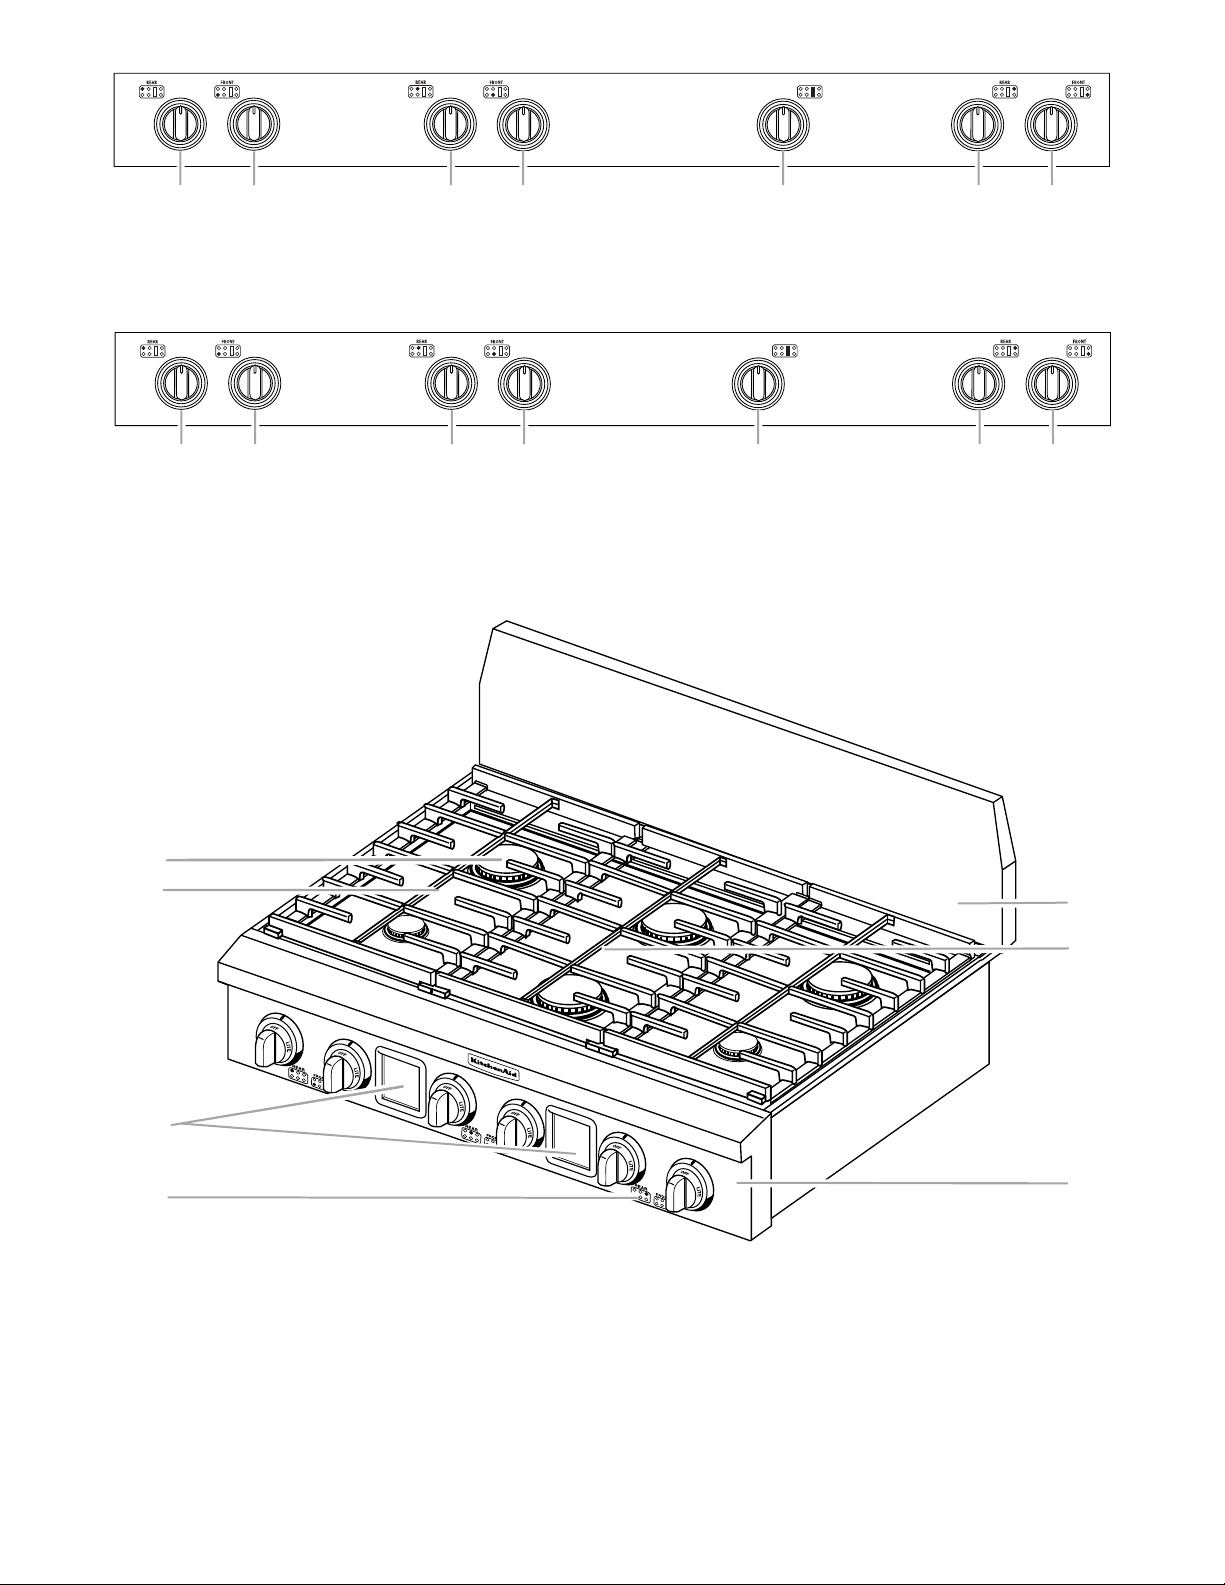
PARTS AND FEATURES
G
This manual covers several different models. The cooktop you have purchased may have some or all of the items listed. The locations
and appearances of the features shown here may not match those of your model.
48" (121.9 cm) Cooktop
A
B
C
D
E
A. Stainless steel backguard
(island trim not shown)
B. Surface burner grate
48" (121.9 cm) Control Panels
A. Left rear control knob (15,000 Btu/h)
B. Left front control knob (6,000 Btu/h)
C. Center left rear control knob (15,000 Btu/h)
GRILL
GRIDDLE
C. Surface burner
D. Grill (on some models)
E. Surface burner marker
D. Center left front control knob (15,000 Btu/h)
E. Center right rear control knob (15,000 Btu/h)
F
F. G r id d l e
(on some models)
G. Control panel
F. Center right front control knob
(15,000 Btu/h)
G. Right rear control knob (15,000 Btu/h)
H. Right front control knob (6,000 Btu/h)
A. Left rear control knob (15,000 Btu/h)
B. Left front control knob (6,000 Btu/h)
C. Grill control knob (18,000 Btu/h)
D. Center right rear control knob (15,000 Btu/h)
E. Center right front control knob
(15,000 Btu/h)
F. Griddle control knob (15,000 Btu/h)
5
GRILL
G
A B C D E F G
A. Left rear control knob (15,000 Btu/h)
B. Left front control knob (6,000 Btu/h)
A B C D E F G
A. Left rear control knob (15,000 Btu/h)
B. Left front control knob (6,000 Btu/h)
36" (91.4 cm) Cooktop
C. Center left rear control knob (15,000 Btu/h)
D. Center left front control knob (15,000 Btu/h)
E. Grill control knob (18,000 Btu/h)
C. Center left rear control knob (15,000 Btu/h)
D. Center left front control knob (15,000 Btu/h)
E. Griddle control knob (15,000 Btu/h)
F. Right rear control knob (15,000 Btu/h)
G. Right front control knob (6,000 Btu/h)
GRIDDLE
F. Right rear control knob (15,000 Btu/h)
G. Right front control knob (6,000 Btu/h)
A
B
C
D
A. Surface burner
B. Surface burner grate
C. Tile bezel assembly (on some models)
D. Surface burner marker
E. Stainless steel backguard (island trim not shown)
E
F
F. Grill or griddle (on some models)
G. Control panel
6
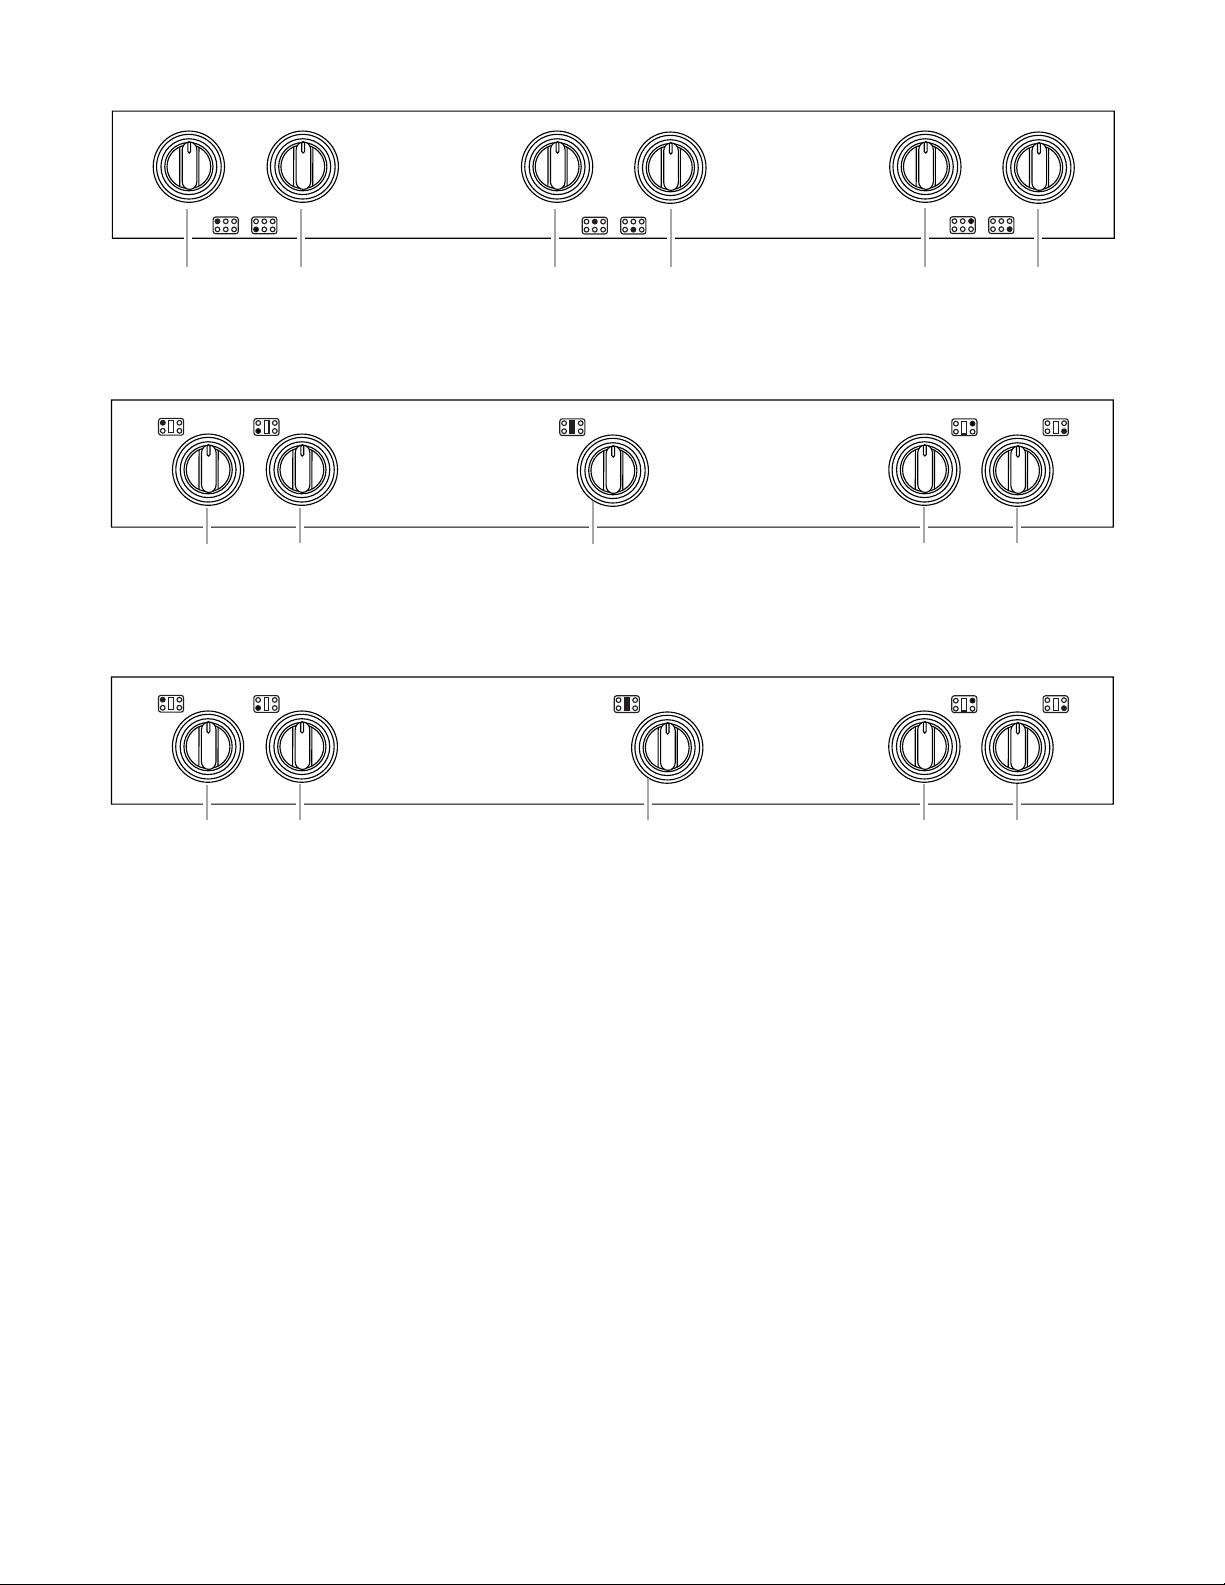
36" (91.4 cm) Control Panels
REAR FRONT
AB CD EF
A. Left rear control knob (15,000 Btu/h)
B. Left front control knob (6,000 Btu/h)
REAR
FRONT GRIDDLE
AB C D
A. Left rear control knob (15,000 Btu/h)
B. Left front control knob (6,000 Btu/h)
REAR
FRONT GRILL
REAR FRONT
C. Center rear control knob (15,000 Btu/h)
D. Center front control knob (15,000 Btu/h)
E. Right rear control knob (15,000 Btu/h)
F. Right front control knob (6,000 Btu/h)
REAR FRONT
REAR
FRONT
E
C. Griddle control knob (15,000 Btu/h) D. Right rear control knob (15,000 Btu/h)
E. Right front control knob (6,000 Btu/h)
REAR
FRONT
AB C D
A. Left rear control knob (15,000 Btu/h)
B. Left front control knob (6,000 Btu/h)
E
C. Grill control knob (18,000 Btu/h) D. Right rear control knob (15,000 Btu/h)
E. Right front control knob (6,000 Btu/h)
7

COOKTOP USE
Cooktop Controls
IMPORTANT: Your cooktop is factory-set for use with Natural
gas. If you wish to use LP gas, an LP Gas Conversion Kit is
included with your new cooktop. See the instructions included
with the LP Gas Conversion Kit for details on making this
conversion.
Electric igniters automatically light the surface burners when
control knobs are turned to LITE.
The large burners (18,000 and 15,000 Btu/h [British Thermal
Units]) provide the highest heat setting, and are ideal for cooking
large quantities of food or liquid, using large pots and pans. The
small burners (6,000 Btu/h) allow more accurate simmer control
at the lowest setting, and are ideal for cooking smaller quantities
of foodc006 4.5(i)sg ,a po19.5(t)-42(06 4.5 (and)7.1( p)-6.2(a-4.5n06 4.5(.)]TJ0 -1.44 TD-0.0296 Tc-0.0824 Tw[Be fos)1018e)-0.8(st)-9.6ein65.4(g )-13.3( (con)67.9th)5.4oso l ptae f(i)78.6lied coowrreo(n65.4 tn)-7.9hn
o n-72.3(o)-269(t)-8.3( )13.3topeae bur-17( n-72.3ers w)53.3(h.6(i)86li5343(e)-.3(u)63(s)-1[(in)72.3g emptn)83.3y( coowr)53.3(a-0.4()98.7(e-0.4(ors w86(i)86tn)83.3(h.6obu))7.3t( )]TJ0 -1.12 TD-0.013 Tc0.023 Tw[anyi53.7( coow ar)12eI)2.7(o(n83.3( t)63(h86.3(e)-09.7( )13.3gratn)69e.r)]TJ/F10 13 fJ0 -1.44 TD-0.0945 Tc0 Tw[NOr)-1817(TE)1
8
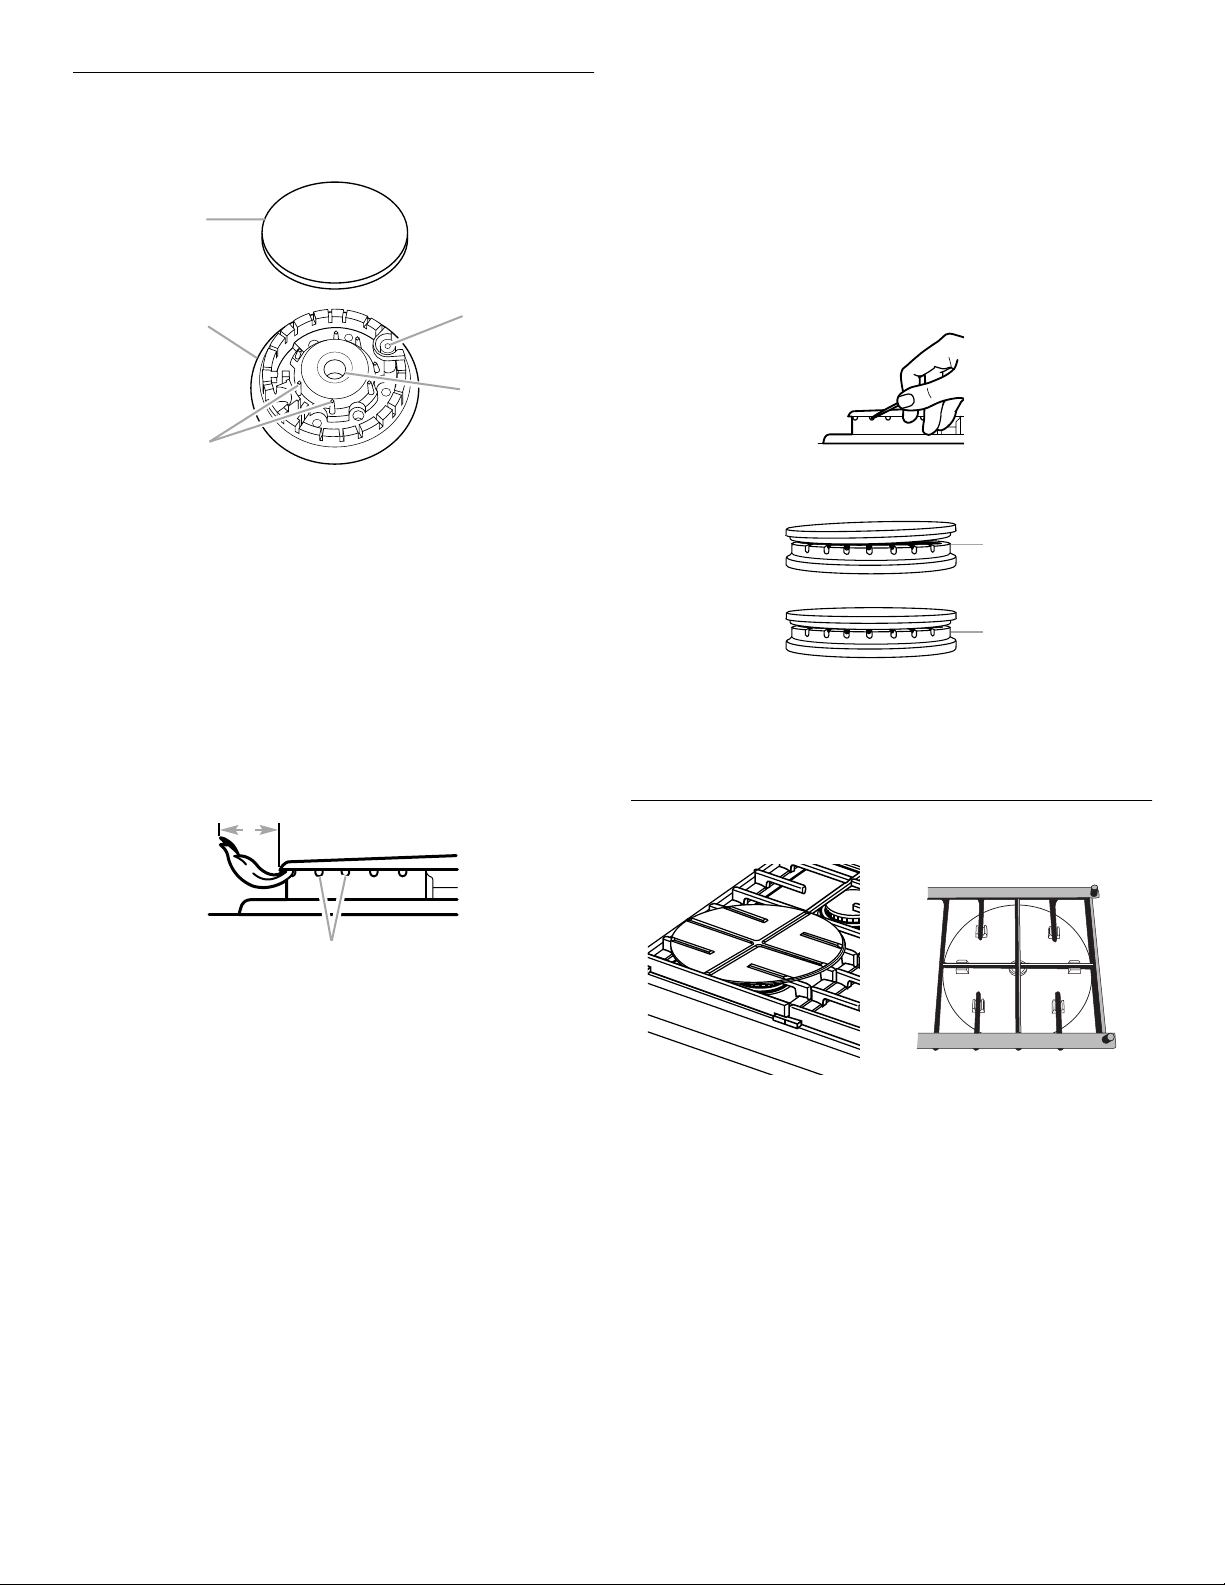
Sealed Surface Burners
D
A
IMPORTANT: Do not obstruct the flow of combustion and
ventilation air around the burner grate edges.
A
B
E
C
To C lea n:
IMPORTANT: Before cleaning, make sure all controls are off and
the oven and cooktop are cool. Do not use oven cleaners, bleach
or rust removers.
1. Remove the burner cap from the burner base and clean
according to “General Cleaning” section.
2. Clean the gas tube opening with a damp cloth.
3. Clean clogged burner ports with a straight pin as shown. Do
not enlarge or distort the port. Do not use a wooden
toothpick. If the burner needs to be adjusted, contact a
trained repair specialist.
A. Burner cap
B. Burner base
C. Alignment pins
D. Igniter
E. Gas tube opening
Burner cap: Always keep the burner cap in place when using a
surface burner. A clean burner cap will help avoid poor ignition
and uneven flames. Always clean the burner cap after a spillover
and routinely remove and clean the caps according to the
“General Cleaning” section.
Gas tube opening: Gas must flow freely throughout the gas tube
opening for the burner to light properly. Keep this area free of soil
and do not allow spills, food, cleaning agents or any other
material to enter the gas tube opening. Protect it from spillovers
by always using a burner cap.
A
B
A. 1-1½" (25-38 mm)
B. Burner ports
Burner ports: Check burner flames occasionally for proper size
and shape as shown above. A good flame is blue in color, not
yellow. Keep this area free of soil and do not allow spills, food,
cleaning agents or any other material to enter the burner ports.
4. Replace the burner cap, making sure the alignment pins are
properly aligned with the burner cap.
B
A. Incorrect
B. Correct
5. Turn on the burner. If the burner does not light, check cap
alignment. If the burner still does not light, do not service the
sealed burner yourself. Contact a trained repair specialist.
Simmer Plate
■ The Simmer Plate is made of aluminum with a nonstick
coating to evenly spread the heat over the bottom of
cookware.
■ Channels on the bottom of the Simmer Plate have been
designed so it fits properly and securely over the grate. See
above illustration.
■ The Simmer Plate may be used on large and small surface
burners.
■ Use the Simmer Plate with burner settings in the medium to
low range on the cooktop when lower temperatures are
needed for simmering, or for maintaining food at a low
temperature over an extended period of time.
See “Assistance or Service” section to order extra Simmer
Plates.
9
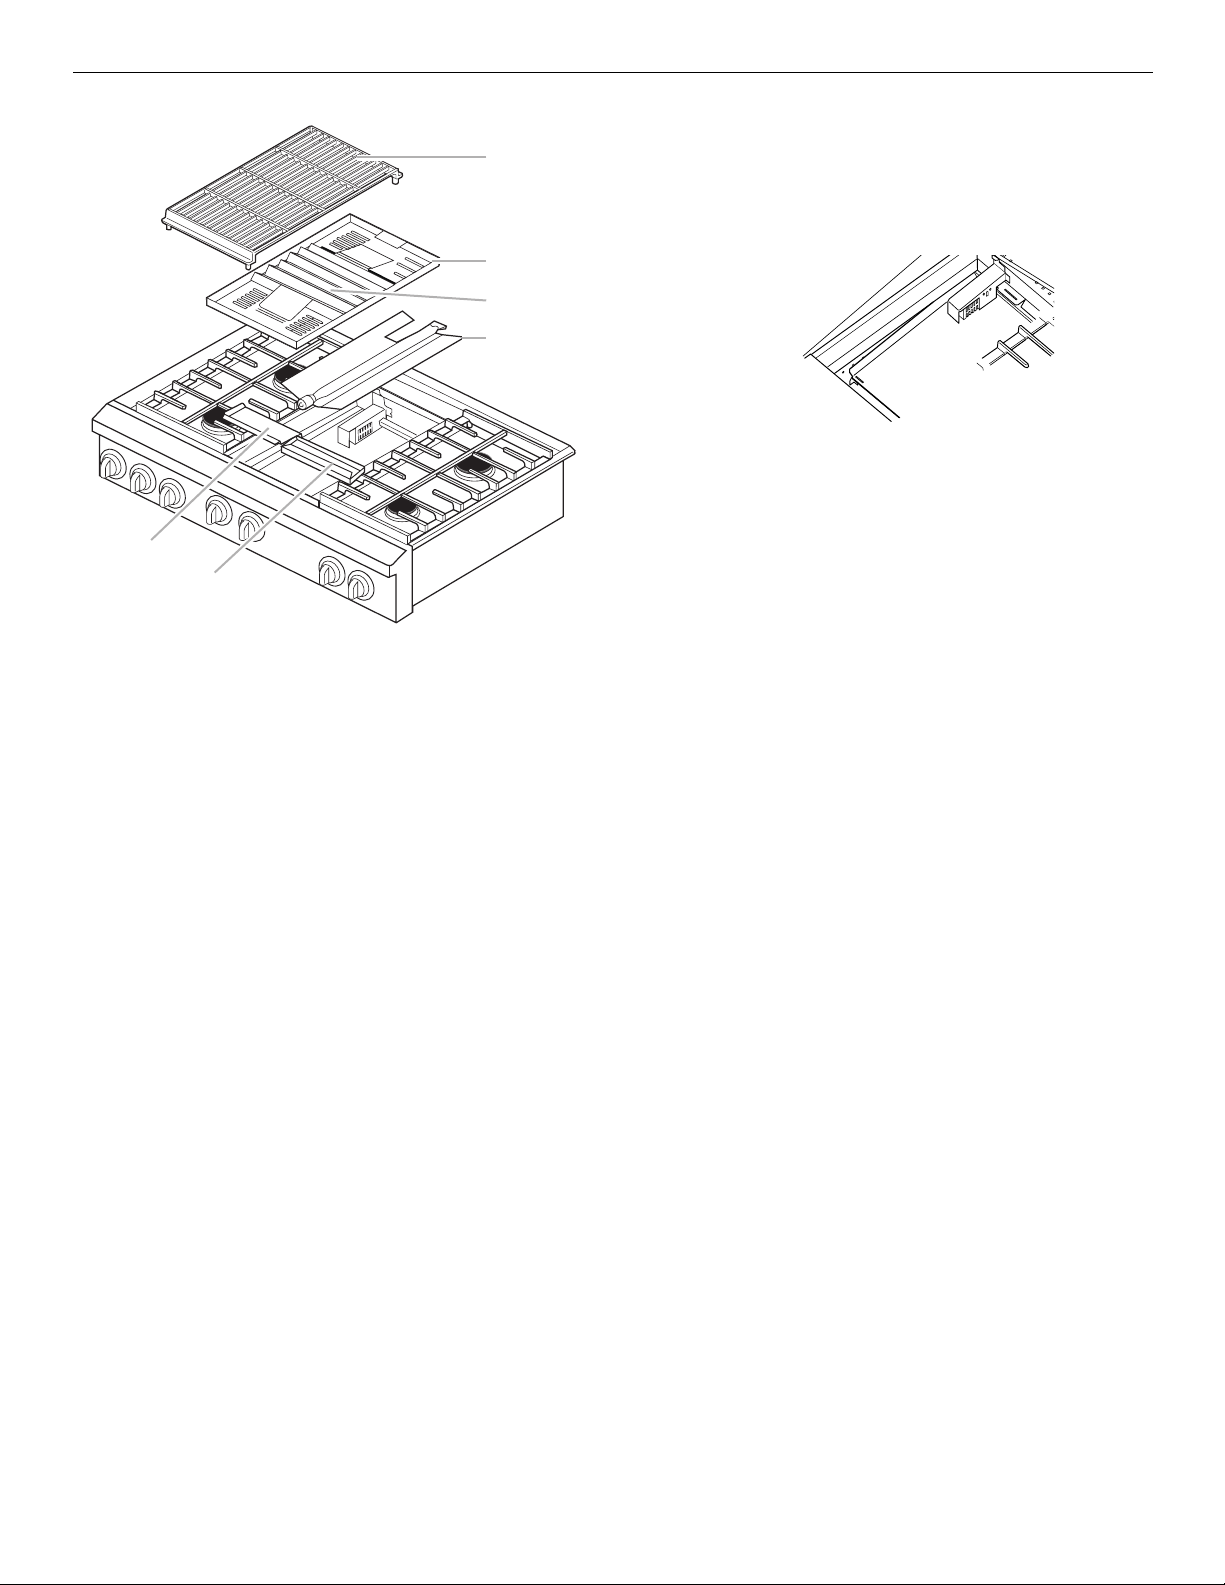
Grill (onsomemodels)
To Replace:
A
B
C
D
E
F
A. Grill grate
B. Wave tray
C.Wave plate
D. Burner assembly
E. Front spill guard
F. Dr i p t ra y
1. Lift burner assembly out of basin and set aside.
2. Place drip tray on bottom of grill basin and slide the tray
forward so that it is located side to side and against the
locating feet of the rear spill guard.
A. Rear spill guard
B. Locating feet
C. Drip tray
3. Insert the front spill guard feet into the slots in the rear spill
guard. The rear flange will rest on the burner box.
The grill module consists of a cast-iron grate, a wave tray, a wave
plate, a burner assembly, a front spill guard and a drip tray. It is
used to grill foods. Refer to the “Grill Chart” for cook times and
settings.
When using the grill, follow the guidelines below.
■ Do not leave the grill unattended while cooking.
■ Do not use aluminum foil, charcoal or wood chips.
■ Trim excess fat to reduce spattering. Slit the remaining fat on
the edges to avoid curling.
■ Allow space between food on the grill. Crowding food will
result in uneven cooking.
■ Use a metal spatula or tongs to turn food.
■ Steaks, chops and hamburgers should be turned only once
to avoid loss of juices.
■ For even cooking, foods such as chicken quarters should be
turned several times.
■ To check for doneness of meats and poultry, use an instant
read thermometer or make a small cut in the center of the
food. This will avoid loss of juices.
Before removing or replacing grill, make sure the control knobs
are turned to OFF. Allow the grill to cool completely before
handling.
To R emo ve:
1. Remove grill grate.
2. Remove wave tray and wave plate.
3. Remove burner assembly.
4. Remove front spill guard.
5. Remove drip tray.
6. Clean basin. See “General Cleaning” section.
A. Front spill guard
B. Feet and slots
4. Place burner assembly over spill guard, making sure burner’s
rear flange is seated in slot.
5. Install the wave tray into the grill. The tab in the left rear
corner of the bay must fit through the slot in the left rear
corner of the wave tray.
A. Slot for locating tab
B. Locating tab
10
 Loading...