

KitchenAid KFIS29BBBL, KFIS29BBMS, KFIS29BBWH, KFIS29PBMS, KFIV29PCMS Quick Reference Guide
Page 1
WWW.KITCHENAID.COM WWW.KITCHENAID.CA
U.S.: 1-800-422-1230 CANADA: 1-800-807-6777
Quick Reference Guide
Guide de référence rapide
W10537978A
Page 2
2
Cooling and Noise
Cooling
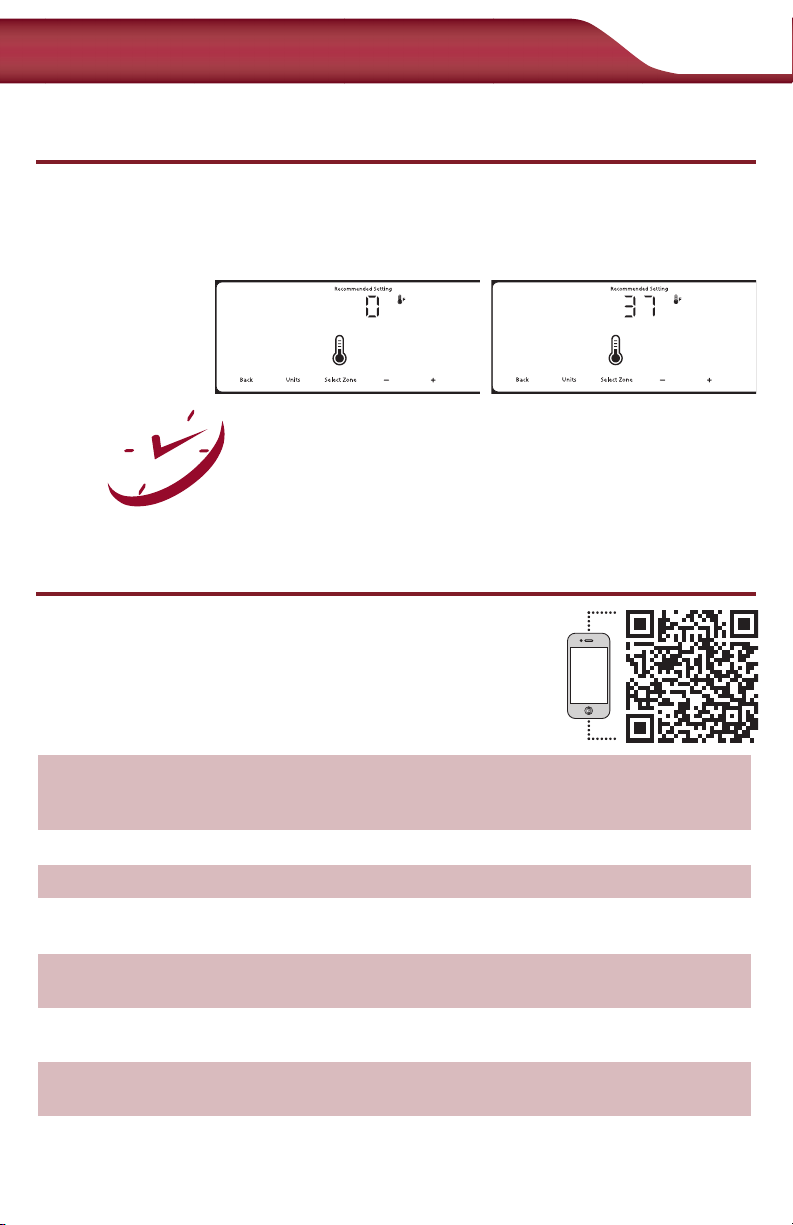
Make sure the controls are set to the recommended temperatures for normal household
use.
NOTE: Areas such as a garage or porch may experience hotter or colder temperatures and
higher humidity than inside the home. You may need to adjust the temperature to
accommodate for these conditions.
Freezer: 0˚F (-18˚C)
Fridge: 37˚F (3˚C)
• Before storing food, wait 24 hours for your refrigerator to cool
completely.
• If you adjust the control settings, allow 24 hours for the
temperature to change between adjustments.
• Make sure the air vents inside the refrigerator and freezer
compartments are not blocked by stored food.
Noise
The compressor in your new refrigerator operates quietly. Due to
this reduction in operating noise, you may notice unfamiliar noises
that are normal. To listen to normal refrigerator sounds, go to
kitchenaid.custhelp.com and search for “normal sounds” OR scan
the QR code located to the right.
Buzzing and Clicking Heard when the water valve opens and closes to dispense water
and/or fill the ice maker. If the refrigerator is not connected to the
water line, turn OFF the ice maker.
Pulsating/Whirring Fans/compressor adjusting to optimize performance
Hissing/Dripping Flow of refrigerant, or flow of oil in the compressor
Rattling/Banging Move water line away from the refrigerator cabinet or fasten the
excess line to the cabinet.
Popping Contraction/expansion of inside walls, especially during initial cool-
down
Water running/
Gurgling
May be heard when ice melts during the defrost cycle and water
runs into the drain pan
Creaking/Cracking/
Grinding
May be heard as ice is being ejected from the ice maker mold
24
Scan
here
Page 3
3
Water Filter
Water Filter Installation/Flushing/Replacement
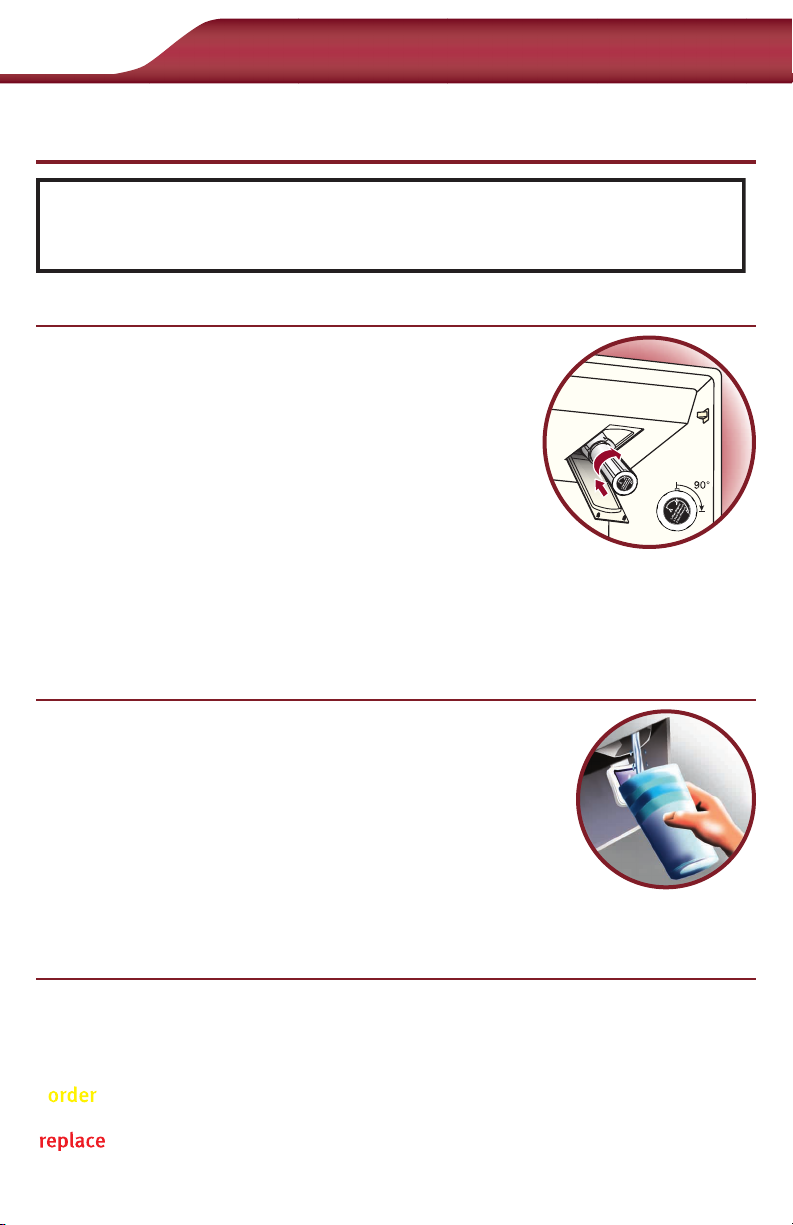
Installation
1. Take the water filter out of its packaging and remove the cover
from the O-rings. Be sure the O-rings are still in place after the
cover is removed.
NOTE: See the water filter certification and performance
data information in the Use & Care Guide.
2. The water filter compartment is located in the right-hand
side of the refrigerator ceiling. Push up on the door to release
the catch, then lower the door.
3. Align the arrow on the water filter label with the cutout notch in
the filter housing and insert the filter into the housing.
4. Turn the filter clockwise 90 degrees (
1
⁄4 turn), until it locks into the housing.
NOTE: If the filter is not correctly locked into the housing, the water dispenser will not
operate. Water will not flow from the dispenser.
5. Lift the filter up into the compartment. Close the filter compartment door completely.
Flushing
IMPORTANT: After connecting the refrigerator to a water source or
replacing the water filter, flush the water system to force air from the
water line to keep the dispenser from dripping.
1. Use a sturdy container to depress and hold the water dispenser
pad for 5 seconds, then release it for 5 seconds. Repeat until
water begins to flow.
2. Continue depressing and releasing the dispenser pad (5 seconds on,
5 seconds off) until a total of 3 gal. (12 L) of water has been
dispensed.
Replacement
Press OPTIONS and select Water Filter Status to display the percentage of use remaining in
the water filter (from 100% to 0%).
ALSO
The water filter status lights will let you know when to change your water filter.
• ORDER (Yellow) - Order a replacement water filter.
• REPLACE (Red) - Replace the water filter.
Do not use with water that is microbiologically unsafe or of unknown quality without
adequate disinfection before or after the system. Systems certified for cyst
reduction may be used on disinfected waters that may contain filterable cysts.
Page 4
4
Ice and Water
Ice and Water
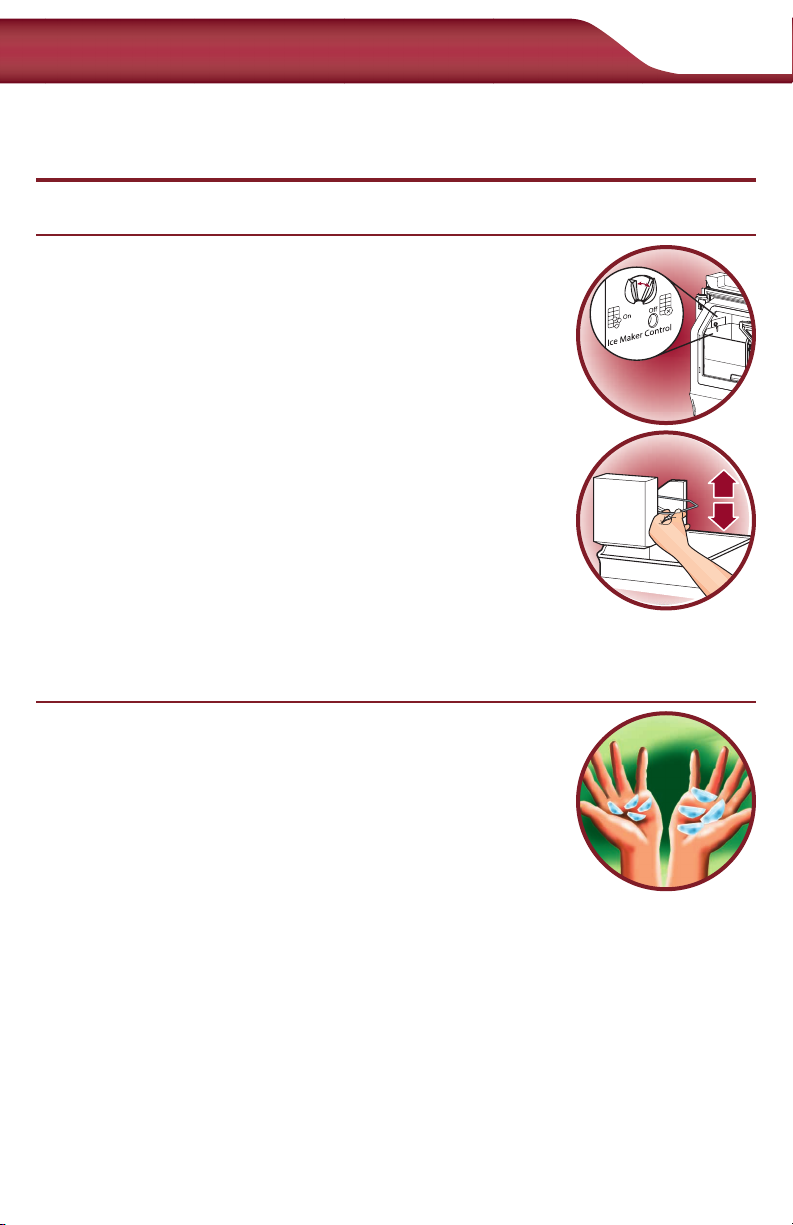
Ice Maker Operation
1. Connect the refrigerator to the household water line. Turn on the ice
maker.
Style 1 - Push up on the latch on the left-hand side of the ice
compartment to open the door. The ice maker switch is located
on the left-hand side of the ice compartment.
• Move the switch to the (left) ON position.
Style 2 - Lower the wire shutoff arm to turn the ice maker ON.
2. Wait 24 hours for the refrigerator to become cold enough
to make ice. If there is no ice after 48 hours, make sure the
water line is connected to the refrigerator, the water supply is
turned on and the ice maker is turned on.
3. Discard the first three batches of ice produced.
4. It will take approximately 2 to 3 days for the ice bin to fill
completely following installation.
NOTE: The ice maker should produce approximately 3 lbs (1.4 kg)
of ice per day under normal operation.
Ice Maker and Dispensers
Hollow ice cubes, slow or no water flow
If the ice cubes are hollow or have an irregular shape, or the water
flow decreases, it could be because of low water pressure.
• Make sure the water filter is locked in its compartment. Replace
the water filter every 6 months or if it is clogged.
• Make sure you have adequate water supply pressure; check the
Reverse Osmosis (RO) system, if applicable.
• Make sure the water line is free of kinks and/or restrictions.
Dispenser or Ice System Jams, No/Slow/Little Ice Production or
Dispensing, Ice Clumping
• Ice shavings collect in the dispenser chute and may eventually lead to jams. Occasionally
dispense cubed ice to clean out the ice chute.
• If necessary, remove the ice clogging the storage bin and delivery chute, using a plastic
utensil.
• An ice cube may be jammed in the ice maker ejector. Remove ice from the ejector arm
using a plastic utensil.
• Warmth, humidity, or lack of use may cause the ice to clump. Dispense ice regularly. If
clumping occurs, clean the storage bin.
Style 1
Style 2
Page 5

5
Door Closing, Leveling and Alignment
Dispenser Drips
Ice and water will continue to be dispensed for a few seconds after
you release the dispenser pad. Wait a few seconds before removing
the glass.
• Flush the water system. Air trapped in the water line will cause
water to continue to flow from the dispenser.
• Check water supply pressure; check Reverse Osmosis (RO) system
if applicable.
• Ice shavings may collect in dispenser chute and melt, which causes the
dispenser to drip. Clean the ice delivery chute using a warm, damp cloth. Dry thoroughly.
Door Closing, Leveling and Alignment
If you want the doors to close more easily, or if the refrigerator
seems unsteady, turn the brake feet clockwise to raise the front of
the refrigerator. Turn both brake feet the same amount to keep
the refrigerator level, then make sure the brake feet are firmly
against the floor.
If the doors are uneven at the top, align the
doors. To ensure best alignment, make
adjustments after food has been stored in
the doors.
• Keeping both refrigerator doors closed,
pull out the freezer drawer.
• The alignment screw is inside the bottom
hinge pin of the right-hand door.
• Insert the
1
⁄8" hex key wrench (packed with
the Handle Installation Instructions) into
the bottom hinge pin until it is fully
engaged in the alignment screw.
To raise the door, turn the hex key to the right.
To lower the door, turn the hex key to the left.
• If necessary, continue to turn the alignment screw until the doors are aligned.
¹⁄₄"
A
Brake foot
Bottom
hinge pin
1
⁄8" Hex key wrench
(provided)
A
B
Page 6

6
Controls
Buttons
Ice Mode - To select Water, or Crushed or
Cubed Ice
Light - To adjust the dispenser light
Temperature - To turn on Temp feature and
to display and adjust the temperature
Options - To select Max Ice, Max Cool or
Water Filter Status features
Vacation Mode - The freezer will
defrost less often to conserve energy
Lock - To lock and unlock all function buttons and the dispensers
Measured Fill - To dispense a preselected volume of water
Lock/Measured Fill - To turn OFF Cooling
Options/Lock - To turn on Measured Fill calibration
Display Screen
Door Ajar - Indicates either a door or drawer is open. An alarm will sound when the door
has been ajar for 5 minutes or longer.
Measured Fill
- Indicates Measured Fill feature is being calibrated.
Max Ice - Indicates Max Ice is on. Increases ice production over a 24-hour period.
Max Cool - Indicates Max Cool is on. Provides extra cooling during periods of high
refrigerator use, warm room temperatures, or full grocery loads.
Temperature - Indicates the set point
• Refrigerator - Displays when the refrigerator compartment temperature is displayed
• Freezer - Displays when the freezer compartment temperature is displayed
• Recommended - Displays when the freezer temperature selected is 0˚F (-18°C) and
refrigerator temperature selected is 37˚F (3°C)
• ˚C /˚F - Degrees Celsius or Fahrenheit
Showroom - Used when refrigerator is on display in a retail store
Sabbath Mode - Used for religious observances requiring lights and dispensers to be off
Light - Indicates the light is on and the brightness level
Cooling is Off - Indicates that cooling has been turned off
Water Filter -
• Percentage of water filter life remaining
• Order replacement water filter
• Replace water filter
Lock - Indicates the controls and dispensers are disabled
Page 7

7
Commandes
Boutons
Ice Mode (mode glaçons) - Pour sélectioner
de l’eau, de la glace concassée ou des glaçons
Light (éclairage) - Pour ajuster l’éclairage du
distributeur
Temperature (température) - Pour activer
la fonction de température et pour afficher et
régler la température
Options - Pour sélectionner les caractéristiques
Max Ice (glaçons max), Max Cool
(refroidissement maximal) ou Water Filter
Status (statut du filtre à eau)
Vacation Mode (mode vacances) - Le congélateur se dégivrera moins souvent afin
d'économiser de l'énergie
Lock (verrouillage) - Pour verrouiller et déverrouiller tous les boutons de fonction et les
distributeurs
Measured Fill (remplissage mesuré) - Pour verser un volume d’eau présélectionné
Lock/Measured Fill (verrouillage/remplissage mesuré) - Pour arrêter le
refroidissement
Options/Lock (options/verrouillage) - Pour activer le calibrage du remplissage
mesuré
Écran d’affichage
Door Ajar (porte ouverte) - Indique qu’une porte ou qu’un tiroir est ouvert(e). Une alarme retentit
si la porte reste ouverte pendant 5 minutes ou plus.
Measured Fill (remplissage mesuré) -Indique que la caractéristique Remplissage mesuré est
en cours de calibrage.
Max Ice (glaçons max) - Indique que la fonction Max Ice (glaçons max) est activée. Augmente la
production de glaçons sur une période de 24 heures.
Max Cool (refroidissement maximal) - Indique que la fonction Max Cool (refroidissement maximal) est
activée. Déclenche un refroidissement supplémentaire lors de périodes d’utilisation intense du réfrigérateur,
en cas d’élévation de la température de la pièce ou lors de l’ajout d’un grand nombre d’aliments.
Temperature (température) - Indique le point de réglage
• Refrigerator (réfrigérateur) - S’affiche lorsque la température du compartiment de
réfrigération s’affiche
• Freezer (congélateur) - S’affiche lorsque la température du compartiment de congélation
s’affiche
• Recommended (recommandé) - S’affiche lorsque la température sélectionnée pour le
congélateur est de 0°F (-18°C) et que la température sélectionnée pour le réfrigérateur est
de 37°F (3°C)
•°C /°F - Degrés Celsius ou Fahrenheit
Showroom (exposition) - Réservé au moment où le réfrigérateur est en exposition dans un magasin
Sabbath Mode (mode Sabbat) - Utilisée pour les personnes dont les croyances religieuses
nécessitent l’extinction des lumières et des distributeurs
Light (lumière) - Signale que la lumière est allumée et indique le niveau de luminosité
Cooling is Off (refroidissement désactivé) - Signale que le refroidissement a été désactivé
Water Filter (filtre à eau) -
• Pourcentage de durée de vie restante pour le filtre à eau
• Commander un filtre à eau de rechange
• Remplacer le filtre à eau
Lock - Signale que les commandes et les distributeurs sont désactivés
Page 8

8
Refroidissement et bruits
Refroidissement
S’assurer que les commandes de température sont toujours aux réglages recommandés pour
un usage normal du domicile/foyer.
REMARQUE : Dans des zones comme un garage ou un porche, la température peut être
plus élevée ou plus basse et le taux d’humidité supérieur à celui de l’intérieur du domicile. Il
faudra peut-être ajuster la température pour que l’environnement de l’appareil soit idéal.
Congélateur: 0˚F
(-18˚C)
Réfrigérateur: 37˚F
(3˚C)
• Avant de remiser de la nourriture, attendre 24 heures pour le
refroidissement complet du réfrigérateur.
• En cas d’ajustement des réglages de commande, attendre
24 heures entre les ajustements.
• S’assurer que les aérations à l’intérieur des compartiments de
réfrigération et de congélation ne sont pas obstruées par des
aliments.
Bruits
Le fonctionnement du compresseur du nouveau réfrigérateur est
silencieux. Les bruits de fonctionnement étant moins importants,
vous remarquerez peut-être des bruits inconnus qui sont en réalité
normaux. Pour écouter des bruits faisant partie du fonctionnement
normal du réfrigérateur, rendez-vous à l’adresse
www.kitchenaid.custhelp.com et cherchez “bruits normaux” OU
scannez le code QR situé à droite.
Bourdonnement et
cliquetis
Se produit lorsque le robinet d’eau s’ouvre et se referme pour
distribuer de l’eau et/ou remplir la machine à glaçons. Si le
réfrigérateur n’est pas raccordé à la canalisation d’alimentation,
ÉTEINDRE la machine à glaçons.
Pulsation/
bourdonnement
Les ventilateurs/le compresseur se règlent afin d’optimiser la
performance
Sifflement/égouttement Écoulement de liquide réfrigérant ou d’huile dans le compresseur
Entrechoquement/
martèlement
Éloigner la canalisation d’eau de la caisse du réfrigérateur ou fixer
l’excédent de canalisation sur la caisse.
Éclatement Contraction/expansion des parois internes, surtout lors du
refroidissement initial
Écoulement
d’eau/gargouillement
Peut se produire lorsque la glace fond lors du programme de
dégivrage et que l’eau s’écoule dans le plateau de dégivrage
Craquement/claquem
ent/grincement
Peut se produire lorsque la glace est éjectée du moule à glaçons
24
Scanner
ici
Page 9

9
Filtre à eau
9
Installation/rinçage/remplacement du filtre à eau
Installation
1. Retirer le filtre à eau neuf de son emballage, puis retirer les
protections des joints toriques. S’assurer que les joints toriques
sont toujours en place une fois la protection retirée.
REMARQUE :
Voir les informations relatives à la performance
et à la certification dans le Guide d'utilisation et d'entretien.
2. Le compartiment du filtre à eau se trouve du côté droit du
plafond du réfrigérateur. Pousser la porte vers le haut pour
dégager le loquet puis abaisser la porte.
3. Aligner la flèche sur l’étiquette du filtre à eau avec l’encoche du
logement du filtre et insérer le filtre dans le logement.
4. Tourner le filtre de 90 degrés (d’un quart de tour) dans le sens horaire jusqu'à ce
qu'il s'emboîte dans le logement.
REMARQUE : Si le filtre n’est pas bien emboîté dans le logement, le distributeur d’eau
ne fonctionnera pas. L’eau ne coulera pas du réservoir.
5. Soulever le filtre pour l’insérer dans le compartiment. Fermer complètement le clapet du
compartiment du filtre.
Rinçage
IMPORTANT : Après avoir raccordé le réfrigérateur à une source
d’alimentation en eau ou avoir remplacé le filtre à eau, vidanger le
circuit d’eau pour évacuer l’air de la canalisation d’eau afin d’empêcher
le distributeur de goutter.
1. Utiliser un récipient robuste pour appuyer sur la plaque du
distributeur d’eau pendant 5 secondes, puis relâcher pendant
5 secondes. Répéter l’opération jusqu’à ce que l’eau commence à
couler.
2. Continuer d’appuyer puis de relâcher la plaque du distributeur (appui
pendant 5 secondes, relâchement pendant 5 secondes) jusqu’à ce qu’un total de 3 gal.
(12 L) soit distribué.
Remplacement
Appuyer sur OPTIONS et sélectionner Water Filter Status (statut du filtre à eau) pour
afficher le pourcentage d’utilisation restant dans le filtre à eau (de 100 % à 0 %).
À NOTER ÉGALEMENT
Les témoins lumineux du filtre à eau vous permettront de savoir quand changer le filtre à eau.
• ORDER (commander) (jaune) – Commander un filtre à eau de rechange.
• REPLACE (remplacer) (rouge) – Remplacer le filtre à eau.
Ne pas utiliser pour le filtrage d'une eau microbiologiquement polluée ou de qualité
inconnue en l'absence d'un dispositif de désinfection adéquat avant ou après le
système. Les systèmes certifiés pour la réduction de kystes peuvent être utilisés
pour une eau désinfectée qui peut contenir des kystes filtrables.
Page 10

10
Glaçons et eau
Glaçons et eau
Fonctionnement de la machine à glaçons
1. Raccorder le réfrigérateur à la canalisation d’eau du domicile. Mettre
la machine à glaçons en marche.
Style 1 - Pousser le loquet sur le côté gauche du compartiment à
glaçons pour ouvrir la porte. La machine à glaçons se trouve du
côté gauche du compartiment à glaçons.
• Mettre le commutateur sur la position ON (marche) (vers la
gauche).
Style 2 - Abaisser le bras d’arrêt métallique pour METTRE
EN MARCHE la machine à glaçons.
2. Attendre 24 heures pour que le réfrigérateur soit suffisamment froid
pour produire des glaçons. S’il n’y a pas de glace après 48 heures,
s’assurer que la canalisation d’eau est connectée au réfrigérateur,
que l’alimentation en eau est ouverte et que la machine à glaçons
est en marche.
3. Jeter les trois premiers lots de glaçons produits.
4. Le bac à glaçons met environ 2 à 3 jours à se remplir
complètement après l’installation.
REMARQUE : Dans des conditions de fonctionnement normales, la machine à glaçons doit
produire environ 3 lb (1,4 kg) de glaçons par jour.
Machine à glaçons et distributeurs
Glaçons creux, écoulement d’eau lent ou pas d’écoulement
Si les glaçons sont creux, que leur forme est irrégulière ou que le débit
d’eau diminue, cela peut être dû à une faible pression en eau.
• S’assurer que le filtre à eau est verrouillé dans son compartiment.
Remplacer le filtre à eau tous les 6 mois ou s’il est obstrué.
• S’assurer que la pression en eau est suffisante; inspecter le système
d’osmose inverse, le cas échéant.
• Vérifier que la canalisation d’eau n'est pas déformée et/ou obstruée
Obstruction du distributeur à glaçons ou du circuit de distribution
des glaçons; production ou distribution de glaçons lente/réduite/inexistante;
agglomération de glaçons
• Des copeaux de glace s’accumulent dans la goulotte du distributeur et peuvent finir par
créer des obstructions. Recueillir occasionnellement des glaçons pour dégager la goulotte.
• Si nécessaire, retirer les glaçons obstruant le bac d’entreposage et la goulotte de
distribution des glaçons à l’aide d’un ustensile en plastique.
• Un glaçon est peut-être coincé dans le bras éjecteur de la machine à glaçons. Enlever le
glaçon du bras éjecteur avec un ustensile en plastique.
• La chaleur, l’humidité et une faible utilisation peuvent entraîner une agglomération de
glaçons. Distribuer des glaçons régulièrement. Si les glaçons s’agglomèrent, nettoyer le bac
d'entreposage.
Style 1
Style 2
Page 11

11
Fermeture, mise à niveau et alignement des portes
Égouttement du distributeur
La distribution d’eau et de glaçons continue pendant quelques
secondes après que l’on a relâché la plaque du distributeur. Attendre
quelques secondes avant de retirer le verre.
• Rincer le système de distribution d’eau. De l’air piégé dans la
canalisation d’alimentation en eau prolonge l’écoulement d’eau du
distributeur.
• Contrôler la pression de l’alimentation en eau; inspecter le système
d’osmose inverse, le cas échéant
• Des copeaux de glace peuvent s’accumuler dans la goulotte du distributeur et fondre, ce
qui fait goutter le distributeur. Nettoyer la goulotte de distribution des glaçons à l’aide d’un
chiffon tiède et humide puis sécher soigneusement.
Fermeture, mise à niveau et alignement des portes
Si vous souhaitez que les portes se ferment plus facilement ou si le
réfrigérateur semble instable, tourner les pieds de stabilisation
dans le sens horaire pour soulever l’avant du réfrigérateur.
Tourner les deux pieds de stabilisation du même nombre de
tours pour que le réfrigérateur reste d’aplomb puis s’assurer
que les pieds de stabilisation sont fermement en contact avec
le sol.
Si les portes sont mal alignées au sommet,
les aligner. Pour un bon alignement, effectuer
les ajustements une fois les aliments placés
dans les portes.
• Tout en gardant les deux portes du
réfrigérateur fermées, retirer le tiroir du
congélateur.
• La vis d’alignement se trouve à l’intérieur
de l’axe de la charnière inférieure de la
porte de droite du réfrigérateur.
• Introduire la clé à tête hexagonale de
1
⁄8"
(jointe aux instructions d’installation de la
poignée) dans l’axe de la charnière inférieure jusqu’à ce qu’elle soit complètement engagée
dans la vis d’alignement.
Pour soulever la porte, tourner la clé à tête hexagonale vers la droite.
Pour abaisser la porte, tourner la clé à tête hexagonale vers la gauche.
• Si nécessaire, continuer à tourner la vis d’alignement jusqu’à ce que les portes soient
alignées.
¹⁄₄"
A
Pied de stabilisation
Axe de
charnière
inférieure
Clé à tête hexagonale
de 1⁄8" (fournie)
A
B
Page 12

10/12
®
/™ ©2012 KitchenAid. Used under license in Canada. All rights reserved.
Printed in U.S.A.
W10537978A
Utilisée sous licence au Canada. Tous droits réservés.
Imprimé aux É.-U.
For more information, refer to the Use & Care Guide and kitchenaid.custhelp.com.
Pour plus d’informations, consulter le guide d’utilisation et d’entretien ainsi que
kitchenaid.custhelp.com.
 Loading...