

Page 1
Part No.8184968 Rev. A
IMPORTANT:
Installer: Leave Installation
Instructions with the consumer.
Comsumer: Keep Installation
Instructions for future reference.
Write down the model and serial numbers
before installing or using Outdoor Bar
Cart.
Both numbers are on the model/serial
number plate, located on the underside,
right front of the Outdoor Bar Cart.
Model #___________________________
Serial # ___________________________
Questions regarding features,
operation, performance, parts or
service? Call 1-800-422-1230 or visit
our web site at www.kitchenaid.com.
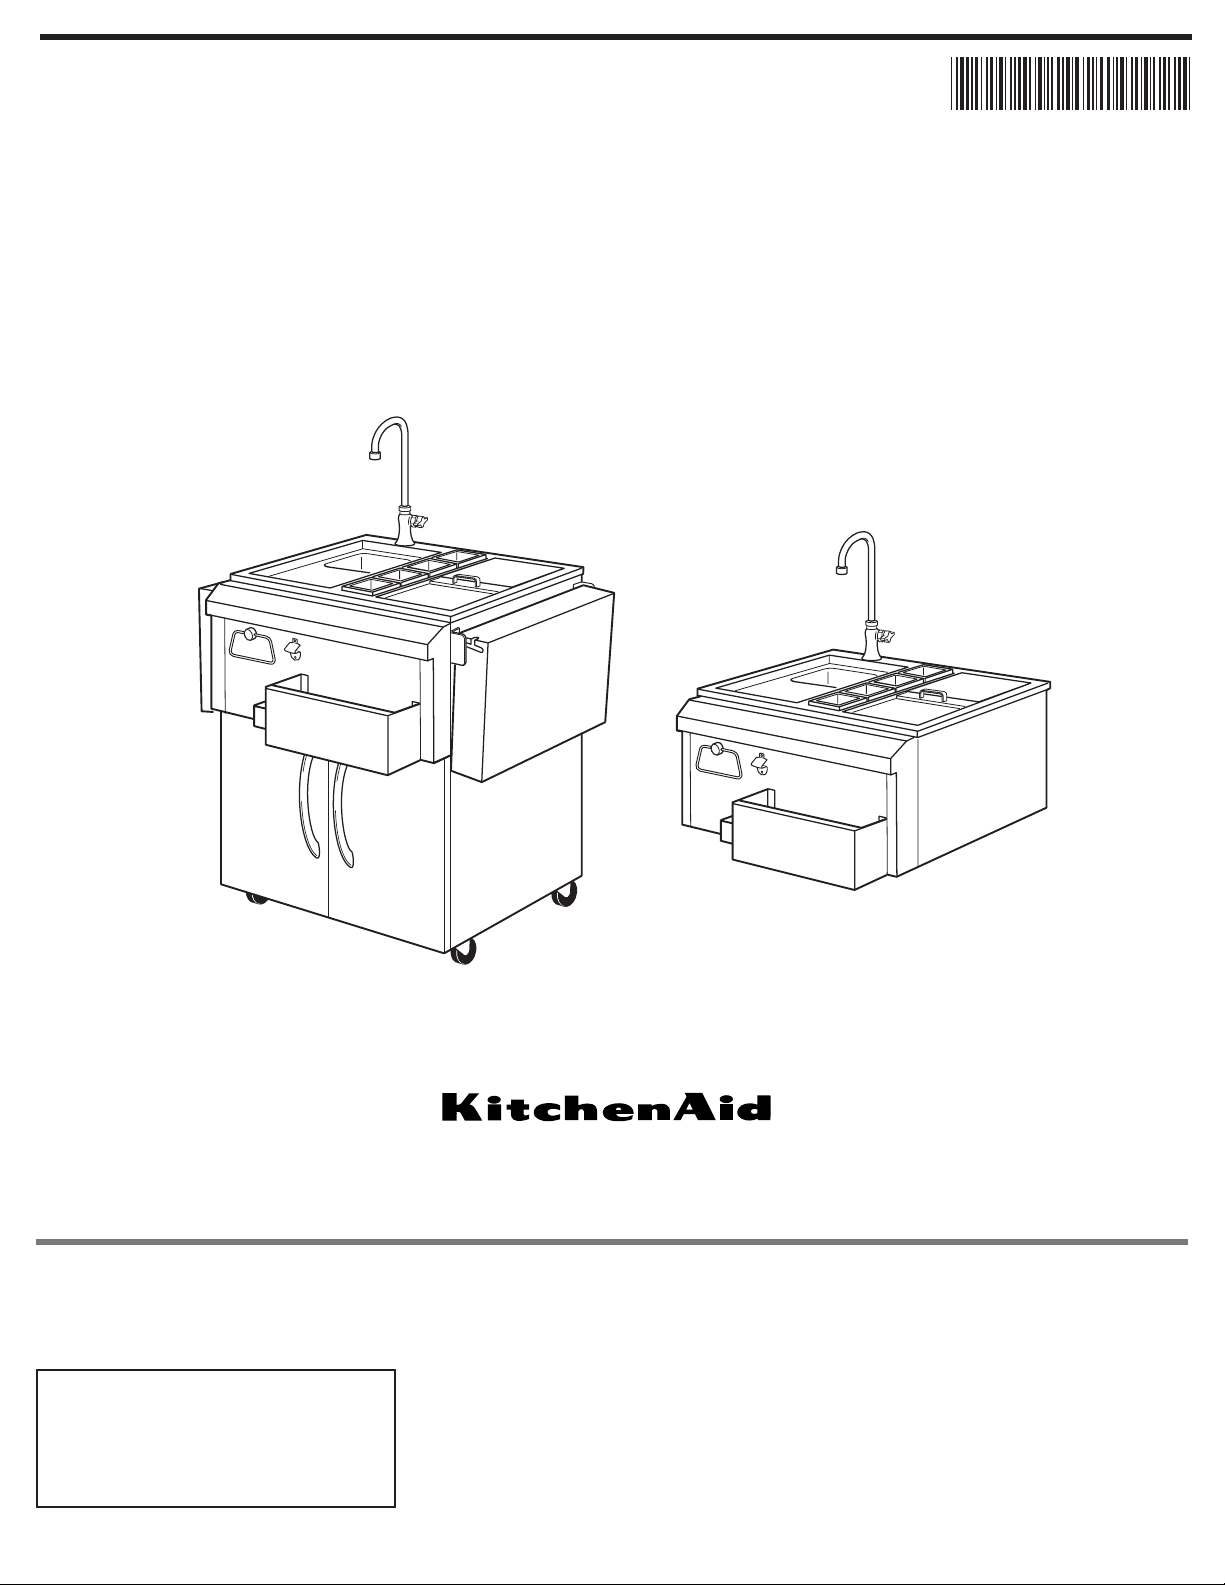
Portable Model
KFBP102LSS
Built-in Model
KFBP100LSS
IMPORTANT:
Read and save these
instructions.
Outdoor Bar Cart
(Portable and Built-in)
For the way it’s made
®
®
Installation Instructions and
Use and Care Guide
8184968A
8184968A
Page 2
Before you start...
You can be killed or seriously
injured if you don’t follow
instructions.
DANGER
Your safety and the safety of
others are very important.
We have provided many impor tant
safety messages in this manual and
on your appliance.Always read and
obey all safety messages.
All safety messages will tell you
what the potential hazard is, tell you
how to reduce the chance of injury,
and tell you what can happen if the
instructions are not followed.
You can be killed or seriously
injured if you don’t immediatel
y
follow instructions.
IMPORTANT: Observe all governing
codes and ordinances.
WARNING
2
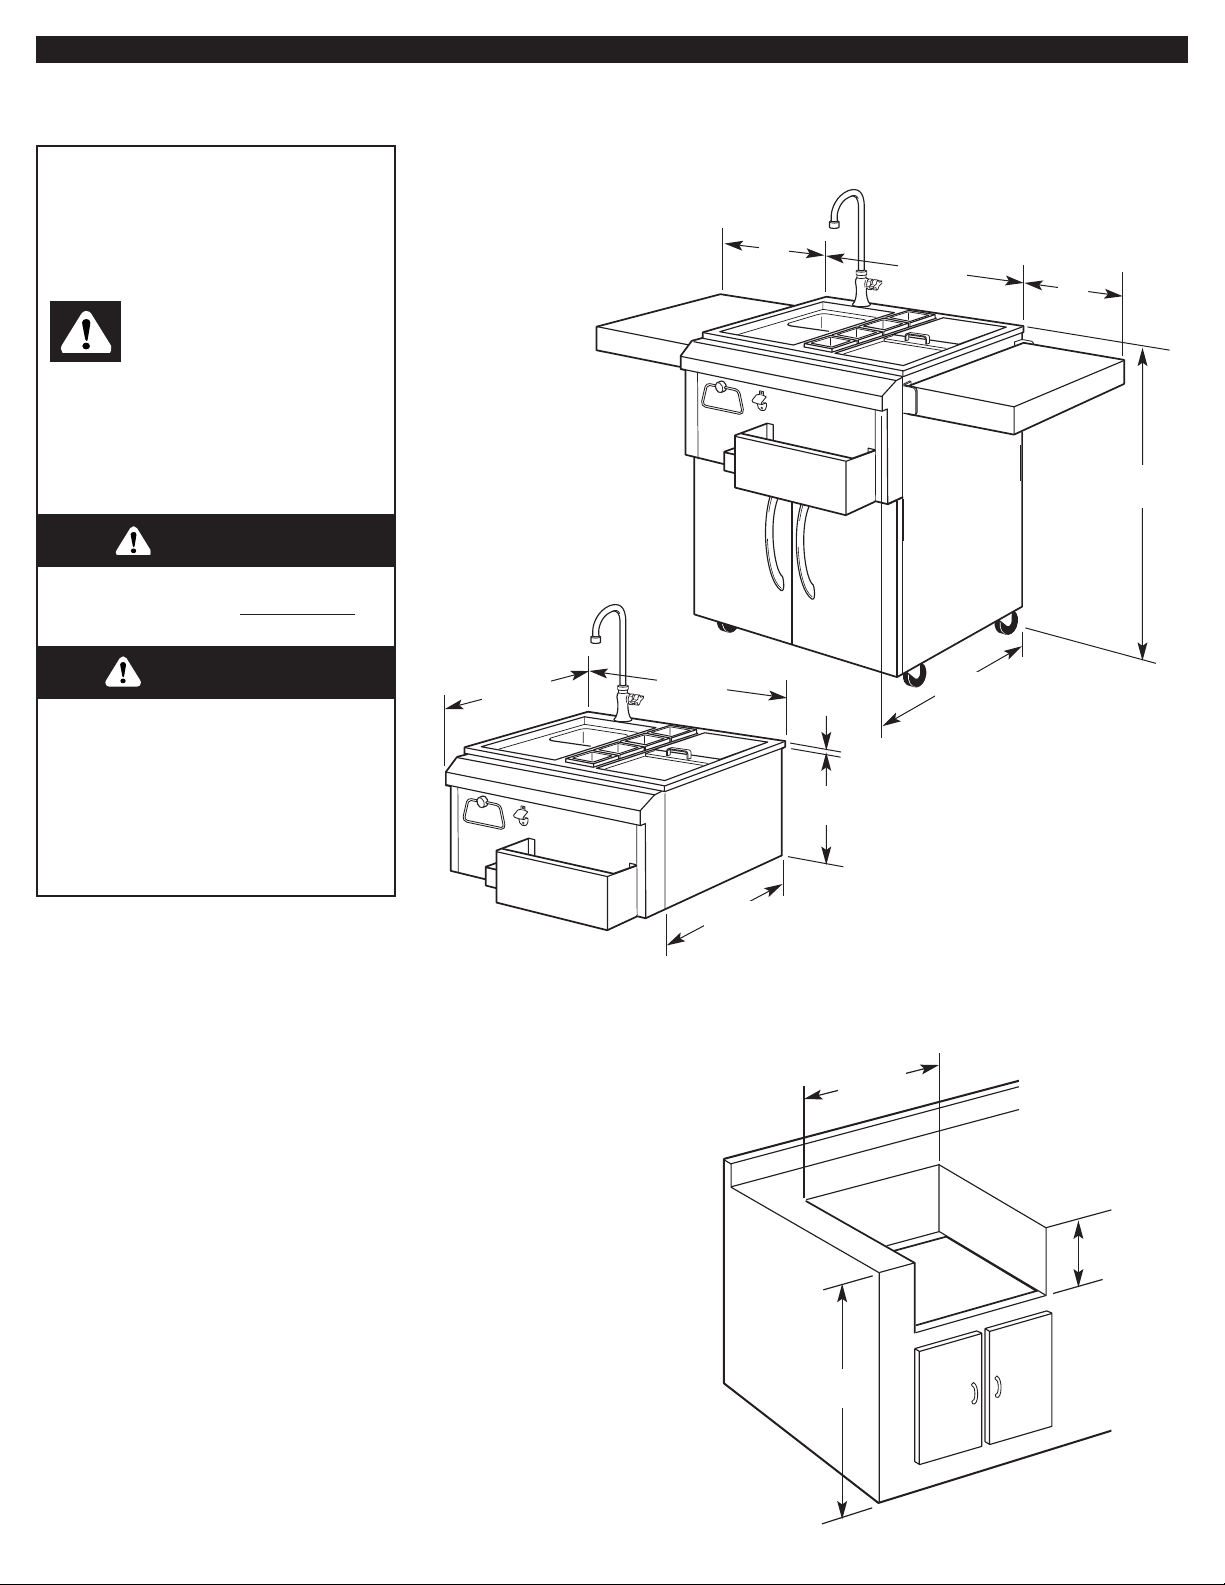
Product Dimensions
Built-in Installation Dimensions
This is the safety alert
symbol.
This symbol alerts you to
potential hazards that can kill or hurt
you and others.
All safety messages will follow the
safety alert symbol and either the
word “DANGER” or “WARNING.”
These words mean:
Portable and Built-in models
29"
(73.7 cm)
10-5/8"
(27.0 cm)
35-1/2"
(90.2 cm)
30"
(76.2 cm)
36"
(91.4 cm)
25-1/2"
(64.8 cm)
1/2"
(1.3 cm)
Provide suitable drain
systems in accordance with
local codes for ice bin and
sink drains.The drains and
filter must be accessible.
The portable model must
have suitable drain systems
in accordance with local
codes for the ice bin and
sink drains.
12"
(30.5 cm)
12"
(30.5 cm)
10-1/2"
(26.7 cm)
23"
(58.4 cm)
30"
(76.2 cm)
25-1/2"
(64.8 cm)
Page 3
3
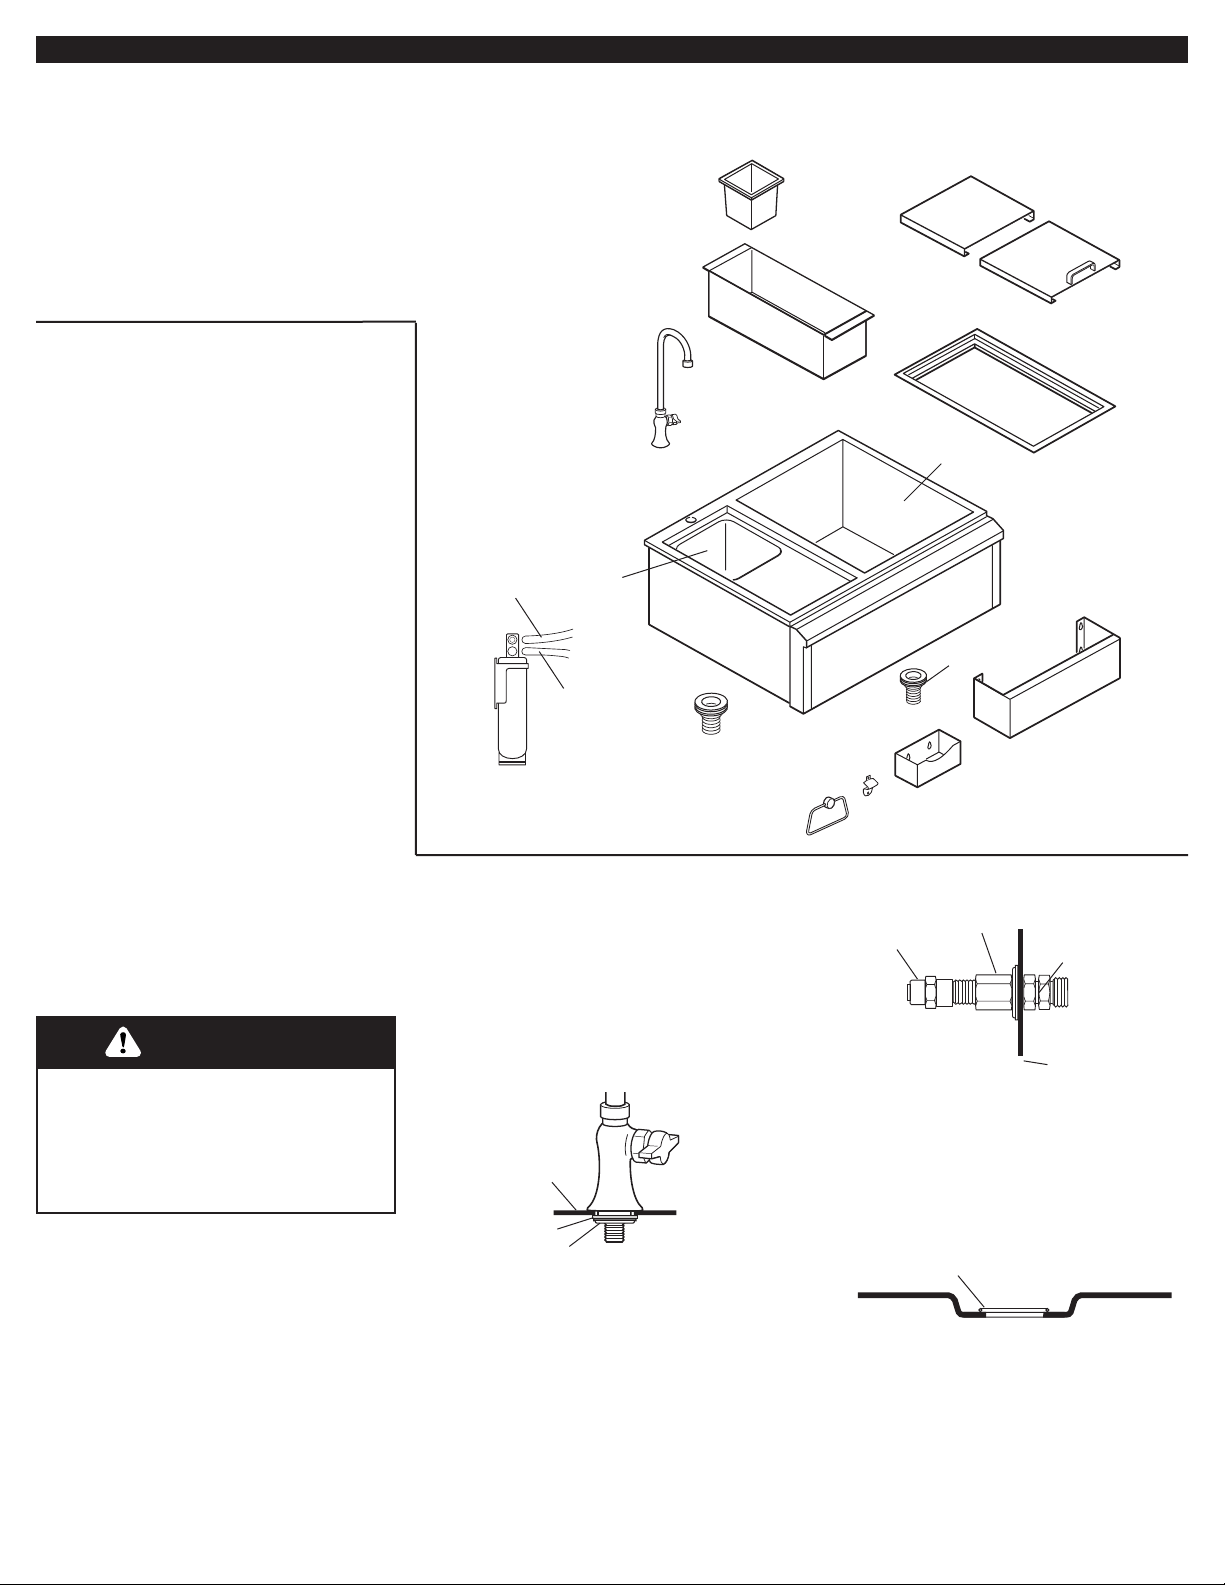
Side shelves not shown
bottle well
bottle well
holder
two piece
sliding cover
support
frame
single
faucet
ice bin
sink
outlet hose and
connectors
bottle
rail
bottle cap
catch pan
towel
holder
bottle
opener
1-1/2"
drain fitting
1"
drain fitting
Basic Par ts of the
Built-in and Portable
models
Installation Built-in model
Tools needed:
Excessive Weight Hazard
Use two or more people to move
and install bar cart.
Failure to do so can result in back
or other injury.
WARNING
Use a certified plumber to connect and
install potable water supply and drain
system to outdoor bar cart per local code
requirements.
1.Set the Bar Car t on a protective
surface such as cardboard or a blanket.
2.Make sure you have the drain
connections, in accordance with local
codes, under the Bar Cart.
8.Place a small amount of plumbers
putty around both the ice bin and sink
drain mounting seats.
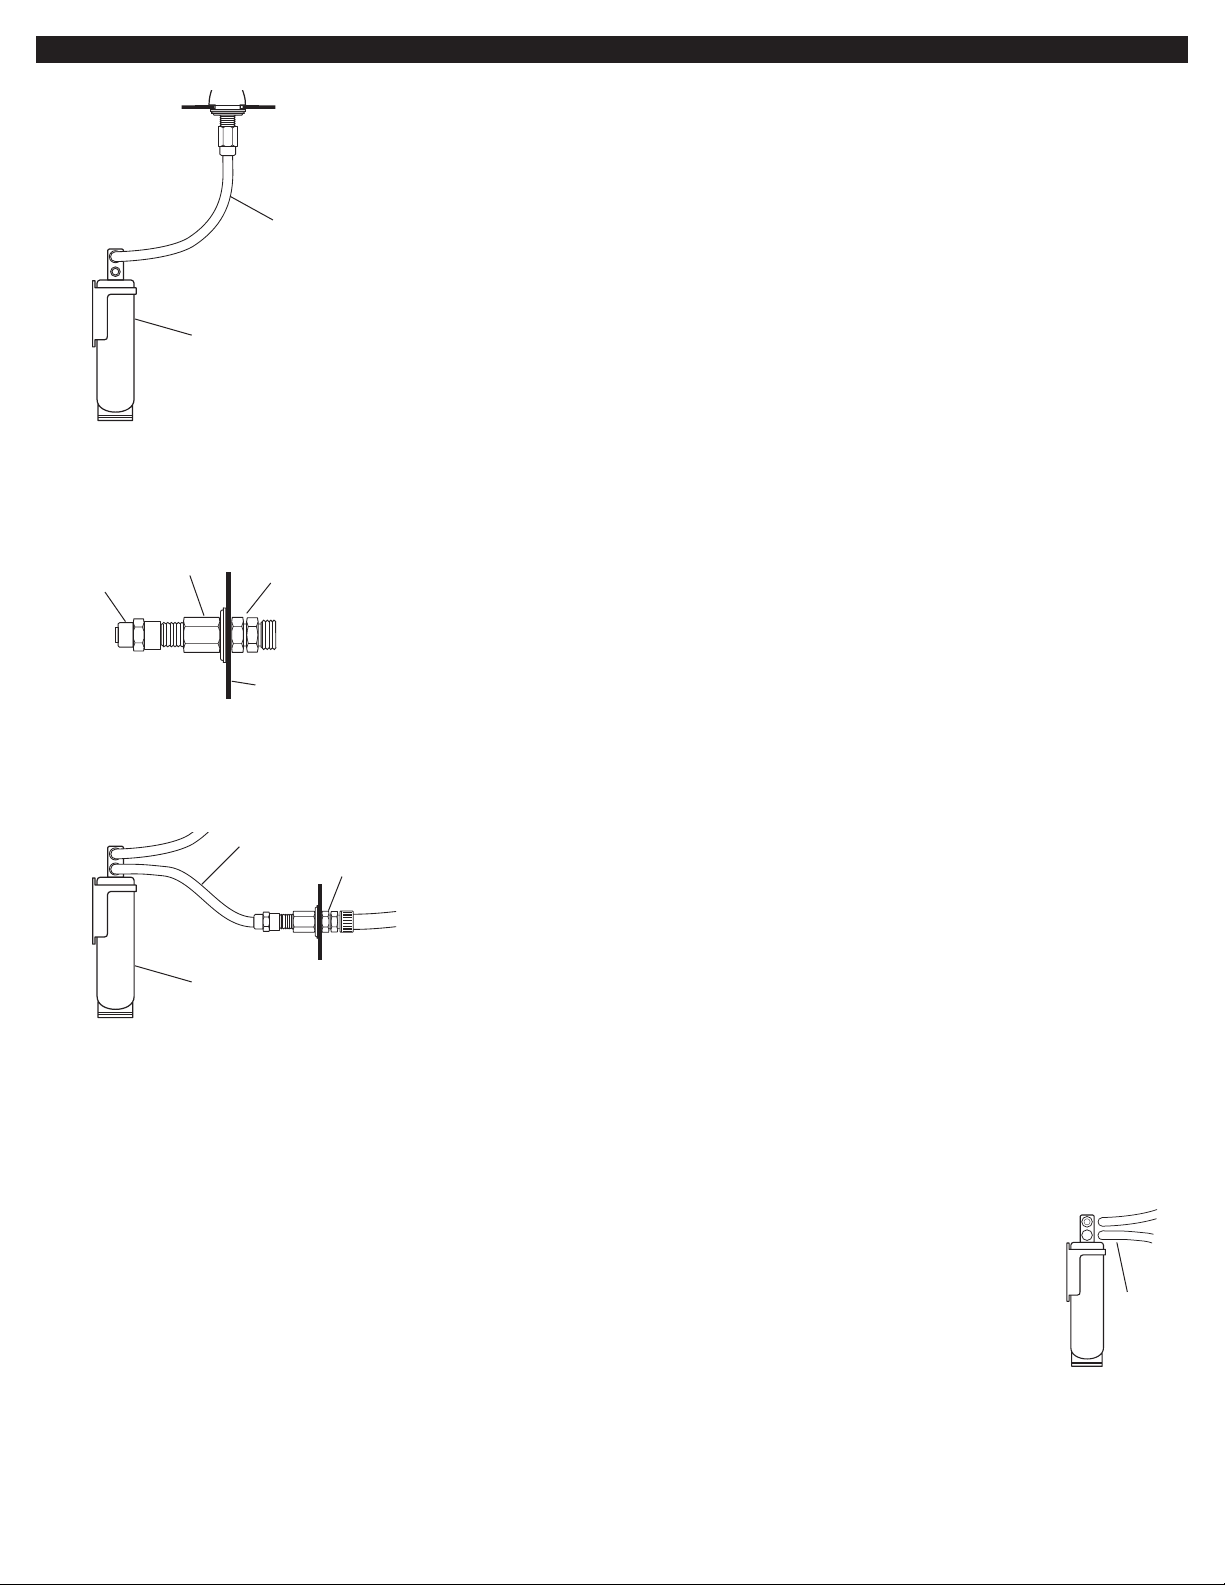
7.Install water inlet connection in a
convenient location under the cutout.
Position the water inlet connection so that
the plastic hose easily reaches the filter
inlet connection.
sink
washer
locknut
plumbers putty
5.Install the faucet and fasten
securely.
6.Install the water filter on the
sink/faucet side of the cutout. Position the
filter so that the plastic hose attached to
the filter easily reaches the faucet
connection.
plastic hose
connector
inlet
connector
nut
mounting
panel
3.Remove the bottle rail, bottle cap
catch pan and water filter from the ice bin.
4.Remove the faucet from the sink.
Gather the required tools and parts before
starting installation. Read and follow the
instructions provided with any tools listed.
• Level
• Phillips screwdriver
• tape measure or ruler
• slip joint pliers
• pipe wrench
• adjustable wrench
Parts needed:
• 1-1/2" drain system
• 1" drain system
• NSF- or UPC-listed water connection lines
• plumbers putty
• clear silicon
inlet hose and
connectors
water filter connection
and filter
Page 4
4
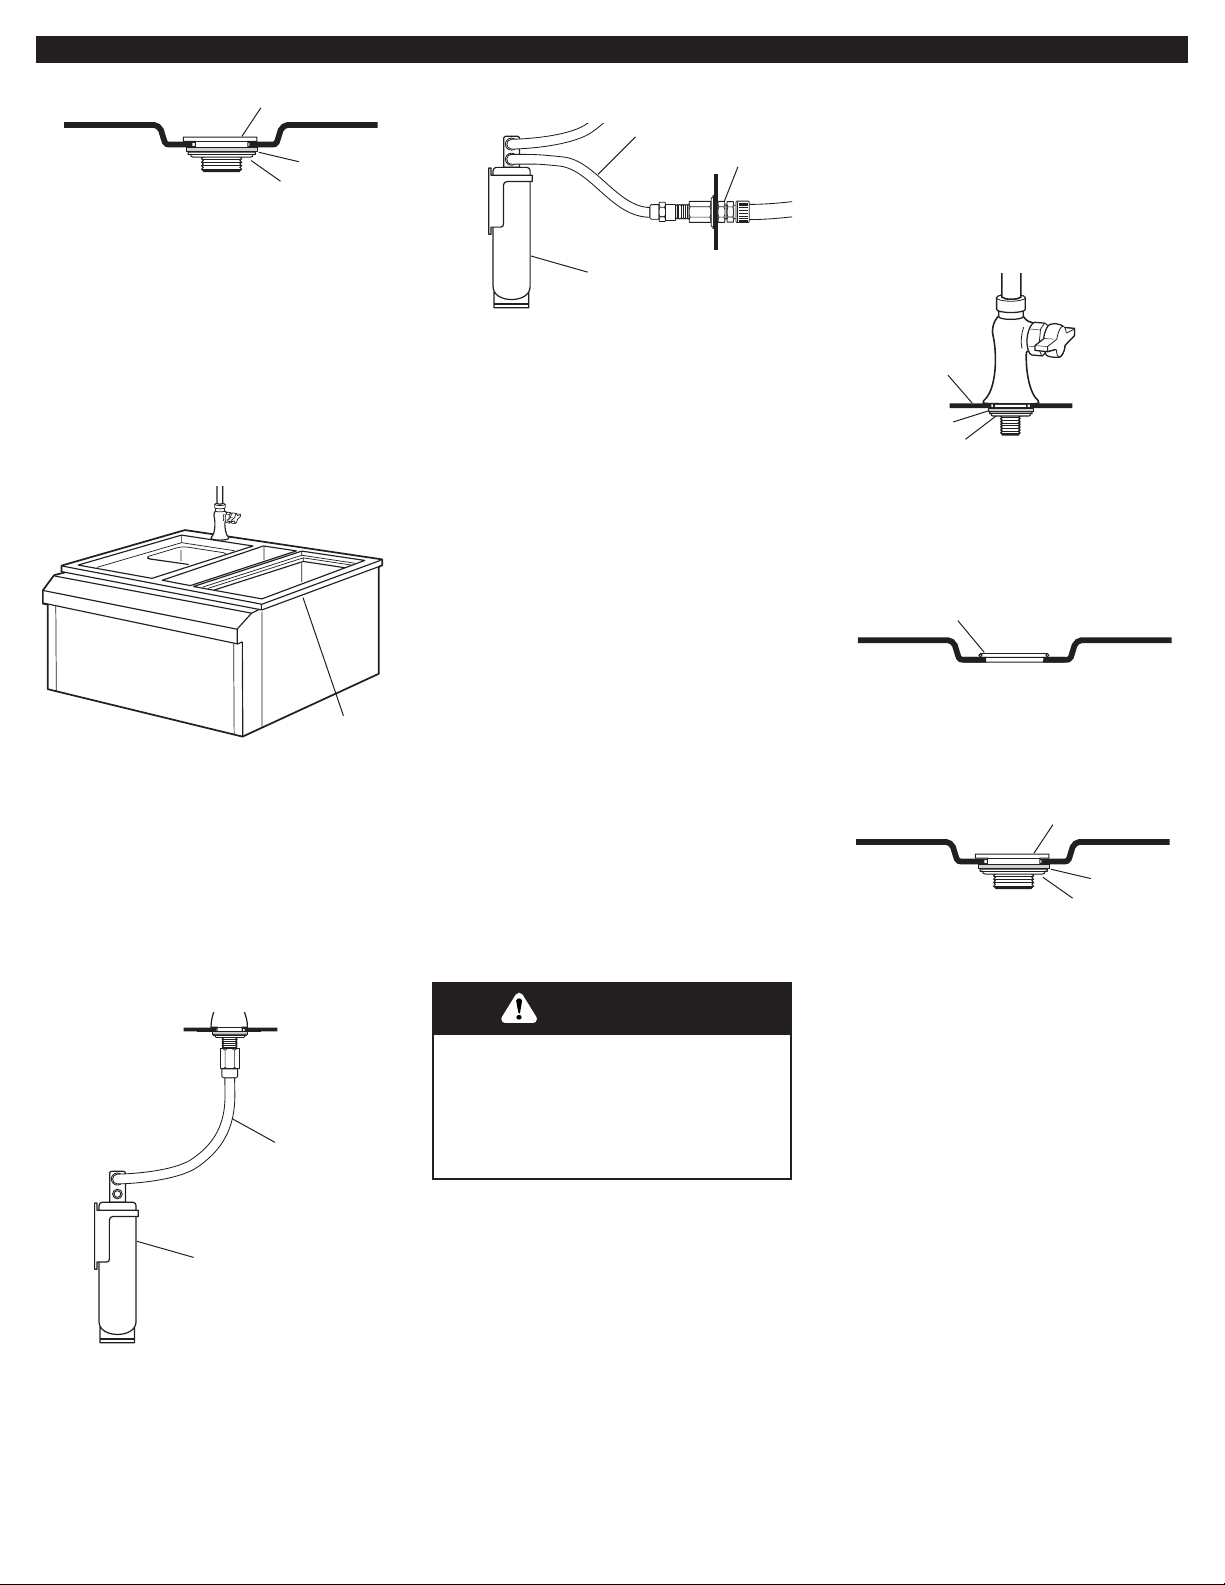
11.Apply a bead of all weather
clear silicone on the under side of the
back and two sides of the top lip.
12.Carefully position the Bar Cart
into the cut out. Immediately remove any
excess silicone.
apply clear
silicone
13.Connect the plastic hose from
the water filter to the faucet connection
and tighten securely.
14.Attach the plastic cold water
hose from the water inlet connection to
the inlet side of the filter.Use N.S.F.or
U.P. C.-listed water connection line for
water supply to inlet connector.Potable
water supply system to be connected to
inlet connector per local code
requirements.
15.Unwrap the bottle rail and
bottle cap catch pan. Position them over
the key-lock studs and slide down to lock
in place.
16.Unwrap the sliding cover and
place into frame on top of the ice bin.
plastic
hose
filter
plastic
hose
inlet
connector
filter
Installation Portable model
Excessive Weight Hazard
Use two or more people to move
and install bar cart.
Failure to do so can result in back
or other injury.
WARNING
1.Make sure you have adequate
drain connections for the Bar Cart.
sink
washer
locknut
4.Install the faucet and fasten
securely.
6.Ice bin drain and sink drain fittings
to be connected to drain system in
accordance with local code requirements.
7.Install the 1" (2.5 cm) drain fitting
in the ice bin and the 1-1/2" (3.8 cm)
drain fitting in the sink.Tighten securely.
Remove and discard the excess plumbers
putty.
drain
washer
locknut
5.Place a small amount of plumbers
putty around both the ice bin and sink
drain mounting seats.
plumbers putty
9.Install the 1" (2.5 cm) drain fitting
in the ice bin and the 1-1/2" (3.8 cm)
drain fitting in the sink.Tighten securely.
Remove and discard the excess plumbers
putty.
10.Ice bin drain and sink drain
fittings to be connected to drain system in
accordance with local code requirements.
drain
washer
locknut
Use a certified plumber to connect and
install potable water supply and drain
system to outdoor bar cart per local code
requirements.
2.Remove the bottle rail, bottle cap
catch pan and water filter from the ice bin.
3.Remove the faucet from the sink.
Page 5
5
plastic
hose
inlet
connector
filter
8.Connect the plastic line from the
water filter to the faucet connection and
tighten securely.
plastic
line
filter
Taking care of your Bar Cart
Wipe up any water spills on the exterior.
Water can cause spots.
Stainless steel surfaces: Use any cleaner
acceptable for use on stainless steel.
Always rub in the direction of the
manufacturer's polishing marks.
Other surfaces: Clean with warm
dishwashing soap and water.
Cleaning
General Tips
IMPORTANT:
Always follow label
instructions on cleaning products.
For routine cleaning, wash with soap and
water using a soft cloth or sponge. Rinse
with clean water and dry at once with a
soft, lint-free cloth to avoid spots and
streaks.
Never use steel wool, as it will scratch the
surface.
Use of the accessory cover designed for
Outdoor Bar Cart will protect finish from
weather.
Stainless Steel
IMPORTANT:
Do not use soap-filled
scouring pads, abrasive cleaners,
Cooktop Polishing Creme, steel wool,
gritty wash cloths or paper towels.
Cleaners should not contain chlorine.
Damage may occur.
Rub in direction of grain to avoid
scratching or damaging the surface.
Food spills should be cleaned as soon as
possible.Spills may cause permanent
discoloration.
• Use Stainless Steel Cleaner & Polish
(Part #4396095). See “Requesting
9.Install water inlet connection
through hole provided in cabinet rear
panel.
plastic hose
connector
inlet
connector
nut
cabinet
panel
10.Attach the plastic cold water
hose from the water inlet connection to
the inlet side of the filter.Use N.S.F.
U.P. C.-listed water connection line for
water supply to inlet connector.Potable
water supply system to be connected to
inlet connector per local code
requirements.
11.Unwrap the bottle rail and
bottle cap catch pan. Position them over
the key-lock studs and slide down to lock
in place.
12.Unwrap the sliding cover and
place into frame on top of the ice bin.
13.Rotate the side shelves up into
their locked position or leave down as
needed.
14.Lock the front locking caster
wheels when in use.
Assistance or Service” on Page 7 to
order.
• Use a mild liquid detergent or allpurpose cleaner according to label
instructions.
• Rinse with clean water and dry at once
with soft, lint-free cloth to avoid spots
and streaks.
• Use vinegar to remove hard water
spots. Rinse with water and dry
thoroughly.
• Use a glass cleaner to remove
fingerprints.
Exterior
The quality of this material resists most
stains and pitting, providing that the
surface is kept clean and protected.
• Apply stainless steel polish to all areas
before first use.Re-apply after each
cleaning to prevent permanent damage
to surface.
• Cleaning should always be followed by
rinsing with clean warm water.
• Use a metal polish or stainless steel
brightener to remove fingerprints, water
spots, oxidation and food stains. Always
follow the manufacturer’s directions.
• Wipe the surface completely dry with a
soft cloth.
Winterization of faucet and
drain system
When temperatures are below 35° F for
an extended period of time:
1.Turn off water source to sink.
2.Remove potable water supply
system from connection and
store appropriately.
3.Remove filter
from its connection and
store inside in a warm
dry area.
4.Disconnect drain
traps and 1/4" tubing
from the filter connector
and allow to drain.
5.Cover bar cart with accessor y
cover or tarp.
plastic
hose
Page 6

6
Warranty
KitchenAid®Outdoor Bar Cart Warranty
LENGTH OF WARRANTY KitchenAid WILL PAY FOR:
LIMITED ONE-YEAR WARRANTY Factory Specified Parts and Repair Labor to correct defects in material and
From Date of Purchase workmanship (except filters). Ser vice must be provided by a Service
Company designated by KitchenAid.
This warranty excludes damage to the finish, such as scratches or
discoloration, which may occur during regular use.
KitchenAid WILL NOT PAY FOR:
A. Installation of your KitchenAid Outdoor Bar Cart or damage caused by improper installation or failure to comply with
local code requirements
B. Shipping, pickup and delivery, removal or re-installation, as your bar car t is designed to be repaired in the home.
C. Ser vice calls to:
1. Correct the installation of your KitchenAid bar car t.
2. Instr uct you how to use your KitchenAid bar cart.
3. Correct house plumbing.
4. Perform normal maintenance, including periodic replacement of seals, fittings, etc.
D. Repairs when your bar cart is used in other than nor mal, single-family household use.
E. Damage to your bar cart caused by negligence, accident, misuse, fire, flood, acts of God, or use of products,
including cleaning products, not approved by KitchenAid or KitchenAid Canada.
F. Repairs to parts or system resulting from unauthorized modifications to your bar cart.
G. In Canada, travel or transportation expenses for customers who reside in remote areas.
H. Replacement parts or repair labor costs for units operated outside the United States and Canada.
I. Deterioration due to nor mal wear and tear of your bar cart.
KitchenAid and KitchenAid Canada do not assume any responsibility for Incidental or Consequential Damages.
Any implied warranty or merchantability or fitness for a particular purpose is limited in duration to the duration
of this warranty. Some states do not allow the exclusion or limitation of incidental or consequential damages, or allow
limitations on how long an implied warranty lasts, so these exclusions or limitations may not apply to you.This warranty
gives you specific legal rights, and you may also have other rights, which vary, from state to state or province to province.
Outside the United States and Canada, a different warranty may apply. For details, please contact your
authorized KitchenAid bar cart dealer.
If you need customer or technical assistance, check the “Requesting Assistance or Service” section or by calling our
KitchenAid Customer Interaction Center at 1-800-422-1230, from anywhere in the U.S.A. , and 1-800-807-6777, from
anywhere in Canada.
Page 7

7
Requesting Assistance or Service
Call the KitchenAid Customer Interaction
Center toll-free at 1-800-235-0665.
Our consultants are available to assist you.
When calling: Please know the purchase date, and
the complete model and serial number
of your appliance This information will
help us better respond to your request.
Our consultants provide assistance with:
•
Features and specifications on our full line
of appliances
•
Installation information
If you need replacement parts
If you need to order replacement parts, we recommend that you only use factory-authorized parts.
These parts will fit right and work right, because
they are made to the same exacting specifications
used to build every new KitchenAid®appliance.
To locate factory-authorized parts in your area, call
our Customer Interaction Center telephone number,
your nearest authorized service center, or KitchenAid
Factory Service at 1-800-442-1111.
For further assistance
If you need further assistance, you can write to
KitchenAid with any questions or concerns at:
KitchenAid Brand Home Appliances
Customer Interaction Center
c/o Correspondence Dept.
2000 North M-63
Benton Harbor, MI 49022-2692
Please include a daytime phone number in your
correspondence.
•
Use and maintenance procedures
•
Accessory and repair parts sales
•
Specialized customer assistance (Spanish
speaking, hearing impaired, limited vision, etc.)
•
Referrals to local dealers, service companies, and
repair parts distributors
KitchenAid designated service technicians are
trained to fulfill the product warranty and provide
after-warranty service, anywhere in the United
States.
To locate the designated KitchenAid service
company in your area, you can also look in your
telephone directory Yellow Pages.
If you need assistance or service in U.S.A.
Page 8

Part No.8184968 Rev. A
© 2004 KitchenAid.
® Registered Trademark/Trademark of
KitchenAid U.S.A., KitchenAid
Canada licensee in Canada
Prepared by KitchenAid, Benton Harbor, Michigan 49022
Printed in U.S.A.
07/2004
®
2. If you need service✝...
Contact your nearest KitchenAid Canada Appliance Service branch or authorized servicing
outlet to service your appliance. (See list below.)
Make sure the service company you contact is
authorized to service your appliance during the
warranty period.
1. If the problem is not due to one of the items
listed in “Check Operation”
✝
...
Contact the dealer from whom you
purchased your appliance, or call the
KitchenAid Canada Customer
Interaction Center toll-free,
8:30 a.m. – 6 p.m. (EST),
at 1-800-235-0665.
KitchenAid Canada Appliance Service – Consumer Services
Direct service branches:
BRITISH COLUMBIA 1-800-665-6788
ALBERTA 1-800-661-6291
ONTARIO Ottawa area 1-800-267-3456
(except 807 area code) Outside the Ottawa area 1-800-807-6777
MANITOBA,SASKATCHEWAN 1-800-665-1683
and 807 area code in ONTARIO
QUEBEC Montreal (except South Shore) 1-800-361-3032
South Shore Montreal 1-800-361-0950
Quebec City 1-800-463-1523
Sherbrooke 1-800-567-6966
ATLANTIC PROVINCES 1-800-565-1598
For further assistance
If you need further assistance, you can write to
KitchenAid Canada with any questions or concerns at:
Consumer Relations Department
KitchenAid Canada
1901 Minnesota Court
Mississauga, Ontario L5N 3A7
Please include a daytime phone number in your
correspondence.
✝
When asking for assistance or service, please
provide a detailed description of the problem,
your appliance’s complete model and serial
numbers, and the purchase date. This
information will help us respond properly to
your request.
If you need assistance or service in Canada
Requesting Assistance or Service
Page 9

BIEN PENSé, BIEN fabriqué
®
®
APPAREILS MÉNAGERS
®
Pièce n° 8184968 Rév.A
IMPORTANT :
Installateur :
Remettre les instructions
d’installation au propriétaire.
Propriétaire :
Conserver les instructions
d’installation pour consultation ultérieure.
Avant l’installation du produit, prendre
note ci-dessous du numéro de modèle et
du numéro de série.
On trouve les deux numéros sur la plaque
signalétique située sur la face inférieure
(angle avant/droit) du produit.
Numéro de modèle :_________________
Numéro de série :___________________
Pour toute question concernant caractéristiques, pièces, utilisation,
performance ou entretien du produit, téléphoner au 1-800-422-1230
ou consulter le site Internet www.kitchenaid.com.
Modèle mobile
KFBP102LSS
Modèle stationnaire
KFBP100LSS
IMPORTANT :
Lire et conserver ces
instructions.
Bar d’extérieur
(Mobile ou stationnaire)
Instructions d’installation et
Guide d’utilisation
Page 10

Avant de
commencer…
IMPORTANT : Respecter les prescriptions
de tous les codes et règlements en vigueur.
C’est au propriétaire du produit
qu’incombe la responsabilité d’une
installation correcte.
2
Dimensions du produit
Dimensions pour l’installation
du modèle stationnaire
Modèle mobile et modèle stationnaire
73.7 cm
(29 po)
27.0 cm
(10-5/8 po)
90.2 cm
(35-1/2 po)
76,2 cm
(30 po)
91,4 cm
(36 po)
64,8 cm
(25 1/2 po)
1,3 cm
(1/2 po)
Prévoir des systèmes
d’évacuation adéquats
conformes aux codes locaux
pour le bac à glace et l’évier.
Le filtre et les raccords de
vidange/drainage doivent être
accessibles.
Pour le modèle mobile, on
doit disposer de systèmes
d’évacuation appropriés
conformes aux codes
locaux pour le drainage de
l’évier et du bac à glace.
30,5 cm
(12 po)
30,5 cm
(12 po)
26,7 cm
(10 1/2 po)
58,4 cm
(23 po)
76,2 cm
(30 po)
64,8 cm
(25 1/2 po)
Votre sécurité et celle des autres
est très importante.
Nous donnons de nombreux
messages de sécurité importants
dans ce manuel, et sur votre appareil
ménager.Assurez-vous de toujours
lire tous les messages de sécurité et
de vous y conformer.
Voici le symbole d’alerte de
sécurité.
Ce symbole d’alerte de sécurité vous
signale les dangers potentiels de
décès et de blessures graves à vous
et à d’autres.
Tous les messages de sécurité
suivront le symbole d’alerte de
sécurité et le mot “DANGER”ou
“AVERTISSEMENT”. Ces mots
signifient :
Risque possible de décès ou de
blessure grave si vous ne suivez
pas les instructions.
Tous les messages de sécurité vous
diront quel est le danger potentiel et
vous disent comment réduire le risque
de blessure et ce qui peut se produire
en cas de non-respect des
instructions.
DANGER
Risque possible de décès ou de
blessure grave si vous ne suivez
pas immédiatement
les instructions.
AVERTISSEMENT
Page 11

3
Étagères latérales pas
représentées
casier pour
bouteilles
couvercle coulissant
(2 composants)
cadre de
support
robinet de
puisage
bac à glace
évier
balconnet à
bouteilles
réceptacle pour
bouchons et
capsules
porte-
serviette
ouvre-
bouteille
raccord
d’évacuation
1 1/2 po
raccord
d’évacuation 1 po
Composants des
modèles stationnaires
et mobiles
Installation –
Modèle stationnaire
Risque du poids excessif
Utiliser deux ou plus de
personnes pour déplacer et
installer le bar d’extérieur.
Le non-respect de cette
instruction peut causer une
blessure aou dos ou d’autre
blessure.
AVERTISSEMENT
Avoir recours à un plombier agréé pour
connecter et installer l’alimentation en
eau potable et le système d’évacuation
sur le bar d’extérieur selon les exigences
des codes locaux en vigueur.
1.Placer le bar d’extérieur sur une
surface protégée par une feuille de carton
ou une couverture.
8.Placer une petite quantité de
mastic de plomberie sur les sièges de
montage des raccords de drainage de
l’évier et du bac à glace.
7.Installer le raccord d’admission
d’eau en un endroit pratique sous
l’espace d’encastrement. Positionner le
raccord d’arrivée d’eau de telle manière
que le tuyau de plastique puisse
facilement atteindre la connexion d’entrée
du filtre.
tôle de l’évier
rondelle
écrou de blocage
mastic de plomberie
5.Installer le robinet; bien serrer
l’écrou de blocage.
6.Installer le filtre à eau (côté
évier/robinet de l’espace d’encastrement).
Positionner le filtre de telle manière que
le tuyau de plastique connecté au filtre
puisse facilement atteindre le point de
connexion au robinet.
connecteur
pour tuyau
de plastique
raccord d’arrivée
d’eau
écrou
panneau de
montage
2.S’assurer que les connexions de
drainage soient bien placées sous le bar
d’extérieur, conformément aux codes
locaux.
3.Enlever balconnet à bouteilles,
réceptacle à capsules et filtre à eau du
bac à glace.
4.Retirer de l’évier le robinet.
porte-bouteille
raccords et conduit
de sortie
raccords et
conduit d’entrée
filtre, et raccordement
du filtre
Outils nécessaires :
Rassembler les outils et pièces nécessaires
avant de commencer l'installation. Lire et
respecter les instructions d’installation
fournies avec chacun des outils de cette
liste.
• Niveau
• Tournevis Phillips
• mètre-ruban ou règle
• pince articulée
• clé à tuyauterie
• clé à molette
Pièces nécessaires :
• Système d’évacuation 1 1/2 po
• Système d’évacuation 1 po
• Canalisations d’eau (homologation NSF
ou CUP)
• Mastic de plomberie
• Calfeutrant aux silicones, transparent
Page 12

4
11.Appliquer une coulée de
calfeutrant aux silicones transparent sur
la face inférieure du rebord périphérique
du produit (à l’arrière et sur les deux
côtés).
12.Positionner prudemment le bar
d’extérieur dans l’espace d’encastrement.
Enlever immédiatement tout excès de
calfeutrant aux silicones.
application de
calfeutrant aux
silicones
transparent
13.Raccorder le tuyau de plastique
du filtre à eau au robinet de puisage; bien
serrer les écrous de blocage.
14.Raccorder le tuyau de
plastique d’arrivée d’eau froide entre le
raccord d’arrivée d’eau et l’entrée du
filtre. Utiliser un tuyau à homologation
N.S.F.ou un tuyau de connexion d’eau
listé dans le CUP pour l’arrivée d’eau
jusqu’au raccord d’arrivée d’eau. Un
système d’alimentation en eau potable
doit être connecté au raccord d’arrivée
d’eau selon les exigences des codes
locaux.
15.Déballer le balconnet à
bouteilles et le réceptacle à capsules.
Engager ces composants sur les goujons
de positionnement; laisser glisser vers le
bas pour la mise en place.
16.Déballer le couvercle
coulissant; placer les deux composants
sur le cadre au sommet du bac à glace.
tuyau de
plastique
filtre
tuyau de
plastique
raccord
d’arrivée d’eau
filtre
Installation –
Modèle mobile
Risque du poids excessif
Utiliser deux ou plus de
personnes pour déplacer et
installer le bar d’extérieur.
Le non-respect de cette
instruction peut causer une
blessure aou dos ou d’autre
blessure.
AVERTISSEMENT
2.Enlever balconnet à bouteilles,
réceptacle à capsules et filtre à eau du
bac à glace.
3.Retirer de l’évier le robinet.
1.Veiller à disposer d’un point
d’évacuation adéquat pour les conduits
de drainage du bar d’extérieur.
tôle de l’évier
rondelle
écrou de blocage
4.Installer le robinet; bien serrer
l’écrou de blocage.
6.Installer le raccord de drainage de
2,5 cm (1 po) sur le bac à glace, et le
raccord de drainage de 3,8 cm (1 1/2 po)
sur l’évier. Bien serrer chaque écrou de
blocage.Enlever et jeter l’excès de mastic
de plomberie.
7.Les raccords de drainage du bac à
glace et de l’évier doivent être connectés
au système de drainage conformément
aux exigences des codes locaux.
raccord de drainage
rondelle
écrou de blocage
5.Placer une petite quantité de
mastic de plomberie sur les sièges de
montage des raccords de drainage de
l’évier et du bac à glace.
mastic de plomberie
9.Installer le raccord de drainage de
2,5 cm (1 po) sur le bac à glace, et le
raccord de drainage de 3,8 cm (1 1/2 po)
sur l’évier. Bien serrer chaque écrou de
blocage; enlever et jeter l’excès de mastic
de plomberie.
10.Les raccords de drainage du
bac à glace et de l’évier doivent être
connectés au système de drainage
conformément aux exigences des codes
locaux.
raccord de drainage
rondelle
écrou de blocage
Avoir recours à un plombier agréé pour
connecter et installer l’alimentation en
eau potable et le système d’évacuation
sur le bar d’extérieur selon les exigences
des codes locaux.
Page 13

5
tuyau de
plastique
filtre
tuyau de
plastique
raccord
d’arrivée d’eau
filtre
8.Raccorder le tuyau de plastique du
filtre à eau au robinet de puisage; bien
serrer les écrous de blocage.
Entretien du bar
d’extérieur
Essuyer l’eau renversée sur les surfaces
extérieures; l’eau peut laisser des taches.
Surfaces d’acier inoxydable :
Employer
un produit de nettoyage utilisable sur
l’acier inoxydable.Frotter toujours dans la
direction des marques de polissage
laissées lors de la fabrication.
Autres surfaces : Nettoyer avec de l’eau
tiède et un détergent à vaisselle.
Nettoyage
Conseils généraux
IMPORTANT :
On doit toujours respecter
les instructions du mode d’emploi du
produit de nettoyage.
Pour le nettoyage de routine, laver avec
du savon et de l’eau, avec une éponge ou
un linge doux. Rincer avec de l’eau
propre et sécher immédiatement avec un
linge doux sans peluches pour éviter la
formation de taches et traînées.
Ne jamais utiliser de la laine d’acier, ce
qui laisserait des éraflures sur la surface.
L’utilisation de la housse de protection du
bar d’extérieur (accessoire) protègera la
finition contre les intempéries.
Acier inoxydable
IMPORTANT :
Ne pas utiliser tampon de
récurage savonneux, produit de nettoyage
abrasif, crème de polissage de table de
cuisson, laine d’acier, lavette abrasive ou
essuie-tout en papier.
Ne pas utiliser un produit de nettoyage
contenant du chlore, ce qui
endommagerait le matériau.
Frotter dans la direction du grain pour
éviter d’égratigner ou d’endommager la
surface.
9.Installer le raccord d’admission
d’eau dans le trou prévu à cet effet dans
le panneau arrière du placard.
connecteur
pour tuyau de
plastique
raccord
d’arrivée d’eau
écrou
panneau de
montage
10.Raccorder le tuyau de
plastique d’arrivée d’eau froide entre le
raccord d’arrivée d’eau et l’entrée du
filtre. Utiliser un tuyau à homologation
N.S.F.ou un tuyau de connexion d’eau
listé dans le CUP pour l’arrivée d’eau
jusqu’au raccord d’arrivée d’eau. Un
système d’alimentation en eau potable
doit être connecté au raccord d’arrivée
d’eau selon les exigences du code
locaux.
11.Déballer le balconnet à
bouteilles et le réceptacle à capsules.
Engager ces composants sur les goujons
de positionnement; laisser glisser vers le
bas pour la mise en place.
12.Déballer le couvercle
coulissant; placer les deux composants
sur le cadre au sommet du bac à glace.
13.Étagère latérale : relever à la
position de blocage ou laisser abaissée,
selon le besoin.
14.Bloquer les roulettes pivotantes
pendant l’utilisation.
Nettoyer les renversements de produit
alimentaire dès que possible.Les produits
alimentaires renversés peuvent laisser
des taches indélébiles.
• Utiliser le produit de polissage nettoyant
pour acier inoxydable (pièce n° 4396095).
Pour la commande, voir “Demande
d’assistance ou de service”, page 7.
• Utiliser un détergent liquide doux ou un
produit de nettoyage polyvalent en
suivant les instructions fournies avec le
produit.
• Rincer avec de l’eau propre puis sécher
immédiatement avec un linge doux sans
peluches pour éviter de laisser des
marques et des taches.
• Utiliser du vinaigre pour éliminer les
taches laissées par de l’eau dure.
Rincer avec de l’eau et bien sécher.
• Utiliser un produit de nettoyage du verre
pour éliminer les traces de doigt.
Extérieur
Ce matériau de qualité peut résister à la
plupart des produits susceptibles de
former des taches ou de corroder
d’autres matériaux, sous réserve que la
surface soit maintenue propre et
protégée.
• Avant la première utilisation, appliquer
un produit de polissage de l’acier
inoxydable partout. Effectuer une autre
application après chaque opération de
nettoyage, pour éviter que la surface
subisse des dommages irréversibles.
• Chaque nettoyage devrait être suivi d’un
rinçage avec de l’eau tiède propre.
• Pour faire disparaître les traces de doigt,
les taches laissées par l’eau, les taches
d’oxydation et les taches de produits
alimentaires, utiliser un produit de
polissage des métaux ou
d’éclaircissement de l’acier inoxydable.
Toujours respecter les instructions du
fabricant du produit.
• Pour le séchage, essuyer complètement
la surface avec un linge doux.
Page 14

6
Garantie
Bar d’extérieur KitchenAid®– Garantie
DURÉE DE LA GARANTIE KitchenAid PAIERA POUR :
GARANTIE LIMITÉE DE UN AN
Pièces spécifiées par l’usine et main-d’œuvre d’intervention
pour l’élimination
À compter de la date d’achat des vices de matériau et de fabrication (à l’exception des filtres). Le travail doit
être exécuté par une entreprise de service après-vente agréée par KitchenAid.
Cette garantie ne couvre pas les détériorations de la finition, comme éraflures ou
changements de couleur, qui peuvent survenir dans le cadre de l’utilisation régulière.
KitchenAid NE PAIERA PAS POUR :
A. Installation du bar d’extérieur KitchenAid ou réparation de dommages imputables à une installation incorrecte, ou au non-
respect des exigences des codes locaux.
B. Expédition, livraison, dépose et réinstallation du bar d’extérieur – le bar d’extérieur est conçu pour être réparé à domicile.
C. Inter vention pour :
1. Correction de l’installation du bar d’extérieur KitchenAid.
2.
Instruction de l’utilisateur pour l’utilisation du bar d’extérieur KitchenAid.
3. Correction de la plomber ie de la résidence.
4. Travaux d’entretien de routine, ceci incluant le remplacement périodique de joints, raccords, etc.
D. Réparations, lorsque le bar d’extérieur est utilisé autrement que dans le cadre du service normal d’une résidence
unifamiliale.
E. Dommages imputables à une négligence, un accident, un emploi impropre, un incendie, une inondation, un désastre
naturel, ou l’utilisation d’un produit non approuvé par KitchenAid ou KitchenAid Canada.
F. Réparations sur des composants ou l’ensemble, imputables à une modification non autorisée de l’appareil.
G.
Au Canada, frais de déplacement ou de transport lorsque le client réside en un lieu éloigné.
H. Pièces de rechange et frais de réparation pour un appareil utilisé hors des États-Unis ou du Canada.
I. Détériorations imputables à l’usure normale du bar d’extérieur.
KitchenAid et KitchenAid Canada déclinent toute responsabilité au titre de dommages secondaires ou indirects.Toute
garantie implicite de qualité marchande ou d’aptitude du produit pour une application particulière est limitée dans le temps à
la durée de validité de cette garantie.
Certains états ou cer taines provinces ne permettent pas l’exclusion ou la limitation des
dommages secondaires ou indirects, ou la limitation de la durée de validité des garanties implicites;par conséquent ces
exclusions ou limitations peuvent ne pas vous être applicables. Cette garantie vous confère des droits juridiques spécifiques;
vous pouvez également jouir d’autres droits, variables d’un état à un autre ou d’une province à une autre.
Hors des États-Unis et du Canada, l’appareil peut être couvert par une garantie différente. Pour les détails, contacter le
revendeur agréé du bar d’extérieur KitchenAid.
Pour obtenir une assistance particulière ou technique, consulter la section “Demande d’assistance ou de service” ou appeler le
centre d’interaction avec la clientèle KitchenAid au 1-800-422-1230, de n’importe où aux É.-U., et au 1-800-807-6777, de
n’importe où au Canada.
Protection contre le gel
Lorsque la température peut s’abaisser
au-dessous de 0°C (35°F) pendant une
période prolongée :
1.Fermer la source d’alimentation
d’eau de l’évier.
2.Déconnecter le système
d’alimentation en eau potable et le
remiser adéquatement.
3.Déconnecter le filtre; le remiser à
l’intérieur dans un endroit
sec et chauffé.
4.Déconnecter les
siphons et le tube de
1/4 po du connecteur de
filtre; drainer
complètement l’eau.
tuyau de
plastique
5.Recouvrir le bar d’extérieur avec la
housse ou une bâche.
Page 15

7
Demande d’assistance ou de service
Contacter le centre d’interaction avec la clientèle
KitchenAid sans frais au 1-800-235-0665.
Nos consultants sont prêts à vous aider.
Lors d’un appel, veuillez connaître la date d’achat et les
numéros de modèle et de série au complet
de votre appareil. Ces renseignements nous
aideront à mieux répondre à votre
demande.
Nos consultants vous renseigneront sur les sujets
suivants :
•
Caractéristiques et spécifications de notre gamme
complète d’appareils électroménagers
•
Renseignements sur l’installation
Si vous avez besoin de pièces de rechange
Si vous devez commander des pièces de rechange, nous
vous recommandons d’utiliser seulement les pièces de
rechange d’origine. Ces pièces de rechange conviendront
et fonctionneront bien parce qu’elles sont fabriquées selon
les mêmes spécifications précises appliquées lors de la
fabrication de chaque nouvel appareil ménager
KitchenAid
®
.
Pour localiser des pièces de rechange d’origine dans votre
région, appeler notre centre d’interaction avec la clientèle,
le centre de service agréé le plus proche, ou contacter le
département de service après-vente de KitchenAid au
1-800-442-1111.
Pour plus d’assistance
Si vous avez besoin de plus d’assistance, vous pouvez nous
écrire en soumettant toute question ou tout problème à :
KitchenAid Brand Home Appliances
Customer Interaction Center
c/o Correspondence Dept.
2000 North M-63
Benton Harbor, MI 49022-2692
Veuillez indiquer dans votre correspondance un numéro de
téléphone où l’on peut vous joindre durant la journée.
•
Méthodes d’utilisation et d’entretien
•
Vente de pièces de rechange et d’accessoires
•
Assistance spécialisée à la clientèle (langue espagnole,
malentendants, malvoyants, etc.)
•
Coordonnées des revendeurs, compagnies de service et
distributeurs locaux de pièces de rechange
Les techniciens de service désignés par KitchenAid ont
reçu une formation qui leur permet d’effectuer les travaux
de réparation sous garantie et le service après-garantie
partout aux États-Unis.
Vous pouvez également consulter les Pages jaunes de
l’annuaire téléphonique pour identifier une compagnie de
service agréée KitchenAid dans votre région.
Si vous avez besoin d’assistance ou de service aux É.-U.
Page 16

®
APPAREILS ÉLECTROMÉNAGERS
Pièce No° 8184968 Rév.A
© 2004 KitchenAid.
® Marque de commerce déposée / Marque
de commerce de KitchenAid U.S.A.,
Utilisation sous licence au Canada par
KitchenAid Canada
Préparé par KitchenAid, Benton Harbor, Michigan 49022
Imprimé aux É.-U.
07/2004
2.
Si vous avez besoin de service✝...
Contacter la succursale ou l’établissement de service
agréé de KitchenAid Canada le plus proche (voir la
liste ci-dessous). S’assurer que l’établissement de
service contacté est autorisé à réparer votre appareil
ménager durant la période de garantie.
1.
Si le problème n’est pas attribuable à
l’une des causes indiquées dans
”Dépannage/contrôle du
fonctionnement”
✝
...
Contacter le commerçant qui a vendu
l’appareil électroménager, ou téléphoner
sans frais au Centre d’interaction avec la
clientèle de KitchenAid Canada, de 8 h 30 à
18 h 00 (HNE), au 1-800-235-0665.
Service pour les appareils KitchenAid Canada – Service à la clientèle
Succursales “service en direct” :
COLOMBIE-BRITANNIQUE 1-800-665-6788
ALBERTA 1-800-661-6291
ONTARIO Région d’Ottawa 1-800-267-3456
(à l’exception de l’indicatif régional 807) En dehors de la région d’Ottawa 1-800-807-6777
MANITOBA,SASKATCHEWAN 1-800-665-1683
et indicatif régional 807 en Ontario
QUÉBEC Montréal (à l’exception de la Rive Sud) 1-800-361-3032
Montréal - Rive Sud 1-800-361-0950
Québec 1-800-463-1523
Sherbrooke 1-800-567-6966
PROVINCES DE L’ATLANTIQUE 1-800-565-1598
Pour plus d’assistance
Si vous avez besoin de plus d’assistance, vous pouvez nous
écrire en soumettant toute question ou tout problème à
Service des relations avec la clientèle
KitchenAid Canada
1901 Minnesota Court
Mississauga, Ontario L5N 3A7
Veuillez indiquer dans votre correspondance un numéro
de téléphone où l’on peut vous joindre dans la journée.
✝
Lorsque vous demandez de l’assistance ou une
intervention, veuillez fournir une description détaillée
du problème, les numéros de modèle et de série de
l’appareil au complet, et la date d’achat. Ces
renseignements nous aideront à mieux répondre à
votre demande.
Si vous avez besoin d’assistance ou de service au Canada
Demande d’assistance ou de service
 Loading...